Removing a watermark in DaVinci Resolve starts with knowing which one you have. If "DaVinci Resolve Studio" shows over your video in the free version, a Studio-only feature is sitting on one of your clips: find it and switch it off, swap it for a free tool or open the project in activated Studio to remove that feature watermark. If the mark is already in the source file, use the burned-in methods below.
If a logo or text is burned into the footage itself, Resolve can only hide it, and the free version has three good ways to do that: crop past it, blur it inside a window, or paint over it with a Fusion clone. Studio adds Object Removal and Patch Replacer, which fill the area using other frames, a clean plate, a source patch or neighboring-pixel blending, but using either one in the free version puts the Studio watermark on top.
The second half of this guide is for footage you own or are licensed to edit, like an old export with your previous logo or a client clip with burned-in timecode.
Which watermark do you have?
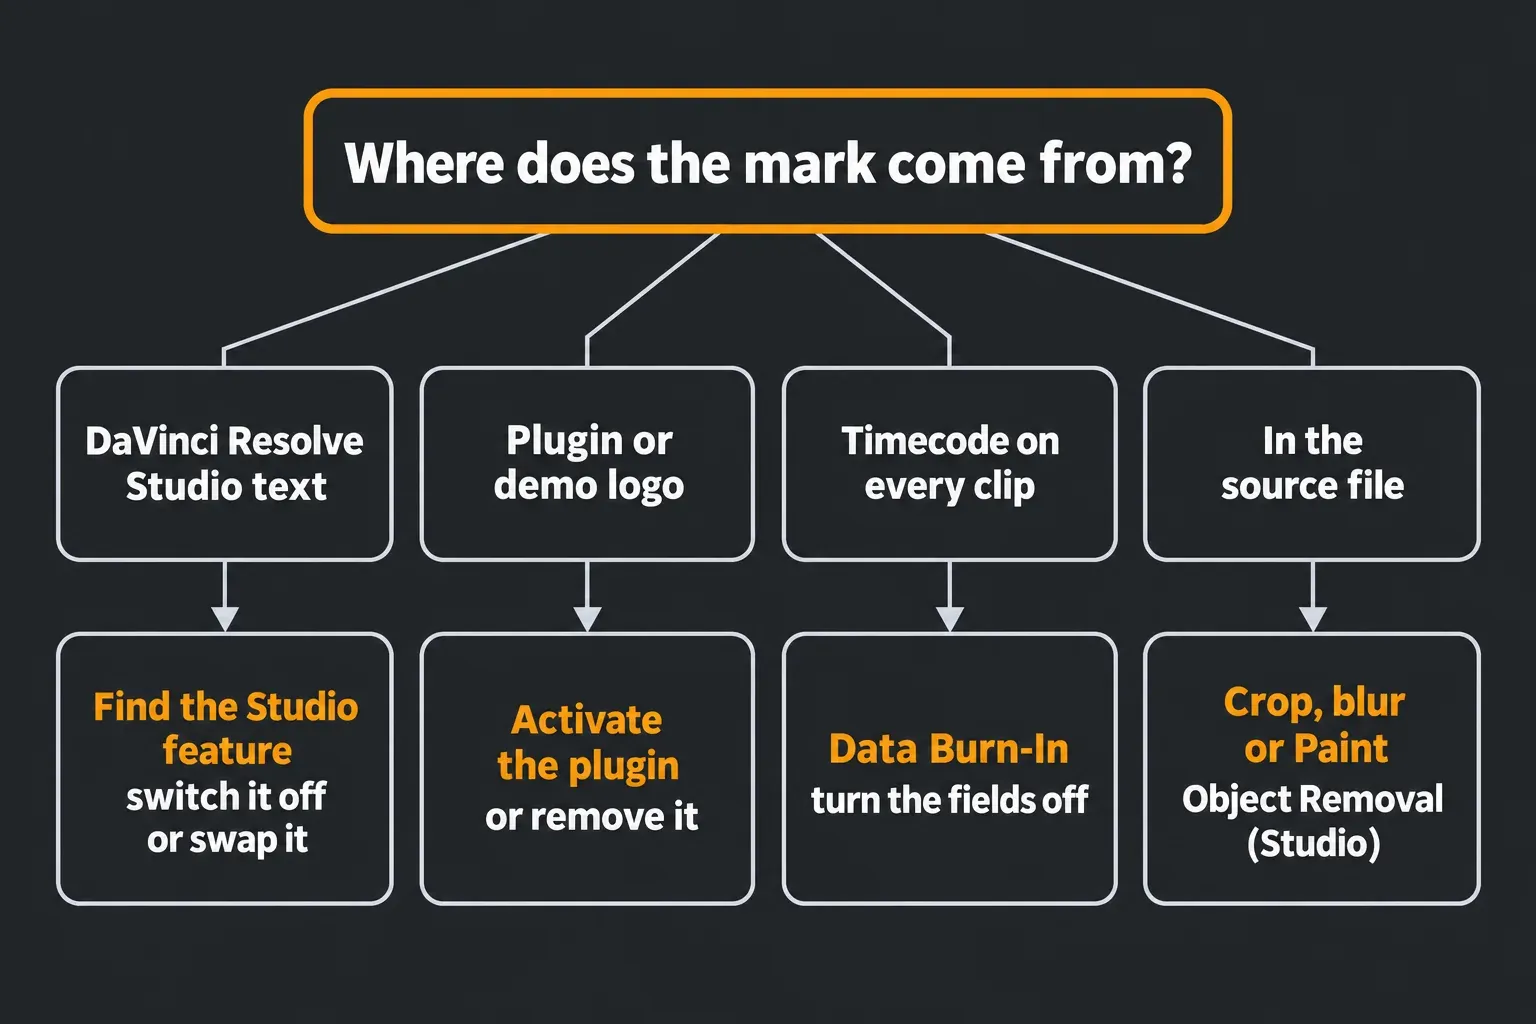
Look at the mark before you change any settings. In ordinary video exports, eligible Studio-only effects add the Studio feature watermark. The easyDCP demo encoder has separate logo overlays, covered below. The DaVinci Resolve Beginner's Guide says Studio-only filters bring up the DaVinci Resolve Studio watermark in the Viewer whenever that clip plays, and that it disappears when the same project opens in Studio. Other marks can come from plugins, Data Burn-In or the source file.
- "DaVinci Resolve Studio" over some clips: a Studio-only feature used in the free version. If the source file is clean, fix the feature in the project.
- A plugin maker's name or a demo logo: an unactivated third-party plugin, or the easyDCP demo when you export a DCP.
- Timecode, a clip name or your own text over the whole timeline: Data Burn-In is switched on.
- A logo or text that's there in every app: it's in the pixels of the source file, so you have to hide it.
The fastest check is to open the source file in any media player. If the mark is there too, it's burned in. If it shows only inside Resolve or on your Resolve export, the project is adding it.
Remove the DaVinci Resolve Studio watermark in the free version
Blackmagic lets the free version preview some Studio-only Resolve FX with a watermark; this does not make every Studio capability available in Free. The Beginner's Guide on Resolve FX puts it plainly: you can apply them in the free version "with a watermark." In a March 2019 reply on the Blackmagic forum about a finished render with the mark, the DaVinci Resolve product manager answered: "You have used a feature in your video that is only available in the Studio version so in the free version it shows the watermark." No Deliver page setting turns it off. Find and disable or replace the feature that adds it.
Find the clip and the feature
Work through these checks in order. Start with the visible clip settings, then isolate Color and Fusion.
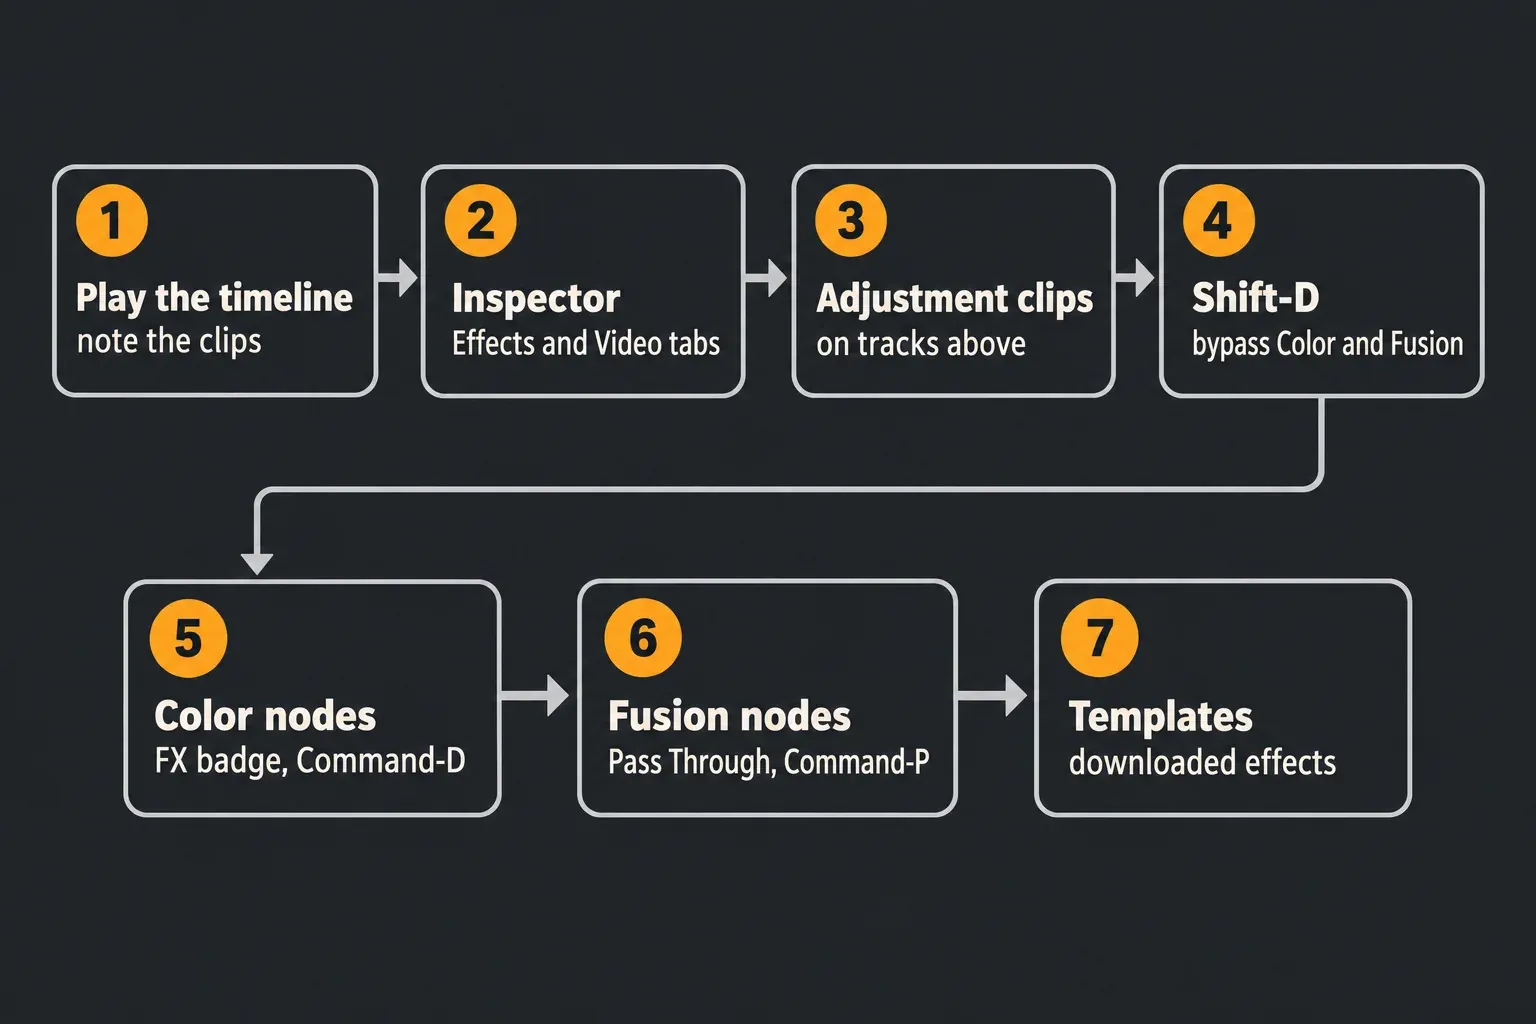
- Play the timeline and note where the mark appears. A feature may affect a clip, a group or the timeline; drop a marker at each occurrence. Clips that carry any effect, speed change or plugin also look a darker shade on the Timeline, per the Reference Manual's effects section.
- Select the clip and open the Inspector. The Effects tab lists every effect applied on the Edit page, as the manual's Effects Library section notes. In the Video tab, look at Lens Correction, Super Scale, Smart Reframe and Retime and Scaling. With Retime Process set to Optical Flow, inspect Motion estimation mode for Speed Warp; Speed Warp is not a Retime Process option. Each group has a dot that's orange when it's on and gray when it's off, per the Inspector controls. The Inspector guide shows where each group lives.
- Look above the clip. An adjustment clip on a higher track applies its effects to every clip beneath it, per the manual, so the trigger may not be on the clip at all. The adjustment clips guide covers how they stack.
- Set the bypass to include Color and Fusion, then press Shift-D. Right-click the Bypass Color Grades and Fusion Effects button and select both categories first, as the manual's Viewer controls describe. Shift-D toggles only the selected categories. On the Edit page the command is also under View > Bypass Color and Fusion. If the watermark disappears, inspect those pages. Press Shift-D again to restore the processing.
- Check the Color page nodes. A node carrying a Resolve FX or OpenFX plugin shows an FX badge in its bottom-left corner, per the manual's Open FX section. Select suspect nodes and toggle them with Command-D (Control-D on Windows and Linux) one at a time until the mark goes. Also inspect Group Pre-Clip, Group Post-Clip and Timeline modes in the Node Editor when present; a shared effect can be outside the selected clip’s node tree.
- Check the Fusion comp. If the clip has a Fusion composition, select its nodes and toggle them with Pass Through, Command-P (Control-P), which the manual describes as turning nodes off and on.
- Suspect anything you downloaded. Templates, PowerGrades and macros can carry a Studio-only effect that you never picked yourself. Open the template's nodes and read the effect names.
Swap the Studio-only feature for a free one
Once you know the feature, replace it with the closest free tool. Blackmagic's Studio feature list for DaVinci Resolve 21 lists edition limits. These are examples worth checking:
| Studio-only feature | Where it hides | What to use in the free version |
|---|---|---|
| Lens Blur, CineFocus | Inspector Effects tab, Color nodes | Gaussian Blur or the Color page Blur palette; the manual's Blur category marks Box, Directional, Gaussian, Mosaic and Radial Blur as free |
| Super Scale | Inspector, Clip Attributes | Standard scaling; the Super Scale guide covers when the difference shows |
| Speed Warp | Inspector > Retime and Scaling > Motion estimation mode | Optical Flow with Enhanced Better motion estimation, per the manual's retime options; see the clip speed guide |
| Smart Reframe | Inspector | Zoom and Position keyframes, as in the zoom guide |
| Lens Correction | Inspector | Switch it off |
| Magic Mask | Color page | A tracked Power Window or a qualifier; the Magic Mask guide compares them |
| Noise Reduction, spatial and temporal | Color page, Resolve FX | No built-in match; the noise reduction guide lists what works in Free |
| Film Look Creator, Film Grain, Halation, DCTL | Color nodes | Build the look with ordinary nodes or a LUT; see the Film Look Creator guide |
| Motion Blur | Color page Motion Effects, Resolve FX | Motion blur in a Fusion tool or Vector Motion Blur, from the motion blur guide |
| Object Removal, Patch Replacer, Dead Pixel Fixer | Color nodes | Crop, blur or Fusion Paint, covered below |
Dead Pixel Fixer needs Studio. A July 2025 tutorial’s title and description call it free, but the 21.1 manual’s Revival list labels it Studio Version Only, alongside Object Removal, Patch Replacer, Dust Buster and Noise Reduction. In Free it adds the Studio feature watermark.
If you can't find the trigger, Remove Attributes is the blunt fix. Select the clip, choose Edit > Remove Attributes and tick what to clear, as the manual's Paste and Remove Attributes section describes. It clears everything of that kind, including the grade, sizing or speed change you meant to keep. I'd only use it on a clip that needs nothing it carries, after the checks above have come up empty.
Opening the project in activated Studio removes Blackmagic’s Studio-feature watermark. Third-party plugins and the easyDCP encoder can still need separate licenses; Studio does not erase a mark already burned into source footage. The Free vs Studio comparison helps you decide whether the upgrade is worth it, and the Studio price guide covers the license.
Marks that aren't the Studio watermark
- Third-party plugins. Paid OpenFX plugins often stamp their own mark until you activate them. Dehancer's license page, for one, says that without activation "the watermark is applied to the preview and to the rendered footage." Activate the plugin or remove it from the clip. The OpenFX plugins folder guide shows where installed plugins live.
- Data Burn-In. Workspace > Data Burn-In overlays timecode, clip names, custom text or a logo, and the manual says it's written into the files you render. Switch off the fields you don't want, or the master toggle, then click Save in the Data Burn-In window.
- easyDCP demo. The demo easyDCP encoder embeds visible DaVinci Resolve and easyDCP logos in DCP images, per the manual’s demo limitations. Activate the easyDCP encoder, use native DCP encoding when suitable, or deliver another format. System Preferences > Configuration > Use EasyDCP Encoder selects between native and easyDCP encoding; lacking an easyDCP license does not watermark every native DCP.
Remove a logo or text burned into the footage
A burned-in mark is part of the picture, so no setting removes it. You can hide it, and the best method depends on where the mark sits and how the camera moves. Do this only on footage you shot or have permission to change. In the US, 17 U.S.C. § 1202 bars intentionally removing or altering copyright management information, including an owner’s name and identifying symbols, without authority of the copyright owner or the law, when you know or have reasonable grounds to know it will induce, enable, facilitate or conceal infringement. Stock previews carry watermarks to stop exactly this kind of use, so license the clean file instead.
| The shot | Method | Edition |
|---|---|---|
| Small mark near an edge or corner | Crop past it with Zoom and Position | Free |
| Mark over a busy or detailed background | Blur or Mosaic Blur inside a window | Free |
| Mark over sky, a wall, a floor or other plain texture | Fusion Paint with a Copy Rectangle or Copy Polyline | Free |
| Locked-off camera, mark anywhere | Patch Replacer, or Fusion Paint | Studio or Free |
| Moving camera, mark fixed on screen | Object Removal | Studio |
| Nothing above holds up | Cover it with your own logo or a graphic | Free |
Crop past the mark with Zoom and Position
For a mark at the edge of the frame, my first choice is a crop, because it removes the marked edge from view without a fill patch. Select the clip, open Inspector > Video > Transform, raise Zoom and drag Position until the mark sits outside the frame. For a mark fixed to the screen and unchanged framing, one setting can cover the clip. If it moves, keyframe the framing or choose another method. The crop guide covers the Cropping controls for hiding an edge: they create transparency, showing lower tracks or black when nothing is underneath.
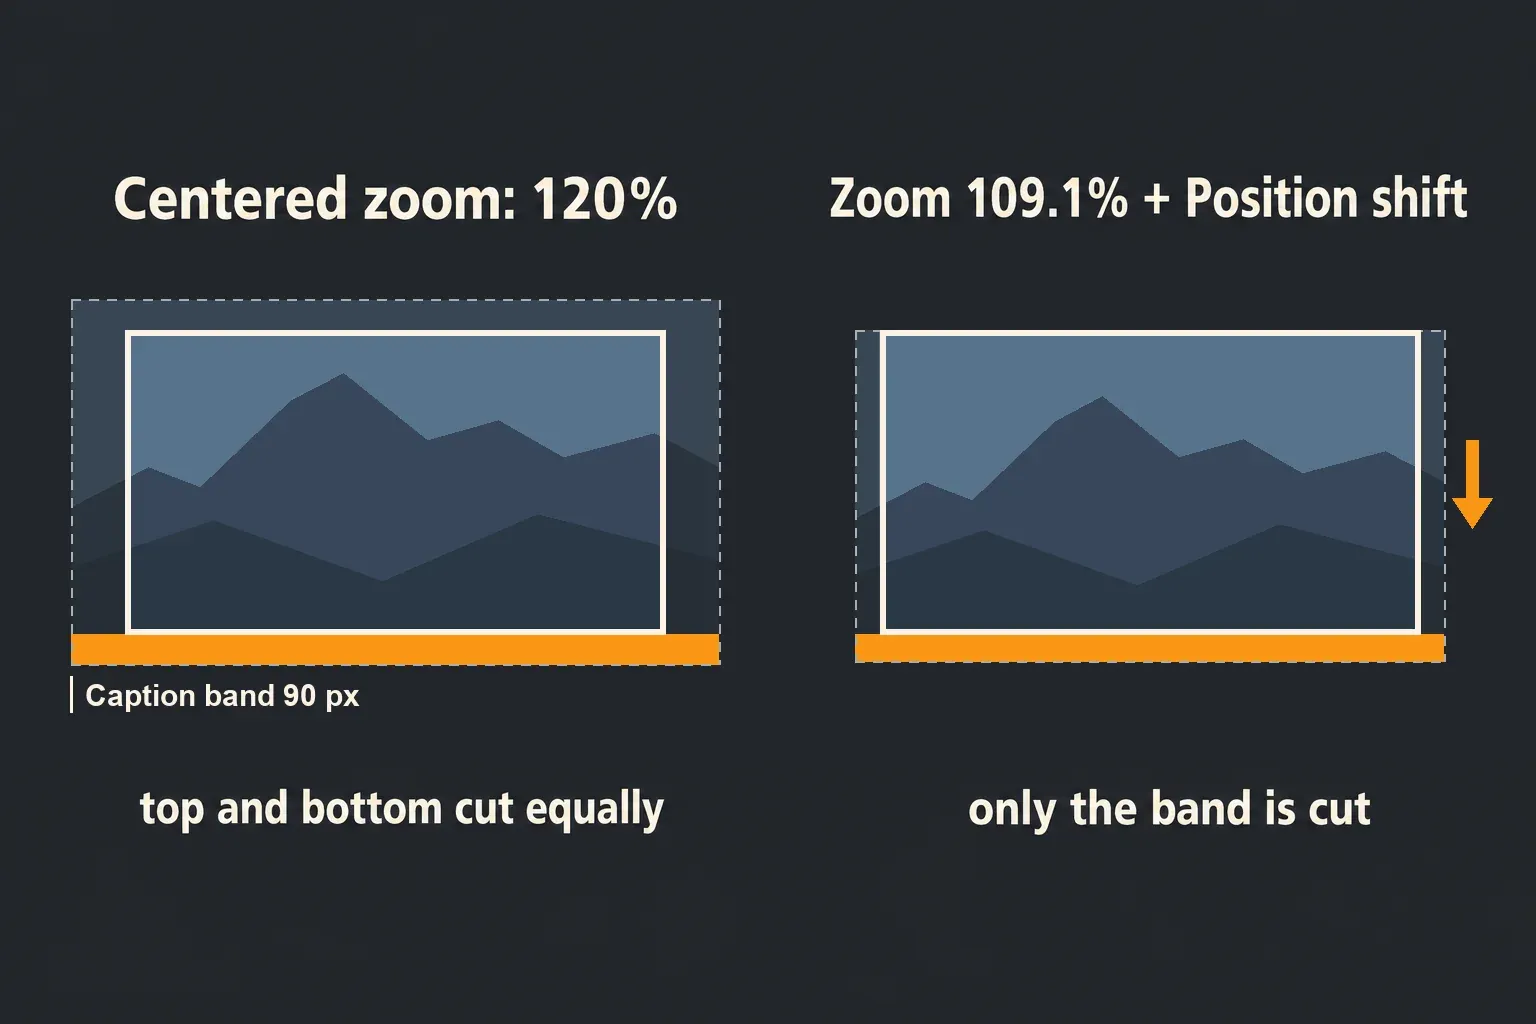
Shifting the picture matters as much as zooming. A centered zoom grows the frame evenly, so it has to push the mark past its edge while throwing away the same amount on the opposite side. Raise Zoom, then slide the picture toward the mark until the far edge lines up with the frame again, and you need far less enlargement. For a frame W pixels across and a mark reaching d pixels in from the edge, including any gap between the mark and that edge, use the formulas below. They assume matching source/timeline aspect ratios, initial Fit at Zoom 1, a centered anchor, linked uniform scaling and no other transforms:
- Centered zoom: Zoom of at least W ÷ (W − 2d), provided d is less than W/2.
- Zoom plus Position shift: Zoom of at least W ÷ (W − d), provided d is less than W.
A 90-pixel band of text along the bottom of a 1080-pixel-tall frame needs 120.0% centered, or 109.1% with the shift. A logo flush with both edges, 240 pixels wide and 90 tall in the corner of a 1920 x 1080 frame needs 114.3% if you push it out sideways and 109.1% if you push it out vertically, so slide it out the short way. Watch the limit: the Reference Manual warns that zooming much more than 10 to 20% past a clip's native resolution visibly softens it. A 3840 × 2160 UHD clip fitted to a 1920 × 1080 timeline reaches source-pixel scale at Zoom 200% under those assumptions. Earlier Fusion processing or a lower-resolution prerender can change that headroom. The zoom guide explains how timeline resolution changes that headroom.
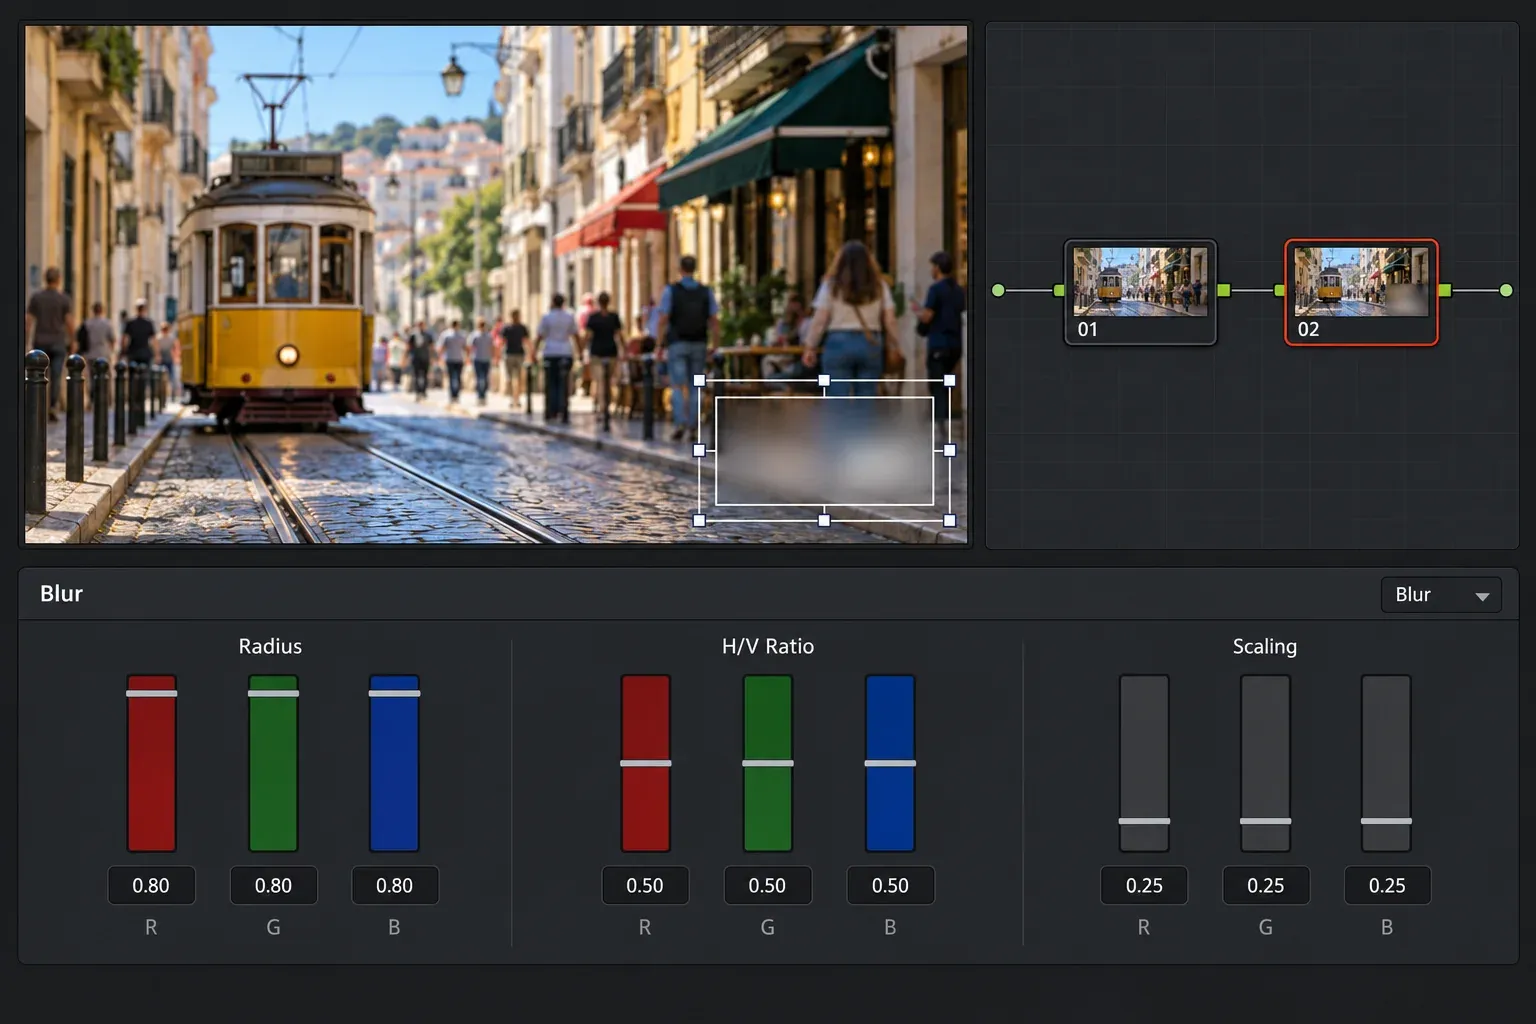
Blur it inside a Power Window
When cropping would cut into the subject, blur the mark instead. Every tool here is in the free version.
- On the Color page, press Option-Q (Alt-Q on Windows and Linux) to add a serial node with a linear window already on, or Option-C (Alt-C) for a circular one. The manual's window shortcuts open the Window palette with it, and the separate node keeps the blur apart from your grade.
- Size the window just larger than the mark in the Viewer. Raise the softness, Soft 1 on a circle or Soft 1 to 4 on a linear window, per the manual's window softness controls, so the edge fades.
- Open the Blur palette and raise Radius. The manual notes the default of 0.50 does nothing and that you can add another node if 1.00 isn't enough.
- For a pixelated look, drag Mosaic Blur from the Effects library onto the node instead; the manual suggests it for hiding the faces of anonymous witnesses.
A blur obscures the mark and leaves a visible soft patch. Adjust its strength until the mark is sufficiently obscured for the job, then inspect the whole shot; blur does not restore the covered detail. If the mark moves, track the window. The face and background blur guide walks through tracking a window.
Paint it out in Fusion
A clone hides a mark better than a blur when the background is plain or repeats, like sky, a wall, a floor or water. The free version's Fusion page has the Paint node for exactly this kind of work; the manual lists wire and rig removal and image cloning among its uses.
- Put the playhead on the clip and open the Fusion page. Select MediaIn1, press Shift-Spacebar, type Paint and press Return to add a Paint node, per the manual's Select Tool dialog.
- From the Paint toolbar above the viewer, choose Copy Rectangle, or Copy Polyline for an odd-shaped mark.
- In the Inspector, set Fill Type to Image and drag MediaIn1 into the Source Tool field. The manual's Paint chapter says every Copy shape needs a connected source and the Image fill type.
- Draw the shape over the mark, then move its offset so it copies a clean patch from right beside it. Copy shapes have an animatable offset and last the whole comp by default, per the Paint node reference, which suits a mark that never moves.
- Play the clip. If the copied patch slides, animate its offset or track it. To borrow a different frame, choose an editable Stroke or Polyline Stroke, select Clone apply mode and drag MediaIn1 into Source Tool. Turn on Overlay, set Time Offset to a frame with suitable detail, then Option-click the source position (Alt-click on Windows and Linux), paint over the mark and disable Overlay, following the manual’s different-frame clone procedure. Select a stroke whose duration covers the frames you need; MultiStroke is single-frame.
On a static mark over plain texture, I'd try Fusion Paint before buying Studio for Patch Replacer. The Fusion hub has the basics of the page, and the rotoscoping guide and Fusion tracking guide help when the patch has to follow motion.
Cover it with your own logo
A mark over a face or fine detail usually won't crop, blur or clone cleanly. Put a graphic of your own over it, such as your logo, a lower third or a title card. The logo watermark guide covers placing and sizing one.
Studio: Object Removal and Patch Replacer
Studio offers two fill tools. They create a replacement from available image material or blending; they do not recover the exact original pixels that the mark covered:
- Object Removal works best, per the manual, on a small moving object over a temporally stable background or lens dirt while the camera moves. A screen-fixed logo on a moving shot can resemble that lens-dirt case when other frames reveal usable background. A fixed logo on a locked-off shot may give the tool little usable detail. Gray areas mean the current settings cannot find a fill, as the manual’s render and clean-plate controls explain. Adjust Search Range or try an Internal or External Clean Plate. A locked-off camera with a moving object can still work; use Assume No Motion for that case.
- Patch Replacer copies or blends a source patch over a target patch; its Fast Mask and Blend Mask modes use neighboring-pixel blending without a source patch. The manual’s fill methods explain the differences. Source and target can be tracked with the FX tracker. Larry Jordan’s July 2025 Resolve 20 walkthrough uses a static-logo example without tracking. His requirement that both areas stay still applies to that setup; moving shots need tracking or animation.
Historical forum reports describe performance problems, without establishing a current clip-length limit. In an October 2021 report about Resolve 17.3.1, Patch Replacer and Object Removal were reported to freeze on a 14-minute clip, and replies suggested splitting it. A later participant reproduced a 0% Scene Analysis freeze with the tracked window and Object Removal on different nodes. Keeping both on one node worked in that test and helped another user. In a November 2019 thread about several slow Object Removal instances, replies suggested separate nodes and the render cache. The Object Removal guide walks through the full workflow, and the render cache guide covers caching those nodes.
What the selected tutorials cover
An October 25, 2026 snapshot of 11 selected YouTube tutorial pages contains 437,450 views. The videos are dated February 2024 to July 2026. Grouping their titles, descriptions and chapter lists separates tutorials about a burned-in mark from those about Resolve’s feature watermark. The counts below describe advertised coverage and snapshot popularity; they do not measure removal quality or success rates.
| Advertised coverage | Videos | Snapshot views | What the metadata establishes |
|---|---|---|---|
| Studio named, or a Studio-only tool described | 6 | 273,200 | Four titles name Studio. Two other descriptions name Object Removal/Patch Replacer or Dead Pixel Fixer. The latter calls Dead Pixel Fixer free despite its Studio-only manual label. |
| Free and Studio routes | 1 | 59,184 | The description and chapter list advertise both editions. |
| Studio watermark fix in Free | 2 | 22,871 | Descriptions address the feature watermark. One lists Inspector and Effects-tab checks; this does not establish everything covered in the video. |
| Crop with Zoom and Position | 1 | 860 | The description identifies the crop method. |
| Method unspecified | 1 | 81,335 | The title and description do not identify the removal method. |
The first group accounts for six of the 11 pages and 62% of the snapshot’s views. That share measures this selected sample’s popularity, not the effectiveness of Studio tools. Check the named effect’s edition before following a tutorial: Dead Pixel Fixer, Object Removal and Patch Replacer need Studio. An incomplete chapter list also cannot prove that a video omits Color or Fusion checks.
My verdict: in the free version, diagnose before you hide anything. For a feature watermark added by the current project, find and disable or replace the Studio-only feature. For a burned-in mark, crop first if the shot can take the zoom, clone with Fusion Paint over plain texture, and blur when neither works. I’d consider Object Removal in Studio when other frames expose suitable background or a usable clean plate is available. The deciding factor is the footage, not tutorial view counts.
Troubleshooting
The Studio watermark is still on the render after I removed the effect
Check whether the source file already carries the mark. If the source is clean, another effect, adjustment clip, group or timeline node may still add it. Play the whole timeline again and watch for the mark, then inspect adjustment clips and shared Color nodes. Configure the bypass to include both Color and Fusion before pressing Shift-D to test them. A Studio-only effect inside a downloaded template or PowerGrade is easy to miss.
The mark shows in the Viewer but not on every clip
Inspect the marked clips and anything processing them: their own effects, adjustment clips above them, and shared Color group or timeline nodes. A feature watermark follows the processing that adds it.
The crop made the shot soft
Check whether the zoom, source resolution or an earlier Fusion/prerender scaling step has left too little detail. Use the shift method to cut the zoom down, swap to a blur or a clone, or work from a higher-resolution source if you have one.
The Fusion Paint patch slides or flickers
The camera or the background moves under the mark, so the copied area no longer matches. Animate the offset, clone from another frame with Time Offset, or track the patch.
Object Removal leaves a gray patch
Gray means the current settings cannot find usable background for the fill. Check the mask and Search Range, and rerun Scene Analysis if you change its Analysis settings. For a fully gray area, try an Internal or External Clean Plate and Build Clean Plate. Patch Replacer or a free hiding method may fit the shot better. A fixed camera alone does not explain every gray result.
Watermark removal FAQ
Does the free version of DaVinci Resolve add a watermark to every export?
No. Ordinary video exports using free features do not receive the Studio feature watermark; the free version features guide covers edition limits. Eligible Studio-only effects add it. Plugins, Data Burn-In, source footage and the easyDCP demo encoder have separate causes.
Why does the watermark vanish in DaVinci Resolve Studio?
Activated Studio clears Blackmagic’s Studio-feature watermark for a project using those features, as the Beginner’s Guide explains. It does not activate third-party plugins or an easyDCP license, and it cannot erase a watermark already burned into source footage.
Can I remove the watermark from a stock video preview?
Don't. The preview mark protects the owner's file, and removing it can break the license terms and copyright law. Buy the license and download the clean file.
Is Dead Pixel Fixer free?
No. The 21.1 Reference Manual labels it Studio Version Only, so using it in the free version adds the Studio watermark.
How do I remove a moving watermark, like a bouncing username?
Track a blur window to it on the Color page, or animate a Fusion Paint shape along its path. In Studio, Object Removal can try to fill it when other frames reveal usable detail or a suitable clean plate is supplied; background visible only beside the mark does not guarantee a convincing fill. Only do this on footage you own or are licensed to edit.
Will Remove Attributes delete my grade?
It removes every attribute type you tick. Untick the grade and anything else you want to keep, or switch off just the Studio feature instead.
Final verdict: the fastest clean fix for each watermark
Name the watermark first, because the two kinds share nothing but the word. The Studio watermark in the free version is a diagnosis job: play the timeline, find the clip, switch off or swap the Studio feature, and that feature overlay disappears. A watermark already in the source needs the burned-in methods. A burned-in logo is a hiding job, and I'd go crop, then Fusion Paint, then blur in the free version, considering Object Removal in Studio when the footage or a clean plate supplies usable fill detail. Whichever you face, check the whole clip at normal speed before you export, and keep the hiding methods for footage you own.