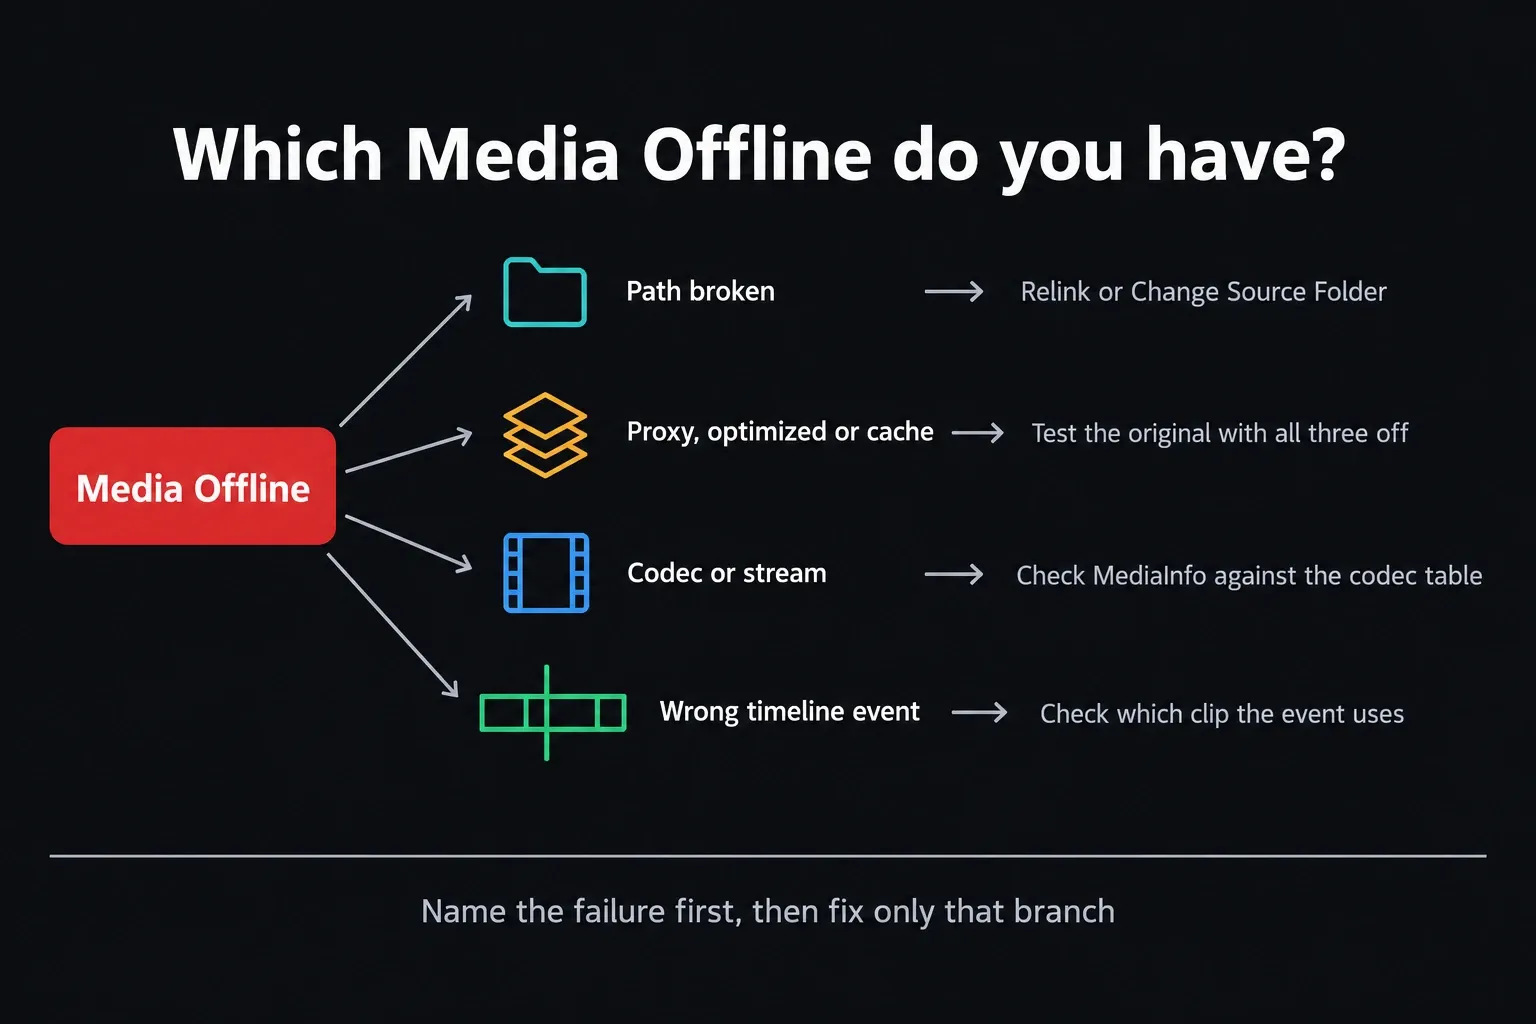
A red “Media Offline” frame can mean several different things. Before you touch any media, work out which one you have: Resolve lost the camera original, only proxy or cached playback is missing, the source can't decode, or the timeline event points to the wrong clip. Relink only the path failures, and test the other branches first.
Blackmagic's Resolve 21.1 Reference Manual is the primary reference for relinking and current command names. Its dedicated supported-codec reference is now the September 2026 list for Resolve 21.1. Read it by platform, container, codec and profile, because .mp4 or .mov on its own tells you very little. For a different failure, start with the Resolve troubleshooting map.
Find Every Offline Clip First in Resolve 21
Large projects are easier to diagnose when every offline source sits in one place. Resolve 21 can build that view for you. It only collects the clips; relinking and repair are still your job.
Open DaVinci Resolve > Preferences > User > Editing > Automatic Smart Bins and tick Automatic smart bin for offline clips (the 21.1 manual lists the checkbox simply as Offline Clips). The Resolve 21 New Features Guide confirms that this Smart Bin gathers offline clips from across the project. On the Color page, the matching Offline Clips filter gives you the same kind of focused list. Use it to count the affected media and pick a representative clip before you choose the path, proxy, cache, codec or timeline branch below.
If Resolve Lost the Source Path, Relink the Right Files
Resolve stores a source relationship for every clip. Move a folder, rename a file, mount a drive at a different location or open the project on another machine, and that relationship can break. The Resolve 21.1 Reference Manual documents Relink Selected Clips for reorganized media and Change Source Folder for a new root that keeps the old subfolder structure.
Start with the smallest reversible check:
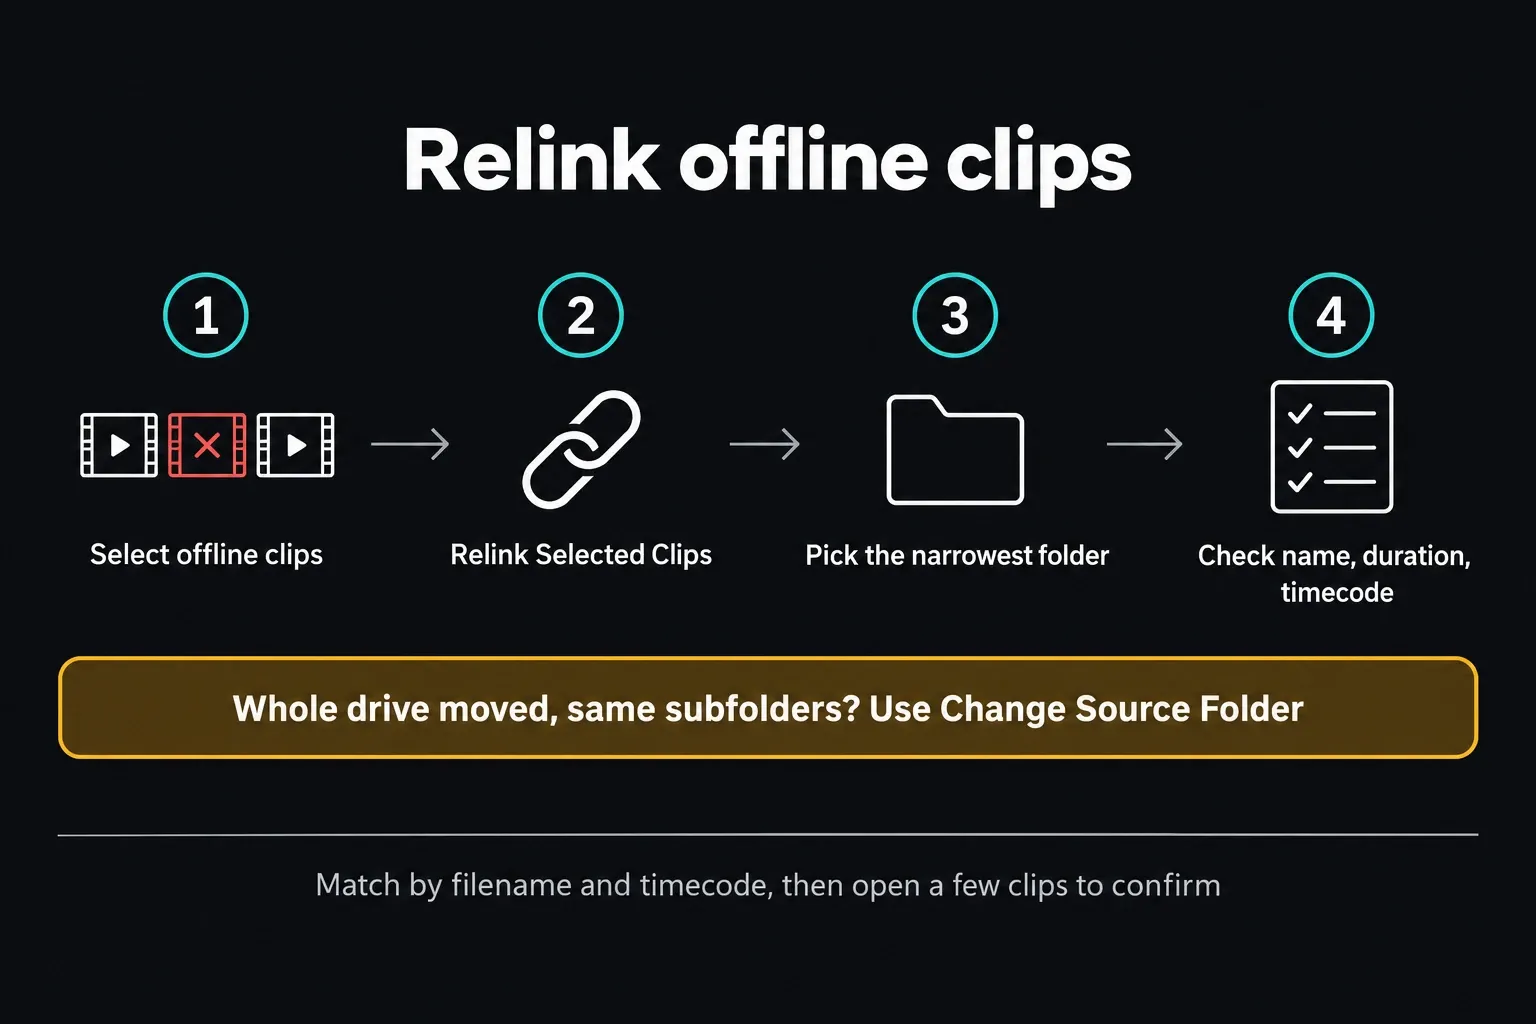
Relink a changed-path case in four steps:
- Open the Media Pool on the Edit or Cut page.
- Select the offline clips you need, or select the bin that contains them.
- Right-click a selected clip and choose Relink Selected Clips. For a selected bin, use Relink Clips for Selected Bin.
- Choose the narrowest folder containing the camera originals and click OK.
Relink Selected Clips uses filename and timecode as its primary matching criteria. Resolve searches the selected directory structure and can offer a deeper search when the quick pass fails. Finding a match is only half the job: open several of them and compare the actual picture, duration, start timecode, frame rate and audio before you continue.
If filenames changed, restore the original names from a backup, or relink carefully and compare filename, duration, start timecode, frame rate and audio channels. Keep Replace out of blind batch fixes: attaching the wrong file can leave a timeline that looks healthy while the edit underneath it has changed.
When an external drive mounts at a different path
On Windows, an external drive can come back with a different drive letter. If the footage was on E: yesterday and the same volume mounts as F: today, clips stored under that root can show as offline even though nothing moved inside the drive.
Start with relinking in Resolve, or with Change Source Folder below; neither touches your Windows drive configuration. Restoring the old letter is an optional alternative, and only for a dedicated media volume that holds neither Windows nor installed apps, with that letter still free. Microsoft warns that changing a letter can stop apps finding their files.
With the required administrator rights, open Disk Management > Change Drive Letter and Paths > Change, select the old letter if it's available and confirm. Then check several clips in Resolve. A restored path won't repair damaged or unsupported media.
If the root changed but the folder structure stayed the same, select the affected Media Pool clips and choose Change Source Folder. In the Relink Media window, click Browse beside Change To, select the new location and click Open, then Change. You skip a broad disk search, which makes this the quick route for a moved drive or a shared-storage root.
To cut down on repeat failures on Windows, give a dedicated media volume a stable drive letter and stay away from letters that removable devices tend to grab. Write the chosen letter into the project handoff notes. Which letter you pick matters less than keeping it the same.
On macOS there are no drive letters, but renaming a volume or changing its mount path still breaks the stored relationship. Check that the expected volume is mounted and readable before you relink.
If the files exist and the stored path is correct
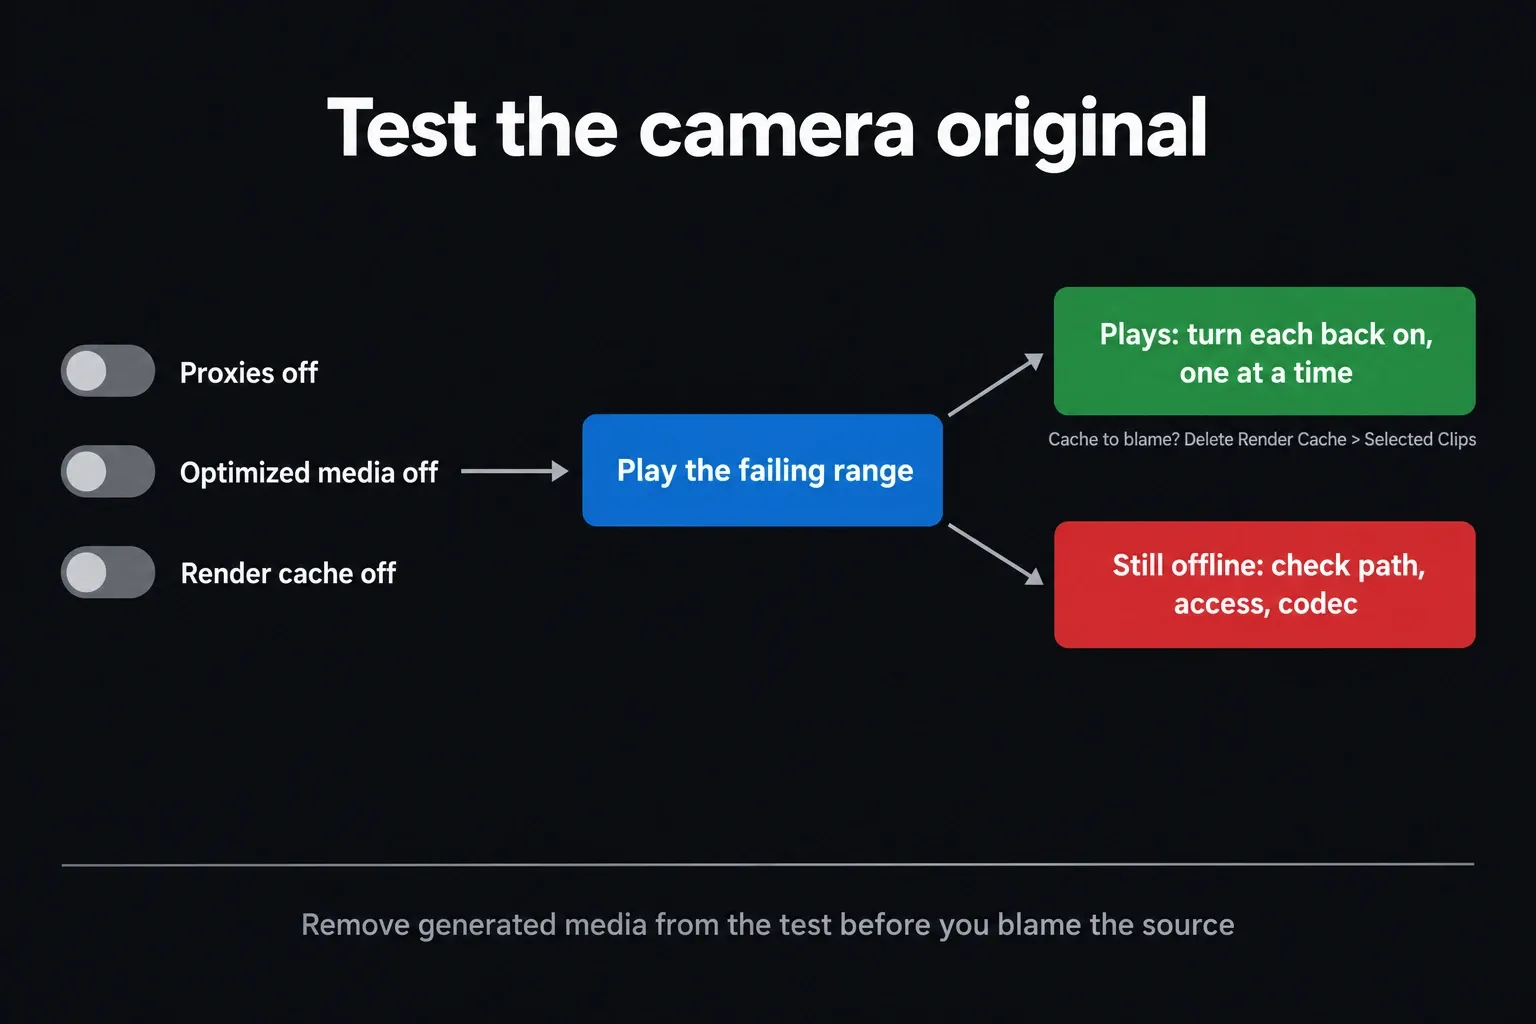
If the source path is correct, test the camera original with no generated media in the way. Note your current playback settings, then make these three changes:
- Playback > Proxy Handling > Disable All Proxies
- Playback > Use Optimized Media if Available: uncheck it
- Playback > Render Cache > None
Replay the same failing range. If it plays, turn the options back on one at a time to find out whether the proxy, the optimized media or the cache triggers the failure. If your build labels the cache option Off, as the Reference Manual does, choose that. Restore your preferred settings after the test. If the original still fails, move on to access, damage or decoding.
Use cache as a controlled test; it's rarely the cure. If the failure comes back only when Render Cache is on, clear the affected clips first. No cache setting can repair a moved original or add support for an unreadable stream.
Run the smallest cache test:
- Select the affected timeline clip or clips.
- Choose Playback > Delete Render Cache > Selected Clips.
- Keep Playback > Render Cache > None while you retest the camera original.
- Regenerate cache only after original-media playback is stable.
If original playback comes back, regenerate cache for the affected range. If the original stays offline, go back to path, permissions, storage health and codec checks. If the clip is online and only stutters or drops playback frames, it isn't missing media at all; use the slow-playback diagnostic.
Proxy media is its own source relationship. Disable All Proxies selects camera originals, while Prefer Camera Originals can fall back to proxies. With optimized media and render cache also off for the test, a missing original shows Media Offline even if its proxy exists. When the fault is confined to proxies, follow the Proxy Media relink checklist and leave a correct camera-original path alone.
When import fails, inspect the actual codec
A container extension isn't a codec diagnosis. Two MP4 files can carry different codecs, profiles, chroma sampling, bit depths, frame-rate modes and audio streams. Read the problem clip with MediaInfo, then compare those fields with Blackmagic's latest dedicated codec table for your OS and edition. The current table was issued in September 2026 for Resolve 21.1; if you run a different Resolve 21 build, check its release notes as well.
If the clip shows up in the Media Pool with audio but no picture, or fails the moment you import it, follow the MP4 stream-check workflow. Test one short transcode before you process a whole folder; the real constraint may be the codec, profile, bit depth, chroma sampling, OS decoder, GPU path or a damaged file.
On Windows, Microsoft's HEVC extension guidance can restore HEVC playback in Windows apps that rely on the OS component. Blackmagic's Windows codec table lists H.265 decoding through 8- and 10-bit OS-supported profiles, with more profiles and GPU acceleration in Studio, so that component can matter in Resolve too. It still isn't a universal Resolve fix, and it can't override Blackmagic's edition, profile or hardware limits. Check the supported-codec table before you buy or install anything.
When the exact source stream is unsupported or unstable, preserve the original and make one editing intermediate in a codec your installation supports. Carry over the source frame rate, frame size, audio layout and timecode wherever the transcoder allows it.
- DNxHR HQ or HQX: choose HQX when the source and encoder need a 10-bit-capable intermediate; don't add bit depth the source never had.
- ProRes 422 family: pick LT, 422 or 422 HQ to suit the quality, generation count, storage budget and delivery needs of the job. LT is more compressed than 422; HQ uses a higher data rate. Reach for HQ when the job calls for it.
- A short test first: import the test beside the original and verify picture, audio, timecode, duration, levels and sync before batching.
Intermediate files are usually much larger than long-GOP camera originals. You pay that in storage for predictable decoding, and it doesn't mean every H.264 or H.265 clip needs converting. Keep supported sources native while they stay stable.
DaVinci Resolve Studio broadens professional-format and accelerated H.264/H.265 support, as Blackmagic's Studio feature page explains. It can't repair corrupt media or reconnect a missing drive. If the stream is supported and native playback still fails, compare the machine and driver with the current Resolve system requirements before you buy your way around one codec symptom.
When red frames point to variable frame rate
Phones, meeting tools, game capture and screen recorders can produce variable-frame-rate media. VFR is a good suspect when a clip imports but shows intermittent red frames, drifts against the audio, or behaves differently while you seek. It proves nothing on its own, though: storage interruptions, damaged frames and decoder failures can look the same.
Check Frame rate mode in MediaInfo. If the symptom follows one VFR source, preserve the original and make one CFR test. HandBrake's official frame-rate documentation says Constant Frame Rate with Same as Source converts variable portions to a constant rate without casually choosing a different cinematic frame rate. Verify duration and audio sync after conversion.
Don't assume every phone, GoPro, OBS or Cinematic-mode file is VFR, and don't assume every VFR clip will fail. Read the actual file, test the exact failing section, and convert only when the controlled CFR comparison makes the symptom go away.
If relinking does not find the correct media
So the relink didn't work. You pointed Resolve at the right folder, it ran its search, and the clips still show offline. A few things can cause that.
First check that the file opens outside Resolve and that the current user can read the drive or folder. Compare the path recorded for the offline clip with the real location. In Resolve 21, Preferences > System > Media Storage sets the scratch location, attached-media access, path mapping, proxy location and default cache locations. Adding a location there won't fix a broken source relationship; you still have to relink.
For synced storage, confirm that a complete copy of the file sits on the local drive. In OneDrive, an online-only file can appear in File Explorer without being stored on the PC. Use Always keep on this device for the media you need and wait for the download to finish. Open the file locally, then compare its local path with the one Resolve recorded before relinking. An item that still exists in the cloud says nothing about whether the old local path still works.
If the source plays in the Media Pool but a timeline event is wrong or offline, check whether that event is connected to the intended Media Pool clip. Conform Lock With Media Pool Clip changes that connection. It's a targeted tool for timeline events and won't repair missing files in general. Work on a duplicate timeline and verify the source first. The source must be at least as long as the selected timeline clip. Resolve aligns it by matching timecode, and when the timecode doesn't match it can align the clips at their first frames. Check the resulting in and out frames and the sync yourself, because an online event can still be the wrong take.
Prevent the same failure on the next project
The cleanest habit is to settle your folder structure before you import anything into Resolve. Once a clip is in the Media Pool, treat its location on disk as permanent. Leave it where it is, with its name intact, unless you're ready to relink.
For a dedicated media drive on Windows, assign and write down a stable, available drive letter before you import the job, and leave the letters of Windows and application volumes alone. On macOS, keep the volume name stable. For collaboration, agree on a folder structure and use Resolve’s path-mapping or relink tools when machines can't share identical roots.
Export important projects as DRP files and keep project-library backups. A DRP holds no camera originals, though. For a portable handoff, use Media Management or export a Project Archive and choose the media, proxies and cache the handoff actually needs.
Before exporting video, turn off proxies, optimized media and render cache for a short camera-original playback test. Inspect the first and last frame of relinked clips and render a representative range. Playback settings don't control every Deliver setting. For this original-media test render, leave Use proxy media, Use optimized media and Use render cached images unchecked in Render Settings. For the final export, decide on purpose whether to use those generated files, and check their quality. A green Media Pool thumbnail can't tell you that every timeline event points to the intended take. If Deliver stops on a processing error and no source is offline, continue with the render-failed checklist.
Media Offline FAQ
Why does DaVinci Resolve say media offline when my files are there?
A stored path can be wrong even when the files still exist, but the path is only one branch. Compare the recorded path with the real location, confirm drive access, then test the original with proxies, optimized media and render cache disabled. If the clip also fails on import, inspect its codec and stream fields.
Why can media show offline during import or after reopening a project?
If the clip fails the moment you import it, check whether the source is readable and supported: inspect it with MediaInfo and compare its stream with Blackmagic’s codec table for your OS and edition. After reopening a project, first check that the expected drive or network share is mounted and that cloud media is available locally. Cache persists between sessions, so repeat the original-only playback test; closing the project doesn't clear it.
Does deleting the render cache fix media offline errors?
Only when the symptom follows generated cache playback. First test the original with proxies, optimized media and render cache disabled, then switch each back on separately. Clearing cache can't repair a moved source, an unavailable drive, an unsupported stream or a damaged file.
Can I fix media offline without relinking every clip manually?
Yes. Select the relevant offline clips or bin and use Relink Selected Clips or Relink Clips for Selected Bin, then point Resolve to the folder containing the originals. Inspect several matches before accepting a large relink.
What's the difference between Relink and Replace in DaVinci Resolve?
Relink is for reconnecting an offline source relationship, normally to the same media at a new location. Replace deliberately swaps the source for another file. Use Replace only when a source substitution is intended and you have checked duration, timecode, audio, and framing.
Why do only a few frames show Media Offline in DaVinci Resolve?
Intermittent red frames don't prove a broken path. Test the camera original with proxies, optimized media and render cache disabled, check whether the same frames fail outside Resolve, and inspect the stream for damage or variable frame rate. Preserve the original and make one constant-frame-rate test only when the symptom follows that source.
If your problem turns out to be slow playback, a render failure, missing audio or project recovery, start with the Fix DaVinci Resolve troubleshooting hub.
