For one constant speed, right-click the timeline clip and choose Change Clip Speed. Enter 200% to play twice as fast or 50% to play at half speed. For a speed change inside the shot, open Retime Controls with Command-R on macOS or Ctrl-R on Windows, add speed points and adjust the segments. In Resolve 21.1, shape the ramp in the Keyframes panel. Motion quality is a separate decision under Inspector > Retime and Scaling.
Use percentage when the playback rate is the target and Duration when the clip must fill an exact gap. For clean slow motion from high-frame-rate footage, calculate timeline fps ÷ source fps × 100 before enabling Optical Flow. If Resolve must invent frames, compare Frame Blend with Optical Flow on the actual shot; Speed Warp is a Studio-only motion-estimation mode, not a universal quality switch.
Before experimenting, duplicate the timeline and keep the original unchanged. Select only the intended video and audio items. A ripple can move later cuts, and Freeze Frame can replace the playback of an entire selected clip. This guide covers fixed speed, variable speed, ramp shape and frame generation, not changing the delivery frame rate.
DaVinci Resolve Change Clip Speed Dialog: Fixed Speed in One Box
Right-click a clip in the Edit page timeline and choose Change Clip Speed, or select it and use Clip > Change Clip Speed. The dialog describes the same change three ways: a percentage, a frame rate, or a duration in HH:MM:SS:FF.
Use Duration when the selected source range must fill an exact gap. For example, a ten-second source range takes five seconds at 200% or twenty seconds at 50%. Those lengths assume you preserve that source range and allow its timeline duration to change. Check Ripple Sequence and the surrounding edit before applying the change.
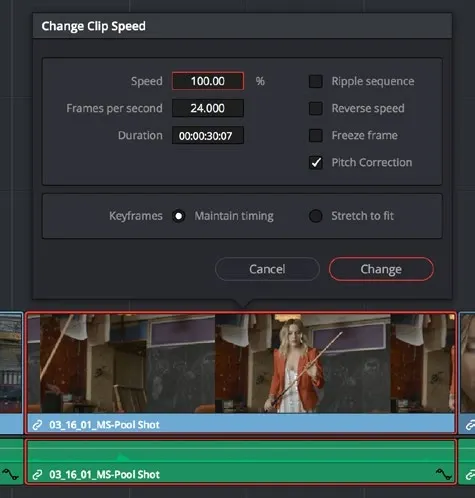
The checkboxes matter more than the number you type:
- Ripple Sequence pushes or pulls clips after the retimed clip to make room for its new duration.
- Reverse Speed changes playback direction.
- Freeze Frame holds the frame under the playhead; Shift-R creates the same whole-clip freeze without opening the dialog.
- Pitch Correction keeps attached audio closer to its original pitch, but large changes can still sound processed.
- Maintain Timing / Stretch to Fit leaves Composite, Transform and Cropping keyframes at their timeline positions or compresses and expands them with the retimed clip.
If Ripple Sequence is off, the timeline won't open or close space automatically, so previously trimmed frames can reappear at the tail while the clip keeps its original slot. When that happens, check Ripple Sequence before changing the speed value again.
Retime Controls: Speed Points, Ramps and Freeze Frames
Select the clip and choose Clip > Retime Controls, or press Command-R on macOS or Ctrl-R on Windows with the default DaVinci Resolve keyboard preset. Custom presets may differ. The current manual also uses the wording Retime Clip in one contextual-menu instruction; the main-menu path avoids that naming inconsistency.
Read the numeric speed beside each segment first. Arrow spacing and direction offer a quick visual check, but the percentage tells you exactly how fast that portion plays. Confirm the selected clip before dragging its retime handles.
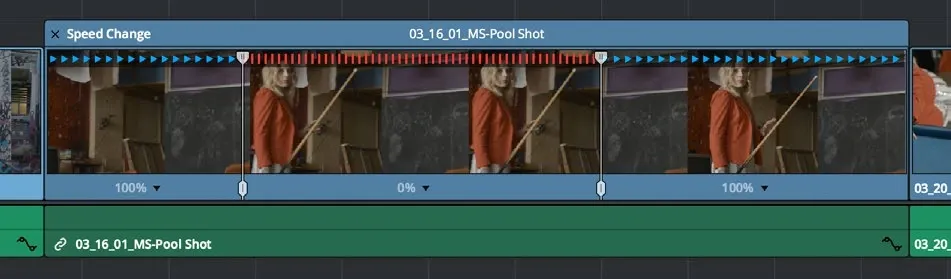
To isolate a middle section, park the playhead at its start, open the speed pop-up and choose Add Speed Point. Move to its end and add a second point. Change that bounded section with its Change Speed menu or its handles:
- Dragging the top handle of the second speed point right slows that segment and left speeds it up, changing the clip length either way.
- Dragging the bottom handle widens the range of the clip playing at that speed, reallocating frames from before and after the segment.
Use the upper handle when the segment speed is the direct target: right slows it, left speeds it, and the clip becomes longer or shorter. The lower handle reallocates source frames before and after that speed point. It also changes the clip duration, but by a different amount; it isn't a locked-duration control.
For a temporary hold, park the playhead on the desired frame and choose Freeze Frame from the Retime Controls speed pop-up. Resolve adds two points around the hold and resumes playback after it. Drag the second point to change the hold length. This differs from Clip > Freeze Frame or Shift-R, which freezes the entire selected clip. Reverse Segment reverses the current section; Rewind adds a reverse-and-replay effect. The Speed Ramp presets replace the current speed effect, so try them only on your backup copy.
Resolve automatically eases one speed segment into the next. Start with that result, then open the Keyframe Editor only when the boundary still lands too hard or must hit a precise moment.
Retime Curve: Shaping a Ramp You Already Built
In Resolve 21.1, select the timeline clip, open the Keyframes tab at the top of the interface, click the Keyframe Curves icon and choose Retime Speed or Retime Frame in the parameter list. Older tutorials that say right-click > Retime Curve describe the former under-clip workflow. Retime Frame maps source frames against timeline time: shallower slopes slow motion, steeper slopes speed it up and a descending slope reverses it. Use Retime Speed to adjust speed segments and verify the resulting numeric percentages in Retime Controls.
Control points on either curve correspond one to one with the speed points in the Retime controls, so adjusting one updates the other live.
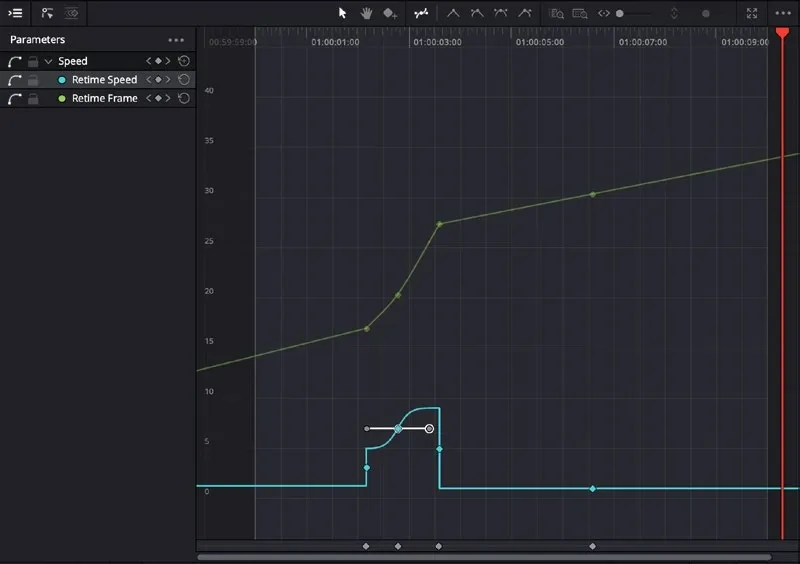
Start with speed points when you want a quick ramp. Use the curves when you need finer timing or a shaped acceleration. You can also build the effect directly in the curve editor; it is not restricted to repairing an existing ramp.
Checked against Blackmagic Design’s September 2026 Resolve 21.1 Reference Manual. Resolve 21 added Bezier easing for retime parameters. Use the curve controls to shape the transition, then inspect the start, end and any freeze boundary in a rendered sample. This is a documentation-based workflow, not a claim of hands-on testing on every platform.
Resolve 21.0.3 added new ease modes for Retime Speed and Retime Frame curves, configurable keyframe ease actions and a legacy speed-mode curve option, as reported in RedShark’s July 2026 release coverage. Legacy speed mode changes curve behavior; it does not restore the old under-clip editor. Do not switch curve modes across a finished sequence without testing a duplicate first. Verify numeric segment percentages and render a short sample before copying the ramp.
Clip Speed and Audio: Pitch, Muting and Linked Tracks
Attached audio can follow a fixed video retime. Use Pitch Correction in Change Clip Speed when you want the duration to change without the obvious chipmunk-or-monster pitch shift. The Resolve 21 Reference Manual warns that large speed changes can still sound worse than small ones, so this checkbox isn't a guarantee of transparent dialogue.
Variable-speed audio has its own Pitch Correction option in the Speed menu of Retime Controls. Check that control in the exact Resolve build you're using; the current manual explicitly documents pitch-corrected and un-pitch-corrected variable-speed playback there.
The Resolve 21.1 manual still contains conflicting audio descriptions: the overview on p. 1216 says variable-speed audio is muted, while the audio section on p. 1127 documents pitch-corrected or uncorrected variable-speed playback. Do not treat silence as inevitable or assume the checkbox guarantees usable dialogue. Check the audio component, selection, mute/solo state and the Speed menu in your installed build, then listen to a rendered sample.
Before locking the retime, check two audio boundaries that are easy to miss:
- Linked Selection makes corresponding linked video and audio select together, and edits to linked items can travel together; it doesn't merge them into a new media file. Confirm both items are selected before a fixed retime. Use a Compound Clip only when several timeline items genuinely need to behave as one container.
- Pitch Correction becomes less transparent as the speed change grows; compare it on and off on the actual source.
If attached dialogue still smears with Pitch Correction enabled, undo the picture retime on that audio component and solve its timing separately. Elastic Wave is the appropriate Fairlight tool when audio must stretch without forcing the picture to follow.
On the Fairlight page, right-click the audio clip and choose Elastic Wave retiming. Its timing points stretch or compress audio while maintaining pitch, without retiming picture on the Fairlight page.
Retime Process and Motion Estimation: Fixing Choppy Slow Motion
When a slowdown asks for more timeline frames than the source holds at its effective frame rate, Resolve has to repeat, blend or synthesize frames. Which of those it does is set project-wide under Project Settings > Master Settings > Frame Interpolation, and per clip in the Inspector under Retime and Scaling.
- Nearest duplicates frames for slow motion and drops them for fast motion. Cheapest to process, and the reason untouched slow motion looks stepped.
- Frame Blend dissolves adjacent duplicated frames together. The manual recommends it specifically when Optical Flow produces unwanted artifacts.
- Optical Flow generates new frames using motion estimation. Exceptionally clean on linear motion, and prone to tearing when two elements cross in different directions or the camera moves unpredictably.
Optical Flow exposes Motion Estimation choices: Standard Faster, Standard Better, Enhanced Faster, Enhanced Better, Speed Warp Faster and Speed Warp Better. On macOS, Resolve 21 also lists AI Speed Warp Metal, a Mac-hardware-optimized Neural Engine mode. The best-looking option is shot-dependent; crossing subjects and unpredictable camera movement can make a lower mode cleaner.
Speed Warp is a Studio feature. Resolve Free users can compare Standard and Enhanced modes, with Enhanced Better as the highest non-Speed-Warp option in this menu. The Resolve Free feature guide and Free vs Studio comparison cover the wider license boundary.
Most guides treat Speed Warp as the answer to every stuttering shot. It isn't. Optical flow methods estimate motion, so a busy foreground crossing the frame can produce worse edge tearing than a simple Frame Blend, at a higher render cost. Test both on the actual shot instead of picking the highest setting on principle.
If both preview and the rendered file show irregular cadence, inspect the source before raising Motion Estimation quality. Phone and screen recordings are often variable frame rate; transcode a test to a constant frame rate, relink it and compare the same section.
Optical Flow can synthesize intermediate images, but it can't guarantee a repair for irregular capture timing. If only the timeline preview stutters while the export is clean, use the separate slow-playback checklist.
Speed Percentages That Skip Interpolation Entirely
For high-frame-rate footage with stable capture timing, the source-to-timeline ratio gives a slowdown that can use one real source frame per timeline frame. Start with Nearest so you are not asking an interpolation algorithm to blend or invent frames unnecessarily.
Speed percentage = timeline frame rate divided by source frame rate, times 100.
Use the actual rates shown in Clip Attributes and Timeline Settings rather than the rounded numbers on the camera body. 59.94fps into a 23.976fps timeline is also 40%. Footage that was previously conformed, variable frame rate files, and clips that already carry a retime can all change how this calculation behaves.
| Source | Timeline | Speed | What Resolve does | Recommendation |
|---|---|---|---|---|
| 60fps | 24fps | 40% | Every timeline frame is one source frame | Use this before touching Optical Flow |
| 120fps | 24fps | 20% | Every timeline frame is one source frame | Uses original source frames |
| 240fps | 24fps | 10% | Every timeline frame is one source frame | No synthesized frames needed |
| 60fps | 30fps | 50% | Every timeline frame is one source frame | Standard choice for 30fps delivery |
| 120fps | 30fps | 25% | Every timeline frame is one source frame | Safe down to a quarter speed |
| 50fps | 25fps | 50% | Every timeline frame is one source frame | Useful for 25fps delivery |
| 24fps | 24fps | Anything below 100% | Frames must be repeated or generated | Frame Blend first, Optical Flow second |
The familiar “60 fps at 50%” advice is correct for a 30 fps timeline, not a 24 fps timeline. At 24 fps, 60 fps footage uses every source frame at 40%.
Exact fractional pairs work the same way: 59.94 ÷ 23.976 is 2.5, so the clean playback percentage is 40%. This assumes the clip hasn't already been conformed or retimed and the source cadence is stable.
Changing Media Pool > Clip Attributes > Video Frame Rate is a different operation: it changes how Resolve interprets the source, rather than adding a timeline speed effect. Setting a genuine 60fps source to 24fps makes it play slowly at 100%, but its audio is unaffected and can lose sync. Record the original setting and test on a separate copy of the project before changing source interpretation. Do not also apply the 40% timeline retime to an already interpreted slow-motion clip unless you intend a second slowdown.
Clip Speed Changes That Break the Timeline
Check the timeline copy before rippling. Which clips move depends on the speed tool, edit mode and track controls:
- The Change Speed dialog ripples only when Ripple Sequence is ticked.
- The Retime controls ripple in Trim mode (T) and can overwrite neighboring clips in Selection mode (A).
On a cut locked to music, a ripple can move later cuts off their beats. With Ripple Sequence off, inspect the changed clip’s out point and available source handles; keeping its timeline slot does not guarantee the same visible ending. With Retime Controls in Selection mode, extending the clip can overwrite a neighbor. Trim mode can ripple instead. Neither choice replaces checking the adjacent cuts.
Sync Lock is enabled by default. Turn it off only on tracks that must stay outside a cross-track ripple; those tracks may then lose relative sync with the retimed section. Position Lock is the stronger finishing control: it prevents horizontal clip movement and all ripple operations, while still allowing many non-positional edits.
Do not treat an empty higher video track as protection against cross-track ripple or lost audio sync. Work in the duplicate timeline and inspect the neighboring cuts, linked audio and any titles after each change. Undo immediately if the result is wrong.
Changing Speed on Multiple Clips
Select every clip you want changed and open Change Clip Speed. The dialog applies across the whole selection, and so does the Inspector's Speed Change group.
To copy a full ramp, build and verify one clip, copy it, select the targets, choose Paste Attributes and enable Retime Effects. The same dialog has a Ripple Sequence choice.
Remove Attributes can remove retime effects from a batch and also asks whether the timeline may ripple. Check mixed-frame-rate destinations individually rather than assuming one interpolation mode fits the selection. The clip-duplication guide covers the separate problem of copying timeline items rather than their attributes.
Review each target after a batch change. A percentage copied between different source frame rates does not produce the same motion cadence. For multicam, check synchronization and the selected audio before retiming; do not flatten or decompose the original merely to make a speed control appear. A compound clip can retime a group as one container, but inspect its internal audio and effects. For Fusion compositions, check the composition’s frame range and animation after retiming a duplicate; changing picture timing is not a guaranteed way to stretch every internal animation.
Speed Methods Compared
| Method | Where it lives | Best for | Recommendation |
|---|---|---|---|
| Change Clip Speed dialog | Right-click clip, or Clip menu | One fixed speed, a duration target, freeze frame, reverse clip | Default choice for anything that is not a ramp |
| Retime controls | Command-R or Ctrl-R on the Edit page | Speed points, speed ramp, mid-clip freezes, rewind presets | Use for timeline speed segments |
| Retime curve | Keyframes tab > Keyframe Curves | Reshaping how one speed eases into the next | Use for precise timing and shaped acceleration |
| Inspector Speed Change | Video Inspector, Cut and Edit pages | Keyframeable speed, numeric entry, Cut page work | Best option when you are cutting on the Cut page |
Choose the speed tool for the job, then check how it affects duration and neighboring clips. Numeric speed, audio timing and frame interpolation each need their own check.
Once motion and audio pass a short test render, use the Resolve export settings guide for delivery. The DaVinci Resolve Tutorial hub keeps this retime workflow inside the larger edit-to-export path.
Clip Speed FAQ
Can you change clip speed in the DaVinci Resolve Cut page?
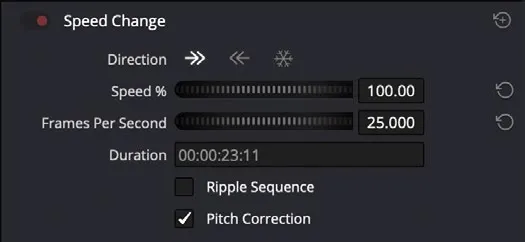
Yes. Speed Change in the Video Inspector works on both Cut and Edit pages and includes Direction, Speed %, Frames Per Second, Duration, Ripple Sequence and Pitch Correction. The timeline Retime Controls overlay with draggable speed points is an Edit-page workflow.
How do you reset a clip to 100% speed in DaVinci Resolve?
Open the Retime controls with Command-R or Ctrl-R, click the pop-up next to the speed percentage at the bottom of the clip, and choose Reset to 100%. To strip retiming from several clips at once, use Remove Attributes and turn on the retime checkbox, then decide whether the timeline should ripple.
Does changing clip speed in DaVinci Resolve reduce video quality?
Retiming doesn't reduce spatial resolution by itself, but it can reduce motion quality. Speeding up skips source frames; slowing beyond the clean source-to-timeline ratio requires repeated, blended or synthesized frames. Judge cadence and artifacts in a rendered sample, especially with Optical Flow.
Can DaVinci Resolve change the speed of audio without the video?
Yes. On the Fairlight page, right-click an audio clip and choose Elastic Wave retiming. Add timing points to stretch or compress the waveform while maintaining pitch; picture isn't retimed from the Fairlight page.
