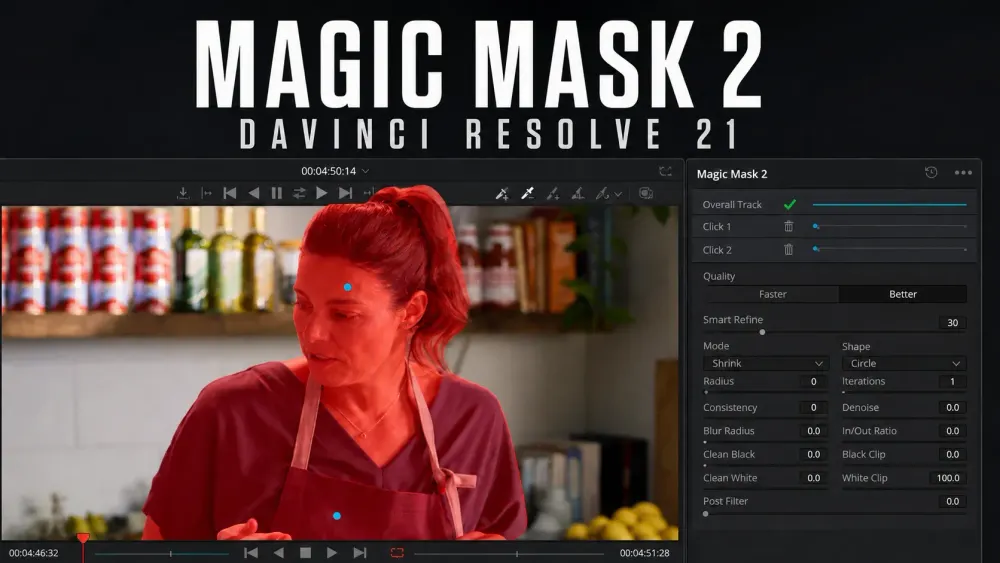
Magic Mask 2 is Studio-only. To isolate a person or object in DaVinci Resolve 21, start on a clear frame, add a dedicated Color node, place one positive click inside the subject, track forward and backward, then inspect the complete black-and-white matte.
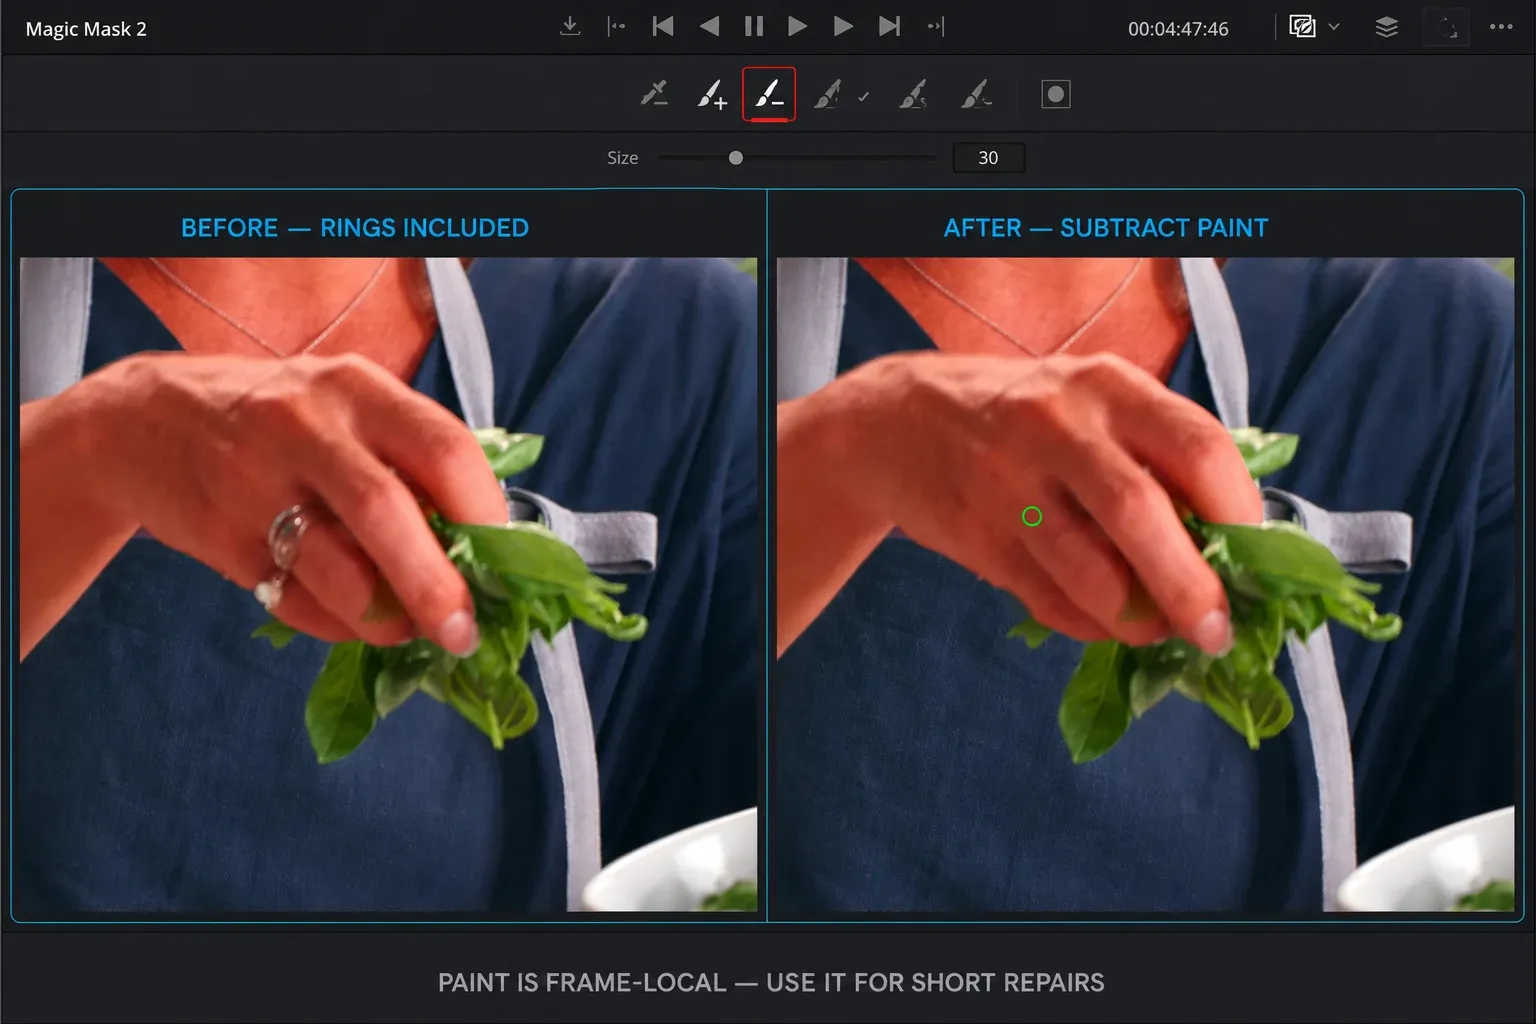
At the first failure, return to the last good frame and move the tracked click to a better feature before adding guidance. Add or subtract a click only when the mask needs different guidance; use Paint only for a few frame-local repairs because Paint doesn't track.
The tracking button is not the finish line. A Magic Mask that looks convincing on one paused frame can leak into the background, drop a hand behind an occlusion or pulse around hair during playback.
Resolve 21 adds a useful final step, rendering the finished mask in place as an external matte, so a verified track can stop being recalculated every time the project changes.
Use Magic Mask Only When the Outline Justifies It
| Isolation method | Use it for | Main limitation |
|---|---|---|
| Magic Mask 2 | People, body regions, products, vehicles, animals and irregular subjects | Hair, repetitive surfaces, motion blur and occlusion still require review |
| Magic Mask 2 Paint repair | A small include/exclude correction on a specific frame | Frame-local cleanup is not a substitute for a sound tracked selection |
| Tracked Power Window | Faces, signs and objects that fit a simple geometric window | The outline does not deform around complex limbs or hair |
| Fusion Polygon or roto | A deterministic matte that must survive difficult occlusion | More manual keyframes and edge work |
A tracked window is usually the better tool for a circular face blur or a rectangular screen. Magic Mask earns the extra processing when the edge changes shape and a simple window would include too much background.
If the final job is anonymization rather than grading, the face and background blur workflow covers tracking, Mosaic Blur and privacy checks.
Magic Mask 2 is Studio-only, as Blackmagic’s Resolve Studio feature page and the final Resolve 21 Reference Manual confirm. Version 2 removed separate Person/Object modes and replaced core selection strokes with Add/Subtract clicks; Paint is a frame-local repair tool. Resolve Free still offers Power Windows, qualifiers, conventional tracking, and Fusion masks.
Prepare the Shot Before the First Click
Set the intended edit, speed, and source before final approval. A trim or retime changes the analyzed range or source-frame timing and therefore requires inspection of the affected range; retrack only when the matte no longer follows.
A source replacement also requires a fresh full-range check rather than an automatic assumption that the mask is invalid or valid.
Put the isolation on its own serial node. Name it Magic Mask or Subject Matte. A dedicated node makes three later decisions obvious: whether the mask is enabled, which correction it controls and which node must be rendered or rebuilt.
Choose a reference frame where the subject is visible, reasonably sharp and not crossing an object with similar color or texture.
The middle of the shot is often better than the first frame because it may show more of the subject. Do not begin on a frame dominated by motion blur just because the playhead happens to be there.
Track a Person or Object in Magic Mask
- Open the clip on the Color page and add a separate serial node.
- Open the Magic Mask 2 palette. Do not look for the old Person/Object switch; version 2 recognizes either type from the clicks you place.
- Park on the strongest reference frame and place one positive add click inside a distinctive part of the subject.
- Inspect the initial overlay. If it includes a background object, place a subtract click on that object rather than clicking around the entire background.
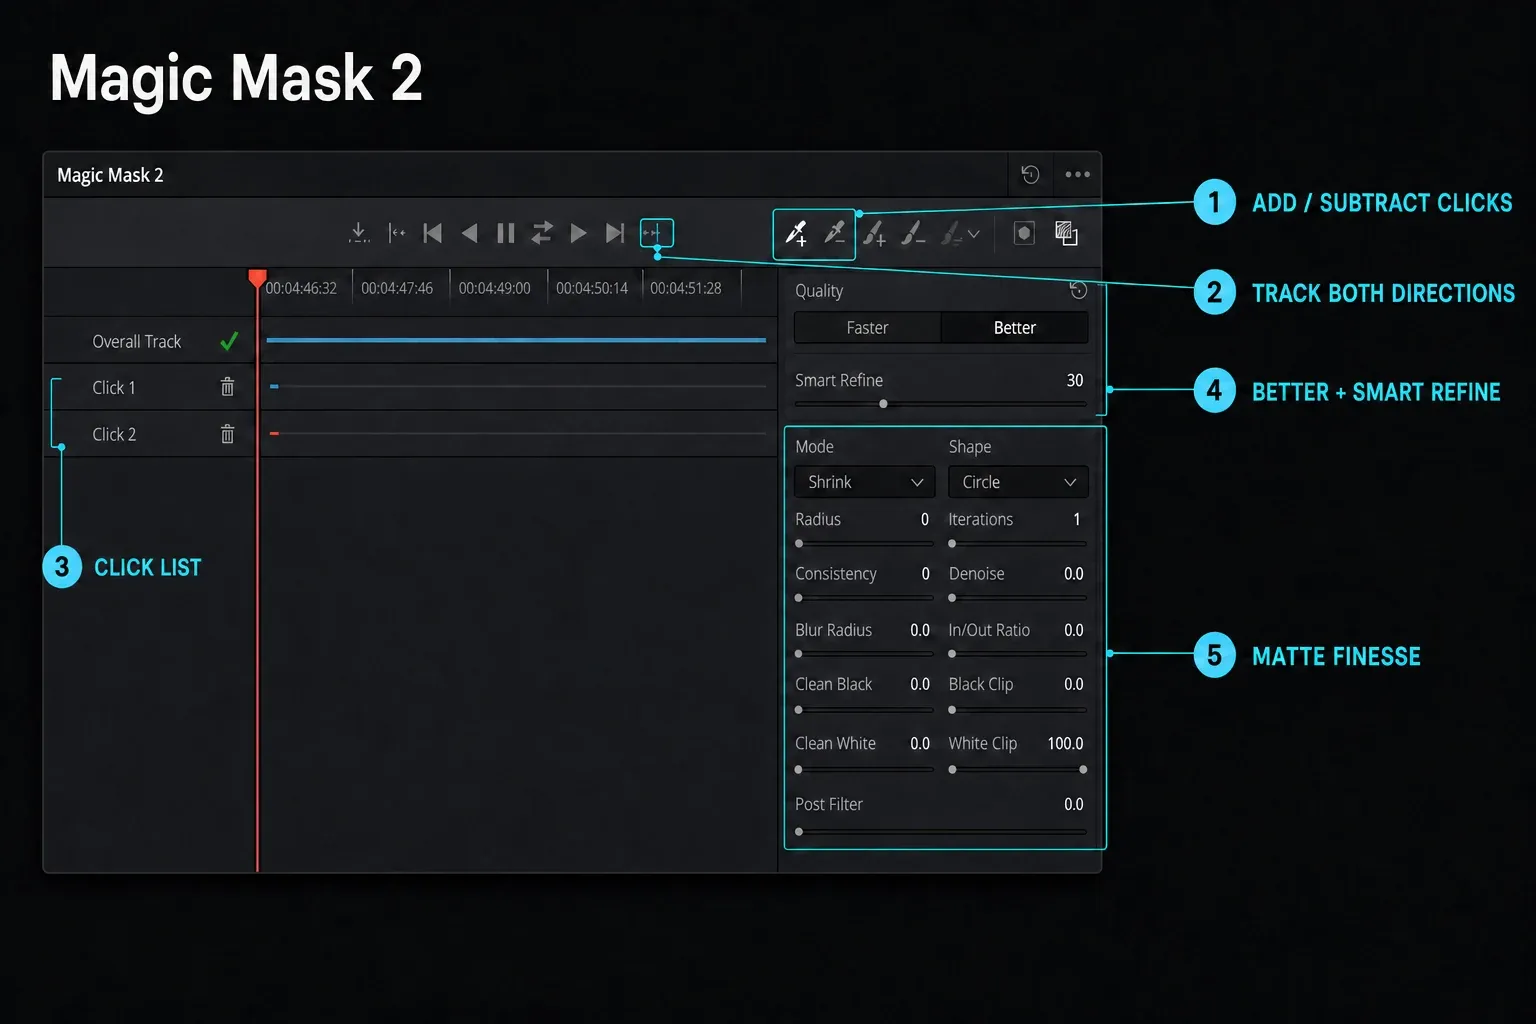
- Use the Click List to identify or delete a prompt instead of adding another click blindly.
- Track forward to the end of the clip and backward to the beginning.
- Switch to the black-and-white mask view and scrub the complete analyzed range.
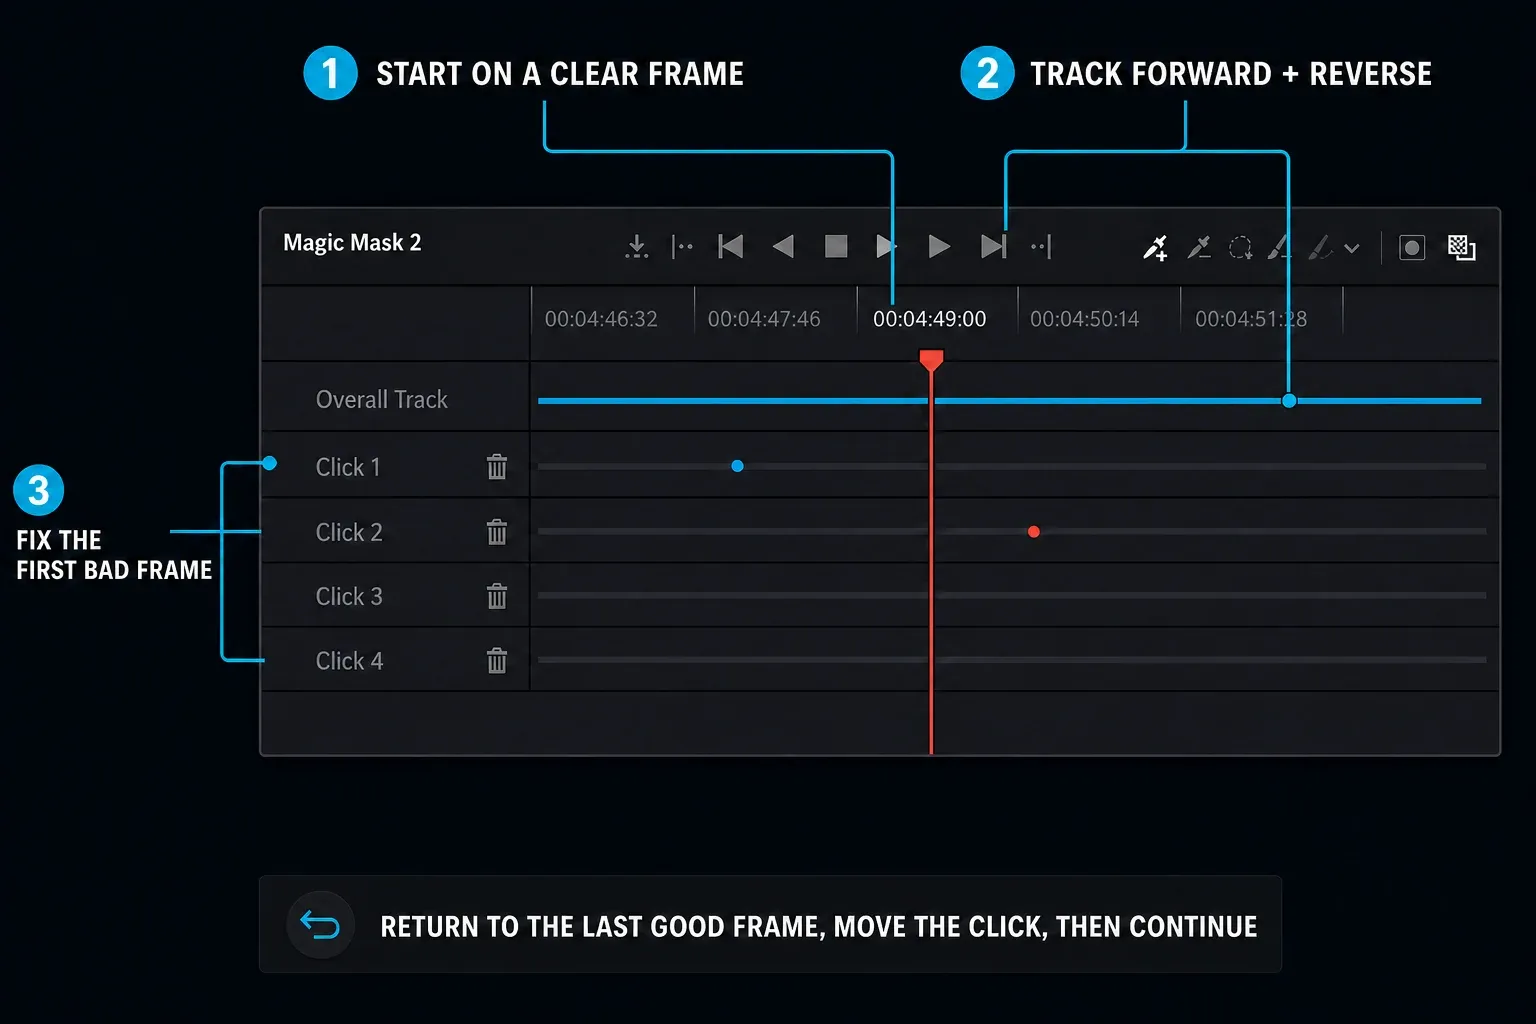
- Stop at the first failed frame, return to the last good frame, and first drag the tracked click to a better feature. Add or subtract guidance only when the matte semantics require it; use Paint only for a few frame-local repairs. Then track away from the corrected frame.
- Only after the track is stable, refine the edge and render or cache the result.
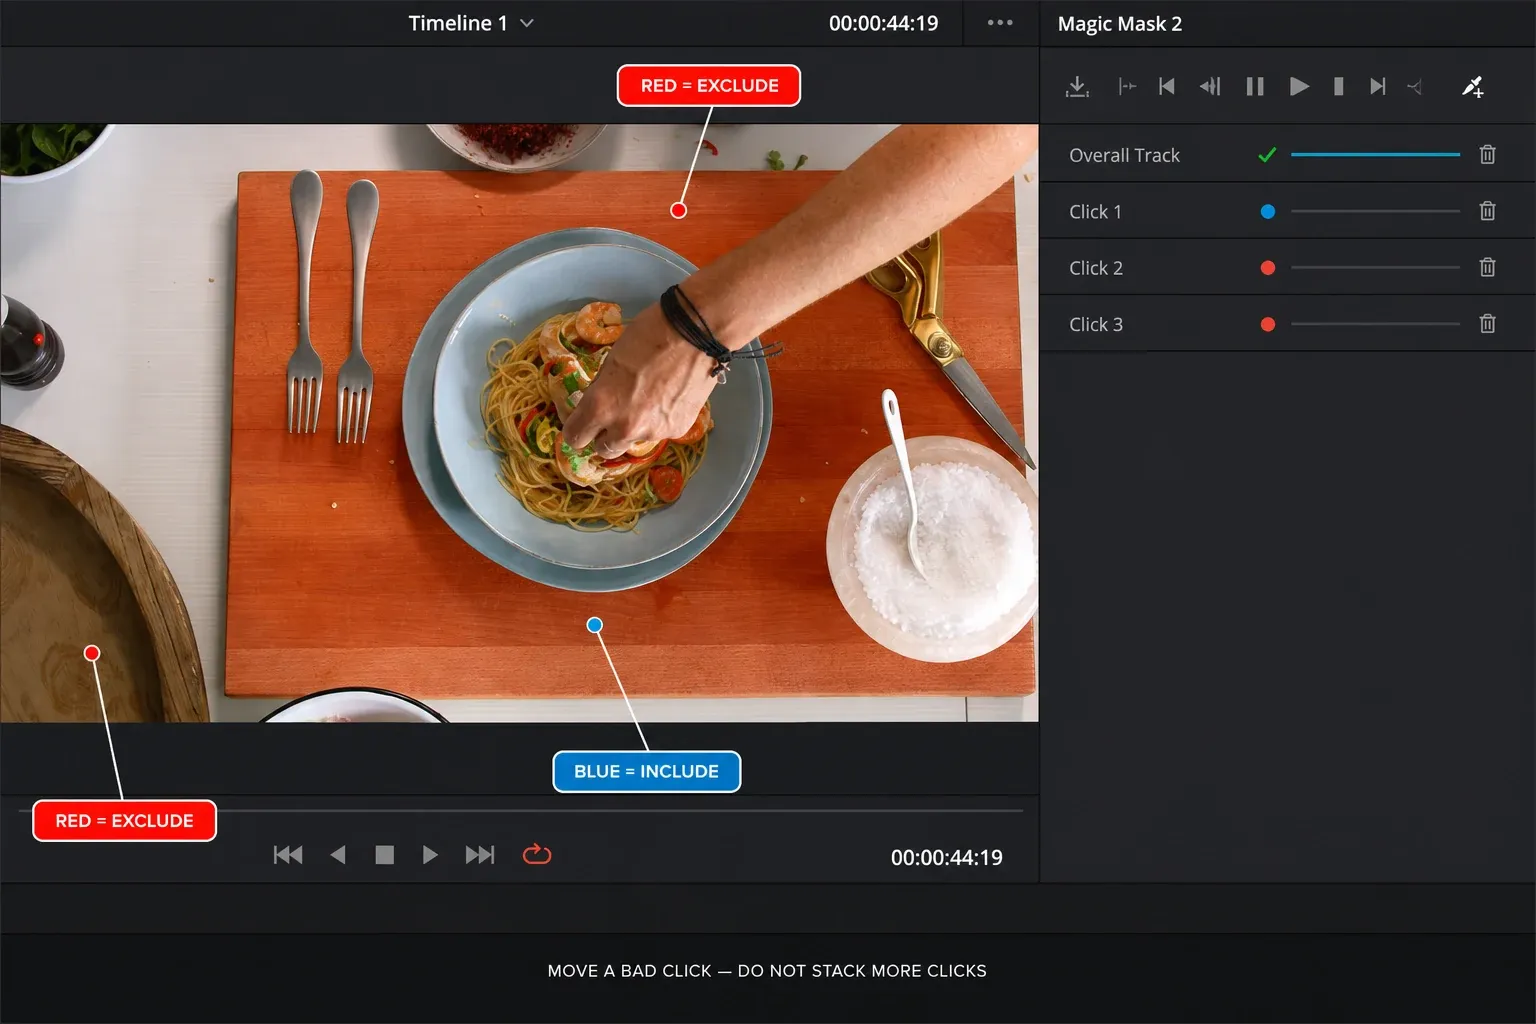
More clicks aren't automatically more precise. Several prompts on the same subject can describe conflicting regions and make later diagnosis harder. One well-placed add click on a distinctive area is the better first test. Add a subtract click or another local prompt only where the matte proves that it needs more.
Repair the First Bad Frame, Not the Last Obvious One
When a matte drifts, the visible disaster may occur several frames after the model first lost the edge. Scrub backward until you find the first frame where a hand thins, a sleeve disappears or background texture enters the subject. Correct there and track forward again.
At an occlusion, back up to the last frame where the tracked click still follows a useful feature and drag that click to a better position before tracking again.
After the subject reappears, reposition the tracked click again if needed. Add or subtract another click only when the mask needs different semantic guidance; reserve Paint for a few stubborn frames because Paint doesn't track.
If the subject repeatedly crosses foreground objects, combine tools. Let Magic Mask describe the subject and use an additional Power Window or Key Mixer logic to exclude the occluder. For more controlled hand-built isolation, the Fusion rotoscoping guide covers multiple shapes, keyframe spacing and occlusion layers.
Refine the Matte in the Right Order
Finish tracking before pushing matte-finesse controls. Clean Black and Clean White can remove small background specks or fill small holes, but aggressive values also erase semi-transparent hair, motion blur and fabric detail. Blur Radius can blend a hard edge; it can't recover an arm the track lost.
Quality offers Faster and Better. Faster creates a lower-quality mask more quickly and is useful for garbage-matte work; Better preserves more detail at higher processing cost.
In Better mode, Smart Refine expands or contracts the generated mask from image analysis before the matte-finesse pass. Consistency adds temporal smoothing only after a click has duration across multiple tracked frames. Raise it cautiously and watch for edge lag or lost detail.
Use this order:
- At the last good frame, move the tracked click to a better feature and retrack. Add/subtract clicks only when different guidance is needed; use a small Paint correction only for a few frame-local misses.
- Use Clean Black for isolated contamination outside the subject.
- Use Clean White for small holes inside a stable matte.
- Adjust In/Out Ratio only when the edge is consistently too far inside or outside.
- Add the minimum Blur Radius that blends the correction at delivery resolution.
Check the finished correction as well as the matte. A technically clean silhouette can still look cut out when exposure, saturation or sharpness changes too abruptly at the boundary.
Grade the Subject and Background Separately
Use the Magic Mask node for the subject correction, then create an outside node or an inverted key for the background. Keep the corrections separate. This makes it possible to soften the background, reduce its saturation or guide attention with exposure without changing the subject node.
Don't stack an aggressive subject grade, noise reduction and a heavy background effect before the mask is proven. Bypass the corrections and inspect the matte first.
Once the isolation is stable, add the creative work one node at a time. If the node structure is unfamiliar, the Resolve nodes guide explains serial, parallel and outside-node decisions.
Render Magic Mask in Place in Resolve 21
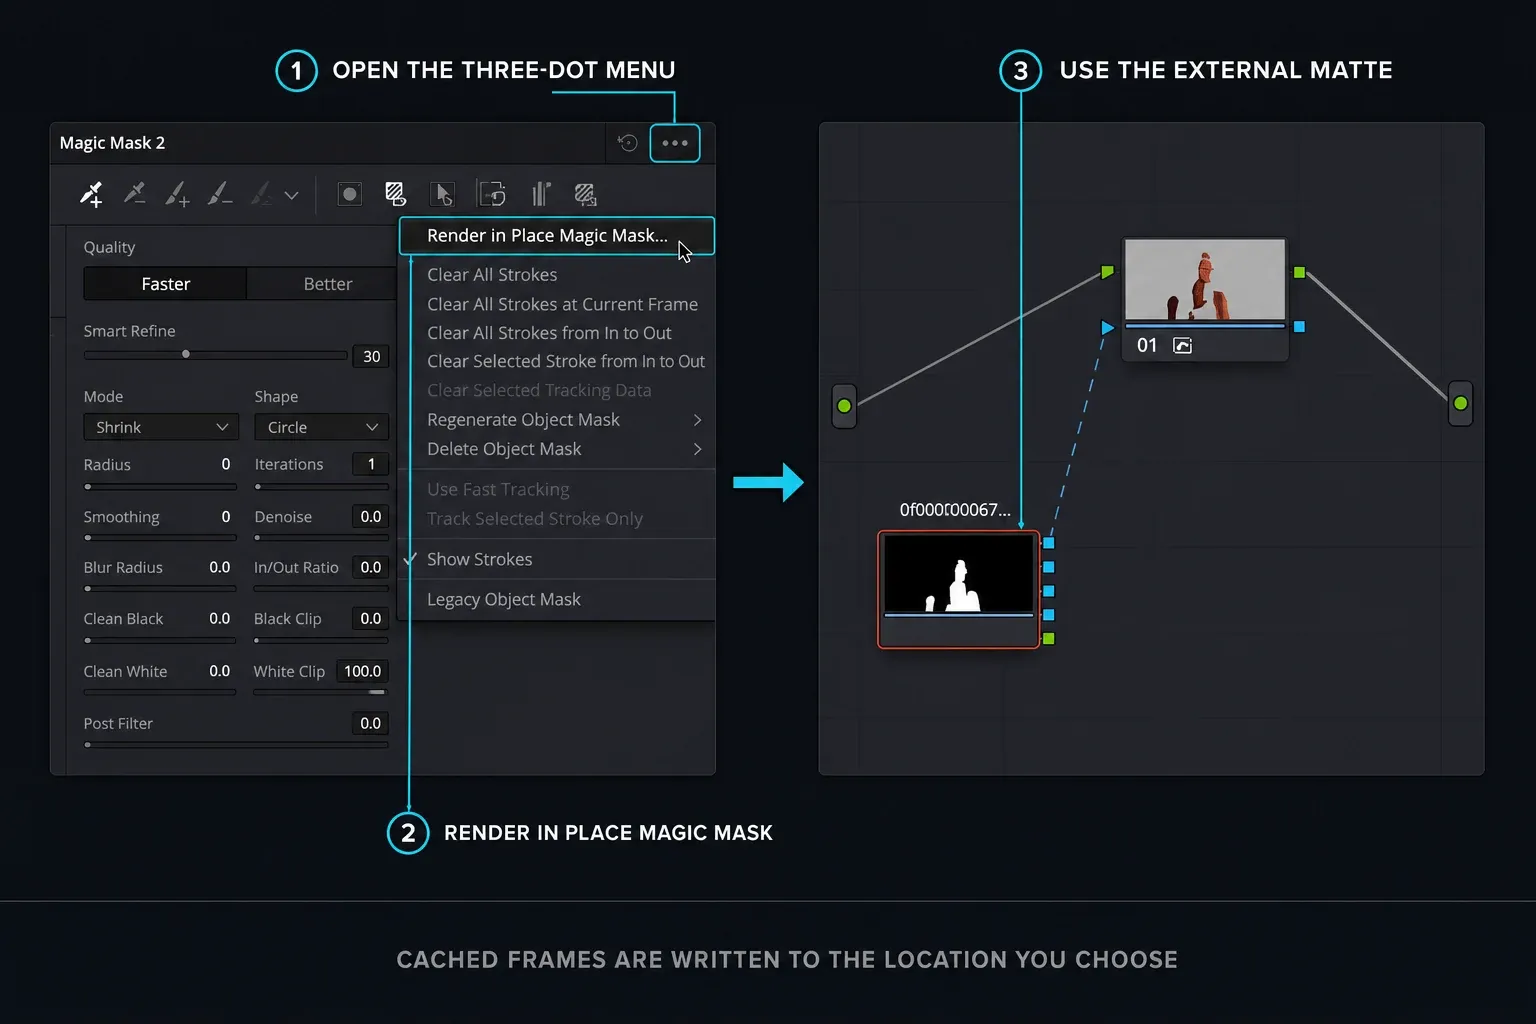
Resolve 21 can render Magic Mask 2 as an external matte. In the Magic Mask palette, open the three-dot options menu and choose Render in Place Magic Mask, then select a location for the cached matte frames. Resolve creates a separate external matte node that can feed later corrections or effects.
Checked September 5, 2026, the final Resolve 21 Reference Manual documents the exact three-dot-menu command: Render in Place Magic Mask.
The rendered frames become an external alpha source for downstream nodes, preserving the approved result until the source, timing, matte, render location, or rendered frames themselves need to be updated. The Resolve 21 AI tools guide provides the wider Neural Engine context without replacing this shot-level workflow.
Render only after checking the complete matte; a rendered error is still an error.
Keep the original Magic Mask setup until approval, choose a deliberate render location, and include the external matte frames in the project handoff or archive. A DRP alone doesn't package source media or arbitrary external files, so verify the receiving system rather than assuming transient cache or matte media will travel.
Keep Magic Mask from Taking Over the GPU
Magic Mask, temporal noise reduction, Depth Map and heavy Fusion work all compete for GPU memory and processing time. Track the mask before adding the most expensive downstream nodes. Use a lower working timeline resolution when necessary, but inspect the final matte at full resolution before approval.
If playback slows after a good track, render the mask in place or cache the specific result instead of repeatedly clearing unrelated cache. When Resolve reports a capacity error rather than ordinary slow playback, follow the GPU memory troubleshooting sequence to isolate the failing node or clip.
Common Magic Mask Failures
The mask selects part of the background
Remove unnecessary prompts. Start with one add click on a distinctive subject region, then place one subtract click on the specific background object that leaks into the matte.
A hand or leg disappears
Return to the last good frame and first move the tracked click onto a feature that remains identifiable. Retrack and inspect. Add a local positive click only if the matte still lacks subject guidance; use Paint for a few frame-specific patches. Clean White can't reconstruct a large missing limb reliably.
Hair flickers during playback
Inspect at full resolution, reduce aggressive cleanup and add only a small amount of edge blur. If hair crosses a similar background, accept that some frames need new guidance or a manual auxiliary mask.
The track is lost after trimming or retiming
A trim or retime may change the analyzed range or the source frames seen at each timeline position. Inspect the complete affected range first; retrack if the matte no longer follows. Set timing before final approval, then render or cache the verified result and retest after any later editorial change.
Resolve keeps recalculating the mask
Confirm whether source media, clip timing, upstream processing, matte guidance, or rendered frames changed. After approval, Render in Place Magic Mask lets downstream work read an external matte rather than repeatedly evaluating the live AI track; update that rendered matte when an upstream dependency changes.
Review the Matte Like an Editor, Not a Screenshot
Play the shot at normal speed, then pause on the fastest movement, the deepest motion blur and every occlusion. Check both the black-and-white matte and the finished correction. Look for pulsing edges, background color changes, holes inside the subject and one-frame flashes at the beginning or end.
A strong Magic Mask uses the fewest clicks needed to describe the target, survives the complete shot and has an explicit handoff plan. The goal isn't to make the overlay look impressive on the reference frame; it's to make the correction invisible during playback.
The DaVinci Resolve color-grading hub places this mask in the node workflow. For deterministic manual isolation when repair cost becomes unreasonable, switch to the Fusion rotoscoping workflow. Compare edition-dependent tools in the Resolve Free versus Studio breakdown.
DaVinci Resolve Magic Mask FAQ
Is Magic Mask available in DaVinci Resolve Free?
No. Magic Mask is a DaVinci Resolve Studio feature. Free users can isolate subjects with Power Windows, qualifiers, Fusion masks and conventional trackers.
Does Magic Mask 2 still have Person and Object modes?
No. Magic Mask 2 removed the separate Person and Object modes. Place an add click inside the person, feature or object you need; use a subtract click or Paint repair only where the generated matte needs correction.
Why does Magic Mask lose the subject?
Return to the last good frame and first move the tracked click to a better feature. Add or subtract a click only when the mask needs different guidance, and use Paint only for a few frame-local repairs.
Can I grade inside and outside the same Magic Mask?
Yes. Use the matte for the subject node and an outside node or inverted key for the background. Separate nodes keep the two corrections easy to bypass and tune.
Does Magic Mask work on a retimed clip?
It can. Retiming changes which source frames appear when, so inspect the complete affected range and retrack it if the matte no longer follows. Set the speed before final approval, then render or cache the verified result.
What changed for Magic Mask in DaVinci Resolve 21?
Resolve 21 adds Render in Place Magic Mask, which creates an external matte node and cached matte frames for reuse after the track has been verified.
