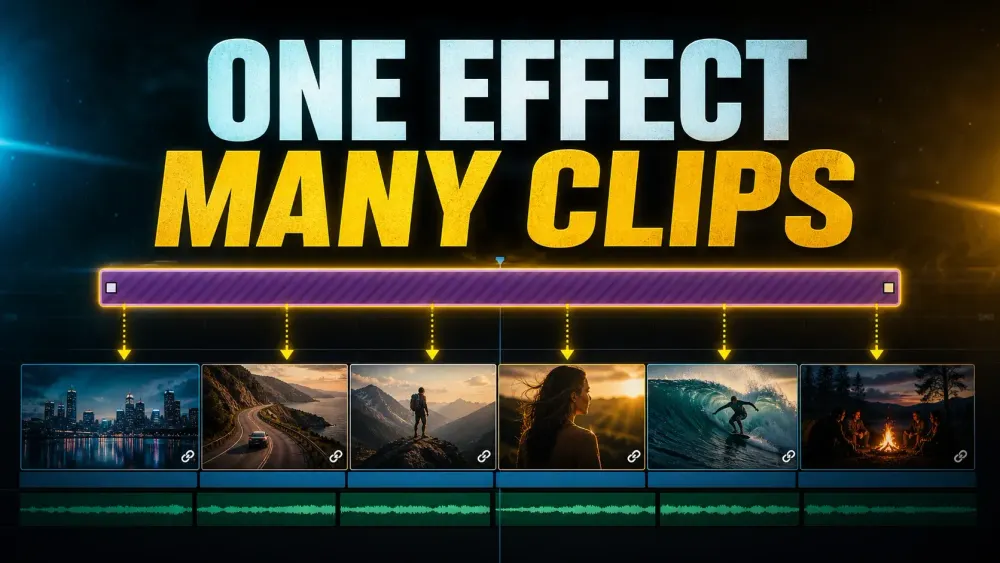
Drag an Adjustment Clip to a video track above the shots, trim it to the exact range, then add the effect, transform or grade. Resolve processes every lower video layer during that overlap.
If a title, transition or picture-in-picture layer sits underneath, it's part of the result; if it sits above, it stays outside the adjustment.
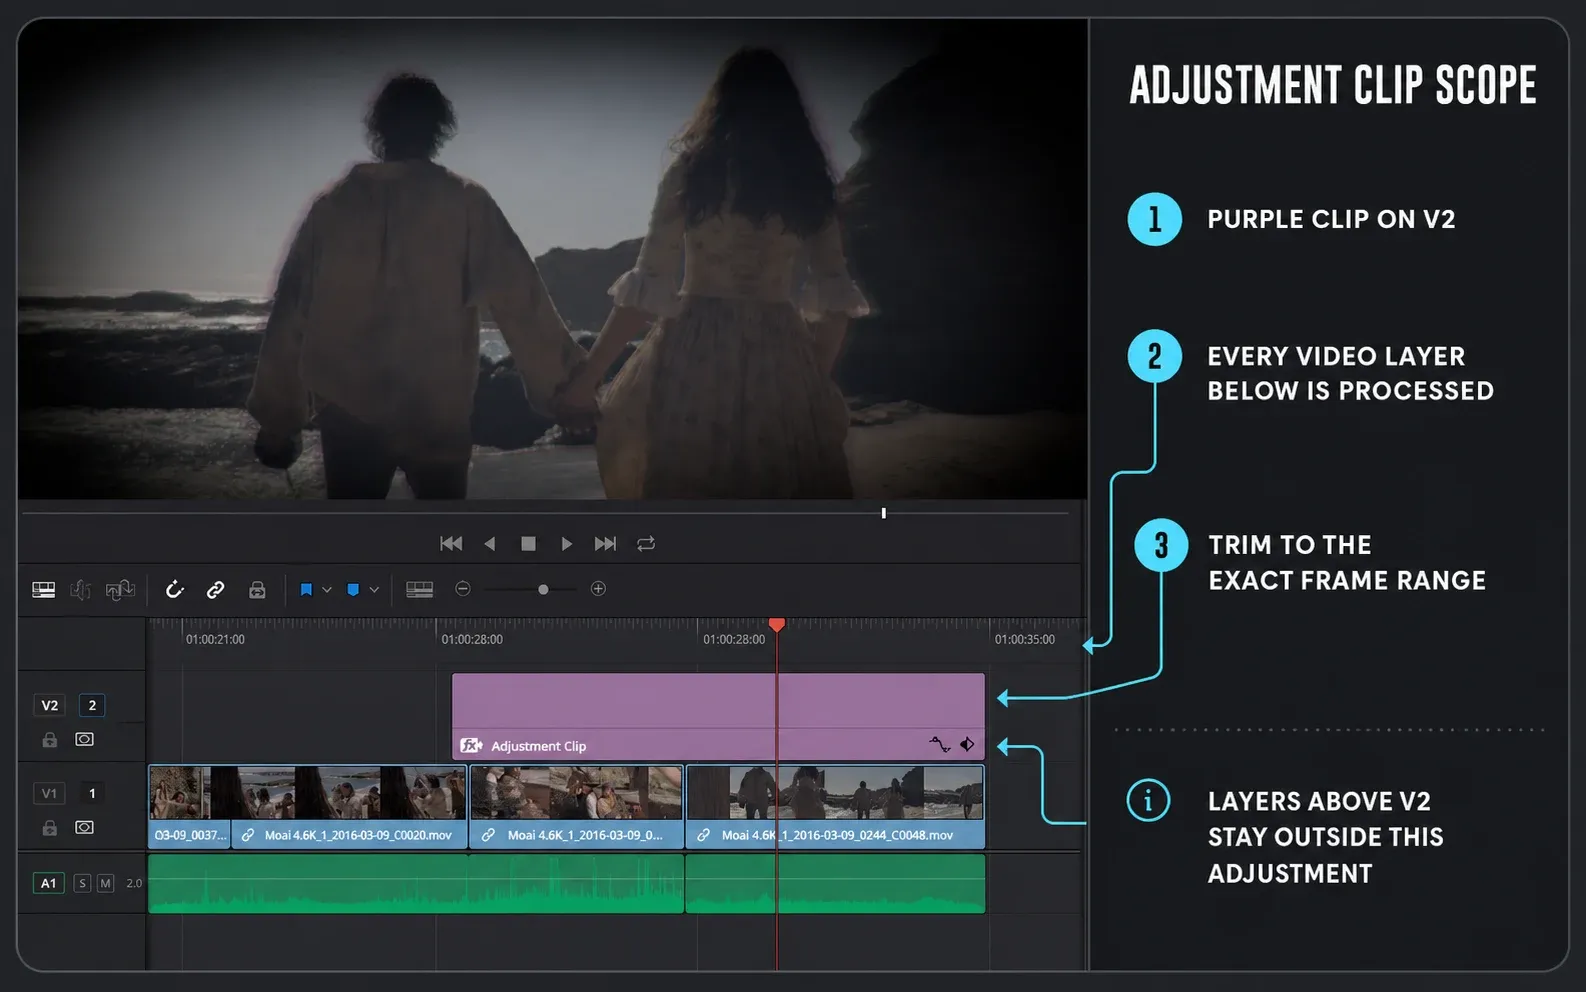
What an Adjustment Clip actually does
An Adjustment Clip has no source picture of its own. It receives the current composite from lower video tracks for the frames it overlaps, applies its processing, and passes the result onward. Its horizontal duration defines when the effect runs; its vertical track position defines which lower layers are included.
Checked September 5, 2026, the current Adjustment Clips documentation confirms the top-down workflow and shows the clip being placed on a higher video track, trimmed, named and dragged back into a Media Pool bin.
The final Resolve 21 Reference Manual also documents the supported processing: Resolve FX/OpenFX, Inspector Composite, Transform, Cropping and Dynamic Zoom, Fusion effects, plus Color-page grading and sizing.
An Adjustment Clip is a good fit when the rule is “process the visible result under this exact timeline span.” It isn't automatically the best way to make several source clips share every type of change.
For the surrounding edit-to-delivery sequence, use the task-first DaVinci Resolve tutorial roadmap. Browse the Workflow hub when you need the next focused editing or finishing task.
Adjustment Clip vs Compound Clip, shared grade, and timeline node
| Method | Best use | What changes |
|---|---|---|
| Adjustment Clip | A bounded effect, transform or finishing look across visible lower layers | Processes the composite below for its overlap |
| Multi-select in Inspector | Several clips need the same relative or absolute Inspector value | Writes that parameter to each selected clip |
| Paste Attributes | Selected clip attributes or effects must be copied to chosen clips | Copies only the attributes selected in the dialog |
| Compound Clip | Several selected clips must behave as one nested container | Changes edit organization and creates an internal timeline |
| Group Pre-Clip/Post-Clip grade | Source shots need shared color processing while retaining clip-level control | Lives inside the Color pipeline for members of a group |
| Shared Node | One grade node must stay linked across selected shots or timelines | Updates linked node instances, not the whole timeline composite |
| Timeline Node | A final grade or technical operation truly applies to the whole timeline | Processes the timeline-level result in the Color page |
Choose the narrowest method that matches the job. An Adjustment Clip is right when the already composited result needs one time-bounded treatment.
Multi-select or Paste Attributes is cleaner when the same Inspector setting should remain attached to each source clip. For Color work, use groups, Shared Nodes or a one-time copy when each camera clip still needs its own input transform, balance, isolation or shot match. The Resolve 21 grade-copy guide separates replace, append and linked methods.
How to add and use an Adjustment Clip
1. Define the exact affected range
Mark the first and last frame and inspect every video layer crossing that range. Decide whether titles, subtitles, overlays, transitions, and borders should be included. Create a clean higher video track if the current stacking order is ambiguous.
2. Add the Adjustment Clip above the footage
Open Effects Library, then Toolbox, then Effects and drag Adjustment Clip to the new track. Place graphics above it when they must remain untouched. Resolve doesn't offer a “skip V2 but affect V1” switch inside one Adjustment Clip; scope follows top-down compositing.
3. Trim and split at meaningful boundaries
Snap the start and end to the intended edits. Split around an exception instead of offsetting the underlying shot to cancel the effect. Short, purpose-specific clips are easier to audit than one purple bar spanning unrelated scenes.
4. Apply one clearly named job
Select the Adjustment Clip. Use the Inspector for transform, crop, Dynamic Zoom, opacity, and compositing controls; drag Resolve FX/OpenFX onto the clip for an Edit-page effect; or select the Adjustment Clip on the Color page for a bounded grade.
Rename it by purpose: Push-In 102–118, Glow Montage, or Final Warm Look. “Adjustment Clip 7” tells the next editor nothing.
5. Bypass before you trust it
Disable the Adjustment Clip and compare the same frame. Then disable the track to catch other overlapping adjustment layers. Check the first and last frame, every transition underneath, and every title that enters or exits its range.
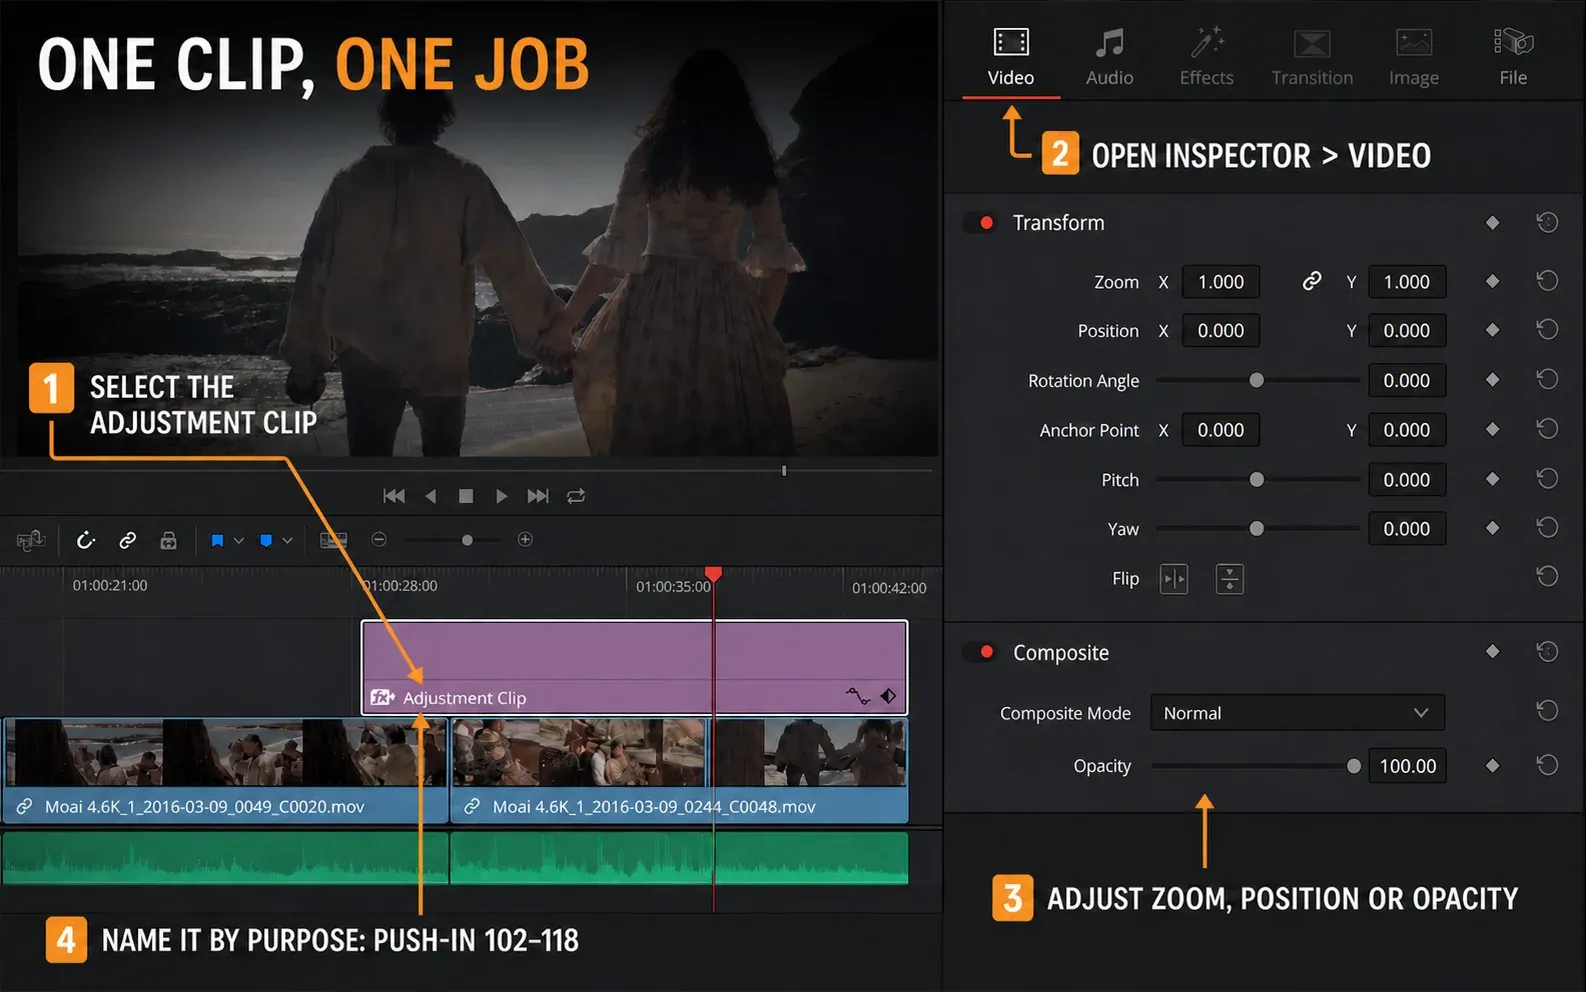
Use Adjustment Clips for shared transforms and effects
A single animated zoom, position move, crop, or opacity change can run across several edits without copying keyframes to every shot. This is useful for a montage push-in, shake, blur, glow, grain treatment, or an animated treatment spanning a cut.
Remember that the transform acts on the composited frame. If a title sits below, the title moves too. If a clip has already been reframed, the Adjustment Clip adds another transform after that result. A double zoom may be intentional, but it should never be accidental.
Because an Adjustment Clip processes the timeline result beneath it, treat Inspector Zoom there as a post-composite enlargement. Don't rely on it to recover the extra raster area of a 4K source in a 1080p timeline. Reframe the source clips when that source-resolution headroom matters, then reserve the Adjustment Clip for the shared treatment.
For letterboxing or a delivery aspect ratio, don't automatically scale the whole composite with an Adjustment Clip. Output Blanking, timeline settings, or a correctly built matte may express the requirement more safely. The Resolve aspect-ratio guide separates framing, resolution, and black-bar workflows.
What happens when Adjustment Clips are stacked
Resolve processes the timeline from lower layers upward. A higher Adjustment Clip receives the result of footage plus any lower Adjustment Clip. That makes order visible in the track stack:
- V1 footage is composited.
- The Adjustment Clip on V2 processes that result.
- Titles or graphics on V3 are added if they sit above V2.
- A second Adjustment Clip on V4 processes everything below, including the V3 title.
Stacking is valid when the order is deliberate. Keep separate clips when the jobs need independent ranges or bypass checks, but do not duplicate the same effect on source clips, a Compound Clip, two adjustment layers, and the Timeline node. Bypass each stage one at a time if the image looks too strong.
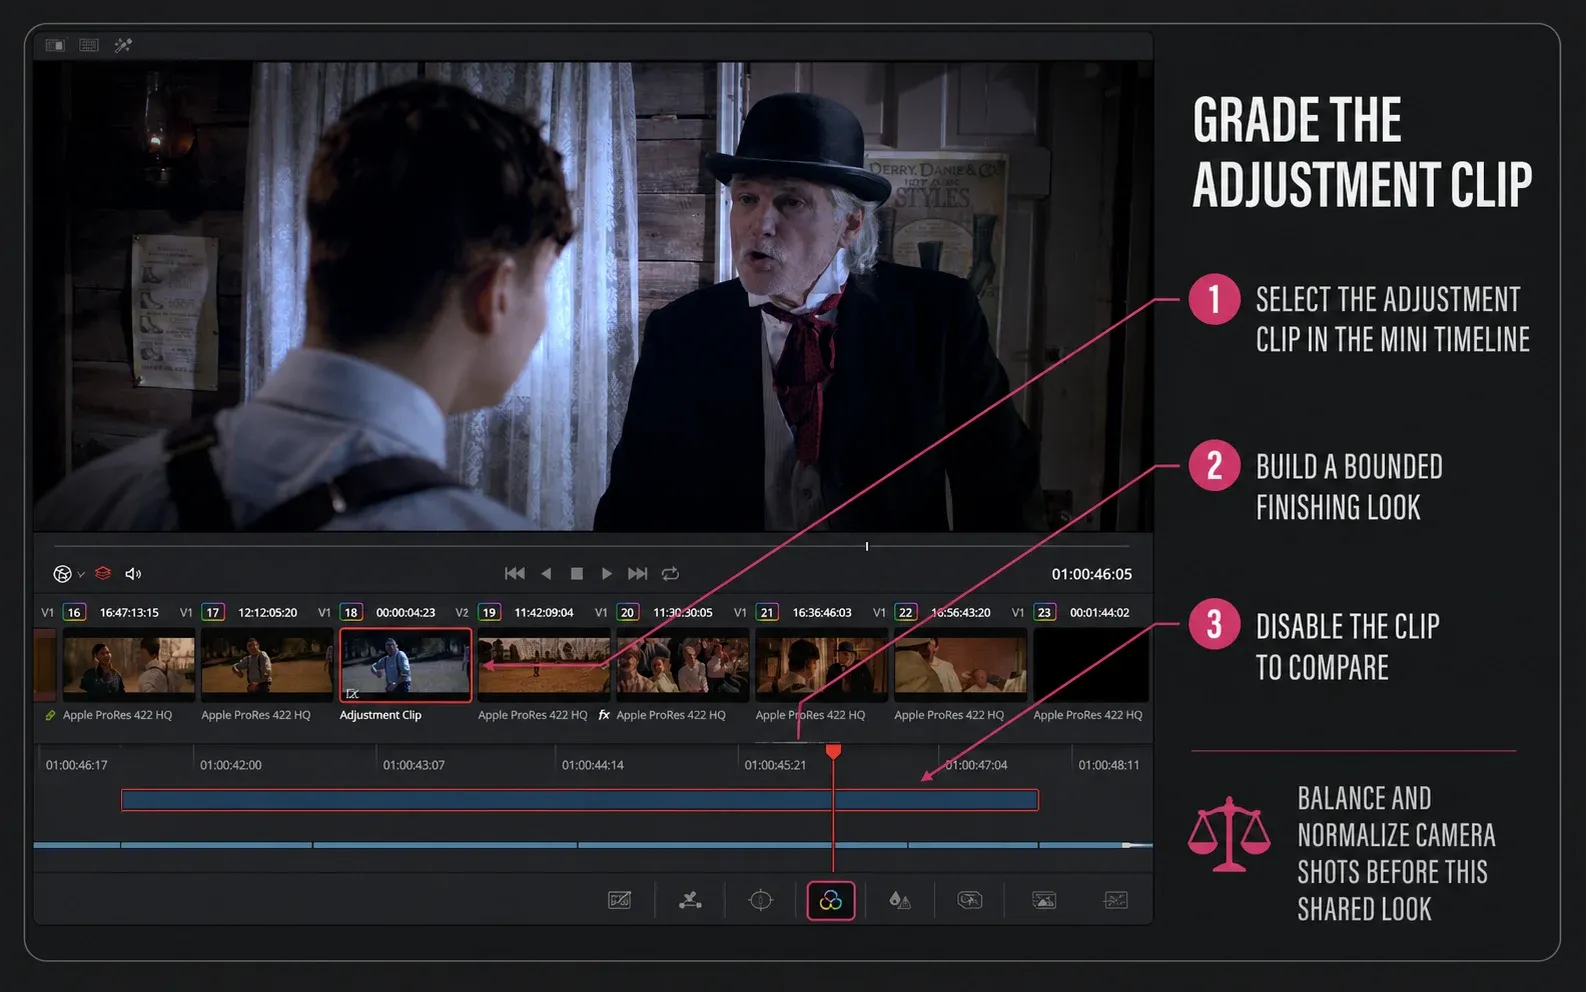
Color grading with an Adjustment Clip
Yes, Resolve lets you grade an Adjustment Clip on the Color page. The important limitation is scope: the grade sees the composite under that clip, not each underlying source as an independent camera original.
That makes an Adjustment Clip sensible for a limited finishing look, vignette, glow, monochrome passage, or a creative treatment across several already balanced shots. It's a poor place for camera-specific input transforms when the lower clips use different log curves, gamuts, white balances, or exposure corrections.
In a color-managed project, do not paste a camera LUT onto an Adjustment Clip simply because every lower shot looks flat.
Normalize and balance each source in the appropriate input pipeline first, then use the Adjustment Clip for a deliberately shared finishing look. The DaVinci Resolve color-grading guide explains the correction-before-look order and the clip, group and timeline levels.
Why transitions look different underneath
An Adjustment Clip processes the transition’s composited output while the overlap is active. That can be exactly what you want for a glow or blur spanning the cut. It's different from placing the effect separately on each source before the transition is built.
If only one side should receive the treatment, split or trim the Adjustment Clip at the edit. If the effect must influence transition generation per source, apply it to the source clips or use a Compound Clip/Fusion structure that gives you the required order.
Save an Adjustment Clip as a reusable preset
After naming and testing it, drag the Adjustment Clip from the timeline into a Media Pool bin. Put it in a Power Bin only when it should be available to projects in the same project library; in a multi-user setup, that shared access follows the Resolve user.
Preserve enough duration for any animation, then check the first and last visible frame after placing and trimming a copy.
Treat each placed copy as an independent timeline item unless you've verified linked behavior for the exact parameter. Updating a saved bin item isn't a safe substitute for checking existing timeline instances.
For reusable animated transforms, check the first and last visible frame after every trim. That observable check is safer than assuming a saved animation still lands on the intended edit. The Resolve keyboard shortcuts guide includes timeline navigation and splitting commands that speed up range cleanup.
Playback and render performance
A heavy effect on one Adjustment Clip can force Resolve to process every lower pixel across a long range. Several stacked blur, noise, optical-flow, or AI effects can turn a smooth edit into a slow timeline even though the source clips play normally.
- Bypass Adjustment Clips to identify the expensive layer.
- Disable individual effects to find the real cost.
- Use render cache or proxies where appropriate, but don't confuse cached playback with a verified final render.
- Render the hardest short section and reopen it before committing to the full delivery.
If the symptom is dropped frames rather than a memory error, work through the Resolve slow-playback checklist. If Resolve reports exhausted VRAM, use the separate GPU Memory Full troubleshooting guide. Removing duplicate effects or shortening their scope is often more useful than lowering quality everywhere.
Adjustment Clip troubleshooting
A title or graphic is affected
The title sits below the Adjustment Clip during the overlap. Move it to a track above, shorten or split the Adjustment Clip, or restructure the title and effect inside a Compound Clip if they must be processed together but isolated from the footage.
I need to affect V1 but skip V2
One Adjustment Clip can't selectively ignore an intervening lower layer. Reorder tracks, move the unaffected layer above the Adjustment Clip, compound only the intended elements, or apply the effect directly to the chosen clip. The fix belongs in the timeline structure; there's no skip-track switch inside the Adjustment Clip.
The effect is applied twice
Check the source clip, Compound Clip, lower adjustment layers, Color group nodes, shared nodes, and Timeline node. Bypass from top to bottom until the duplicate disappears.
Transitions change or flash
The Adjustment Clip may start or end inside the transition, or the effect may process the combined transition rather than each source. Extend it across the entire transition or split it so neither side is ambiguously covered.
Playback is smooth but the export differs
Clear the assumption that real-time preview is final proof. Render a short section with the delivery settings, then check frame boundaries, motion blur, noise, and effect order in the file.
A clean Adjustment Clip checklist
- The clip’s name states one clear job.
- Its duration starts and ends on intentional frames.
- Every lower title, overlay, and transition has been reviewed.
- No identical effect exists elsewhere in the processing chain.
- The clip is bypassed and compared on the same frames.
- The hardest section has been rendered and reviewed outside Resolve.
Adjustment Clips FAQ
What does an Adjustment Clip affect in DaVinci Resolve?
It affects the composited video on lower tracks for the frames where it overlaps. Layers above it and frames outside its duration aren't processed.
Where is the Adjustment Clip in Resolve 21?
On the Edit page, open Effects Library, then Toolbox and Effects. Drag Adjustment Clip to a video track above the footage.
Can I color grade with an Adjustment Clip?
Yes. Use it for a bounded finishing look across the composite below. Use clip, group, or shared nodes when underlying sources need independent color management and shot-level control.
Why does an Adjustment Clip affect my title?
The title is on a lower track inside the Adjustment Clip’s time range. Move the title above it or change the range and timeline structure.
Can I stack Adjustment Clips?
Yes. Higher Adjustment Clips process the result of all lower layers. Name each job, keep ranges narrow, and verify that the same effect isn't duplicated elsewhere.
Do Adjustment Clips work in Resolve Free?
The Adjustment Clip itself is a standard Edit-page feature in Resolve Free. The Resolve FX, OpenFX or AI tool placed on it may still be Studio-only, so check the specific effect rather than treating the container as the license boundary.
