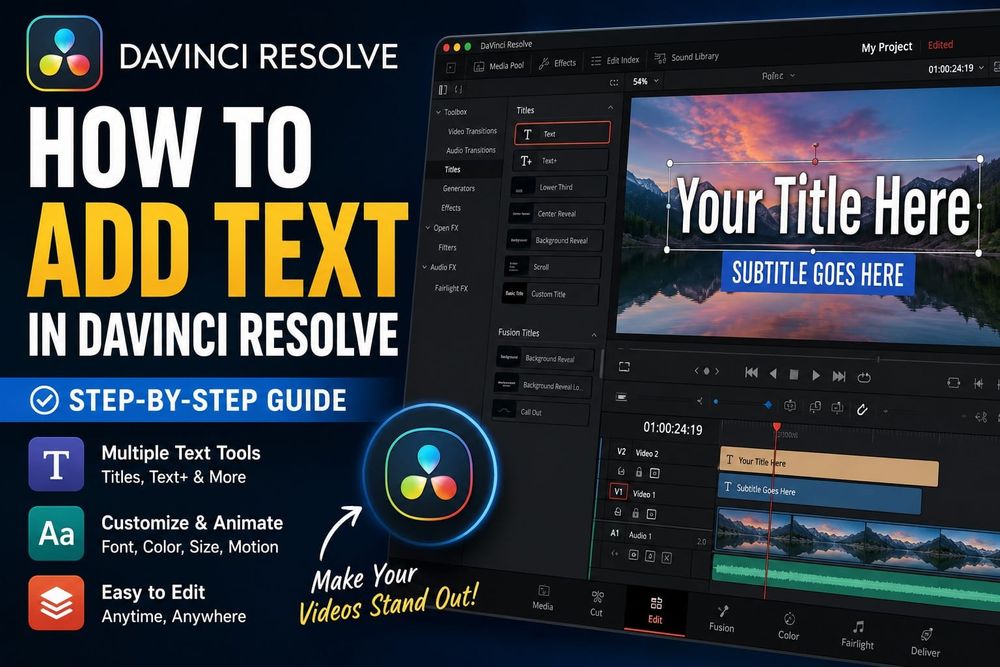
The first time I needed a lower third on a commercial cut, I dropped in the basic Text tool, typed the client's name, and called it done. Three rounds of revisions later, the agency wanted a filled background box behind the name, with a separate stroke and a glow. Basic Text has one set of options in the Inspector. No shading layers, no stacked effects. I had to rebuild the whole thing in Text+. That 11-minute detour taught me something: knowing which text tool to reach for before you start saves more time than any keyboard shortcut.
Resolve has four distinct ways to put text on screen: basic Text, Text+, Fusion Titles, and subtitle tracks. They are not interchangeable. This guide covers each one, when to use it, and how to set it up correctly.
DaVinci Resolve Text Tools: Which One to Use
Most tutorials treat all four text options as roughly equivalent. They're not.
- Text — Simple overlay for titles, credits, and temp graphics. One Inspector tab, limited to basic font, color, and drop shadow settings.
- Text+ — Everything Text does, plus five Inspector tabs: shading layers, per-character animation, 3D transforms, and a Fusion node graph you can open if you need it. This is the one you'll use on real projects.
- Fusion Titles — Pre-built animated templates. Good when you need motion graphics fast and don't want to build them from scratch in the Fusion page.
- Subtitle track — A dedicated track for timed captions. The only option that exports as SRT or VTT. Use it for any dialogue or accessibility captioning.
If you're unsure which to pick, go with Text+. It does everything basic Text does and more. The only reason to use basic Text is for a temp title you plan to replace later.
How to Add Text in DaVinci Resolve Using the Basic Text Tool
Go to the Edit page. Open the Effects Library (top left corner). Click Toolbox > Titles. Hover over any option to preview it in the viewer. Drag Text onto your timeline, either above your clip on a new track for an overlay, or between clips on the same track for a standalone title card.
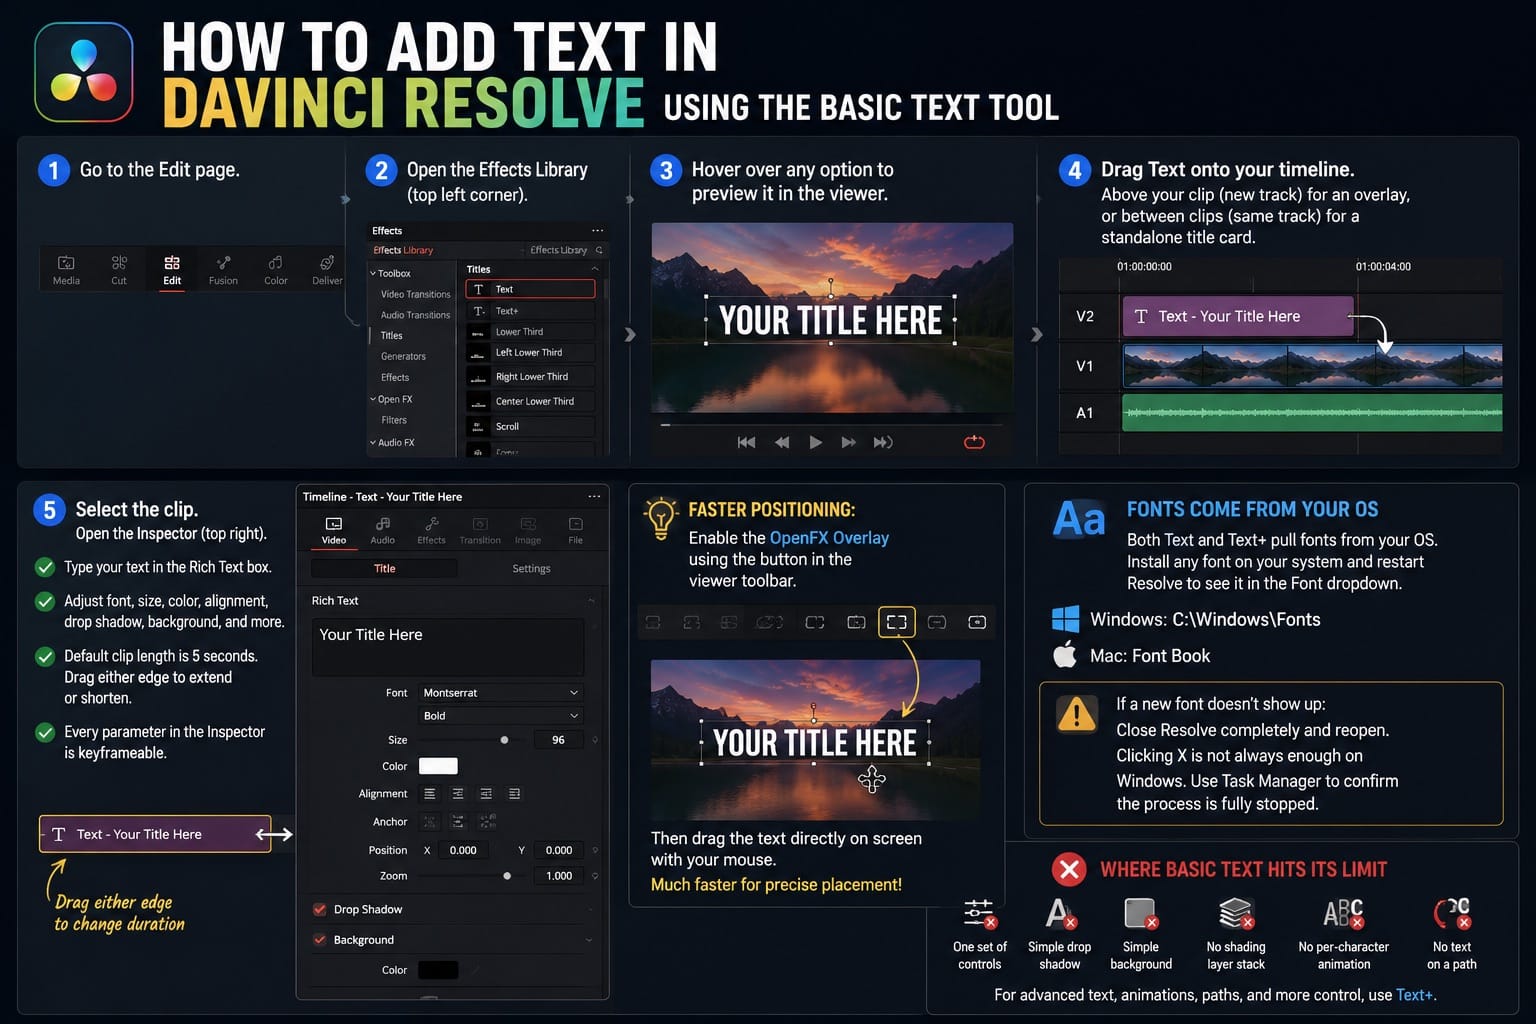
Select the clip. Open the Inspector (top right). Type your text in the Rich Text box. From there, adjust font, size, color, alignment, drop shadow, and background. The default clip length is 5 seconds. Drag either edge of the clip to extend or shorten it. Every parameter in the Inspector is keyframeable.
One thing most guides skip: the position sliders in the Inspector are not your only option. Enable the OpenFX Overlay using the small button in the viewer toolbar, and you can drag the text directly on screen with your mouse. Faster for positioning, especially on lower thirds where you're eyeballing placement against a subject's shoulder.
Both Text and Text+ pull fonts from your OS. Install any font on your system (C:\Windows\Fonts on Windows, Font Book on Mac), restart Resolve, and it appears in the Font dropdown for either tool. If a newly installed font isn't showing up, close Resolve completely and reopen. Clicking X is not always enough on Windows; use Task Manager to confirm the process is fully stopped before restarting.
Where basic Text hits its limit: it has one set of Inspector controls. Drop shadow and a simple background are about the extent of it. There's no shading layer stack, no per-character animation, no ability to put text on a path. For anything beyond a clean title over a simple background, you'll want Text+.
DaVinci Resolve Text+ Tutorial: More Control, Same Starting Point
Most tutorials lead with basic Text. That's backwards. Text+ should be your default for any finished work.
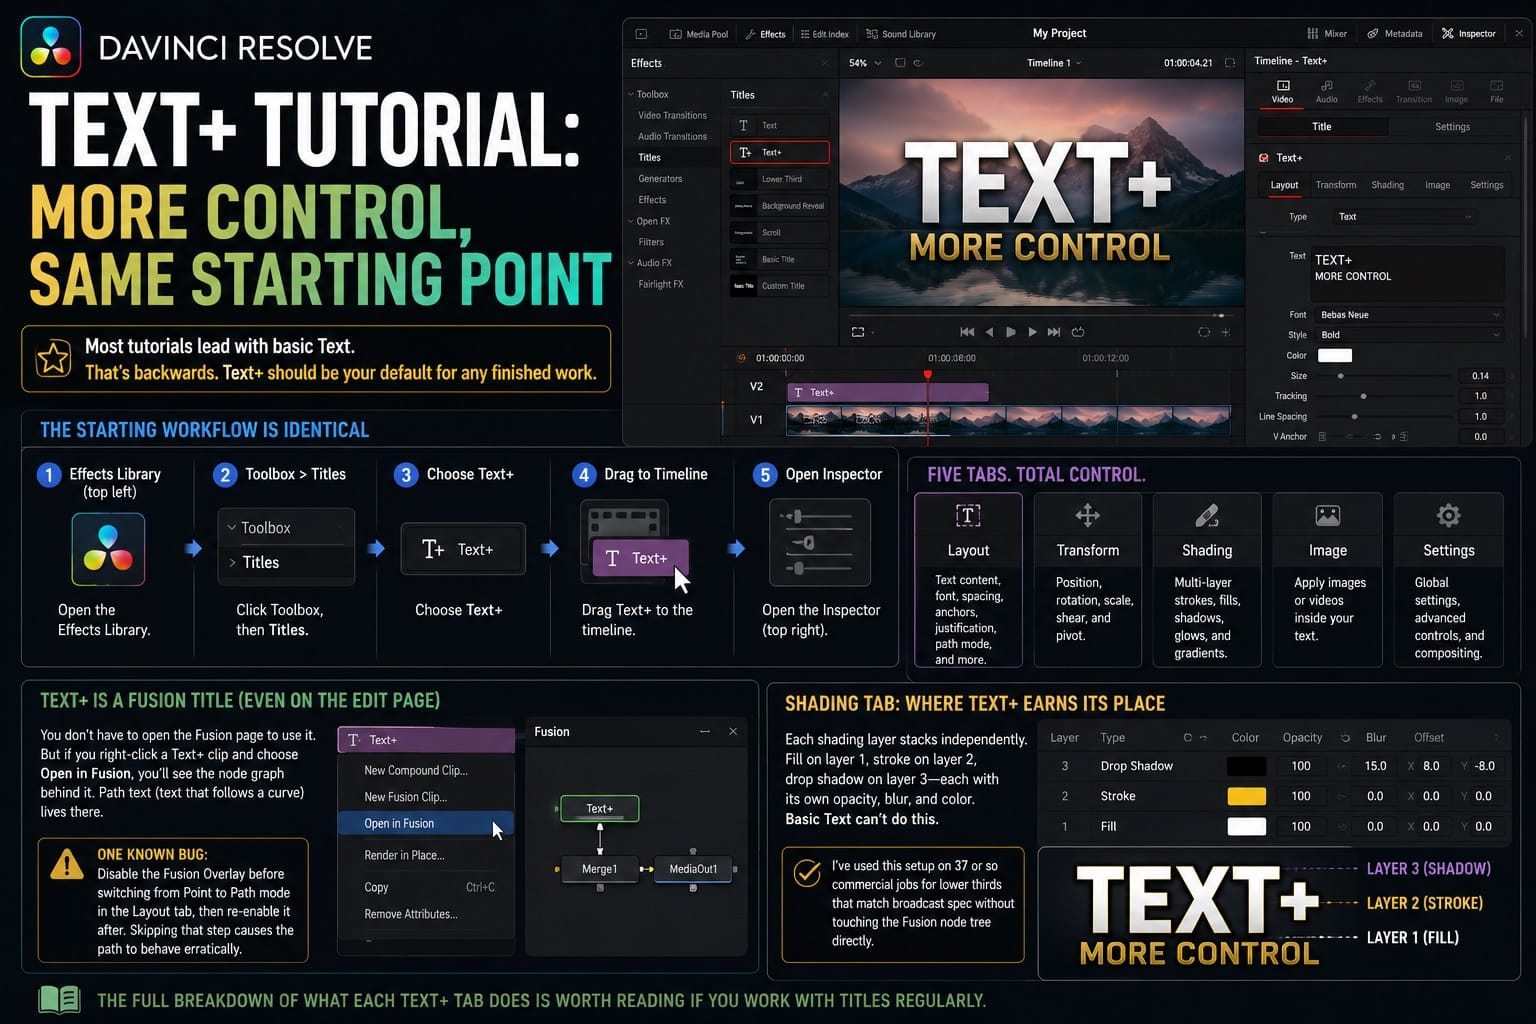
The starting workflow is identical: Effects Library > Toolbox > Titles > Text+. Drag it to the timeline, open the Inspector. But instead of one tab of options, you get five: Layout, Transform, Shading, Image, and Settings.
Text+ is a Fusion title running under the Edit page. You don't have to open the Fusion page to use it. If you right-click a Text+ clip and choose Open in Fusion, you'll see the node graph behind it. Path text (text that follows a curve) lives there. One known bug in current versions: disable the Fusion Overlay before switching from Point to Path mode in the Layout tab, then re-enable it after. Skipping that step causes the path to behave erratically.
The Shading tab is where Text+ earns its place on finished work. Each shading layer stacks independently: a fill on layer 1, a stroke on layer 2, a drop shadow on layer 3, each controlled separately with its own opacity, blur, and color. Basic Text can't do this. I've used this setup on 37 or so commercial jobs for lower thirds that match broadcast spec without touching the Fusion node tree directly. The full breakdown of what each Text+ tab does is worth reading if you work with titles regularly.
DaVinci Resolve Fusion Titles: Pre-Built Motion Graphics
Fusion Titles live in the Effects Library under their own category below the basic title options. Hover over each one to preview the animation. Drag to the timeline and open the Inspector.
What you can customize depends on the specific Fusion Title. Most expose upper text, lower text, and a handful of motion parameters. They won't give you the same control as building something in Text+ from scratch, but they're usable in 4.2 minutes flat when a deadline is tight and the motion style doesn't need to be unique.
If you need to change something the Inspector doesn't expose, right-click the clip and open it in Fusion. The text lives in a Text+ node inside the node graph. Adjust it there. Changes reflect back in the Edit page in real time.
DaVinci Resolve Subtitle Track: Right Tool for Captions
A subtitle track is not the same as a text overlay. Subtitle tracks store timed caption items that export as SRT, VTT, or embedded captions. Text overlays burn into the video and can't be extracted as a caption file afterward.
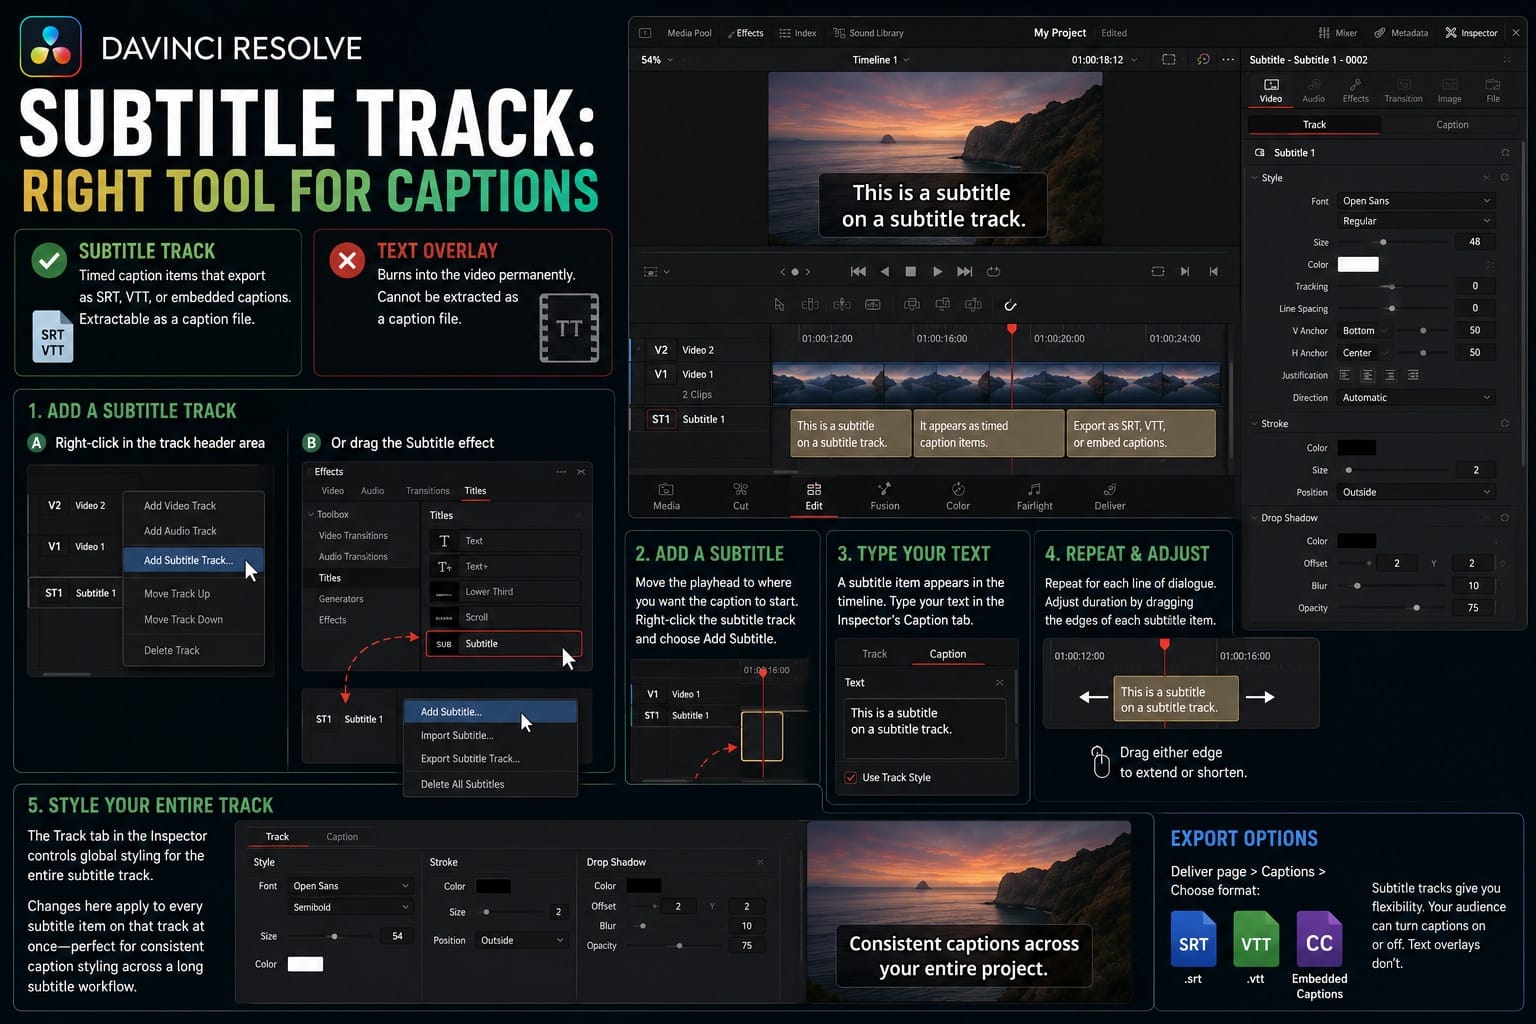
To add a subtitle track: right-click in the track header area of the Edit page timeline and choose Add Subtitle Track. Alternatively, go to Effects Library > Toolbox > Titles, scroll to the bottom, and drag the Subtitle effect onto the timeline.
Move your playhead to where you want a caption to start. Right-click the subtitle track and select Add Subtitle. A subtitle item appears in the timeline. Type your text in the Inspector's Caption tab. Repeat for each line of dialogue. Adjust duration by dragging the edges of each subtitle item.
The Track tab in the Inspector controls global styling for the entire subtitle track: font, stroke, drop shadow, position. Changes here apply to every subtitle item on that track at once, which is what you want for consistent caption styling across a long subtitle workflow.
DaVinci Resolve Auto Captions: What You Actually Need
If you're on the free version, you cannot use auto captions. The Create Subtitles from Audio feature requires DaVinci Resolve Studio 18.5 or newer, plus hardware that supports the DaVinci Neural Engine. Many tutorials skip this caveat entirely, which is why so many people end up confused when the option doesn't appear in their Timeline menu.
On Studio, go to the Edit page, open the Timeline menu, and choose AI Tools > Create Subtitles from Audio. Set your language, choose a caption preset, and set the maximum characters per line. The default of 18 characters is a reasonable starting point. Hit Create. Resolve processes your audio and builds a subtitle track.
One problem that catches people on export: if your timeline starts at 1:00:00:00 (Resolve's default start timecode), exported SRT files will be offset by an hour when uploaded to YouTube. Fix it before you export. Right-click the timeline in the Media Pool, choose Timelines > Change Start Timecode, and set it to 00:00:00:00. Re-export the SRT and the timing lines up correctly. This is covered in detail for Resolve 19 and 20, but it applies all the way back to 18.5.
Accuracy on clean audio is solid. Noisy location recordings with overlapping speakers tend to need manual cleanup on roughly 1 in 7 lines in my experience.
How to Animate Text in DaVinci Resolve
Both basic Text and Text+ support keyframe animation through the Inspector. Click the diamond icon next to any parameter to set a keyframe at the current playhead position. Move the playhead, change the value, and Resolve creates a second keyframe automatically. The clip transitions between the two states.
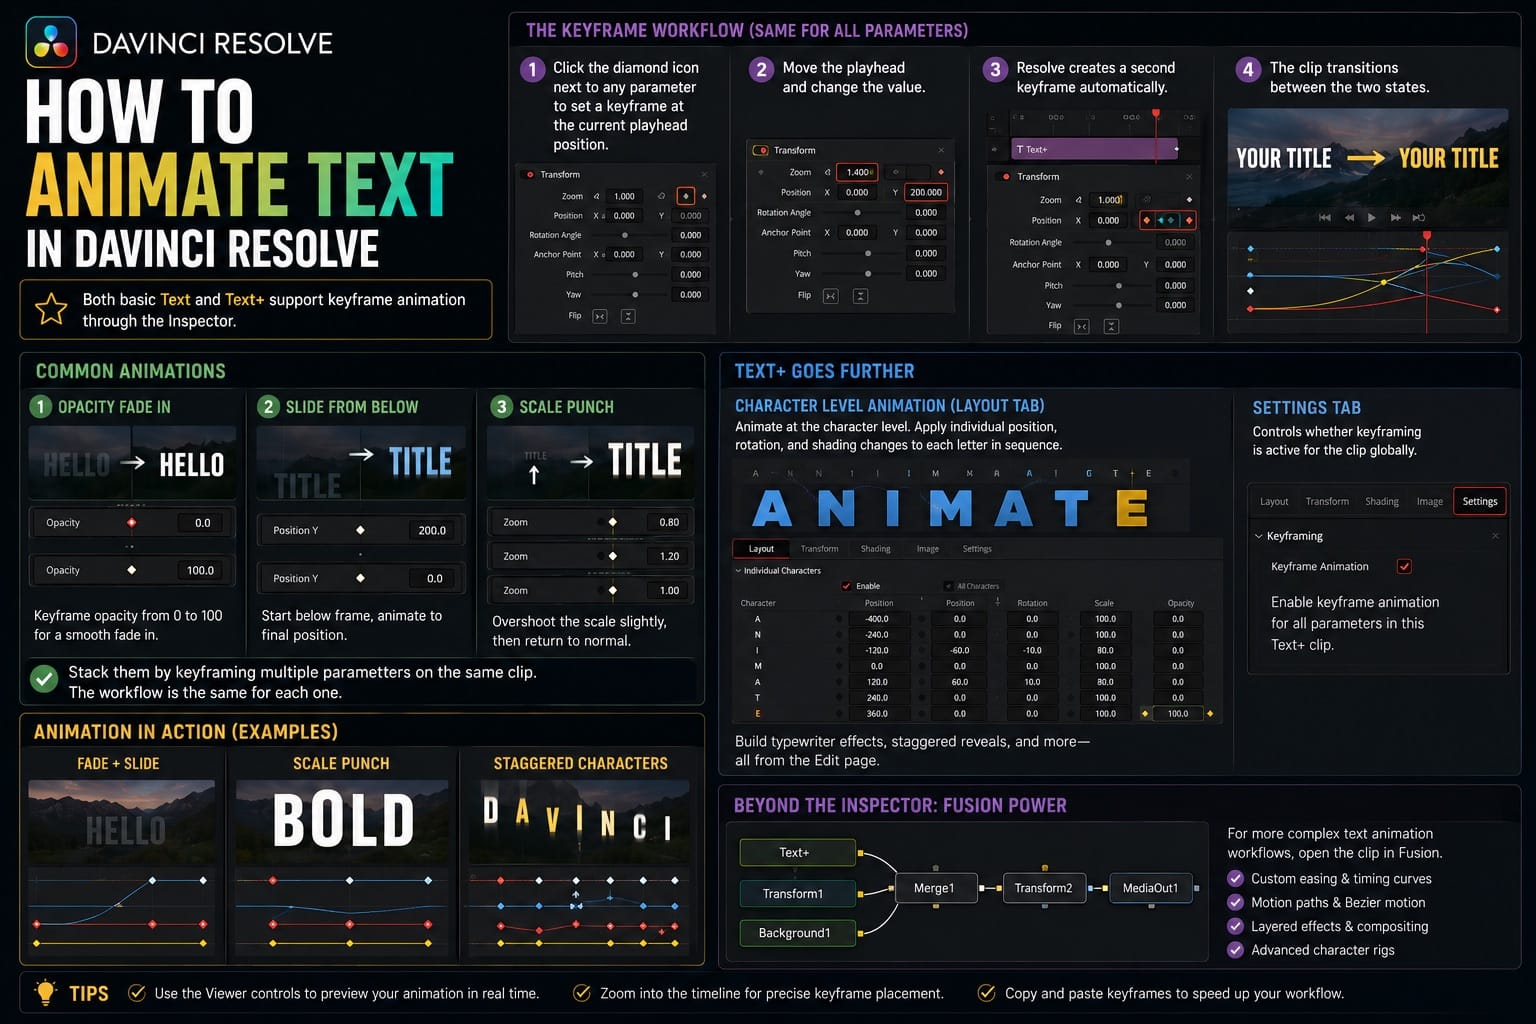
Common animations: opacity fade in, position slide from below frame, scale punch on entry. Stack them by keyframing multiple parameters on the same clip. The workflow is the same for each one.
Text+ goes further with the Layout tab. You can animate at the character level, applying individual position offsets, rotation, and shading changes to each letter in sequence. This is how you build a typewriter effect or staggered character reveal without opening Fusion. The Settings tab in Text+ controls whether keyframing is active for the clip globally.
For more complex text animation workflows involving Fusion compositing, the node tree gives you full control over timing curves, motion paths, and layered effects that go well beyond what the Inspector exposes.
DaVinci Resolve Text FAQ
Why can't I use my custom font in DaVinci Resolve?
Both Text and Text+ pull fonts from your OS. Install the font in Windows (C:\Windows\Fonts) or Mac (Font Book), then restart Resolve completely. If the font still doesn't appear, use Task Manager or Activity Monitor to confirm Resolve isn't still running in the background before reopening. Corrupted or non-TTF/OTF font files can also cause this; download a fresh copy and reinstall.
What is the difference between Text and Text+ in DaVinci Resolve?
Text+ has five Inspector tabs versus one. That means stacked shading layers (fill, stroke, glow all independent), per-character animation, 3D transforms, the ability to put text on a path, and access to the Fusion node graph underneath. Both tools support system-installed fonts. The real limit of basic Text is its controls, not its font access.
How do I add lower thirds in DaVinci Resolve?
Use Text+ with two separate text elements for name and role. Set font, size, and shading in the Inspector. Position elements with the OpenFX Overlay for on-screen dragging. Use the Shading tab to add a background fill behind the text if your design requires one.
Can I export subtitles from DaVinci Resolve as an SRT file?
Yes, but only from a subtitle track, not from text overlays. Right-click the subtitle track header and choose Export Subtitle. Choose SRT without formatting for the cleanest file for YouTube or most web platforms. Check your timeline start timecode before exporting or the SRT timing will be off.
Is auto captioning in DaVinci Resolve free?
No. Automatic subtitle generation requires DaVinci Resolve Studio, which costs $295 as a one-time purchase. The free version requires manual subtitle entry on a subtitle track. Blackmagic's product page lists the full feature comparison between free and Studio.
How do I position text precisely in DaVinci Resolve?
Use the position sliders in the Inspector for numeric control, or enable the OpenFX Overlay in the viewer toolbar to drag text directly on screen. The overlay method is faster when you're aligning text against moving footage.
Related guides
- DaVinci Resolve tutorial for beginners
- How to split a video
- How to mute and split audio
- How to transcribe audio (auto subtitles)