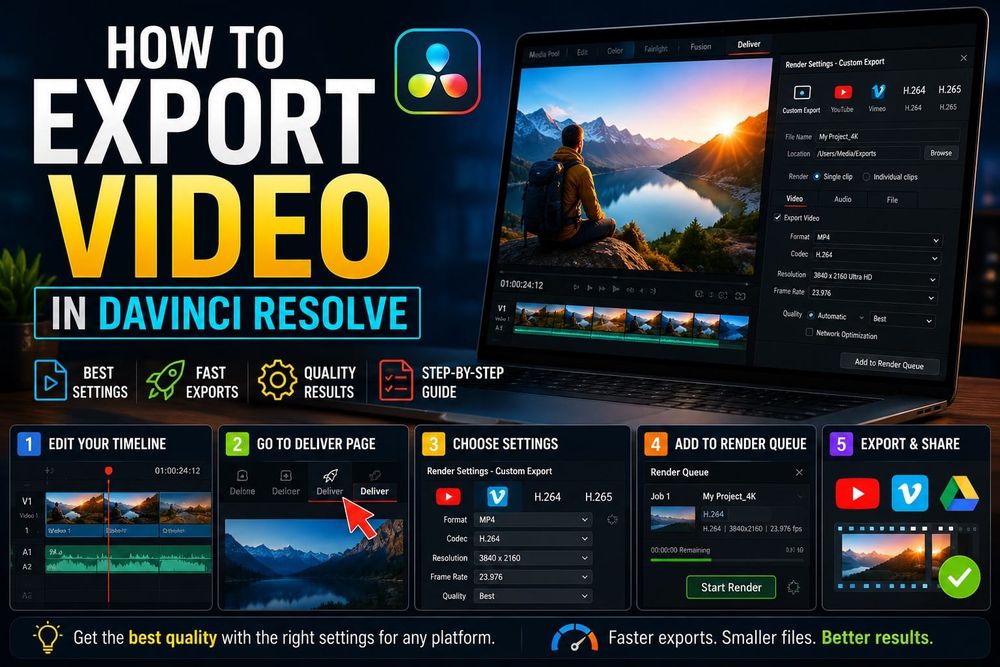
The Deliver page is where every project ends. You spend hours cutting on the edit page, grading on the color page, maybe cleaning up dialogue in Fairlight — and then you hit that rocket ship icon at the bottom and everything you did either survives the export or it doesn't. I've had jobs where a wrong codec choice or a missed audio setting turned a clean grade into a disaster for the client. Getting this right is not complicated, but the number of ways to go wrong is higher than most tutorials admit.
Quick answer for most projects: go to the Deliver page, set Format to MP4 and Codec to H.264, leave resolution and frame rate on Match Timeline Settings, check that Export Audio is enabled in the Audio tab, click Add to Render Queue, then Start Render. Everything below covers when to deviate from that and why.
How to Export Video in DaVinci Resolve Using Quick Export
Quick Export is the fastest path out of Resolve. It's in the Cut and Edit pages and it's useful for social cuts, client review copies, and anything where you need an H.264 or H.265 file without fussing over bitrate settings.
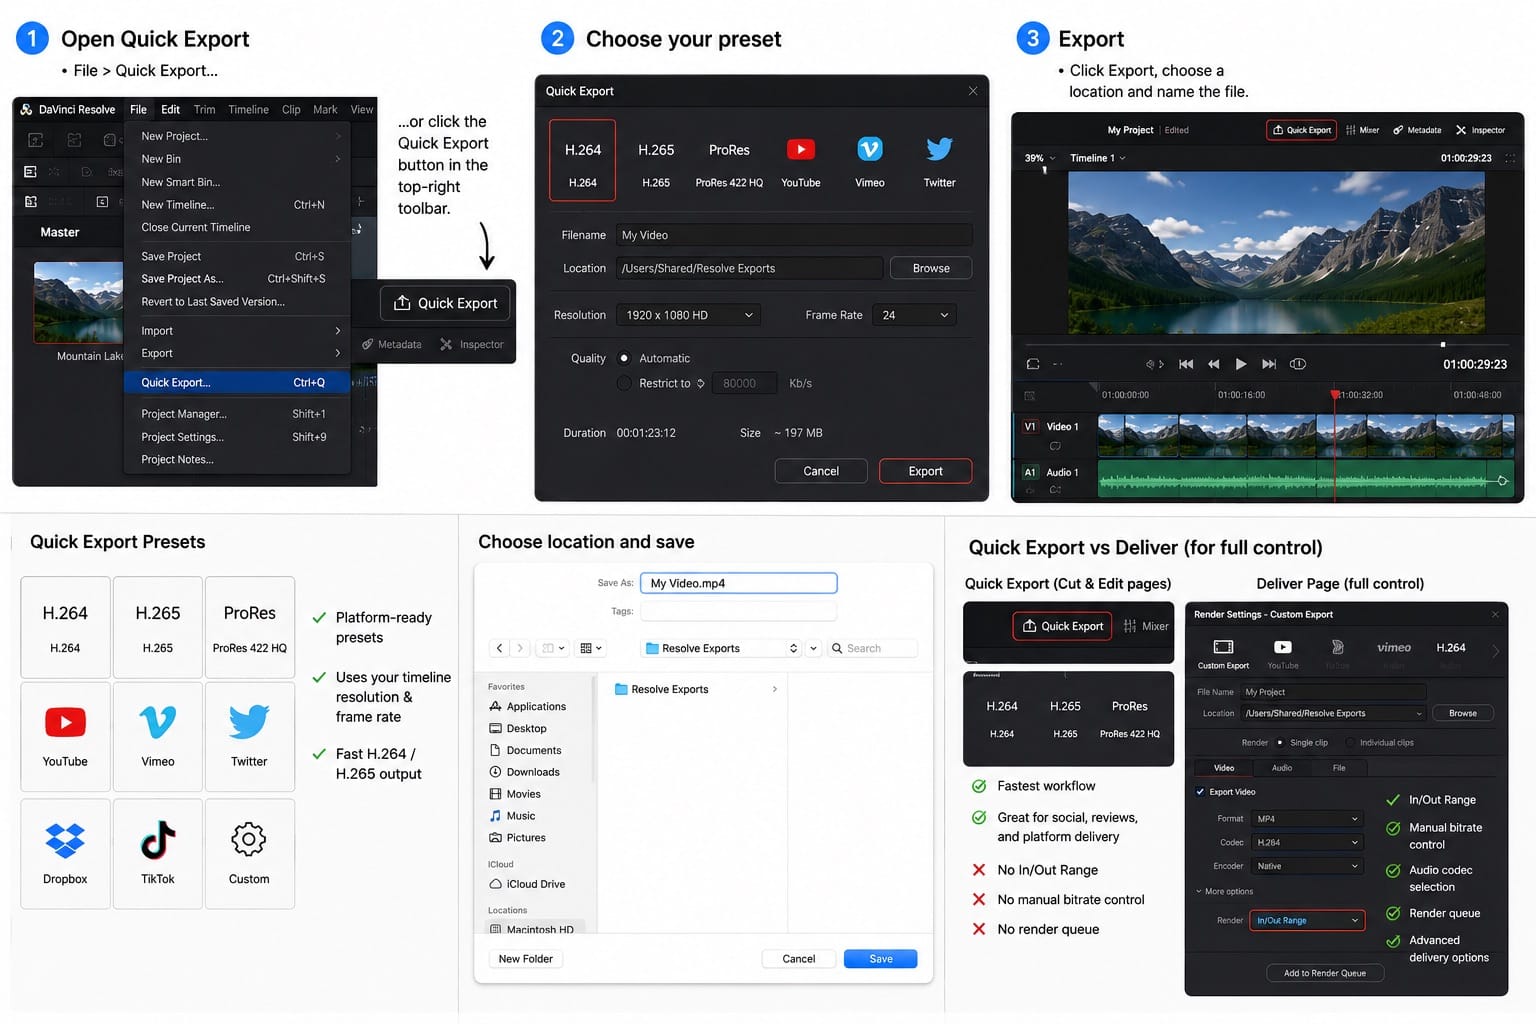
Go to File > Quick Export, or click the Quick Export button in the top-right toolbar. A window opens with preset options: H.264, H.265, ProRes (on Mac with appropriate version), YouTube, Vimeo, Twitter, and a few others. Pick your destination, click Export, choose a save location, name the file, and you're done.
The YouTube and Vimeo presets pull platform-recommended settings automatically and pick up your timeline resolution and frame rate. For a quick client review file or a social cut, this is all you need.
What Quick Export does not give you: the same explicit In/Out Range control, manual bitrate control, audio codec selection, render queue management, or the advanced delivery options available on the Deliver page. If you need a guaranteed partial-timeline export with full control over which section renders, use the Deliver page and set Render to In/Out Range.
How the DaVinci Resolve Deliver Page Works (7 Steps)
The Deliver page has 3 panels. Top-left is Render Settings — this is where you configure your output. Center is the timeline preview. Top-right is the Render Queue. You stage jobs in the queue, then render them all in one pass. That means you can set up 4 different exports — a full master, a client review cut, a YouTube version, a social crop — and walk away while they process in sequence.
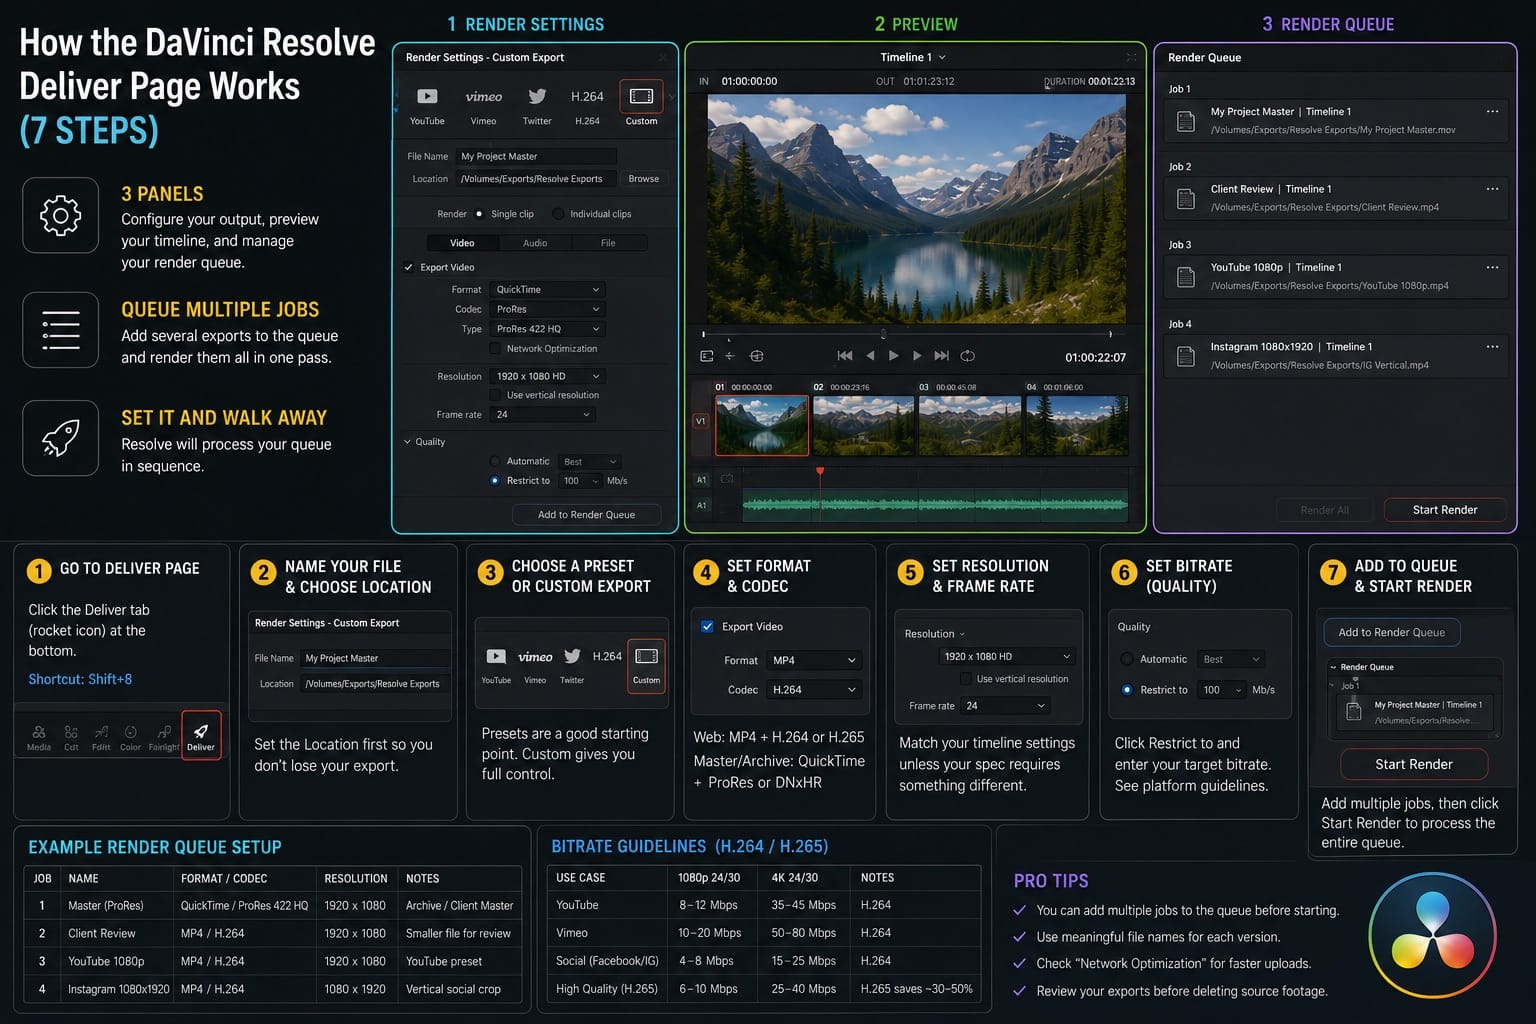
- Click the Deliver tab (the rocket icon at the bottom of the Resolve interface). Keyboard shortcut: Shift+8.
- Name your file and choose a location first, in the Render Settings panel. Set the Location field before anything else. Resolve does not always default to your project folder and it's easy to lose an export to the wrong directory.
- Select a preset or choose Custom Export. YouTube, Vimeo, and other platform presets are decent starting points. Custom gives you full control over every setting.
- Set Format and Codec. For web delivery: Format MP4, Codec H.264 or H.265. For archive or client masters: Format QuickTime (.mov), Codec ProRes 422 HQ or DNxHR HQ.
- Set resolution and frame rate. Match your timeline settings unless your delivery spec requires something different. The "Match Timeline Settings" checkbox handles this automatically.
- Set your bitrate in the Quality section. Click "Restrict to" and enter your target value. See the table below for platform-specific numbers.
- Click Add to Render Queue, then Start Render in the queue panel on the right. Resolve shows progress with a percentage and time estimate.
One thing most step-by-step guides skip: after you click Add to Render Queue, you can change settings and add a second job before hitting Start Render. That's the whole point of the queue. Use it.
DaVinci Resolve Export Settings: YouTube Official Bitrates and Practical Targets
Most tutorials quote numbers without distinguishing between YouTube's official recommended minimums and what actually produces a clean-looking upload. They're not the same thing. YouTube's official recommended upload encoding settings give the floor. Uploading above that floor gives the re-encode chain more to work with.
| Delivery Target | Format | Codec | Bitrate | Notes |
|---|---|---|---|---|
| YouTube 1080p 30fps SDR | MP4 | H.264 | 8 Mbps official; 12–15 Mbps practical | YouTube re-encodes everything; more headroom helps |
| YouTube 1080p 60fps SDR | MP4 | H.264 | 12 Mbps official; 15–18 Mbps practical | High-motion footage benefits from the higher end |
| YouTube 4K 30fps SDR | MP4 | H.264 official / H.265 practical | 35–45 Mbps official | YouTube's official page recommends H.264. H.265 is a practical 4K upload alternative from Resolve for smaller files; test your workflow |
| YouTube 4K 60fps SDR | MP4 | H.264 official / H.265 practical | 53–68 Mbps official | Target the upper end for complex footage |
| Instagram Reels | MP4 | H.264 | 12,000–15,000 Kb/s | Platform recompresses aggressively; check Meta's current specs |
| TikTok | MP4 | H.264 | 12,000 Kb/s | 1080×1920, 30fps; check TikTok's current creator guidelines |
| Client review | MP4 | H.264 | 20,000 Kb/s | Reasonable quality, manageable file size for transfer |
| Archive / master | QuickTime (.mov) | ProRes 422 HQ or DNxHR HQ | N/A (constant quality) | Check platform and version codec support before promising delivery |
On the YouTube 4K point: uploading in 4K gives YouTube a higher-quality source file to work from, which makes VP9 or AV1 playback more likely on supported devices. YouTube's final codec choice depends on the viewer's device and browser — you don't control it directly — but a higher-resolution, higher-bitrate upload generally gives you a cleaner result at playback.
Social media bitrates for Instagram and TikTok shift with platform updates. The values in this table are current working targets as of 2026, but treat them as guidelines rather than guarantees. Check Blackmagic's support documentation and each platform's creator guidelines before high-stakes delivery.
DaVinci Resolve Audio Export Settings You Should Not Skip
The number of times I've gotten a file back from a client saying there's no audio — and then traced it to a single unchecked box — is embarrassing. Audio settings live in a separate tab inside Render Settings and are easy to walk past entirely.
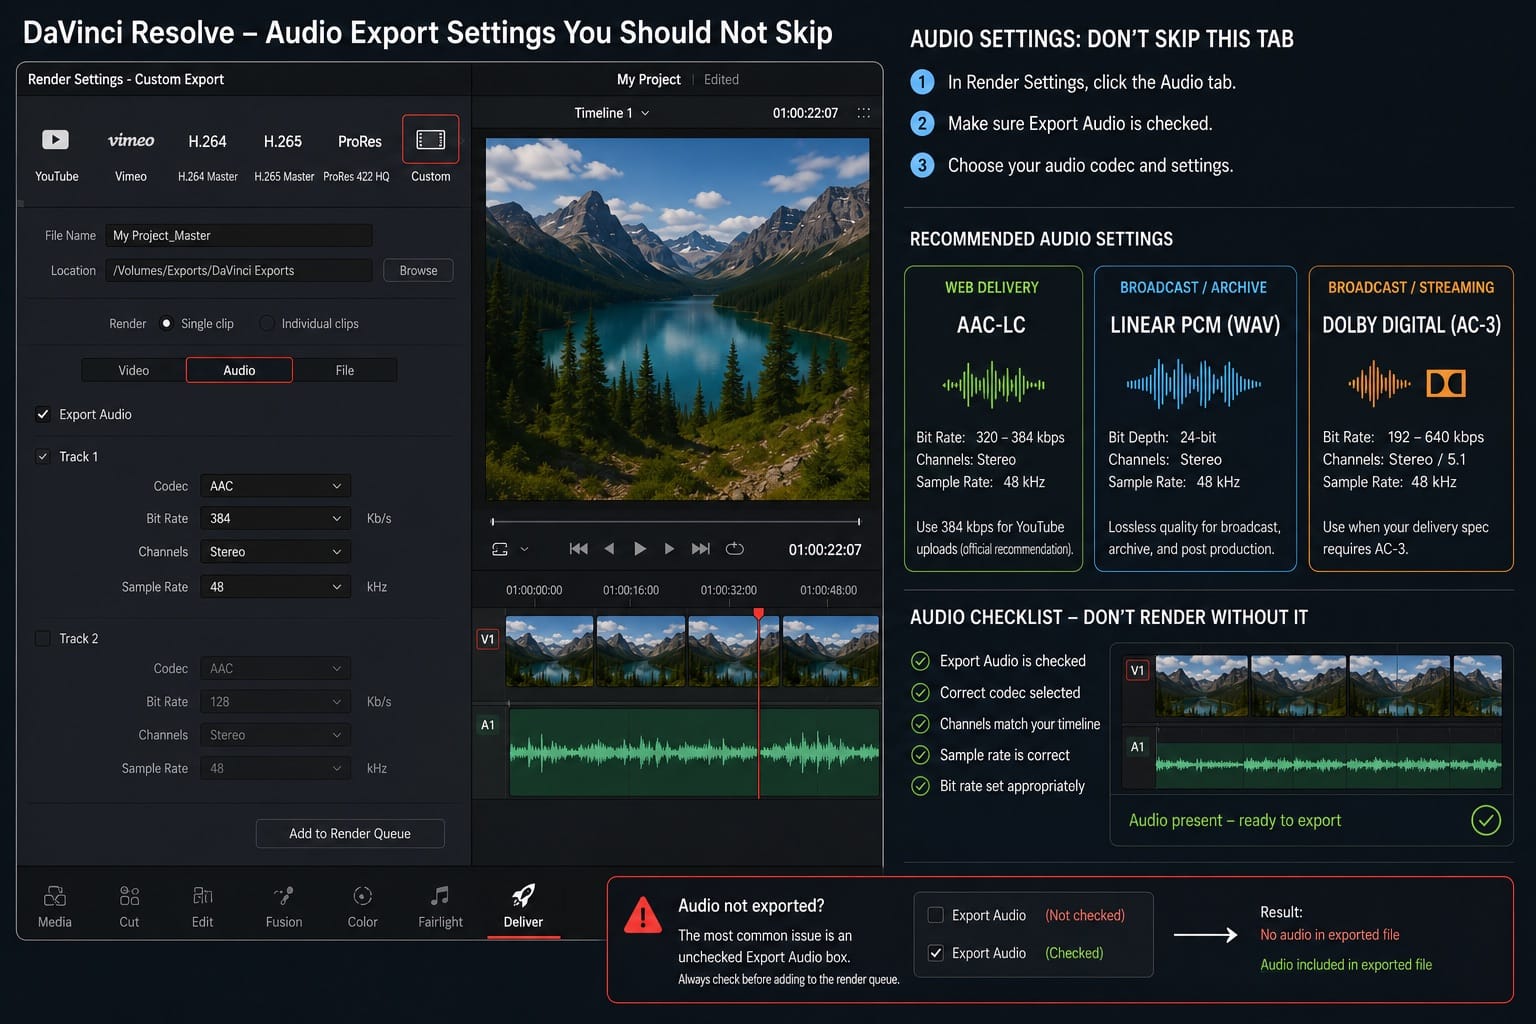
In Render Settings, click the Audio tab (next to Video). Make sure Export Audio is checked. Then set your codec:
- AAC-LC at 320–384 kbps for web delivery. YouTube's official encoding settings recommend 384 kbps for stereo uploads; 320 kbps works fine for general web delivery but use 384 kbps if you want to match YouTube's recommendation exactly.
- Linear PCM (WAV) for broadcast, archive, or any deliverable going to post. Lossless, larger files, but correct for anything that will be reprocessed.
- Dolby Digital (AC-3) if your delivery spec requires it. Broadcast and some streaming platforms specify this.
Single Clip vs Individual Clips: Choose the Right Render Mode
This one trips people up constantly, and it causes the most confusing export failures because the file looks fine — correct length, video intact — but the audio is wrong or missing entirely.
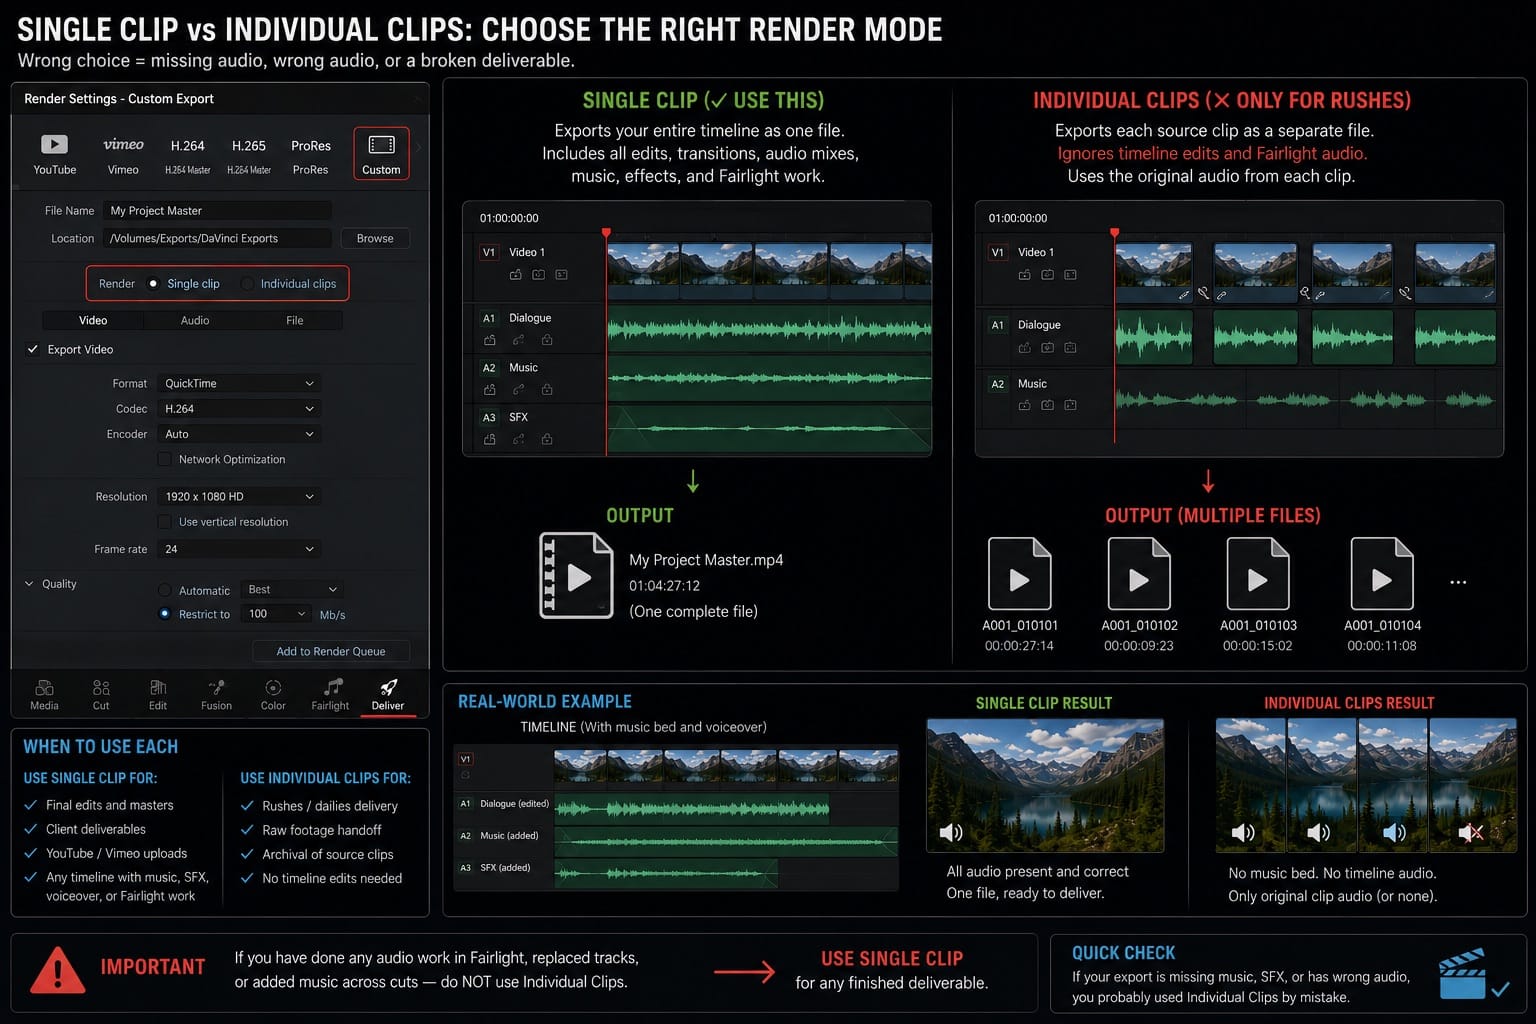
In Render Settings, look for the render mode option near the top: Single Clip or Individual Clips. Individual Clips is a rushes delivery workflow. It exports each clip as a separate file and pulls the source audio from each clip rather than the edited timeline audio. If you've done any audio work in Fairlight, replaced tracks, or laid music across cuts, Individual Clips discards all of that.
For anything that should produce one finished output file — a completed edit, a client deliverable, a YouTube upload — use Single Clip. Always.
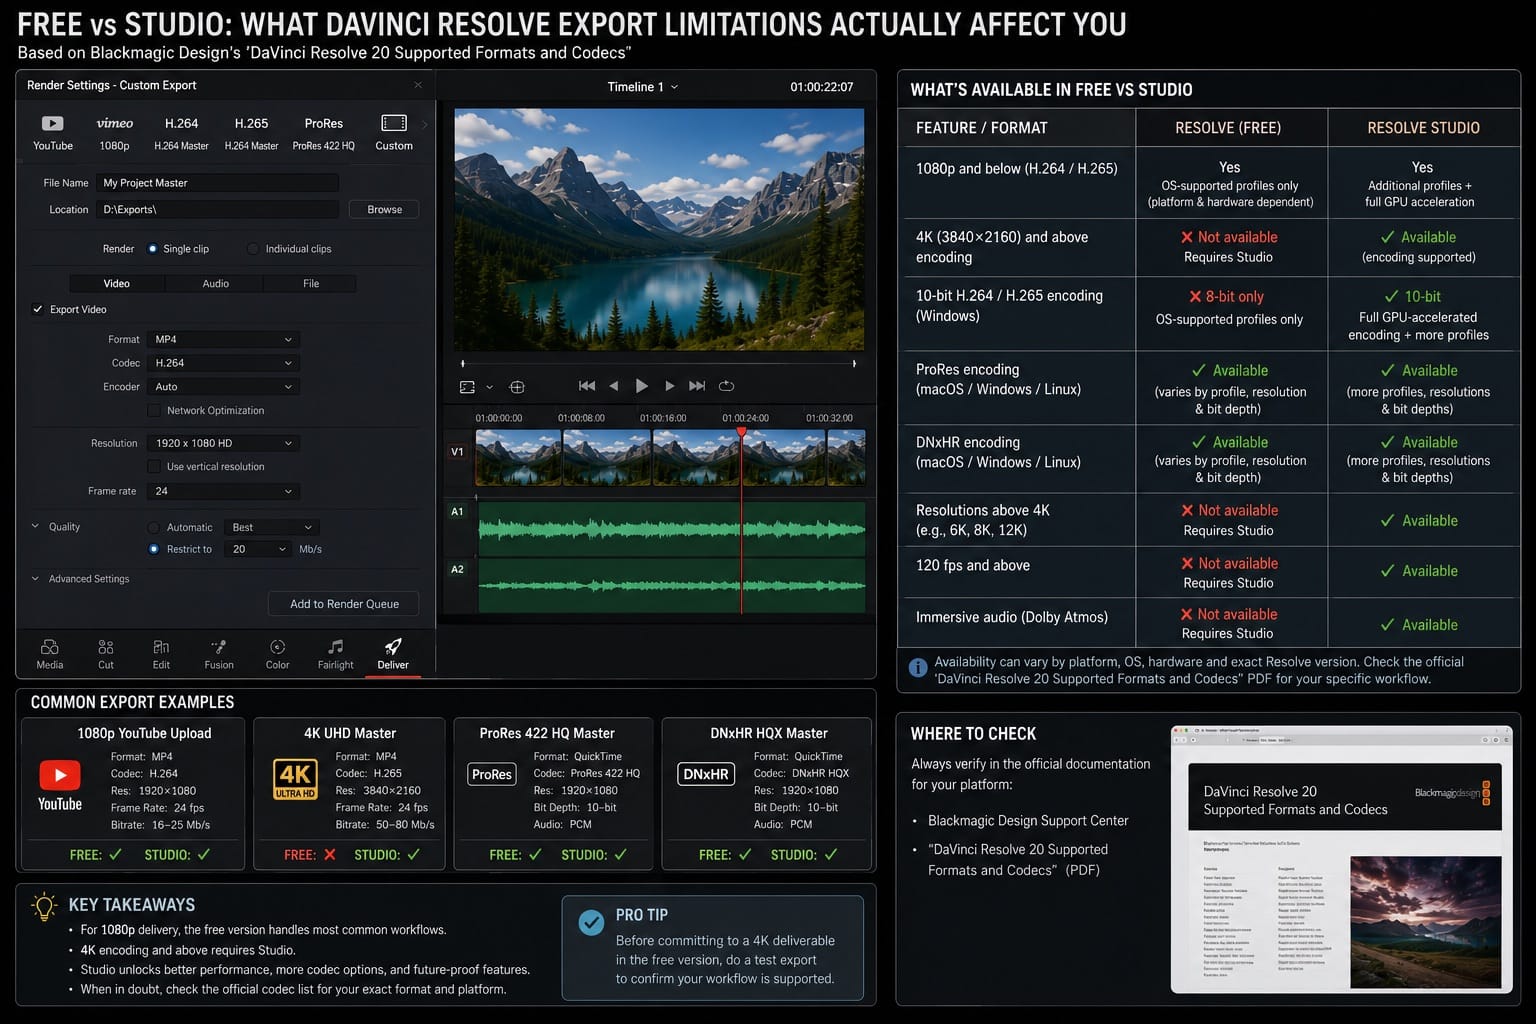
Free vs Studio: What DaVinci Resolve Export Limitations Actually Affect You
Blackmagic's official Resolve 20 Supported Formats and Codecs list is explicit on one point: encoding video at resolutions of 4K and above requires DaVinci Resolve Studio. That note appears in the codec list for macOS, Windows, and Linux.
What this means in practice:
- 1080p and below: Common OS-supported H.264 and H.265 encode paths are available in the free version, but exact profiles and GPU acceleration depend on platform, hardware, and Studio licensing. On Windows, the free version uses OS-supported profiles only; Studio unlocks additional profiles and full GPU-accelerated encoding.
- 4K and above: Requires Studio, per Blackmagic's current codec documentation. If you need to deliver UHD 4K (3840×2160) or DCI 4K from the free version, verify this against your installed version before committing to that workflow for a client.
- 10-bit H.264/H.265: The free version on Windows encodes using OS-supported profiles only, which in practice means 8-bit. Studio unlocks full GPU-accelerated encoding and additional profiles.
- ProRes and DNxHR encoding: Both are listed as available in the free version across macOS, Windows, and Linux in the codec PDF. This is a more nuanced picture than a blanket "requires Studio" claim. That said, specific profiles, resolutions, and bit depths vary. Check the codec list for the exact format and platform combination you need before quoting delivery to a client.
- Resolutions above 4K, 120fps, immersive audio: All Studio-only.
For 1080p delivery — social media, client review files, most commercial work — the free version handles the job. The 4K encoding limitation is where working editors get caught off guard, particularly those upgrading from older Resolve versions where the behavior may have differed.
DaVinci Resolve Export Not Working: 4 Common Problems
Something goes wrong on a job every few months that I'd otherwise call routine. These are the issues I run into most:
Export has no audio. Work through this in order: (1) check that Export Audio is ticked in the Audio tab of Render Settings, (2) confirm you're in Single Clip mode and not Individual Clips, (3) check that your audio tracks in Fairlight are routed to Bus 1. One of those three covers the vast majority of silent export reports.
Export file is much larger than expected. Your bitrate is too high, or you're rendering to ProRes or DNxHR when you meant H.264. Look at the Quality section in Render Settings and lower the "Restrict to" value. A standard 1080p web export should sit in the 8,000–15,000 Kb/s range.

Colors look different in the exported file. For SDR delivery, YouTube recommends using BT.709 (Rec.709) consistently through your project and export settings. If you're on Mac and seeing a gamma shift in QuickTime Player or on upload, Rec.709-A is sometimes used as a workaround because it adjusts the gamma interpretation for Apple's video frameworks. It's a Mac-specific playback correction, not a universal export standard. Test your export in your target player before making any gamma tag change your default workflow.
Render is extremely slow. GPU acceleration may be off. Go to DaVinci Resolve > Preferences > Memory and GPU and check that your GPU is listed and enabled. For complex timelines with heavy node trees or ResolveFX, use Render Cache before exporting: Playback menu > Render Cache > Smart. Resolve pre-renders the demanding sections so the final export runs faster.
How to Export Just Part of Your Timeline in DaVinci Resolve
The default on the Deliver page is to render the entire timeline. To render a section, mark in and out points on the Deliver page timeline: press I for in, O for out. Then in Render Settings, change "Entire Timeline" to In/Out Range before adding to the queue.
Running a 30-second test render on a complex grade before committing to a full 90-minute export is one of those habits that takes 4 minutes and saves 47 minutes. I do it on every long-form job now.
Where Did DaVinci Resolve Save My Export?
More common than it should be. Resolve saves to whatever directory you set in the Location field in Render Settings — not necessarily your project folder, and not always where you last exported. If you can't find the file, check the Location field before doing anything else. It shows the exact path.
If you forgot to set it before rendering, look at the completed job in the Render Queue. Hover over or click the finished entry and the output path is usually shown. Alternatively, go to File > Show Project in Finder (Mac) or the equivalent on Windows to open the project directory, then check whether the export ended up there by default.
Setting a dedicated output folder in Render Settings before every job is one of those 7-second habits that prevents a 15-minute file hunt at the end of a long session.
Frequently Asked Questions
How do I export an MP4 from DaVinci Resolve?
On the Deliver page, set Format to MP4 and Codec to H.264 (or H.265 for smaller files). Confirm Export Audio is checked in the Audio tab, add to the Render Queue, and click Start Render.
Can the free version of DaVinci Resolve export 4K?
According to Blackmagic's current Resolve 20 codec documentation, encoding video at resolutions of 4K and above requires DaVinci Resolve Studio. If you need UHD 4K or higher output, verify this against your exact version and platform combination before committing to that delivery for a client.
Why does my DaVinci Resolve export have no audio?
The most common causes in order: Export Audio is unchecked in the Audio tab of Render Settings; you're in Individual Clips render mode instead of Single Clip; or your Fairlight audio tracks aren't routed to Bus 1. Check those three things before anything else.
What's the best export format for YouTube?
For 1080p SDR at 30fps: H.264 MP4, 8 Mbps minimum per YouTube's official guidelines, 12–15 Mbps for a cleaner upload. For 4K SDR at 30fps: H.264 MP4 at 35–45 Mbps per YouTube's official recommendation. H.265 is a practical alternative at 4K if file size matters, but YouTube's official encoding page recommends H.264. YouTube recommends BT.709 as the color space for standard SDR uploads.
How do I export only part of my timeline?
On the Deliver page, press I and O to mark in and out points on the timeline preview. Switch from "Entire Timeline" to "In/Out Range" in Render Settings, then add to the queue and render.
Does DaVinci Resolve export ProRes and DNxHR on Windows?
Per Blackmagic's Resolve 20 codec list, both ProRes and DNxHR encoding are listed as available on Windows in the free version. Specific profiles, resolutions, and bit depths vary by codec and platform. Check the official codec PDF for the exact combination you need before delivery.
Compare DaVinci Resolve Free vs Studio for a full breakdown of which features and formats require an upgrade.
For codec and format reference, see DaVinci Resolve system requirements for version-specific hardware and software support details.
New to the Deliver page workflow? The beginner's guide to DaVinci Resolve covers how the page structure fits into a complete post workflow.