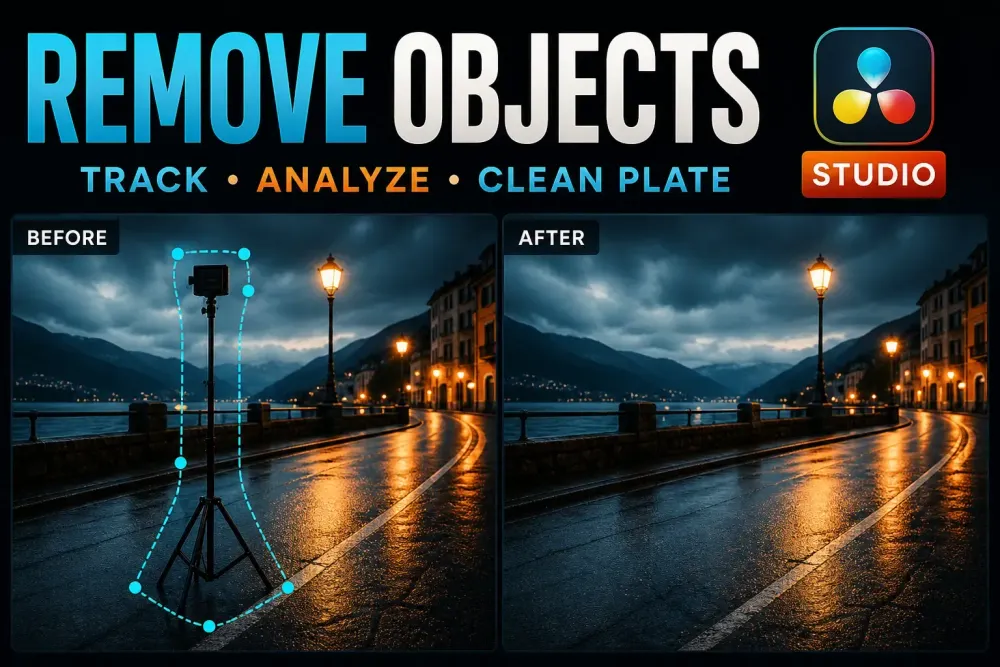
Object Removal hunts through neighboring frames for the background your masked subject is hiding. It's quick, and often convincing, when a small object crosses a stable surface that shows up clean somewhere else in the shot.
It's the wrong first pick when a person blocks unique scenery for the whole take, when a moving reflection has to vanish too, or when the repair crosses another foreground subject. If the fix is part of a bigger grade, the Color task map keeps tracking, correction and cleanup in a sensible order.
Object Removal is a DaVinci Resolve Studio feature. Blackmagic says it works best on a moving object that passes over a temporally stable background, or on lens dirt while the camera moves, and that smaller objects do better than large ones. The simplest current Color-page workflow keeps a tracked Power Window and the Object Removal effect on the same Corrector node, then runs Scene Analysis.
A separate matte node feeding a key input can earn its place in an advanced node tree, but it's optional, not a required Blackmagic step. I rechecked every control below on October 1, 2026 against the current DaVinci Resolve 21 Reference Manual, in its 21.1 edition.
Choose the removal method from the shot
| Problem | Best first method | Why |
|---|---|---|
| Small object crosses a background revealed elsewhere | Object Removal in Studio | Temporal analysis can borrow clean background from nearby frames |
| Small blemish, sensor spot, or fixed object with clean texture nearby | Patch Replacer in Studio | A controlled local source is usually cleaner than scene-wide analysis |
| Face or license plate only needs privacy | Tracked blur or mosaic | No invented background is required |
| Large foreground subject against a changing scene | Rotoscope plus a separate clean plate or replacement | The original may never reveal enough background |
| Object touches the frame edge | Crop, reframe, cover, or manual paint | Temporal fill often lacks boundary information |
| Complex parallax, reflection, or moving shadow | Segmented masks and Fusion cleanup | One automatic pass cannot model every interaction |
Inspect the entire shot before drawing a mask
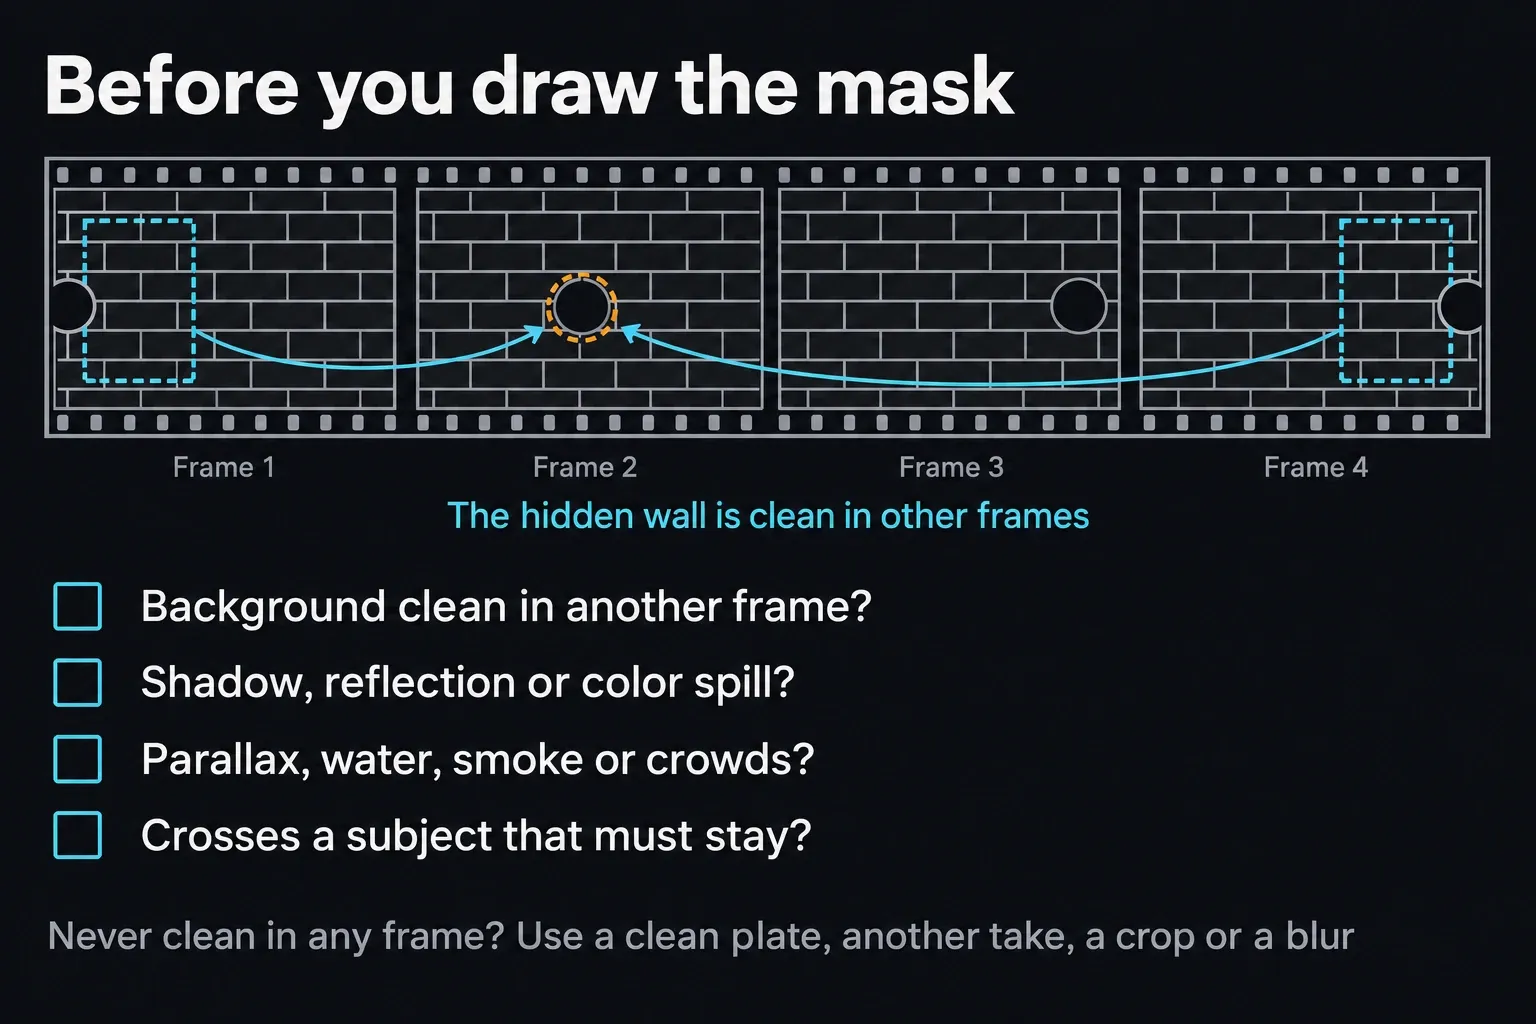
Scrub the whole shot, first frame to last, and answer four questions before you draw anything:
- Does every part of the hidden background show up clean in another frame?
- Does the object cast a shadow, reflection or color spill that also has to go?
- Does the background have parallax, water, smoke, crowds, foliage or repeating motion?
- Does the object cross another foreground subject that has to stay?
If the background is never visible, Scene Analysis has no authentic detail to recover. Your options are a separately photographed clean frame, a controlled patch from nearby, another take, a crop or a designed cover. For privacy work, a tracked blur is often more honest and more stable than invented scenery.
Build a clean node structure
Work on the Color page, and duplicate the timeline or create a new grade version before you touch the shot. For Blackmagic's simplest documented setup, work like this:
- Create or choose one Corrector node for the repair.
- Draw a Power Window that hugs the unwanted object, with just enough softness for its edge and motion blur.
- Track or keyframe that Window through the whole shot, fixing slips by hand.
- Drag Object Removal from Resolve FX Revival onto that same Corrector node.
- Run Scene Analysis, review the result, and run it again whenever you change an Analysis parameter.
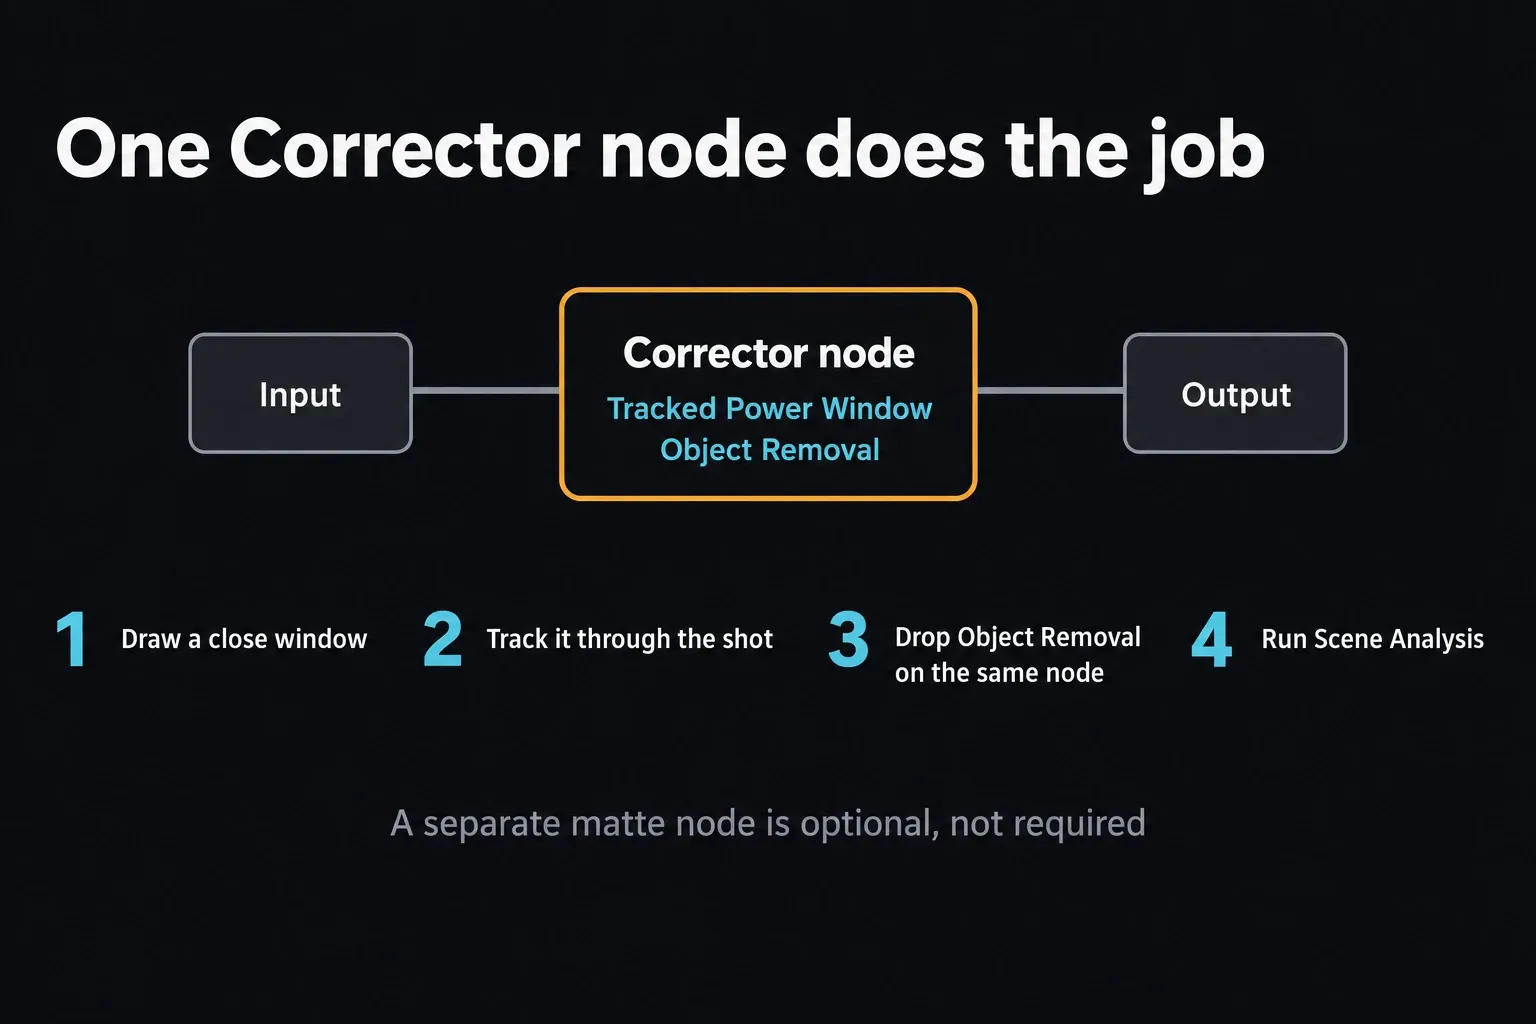
Keeping everything on one node strips needless routing out of the beginner path, and the manual also lets you isolate the object with a qualifier inside that node. If an existing grade needs a dedicated Window node, its key output can feed a separate effect node, as some professional workflows show. Label that branch clearly and check the key polarity; don't copy a node graph blindly.
Draw the smallest stable window
A huge window forces the effect to reconstruct more pixels and drags more background motion into the problem. A window that cuts through motion blur, a shadow or the object's changing silhouette leaves visible residue you'll spot on playback. Start tight, add enough softness for a natural edge, and expand only where the object or its contamination actually reaches.
One Window isn't always enough. A person, their shadow and a reflection can move differently and may each need separate treatment. Split a long shot when the best mask shape or tracking model changes. One oversized matte forced through every condition usually fails somewhere.
If a moving subject needs isolating for a different treatment, not removal, the Magic Mask guide is the better fit. Don't force Object Removal to do another tool's job.
Track, then correct the track manually
Track forward and backward from a frame where the object and background are easy to read. Watch the window itself, not just the tracker graph, and correct slips where the subject is occluded, leaves frame, changes scale or crosses a similar texture. In Studio you can also switch the Color tracker to IntelliTrack, which Blackmagic describes as less likely to fail when a subject slips briefly behind something.
Tracking the object isn't always the same as tracking the surface that will replace it. For a sign on a wall during a camera move, the planar motion of the wall can matter more than the sign's outline. When the Color tracker runs out of road, the Fusion tracking guide covers point, planar and camera-tracking choices.
Run Scene Analysis, then inspect the whole shot
With the Window and effect in place, click Scene Analysis. Resolve searches across the clip for replacement detail. Turn on Assume No Motion only when the camera is locked off and the object moves through the frame; in that case the manual says it greatly simplifies the background analysis.
Scene Mode changes what the analysis studies. Background looks at everything except the object region, Boundary concentrates on the area around it, and Object is meant for an unwanted feature that moves with the background, such as a sticker on a window while the camera moves. Analysis Boundary sets the size of that boundary.
Play the analyzed result at normal speed, then step through the entry, the strongest motion, any occlusions and the exit. Show Mask Overlay highlights the mask Resolve is actually using in red. Gray fill or gray fringing isn't a finished patch. It's Resolve telling you the current settings didn't find enough background detail.
Change Scene Mode, Analysis Boundary, Assume No Motion or any other Analysis control, and you need to run Scene Analysis again before you judge the revision.
Adjust search range, blend mode, and clean plate
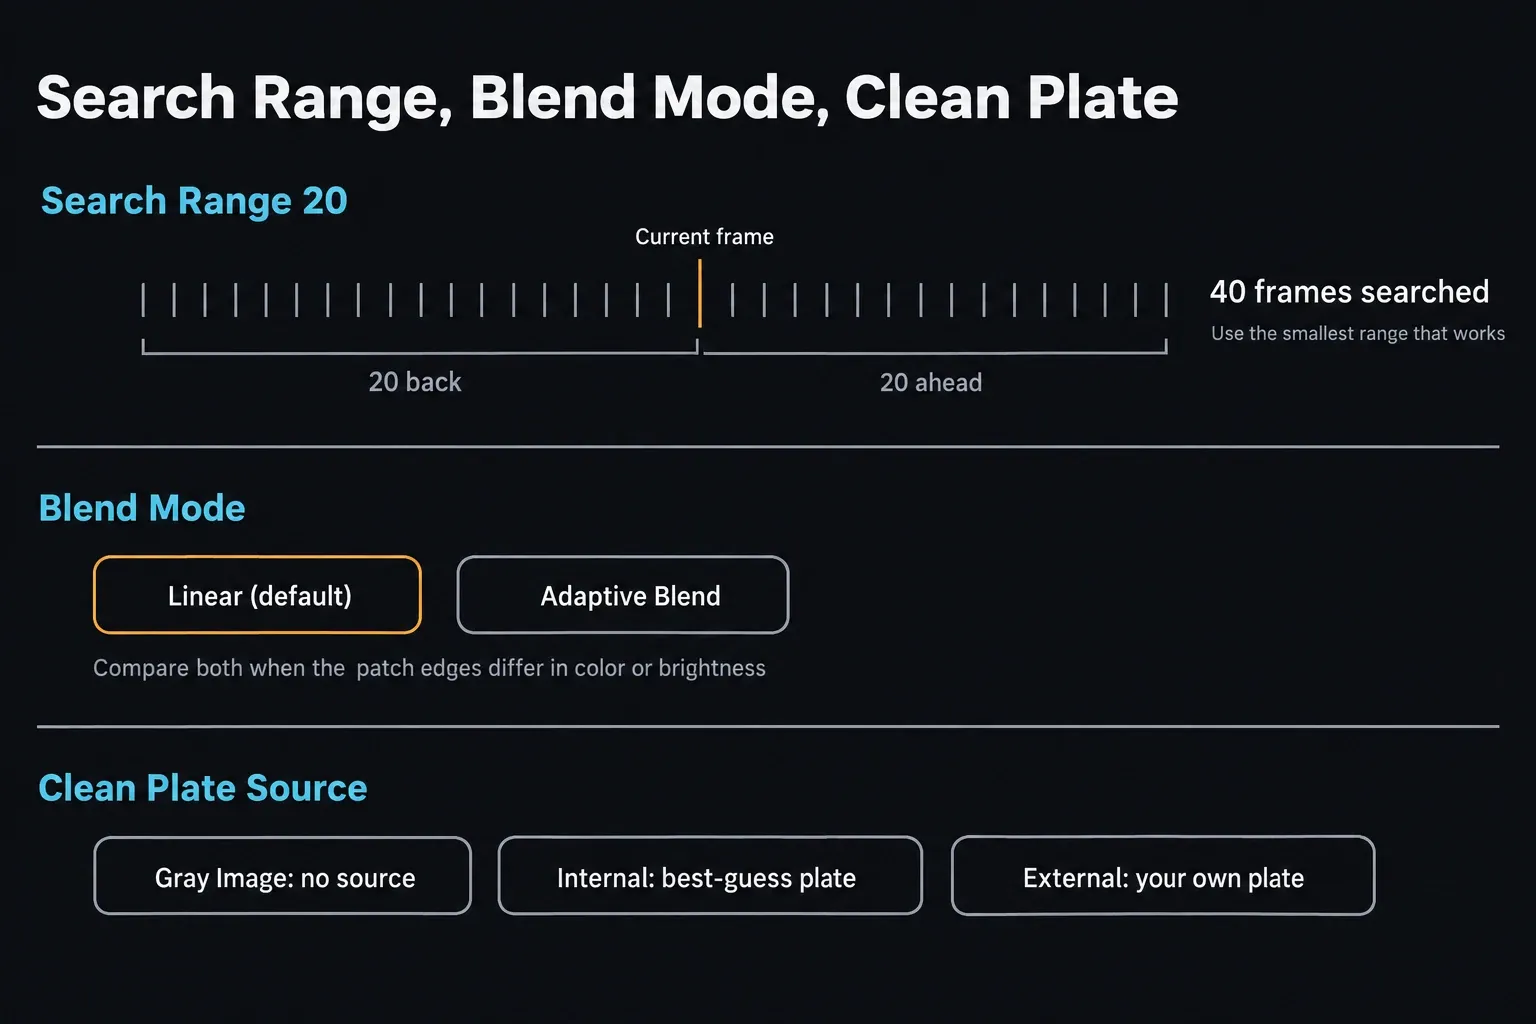
Search Range sets how many frames either side of the current frame Resolve searches for replacement detail. At 20, it looks 20 frames each way, 40 in total. Don't crank it up by reflex. Blackmagic says you'll generally get the best results from the smallest range that gives an acceptable result, and my read is that a wider search pulls in frames with less relevant perspective, focus or lighting. Raise it only when usable background exists farther away, then inspect the whole shot again.
Linear is the default Blend Mode, a simple cloning operation. Adaptive Blend often blends a filled patch more smoothly, but the manual flags the exception: it can do worse where the edges of the patch differ in color or brightness from the background. On a shot like that, compare it against Linear before you commit.
Use Build Clean Plate when frames stay solid gray or the automatic fill is incomplete, not as a ritual final click. Clean Plate Source decides where the plate comes from: Gray Image is effectively no source, Internal asks Resolve to assemble a best-guess plate, and External accepts a plate from another node. Show Clean Plate lets you see what's actually being used.
Fix the artifacts one type at a time
The object edge remains visible
Expand or reshape the matte where motion blur, a shadow or edge spill reaches past the object. Adjust softness carefully: too much reveals original pixels, too little leaves a cutout edge. Re-track after any shape change, and re-run Scene Analysis whenever an analysis setting changes.
The fill flickers or boils
Split the shot where perspective, lighting or occlusion changes. Return Search Range to the smallest value that works, correct the track and use a more controlled clean plate. Add matching grain only once the underlying patch is stable.
The patch slides against the background
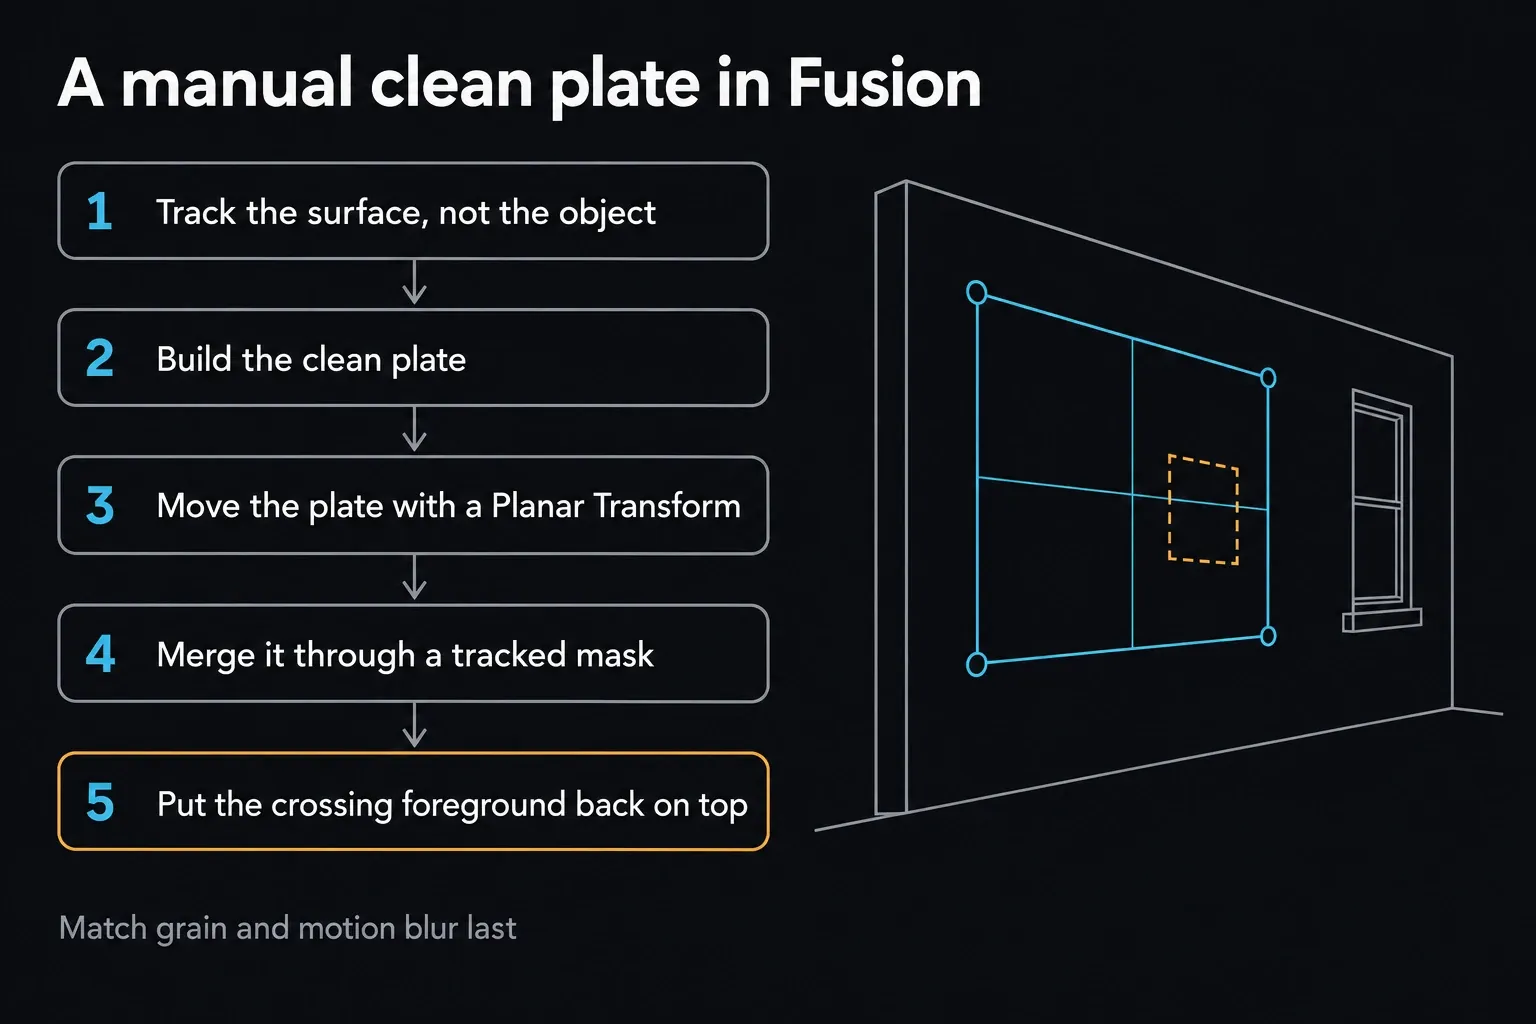
The plate motion doesn't match the surface. Track that surface in Fusion, transform or corner-pin a clean plate, then reveal it through a matte. An accurate object mask won't make a flat clone follow strong parallax.
A shadow or reflection gives the object away
Remove or rebuild that interaction separately. The object matte may miss a soft moving shadow, a mirror image or colored light cast onto nearby surfaces.
The result is soft compared with the shot
Check whether the source plate came from a frame with different focus or motion blur. Once the geometry is correct, match sharpness, blur direction, noise, grain and exposure.
How to use Patch Replacer in DaVinci Resolve
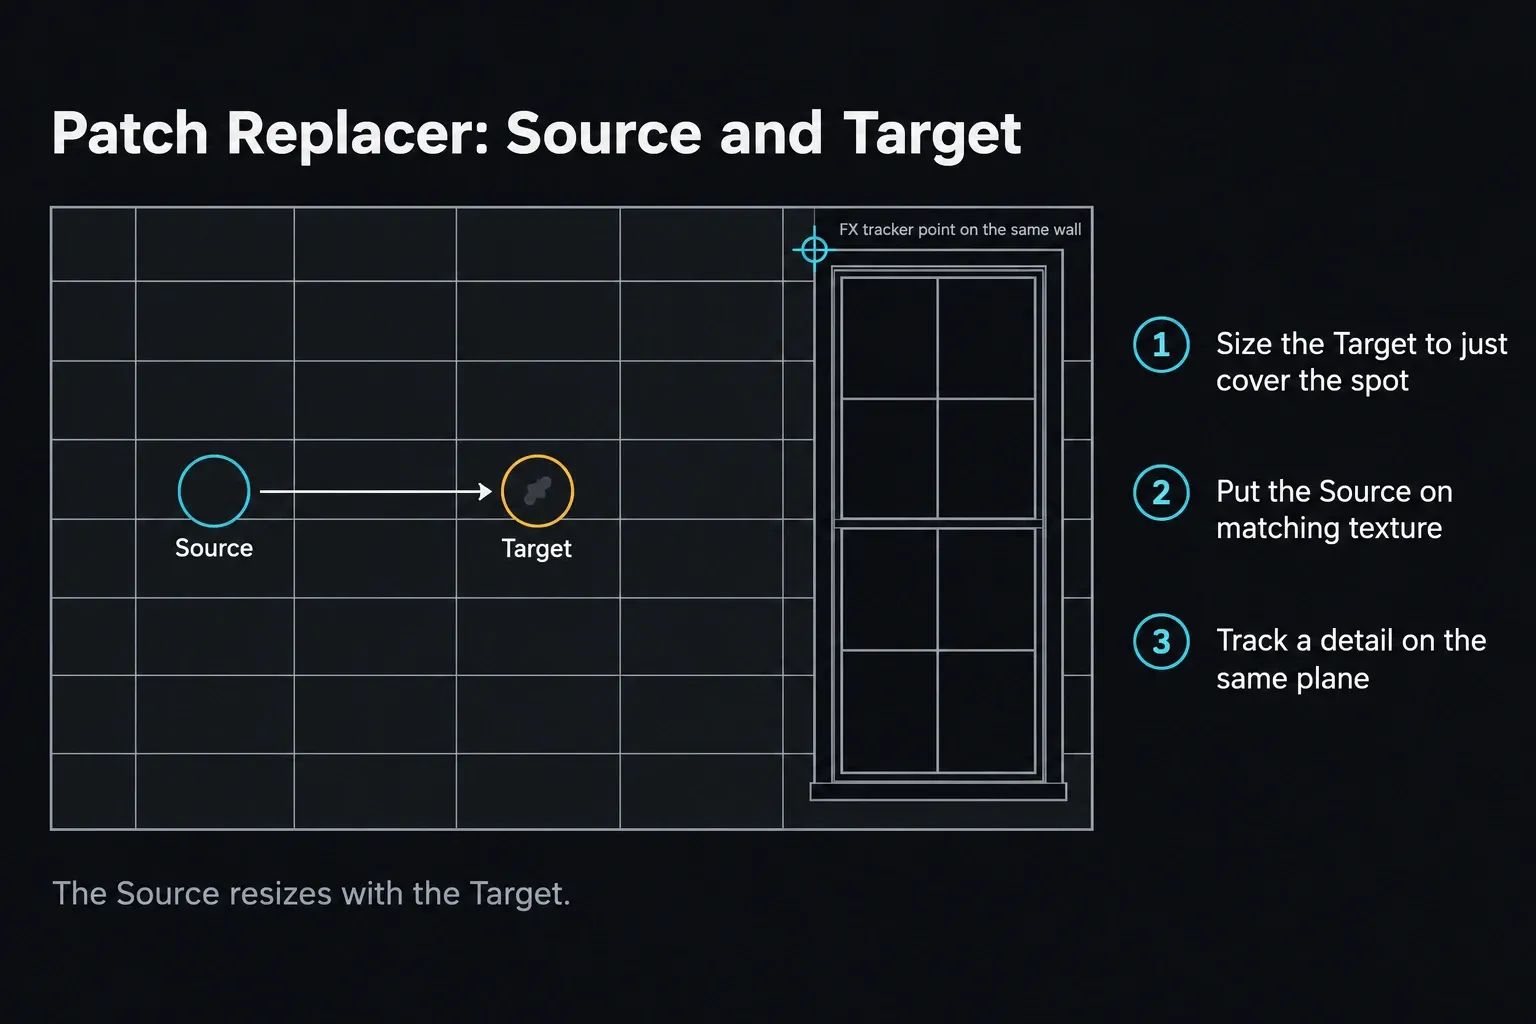
Use DaVinci Resolve Patch Replacer when the defect is small and a clean piece of matching texture exists elsewhere in the same frame. It's a controlled local repair, not a scene-reconstruction tool. When you add it, two patches appear with an arrow between them. The patch behind the arrow is the Source that supplies pixels; the patch in front is the Target that covers the unwanted mark. Patch Replacer is a DaVinci Resolve Studio feature too.
Choose a source patch that can survive the shot
A good Source comes from the same visual surface as the Target. Match texture scale, focus, grain, brightness and direction of light before you worry about edge softness. On a wall, sample the same wall plane. On skin, choose nearby skin with similar detail and shading. A patch from a different depth or angle can look convincing on one frame and slide the moment the camera moves.
Stay away from distinctive features that give the copy away: a second window, a repeated screw, a sharp crack, a cloud edge, an eye or facial feature. Repeating texture is easiest to spot in motion, especially when the Target sits near another copy of the sampled detail. Scrub the entire shot before you commit to a Source, because an area that's clean on the first frame may be blocked or lit differently later.
Place Source and Target on the Color page
- Create a dedicated Corrector node for the repair, then add Patch Replacer from Resolve FX Revival.
- Drag the Target over the unwanted spot and resize it with the corner controls until it just covers the defect. The Source resizes to match.
- Move the Source to clean texture on the same surface, at the same perspective.
- Choose a Region Shape that suits the repair, not the object category. A rounded shape can suit a sensor spot; a squarer one may sit more naturally on a sign or wall detail.
- Use Blur Shape Edges to remove the visible boundary, but don't lean on a wide blur to cover a poor source match.
- Play the shot before tracking. If the patch already shows a texture, lighting or perspective mismatch, tracking will only make that mismatch move.
Choose the Fill-in Method
The four modes solve different small defects. Start with the mode that fits the repair; cycling through them at random mostly wastes time.
| Fill-in Method | Use it when | Watch for |
|---|---|---|
| Clone | You need a direct copy of clean source texture. | A hard edge, obvious repetition, or lighting that does not match the Target. |
| Blend Clone | The Source has the right detail but the Target has different local lighting. | A soft or muddy result if geometry, scale, or texture direction is wrong. |
| Fast Mask | A very small blemish can be filled from neighboring pixels without a Source patch. | A grid-like pattern when the patch grows too large. |
| Blend Mask | A tiny local defect needs a source-free blended fill. | Excessive blur on a larger repair. |
Clone and Blend Clone use the Source, because they work from sampled detail. Fast Mask and Blend Mask remove it and fill from the pixels around the Target. That split tells you more than any claim that one mode is always better. In Blend Clone, Keep Original Detail merges detail from both patches, and Variability sets how solid the center of the patch is.
Track the patch with the FX Tracker
Patch Replacer tracks with the FX mode of the Color-page Tracker palette. Select FX, click Add Tracker Point, then drag the crosshair to a high-contrast detail that belongs to the same plane of motion as the repair. Track forward and backward through the range you need, and judge the Target against the surface, not just the tracker graph. Studio's FX tracker also has an IntelliTrack setting, which Blackmagic says is more precise than the normal Point Tracker in most cases.
The tracker point doesn't have to sit inside the Target. It needs a stable feature whose movement represents the surface you're repairing. After tracking, you can reposition the effect and keep the tracked motion as an offset. Source Follows Track and Target Follows Track decide which patch follows that data, and Align Source to Target snaps the Source back over the Target when you want to start placement again. Source X/Y, Target X/Y and Target size can also be keyframed when one automatic motion path isn't the cleanest answer.
Diagnose Patch Replacer artifacts
- The patch slides: the tracker follows the wrong plane, the point loses contrast, or the surface changes in a way a simple track can't describe. Move the point to a stable same-plane feature, correct the track, or switch tracking methods.
- The edge is visible: tighten the Target, choose a better Region Shape, then add only enough Blur Shape Edges to hide the boundary.
- The texture repeats: move the Source away from a recognizable feature or choose a less distinctive sample. A technically perfect clone still fails once the audience notices the duplicate.
- The patch flickers: check whether the Source passes through changing light, focus, motion blur or occlusion. Keyframe the Source, segment the shot, or build a controlled clean plate.
- The result looks smeared: the repair may be too large for Fast Mask or Blend Mask, or the source detail may not match the Target. Shrink the patch or go back to a sampled Clone mode.
Know when Patch Replacer is the wrong tool
FX tracking can move a patch, but it can't teach a flat clone every change in rotation, perspective, light, surface deformation or foreground occlusion. A face turning while the jaw moves, fabric folding, or a camera move across a steeply angled surface can change the Source itself. More edge blur won't repair that geometry.
| Shot condition | Better route |
|---|---|
| Clean background appears in other frames | Object Removal with a tracked Power Window and Scene Analysis |
| A rigid flat surface changes position or perspective | Planar Tracker with a clean plate in Fusion |
| The surface bends, turns, or changes lighting across its shape | Surface Tracker with a stabilize-and-rewarp workflow |
| A foreground subject crosses the repair | Fusion clean plate plus a separate occlusion matte; Magic Mask can help isolate a suitable subject |
| The repair needs hand-shaped strokes or frame-specific cleanup | Fusion Paint with tracking, masks, and a controlled plate |
Keep Patch Replacer for the repair it does well: a small, local defect with believable texture nearby and manageable motion. Move to a tracked plate or surface workflow as soon as the patch has to behave like changing three-dimensional material.
Build a manual clean plate in Fusion when needed
Fusion is the controlled route when the repair needs planar tracking, several masks, paint strokes, a photographed plate or foreground occlusion. Build a clean background branch, match it to the shot, and merge it through a tracked mask.
It takes longer than the Color effect, but you can inspect each failure, where one automatic fill would hide it.
Keep foreground objects on a separate branch when they cross the repair. A single patch over the composite erases the wanted foreground along with the unwanted subject. Match motion blur and grain only after plate geometry, color and occlusion are stable. When the plate needs a controlled matte boundary, the Fusion rotoscoping workflow walks through it.
Use blur when removal is unnecessary
Privacy work doesn't need plausible invented scenery. For faces, addresses, account data and license plates, a tracked blur, mosaic or cover is clearer and often easier to defend. When concealment is the real requirement, follow the tracked face and background blur guide.
A logo, a lower third, a crop or a reframed shot can also solve a corner obstruction with no temporal artifacts at all. The best fix is the one the audience doesn't question, not the most computationally impressive effect.
Quality-control the final removal
- Watch at normal speed, and don't stare only at the repair.
- Step through the entry, exit, occlusions and the strongest camera move.
- Check at full resolution and through the actual delivery transform.
- Compare grain, texture, sharpness, exposure, and color.
- Check shadows, reflections, and foreground crossings.
- Render a short test in the final codec and watch it outside Resolve.
Compression can hide a small flaw or make a soft patch pulse more visibly. Review both a high-quality master and the delivery encode. Keep the unaltered shot and a version with the node disabled so you can compare.
Cache the result only after the matte is approved
Scene analysis and temporal reconstruction can be heavy to play in real time. A dropped frame during preview can look like a bad removal even when the rendered frame is fine. Inspect short ranges frame by frame first, then cache the approved node or clip so you can judge temporal stability at normal speed.
If a cached result goes stale after you change the window, track, source trim or clean plate, regenerate that cache before you approve the shot. Keep analysis data, render cache and original media conceptually separate. Deleting generated cache should never remove the only copy of the clean plate or source.
For a long take, split the work into logical sections wherever perspective, lighting or occlusion changes. Give each section its own reviewed matte and plate, then check the joins for a jump in texture or grain. One enormous analysis isn't automatically more consistent than several controlled repairs.
Frequently Asked Questions
Is Object Removal available in DaVinci Resolve Free?
No. Blackmagic lists Object Removal and Patch Replacer as DaVinci Resolve Studio features. On Free, you can crop, cover or blur the problem, or build a manual Fusion paint and clean-plate repair with the tools your exact version includes.
Why does Object Removal leave a blurry or gray patch?
Gray fill or fringing means the current analysis can't find usable background detail. A patch that's filled but soft can come from a source frame with different focus, motion blur or lighting. Tighten the matte and track, use the smallest Search Range that works, compare Blend Modes, then build or supply a clean plate only if you still need one.
Should I use Object Removal or Patch Replacer?
Use Object Removal when other frames reveal the hidden background and temporal analysis can rebuild it. Use Patch Replacer when the defect is small and clean matching texture exists elsewhere in the same frame. Both are Studio features.
If the surface rotates, changes perspective, bends, changes lighting or passes behind a foreground subject, move to a Planar Tracker, a Surface Tracker or a manual Fusion clean plate. Stretching either automatic repair past its limits rarely ends well.
Can Object Removal erase a person from any video?
No. A large person can hide unique background for the whole shot and bring shadows, reflections or foreground crossings along. Those shots may need a separate clean plate, rotoscoping, Fusion compositing, another take or a crop.
Why does the removal work on one frame but flicker in motion?
A still frame doesn't test temporal consistency. A slipping matte, changing source frames, parallax, grain or lighting can make the fill boil. Review every frame, segment the shot when conditions change, and stabilize the plate before you match texture.
