For motion tracking in DaVinci Resolve, use Tracker for one or more recognizable 2D features, Planar Tracker for a rigid surface such as a screen or sign, and Camera Tracker for a parallax-rich 3D solve. Conventional point and planar tracking work in Resolve Free; Camera Tracker and AI IntelliTrack require Studio. The controls below were checked against Blackmagic’s September 2026 Resolve 21.1 manual.
If a track slips, first check geometry, texture, mixed depths, reflections, motion blur, and anything crossing the analyzed pixels.
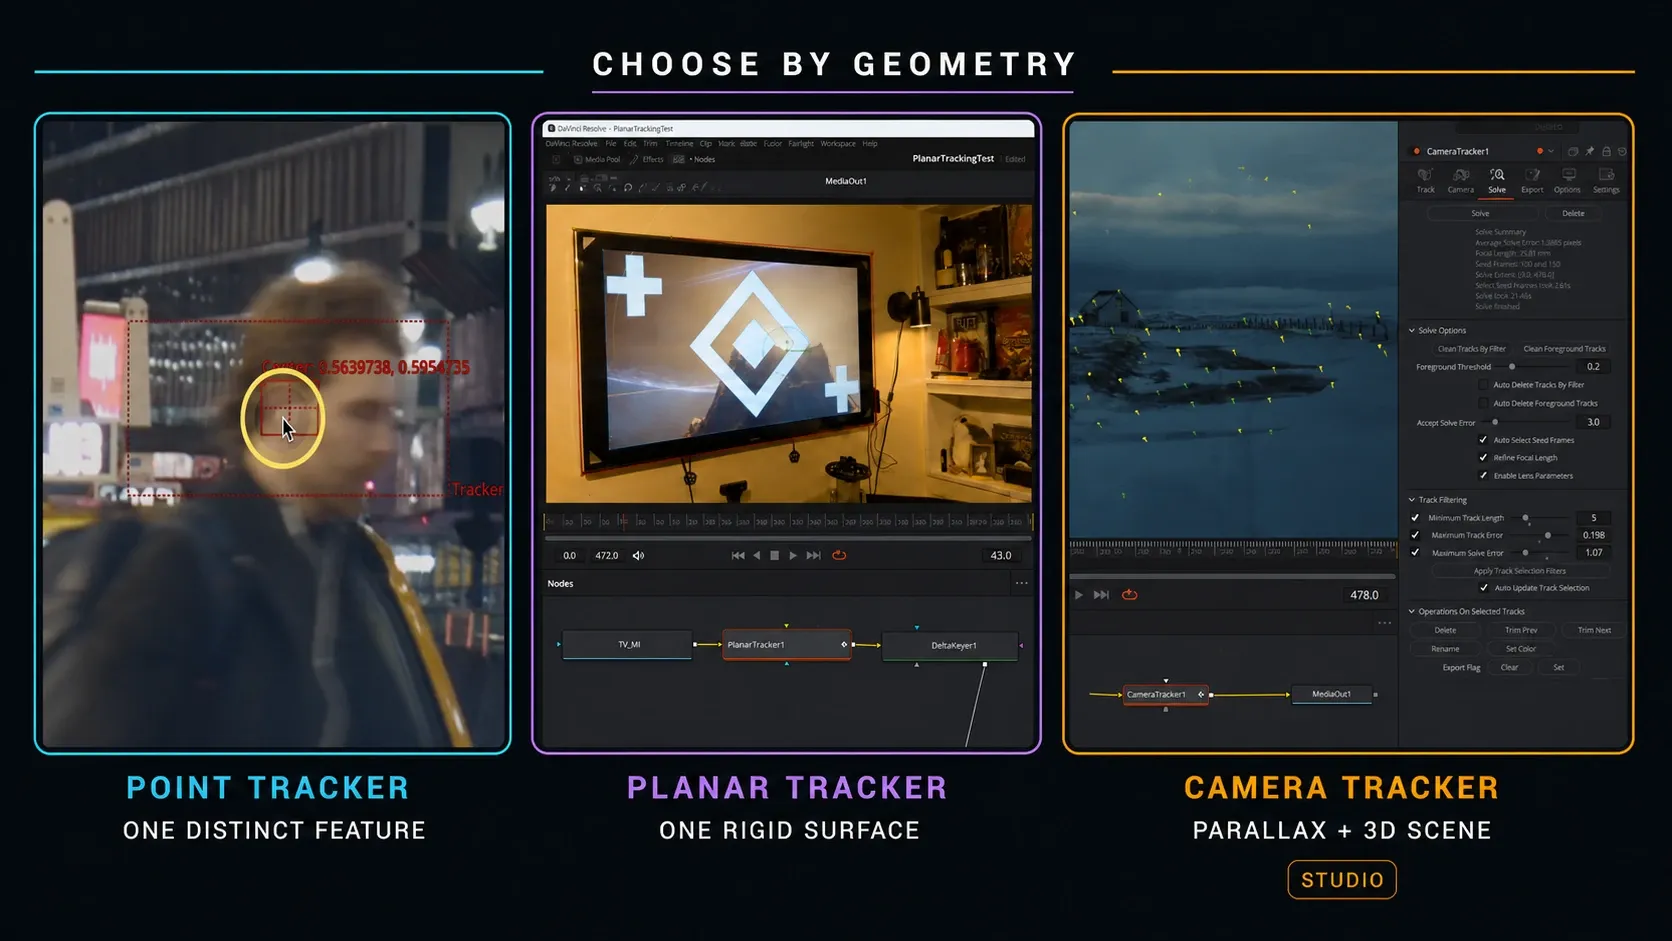
Choose the right Fusion tracker
| Tool | Use it for | Do not expect it to solve | Edition |
|---|---|---|---|
| Tracker (Point) | Position, stabilization, and match moving from one or more recognizable 2D features | A full surface changing in perspective or a 3D camera move with parallax | Free and Studio |
| Planar Tracker | Screens, signs, walls, phone faces, vehicle panels, and other rigid planes | A face, cloth, curved object, or pixels crossing several depths | Free and Studio |
| Camera Tracker | Recreating camera motion and a 3D point cloud so 3D objects can sit in the shot | A locked-off shot or pure zoom that provides too little parallax to reconstruct useful depth | Studio |
If you only need a title to follow a shoulder, don't solve a 3D camera. If you are replacing a screen seen at an angle, a position-only point track is usually too weak. Blackmagic’s Fusion overview introduces point, planar, and camera tracking; the current DaVinci Resolve 21.1 Reference Manual controls the exact steps and interface terms used below.
This page is the tracking route inside the DaVinci Resolve Fusion hub. If MediaIn, Merge, masks, and node inputs are still unfamiliar, start with the Fusion tutorial for beginners before applying tracker data.
Prepare the shot before tracking
Open the clip on the Fusion page and inspect it at full resolution. Tracking is easier on the clean image than after grain, glow, heavy blur, or aggressive grading changes the texture. Fusion processes before the Color page in Resolve’s normal image pipeline, so the original clip is often already the best starting point.
Choose a reference frame where the target is sharp, large, unobstructed, and close to the orientation you want for the insert. Starting on frame one is convenient, not automatically correct. For a planar track, Blackmagic’s training specifically recommends starting when the surface is large, clear, least distorted, and moving slowly enough to avoid motion blur.
If the shot has significant lens distortion, correct it before planar analysis. Straight graphics tracked into a distorted plate can otherwise look attached in the center but slide near the edges. Restore distortion after the insertion only when the finished graphic must inherit the original plate’s lens shape; the required node order depends on the composite and delivery pipeline.
How to use the 2D Tracker node
The Resolve 21.1 manual describes IntelliTrack as the Tracker node’s default. IntelliTrack requires Studio. Choose Point for the conventional pattern/search-box controls below, including when working in Resolve Free. This Point option is separate from the Point algorithm inside Planar Tracker.
- Select MediaIn and press Shift-Spacebar. Search for Tracker and add it after MediaIn.
- Move to a clear frame and place the tracker on a unique, high-contrast feature that belongs to the motion you need.
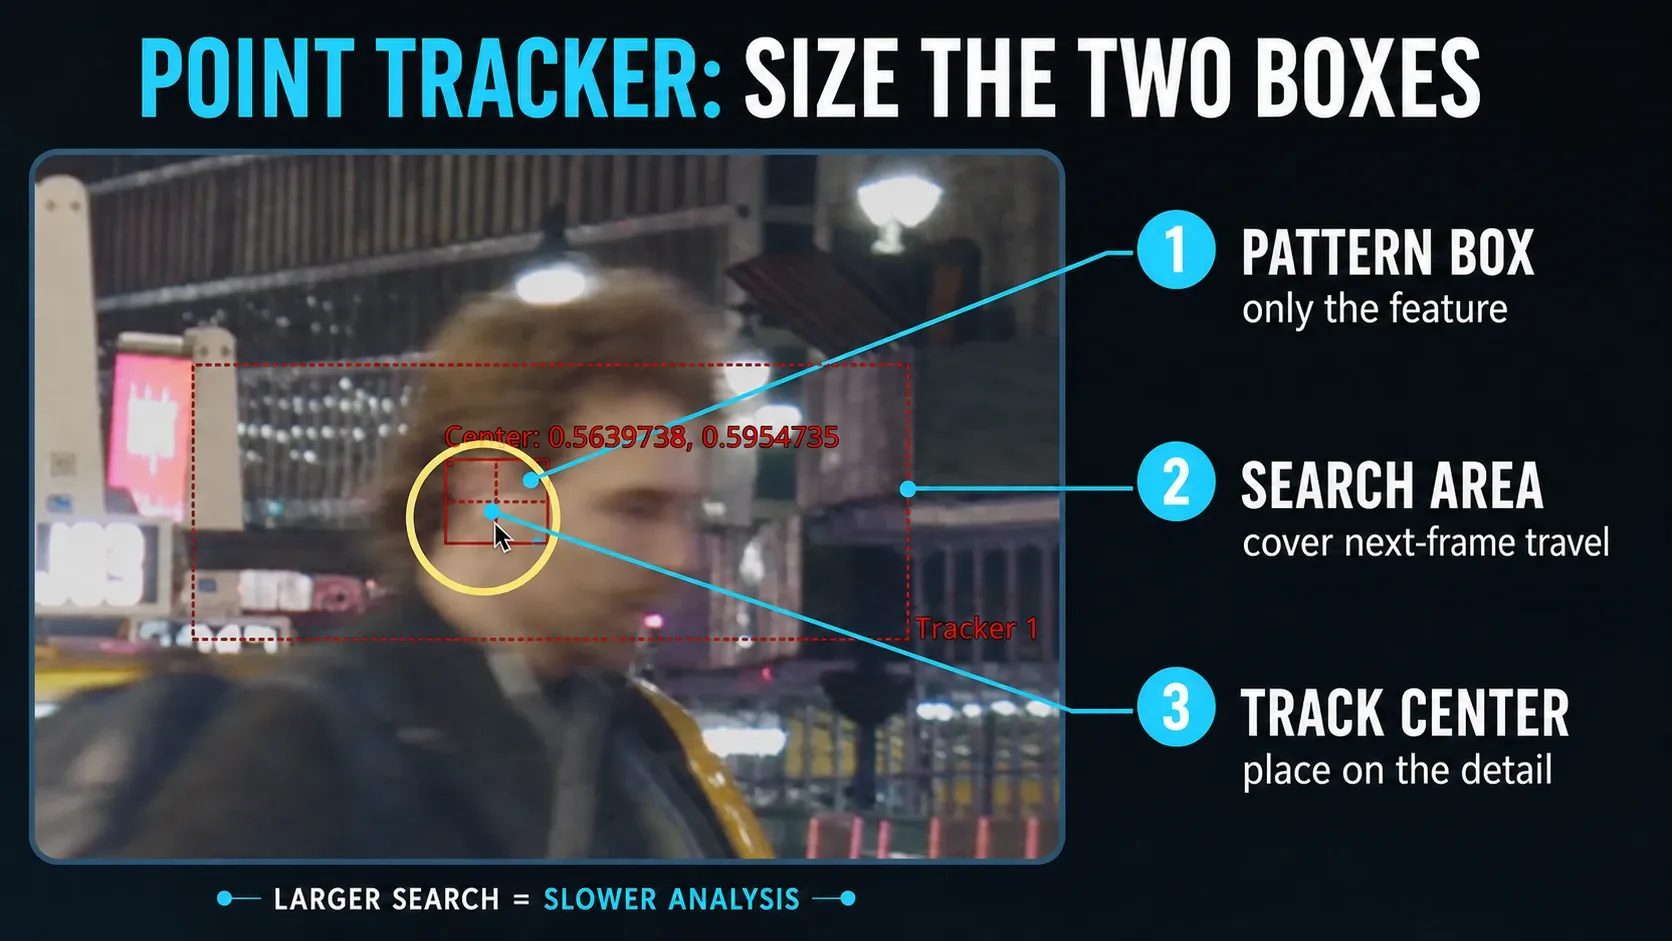
- Size the inner pattern box around the recognizable detail. Size the outer search box only large enough to contain the feature’s next-frame movement.
- Track forward or backward while watching the viewer. Stop when the marker jumps to a different edge or texture.
- Open the Operation tab and set Operation to Match Move. With the plate on the orange background input and no foreground, this stabilizes the plate. To attach a graphic, connect it to the green foreground input and set Merge to FG Over BG; BG Only is the plate-stabilization output.
- Under Match Move Settings, check Reference Time before positioning the graphic. Custom Time lets you choose a specific frame with Set and return to it with Go. Place the graphic on that reference frame, then inspect the composite at normal speed. A wrong initial offset is not necessarily a bad track.
The inner box answers “what should I recognize?” The outer box answers “where should I look for it next?” A huge search area is not insurance; it slows analysis and gives the tracker more wrong candidates. Fast motion may need a larger search area, while slow motion usually doesn't.
One tracked pattern supports position. Two or more good patterns support both rotation and scale in Match Move; add the second with Add above the Tracker List and enable the Position, Rotation, and Scaling components you need. Keep the patterns well separated on the same rigid object. Extra patterns help only when their motion is consistent.
How to track a screen or sign with Planar Tracker
Planar tracking analyzes many pixels across one rigid surface. It's usually the best first choice for a screen replacement, billboard, book cover, wall graphic, or flat vehicle panel.
- Add Planar Tracker between MediaIn and MediaOut.
- Go to a clear reference frame, click Set, and draw a polygon around textured pixels on one plane. The shape does not have to trace the final graphic’s corners.
- Exclude the background, rotating wheels, reflections, hands, faces, or anything that moves independently of the plane.
- Choose Motion Type for the actual motion. Translation handles position; Translation, Rotation, Scale adds uniform scale and rotation; Affine also models skew; Perspective handles changing corner angles. Blackmagic recommends Perspective when unsure. A simpler model can help weak tracks, but it will slide if the shot really needs perspective.
- With the reference already set, use Go to return there, track to the end, return with Go, then track to the start. Changing the Planar Tracker reference after analysis destroys its existing tracking data; save a copy before starting a new reference-based track.
- After analysis, switch Operation Mode to Steady. The tracked plane should appear locked. Residual wobble exposes drift more clearly than a polished insert does.
- Return the mode to Track. For a simple same-frame corner pin, use the Planar Tracker’s corner-pin workflow. For reusable motion data, click Create Planar Transform and feed the graphic, matte, or clean plate through that node.
The tracking shape identifies pixels to analyze; it isn't the corner pin. This distinction prevents a common mistake: drawing a tight four-corner rectangle around a glossy screen even though the border or nearby textured frame would provide a more stable plane.
Steady and Stabilize are not interchangeable. Steady locks the tracked plane so you can spot residual drift. Stabilize smooths translation, rotation, and scale while retaining the intended move; it requires Compute Stabilization. For a screen insert, return to Track or Corner Pin rather than leaving the background steadied.
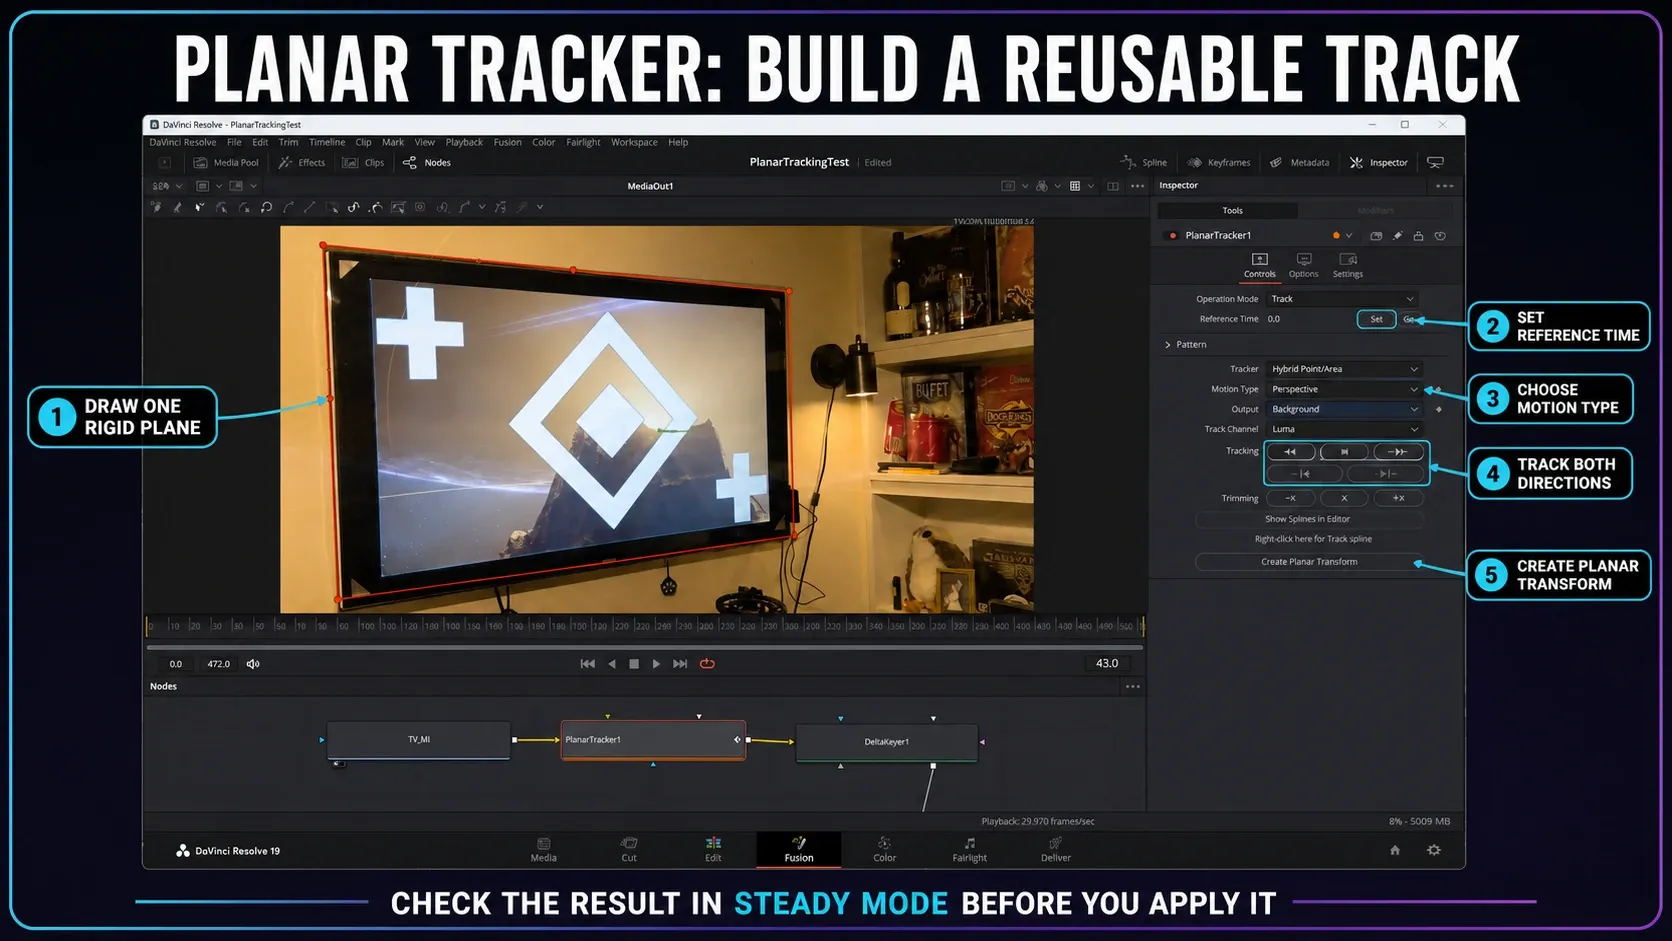
The current Resolve 21.1 Reference Manual documents the current sequence: choose a clean reference, click Set, define the track region, analyze the needed range, inspect the result in Steady, and create a Planar Transform when reusable motion data is required. The older Resolve 18 practice guide is useful training, but it isn't the controlling source for current UI claims.
Keep the original plate on Merge’s background input. Build the graphic on a separate branch, position it at the Planar Transform’s Reference Time, then connect the transformed graphic to Merge’s foreground. Apply that motion once. The generated Planar Transform normally shares the Track spline with its source, so edits to that track update it automatically. After a retrack, inspect the spline’s covered frames and the composite instead of assuming a pasted or separately edited node still uses the intended data.
When to use the 3D Camera Tracker
Use Camera Tracker when the camera moves through a scene and the insert must live in 3D space: a sign on a wall revealed by parallax, a 3D title behind foreground objects, or an object placed on a ground plane. The tool analyzes many features, solves a virtual camera, and produces a point cloud that represents scene structure.
A useful solve needs parallax: static features at different depths must shift by different amounts as the camera moves. Locked shots and pure zooms provide little depth information. Heavy rolling-shutter wobble can also corrupt feature paths, so a numerically solved camera may still fail a simple geometry test.
- Add Camera Tracker after MediaIn. Connect a rough matte to the node’s white Occlusion Mask input when moving people, cars, water, reflections, or other non-static regions would generate bad tracks. White areas are ignored; unmasked fixed scenery remains available for analysis. Preview the generated points before solving and confirm that excluded motion isn't contributing camera tracks.
- Enter the recorded focal length and film gate or camera model when they're known. If the metadata is missing, give the solver the closest defensible camera information and estimate only what the shot supports.
- Analyze the clip, inspect the generated tracks, and solve the camera. Delete obvious outliers in small groups, rerun Solve, and compare the result. Removing too many tracks can leave the solver without enough information and make the error worse.
- Evaluate the solve visually as well as numerically. Average Solve Error measures how far the solved 3D locators miss the original 2D tracks when reprojected, in pixels. The Resolve 21.1 reference describes below 1.0 as a useful HD target and asks for lower error at higher resolutions. A low number still does not prove that ground orientation, scene scale, contact, or parallax is correct.
- Select suitable points to establish the ground plane and origin, then export the solved 3D scene.
- Place a simple ImagePlane3D or primitive first. Check contact, perspective, and parallax before building the final asset.
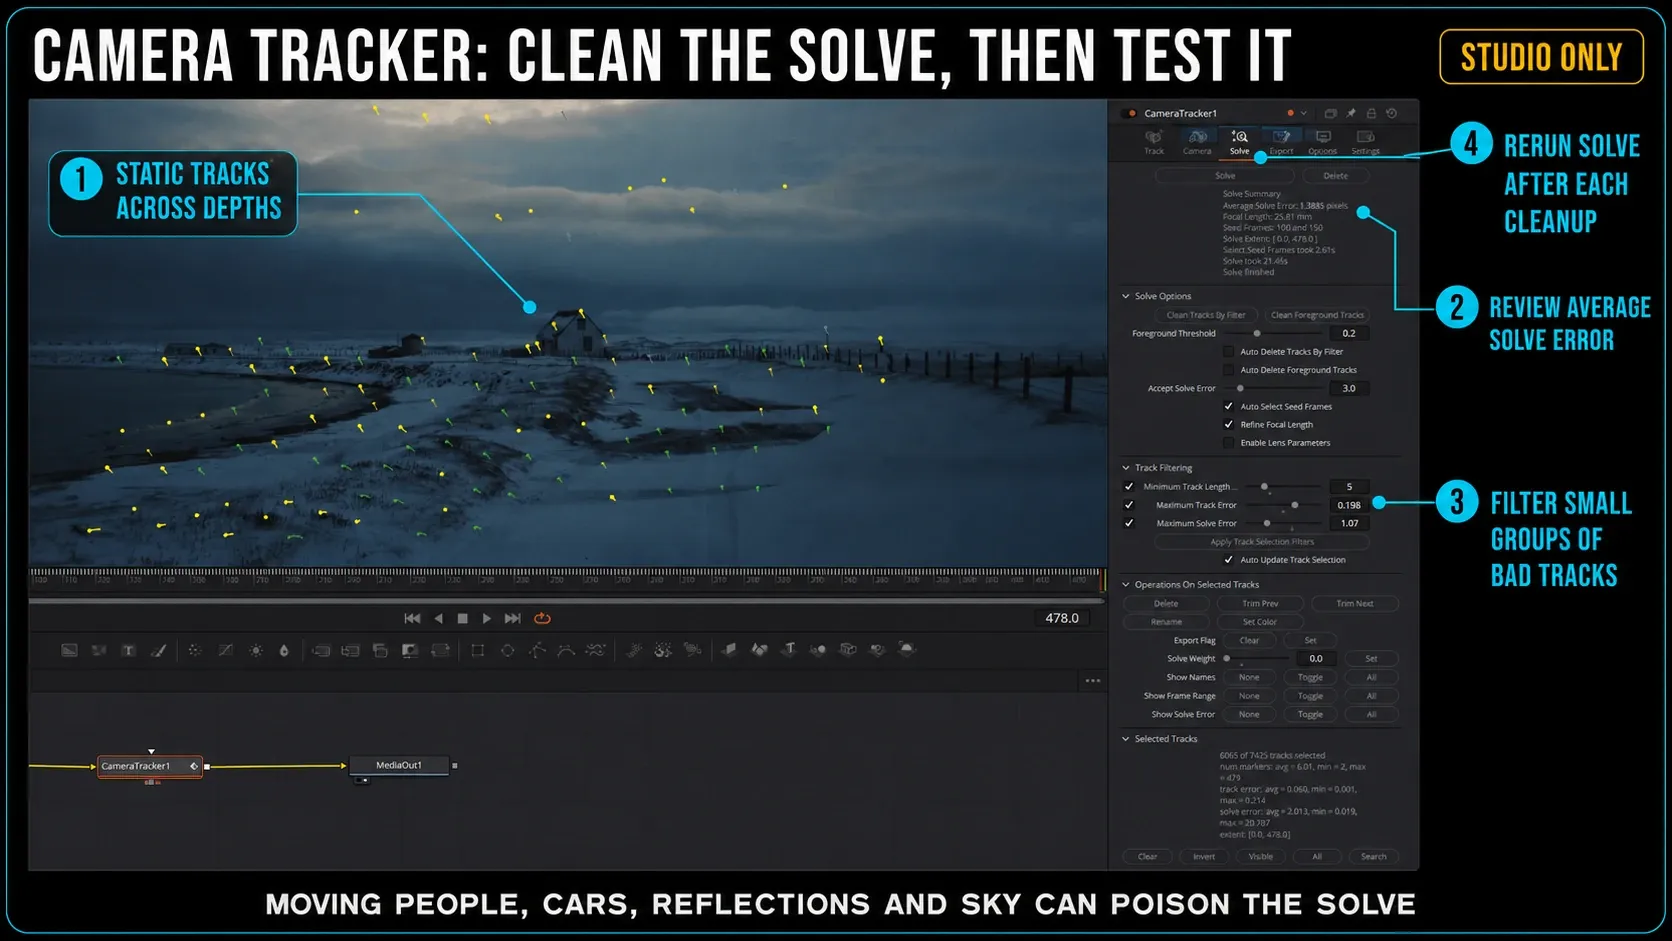
Camera Tracker requires DaVinci Resolve Studio; point and planar tracking remain available in Free. Blackmagic lists that edition boundary in the official Studio feature comparison. The Resolve Free vs Studio breakdown puts that limitation in context before you build a 3D workflow around a Studio-only solve.
Track through occlusion without poisoning the data
A tracker can't see detail hidden by a hand, person, car, or frame edge. Continuing blindly through the obstruction creates confident-looking but wrong keyframes.
For a point track, stop on the last good frame and trim the bad tail with Trim to End. To switch to another nearby feature on the same rigid object, set Path Center to Track Center (append) before repositioning the pattern; this offsets the new path to continue the old one. Check the join for a jump. If no reliable feature survives, bridge only the short missing interval manually and inspect every frame.
For a planar track, keep foreground motion outside the tracking polygon or feed a matte into the white Occlusion Mask input. White areas in that matte are ignored by the Planar Tracker; they identify the foreground occluder, not the plane to analyze.
Repair planar drift from the last good tracked frame: trim the failed tail, improve the region or occlusion mask, and analyze again. Moving the polygon only changes which pixels are analyzed; it does not repair previously computed motion. The manual warns that temporary planar tracking information is not restored after saving and reloading a composition, so resuming analysis may require a fresh track. Keep saving your project, but do not rely on reopening to resume an unfinished analysis.
A community planar-tracking case illustrates the symptom and repair pattern: check the grid, mask a crossing hand, and return to the last reliable frame. The Resolve 21.1 manual remains the controlling technical source.
If the obstruction needs to pass in front of the insert, tracking is only half the composite. Build a holdout mask or roto layer for the foreground object. The Fusion rotoscoping guide explains manual edge work, while the Magic Mask guide covers the Studio-assisted option.
The Color page’s Tracker palette is a different tool, commonly used to move Power Windows for local corrections or blur. It is not this Fusion Tracker node. For a face that simply needs obscuring, start with that simpler Color workflow; use Fusion when the composite needs its node-based motion transfer or holdout layers. The face and background blur guide covers Power Window tracking, first-bad-frame repair, mosaic, and the final privacy review without turning a simple anonymization task into a larger composite.
How to diagnose and fix tracking drift
The track slides gradually
Return to the first visibly wrong frame. Choose texture that changes less, enlarge the useful planar region, remove pixels at another depth, or reduce the motion model. Don't blur or smooth a path that follows the wrong surface.
The tracker jumps during motion blur
Use a broader recognizable pattern or a nearby feature on the same rigid object. A larger search region helps only when displacement is the problem. If the pixels themselves become unreadable, bridge those frames manually and reconnect to valid analysis.
The plane flips or bends
The shape probably includes independently moving detail, a reflection, two depths, or too little stable texture. Go back to the reference frame, redraw the region, retrack the failed range, and verify the result in Steady mode before using the transform data.
The insert moves twice
Tracking data has likely been applied in two places, for example, through a Planar Transform and again through a tracked Transform or corner pin. Follow the node chain from the graphic to Merge and keep one intentional motion transfer.
The object disappears near the frame edge
Check Domain of Definition and frame bounds at each node, then inspect Global In/Out, mask bounds, timing, and Merge order. A Transform or crop can clip the insert even when the tracking data remains valid. The Resolve Inspector guide is useful when Edit-page transforms or clip timing are also involved.
Make the tracked insert look attached
A perfect path can still produce a fake composite. Match the insert’s perspective, brightness, contrast, black level, sharpness, grain, and motion blur to the plate. If the sign sits behind a foreground object, restore that occlusion. If it belongs on a glossy screen, consider reflections and glare rather than covering them with a perfectly clean rectangle.
If the insert also depends on a keyed foreground, the Delta Keyer workflow covers matte cleanup before that foreground is recombined with the tracked composite.
Place the graphic at the reference frame before judging the track. A Planar Transform moves it relative to that reference, so a poorly chosen initial position can look like drift even when the data is stable.
Finish the artwork before the tracked transform when you want all its elements to move as one; place view-dependent finishing after the transform when the effect belongs to the final composite.
For styled cards or labels, build the design first and then pass the combined result through the tracking transform. The rounded-corner workflow shows a reusable graphic treatment that can be attached this way.
Final tracking QA
- Watch the raw tracker or Steady view before judging the finished graphic.
- Inspect the first frame, reference frame, last frame, occlusions, blur, and frame exits.
- Check the insert’s corners and edges at full resolution.
- Confirm only one node applies the tracking transform.
- Play at normal speed, then render a short test and review it outside Fusion.
After the short test render passes, use the DaVinci Resolve Fusion hub to continue into node fundamentals, keying, rotoscoping, masks, and motion-graphics workflows without duplicating this page’s tracking scope.
Fusion tracking FAQ
Which Fusion tracker should I use for text?
Use the 2D Tracker when the text follows a distinct feature without meaningful perspective change. Use Planar Tracker when it sits on a flat surface. Use Camera Tracker when the text must exist in solved 3D space with camera parallax.
Is Planar Tracker available in DaVinci Resolve Free?
Yes. The classic 2D Tracker and Planar Tracker are available in Resolve Free and Studio. Fusion Camera Tracker requires Studio.
What is the best frame to start a planar track?
Choose a frame where the plane is large, sharp, unobstructed, relatively undistorted, and not smeared by fast motion. Set that frame as the reference and analyze in both directions.
How can I check whether a planar track is good?
After tracking, change Operation Mode to Steady and watch the tracked surface. It should remain locked without residual sliding or bumps. A temporary grid or high-contrast insert also makes edge drift visible.
Why does my tracked graphic slide?
The tracker may be following weak texture, multiple depths, reflections, or an occluding object. The motion type may also be too simple, or more complex than the shot supports. Fix the first bad frame and retest the raw data.
Should I use Planar Transform or corner pin?
Use the direct corner-pin workflow for a straightforward screen or sign replacement. Create a Planar Transform when you want reusable planar motion on a graphic, mask, clean plate, or irregular element elsewhere in the node tree.
