The first time I opened DaVinci Resolve, I stared at it for about 11 minutes before touching anything. Seven pages along the bottom of the screen, a Media Pool that made no sense yet, and a Color page that looked like it belonged in a spaceship. Nobody told me which page to start on. Most tutorials just walked me through the interface top-to-bottom like a product manual. This guide skips that. You'll build a real edit, understand why Resolve is structured the way it is, and avoid the 3 mistakes that trip up every beginner in their first session.
DaVinci Resolve Free vs Studio: Which One to Download
Download the free version. Full stop. For a first project, and for the majority of projects you'll ever do, it covers everything you need: multi-track editing, the full color grading engine, Fusion for compositing, and Fairlight for audio. The free version handles UHD export in H.264 and H.265 on most platforms, though exact codec and container support can vary by operating system. Blackmagic Design keeps the official feature comparison up to date — worth checking if your delivery format is unusual. That's not a limited trial. That's a complete tool.
DaVinci Resolve Studio costs $295 as a one-time perpetual license. It adds the DaVinci Neural Engine (which powers Magic Mask, AI noise reduction, and features like Animated Subtitles in version 20), HDR grading tools, Dolby Vision support, advanced ResolveFX, collaboration features, and resolutions beyond 4K. As of 2025, Blackmagic also offers a $30/month rental if you need Studio for a short-term project.
Start free. You'll know when you've outgrown it.
DaVinci Resolve System Requirements: What You Actually Need
Resolve 21 on Windows needs Windows 10 or later, 16GB RAM (32GB if you're using Fusion), and a GPU with at least 4GB VRAM with up-to-date NVIDIA or AMD drivers. On macOS, treat an Apple Silicon Mac on a current macOS as the safe baseline for Resolve 21, with 8GB RAM (16GB for Fusion). Blackmagic's pages have listed the Mac minimums inconsistently, so check the official download page before installing; Intel Mac users should stay on Resolve 20 unless that page says otherwise.
Those are the minimums. In practice, with H.264 1080p footage, 16GB RAM and an RTX 3060 or M1 MacBook Pro runs comfortably without proxies. With 4K RAW or LOG footage from a mirrorless camera, you'll want 32GB and a faster GPU — or you'll be relying on proxy workflow for smooth playback.
Install Resolve on your fastest SSD, and store your project media on a separate SSD if you can. A slow HDD for cache kills playback even on a powerful machine. That one costs people hours they don't need to lose.
DaVinci Resolve Pages Explained: The 7-Page Workflow
Resolve organizes the entire post-production process into dedicated pages, accessible from the row of icons at the bottom of the screen. Understanding what each page does — and which ones you'll actually use — cuts the intimidation factor fast.
- Media — Import and organize your footage before editing. Think of it as your bin management page.
- Cut — A simplified editing environment designed for fast assembly and quick turnarounds.
- Edit — The full-featured timeline, where most editors spend most of their time.
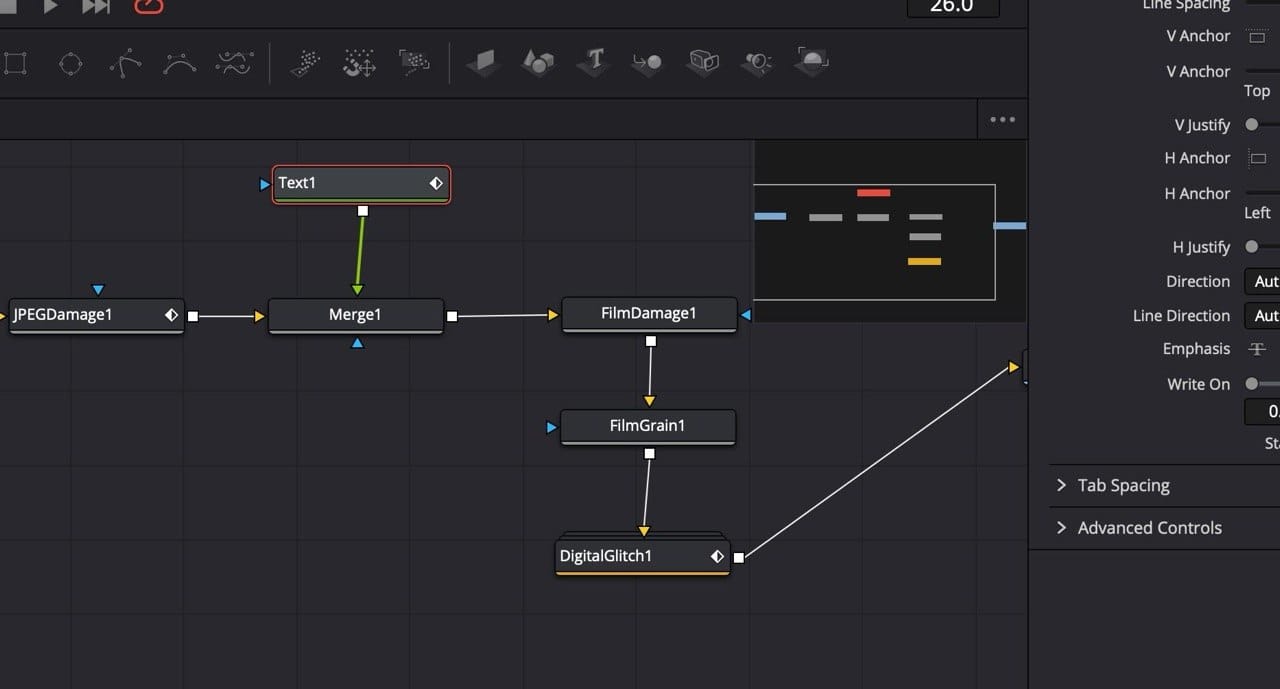
- Fusion — Node-based compositing for VFX, motion graphics, and titles. You don't need this on your first edit.
- Color — The color grading page. Node tree, color wheels, curves, qualifiers, power windows, scopes. The reason Resolve exists.
- Fairlight — A full audio post-production environment. EQ, dynamics, mixing, ADR tools.
- Deliver — Export settings and render queue. Every project ends here.
For a first project: Media, Edit, Color, Deliver. That's your workflow. You can ignore Cut, Fusion, and Fairlight until you need them.
DaVinci Resolve Project Setup: The Step Most Tutorials Rush
Create a new project from the Project Manager screen that opens when you launch Resolve. Name it something specific — not "Project 1." Once the project is open, click the gear icon at the bottom right to open Project Settings.
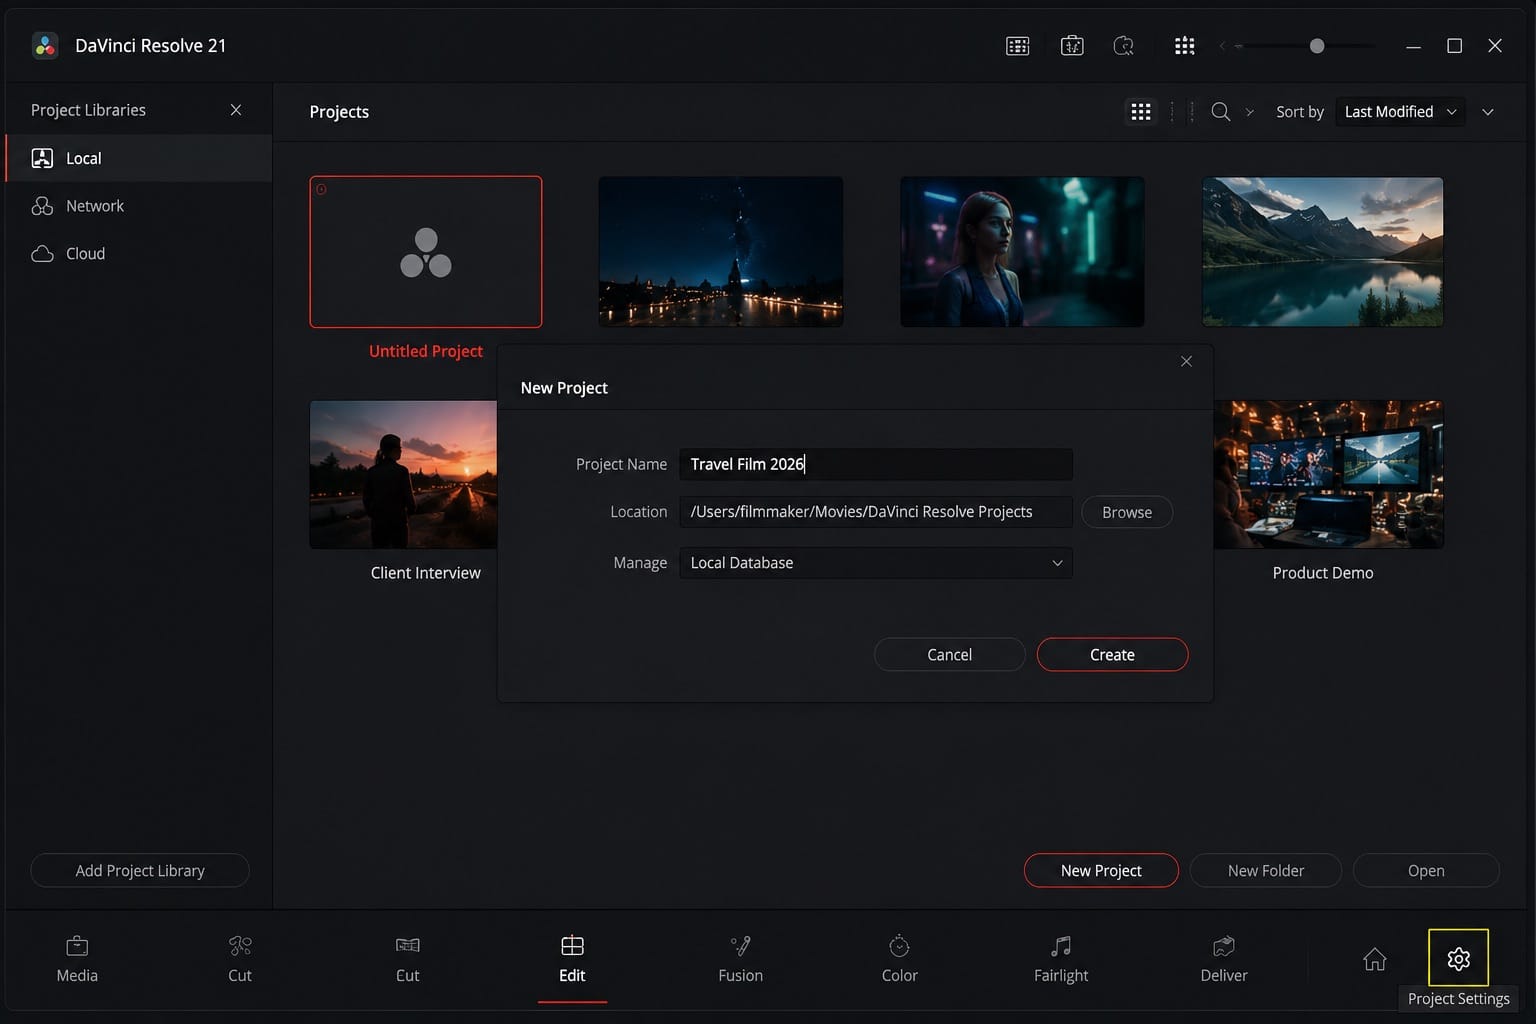
The single most important setting: Timeline Frame Rate. Match it to your footage before you do anything else. If your camera shoots at 29.97fps and Resolve defaults to 24fps, every clip you drop into the timeline will trigger a mismatch warning. The fix after the fact is painful. The fix before you start takes 4 seconds.
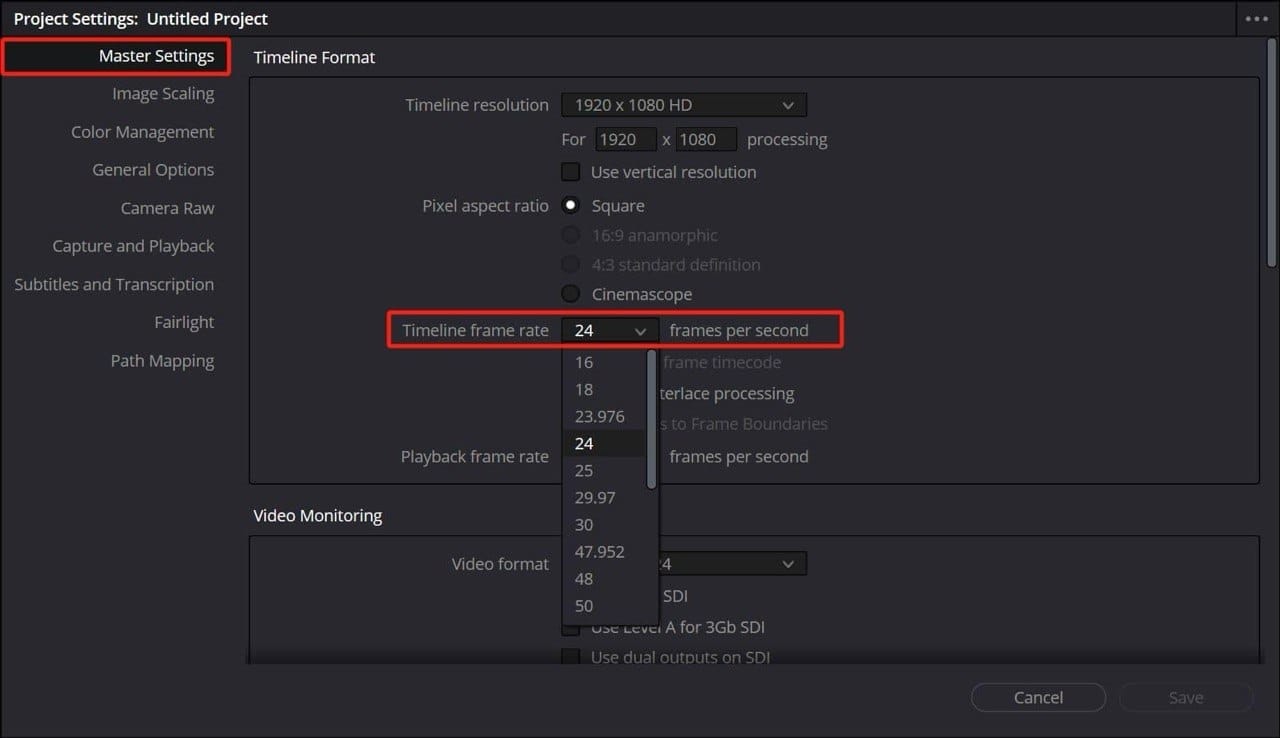
This is the number one beginner complaint on the Blackmagic forum and r/davinciresolve. Frame rate mismatch causes rendering artifacts, choppy playback, and a cascade of settings problems that all trace back to this one screen.
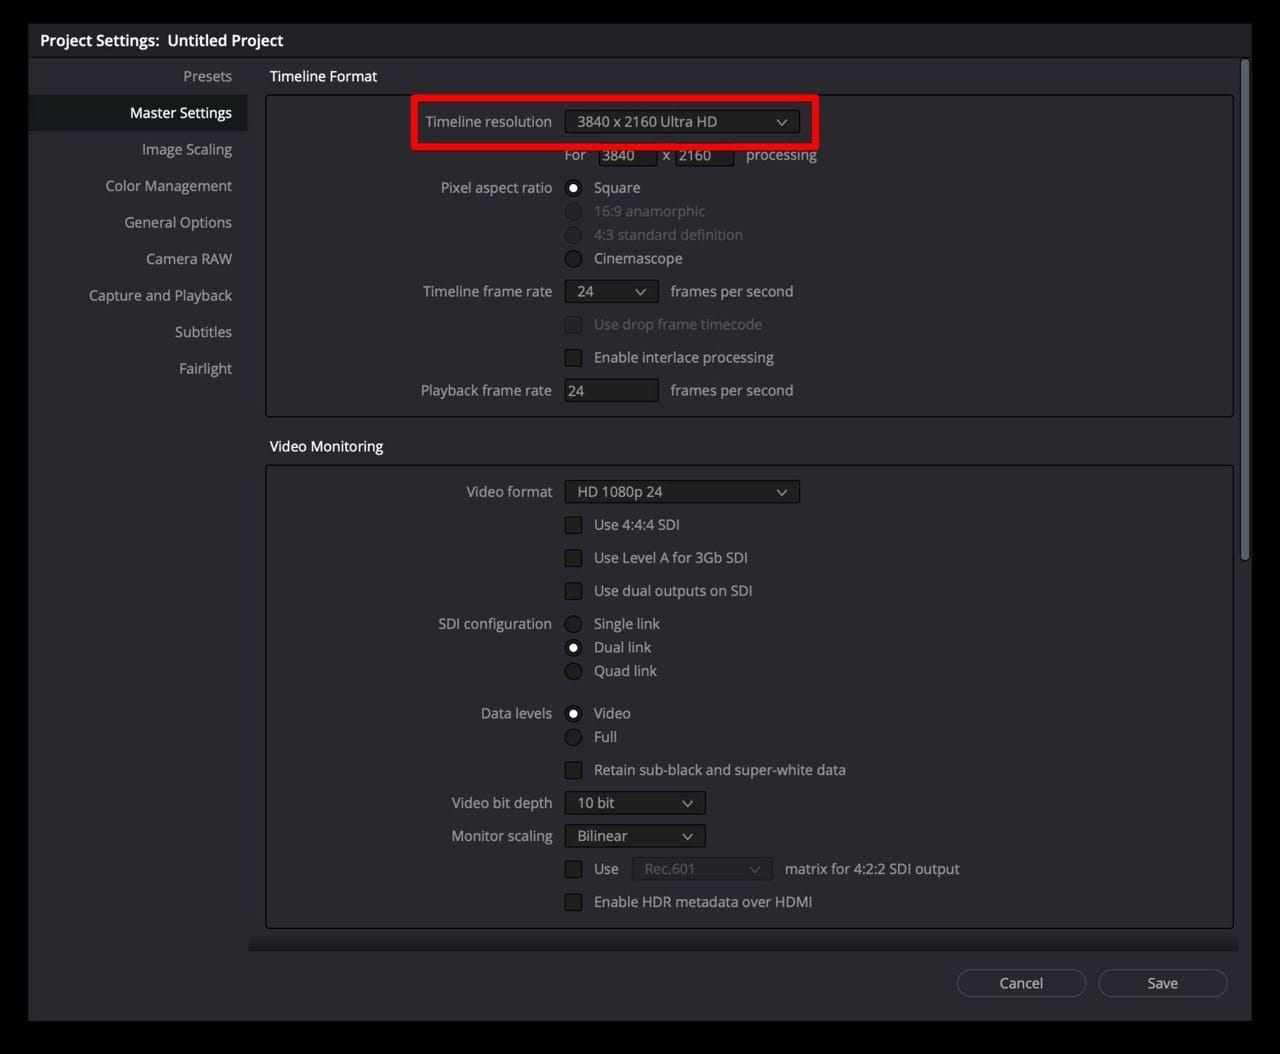
Set your timeline resolution to match your delivery target too. If you're shooting 4K and delivering 1080p, set the timeline to 4K and scale down at export. If you're shooting 1080p and delivering 1080p, keep it at 1080p. Don't mix these up mid-project.
Once settings are confirmed, go to the Media page. Drag your footage from the Media Storage panel on the left into the Media Pool. You can organize clips into bins (right-click in the Media Pool to create one). Then switch to the Edit page.
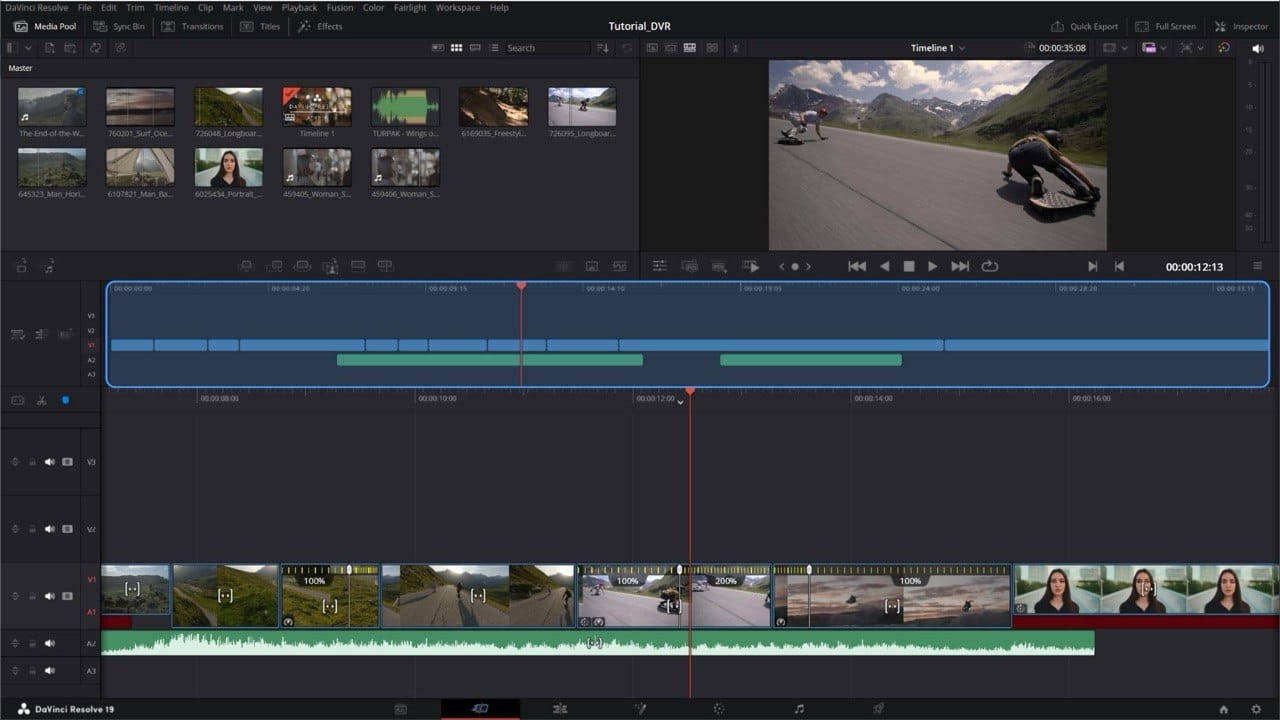
DaVinci Resolve Cut Page vs Edit Page: Where Beginners Should Start
Most tutorials tell you to start on the Cut page because it's simpler. That's backwards advice for anyone who wants to actually learn the software.
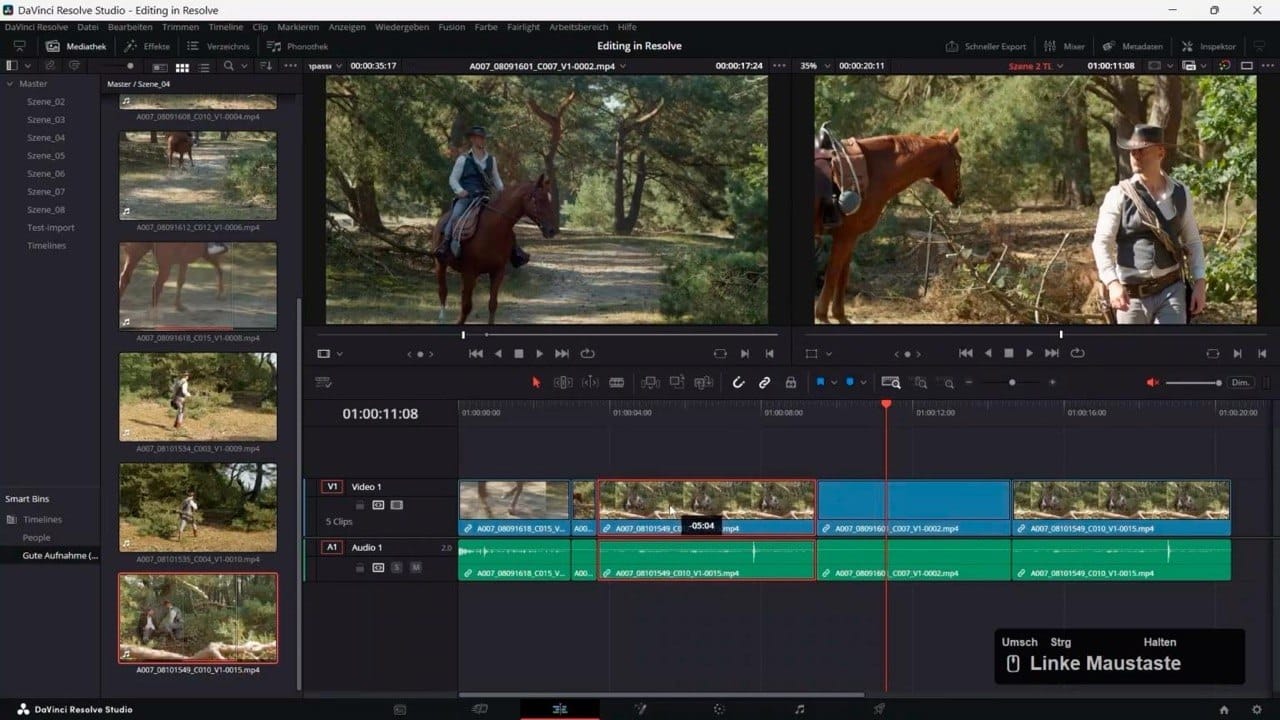
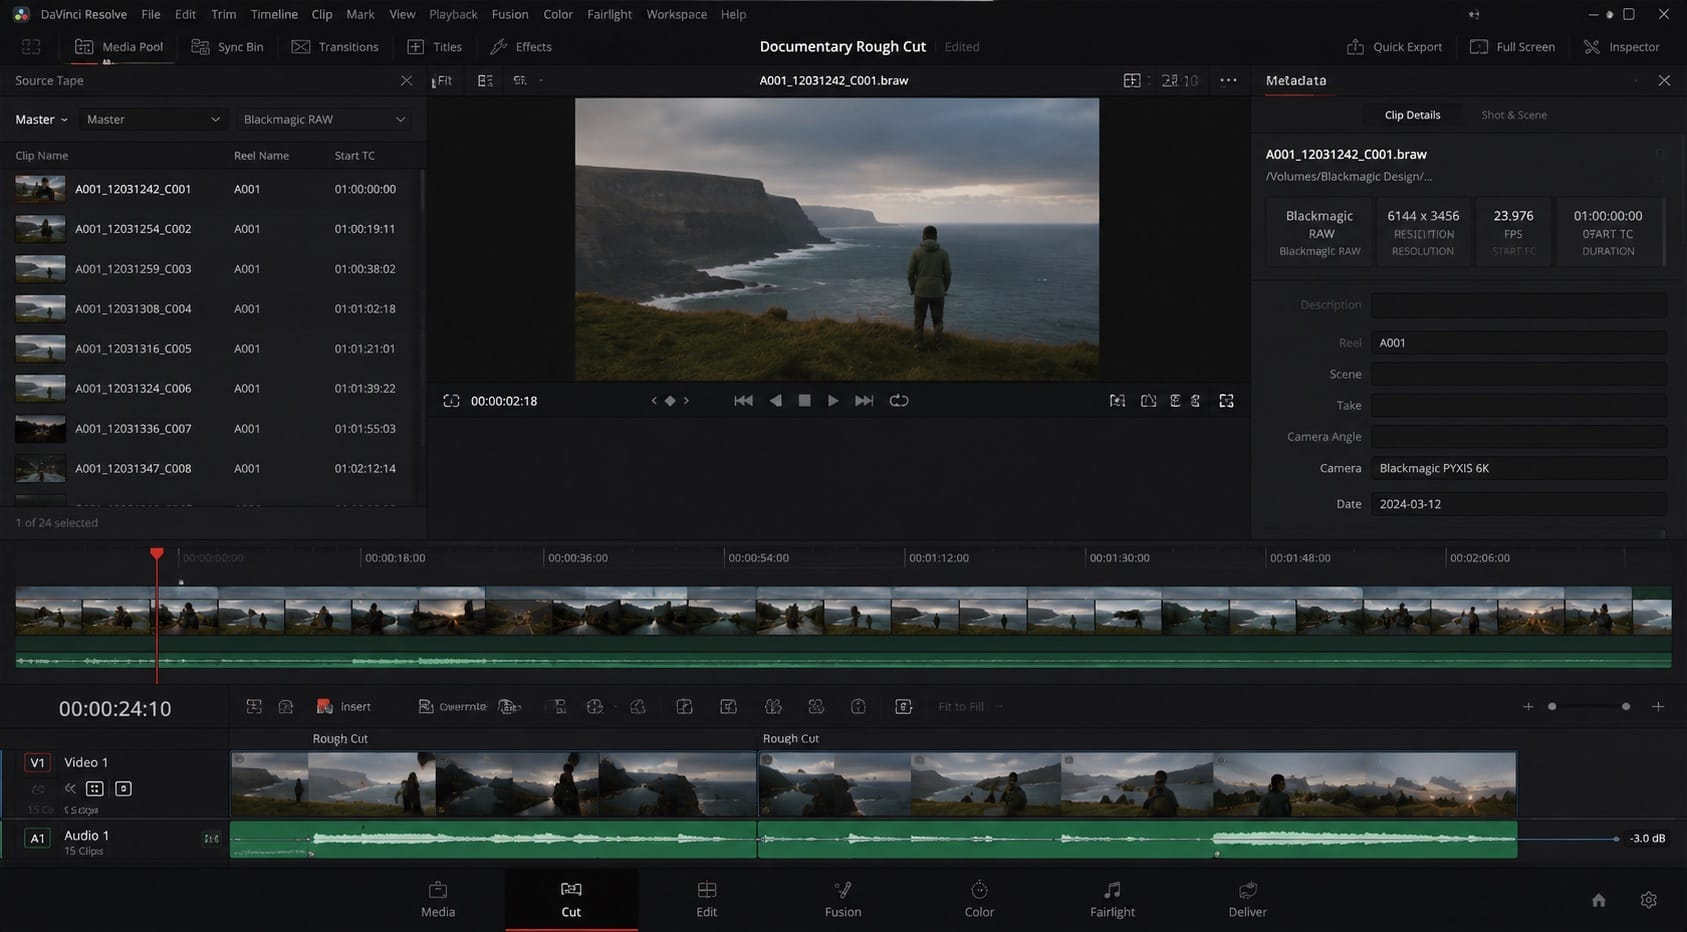
The Cut page is genuinely useful — it has a dual timeline (a zoom-level overview above and a fine-detail timeline below), smart insert tools, and a Source Tape mode that's fast for documentary assembly. But it hides controls that the Edit page exposes. You'll hit a wall faster on the Cut page if you need anything beyond basic assembly.
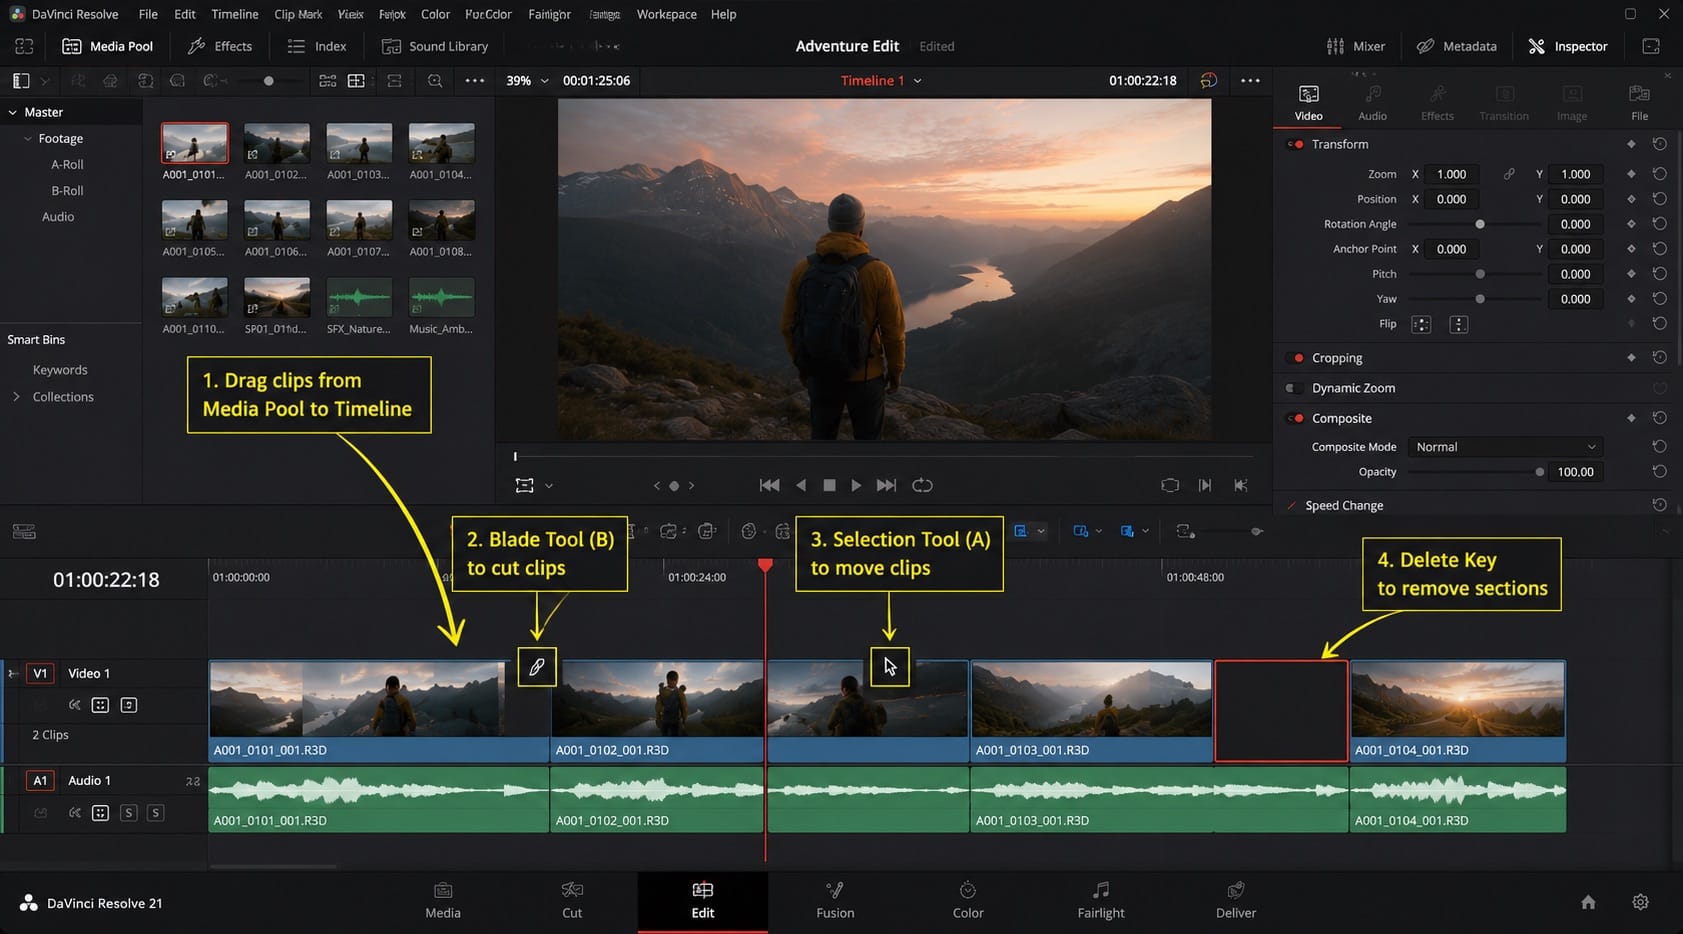
Start on the Edit page. Drag clips from the Media Pool directly into the timeline. Use the blade tool (B on your keyboard) to cut clips, the selection tool (A) to move them, and the delete key to remove sections. These three tools cover 80% of what you'll do in any edit.
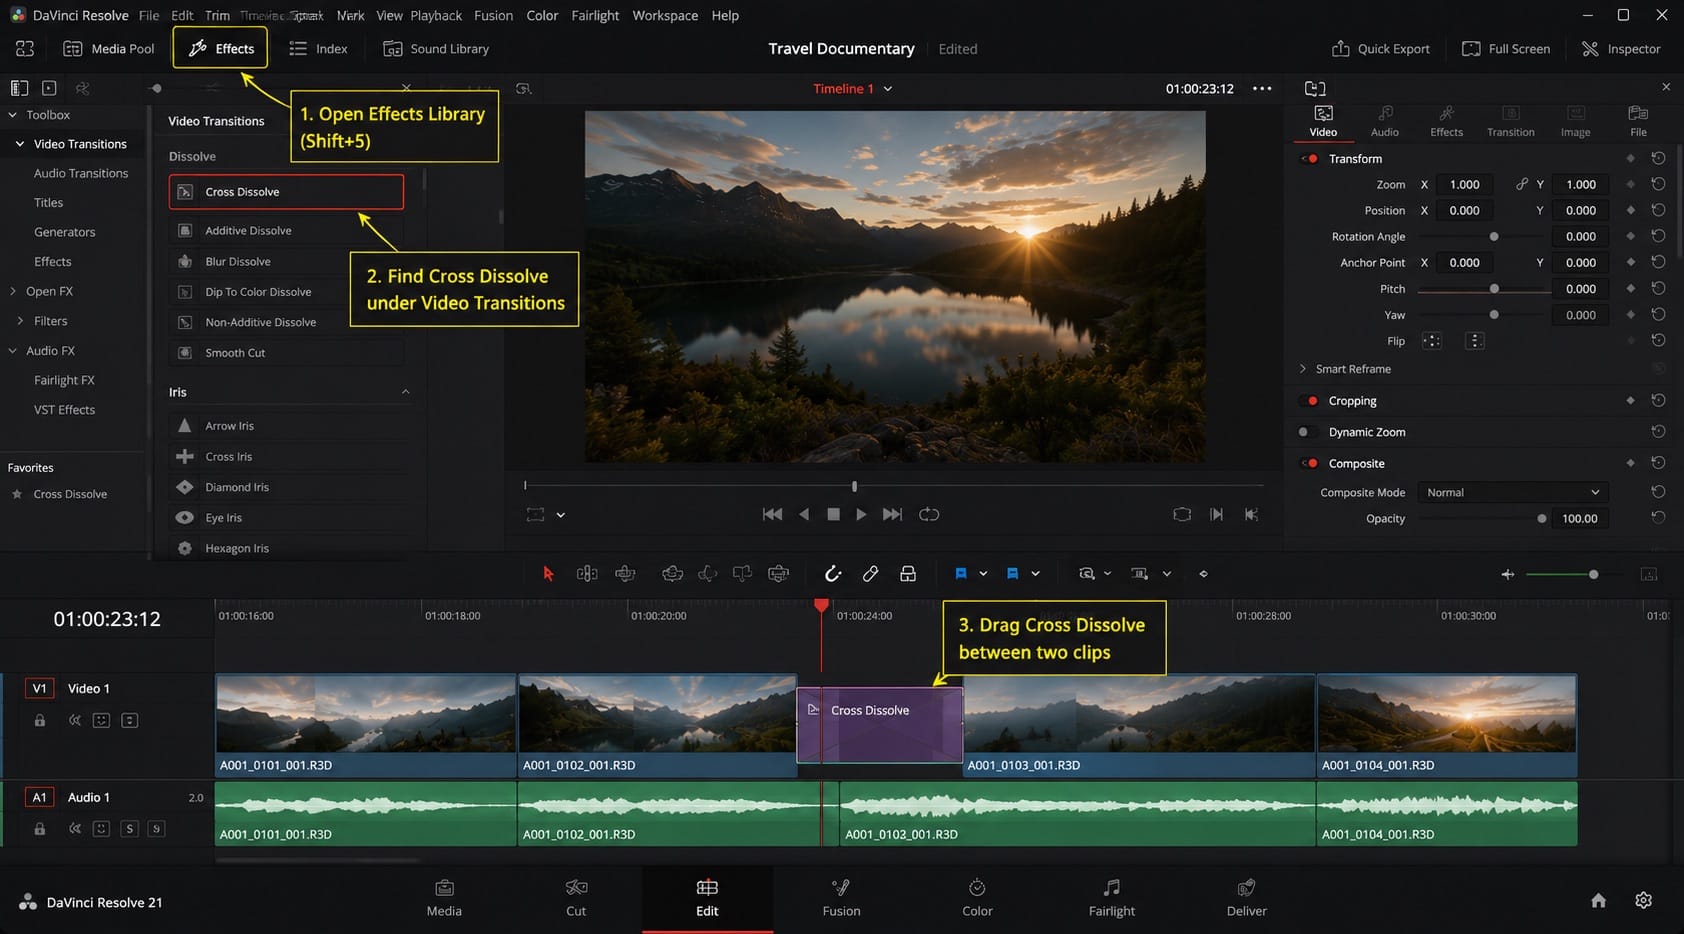
For transitions, open the Effects Library (top left, or Shift+5), find Video Transitions, and drag a Cross Dissolve between two clips. Use them sparingly. Beginners over-rely on transitions. A straight cut nearly always works better.
If playback stutters on the Edit page, go to Playback > Render Cache > Smart. Resolve will start caching your timeline in the background. Give it a few minutes and playback will smooth out. You can also right-click any clip and select Generate Optimized Media for more aggressive caching of problem clips.

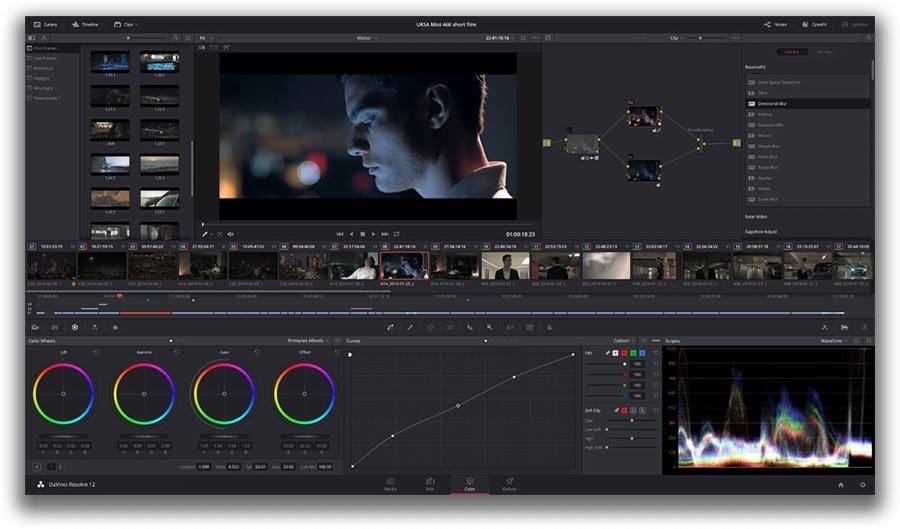
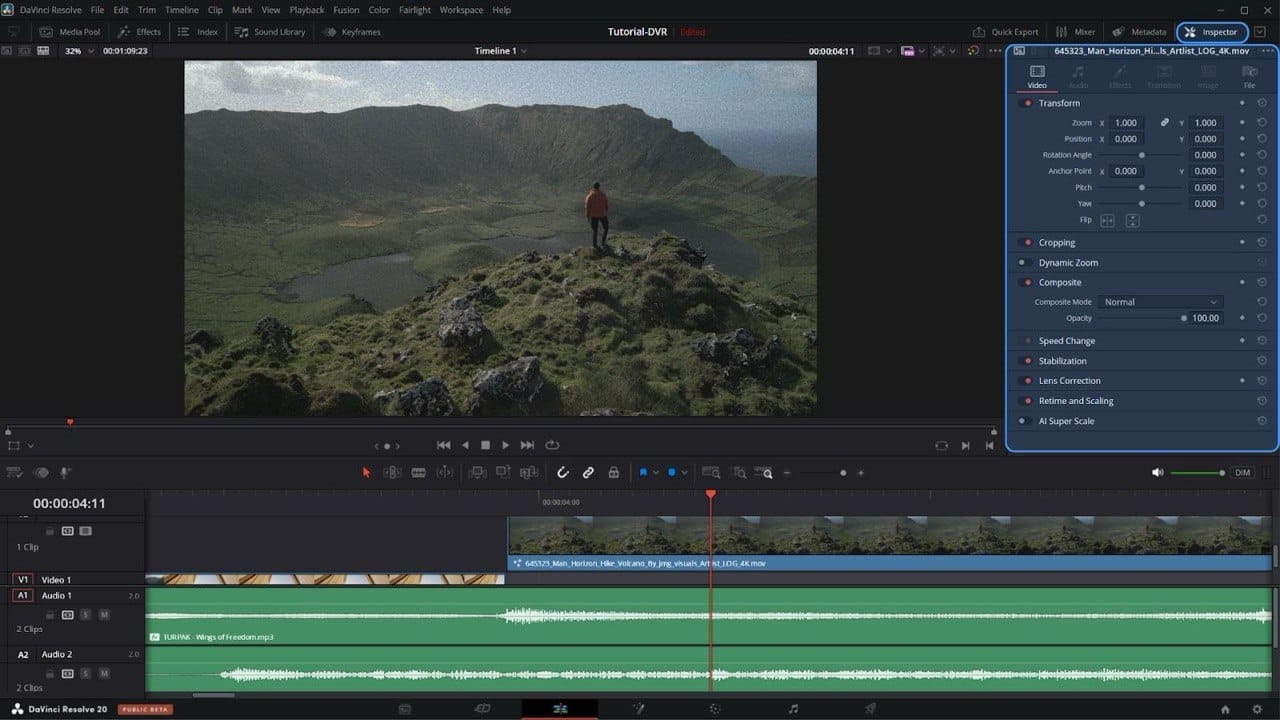
DaVinci Resolve Color Page: Your First Grade Without the Node Tree Fear
Switch to the Color page once your edit is locked. The node tree that greets you looks complex. For a first grade, you'll work with one node — the one that's already there by default.
The primary correction tools live in the Color Wheels panel: Lift (shadows), Gamma (midtones), Gain (highlights), and Offset (overall shift). Watch the Parade scope on the right. You want your waveform to sit between the bottom and top limits of the scope — not clipping at the top, not crushing at the bottom. That's a balanced exposure.
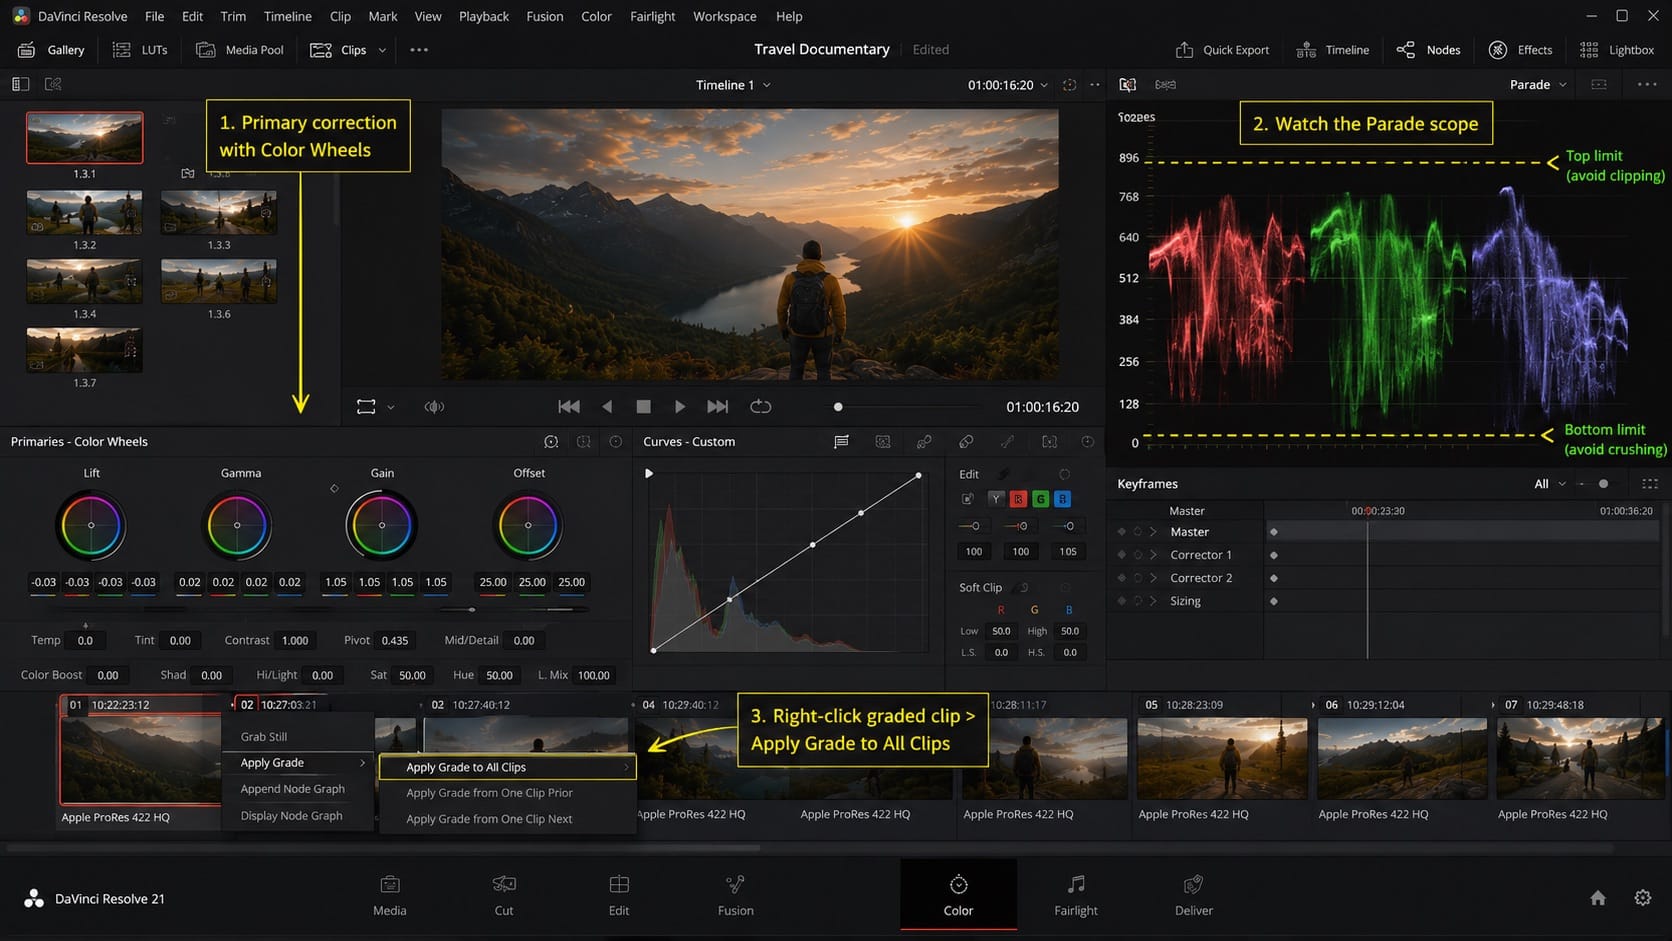
To match a look across multiple clips: grade one clip the way you want it, right-click the clip in the thumbnail strip at the bottom, and choose Apply Grade to All Clips. Then go through and adjust individual clips from there. Not perfect, but it gets you 70% of the way there in about 4 minutes.
The node tree is worth learning separately. It's the reason professional colorists use Resolve over everything else. But you don't need it on your first project. One node, primary corrections, scopes. That's enough to make footage look intentional rather than flat.
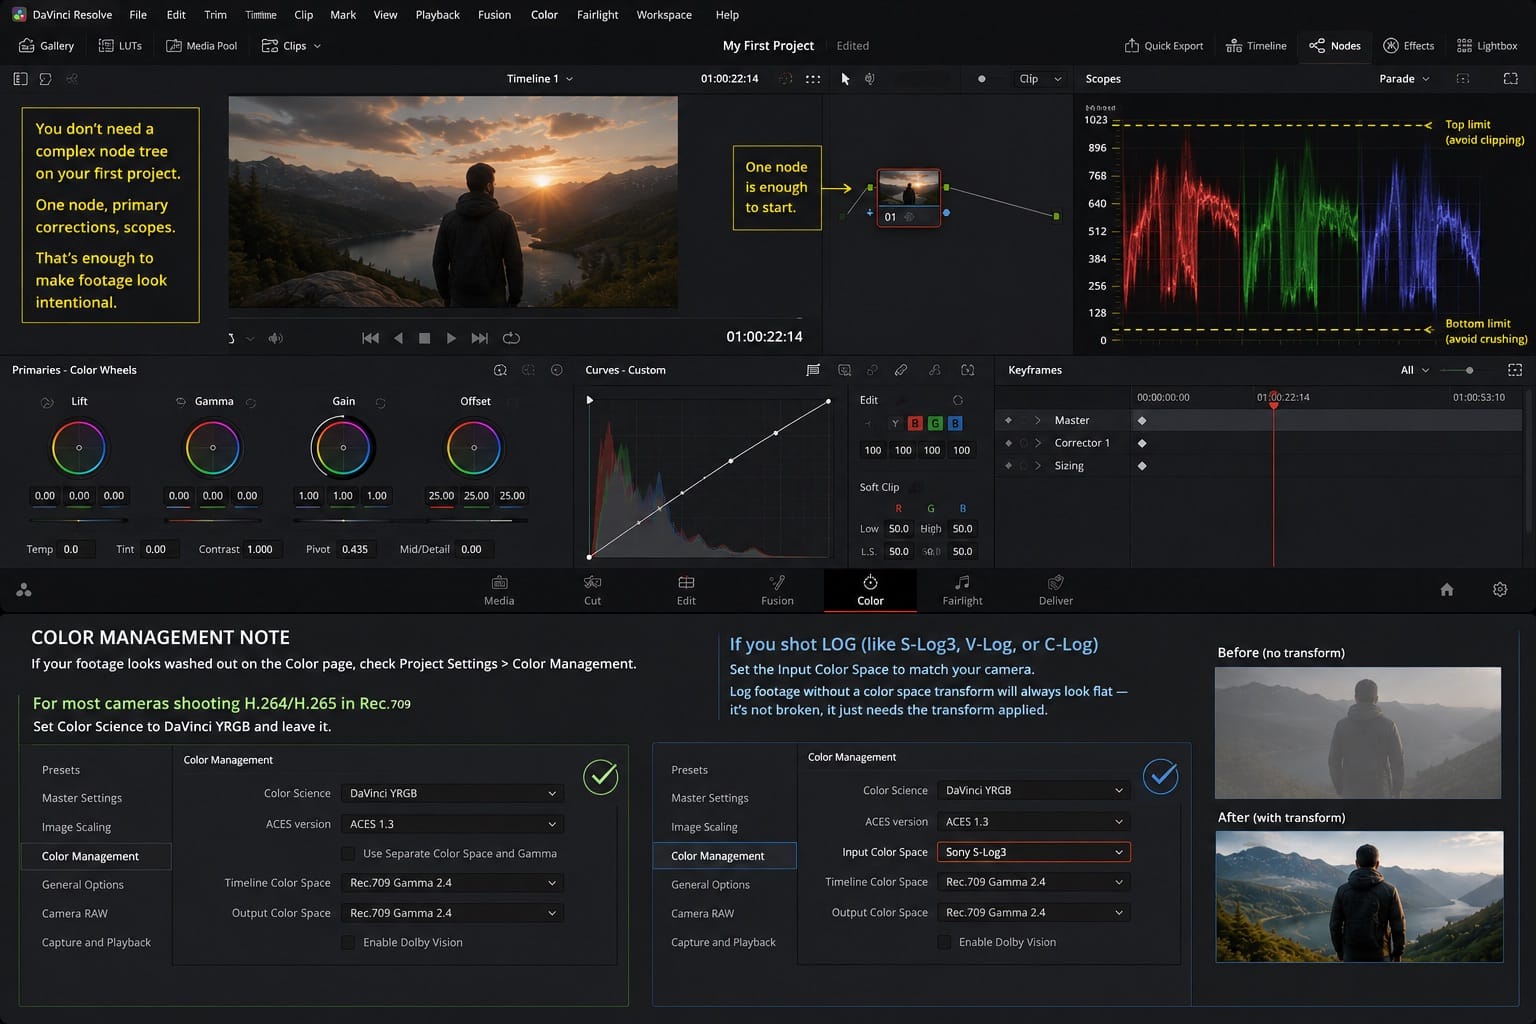
Color management note: if your footage looks washed out on the Color page, check Project Settings > Color Management. For most cameras shooting H.264/H.265 in Rec.709, set Color Science to DaVinci YRGB and leave it. If you shot LOG (like S-Log3, V-Log, or C-Log), you'll need to set the Input Color Space to match your camera. Log footage without a color space transform will always look flat — it's not broken, it just needs the transform applied.
DaVinci Resolve Export Settings for Your First Deliver
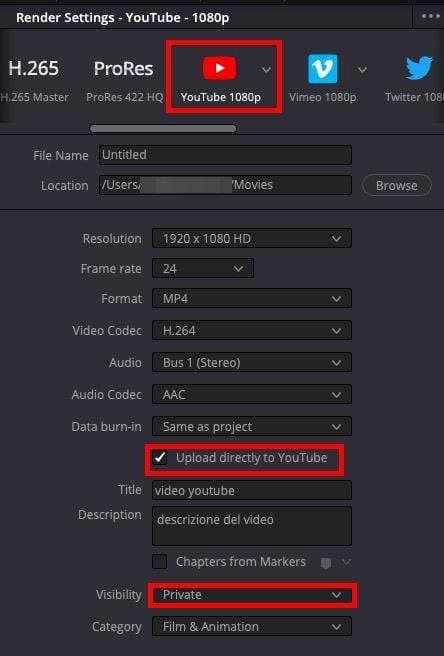
Go to the Deliver page. In the Render Settings panel on the left, you'll see preset tabs at the top: YouTube, Vimeo, Twitter, Custom, and others. The YouTube preset is a reasonable starting point, but it uses a low default bitrate that compresses harder than you want.
For YouTube or social media delivery from 1080p footage:
- Format: MP4
- Codec: H.264 (H.265 works too and produces smaller files, but H.264 has wider compatibility)
- Resolution: 1920x1080
- Frame Rate: match your timeline
- Quality: switch from Automatic to Restrict to, and set 16,000 Kb/s for 1080p
- Audio: AAC, 320 Kb/s, 48 kHz
That bitrate is higher than YouTube's own recommendation, but YouTube recompresses everything on upload. Giving it a higher-quality source file produces a noticeably cleaner result after that recompression — especially on gradients and dark scenes.
Click Add to Render Queue, then Render All. That's it. Your first export will take a few minutes depending on your hardware and project length. Watch the progress bar in the queue panel on the right.
Save your render settings as a custom preset (three dots in the top-right of the Render Settings panel > Save as new preset). You'll use the same settings again. No reason to dial them in twice.
DaVinci Resolve Beginner FAQ
Is DaVinci Resolve really free?
Yes. The free version has no watermarks, no time limits, and no feature gating on the core editing, color, and audio tools. The primary color grading workflow — node tree, color wheels, curves, qualifiers, power windows, scopes — is fully available. Blackmagic Design makes money on hardware, so the free software drives adoption. Studio adds tools on top of that: AI-powered noise reduction, HDR grading, Dolby Vision, additional ResolveFX, and multi-user collaboration. For solo work at standard delivery specs, free handles the vast majority of real projects.
Can I edit professionally on the free version?
Feature films have been finished on the free version. The core color grading workflow — node tree, wheels, curves, qualifiers — is all there. The practical limits are AI-powered tools like Magic Mask and noise reduction, HDR and Dolby Vision grading, resolution beyond 4K, and multi-user collaboration. For solo work at 4K or under with standard delivery, free is sufficient for professional output.
Why does DaVinci Resolve crash or stutter on my machine?
Almost always one of three things: your GPU drivers are outdated, your cache drive is too slow (use an SSD), or you're trying to play back a codec Resolve struggles with natively (like some H.264 variants). Enable Render Cache under Playback > Render Cache > Smart, and generate optimized media for problem clips. That fixes playback stutters in the vast majority of cases.
Is DaVinci Resolve better than Premiere Pro?
For color grading: yes, by a large margin. The node-based workflow, the scopes, and ResolveFX give colorists control that Premiere's Lumetri panel doesn't come close to matching. For editing workflow, Premiere has tighter Adobe Creative Cloud integration. If you're not already embedded in the Adobe ecosystem, Resolve is the better starting point — and it costs nothing to start.
Does DaVinci Resolve work on Windows?
Yes. Resolve 21 runs on Windows 10 and later. NVIDIA GPUs with CUDA are generally the most reliable option for GPU acceleration on Windows. AMD GPUs work with OpenCL but have historically had more driver-related quirks with Resolve.
Should I learn the Cut page or the Edit page first?
Edit page. The Cut page has its uses — especially for fast-turnaround documentary work — but learning on the Edit page gives you a complete picture of how Resolve handles a timeline. You can switch to Cut page workflows later once you understand the underlying structure.
Blackmagic Design offers free official training videos that go much deeper on every page. They're dry but accurate. Worth watching once you've got your first project under your belt.
Related guides
- How to split a video
- How to add text
- How to mute and split audio
- DaVinci Resolve system requirements
- How to save your work
- How to color grade (beginner tutorial)