In DaVinci Resolve Fusion, rotoscoping means animating one or more mask shapes to isolate a subject over time. Split independent motion into overlapping Polygon, B-Spline, or MultiPoly shapes, set a clean reference pose, build end and middle poses, then add keys only where interpolation fails. Start with sparse control points and a few key poses. Add shapes for independent motion and more keys wherever the silhouette stops following the plate.
Choose the right rotoscoping method
| Method | Best use | Main limitation |
|---|---|---|
| Polygon | Hard or mixed edges that need direct Bézier control | Too many points and handles become slow to animate |
| B-Spline | Smooth organic curves with fewer control points | The curve is influenced by points rather than passing directly through each one |
| MultiPoly | Several named shapes for body parts or a complex holdout inside one node | Shape animation must be enabled before keyframing |
| Tracked or stabilized roto | Removing broad camera or rigid-object motion before manual shape work | Tracking does not understand anatomy or changing occlusion |
| Magic Mask | A fast AI-assisted first matte for a recognizable person or object | Studio-only and still needs edge, occlusion, and temporal QA |
Use a keyer for hair, transparency, and fine edge detail when the plate has usable color separation. The Delta Keyer guide covers pulling and refining that key. Use roto shapes for solid cores, unwanted regions, foreground occluders, and edges you can define reliably.
Checked September 15, 2026 against Resolve 21.1, Blackmagic’s Fusion overview confirms the Bézier and B-Spline roto workflow; the current DaVinci Resolve 21.1 Reference Manual documents the mask inputs, alpha behavior, animation, MultiPoly, Roto Assist, and softness controls used below.
Plan the matte before drawing
Watch the whole shot and write down what changes: frame entry and exit, pose reversals, hands crossing the torso, motion blur, hair movement, and foreground occlusions. Also decide what the matte is for. A rough local color correction does not need the same edge fidelity as a subject cutout placed over a bright contrasting background.
Pick a reference frame where the pose is readable and the important edges are sharp. Then divide the subject by independent motion:
- head and neck;
- torso or coat body;
- upper arm and forearm;
- hand when its silhouette matters;
- upper leg and lower leg;
- props, loose clothing, or hair as separate problem areas.
Overlap neighboring shapes slightly around joints. A small controlled overlap is easier to manage than a one-pixel gap opening between an upper arm and torso. Name every shape before the shot becomes crowded.
Manual rotoscoping step by step
1. Add the mask where it can do the intended job
First identify the input you're feeding. A blue Effect Mask on most Fusion tools limits that tool’s result to the mask. A mask connected directly to a MediaIn or Loader input can instead add an alpha channel; Blackmagic recommends drawing the closed shape while the mask is disconnected, then connecting it.
For an explicit roto-to-alpha branch, connect the source image to MatteControl Background and the Polygon to its gray Garbage Matte input. A garbage matte removes its white region. If you drew around the subject you want to keep, enable Garbage Matte > Invert in MatteControl and check that the subject is white in the output alpha. Its white Solid Matte input instead fills alpha holes; it is not the same operation as cutting away the outside.
Feed the resulting image to a Merge node's green Foreground input, the replacement plate to yellow Background, and Merge to MediaOut. Masking Merge's blue Effect Mask limits that merge; it does not create a reusable alpha on the upstream source. Check Post-Multiply Image when preparing the cutout for a premultiplied Merge; do not apply repeated alpha multiplication to an already premultiplied branch.
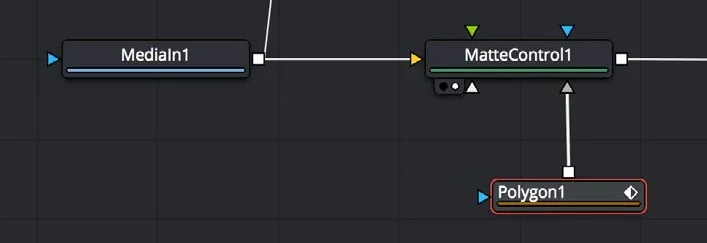
This input distinction explains why an animated outline may appear to do nothing, blank the image, limit only an effect, or produce an unexpected small alpha. Before rebuilding the shape, load the affected node in a viewer, inspect the connected input, and check the matte as white foreground over black.
2. Draw with the fewest points that hold the silhouette
Place points at real direction changes: jaw corner, shoulder, elbow, wrist, knee, heel. Let curve handles or B-Spline influence describe smooth sections between them. Don't add points at uniform intervals when the curve doesn't need them. Every unnecessary point is another control that can chatter between frames.
Keep each point following the same feature across poses, and avoid crossing the spline. Adding a point fits it into every existing shape keyframe; deleting one removes it from every keyframe. Review the whole animation after changing point count. For soft organic areas, a B-Spline can describe a smooth arc with fewer points. For a hard prop or clothing corner, Polygon gives more direct control.
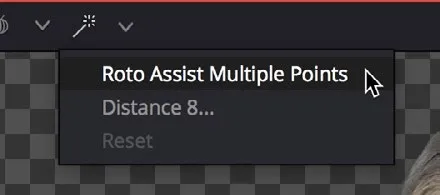
Resolve 21 also includes Roto Assist, which can snap newly drawn points to the nearest high-contrast edge. Multiple Points can add several points along an edge with one click, Distance sets the pixel search range, and Reset clears the snapped state so those points are no longer available for tracking.
Treat it as drawing assistance, not an automatic finished matte: review point count, edge choice, and every interpolated pose.
Roto involves constant viewer navigation and frame stepping. Set up the commands you actually use, full-frame view, next/previous key, and tool search, before a long shot; the Resolve keyboard shortcuts guide explains how to verify and customize them without overwriting an existing layout.
3. Build key poses with divide and conquer
Close the shape by clicking its first point on the reference frame. Keep Solid enabled for a filled mask rather than an outline. Polygon and B-Spline control points auto-animate by default: move to another frame and adjust the points to create a new shape keyframe. Center and rotation do not auto-animate; enable their Inspector keyframes separately if you use those controls. Move to the end of the required range and fit the silhouette, then go to the midpoint and correct it.
Play the two halves. Add another key only in the half that fails, then repeat. The current Resolve 21.1 manual notes that Polygon and B-Spline control points auto-animate and interpolate between shape keyframes.
4. Add keys at changes, not every frame
Useful keyframes usually sit at a change of direction, a pose extreme, a silhouette change, an occlusion boundary, or the start and end of heavy blur. If interpolation already follows the edge, leave it alone. Adding a key on every frame often creates tiny inconsistent corrections that read as edge vibration during playback.
5. Review the matte, then the composite
View the result as white foreground over black background to find holes, gaps, and temporal chatter. Then place it over the actual destination background. A matte can look clean in isolation yet reveal a dark halo over white or a bright fringe over black.
Use MultiPoly for complex subjects
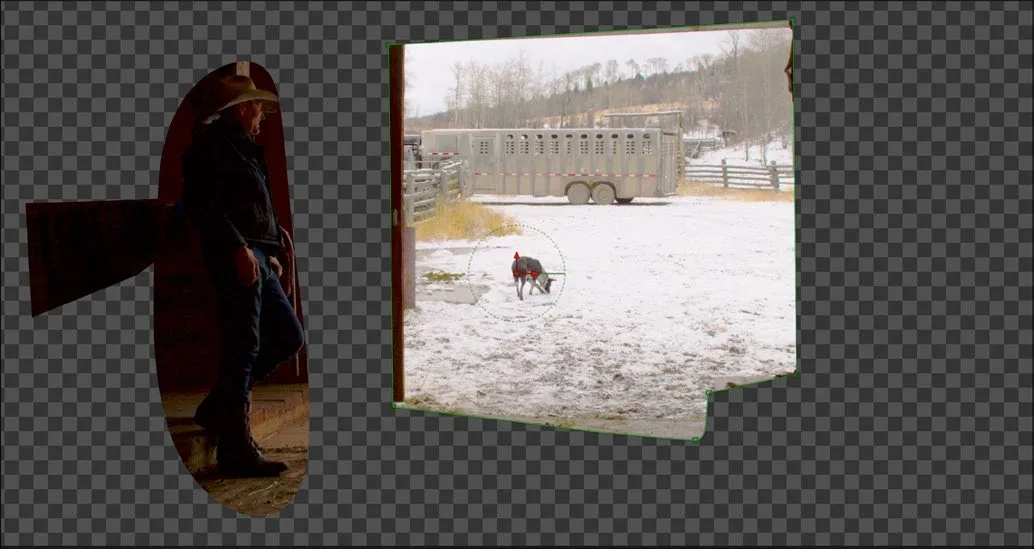
MultiPoly stores several independent named shapes in one node. It is useful for a person, creature, vehicle, or any holdout that would otherwise produce a tangle of separate mask nodes. Create one shape per independently moving part and set its combine behavior deliberately.
Important: MultiPoly doesn't auto-enable shape animation the way Polygon and B-Spline masks do. Select the animation diamond beside Right-click here for shape animation at the bottom of the Inspector, or right-click the label and choose Animate, before changing shapes across time.
If the animation diamond, combine controls, or per-shape settings are hidden, select MultiPoly and reopen the Inspector rather than redrawing the mask. The DaVinci Resolve Inspector guide covers panel state and control discovery across pages.
During the rough pass, fit the main masses with minimal points. Select each shape and confirm that edits at a second frame produce a distinct keyframe before continuing the shot. Use Modify Only to move existing points without accidentally adding new ones. It still allows deletion, so check earlier keys if you remove a point.
Track broad motion before detailed roto
If the subject or camera translates, rotates, or scales while local deformation is modest, track the broad motion first. Track a rigid feature or plane, remove its motion, animate the roto on that steadied image, then apply the original motion to the matte. For Planar Tracker, Steady is the mode intended for a locked-off paint or roto view; Stabilize smooths camera movement and is not the same operation.
This is not a shortcut for every shot. It works when the tracking data describes the same rigid motion as the body part or object you're isolating. A tracker attached to the torso won't correctly animate a swinging forearm. Use tracking for the base movement and manual keys for deformation.
Keep the inverse transform and the re-applied transform paired. If the mask or image receives both tracked motion and a second Planar Transform, it can drift or move twice. The Fusion tracking guide covers reference frames, Planar Transform, occlusion masks, and drift checks in detail.
Handle occlusion as layers
When a hand crosses the torso, don't force one torso outline to describe both depths. Keep the torso matte stable and animate the hand as a separate foreground shape. If you are combining separate takes of the same performer, the clone-effect workflow covers shooting and compositing those takes; the roto here only supplies the matte.
When a subject passes behind a pole, make a separate holdout matte for the pole and use it to remove that foreground region from the subject result. The pole must remain visually in front; changing the label or mask color doesn't change the composite order.
If the tracked feature becomes hidden, stop at its last reliable frame rather than accepting drift. Track the visible sections separately or use another feature with the same rigid motion. Keyframe the necessary transition and inspect the join. An occlusion mask can exclude an obstruction from a planar track, but it cannot recover an entirely hidden surface.
If Studio is available, Magic Mask can create a fast first pass for the recognizable subject. Keep manual shapes for corrections and hard holdouts. Don't treat an AI matte as finished simply because the first frame looks good.
Refine edges only after motion is stable
Soft Edge
Match the plate's focus and edge contrast. A sharp prop may need almost no softness; defocused clothing needs more. Excessive global feather can produce halos or lose detail. For local softness, click Double Polyline or choose Make Outer Polyline from the mask's viewer menu. Press Tab to select the dashed outer contour, then move only the segments that need a wider falloff. Adjust the outer contour, not the inner subject outline.
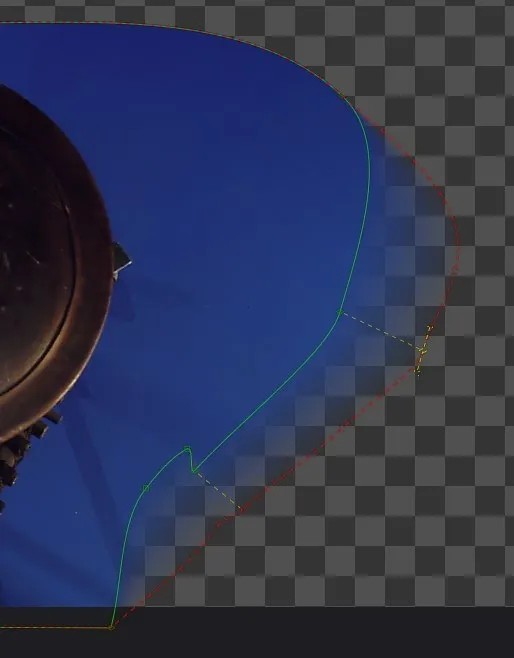
Motion blur
A moving hand can have a blurred edge even when the torso remains sharp. Fit the matte to the photographed boundary and use the outer polyline where a local falloff is enough. For a mask animated in Fusion, its Settings tab also has Motion Blur, Quality and Shutter Angle controls. Motion Blur samples the mask's animated movement; it does not recover missing detail from the footage. Increase Quality only when the blur needs smoother sampling, and judge Shutter Angle against the plate rather than assuming one value fits every shot.
If a separate element is match-moved, add motion blur from the transform that actually drives that element and compare direction and extent with the plate.
Combine modes
For chained masks, Merge is the default Paint Mode; Maximum keeps the higher mask value in an overlap. Add sums values and can make overlapping soft edges more opaque, so it is not an interchangeable default. Use Subtract for holes or excluded regions and inspect the combined matte. MultiPoly also gives each shape its own combine controls. Names such as Torso, Arm_FG, and Coat_Hole help you identify the shape that needs correction.
Hair and transparency
Roto the solid core of the head and shoulders. Preserve flyaway hair with a keyer, Magic Mask, or a separate edge matte when possible. Drawing each strand is slow and rarely temporally stable.
Resolve Free vs Studio for rotoscoping
Resolve Free includes the manual masks, keyframing, conventional point tracker and Planar Tracker used in this workflow. You do not need Studio to draw, animate or combine these mattes. This does not mean every Fusion tracking tool is free; the 3D Camera Tracker is a separate Studio feature and is not required here.
Magic Mask requires DaVinci Resolve Studio. Blackmagic’s Resolve Studio page confirms the edition boundary. It can reduce first-pass labor on people and recognizable objects, but it does not remove the need to check every cut, edge, occlusion, and motion-blurred frame. Use the Fusion hub to place the manual roto workflow inside a complete node-based composite.
Rotoscoping troubleshooting
The edge chatters
Remove unnecessary points and keyframes. Return to the first meaningful deviation, fix that pose, and let interpolation carry more frames. Watch at normal speed instead of correcting harmless single-frame texture.
A limb disappears or a gap opens
Split the limb into its own shape and overlap it slightly with the torso or neighboring segment. Check the shape’s combine mode, animation state, and active frame range.
The MultiPoly shape does not animate
Enable the shape-animation diamond at the bottom of the Inspector. Then create distinct poses on different frames and confirm key indicators appear.
The mask is tiny or offset
Compare the source and mask image dimensions, pixel aspect ratio, Domain of Definition, and any Transform, resize or tracking operation between them. Display the same reference frame on both branches. A matte built on a steadied image must receive the matching motion exactly once before it is applied to the original moving plate.
The matte works in Fusion but fails after an edit
Check the clip’s Global In/Out, source timing, retime, and Fusion composition range. A slip, trim, or copied mask on a different-resolution clip can separate existing shape keys from the intended frames.
Final roto QA checklist
- Scrub the matte in black and white for holes and shape pops.
- Watch the full shot at normal speed for chatter.
- Check every occlusion, frame entry, frame exit, and direction change.
- Inspect hard, soft, blurred, and transparent edges against the final background.
- Confirm the matte is connected to the intended node or alpha operation.
- Render a short test and inspect it outside the interactive Fusion viewer.
Roto makes more sense after node and tracking basics; the DaVinci Resolve tutorial roadmap keeps those Fusion skills in a practical order.
Rotoscoping in Fusion FAQ
What is rotoscoping in DaVinci Resolve?
Rotoscoping is the animation of masks or mattes over time to isolate a subject for compositing, correction, removal, replacement, or foreground holdout work.
Should I use Polygon, B-Spline, or MultiPoly?
Use Polygon for direct Bézier control, B-Spline for smooth organic curves with fewer points, and MultiPoly when one complex subject needs several named independent shapes in a single node.
How many mask points should I use?
Use the fewest points that describe real changes in curvature. Place them at joints and silhouette corners, then let curves handle the sections between them.
Do I need to keyframe every frame?
No. Build start, end, and middle poses, then add keys only where interpolation fails. Every-frame corrections are appropriate only for genuinely unpredictable motion or brief difficult sections.
Can I rotoscope in DaVinci Resolve Free?
Yes. Resolve Free includes the core manual masks, MultiPoly, keyframing, and tracking tools needed for rotoscoping. Magic Mask requires Studio.
Why does a Polygon mask not make the background transparent?
A blue Effect Mask on most Fusion tools limits that tool’s effect. A mask connected directly to MediaIn or Loader can add alpha, while MatteControl provides an explicit branch for combining or inverting mattes. Check the node and input type before rebuilding the shape.
