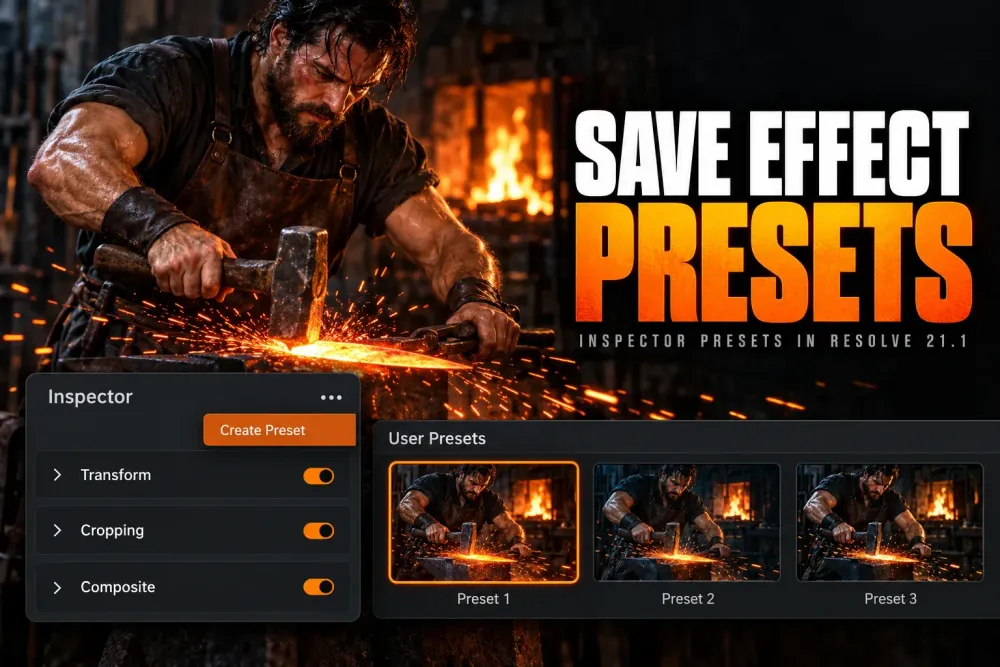
To save an effect preset in DaVinci Resolve 21.1, select the clip, open the Inspector and either choose Create Preset from the Inspector's 3-dot menu to save the whole tab, or click the Create Preset icon beside a single section such as Transform. Name it, and it appears in the Effects library under User Presets, ready to double-click or drag onto other clips. Older versions have no Inspector presets, so there you store the settings on an adjustment clip in a bin and paste them back, or save them as a Fusion setting or macro.
Inspector presets came with the free DaVinci Resolve 21.1 update, which Blackmagic says lets you "save and recall favorite parameter configurations for video, audio, transitions and transforms." The manual gives them no Studio label, so they work in the free version as well as Studio, and the Resolve 21 what's new guide covers the rest of that release.
Pick the right kind of preset
Resolve has a save route on almost every page, and each one keeps something different in a different place. Pick by what you want to reuse:
| What you want to reuse | Save it as | Version | Where it's kept |
|---|---|---|---|
| One group of clip settings, such as scale, crop or composite | Inspector section preset | 21.1 and later | Effects > User Presets |
| Everything on one Inspector tab, effects included | Inspector tab preset | 21.1 and later | Effects > User Presets |
| A customized transition | Transition preset | Older versions too | Video Transitions > User; 21.1 also lists converted user transitions in User Presets |
| A look that sits over several clips | Adjustment clip in a bin or Power Bin | Older versions too | One project, or every project in the library with a Power Bin |
| Settings from a clip already in the timeline | Copy, then Paste Attributes | Older versions too | Nowhere: you need the source clip |
| A Fusion effect or title | Versions, a .setting file, a default or a macro | Older versions too | With the node, or as a file on disk |
| A grade | PowerGrade | Older versions too | PowerGrade album of the project library |
| A window shape or group of windows | Window preset | Older versions too | Window palette's option menu |
| An audio plug-in or a chain of them | Plug-in preset or Chain FX preset | Older versions too | Preset menu in the plug-in or Chain FX window |
Workspace > Layout Presets is a separate feature that saves the arrangement of panels on screen. If that's what you were after, the workspace layout presets guide covers it.
Save an Inspector preset in Resolve 21.1
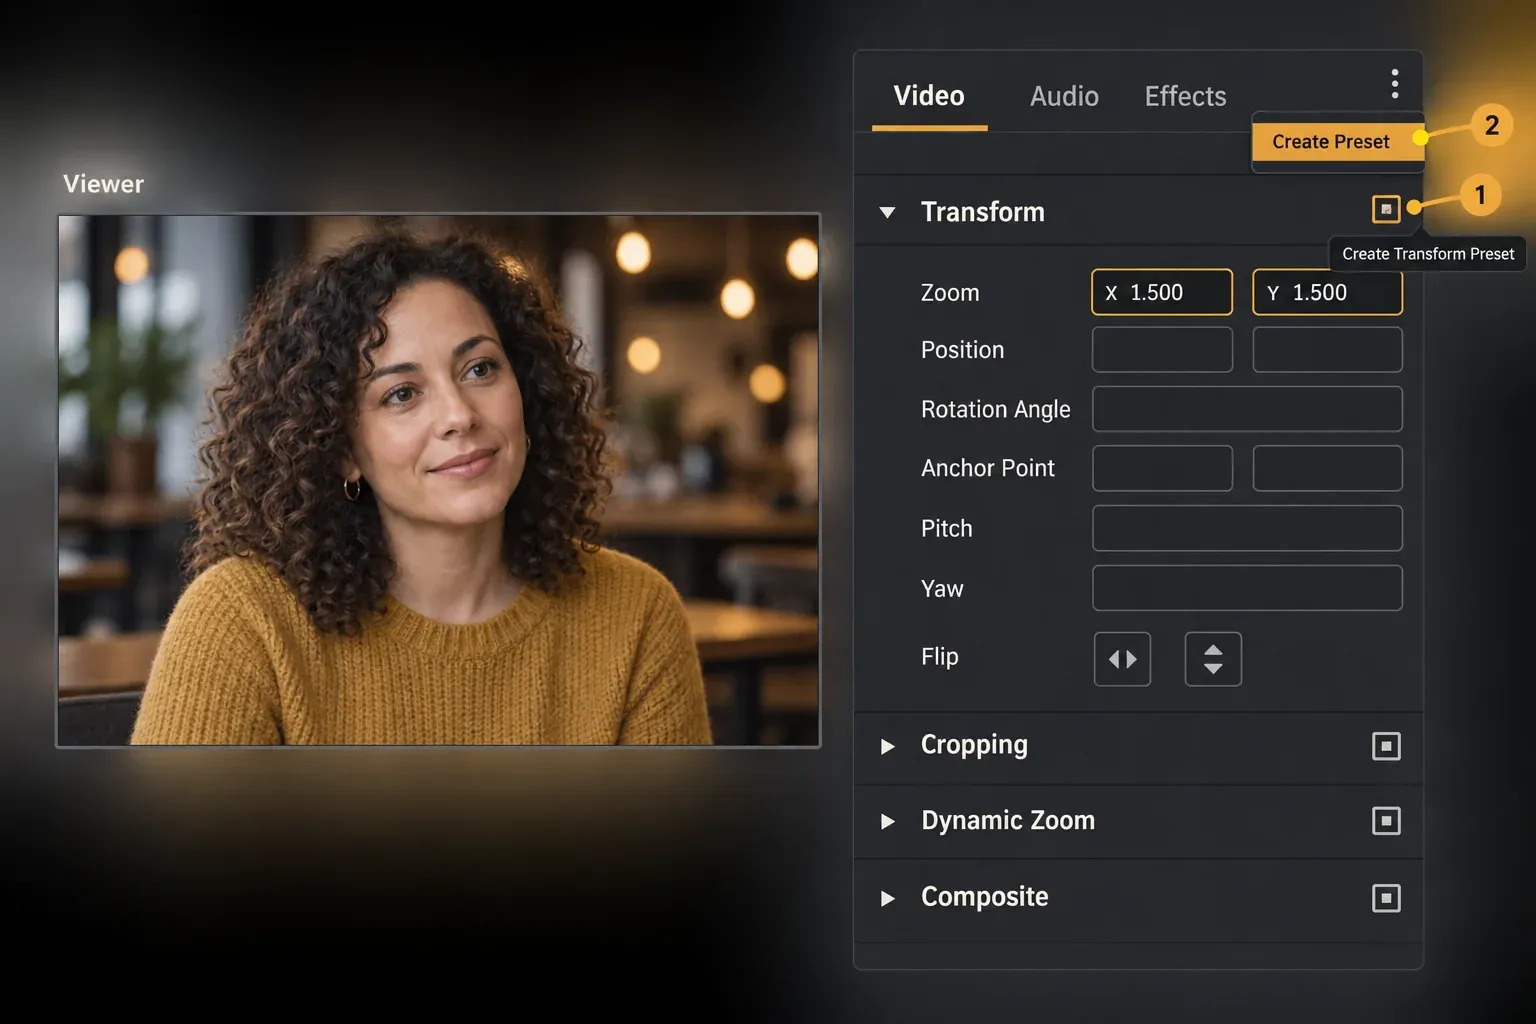
Inspector presets work on the Edit and Cut pages, where Newsshooter's 21.1 rundown lists them. The manual's example is a batch of clips that all need a 1.5x zoom to clear up an aspect ratio problem: save XY Transform at 1.5000 once, then apply it to all of them simultaneously without touching each clip's parameters. If the Inspector is new to you, the Inspector guide explains its tabs and sections first.
Save one section
- Select a timeline clip whose settings are already right and open the Inspector.
- On the Video tab, find the section you want to reuse: Transform, Cropping, Composite and so on.
- Click the Create Preset icon beside that section's header. The manual's figure shows it as the Create Transform Preset icon on the Transform section, and transitions carry the same icon.
- Type a name. Name it for the job, such as "Zoom 1.5 aspect fix", so it's easy to pick out of the list later.
Save a whole tab
- Select the clip and click the tab you want to save, such as Video, Audio or Effects.
- Open the 3-dot menu at the top of the Inspector and choose Create Preset.
- Name the preset.
A tab preset saves every section and parameter on that tab. Creative Video Tips puts the split the same way: parameters "can be saved individually or combined into a group preset via the option menu." I'd use section presets for most jobs because of that difference. A scale fix saved as a Video tab preset also carries the source clip's cropping, composite and opacity values to every clip you apply it to. The Effects tab is the one worth saving whole, when you've built a stack of effects on one clip and want the entire stack again.
Apply the preset
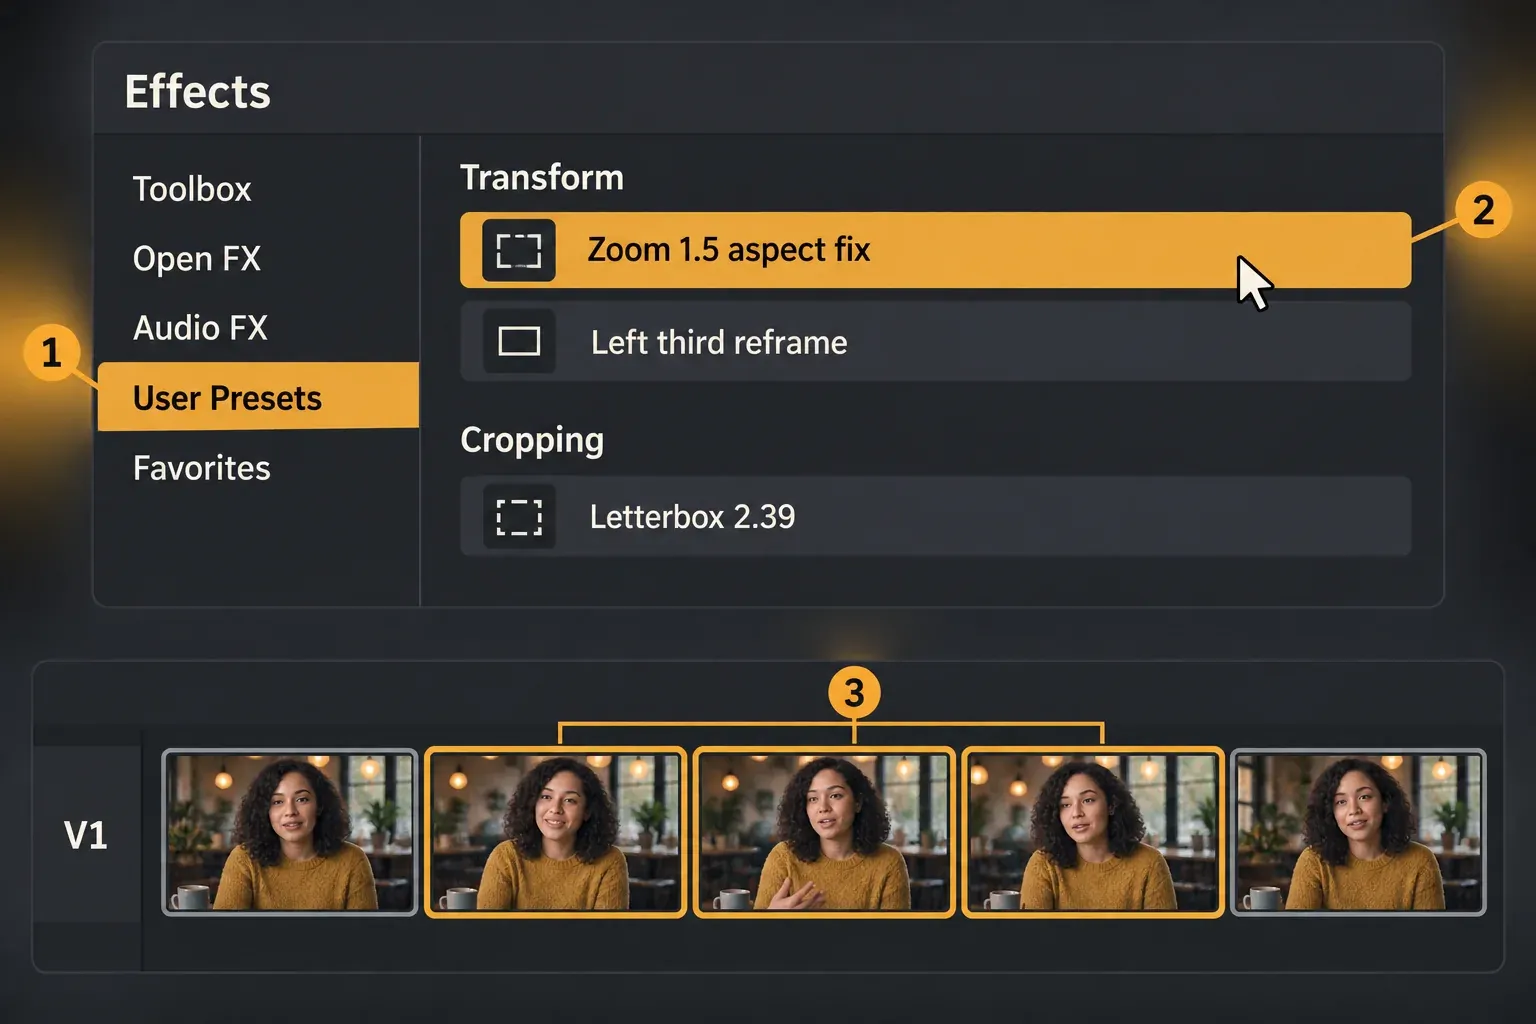
- Open the Effects library and click User Presets. Your preset sits under the tab and section group it came from.
- Select the clips that need it and double-click the preset, or drag it onto a clip like any other effect, as the manual's apply step describes.
- Check one of the clips in the Inspector to confirm the values landed.
The first time you open User Presets after updating, any custom transitions you saved in older versions are already there, converted to transition presets and listed separately.
Keep a copy that can travel
Inspector presets recall across projects. For a Fusion-built effect, save its node setup as a .setting file or macro using the Fusion section below. For applicable Edit attributes on another computer, put a configured source clip in a small timeline, export that timeline as DRT and import it at the destination, then copy the carrier clip and use Edit > Paste Attributes for the controls offered there. This transfers clip attributes, not the Inspector preset library; the destination still needs the required media, fonts and plug-ins.
Save a transition preset
Transitions had their own preset command long before 21.1. A 2025 post in Blackmagic's effects-preset request thread even held it up as the model the rest of the Inspector should follow, because it keeps the length and parameters together.
- Add the transition and double-click it to open it in the Inspector, then set it up.
- If the timing curve matters, set it in the transition's Curve Editor. The manual says a customized curve is saved inside the preset, and the keyframes and curve editor guide covers the curve shapes.
- Right-click the transition in the timeline and choose Create Transition Preset.
- Type a name and click OK.
Look under Video Transitions > User for saved transition presets. In 21.1, existing user transitions are also converted and listed separately in Effects > User Presets. A saved preset applies like any other transition. It can be favorited or set as the Standard Transition, and right-clicking it gives you Delete Transition Preset when you no longer need it. The transitions guide shows the orange marker that tells you which transition is the current standard.
Before 21.1: keep settings on an adjustment clip
Without Inspector presets, a recurring workaround in the Blackmagic forum is an adjustment clip kept in a bin. Adjustment clips pass Resolve FX and Open FX plug-ins, the Inspector's Composite, Transform, Cropping and Dynamic Zoom settings, Fusion effects and Color page grades to every clip underneath, per the manual's adjustment clip section, so one clip can hold a whole look.
Store the adjustment clip
- Add an adjustment clip above the footage and build the look on it, as the adjustment clips guide shows.
- Give it a clear name in the Inspector, where the manual says adjustment clips can be named.
- Drag it from the timeline into a Media Pool bin. That keeps it in this project.
- To reach every project in the same project library, drag it into a Power Bin instead. Power Bins are hidden by default, so show the Power Bins area, right-click inside it and choose Add Bin. The Smart Bins and Power Bins guide explains how far that sharing goes.
Reuse it as a layer or paste it in
The simple reuse is to drag the clip back over new footage as a layer. To apply its settings to the clips themselves, a 2023 Blackmagic forum workaround takes four steps:
- Drag the adjustment clip from the Power Bin to the timeline.
- Select it and press Ctrl-C (Command-C on a Mac).
- Select the target clips and press Alt-V (Option-V on a Mac) to open Paste Attributes, tick the attributes you need and click Apply.
- Delete the adjustment clip.
Its author called the routine "a bit cumbersome but still faster than typing in numbers every time." Paste Attributes copies whatever you tick, so leave unrelated boxes off. Resolve FX and Open FX ride on the Plugins box under Video Attributes, as the manual's Video Montage example shows, and for keyframed settings the Paste Attributes window asks whether to Maintain Timing or Stretch to Fit.
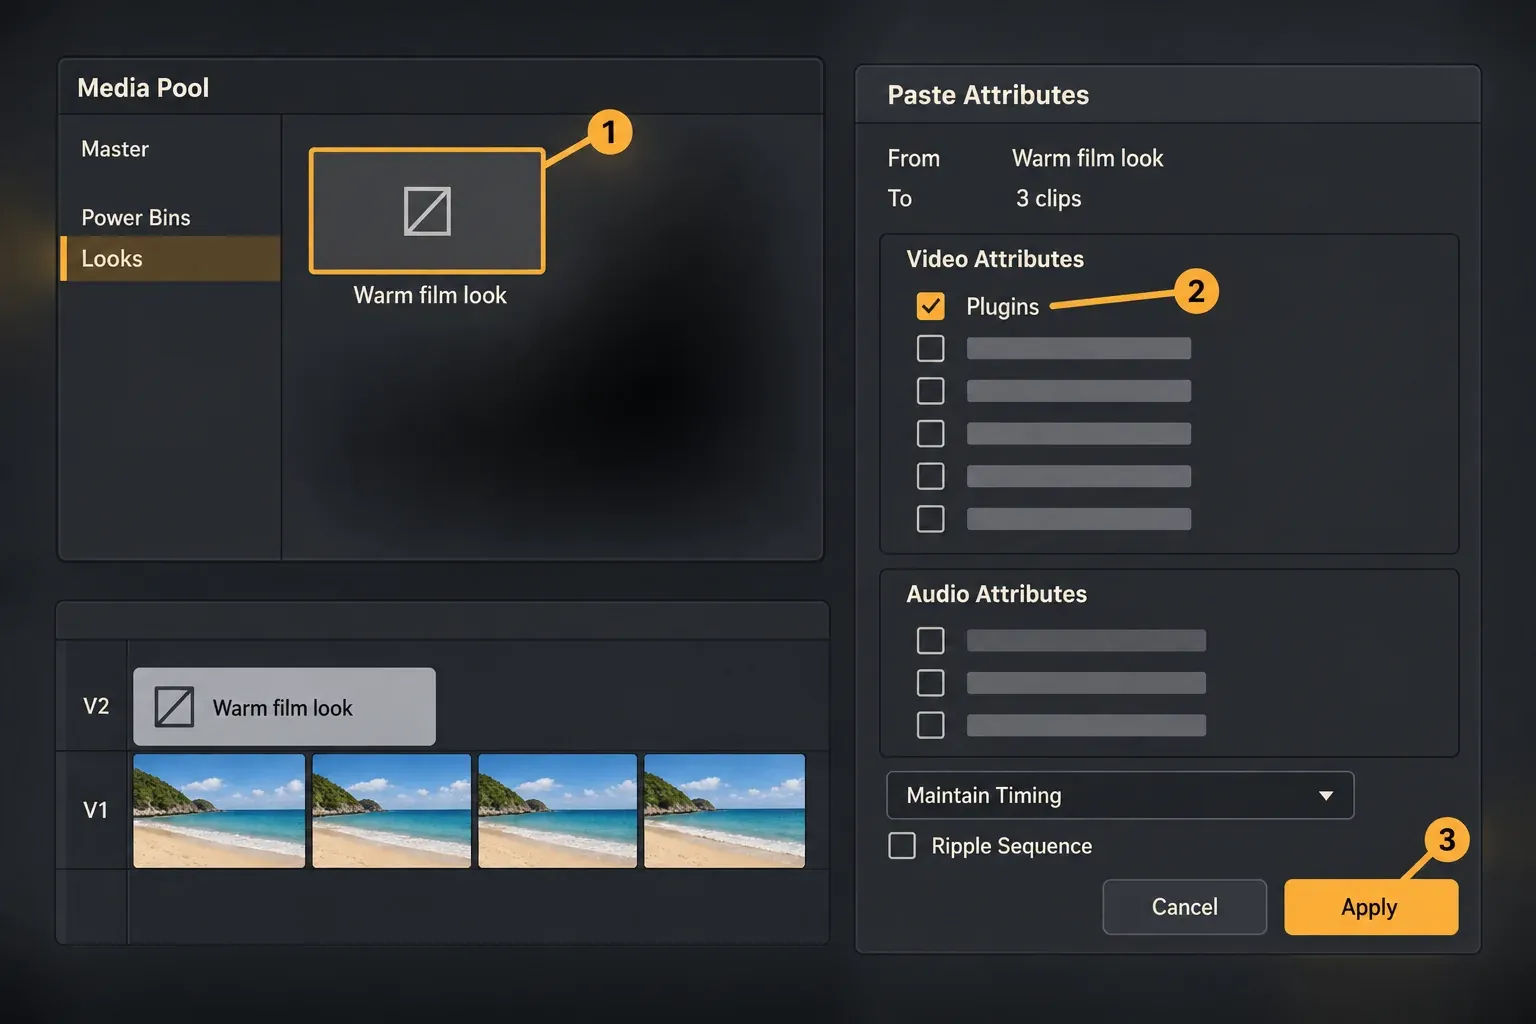
Audio works the same way with a placeholder clip. A 2022 forum answer adds the audio effects to a dummy audio clip and drags it into a Power Bin with a descriptive name. To reuse it, drag it back to the timeline, copy it and delete it, select the target clips, choose Paste Attributes and enable Audio Attributes > Plugins. A reply in the same thread notes that, at the time, presets existed only inside each plug-in's own preset system.
Where the adjustment clip route falls short
The biggest catch is that an adjustment clip only works on what's already in the frame. In a 2025 forum thread on transform presets, PhotoJoseph points out that on 6K 4:3 open-gate footage filling a 16:9 UHD timeline, an adjustment clip that zooms out won't reveal the media cropped outside the frame. A trainer in the same thread recommends the Edit Inspector's zoom or a single-clip Fusion comp for scaling the native pixels. He also describes a reference-comp setup with a highest-resolution layer at the bottom. An adjustment-clip zoom acts on the timeline image, so it won't recover the cropped edges. So a scale or reframe fix belongs on the clip itself: an Inspector section preset on 21.1, or Paste Attributes from a correctly scaled clip before that.
The route also adds work around every use. In his 2023 request for a Final Cut style "Save Effects Preset", PhotoJoseph notes that with copy and paste "you have to have something to copy from", and that a saved adjustment clip means "yet another clip on the timeline." Scope is the last limit. A Power Bin reaches one project library, and a reply in a 2023 thread on saving effects notes that Power Bins, transition presets, node settings and macros suit a single user, machine or database, not a team spread across several databases.
Save Fusion effects and titles
Many Edit-page titles and effects are Fusion compositions underneath, which is why a Blackmagic forum answer on saving effect settings sends people to Fusion: save macros, settings and templates there and package them as DRFX to see them on the Edit page. Its author calls that packaging step "a bit of a hassle." Fusion gives you four save routes, and the right one depends on how far the setting has to travel. If the Fusion page is new to you, the Fusion tutorial for beginners covers nodes and the Inspector first.
Versions: up to six looks on one node
Click the Versions button in a node's Inspector to reveal six buttons, each holding a separate set of settings for that node. All versions are saved with the node, an orange underline marks the one in use, and right-clicking a number lets you clear it, per the manual's Versions section. A 2023 forum reply takes this further: set up to six versions on a title's node, save the node's settings as a template, and every copy of that title carries the six looks. To select a version later, open the saved title in Fusion, select its node and click the version number in that node's Inspector.
Settings Save As and Load
Right-click a node and choose Settings > Save As to write a .setting file anywhere on disk. Settings > Load applies the file to another node, and dragging a .setting file into the Node Editor creates a node from it, as the manual's settings section explains. A 2021 forum post uses this to keep "100's of presets" for a single title, by adding the title to the timeline, opening Fusion and loading the saved file onto its node.
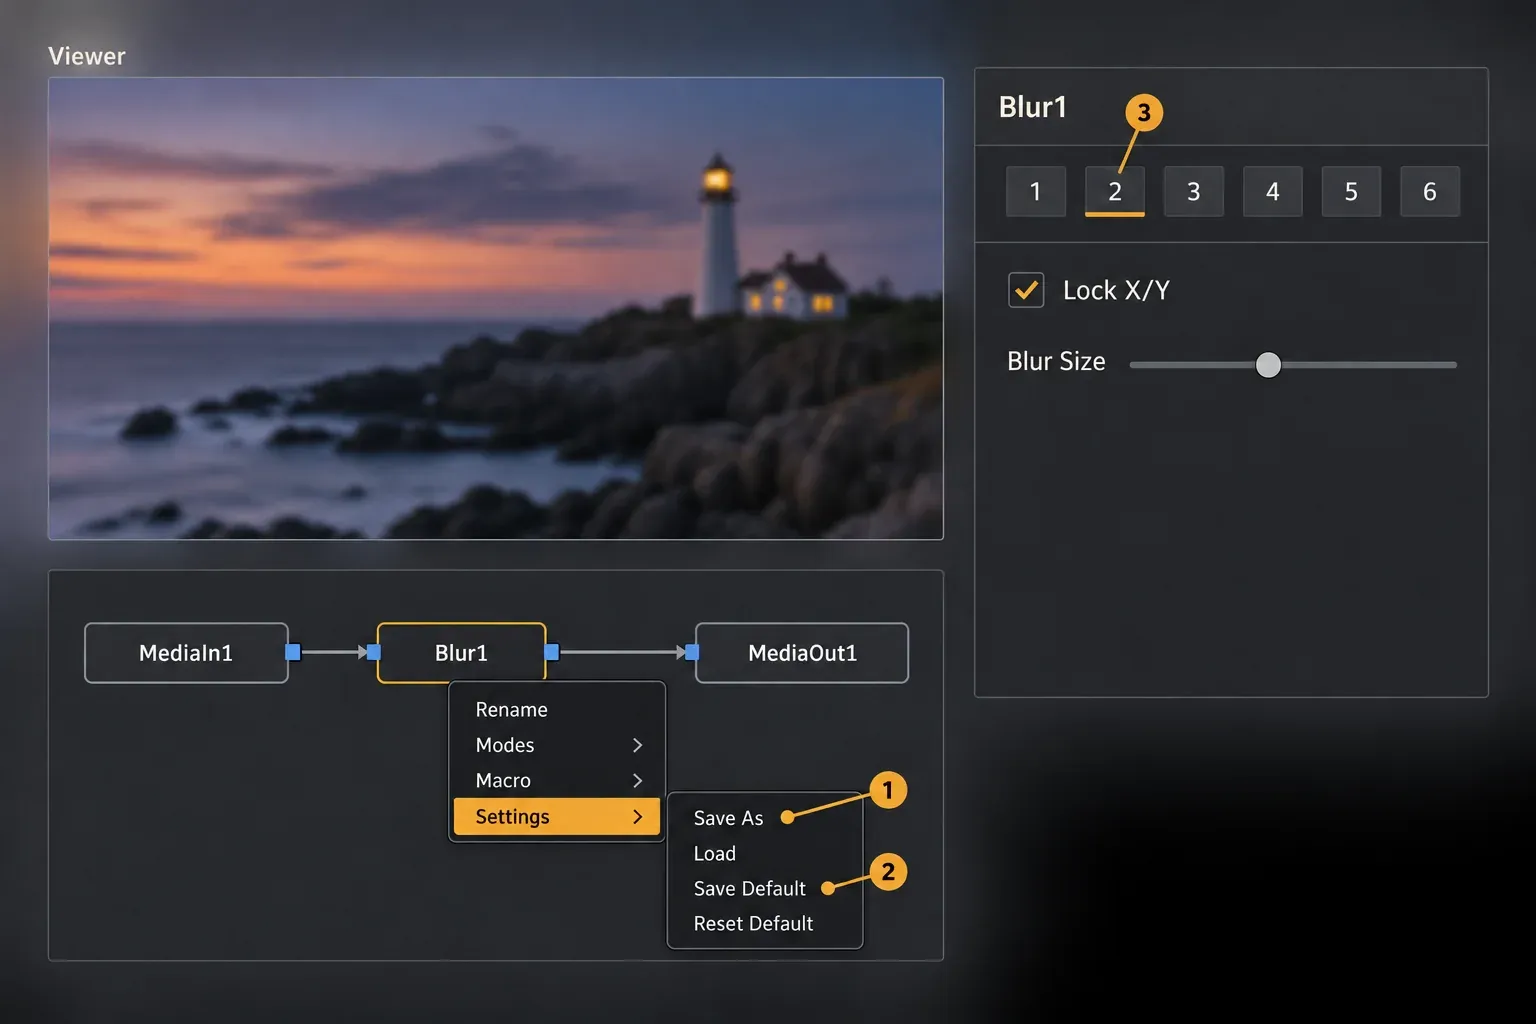
Save Default: change a node's starting values
Settings > Save Default makes the current values the starting point for every new node of that type. Resolve writes the file to the Defaults folder set in Fusion Settings > Path Map, so a Blur default becomes Blur_Blur.setting, and Settings > Reset Default, or deleting that file, brings back the factory values (manual). The default folder is:
- macOS:
~/Library/Application Support/Blackmagic Design/DaVinci Resolve/Fusion/Defaults - Windows:
C:\Users\<username>\AppData\Roaming\Blackmagic Design\DaVinci Resolve\Fusion\Defaults - Linux:
~/.fusion/BlackmagicDesign/DaVinci Resolve/Fusion/Defaults
Macros and templates for the Edit page
To turn a node setup into something you drag from the Effects library, select the nodes, right-click and choose Macro > Create Macro. In 21.1 the Macro Editor's Save to menu writes a plain .setting file or one of four template categories, and a .drfx bundle packs templates into a single file for another computer. The Fusion macros and templates guide walks through Save to, .setting files and .drfx bundles step by step.
21.1 also lets you edit several Fusion titles at once. Select them on the timeline and a Multiple Values toggle appears, with their shared controls on the Inspector's Video > Title tab, all of them active when the titles come from the same template, as the manual's multiple clips section describes. That fixes titles already in the timeline, while a template or preset sets up the next ones.
Fusion defaults, .setting files, macros and templates are files on your drive, so copy them before you update or reinstall. The safe update guide lists macros, title templates and Power Bins among the things to back up.
Color and audio presets
Color page: PowerGrades and window presets
Grades go into PowerGrades. A PowerGrade album is shared among all projects in one project library, each library has its own album, and stills can be copied between libraries through the Gallery window. The copy color grade guide covers stills, PowerGrades and pasting grades. A 2023 forum post even uses a PowerGrade to store an Open FX setup: build the effect in a single node, save that grade as a PowerGrade, then drag it onto a node of each clip that needs it.
Window shapes have their own preset. Open the Window palette's option menu, choose Save as New Preset and name it, then recall it from the same menu. Loading a window preset overwrites the windows already in that node, so add a fresh node first if you want to keep them.
Audio: Inspector, plug-in and Chain FX presets
On the Edit and Cut pages, 21.1 covers clip audio too: select the Inspector's Audio tab and choose Create Preset from the 3-dot menu, exactly as in the tab steps above. Inside Fairlight, every Fairlight FX plug-in window has an Add Preset button that saves the current settings under a name, plus a Preset menu, Previous and Next buttons, an A/B comparison and Reset, per the manual's plug-in controls.
For a whole chain of plug-ins, save it with the Plus button to the left of the Preset menu in Chain FX, make it the default from its Options menu, or copy and paste it to another instance, as the Chain FX section shows. Fairlight > Presets Library lists saved presets and filters them by Equalizer, Dynamics, Plugins, Global Track, which stores a whole channel strip, and Global Bus. I'd name EQ and dynamics presets after the voice or microphone they were built for, because a curve that fixed one recording is only a starting point on the next. The dialogue EQ guide explains why those frequency ranges are clues to check by ear.
Published preset workflows compared
I compared 19 selected Blackmagic forum replies about saving or reusing effect settings, dated March 2021 to April 2025, from five threads: requests for Inspector presets and effect presets, plus discussions of saved effects, audio and transforms. The table puts four of those forum workflows beside the Reference Manual's Inspector and transition presets. It shows what has to be ready and what to do next. The replies group actions differently, so their step counts don't establish which workflow is fastest.
| Recipe | Version | Reuse workflow | Saved where | Starting point / limit |
|---|---|---|---|---|
| Inspector preset, Reference Manual 21.1 | 21.1 and later | Double-click the preset, or drag it onto a clip | Effects > User Presets | Preset already saved; select target clips for double-click |
| Transition preset, Reference Manual 21.1 | Older versions too | Apply the saved transition to an edit point | Video Transitions > User; converted entries also in 21.1 User Presets | Transition already saved; applies to transitions only |
| Adjustment clip in a Power Bin, forum, Jan 2023 | Older versions too | Drag the carrier in, copy it, paste chosen attributes onto target clips, then delete the carrier | Power Bin, one project library | Configured adjustment clip already saved; choose attributes and Apply in the paste dialog |
| Dummy audio clip in a Power Bin, forum, May 2022 | Older versions too | Drag the carrier in, copy and delete it, then paste Audio Attributes > Plugins onto target clips | Power Bin, one project library | Configured audio clip already saved; select targets and confirm Apply |
| Fusion Settings Save As and Load, forum, Apr 2021 | Older versions too | Add the title, open Fusion, right-click its node, choose Settings > Load and open the file | .setting file on disk | Saved .setting file; the title and its node must be available |
| Fusion Versions saved as a template, forum, Feb 2023 | Older versions too | Add the saved template, open Fusion, select its node and choose a version in the Inspector | With the node and its template | Template already saved with up to six node versions |
Within these 19 replies, Fusion is recommended in 11, a bin or Power Bin in 8, transition presets in 2, and the Color page, an audio plug-in preset system and a rendered file in 1 each. Some replies recommend several methods. These counts describe the selected discussions, not how often Resolve users choose each route. The useful distinction is the saved object: an Inspector preset applies clip controls directly, a carrier clip supplies attributes to copy, and a Fusion setting loads values onto a node.
The demand behind those workarounds was long-running. The effects-preset request thread ran to 49 posts between February 2021 and December 2025, and when 21.1 shipped, ProVideo Coalition called the missing presets "a glaring omission in Resolve's Inspector." Digital Production put the payoff plainly: the feature "becomes valuable after the 400th repeated setup."
My verdict: on 21.1 or later, save repeat Edit-page settings as Inspector section presets, because each changes one group of controls and Blackmagic says they recall across projects. I'd keep .setting files and .drfx bundles for effects built in Fusion. For transferable Edit attributes, use the configured-clip DRT route above. Before 21.1, keep a configured clip in a Power Bin for Paste Attributes, or leave an adjustment clip over the footage when the look belongs on a layer. For a title with several alternate looks, save its node versions in a Fusion template.
Fix common effect preset problems
There's no Create Preset command
Inspector presets arrived in 21.1, so an older version has neither the section icons nor the menu item. Check your version under DaVinci Resolve > About DaVinci Resolve and update, or use the adjustment clip and Fusion routes above until you do.
The preset changes more than you wanted
It's probably a tab preset, which carries every section's values. Save the one section you need with the icon beside its header and apply that instead.
Zooming out doesn't reveal the edges of the shot
An adjustment clip works on the frame that's already composited, so it can't bring back media cropped outside it. Apply the scale on the clip itself with an Inspector preset or Paste Attributes.
The preset is missing in another project or on another computer
An adjustment clip in a normal bin stays in its project, and a Power Bin or PowerGrade album covers only the current project library. To move applicable Edit attributes, export a small DRT timeline containing the configured clip, import it at the destination, then copy the clip and use Edit > Paste Attributes. Save a local Inspector preset there if needed. Fusion .setting files and .drfx bundles transfer Fusion-built setups; grades move as stills through the Gallery window.
A Fusion default or template disappeared after an update
Check that Fusion Settings > Path Map > Defaults still points at the folder that holds your files, then restore any missing .setting or template files from your backup.
Effect presets FAQ
Can you save effect presets in DaVinci Resolve like in Premiere Pro?
Yes, since 21.1. Save from the Inspector with Create Preset and apply from Effects > User Presets with a double-click or a drag. On older versions, use an adjustment clip in a Power Bin with Paste Attributes, or a Fusion setting file.
Do Inspector presets work in the free version?
Yes. The manual gives them no Studio label, Blackmagic shipped them in the free 21.1 update, and the edition table in cutsio's 21.1 workflow guide lists inspector presets in both Free and Studio.
Can I share presets with another computer?
For a Fusion-built effect, copy its .setting file, macro or .drfx bundle. For applicable Edit attributes, carry the configured clip in a DRT timeline, import it, then copy the clip and use Edit > Paste Attributes; this is not direct export of the Inspector preset library. PowerGrade stills move through the Gallery window. Required plug-ins, fonts and media must also be available at the destination.
How do I save audio effect presets?
In 21.1, select the Inspector's Audio tab and choose Create Preset. In Fairlight, use a plug-in's Add Preset button for one effect and a Chain FX preset for a whole insert chain.
Can I save Open FX settings?
Yes. In 21.1, save the Inspector's Effects tab as a tab preset to keep the whole effects stack. Before 21.1, store the effect on an adjustment clip in a Power Bin, or build it in a Color page node and save that grade as a PowerGrade.
Final verdict: the preset route for your version
On 21.1 or later, I'd save repeat settings as Inspector section presets, since each one changes a single group of controls, and keep tab presets for the rare case where every control on the tab should travel together. Transitions go into transition presets on any version. Before 21.1, keep the look on a named adjustment clip in a Power Bin and paste it with Paste Attributes when the settings need to be applied to the clips. Use Fusion settings, macros or a .drfx bundle for effects built in Fusion, use the configured-clip DRT route for applicable Edit attributes on another computer, and keep grades in PowerGrades and audio chains in Chain FX. The Learn Resolve hub collects the rest of the editing guides.