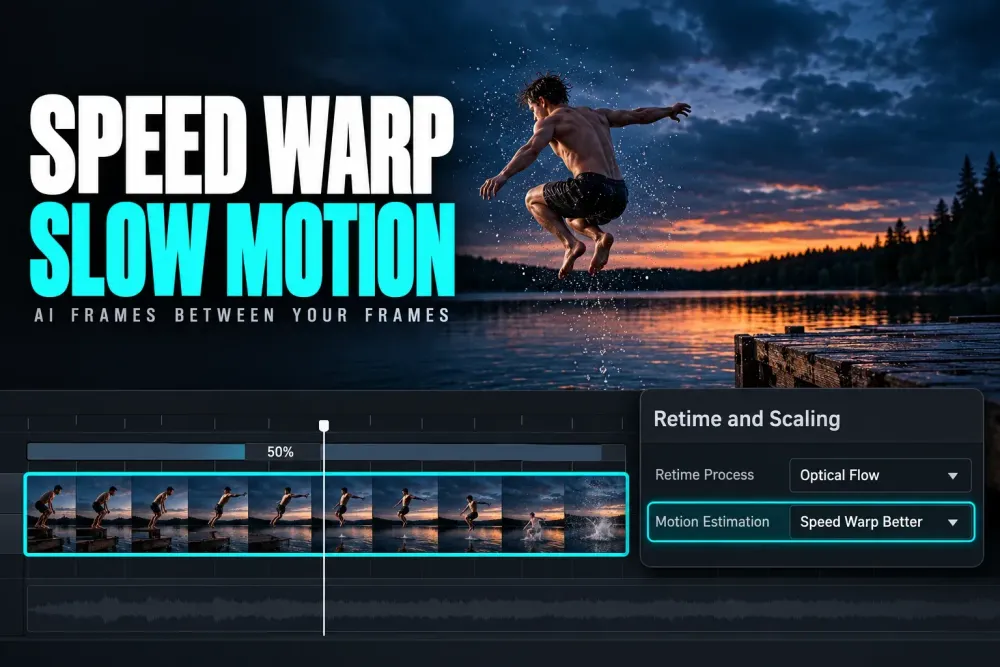
Speed Warp is the AI frame interpolation in DaVinci Resolve Studio that builds new in-between frames, so a slowed clip plays smoothly where it would otherwise stutter. Select the clip on the Edit page, open Inspector > Video > Retime and Scaling, set Retime Process to Optical Flow and Motion Estimation to Speed Warp Better, then slow the clip, for example with right-click > Change Clip Speed > 50%. On a Mac, AI Speed Warp Metal in the same list is the faster version built for Apple hardware.
Speed Warp is a Studio feature on Windows, macOS and Linux. On the iPad it comes with the Studio in-app upgrade, and iPads with A14, A15 or A16 chips may get a simpler fallback process. It runs on the DaVinci Neural Engine and is heavy: in the test results below, no graphics card processes it at real time.
I set it per clip and leave the project default alone, because a project-wide Speed Warp setting reaches every retimed and mixed frame rate clip in the timeline and multiplies render time on shots that never needed it.
What Speed Warp does and who gets it
Slow a 24 fps clip to 50% on a 24 fps timeline and Resolve has to show every source frame twice, or make up the missing half. The Frame Interpolation options in the DaVinci Resolve 21.1 manual list three ways to fill the gap. Nearest drops or duplicates frames, the most processor-efficient and lowest-quality route. Frame Blend dissolves neighboring frames into each other. Optical Flow estimates the motion between frames and draws new ones, which looks exceptionally smooth on linear motion, while two elements crossing in different directions or unpredictable camera movement can leave artifacts.
Speed Warp is the top tier of that Optical Flow estimation. The manual's Motion Estimation notes say Speed Warp Faster and Speed Warp Better use the DaVinci Neural Engine and, in ideal circumstances, give higher visual quality with fewer artifacts than even Enhanced Better. Results depend on the content of the clip, so it isn't an automatic win on every shot.
- Windows, Mac and Linux: DaVinci Resolve Studio. The DaVinci Resolve Studio 21 features list marks Speed Warp as a Studio feature that uses the DaVinci Neural Engine.
- Free edition: no Speed Warp. The free version still retimes with Optical Flow, and the free version feature list covers what else stays locked.
- iPad with an M-series chip: Speed Warp after the Studio in-app purchase. The DaVinci Resolve for iPad guide covers the rest of that edition.
- iPad with an A-series chip: the Studio upgrade adds it too, but on A14, A15 and A16 iPads the features list warns that Speed Warp may use simpler fallback processes.
Turn on Speed Warp for one clip
- Select the clip. Click it in the Edit page timeline and open the Inspector from the top right of the window.
- Open Retime and Scaling. In the Video tab, expand Retime and Scaling. It holds four controls: Retime Process, Motion Estimation, Scaling and Resize Filter, as the Edit page Inspector section of the manual lists.
- Set Retime Process to Optical Flow. The default is Project Settings, which follows whatever the project uses. Choosing Optical Flow enables the Motion Estimation menu for this clip.
- Pick Speed Warp Better. In Motion Estimation, choose Speed Warp Better, or AI Speed Warp Metal on a Mac.
- Slow the clip. Right-click it and choose Change Clip Speed, or use Clip > Change Clip Speed, then enter a percentage such as 50%. Turn on Ripple Sequence if the rest of the timeline should move to make room.
- Play it back. Check the slowed section in the Viewer, and cache it if playback can't keep up.
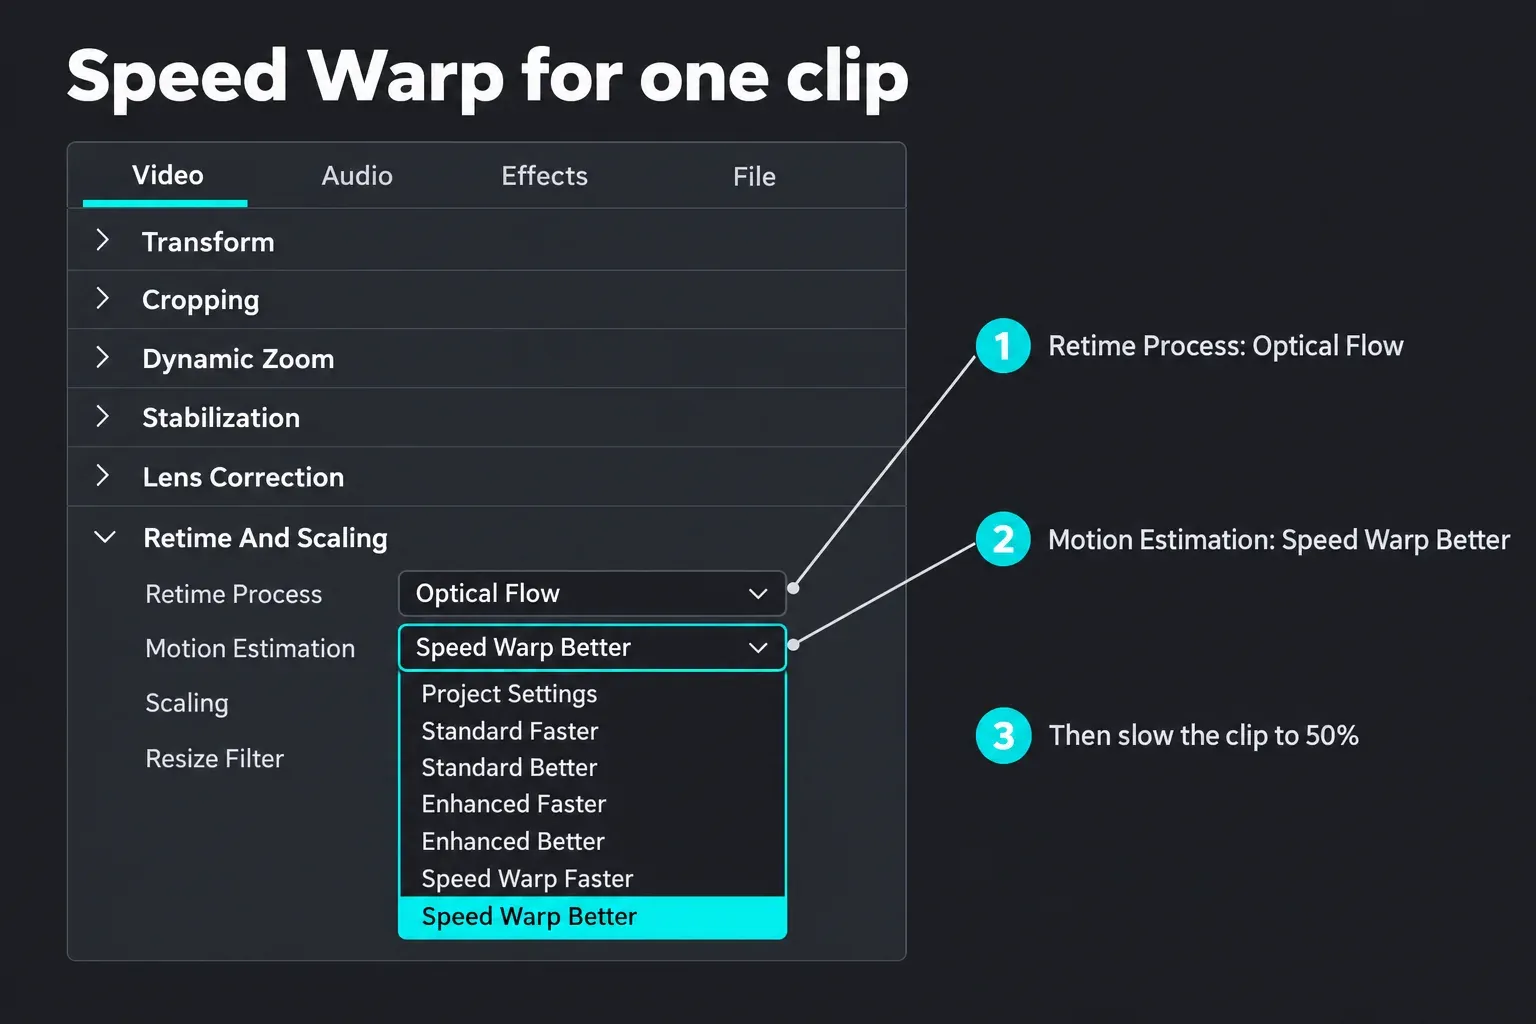
The same Retime and Scaling group appears in the Cut page and Media page Inspectors, so you can set it before a clip reaches the timeline. For curves and gradual changes, the Retime Controls open with Clip > Retime Controls (Command-R on a Mac) or right-click > Retime Clip, and the keyframes and curve editor guide covers shaping a speed ramp. Two audio rules come with any speed change. A linear change retimes the audio along with the picture, and the Pitch Correction checkbox in Change Clip Speed keeps voices natural. Audio under a variable speed effect is muted, according to the speed effects chapter.
The Inspector guide walks through the other panels in that tab, and our change clip speed tutorial covers reverse, freeze frames, Fit to Fill and the percentage math.
Set Speed Warp for the whole project, or leave it per clip
The project-wide controls live in File > Project Settings > Master Settings > Frame Interpolation. Retime process sets the default for every clip left on Project Settings, Motion estimation mode sets the quality tier, and Motion range picks small, medium or large motion as the default for those calculations. The Master Settings section of the manual adds that Motion range can be changed clip by clip in the Edit page Inspector, which is the place to match it to a single fast or slow shot.
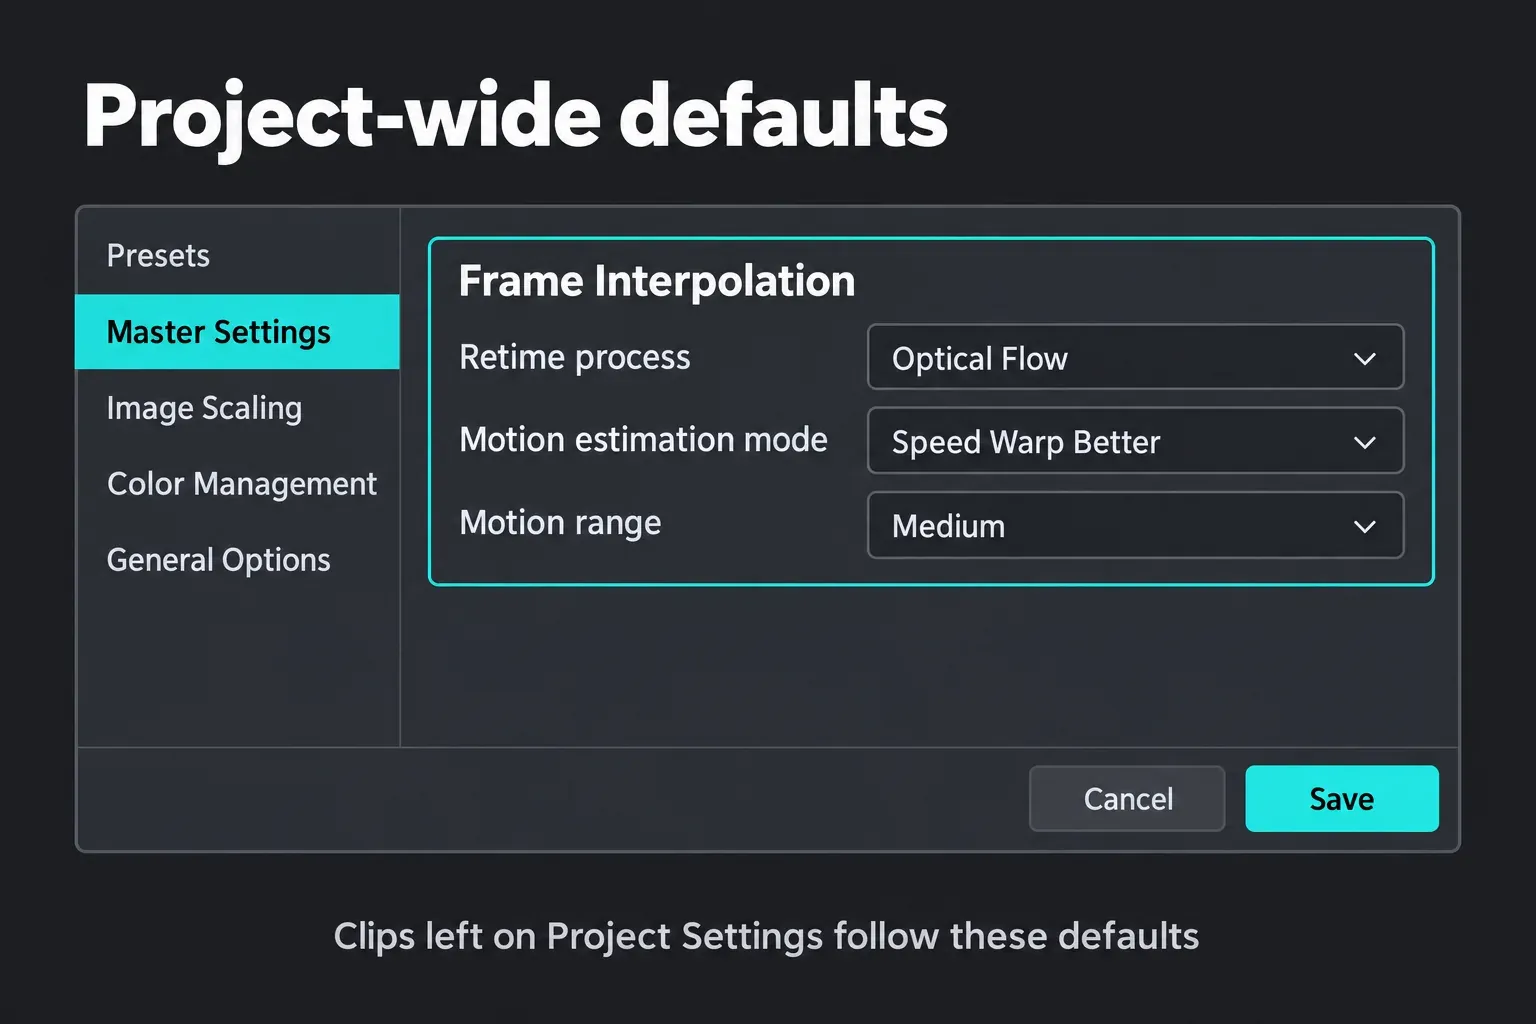
That reach is the reason to keep the project default modest. The project setting covers every speed change and every clip whose frame rate differs from the timeline, and the same manual page says the Motion estimation mode also governs Image Stabilization and Temporal Noise Reduction on the Color page. Set the project to Optical Flow with Speed Warp, and a 30 fps phone clip on a 24 fps timeline gets Speed Warp processing too. Leave the project-level Retime process alone and put Speed Warp only on the clips that need it.
Speed Warp Faster, Better or AI Speed Warp Metal
- Speed Warp Better: the higher-quality Neural Engine pass and the starting point for a hero slow-motion shot.
- Speed Warp Faster: the quicker Neural Engine pass. I drop to it when a frame-by-frame look at the shot shows no difference from Better, because then the extra render time buys nothing.
- AI Speed Warp Metal: macOS only. The manual calls it a version of Speed Warp built for Mac hardware that should dramatically speed up the operation, so it's the one I'd pick first on any Apple silicon Mac.
Blackmagic keeps speeding up the Metal path. The Resolve 21.0 release notes, as published by RedShark News, list an up to 2x faster AI Speed Warp Metal option on macOS and a faster native speed warp in Fusion Studio. Blackmagic's 21.1 figures, as reported by postPerspective, put AI Speed Warp over 60% faster on Macs with M6 than with M5, and up to 41 times faster on NVIDIA RTX Spark systems than on ARM-based Windows laptops without RTX graphics. Those are vendor figures, so the test results below are the better guide to real hardware. The Resolve 21.1.2 update notes list no Speed Warp changes.
When you don't need Speed Warp at all
Speed Warp only matters when Resolve has to invent frames. Footage shot at a higher frame rate than the timeline already holds the real ones: 60 fps footage slowed to 40% on a 24 fps timeline shows every captured frame once, and 120 fps footage reaches 20% the same way. Slow it further than that and the interpolation starts. Our change clip speed guide has the formula and a table of common pairs, and the frame rate guide covers timeline settings.
Phone footage is the other trap. A variable frame rate clip can stutter on its own, before any speed change, so the variable frame rate fix comes first, and Speed Warp only after that.
The SpeedWarp node on the Fusion page
Fusion has its own SpeedWarp tool, listed in the Miscellaneous nodes chapter as an AI-powered retiming node that analyzes the motion between existing frames to construct new intermediate frames. It's the right place when the retime has to happen inside a composite, for example before a tracker or a paint fix that needs the slowed frames.
- Wire it in. Add SpeedWarp between MediaIn and MediaOut, feeding the clip into its orange input.
- Set Speed. Speed starts at 1.0. A value of 0.5 halves the speed and 2.0 doubles it, as the SpeedWarp controls page explains.
- Offset with Delay if needed. Delay shifts the starting frame of the output: 10.0 moves it 10 frames forward, and -10.0 moves it 10 frames back.
- Choose the Mode. Faster gives a quicker result, and Better gives higher quality at a performance cost.
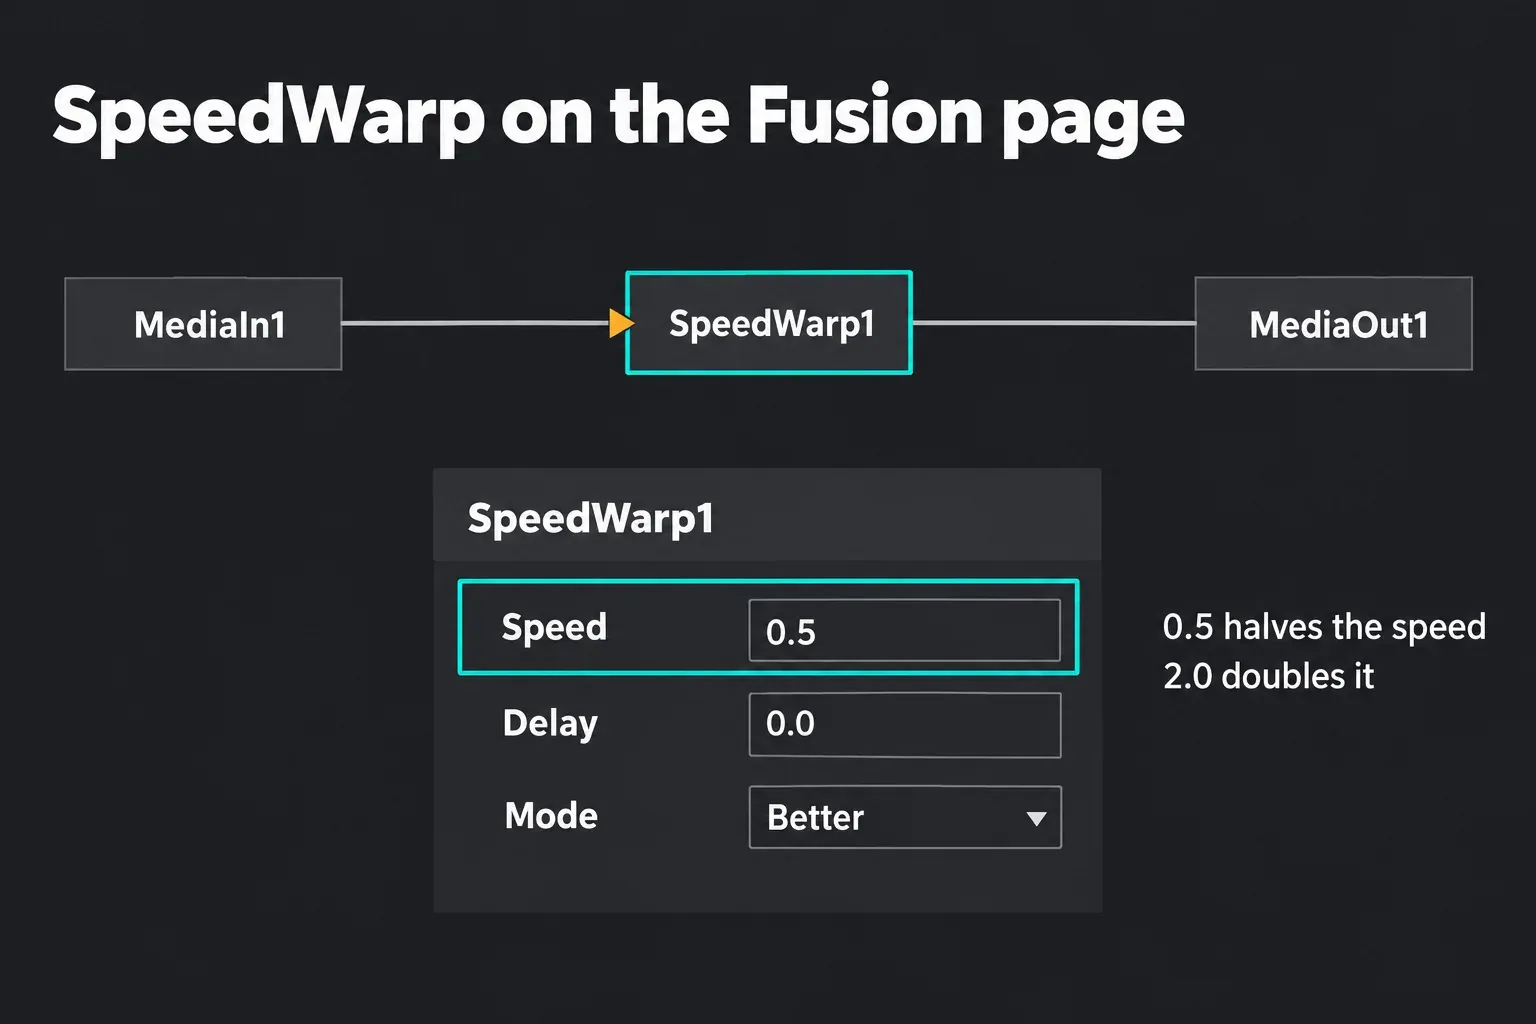
For a plain slow-motion shot, the Edit page route is simpler, and the Fusion node is worth it only when the retimed frames feed other nodes. The Fusion tutorial for beginners covers MediaIn, MediaOut and the node basics.
Smooth Cut: Speed Warp across a jump cut
Smooth Cut uses the same engine to hide a short jump cut inside an interview. The Cut page instructions are two steps: put the playhead on or near the edit and click the Smooth Cut button at the bottom left of the Media Pool. Resolve adds a one-second Smooth Cut with a Mode menu, where Better is the default. On the Edit page it sits in the Dissolve group of Video Transitions in the Effects library.
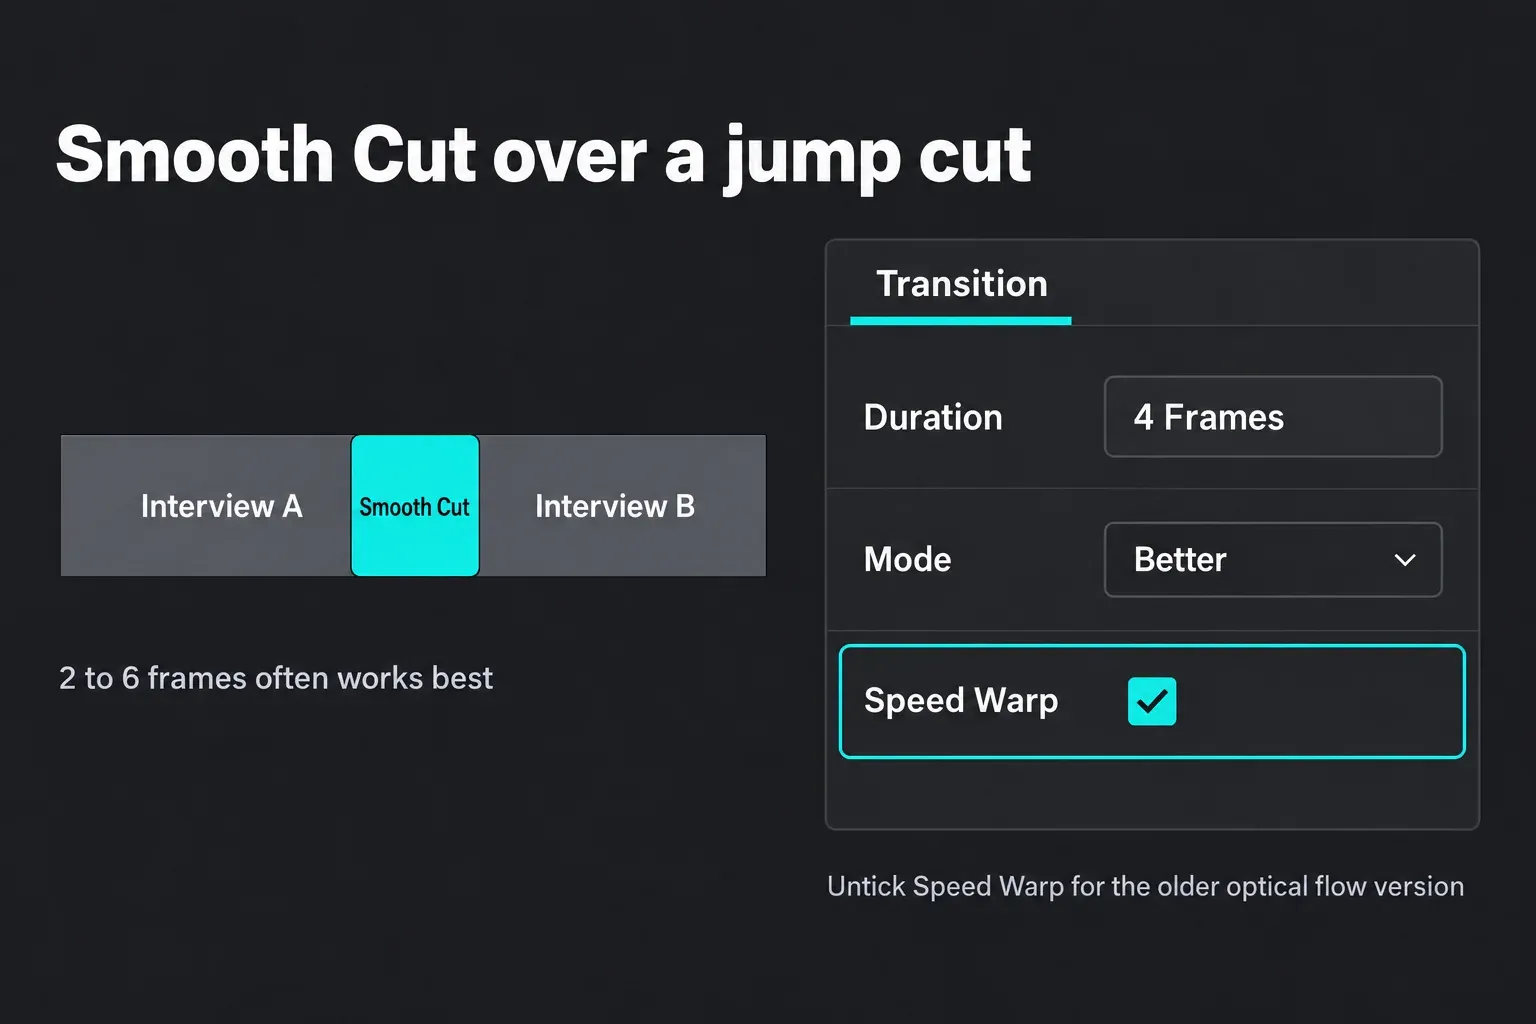
Shorten it first. The transition notes in the manual say 2- to 6-frame Smooth Cuts often work best, and that the more the background and the speaker move, the harder a good result gets. Since Resolve 20, Smooth Cut uses AI Speed Warp automatically, a Studio-only upgrade according to the Resolve 20 New Features Guide. Untick Speed Warp in the Transition inspector to go back to the older optical flow version. The transitions guide covers the rest of the transition toolset.
How heavy Speed Warp is: the test results
The public PugetBench for DaVinci Resolve database is the broadest published measure of Speed Warp speed. Its benchmark includes an Optical Flow test that slows a clip to 50% with Speed Warp, and a second run of the same clip with Enhanced Better. The table pools user uploads on mixed systems from one benchmark version group in the database, eight graphics cards in all, and gives each result in frames per second as published.
| Graphics | Speed Warp, 50% (fps) | Enhanced Better, 50% (fps) | Enhanced Better runs faster by |
|---|---|---|---|
| RTX 5090 | 21.75 | 70.05 | 3.2× |
| RTX 4090 | 16.42 | 52.69 | 3.2× |
| RTX 5080 | 12.21 | 44.9 | 3.7× |
| RTX 5070 Ti | 10.53 | 40.49 | 3.8× |
| RX 9070 XT | 5.4 | 41.16 | 7.6× |
| RTX 5060 Ti | 4.84 | 24.3 | 5.0× |
| Apple M4 Max, 40-core GPU | 2.53 | 29.15 | 11.5× |
| Apple M4 Pro, 20-core GPU | 2.16 | 16.3 | 7.5× |
Across the eight cards, Speed Warp runs at a median of about 8 fps, from 2.2 fps on the M4 Pro to 21.8 fps on the RTX 5090. None reaches 24 fps, so on the benchmark's footage every second of 24 fps slow motion takes about three seconds to process on a median card. Enhanced Better runs a median 4.4 times faster on the same hardware, from 3.2 to 11.5 times, at a median of about 41 fps, and seven of the eight cards process it faster than 24 fps. The four NVIDIA cards from the RTX 5070 Ti up hold the lead at 10.5 to 21.8 fps, while the M4 Max and M4 Pro sit 76% and 79.5% below the 5070 Ti.
Two uploads don't fit the pattern and stay out of the median. The same database lists the RTX 4070 Ti at 1.14 fps and the RTX 5070 at 0.82 fps in Speed Warp, well below the RTX 5060 Ti, although both beat it in Enhanced Better at 30.08 and 33.24 fps. The pages don't show why. The database also doesn't label the exact Resolve build, and the Mac rows may predate the 2x faster Metal option in 21.0.
A second graphics card is the wrong fix. In the Puget Systems GPU analysis for Resolve 18.6, the Speed Warp test gained nothing from a second card and a large jump from a third, so a two-card workstation pays for hardware this effect doesn't use.
If Speed Warp shows up in most of your edits, I'd spend on an RTX 5070 Ti class card or above, because the NVIDIA cards hold a clear lead here. The RX 9070 XT matches the 5070 Ti in Enhanced Better but manages about half its Speed Warp rate. On anything slower, I'd cache or render the slow-motion clips once and edit around them. The best GPU guide for DaVinci Resolve weighs this test against effects, Fusion and export.
Speed Warp not working? Fixes
- Motion Estimation is grayed out. Set the clip's Retime Process to Optical Flow in the Inspector. Choosing it enables the Motion Estimation menu, as the Retime Process steps in the manual note.
- The clip still stutters. Check that the clip is slowed or has a different frame rate than the timeline. Motion estimation does nothing on a 100% clip whose frame rate matches.
- Edges warp or smear where things cross. Crossing motion and erratic camera moves are Optical Flow's weak spot. Try Motion range set to large or small for that clip, then step down to Enhanced Better or Frame Blend for that one shot.
- Speed Warp isn't available in your copy. It needs DaVinci Resolve Studio. The free vs Studio comparison lists what the license adds.
- Playback crawls. Turn on the Smart render cache, which caches speed effects at the source level so a cached clip can move without re-caching, as the render cache section of the manual notes. The render cache guide covers the setup, and Render in Place bakes a finished ramp into a new media file. For general stutter, the slow playback fixes and the proxy workflow help.
- Resolve reports a GPU memory error. The GPU memory full guide walks through the fixes in order.
- It's slow on a Mac. Choose AI Speed Warp Metal in Motion Estimation. The DaVinci Resolve for Mac guide covers the other Apple silicon settings.
- The sound disappeared. Audio under a variable speed effect is muted. Use a linear speed change if the retimed sound has to stay.
- A Smooth Cut looks like a morph. Shorten it to 2 to 6 frames. Movement behind the speaker makes a clean result harder, and a cutaway hides that jump better.
Questions about Speed Warp in DaVinci Resolve
Is Speed Warp available in the free version of DaVinci Resolve?
No. Speed Warp is a DaVinci Resolve Studio feature. The free version still offers Optical Flow for smoother slow motion.
What's the difference between Speed Warp Faster and Speed Warp Better?
Both use the DaVinci Neural Engine. Better gives higher quality and takes longer to process, while Faster trades some of that quality for speed.
Why is Speed Warp so slow?
It builds every new frame with the DaVinci Neural Engine, the heaviest Motion Estimation option. In the PugetBench database, the median card manages about 8 fps on its 50% Speed Warp test, while Enhanced Better runs about four times faster on the same hardware.
What is AI Speed Warp Metal?
It's a macOS-only Speed Warp option built for Mac hardware. Blackmagic made it up to twice as fast in Resolve 21.0.
Can I use Speed Warp in Fusion?
Yes. The SpeedWarp node on the Fusion page retimes a clip with a Speed value, where 0.5 is half speed, and has its own Faster and Better modes.
Do I need high frame rate footage for Speed Warp?
No. Speed Warp invents the missing frames, which is its whole purpose. Footage shot at 60 or 120 fps gives you real slow-motion frames first, so it needs Speed Warp only when you slow it past its native rate.
Verdict: when Speed Warp is worth the render time
Speed Warp is the best slow motion Resolve can build from footage that wasn't shot for it, and in ideal circumstances the manual rates it above every other Motion Estimation setting. It's also the heaviest, at a median of about 8 fps in the published tests and no card at real time, so it belongs on the few clips that need it. Set it per clip, start with Speed Warp Better or AI Speed Warp Metal on a Mac, step down to Enhanced Better when crossing motion smears, and cache the result before you grade. For every other way to change speed, the change clip speed guide is the next stop.