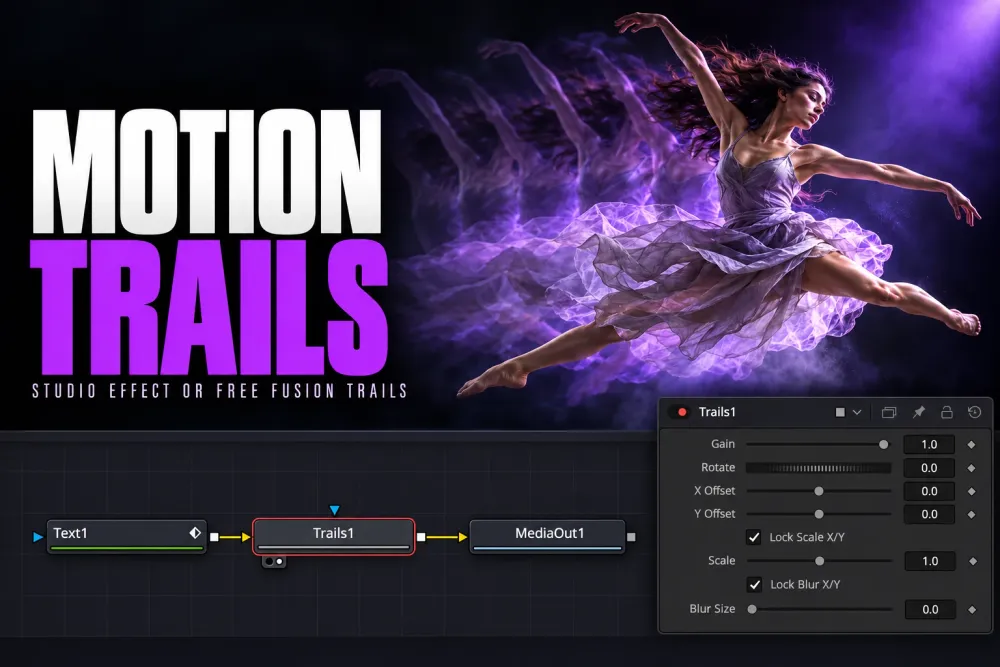
To add motion trails in DaVinci Resolve, drag Motion Trails from the Edit page's Effects Library (OpenFX > Filters) onto a clip and raise Trail Length in the Inspector until the ghost is as long as you want. That effect is Studio-only. In the free version, put a Trails node after an animated title on the Fusion page, or cut the moving subject out of its background first and run it through Trails or a Duplicate node with a negative Time Offset.
Motion Trails sits in the Resolve FX Temporal group, and the Reference Manual marks it Studio Version Only, the same as Motion Blur. You can still drop it on a clip in the free version, but it previews with a DaVinci Resolve Studio watermark until you render on a Studio license, as the free version features guide explains. The Trails and Duplicate nodes belong to Fusion and work in both versions.
Pick a method
There are four ways to get the look. The right one depends on what's moving and which version you run.
| Method | Version | Best for | Trail control |
|---|---|---|---|
| 1. Motion Trails effect | Studio (watermark in Free) | Whole clips on the Edit page, long-exposure and video-feedback looks | Trail Length and Dropoff |
| 2. Fusion Trails node | Free and Studio | Titles, graphics and keyed subjects with transparency around them | Gain, plus Offset, Scale and Blur Size |
| 3. Fusion Duplicate node | Free and Studio | A countable set of separate ghosts on a title or keyed subject | Copies and a negative Time Offset |
| 4. Stacked timeline copies | Free and Studio | One quick ghost on a short moment | Opacity and a one-frame offset per copy |
Footage is the catch for the free routes. The Trails node lays each new frame over the top of its trail, and Fusion's manual describes the effect as most interesting on moving images with an Alpha channel. With the default Normal/Over combination, a full, opaque frame covers its own ghost, which is why the footage section below starts by isolating the subject.
Method 1: Motion Trails in DaVinci Resolve Studio
This is the fastest route on ordinary footage because it works on the whole clip, right on the Edit page.
- On the Edit page, open the Effects Library and go to OpenFX > Filters, where the manual's Effects Library section lists the Resolve FX filters.
- Drag Motion Trails onto the clip in the timeline.
- Select the clip, open the Inspector and click the Effects tab. The effect's controls sit in its Open FX group, as the Inspector section describes.
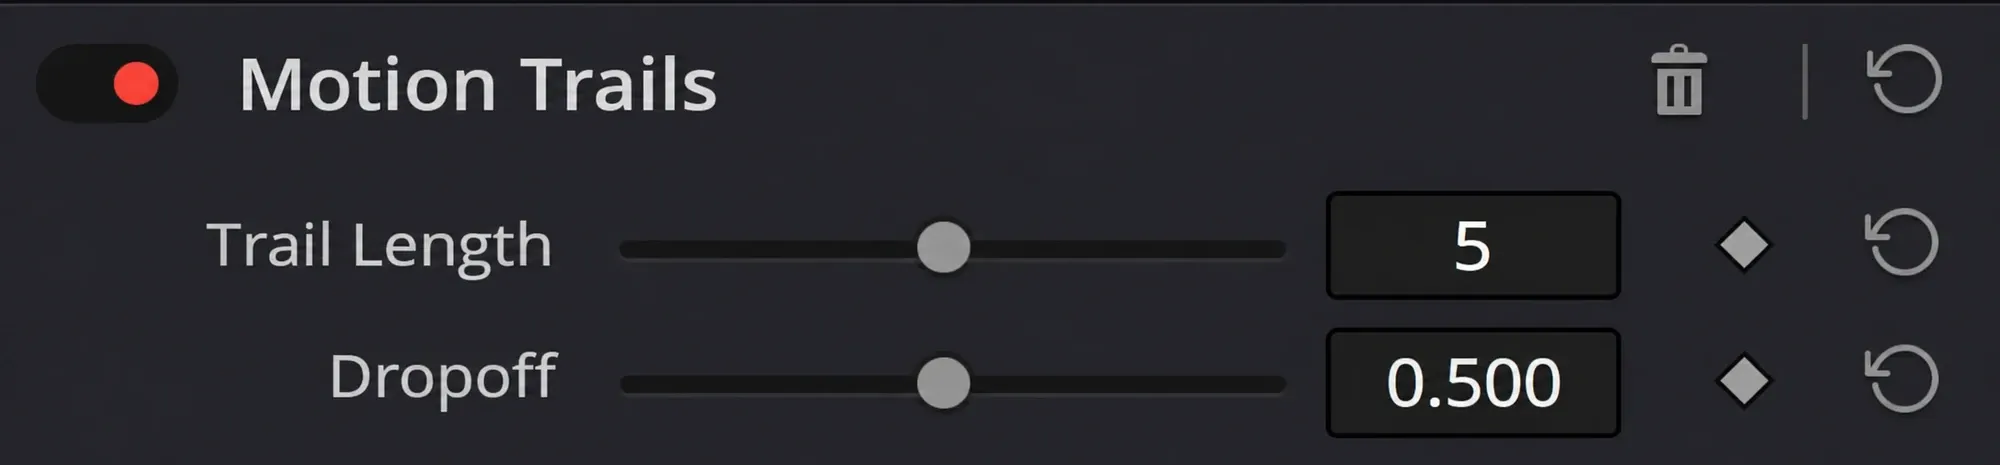
- Raise Trail Length for more copies, then set Dropoff for how quickly they fade.
- Play across the move. If you only see the plain clip, jump to the no-trail fix below.
The two General sliders do most of the work. Trail Length sets how many copies build the trail, and Dropoff fades each copy, compounding as it goes. The manual's example is a Dropoff of .5, which gives the first copy 50% opacity, the second 25% and the third 12.5%. Because the value multiplies in again for every copy, a higher Dropoff keeps more copies visible and a lower one makes the copies fade faster. A good starting point comes from a Blackmagic forum thread where a Studio user checked the effect against nine numbered pictures and found every frame in use: keep the defaults and change only Trail Length.
Advanced Options control how the copies blend. Composite Gamma sets the brightness of the overlaps: Timeline follows your project's timeline color space, and Linear often produces much stronger highlights. I'd keep Timeline on faces and try Linear on light streaks and feedback looks, where the extra punch helps. Input Alpha only matters for clips that carry an alpha channel. Ignore, the default, disregards it, while Use in Compositing uses it for the trails and composites them over the video track below once Use Alpha is enabled.
Move Trail pushes the copies around, and each amount is applied as an offset from one copy to the next. The manual's Rotate example turns the first copy 5 degrees, the second 10 and the third 15, so a small value curls the trail into a spiral, while Pan and Pan Angle slide the copies away from the original in one direction. Leave Reuse Current Frame off for a real trail. With it off, the first copy is the previous frame and the second is the frame before that. With it on, every copy uses the current frame, so you only see copies once Pan, Zoom or Rotate moves them apart, which suits a repeating echo pattern. When Zoom shrinks copies below the frame, Border Type decides what fills the edges: Black, Soften, Replicate, Reflect or Wrap-Around.
Hide the build-up at the start of the clip
The effect needs earlier frames, so the trail grows over the first few frames of the clip. The same forum thread gives two fixes. Cover the start with a transition, or make a compound clip after adding the effect and trim its start, so the trail is already full when the shot appears. Right-click the clip and choose New Compound Clip, as the compound clips guide shows.
No trail at all
If Motion Trails shows only the plain clip, open Advanced Options and check Input Alpha. In a 2024 Blackmagic forum thread, users on the 19.0 betas saw no trail while Motion Blur worked; setting Input Alpha to Ignore fixed it, and a Blackmagic staff member replied that "the new 19.0 beta 6 should fix this." Ignore is the default on current versions. If the trail still doesn't show, check that the subject moves between frames and that Dropoff isn't so low the copies vanish.
Method 2: Fusion Trails on a title
Titles are the easy case for the free version because a Text+ title already has transparency around the letters, so its trail has somewhere to show. If Fusion is new to you, the Fusion tutorial for beginners covers the node editor first.
- On the Edit page, open the Effects Library, select the Effects category and drag a Fusion Composition into the timeline. Park the playhead on it and open the Fusion page, where it opens as a single MediaOut node, per the manual's Fusion Composition steps.
- Add a Text+ node, type the title and animate it so it moves: keyframe Center or Size, as in the keyframes guide. A write-on from the typewriter effect guide trails nicely too, and the text guide covers the rest of Text+.
- Select the Text+ node, press Shift-Spacebar, type Trails and press Return. With one node selected, the new node lands after it.
- Connect the Trails output to MediaOut. If the composition needs a background, put a Merge node in between, with Trails on the foreground input and the background on the background input.
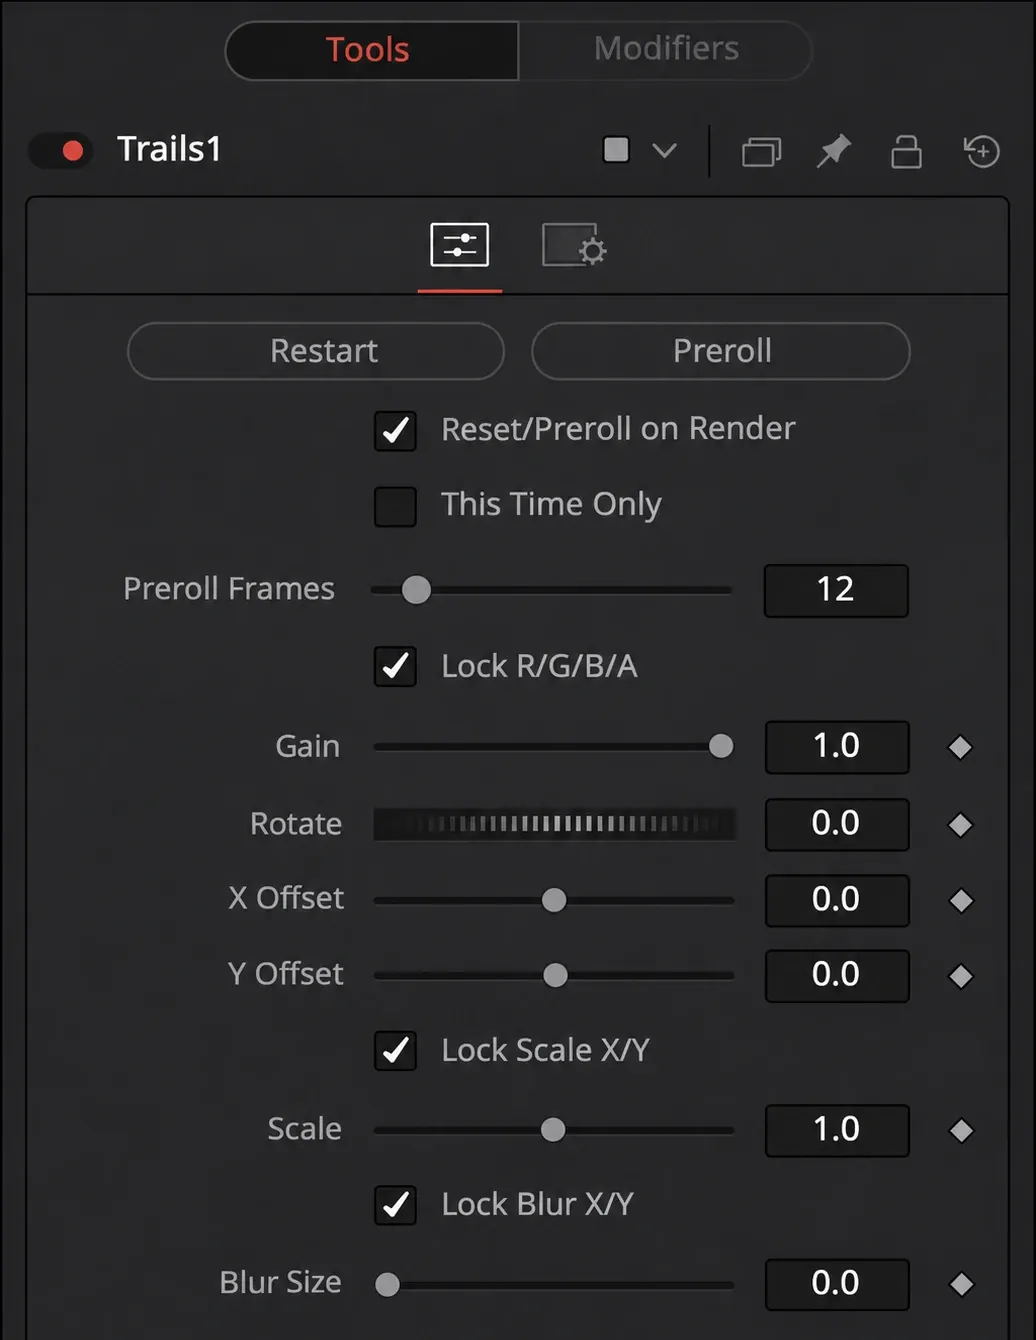
- Click Restart at the top of the Trails Inspector to clear the buffer, then play from the start of the animation. The manual's setup notes warn that trails accumulate if you don't clear them between previews.
Gain is the length control. The manual says lower values give a much shorter, fainter trail and higher values a longer, more solid one. Offset X/Y, Scale, Rotate and Blur Size work on the buffer before each new frame lands, and they compound along the trail, so a Scale just below 1 shrinks every older copy a little more and a small Blur Size softens the tail progressively while the title itself stays sharp. The Lock RGBA checkbox switches Gain between one control and separate color channel gains, which you can use to tint the trail. To keep trails on part of the frame only, connect a mask to the blue Effect Mask input.
Apply Mode decides how each new frame meets the trail. Normal is the default, with Over as its operator. Screen ignores alpha and layer order and always lightens; the manual compares it to projecting several film frames onto one surface. I'd reach for it on bright titles over dark backgrounds, where the lightening reads as glow. Dissolve averages overlapping copies. Alpha Gain below 1 lets the trail behind show through what's in front, brightening the result, and Merge Under puts the current frame under the trail instead of the usual over-the-top order.
Switch on Reset/Preroll on Render, so the node clears itself and pre-rolls the frames set in Preroll Frames whenever a preview or final render starts. If the render begins partway through the move, set Preroll Frames to include the preceding motion and turn This Time Only off; with that option on, pre-roll repeats only the current frame. Resetting keeps the render from inheriting your last preview's buffer. Scrubbing won't show a reliable result either: a user on the Fusion forum points out that Trails needs a previous frame and can't be scrubbed without caching. Play through, or let the cache fill as the render cache guide explains.
Motion trails on footage in the free version
With Normal/Over and a full-frame clip whose alpha is completely opaque, the current frame covers the trail. With the default Normal mode, the Over operator keeps none of the background where the foreground's alpha is solid, and ordinary footage is solid everywhere, so each new frame covers its own trail. There are two ways out.
Isolate the subject and merge it over the original clip
This route gives the isolated subject a trail while keeping the original clip underneath.
- Start with a locked-off shot. On a moving camera the ghosts stay where the subject was in the frame, not where it was in the scene, so they slide against the background. The clone yourself guide asks for a tripod for the same reason.
- Separate the subject. On a plain backdrop a keyer does it, and the Delta Keyer guide covers the free option. Otherwise draw a mask and animate it, as in the rotoscoping guide, with help from Fusion tracking. In Studio, Magic Mask does much of that work for you.
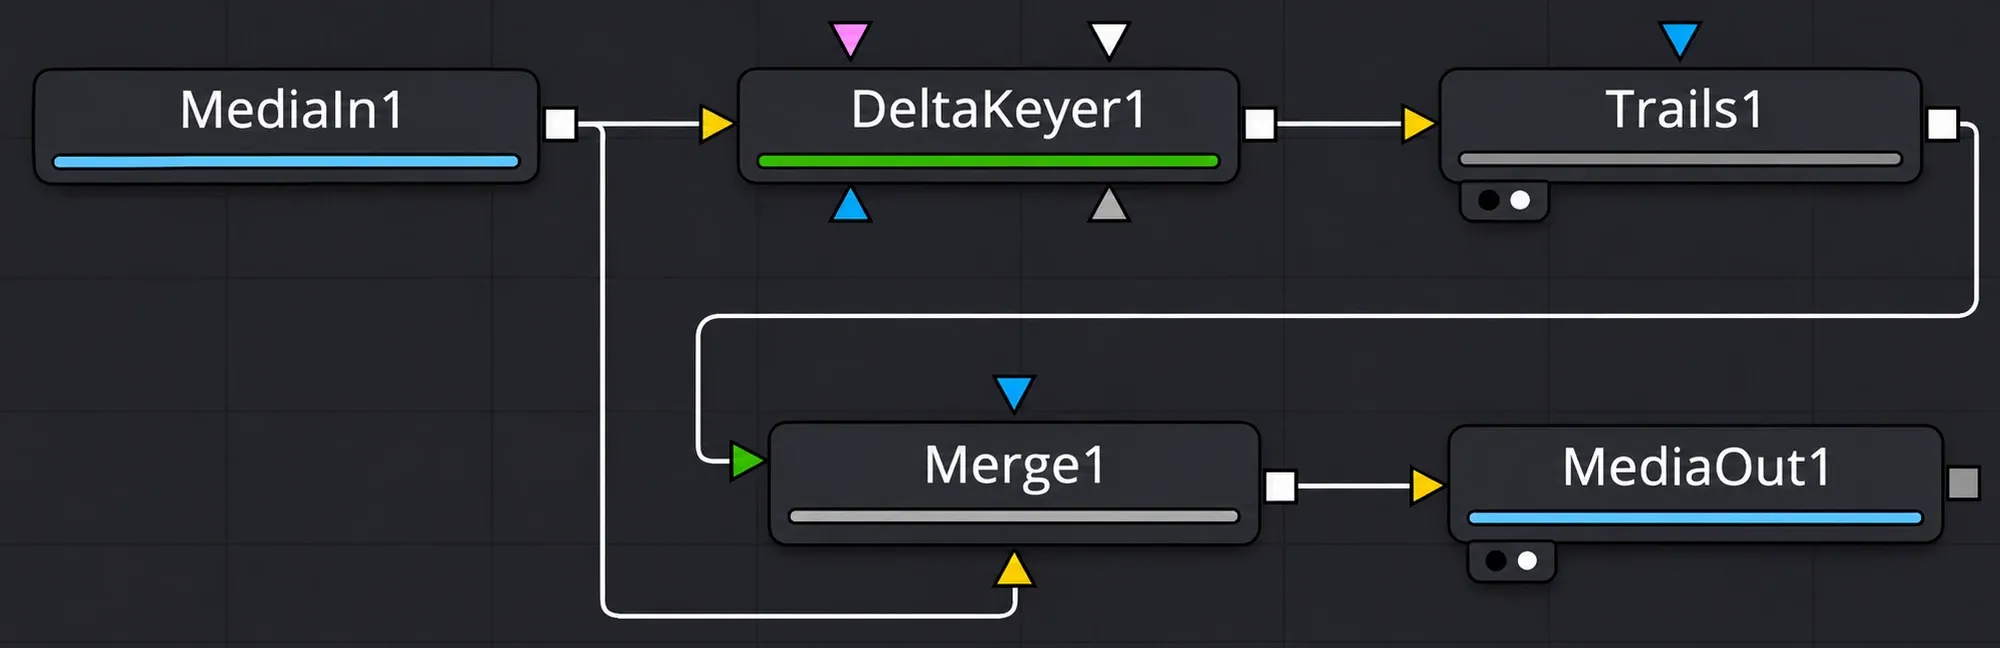
- Branch the clip: the isolated subject goes into a Trails node, and the untouched MediaIn stays on the background branch. It still contains the current subject.
- Add a Merge node. Connect the original MediaIn to its background input first, which sets the output resolution, then connect Trails to the foreground input and Merge to MediaOut.
- Click Restart and play from before the move. Adjust Gain for length and Blur Size for a softer tail.
Use Screen on a bright subject
Screen ignores alpha, so a Trails node set to Screen shows a trail on a full-frame clip with no keying. The cost is that it always lightens, static background included. I'd only use it when the moving subject is clearly brighter than a dark background, such as lights, sparks or a dancer in a spotlight, and I'd keep Gain modest so the background doesn't build up. A rough mask on the Effect Mask input keeps the trail to the path of the move.
Method 3: Duplicate node with a negative Time Offset
Duplicate gives you a set number of distinct ghosts instead of one continuous smear. Feed it the same things you'd feed Trails: an animated title, a graphic or an isolated subject.
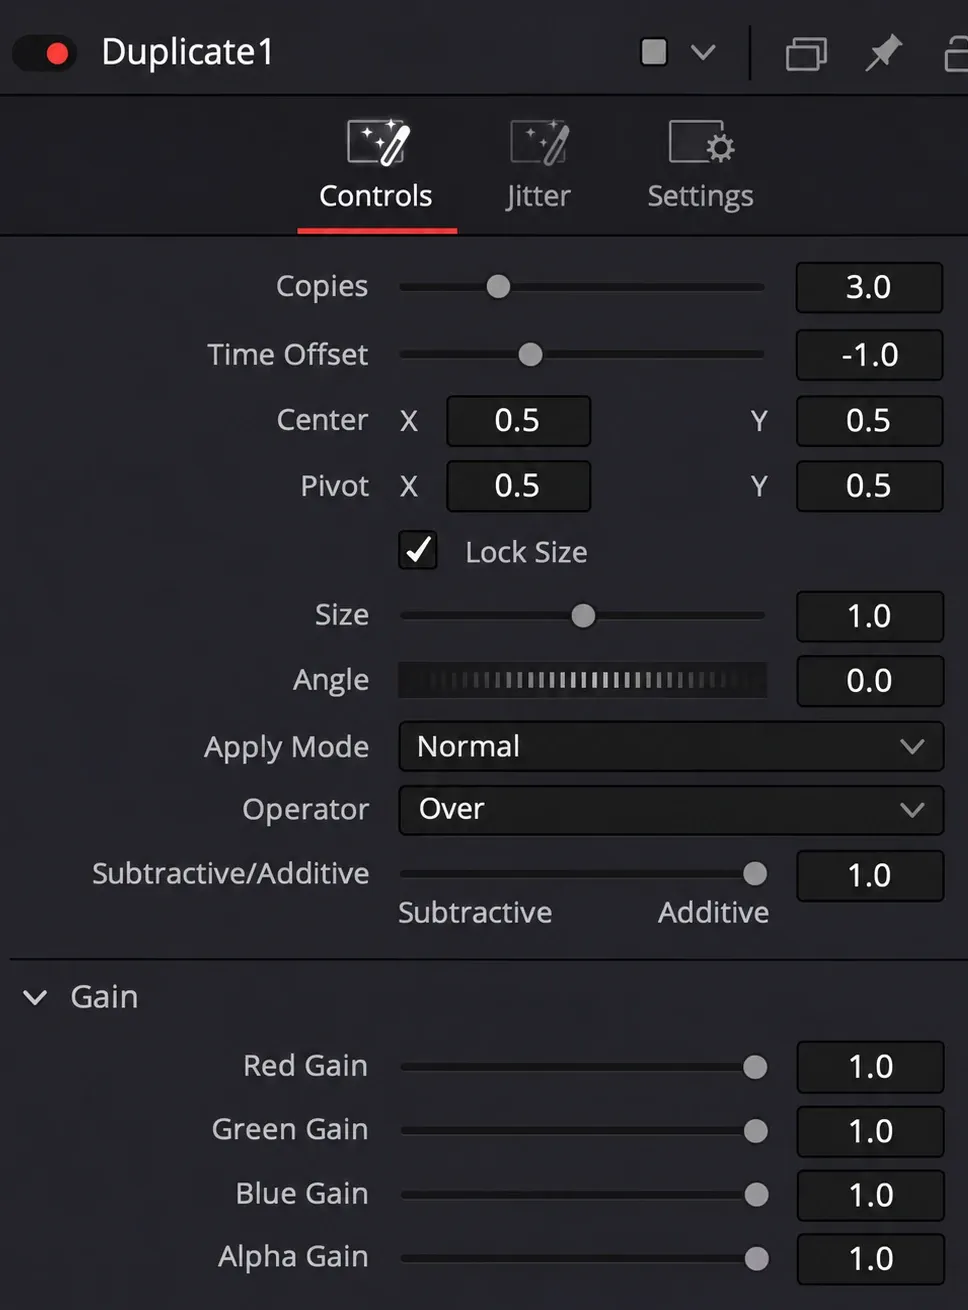
- Select the source node, press Shift-Spacebar, type Duplicate and press Return.
- Set Copies to the number of ghosts you want. Each copy is a copy of the last one, per the manual's Duplicate section.
- Set Time Offset to -1. The first copy then shows the animation a frame earlier and the second a frame before that, which is the trail. A positive value shows later frames instead, so the copies lead the subject, as Creator Academy's Duplicate guide points out.
- Center and Size also apply per copy, so a small change makes each older ghost drift or shrink a little more.
- Use the Gain RGB controls to lower the intensity of older copies. All Gain values compound with the number of copies, while Blur doesn't compound, so every copy gets the same softness. Alpha Gain separately changes how much the copies in front obscure those behind; check the overlaps as you adjust it.
- Check Merge Under. By default the last copy, which is the oldest frame with a negative Time Offset, sits on top; Merge Under reverses the stack so the first copy is topmost.
Two more controls shape the tail. The Blend slider on the Controls tab fades the last copy first, then the one before it, so it shortens the trail without touching Copies. The Jitter tab randomizes the position, rotation, size and color of the copies when an even trail looks too mechanical.
More copies add compositing work, and a Time Offset can require additional source frames. Creator Academy warns about complex inputs and large copy counts. I'd keep the count modest and preview the result before extending it. Once a Trails or Duplicate setup works, save the nodes as a macro so the next title gets the same trail in one drag; the Fusion macros guide walks through it.
Method 4: Stacked copies on the Edit page
For one quick ghost on a short moment, you don't need an effect at all.
- Hold Alt (Option on a Mac) and drag the clip onto the track above, as in the duplicate clip guide.
- Move the upper copy one frame to the right, so at every moment it shows the frame before.
- In the Video Inspector, lower its Opacity; the Composite Mode menu sits right above that slider. Filmmaking Elements' ghost effect guide sets the copy to 50%, and their music video effects guide switches it to Soft Light. Screen blends by inverting both images, multiplying and inverting the result; black leaves the other image unchanged.
- For a longer trail, repeat with more copies, each a frame later and fainter. The forum user from earlier described a stack of five clip instances at 20% opacity, a frame apart, and called the result "time consuming and messy."
- For a dreamier ghost, slow the copy instead of offsetting it. The Filmmaking Elements guide cuts the copy a few frames before the moment, sets Retime Controls > Change Speed to 75% and fades it in and out. The clip speed guide covers the retime controls.
Stacks get hard to adjust once they exist. Marc Wielage warned in the same thread that layered copies "will be very tricky to control," so wrap a finished stack in a compound clip and treat it as one piece.
Ten published motion trail and echo recipes compared
I compared ten published motion trail and echo recipes from seven documents and five publishers: the DaVinci Resolve 21.1 Reference Manual's entries for Motion Trails, Trails and Duplicate, a Blackmagic forum thread, two Filmmaking Elements guides, a Creative COW thread on mild ghosting, a 2025 DvResolveTutorials walkthrough on Medium and Creator Academy's Duplicate guide. Here's what each one sets and reports:
| Recipe | Route | Gap between copies | Copies and opacity | Reported problem |
|---|---|---|---|---|
| Reference Manual 21.1, Motion Trails | Motion Trails | 1 frame, earlier frames | Dropoff .5, first copy 50% | None stated |
| Reference Manual 21.1, Trails | Trails node | Continuous buffer | Gain sets length | Needs playback or pre-roll; trails accumulate between previews |
| Reference Manual 21.1, Duplicate | Duplicate node | 1 frame earlier per copy (Time Offset -1.0) | Not set | None stated |
| Blackmagic forum, 2021, first attempt | Timeline copies | 1 frame | 5 stacked clip instances at 20% | "Time consuming and messy" |
| Blackmagic forum, 2021, final setup | Motion Trails | Effect defaults | Only Trail Length changed | Trail builds over the first frames |
| Filmmaking Elements, ghost effect | Timeline copies | Copy slowed to 75% | 1 copy at 50% | None stated |
| Filmmaking Elements, music video | Timeline copies | A few frames | 1 copy, Soft Light | None stated |
| Creative COW thread | Timeline copies | Copy slowed slightly | 1 copy, lowered opacity | Author says it did not match the requested deflicker look |
| DvResolveTutorials, 2025 | Duplicate node | 2 frames later per copy (Time Offset +2) | 3 copies | None stated |
| Creator Academy, Duplicate | Duplicate node | 2 frames earlier per copy (Time Offset -2) | Not set | Warns about render cost; gives no timed benchmark |
The routes split four ways: timeline copies in 4 recipes, the Duplicate node in 3, Motion Trails in 2 and the Trails node in 1. Across five numeric spacing examples, the median gap by magnitude is one frame (range 1 to 2). Direction matters: the Medium example uses +2 and leads the animation; the manual uses -1 and Creator Academy uses -2 for earlier frames. Three examples give an explicit opacity setting: the manual's first copy at 50%, the forum stack at 20% and Filmmaking Elements' duplicate at 50%. Their median is 50%, a summary of these settings. Medium specifies three generated copies; the forum describes five stacked clip instances. The manual explains the Trails buffer and pre-roll, the 2021 forum posts describe Motion Trails building up, and the separate Fusion thread warns about scrubbing without caching. Two posters in the first forum thread describe timeline stacks as hard to manage. Creator Academy warns about render cost; the beta thread reports the older no-trail bug.
My verdict: I'd start with the manual's Dropoff .5 example in Motion Trails, then adjust it on the shot. That gives a first copy at 50% with progressively fainter copies behind it. In the free version, use Trails or a Duplicate node with Time Offset -1 on a title or an isolated subject; use Gain RGB to adjust Duplicate intensity and check alpha separately. I'd keep timeline stacks for a single ghost, because the forum reports show how much harder larger stacks are to manage.
Fix common motion trail problems
The whole frame ghosts, not just the subject
The trail copies everything that moves, including the background on a handheld shot. Isolate the subject and merge its trail over the untouched clip, or limit the effect with a mask on the blue Effect Mask input, which both the Trails and Duplicate nodes have.
The trail jumps or looks wrong while scrubbing
The Trails node builds from a buffer of earlier frames, so scrubbing shows a broken trail. Play from the start, click Restart before each preview and switch on Reset/Preroll on Render, then set Preroll Frames and turn This Time Only off if the render needs earlier animation in its starting trail.
Overlaps are too bright
In Motion Trails, set Composite Gamma back to Timeline or lower Dropoff. In the Trails node, lower Gain, bring Alpha Gain back toward 1 and check that Apply Mode isn't Screen. If only the edges glow, move the Subtractive/Additive slider; the manual notes that blending between the two tunes edges that come out too bright or too dark.
It looks like motion blur, not a trail
Blur smears each frame along its movement, while a trail keeps separate copies of earlier frames. If a smear is what you're after, the motion blur guide covers it. Stop Motion, in the same Resolve FX Temporal group, repeats frames for a stuttered cadence and draws no trail at all.
Motion trails FAQ
Are motion trails free in DaVinci Resolve?
The Motion Trails effect isn't. It's a Studio-only Resolve FX, and the DaVinci Resolve Beginners Guide notes that Studio effects work in the free version with a watermark. The Fusion Trails and Duplicate nodes are free and create ghost trails on titles and isolated subjects.
What's the difference between motion blur and motion trails?
Motion blur adds a smear along each moving element to soften strobing. Motion trails keep visible copies of earlier frames behind the subject, so the subject stays sharp and its past positions fade out behind it.
How do I add motion trails to text?
Animate a Text+ title in a Fusion Composition and add a Trails node after it, or a Duplicate node with Time Offset -1 for separate copies. The text already has transparency, so no keying is needed.
Can I change the color of the trail?
Yes. In the Trails node, use the Lock RGBA checkbox to get separate color channel gains and tint the trail. In the Duplicate node, the Jitter tab randomizes copy color, and the Gain RGB sliders change every copy.
How many copies should I use?
Start with a few copies and add more only if the move needs them. The Medium example sets three generated copies, while the forum example describes five stacked clip instances. Those are different setups. With Duplicate, more Copies extend the sequence and add rendering work; its Controls-tab Blend fades older copies and can shorten the visible trail. With Trails, higher Gain makes the trail longer and more solid, while lower Gain makes it shorter and fainter. For sparks and streaks, the Fusion particles guide is the better fit.
Final verdict: the motion trail route worth using
For titles and graphics, I'd use the free Fusion Trails node. They already carry alpha, Gain sets the length, and Blur Size softens the tail while the letters stay sharp. On footage in the free version, isolate the subject first, ideally on a locked-off shot, then run it through Trails or a Duplicate node with Time Offset -1 and merge it over the untouched clip. In Studio, Motion Trails is the quickest route on footage: start from its defaults, change Trail Length, and hide the first-frame build-up with a compound clip trim or a transition. Keep timeline stacks for a single quick ghost. The Fusion hub collects the rest of the Fusion guides.