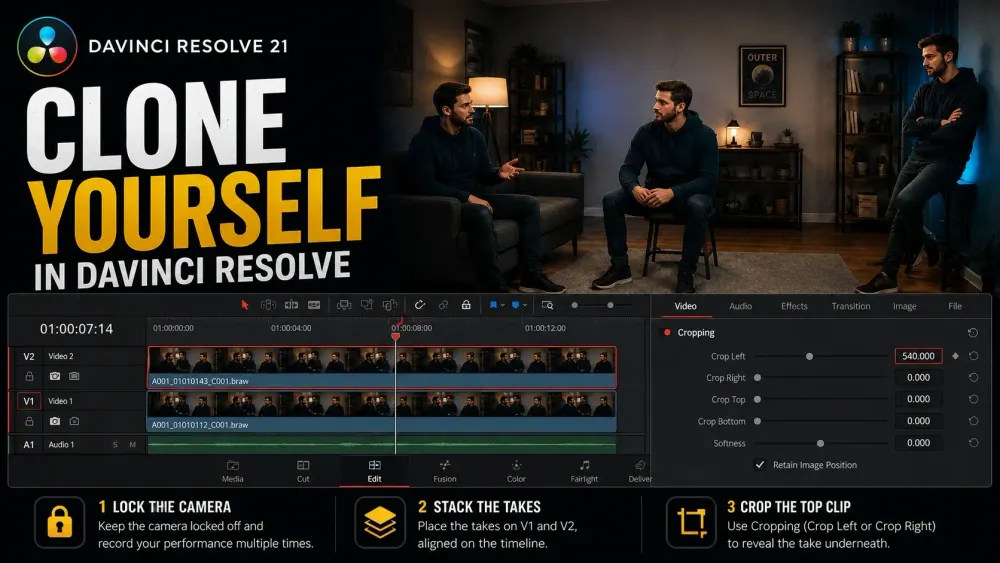
A convincing clone effect starts with two performances that share the same camera position, exposure, focus and lighting. In DaVinci Resolve, the easiest version uses two stacked takes and one fixed crop. Use a maintained matte only when the performances cross, and use Fusion tracking only when the camera movement is repeatable enough to align both takes.
Quick answer: if your clones stand on opposite, non-overlapping sides of a locked frame, stack two takes on separate tracks and crop the upper clip at the split line to reveal the lower take underneath. No drawn mask, no Magic Mask, no Studio license.
Save Magic Mask or a Power Window for clones that cross paths, share the center of frame, or move through a changing outline.
Before You Film Yourself Twice for a DaVinci Resolve Clone Effect
Lock the camera on a tripod and keep its position, focal length and focus unchanged between takes. A small bump can misalign background edges across the split. Record a few seconds of the empty scene before moving anything; that clean plate gives you background pixels for later repairs.
Lock exposure and white balance manually too, on the camera itself, before your first take. Auto white balance drifting between takes is a real problem that shows up as a visible seam right where your clones meet.
Record a few seconds of room tone before and after each performance, and mark a clap, spoken cue, or hand signal at the exact moment one clone needs to react to the other. Trim both clips to that cue once you're editing.
Don't assume matching clip lengths on their own keep two takes in sync. What actually keeps them in sync is trimming both clips to the same reference moment, not the raw duration of either one.
For the crop method, mark a separate floor position for each performance. Keep hands, props and their shadows clear of the planned split, and avoid moving curtains or fans in the background. For an interaction, rehearse the timing and decide which clone or prop should pass in front.
Free Method: The Resolve Split-Screen Clone Effect
The simplest version of this effect needs no drawn mask, AI isolation, or frame-by-frame rotoscoping. If your clones never cross a fixed line in the frame, this is the entire technique:
- Put your clean base take on the bottom video track, V1.
- Put your second take directly above it on V2.
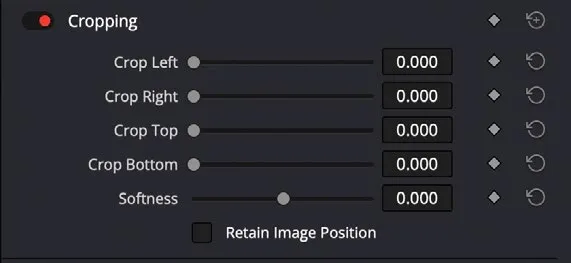
- Select the V2 clip on the Edit page, open Inspector, then Video and Cropping. If the clone you want from V2 is on the right, increase Crop Left until V1 is revealed on the left. Use Crop Right for the opposite arrangement. Keep Composite Mode at Normal and Opacity at 100 while building the split.
- If the seam is visible under your lighting, add a small amount of Softness in the Cropping section to blur the edge rather than leaving a hard line.
For a locked-off shot, this route stays entirely on the Edit page and works in Resolve Free. The Inspector's Crop Left, Right, Top and Bottom controls create transparency, so the lower V1 take becomes visible.
Temporarily lower V2 opacity to compare fixed background edges, then restore it to 100. Do not use a half-transparent mix as the finished clone effect. Align the interaction cue rather than just the clip starts, and mute unused take audio so the room tone and spoken cues do not double up.
The Resolve 21.1 Reference Manual defines negative Softness as feathering inside the crop box and positive Softness as feathering outside. Use only enough to hide a minor boundary; softness cannot repair different camera positions, changing shadows or moving background detail.
This only holds up while your clones stay on their own side of that line. The moment they need to reach across it, you're into real masking, covered next.
Studio Method: Magic Mask for a Resolve Clone Effect
In Resolve 21.1, the Color-page Magic Mask 2 is a Studio feature, not a Resolve Free tool. Blackmagic lists it on the Studio feature page. Use it when the upper clone needs a changing subject outline. Leave the base take intact unless that take also needs isolation.
Magic Mask 2 builds the selection from Add and Subtract clicks. It no longer has separate Person and Object modes. The older stroke-driven tool remains available as Legacy Object Mask, but it isn't the current default workflow.
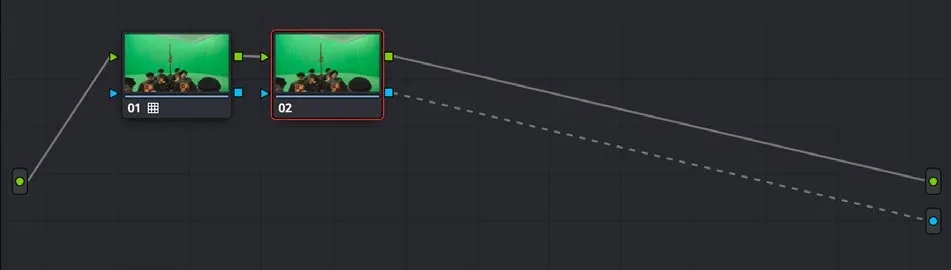
- Keep the base performance on V1 and the take to isolate on V2. On the Color page, select that V2 clip and add a Serial node for its matte. Confirm the correct take is selected before drawing the mask.
- Move to a frame where your full outline is visible and unobstructed, not necessarily the first frame of the clip. Open the Magic Mask palette and click once on yourself in the Viewer to add a point. Add more points, or subtract points, only where the mask misses you or grabs background it shouldn't.
- Set Quality to Better if the edge needs refinement, then track forward and backward from the chosen reference frame across the required shot range. A forward track from the middle does not analyze the earlier frames. Play the entire matte and repair failures before accepting it.
- Right-click an empty area of the node graph and choose Add Alpha Output, then connect the node's blue key output to the blue Alpha Output connector so the mask carries transparency instead of a color correction.
- If playback needs relief after the matte is approved, choose Render in Place Magic Mask from the palette’s three-dot menu and select a location for the cached frames. The manual’s external-matte instructions describe this optional step. Keep those files with the project and regenerate them when source timing or the approved mask changes. This is not the Edit-page Render in Place command.
For click placement, first-failure repair, matte finesse and the Resolve 21 external-matte command, use the complete Magic Mask 2 workflow. Keep this page focused on how that matte participates in the clone composite.
Only isolate additional takes that need their own matte. Rendering a mask does not fix a bad edge, and multiple live masks can slow playback. If the composite remains sluggish after caching, use the DaVinci Resolve slow playback guide to check GPU and cache constraints.
The broader Resolve 21 AI tools guide covers where Magic Mask sits alongside the rest of the Neural Engine features if you want the full picture before deciding on Studio.
Free Method: Power Window and Tracker Masking
The free version skips Magic Mask, but it doesn't skip masking entirely. Power Windows and the Tracker palette ship in every version of DaVinci Resolve, Studio or not, per Blackmagic's Color page feature rundown. What they don't do is replace Magic Mask's actual job.
A Power Window defines a shape. The Tracker can move, rotate, and scale that shape to follow an object through the frame. Neither one turns your shape into a semantic outline that reshapes itself around a moving arm or a turning body on its own.
When your own outline changes, you're moving the window's points by hand at the frames where the shape actually changes, and letting Resolve interpolate between those points, not trusting one continuous track to hold a changing silhouette.
- Select the upper take on the Color page, add a Serial node and draw a Curve Power Window around the region you need to keep. For a separated clone, a loose boundary through unchanged background may be enough; crossings need a closer outline.
- Open the Tracker palette, set the mode to Window, and track both forward and backward from that frame for a shot where your position moves but your outline doesn't change much.
- When the outline changes, switch the Tracker palette from Clip to Frame mode before moving window points. Add a keyframe where the fit is still good, move to a changed pose and adjust the shape. Frame mode keyframes and interpolates these edits; Clip mode changes the shape across the whole clip.
- Right-click an empty area of the node graph and choose Add Alpha Output, then connect the node's blue key output to the blue Alpha Output connector once the shape holds for the full clip.
Review the tracked window and the finished composite throughout the shot. Blackmagic’s Frame-mode instructions explain the difference between a clip-wide correction and an animated shape. For complex limbs, repeated occlusions or several holdouts, the Fusion rotoscoping workflow is a more suitable next step than forcing one window to describe everything.
Making Two Resolve Clones Interact or Cross Paths
A fixed split works while the content you need from each take stays inside its retained region. Looking at each other does not break it. If a hand, prop or shadow reaches the boundary, first see whether moving the seam through unchanged background avoids the crossing. If not, animate the boundary or isolate the crossing element; a subject mask alone does not preserve every cast shadow.
Use the clap, spoken cue or hand signal from the shoot to find the exact frame where the interaction needs to land. Trim both clips to that reference before masking; matching raw clip lengths doesn't synchronize two performances.
For a Fusion version, select the aligned, overlapping video takes on the Edit timeline, right-click and choose New Fusion Clip. Open Fusion and identify each MediaIn by viewing it; do not infer which take it contains from the node number. Connect the base take to Merge’s orange Background input and the upper take to its green Foreground input, then send Merge to MediaOut. The manual’s Merge input reference distinguishes these from the blue Effect Mask input.
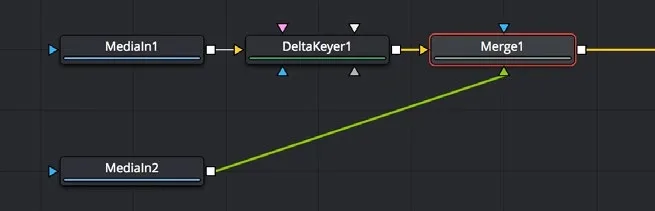
Connect a Polygon or B-Spline mask to the Merge’s blue Effect Mask input to limit where the upper take appears. A loose garbage mask can discard unwanted background when its boundary stays away from either performance. It is not a detailed subject matte and will not solve a body crossing that boundary. Animate the shape when needed; keep the base take visible outside it.
When the front-to-back order changes, use a separate holdout shape or another masked branch for the crossing hand, body or prop. The later foreground Merge appears on top where its alpha and mask allow it. Check the first overlap frame, the tightest crossing and the last overlap frame, then play the interval; one correct still frame is not enough.
Moving-Camera Clone Effect in Fusion
A moving-camera clone isn't the fixed-crop method with stabilization added at the end. Both takes need repeatable camera movement or enough shared background detail to produce compatible tracks. If the camera path and parallax differ substantially between takes, no node arrangement can make the perspectives identical; a controlled reshoot is often faster and cleaner.
In Fusion, track stable background detail, not the performer, in each take. Use compatible reference frames. One tracked pattern supports position; the Resolve 21.1 manual requires at least two for Steady Angle and Steady Size. More patterns do not make incompatible perspectives match.
Steady each take, then register the two backgrounds at the reference frame before masking and merging. Independent stabilization removes motion relative to each take; it does not automatically align one take to the other. Compare fixed edges across the full shot, not just the reference frame.
For translation-only motion, connect a pre-Merge Transform Center on each take to that take's Tracker Steady Position. After the Merge, connect one post-Merge Transform Center to the base take's Unsteady Position to restore the chosen camera move.
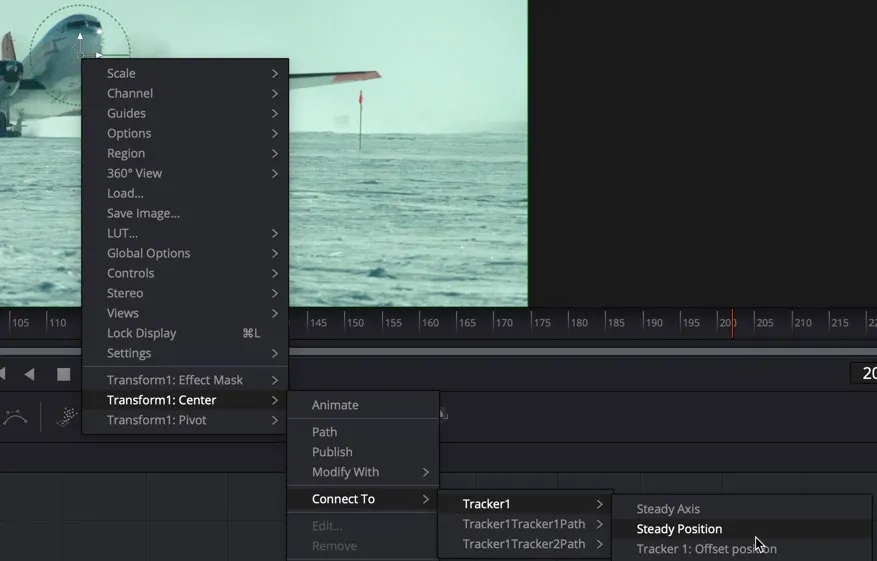
Rotation and scale also require the paired Steady/Unsteady Angle and Size connections with the corresponding pivot/axis setup. The Tracker output reference explains the published controls. This is shot-dependent, so use the Fusion tracking guide for the tracker and reference-frame setup rather than treating position-only wiring as a complete solution. Inspect blank edges and parallax throughout the composite.
At a hand-off, body turn or crossing, add mask points or keyframes where the outline and occlusion order change. Resolve can interpolate keyed shapes, but it can't decide which clone belongs in front. The Fusion tutorial for beginners explains Merge order, while the DaVinci Resolve Fusion hub keeps this effect inside the wider node and tracking path.
Fixing Resolve Clone Effect Edges, Shadows and Sync
Edge flicker can come from a drifting track, an occlusion, changing motion blur, noise or weak subject contrast. On the Color page, use Highlight (Shift+H with the default shortcuts) to inspect the selection, then turn it off to judge the composite. In Fusion, view the relevant mask or alpha channel. Do not treat Color-page Highlight as a Fusion matte-view command.
If the takes were shot against a green or blue screen, keying is another route to a subject matte. It does not remove the need to match timing, lighting and foreground order.
For chroma-key footage, refine the alpha before chasing edge spill; use the Delta Keyer guide for that separate workflow. An ordinary room background is not a reason to add a chroma keyer.
Keep lights in the same positions and shoot the takes close together if daylight is changing. A shadow may need its own retained region or matte; cutting tightly around the body can remove the contact shadow and make the clone look detached from the floor. Avoid feathering across a second shadow or moving object, which can create a translucent double image.
A clean background plate is not mandatory for a locked split because one performance take can remain the base. An empty take is useful when neither performance reveals the background you need or when an unwanted prop or shadow must be patched. Match its camera, lighting and timing where background motion matters. It supplies background pixels, not a missing hand, a correct contact shadow or an automatic occlusion solution.
For three or more separated performances, repeat the same upper-track crop logic and keep each take on its own video track. The duplicate and stack clips guide covers the underlying timeline mechanics; masking and performance sync still need to be checked for each clone.
Clone Effect FAQ
Do you need DaVinci Resolve Studio to clone yourself?
No. The split-screen crop method and manual Power Window masking both work in the free version. Magic Mask speeds up masking specifically when your clones cross paths or move through a changing outline, but it's Studio-only.
What's the easiest way to clone yourself without masking in DaVinci Resolve?
Stack two takes on separate tracks and crop the upper clip at a fixed line using Inspector, Video, Cropping. Keep both performances and required shadows inside their retained regions. If something crosses the boundary, move the seam if possible or use an animated boundary or subject matte with the necessary shadow and occlusion work.
Why do my DaVinci Resolve clone effect edges flicker?
A drifting track, occlusion, motion blur, noise or low subject contrast can make an edge flicker. On the Color page, inspect the selection with Highlight (Shift+H with default shortcuts). In Fusion, inspect the mask or alpha channel. Then review the actual composite in motion before changing the edge settings.
How many clones can you stack in DaVinci Resolve?
This workflow has no two-clone rule. The practical ceiling depends on the system, source codec, timeline resolution and compositing method. Cropped split-screen layers are relatively light; multiple live Magic Masks, tracked mattes and high-resolution Fusion branches demand much more GPU memory and processing time.
Can you do the DaVinci Resolve clone effect without a green screen?
Yes. A green or blue screen is optional. A locked-camera crop needs no subject key at all; Power Windows and Magic Mask isolate a subject against an ordinary background. Use Delta Keyer only when the footage was actually shot for chroma keying.
Can you clone yourself with a moving camera in DaVinci Resolve?
Yes, if the takes have compatible camera motion and perspective. Steady the takes, register their backgrounds, composite, then restore the chosen camera move. Translation uses Steady/Unsteady Position; rotation and scale need their paired controls and pivot setup. Different handheld parallax may require a reshoot.
Part of the DRC guide system: DaVinci Resolve Fusion hub
