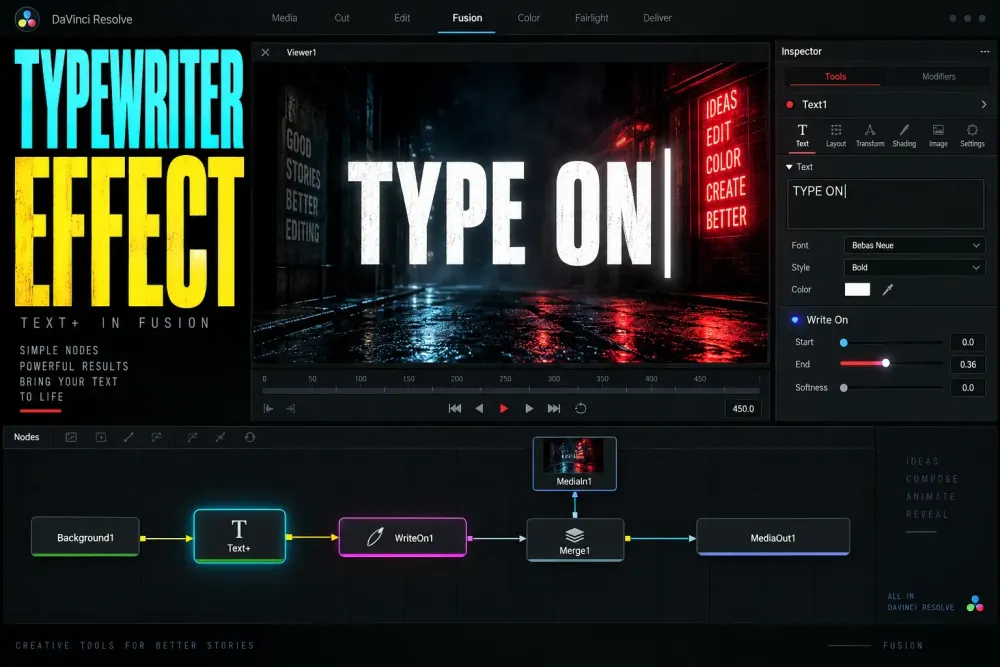
The fastest dependable way to create a typewriter effect in DaVinci Resolve is to use a Text+ title and animate its Write On End control from 0 to 1. The first keyframe hides the line, the second reveals the complete line, and the distance between those keyframes sets the typing speed. Text+ animation is part of the larger Fusion hub.
Build the plain reveal before adding a cursor, sound effects, or uneven timing. That order keeps the diagnosis simple: if the text does not appear, you know the problem is in the title, Write On values, or clip duration rather than an expression or a second animation layer.
| Goal | Best starting method | When to use Fusion |
|---|---|---|
| Simple left-to-right typing | Text+ Write On End keyframes on the Edit page | Usually unnecessary |
| Pauses between words or lines | Add and reposition End keyframes | Use Spline when timing needs finer shaping |
| Blinking cursor after the line finishes | Separate one-character Text+ layer with opacity keyframes | Useful for looping or a cursor rig |
| Cursor follows every new character | Prototype the reveal first | Use a modifier or expression-based setup |
| Reusable title across projects | Finish and verify the composition | Package the controls as a macro or title template |
Use Text+, Not the Standard Text Title
Open Effects Library > Toolbox > Titles and drag Text+ onto a video track above the shot. The standard Text title is fine for static captions and basic transform animation, but the typewriter workflow in this guide depends on the Write On controls exposed by Text+.
If you need a broader comparison before choosing a title tool, the DaVinci Resolve text guide owns the Text, Text+, MultiText, subtitle, and Fusion Title decision. Here, the job is narrower: reveal one Text+ string in a controlled sequence.
Select the Text+ clip and enter the complete final wording in Styled Text. Set the font, size, line spacing, alignment, layout, and screen position before keyframing. The current Blackmagic Design Resolve 21 page documents newer Text+ improvements such as the font browser, spell checking, emoji support, and character-level styling, but those additions do not change the core Write On method.
Give the title enough timeline duration for three phases: typing, a readable hold, and an optional fade or cut. A two-second clip cannot contain a three-second reveal plus a two-second hold. Extend the clip first so later timing changes do not collide with its end.
Animate Write On End from 0 to 1
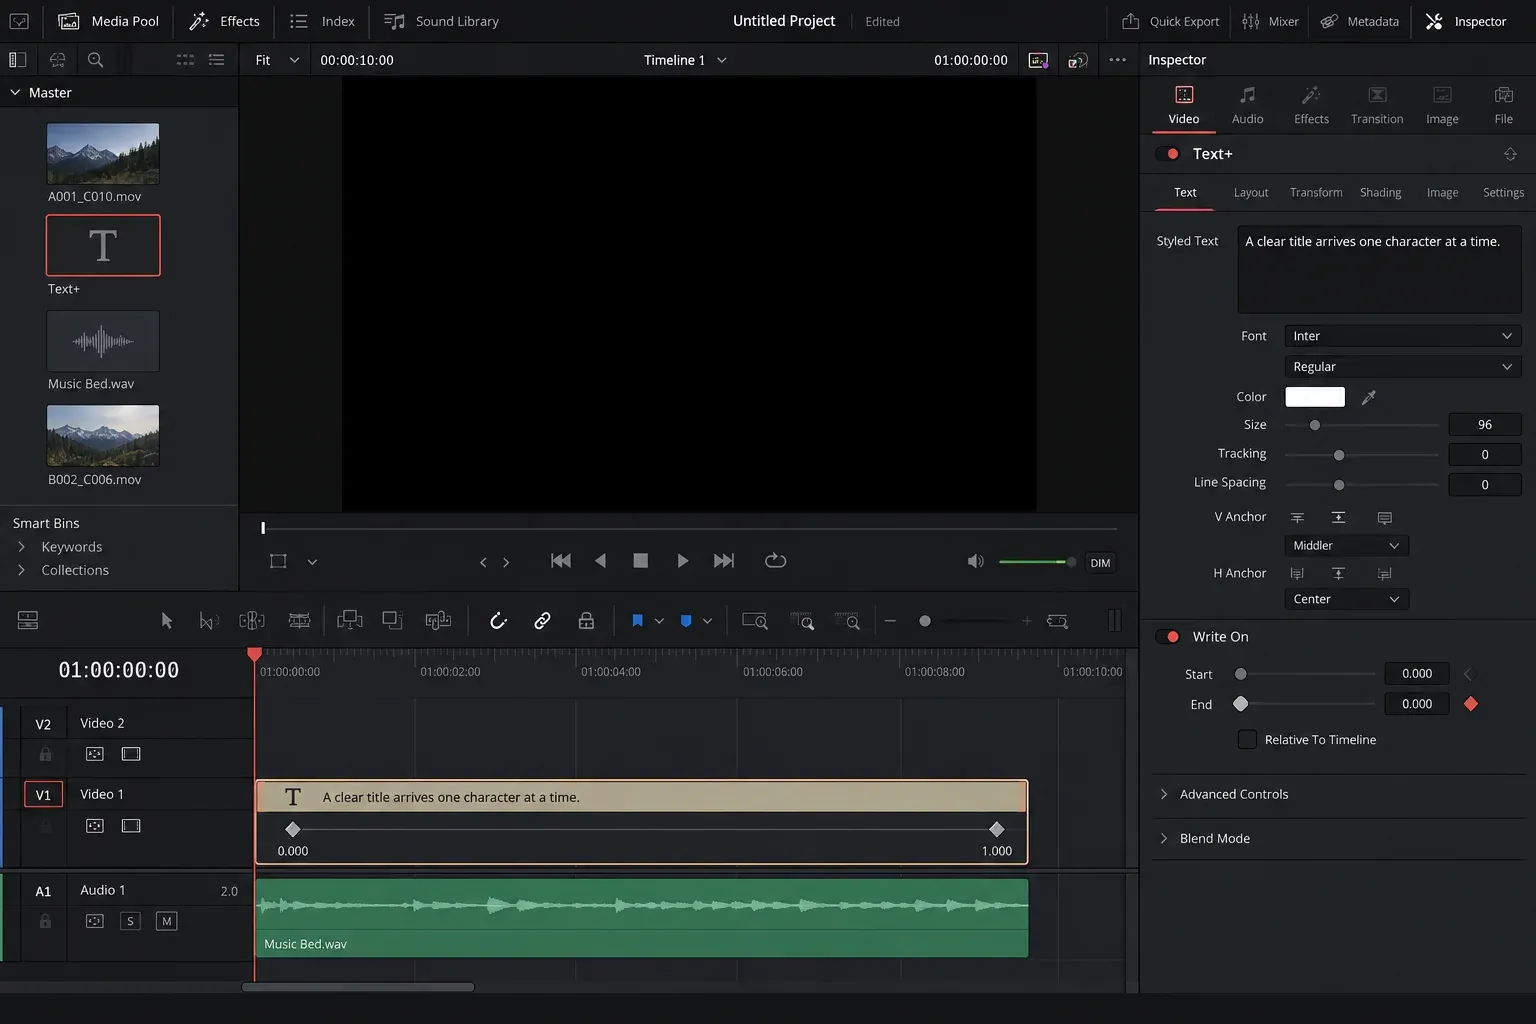
In the Text+ Inspector, find Write On. It contains Start and End. For a normal type-on effect, keep Start at 0. Start controls where the visible range begins; raising it can remove characters that have already appeared. End controls how far through the string the visible range extends. If a control is missing, check the relevant panel in the Inspector guide.
- Move the playhead to the frame where typing should begin.
- Set End to 0 and click its keyframe diamond.
- Move the playhead to the frame where the final character should appear.
- Set End to 1. Resolve creates the second keyframe.
- Play across the title and confirm that the complete line remains visible after the second keyframe.
Blackmagic’s Edit page documentation describes the same keyframe pattern used across Inspector controls: enable the diamond, move the playhead, and change the value. The timeline keyframe and curve editors can then adjust timing and easing.
Do not animate Start and End together unless you intentionally want a moving window or write-off effect. When both values travel toward 1, the first characters can disappear behind the advancing range. That behavior is useful for other motion graphics, but it is the wrong default for text that should accumulate and remain readable.
Set the Typing Speed with Keyframe Spacing
The title’s character count stays the same; the time between the two End keyframes changes how quickly Resolve crosses the 0-to-1 range. Move the final keyframe closer to the first for faster typing. Move it farther away for slower typing.
Start from reading rhythm rather than an arbitrary characters-per-second target. A short label can arrive quickly. A sentence with punctuation needs more room, especially when the audience must read it over a moving shot. Preview at the project frame rate and listen with the actual dialogue or music. The visual rhythm should support the edit instead of competing with it.
After the last character appears, leave the End value at 1. The flat section after the final keyframe is the hold. If the title disappears immediately, the Text+ clip probably ends at the same frame as the reveal or a later keyframe returns End to a lower value.
If the motion feels too smooth, that is a timing problem rather than a font problem. Real typing rarely advances at one perfectly constant rate. Add a few End keyframes and place them around meaningful pauses:
- Use a shorter interval through an ordinary word.
- Leave a slightly wider interval after punctuation.
- Pause before an emphasized word rather than slowing every character.
- Give a line break a visible beat when the second line changes the meaning.
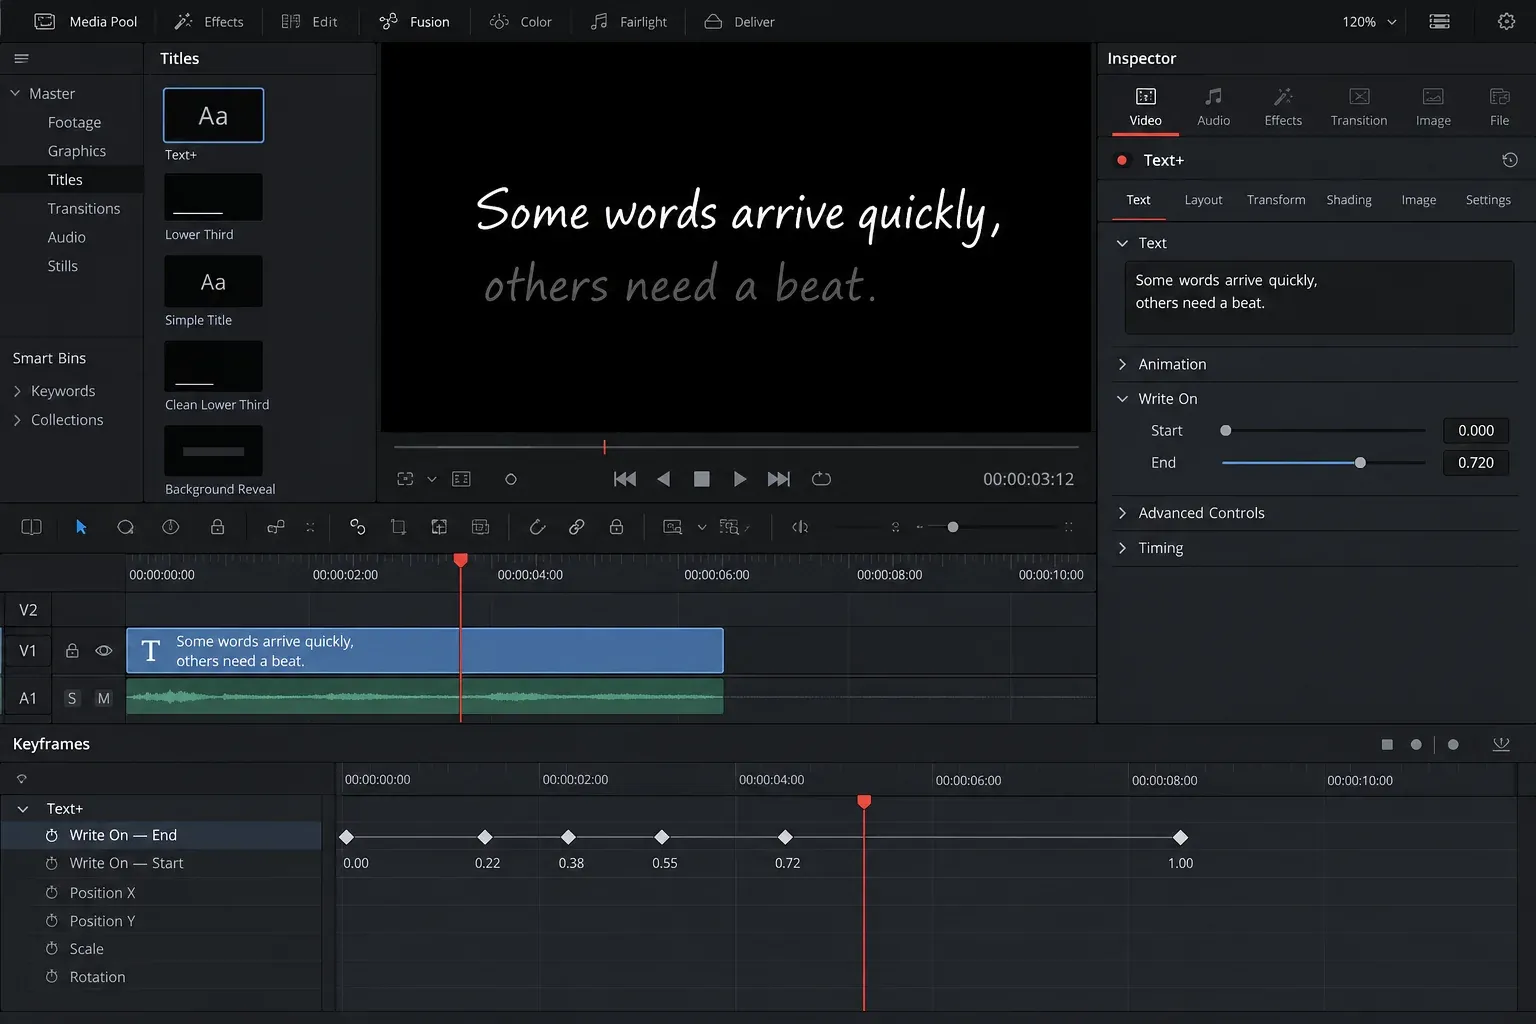
You do not need a keyframe for every letter. That creates a brittle timeline and makes revisions painful. A handful of timing landmarks usually creates enough variation while leaving the text editable.
Control Multiline Text Without Losing the Pause
Write On follows the character order in Styled Text, including spaces and line breaks. A two-line message can therefore run as one continuous reveal. If the second line should start after a deliberate pause, add End keyframes on either side of the break and widen the gap between them.
Use two Text+ clips when the lines need independent layout, animation, or duration. Separate clips are cleaner when the second line begins in a different screen position, uses another style, or must remain after the first line disappears. Keeping unrelated timing in one title may save a track but costs clarity later.
Finish the wording before refining the keyframes. Adding several characters changes where earlier normalized End values land in the string. The animation will still run from 0 to 1, but a carefully placed pause may shift from a comma to the middle of the next word. After any copy edit, replay every timing landmark.
Add a Blinking Cursor After the Reveal
A cursor is optional. The typewriter effect already reads clearly when the text appears character by character. Add the cursor only when it supports the style, and make its behavior predictable before building a rig that follows every character.
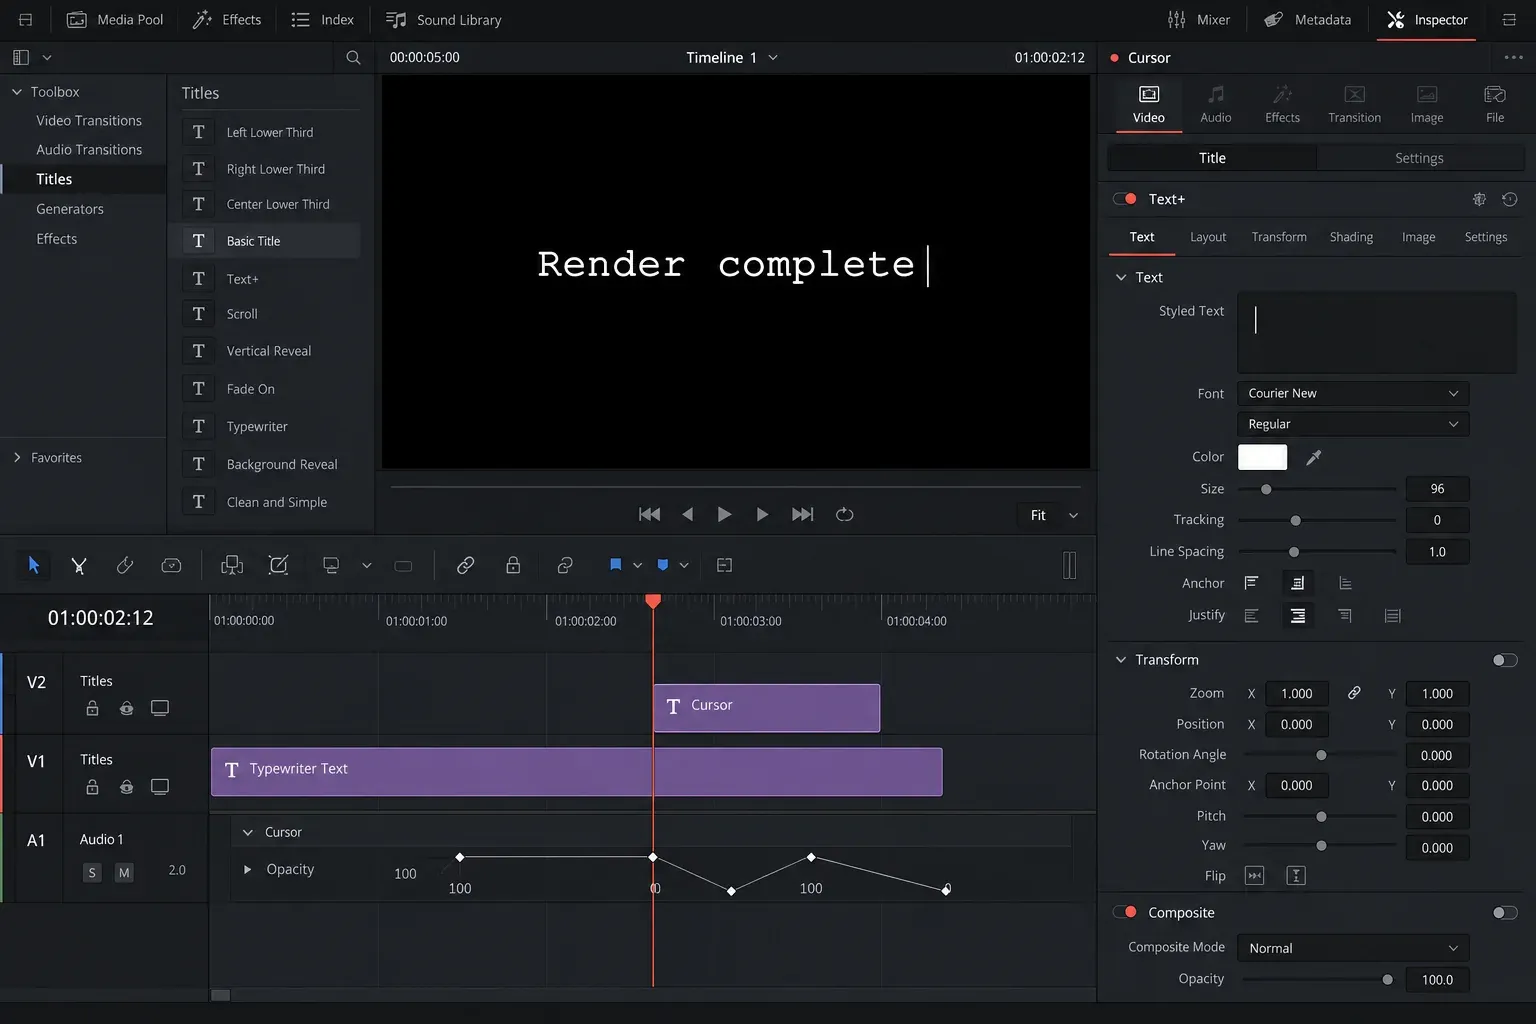
For a simple cursor that blinks after the sentence finishes:
- Add a second Text+ clip above the typewriter title.
- Enter one character such as a vertical bar or underscore.
- Match the font, size, color, baseline, and final text position.
- Trim the cursor clip so it starts when the last character appears.
- Keyframe its opacity between visible and hidden states at an even interval.
- Repeat only long enough to cover the title’s hold.
This method does not pretend the cursor followed the line during typing. It appears at the final position and blinks during the hold, which is often all a lower third, terminal-style label, or chapter card needs. Because the cursor is a separate clip, you can change its rhythm without disturbing the text reveal.
If the cursor must travel with every character, open the title on the Fusion page. A modifier or expression can derive displayed text from time and keep a cursor attached to the current substring, but that setup depends on the exact composition, font metrics, line wrapping, and Resolve version. It is more fragile when the wording changes.
The official Fusion page confirms that Text+ exposes advanced text controls and that the Spline and Keyframes editors refine animation. Use the Fusion beginner guide before modifying a node graph if MediaIn, Text+, Merge, and MediaOut are still unfamiliar.
Shape the Timing on the Fusion Page
The Edit page is enough for the first working version. Switch to Fusion when you need to see the title as a node composition, adjust several animated properties together, reuse a timing pattern, or build a cursor that follows the reveal.
In Fusion, the Keyframes editor is useful for moving events in time. The Spline editor is useful for changing interpolation. For a mechanical type-on, avoid adding a large ease that makes the first characters crawl and the final word rush. The viewer reads discrete character appearances, so timing landmarks matter more than a decorative curve.
Keep one clear control path. If Write On End is already animated on Text+, do not add another modifier that also limits the visible string unless you can explain which control owns the reveal. Two competing systems create the familiar symptom where text appears in the Inspector but vanishes or stops halfway in the viewer.
Once a composition is stable and named cleanly, the Fusion macros and templates guide explains how to expose only the controls an editor needs. Package after the title works with short and long sample text; otherwise the template freezes one successful example rather than a reusable design.
Fix Common Text+ Typewriter Problems
The whole line appears at once
Check that the keyframes are on Write On End, not the Text+ clip’s Zoom, Position, or Composite opacity. At the first keyframe, End must be 0. At the final keyframe, End must be 1. If both keyframes have the same value, there is no reveal to interpolate.
The first letters disappear as new letters appear
Start is probably animated above 0. Return Start to 0 and remove its unnecessary keyframes. Animate only End for an accumulating type-on effect.
The text stops halfway
Inspect the last End keyframe. It may be below 1, outside the trimmed clip, or followed by another keyframe with a lower value. Extend the clip, place the final keyframe inside it, and confirm that End reaches 1.
The final line vanishes immediately
The title clip ends when typing ends. Extend its out point to create a hold. If the clip is long enough, check for a later opacity, Blend, Write On, or global Settings keyframe that hides the title.
The cursor blinks before typing finishes
Move the cursor clip’s in point to the final text keyframe, or keep its opacity at zero until that frame. Treat the text reveal and cursor as two timed events with one shared handoff point.
The pause moved after editing the wording
Write On uses a normalized range across the current string. Adding or deleting characters changes which letter is reached at an intermediate End value. Reposition the timing keyframes after every substantial text edit.
Text is visible in one place but missing in the viewer or export
That is broader than the typewriter control. Check track enable state, title clip range, node connection to MediaOut, composite opacity, render range, and whether the title sits above the picture. Keep the reveal keyframes intact while isolating visibility.
Typewriter Effect Checklist
- The title is Text+, not the standard Text generator.
- The final wording and line breaks are set before detailed timing.
- The Text+ clip is long enough for reveal, hold, and exit.
- Write On Start remains at 0 for a normal accumulating reveal.
- Write On End begins at 0 and reaches 1.
- The final End keyframe sits inside the clip.
- Extra End keyframes create only the pauses the sentence needs.
- Multiline timing is replayed after copy edits.
- A separate cursor starts at the completed-text frame.
- Fusion is reserved for a following cursor, modifiers, or a reusable rig.
- The title is checked at delivery resolution for safe margins and readability.
Text+ Typewriter FAQ
Which Write On control creates the typewriter effect?
Animate End from 0 to 1 and leave Start at 0. End advances the visible portion of the string; Start can remove the beginning of that visible range.
How do I make the typing faster?
Move the final End keyframe closer to the first. For uneven rhythm, keep the overall duration and adjust a few intermediate End keyframes around words, punctuation, or line breaks.
Why does my typewriter text disappear after it finishes?
The title may end at the final reveal frame, or a later keyframe may reduce End, opacity, or another visibility control. Extend the clip and make sure End stays at 1 during the hold.
Can I add a blinking cursor without an expression?
Yes. Put a vertical bar or underscore in a second Text+ clip, start it when the reveal ends, and alternate its opacity. Use Fusion only when the cursor must follow every character or become a reusable control.
Why did my pauses shift after I changed the text?
Intermediate Write On values map across the current character string. When its length changes, the same normalized value can land on another letter. Review the timing after wording or line-break changes.
