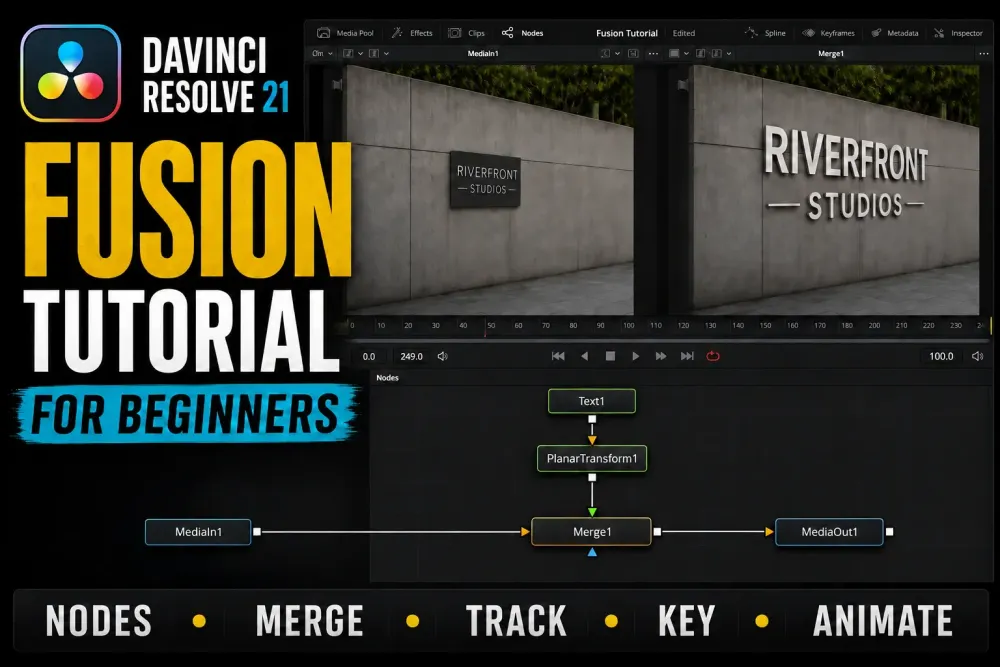
Fusion stops feeling random once you read every comp as a flow: sources first, then tools and Merge nodes, then MediaOut. Learn the workspace and the node logic here, and move on to the specialist tracking, keying and motion-graphics guides when a shot calls for them. If you remember one rule, make it this one: a Merge node's orange input is the background, green is the foreground, and blue is an optional effect mask.
For the tracking exercise, grab a short clip with a textured wall; for the keying exercise, a separate green-screen shot. If you don't have either, the lesson files for Blackmagic's free Visual Effects Guide to DaVinci Resolve 20 include the media for its sign-replacement and green-screen lessons, a download of roughly 1.5GB. Save the project before you start experimenting. Everything here happens on the desktop Fusion page inside Resolve, so you don't need the separate Fusion Studio application.
DaVinci Resolve Fusion Basics: Nodes Instead of Layers
A timeline-based Fusion comp normally opens with two nodes. MediaIn brings the timeline clip into the graph, and MediaOut sends whichever result branch you choose back to the Edit page. Keep that return path in view while you learn. You can build a generator-only title without MediaIn, but any branch you want on the timeline still has to reach MediaOut.
Follow the wires from each source toward MediaOut. In the example below, a graphic is merged over the clip and the combined image then runs through a blur; for a basic title, the Merge output can go straight to MediaOut. Where a node sits on the canvas has nothing to do with which operation happens first.
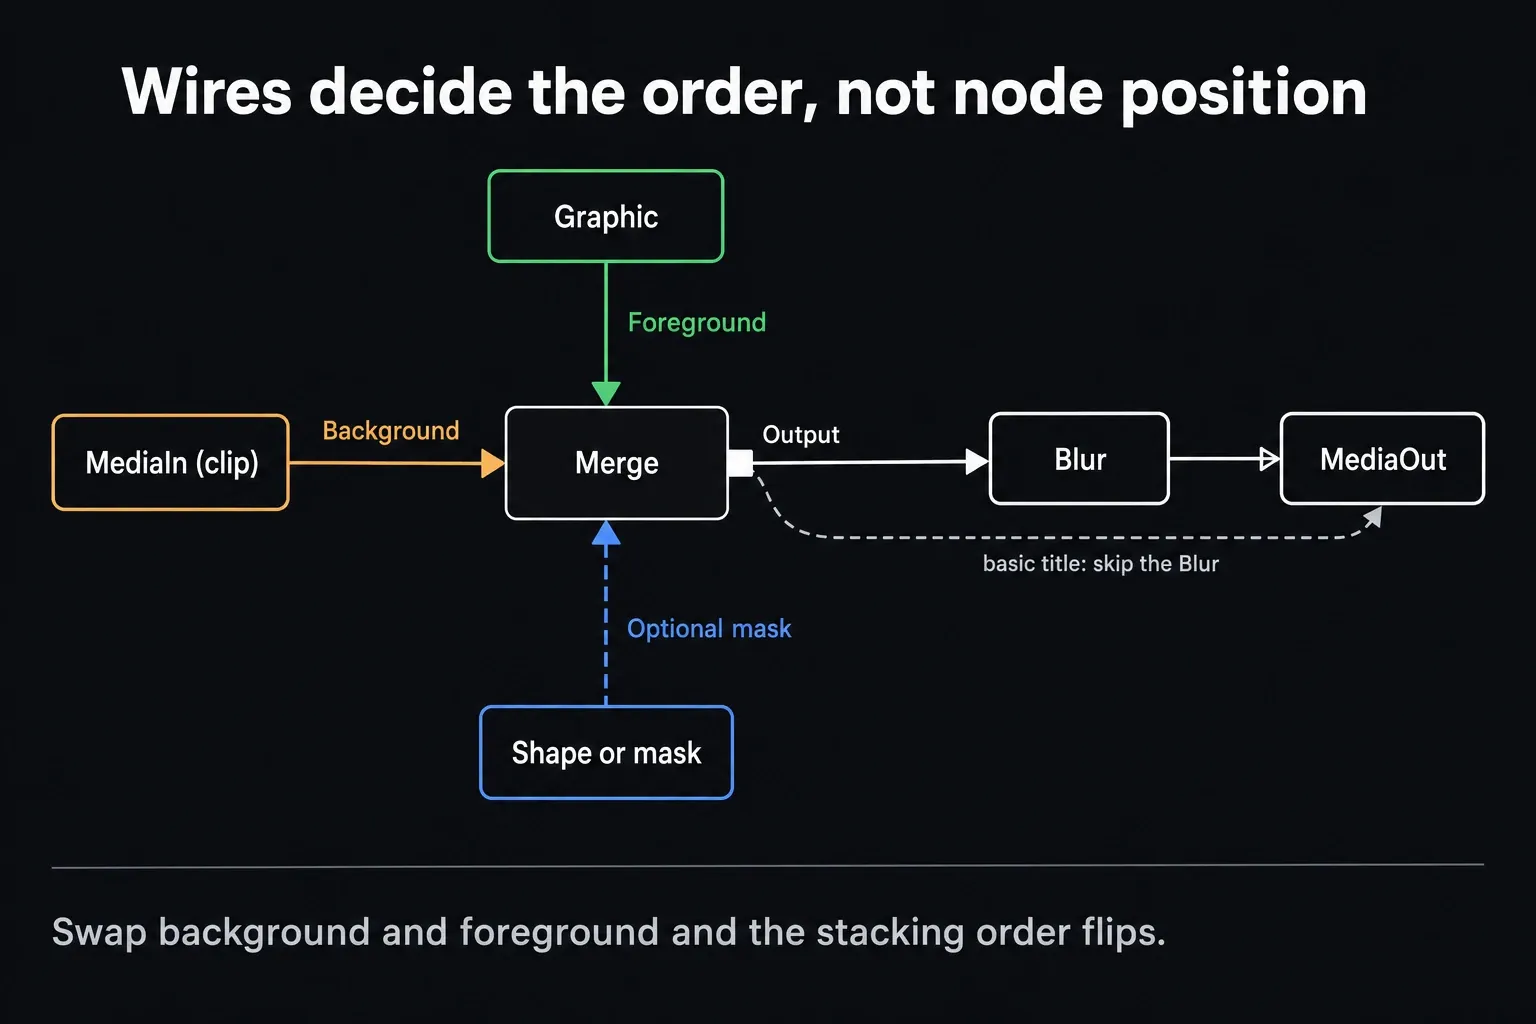
What trips up most people coming from After Effects or Premiere is that screen position in the Node Editor doesn't create a layer stack. The connections decide the image flow. A Merge combines two images: orange is background, green is foreground and blue is an optional effect mask. Plug a shape into blue and it limits the Merge result. The full guide to Fusion and Color nodes explains the two node systems without pretending they're interchangeable. Swap the background and foreground and you change their compositing order, which can hide the element you meant to keep on top.
Fusion Nodes: Quick Map
These eight nodes cover all three exercises below. Skim what each one does now, and come back to the list whenever a connection stops making sense.
- MediaIn: brings the timeline clip or imported media into the comp.
- MediaOut: sends the selected result branch back to the Edit page timeline. The branch you want rendered must reach it.
- Merge: combines a foreground and background image. This is the node to understand first.
- Text+: creates editable text and title graphics.
- Planar Tracker: tracks a flat surface and can drive a corner pin or match move composite.
- Delta Keyer: removes a green or blue screen background.
- Background: generates a solid color or gradient. Fills the entire frame unless you mask it.
- Rectangle mask: draws a rectangular shape you can connect to another node's mask input to limit its area.
Fusion Comp 1: A Tracked Title That Sticks to a Surface
Use a planar track when the title has to follow a wall, a sign, a laptop lid or another flat surface while its perspective changes. The tracker analyzes the surface, and a Planar Transform carries that motion over to the title. Keeping the original clip on the Merge background branch makes the composite easier to read and easier to fix.
- Select the clip on the Edit page and open the Fusion page. Confirm that MediaIn is connected to MediaOut before changing the graph.
- Add a Planar Tracker connected to MediaIn and load that tracker into a viewer: select it and press 1 or 2. In the Inspector, keep Operation Mode set to Track. Move to a sharp, unobstructed frame where the surface is clearly visible, click Set to establish the reference frame, then draw a region around textured detail on that same plane.
- Track from the reference frame to the start, return to the reference frame, and track to the end. Switch to Steady to inspect whether the plane slips, then return to Track.
- Click Create Planar Transform. This creates a separate Planar Transform node carrying the solved motion.
- Add Text+ and enter a short label in its text field, then connect Text+ into the Planar Transform.
- Add a Merge. Connect MediaIn directly to the orange background input, the Planar Transform output to the green foreground input, and the Merge output to MediaOut. Load the Merge into a viewer with 1 or 2, return to the reference frame, then select Text+ to place and style the label over the tracked surface while watching the composite.
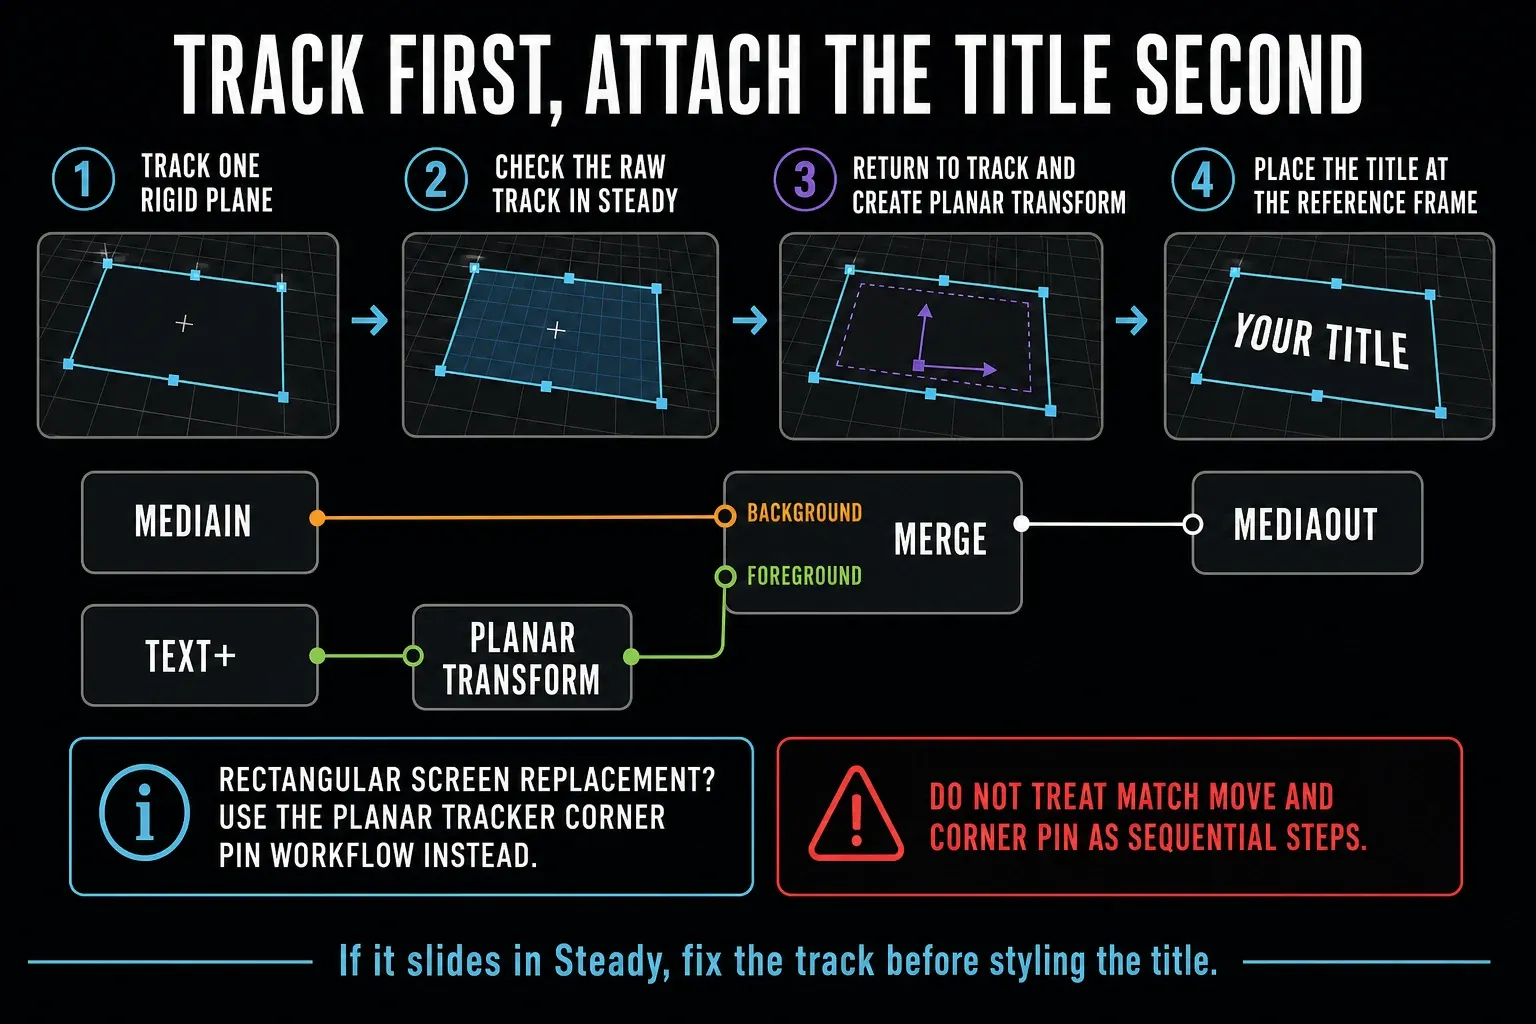
Scrub the whole shot; the middle alone won't show you every tracking failure. If the title drifts, repair the track or pick a better reference region before you touch the text. Then create a new Planar Transform from the repaired track and route the title through it, because the transform you exported earlier holds the old motion and won't update with later tracking changes. No tracker can recover detail that's fully blurred, blocked or out of frame.
For a rectangular screen or sign replacement, the Planar Tracker's built-in Corner Pin route can be quicker than creating a separate transform. It's a different output choice, not a second step after Match Move. The Fusion tracking guide covers point, planar and camera tracking, reference frames and drift repair.
Fusion Comp 2: A Basic Green Screen Key
A useful beginner key does two separate jobs: it builds a clean alpha channel, and it controls green or blue spill on the foreground. Delta Keyer gives you dedicated Key, Pre-Matte, Matte and Fringe controls for those jobs. Don't lean on one global control until the hair and motion blur disappear along with the green.
- Connect the green-screen MediaIn output to Delta Keyer. Select Delta Keyer and press 1 or 2 to load it into a viewer. Open the Key tab and sample a clean part of the screen with the eyedropper.
- In Delta Keyer, switch View Mode to Matte and set the viewer to display the alpha channel. This view shows the key before garbage and solid masks are combined. The subject should remain opaque, the screen transparent, and fine edges should retain useful softness.
- Use the Pre-Matte and Matte controls to repair holes in the subject or leftover screen pixels. Make small changes and recheck hair, fabric, motion blur and shadows.
- Return View Mode to Final Result and set the viewer back to RGB. Open the Fringe tab for spill suppression. Compare the color result against the original so skin, hair and wardrobe don't turn unnaturally neutral.
- Drag the replacement plate from the Media Pool into the node graph to create another MediaIn, then add a Merge. Connect that plate to the Merge's orange background input, the Delta Keyer output to the green foreground input, and the Merge output to MediaOut.
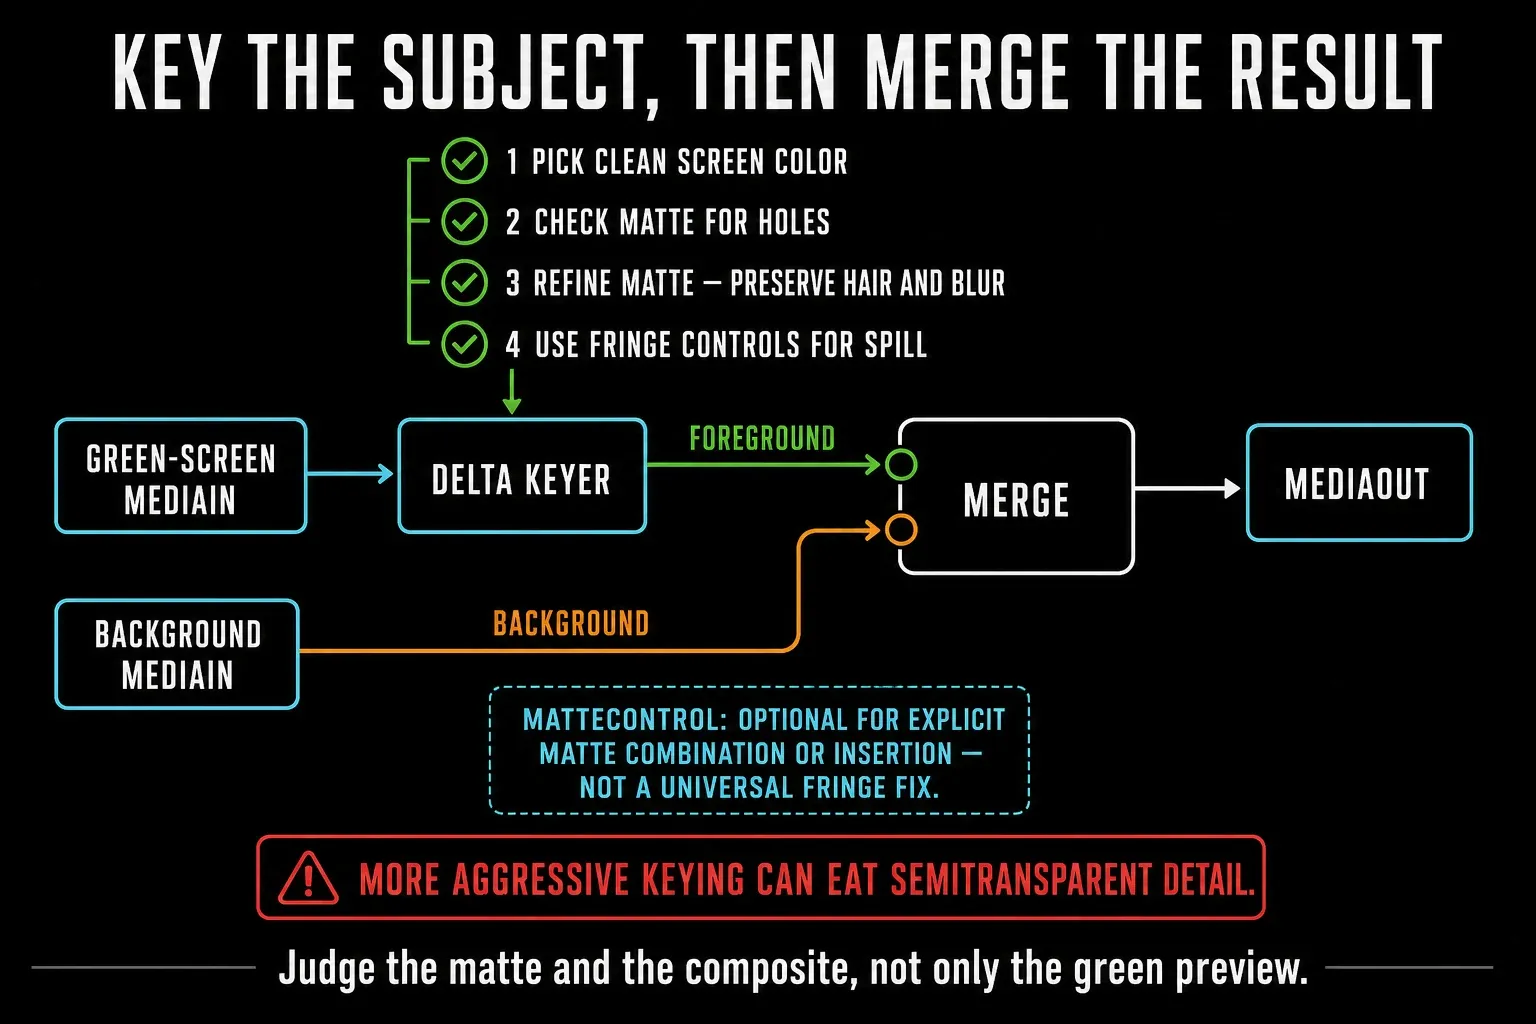
Delta Keyer already has its own Garbage Matte and Solid Matte inputs. Connect a mask to the right one when you need to exclude unwanted areas or hold the subject opaque. MatteControl is optional, for a separate downstream matte-combining job; you don't need it just to feed those masks into Delta Keyer, and it isn't the default fix for green fringe. Spill controls live in Delta Keyer's Fringe tab.
Uneven screens, translucent edges, reflections and smoke can need separate mattes, edge work or more than one keying pass. The complete Delta Keyer guide covers clean plates, matte diagnosis, edge repair and the point where reshooting is safer than stronger keying.
Fusion Comp 3: An Animated Lower Third From Scratch
This comp has the most moving parts, and it's the one that teaches keyframing in Fusion's spline editor, which behaves differently from the keyframe row on the Edit page.
- Add a Background node (Shift+Spacebar, search "Background") and set its color in the Inspector.
- Add a Rectangle mask node and connect it to the Background node's blue mask input. Without this step the Background node fills the entire frame instead of forming a strip. Adjust the Rectangle mask's Width, Height, and Center in the Inspector until the bar sits where you want it, usually along the lower third of frame.
- Add one Text+ node for the name. For this first exercise, use a line break in the same Text+ if you also need a subtitle. Separate Text+ nodes are useful later when the two lines need different animation, but each must be connected into the graphic branch.
- Merge Text+ over the masked Background: text into green, bar into orange. Load this Merge into a viewer, then select Text+ and adjust its size and placement until the name sits on the bar. Keep the text inside the masked graphic area you want to animate.
- Add a second Merge: connect MediaIn to its orange background input and the complete bar-and-text branch to its green foreground input. Connect this Merge's white output to MediaOut so the lower third reaches the timeline over your footage.
- Select the final Merge that places the complete lower-third branch over MediaIn. Move to the frame where the entrance should finish. Leave Center at the position that displays the finished graphic, right-click Center and choose Animate. Confirm that a keyframe exists there before continuing.
- Move to the earlier frame where the entrance should start. Adjust that same Merge Center until the entire bar and text are outside the image. With Center animated, this records the starting position. Play from the earlier frame to the later frame and check that both elements enter together.
- Open the Spline Editor and select the Center animation. Adjust its interpolation to ease the entrance, then replay it. Check that the curve does not overshoot the final position unless that bounce is intentional.
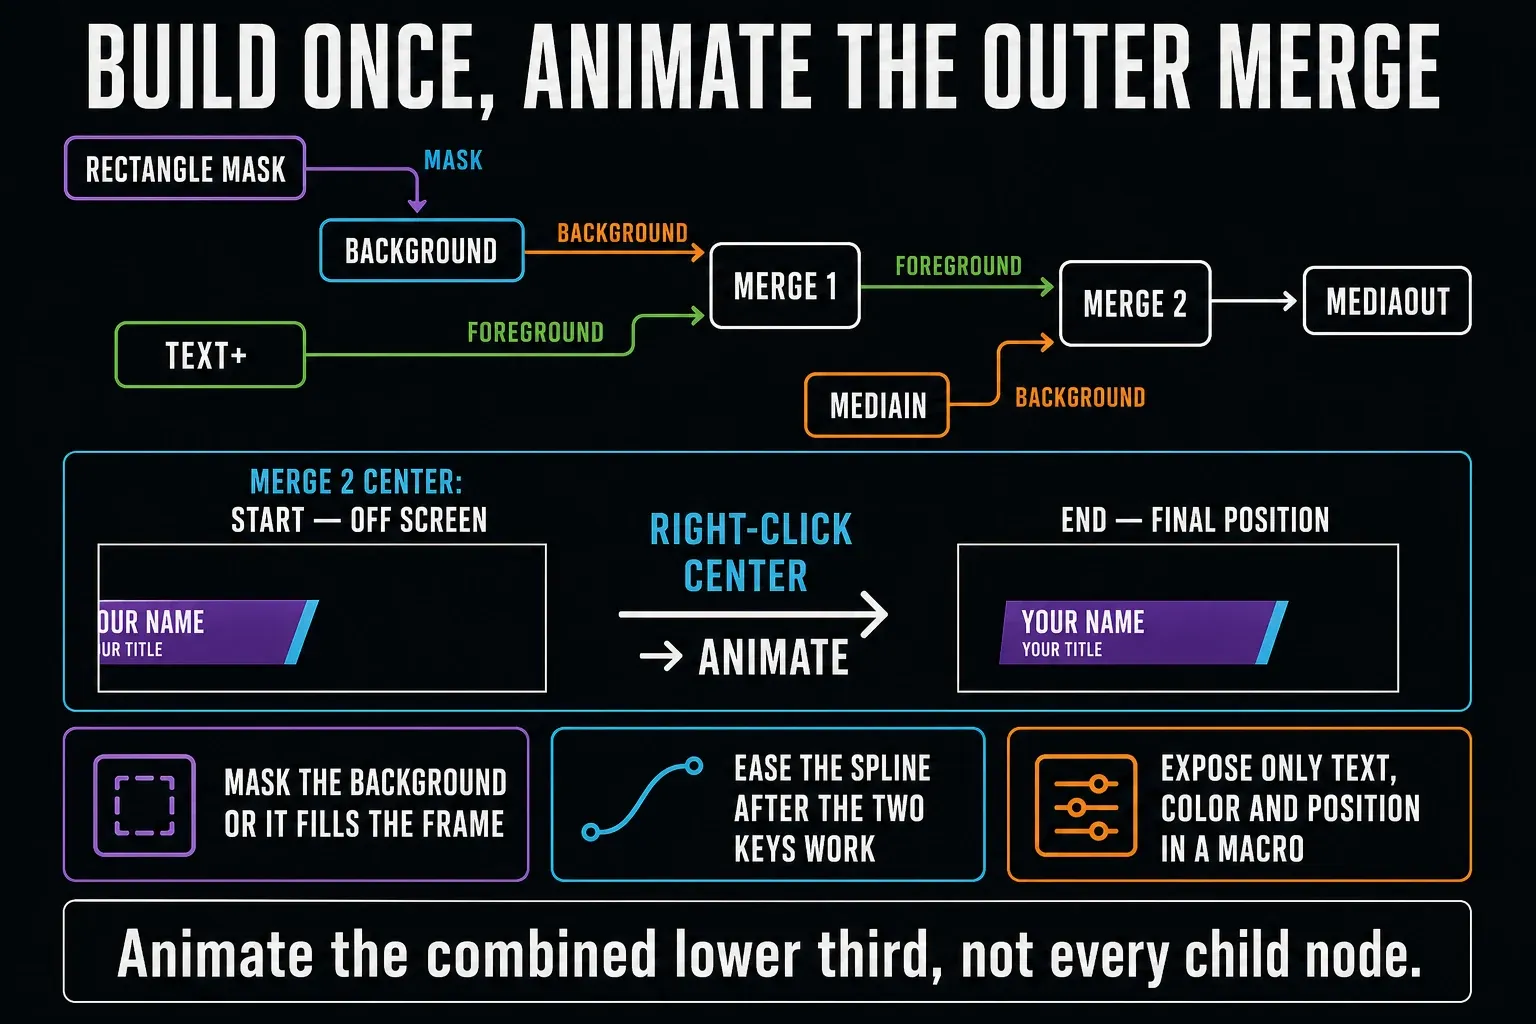
Saving the composition with the project is enough for one-off reuse. This exercise animates the final Merge, which also receives the shot, so exporting only the upstream text and bar would leave that movement behind. For a reusable Edit-page title, the Fusion macros and templates guide explains how to separate the animated graphic from its footage input and save it in the Titles category. Don't package this particular MediaIn clip into a generic title, and test the saved template on a different clip and duration.
Why Nothing Shows Up in Fusion
Go through these five checks before you rebuild the composition.
- MediaOut is disconnected. Connect the final branch you want returned to the timeline to MediaOut. If the wrong branch is connected, the Edit page receives the wrong result or no intended result.
- Merge inputs are swapped. Background goes into orange and foreground into green. If the wrong image is on top, swap the connections and inspect the result, including any transparency.
- A Background node is covering the whole frame. If you wanted a lower-third strip and got a full-screen color instead, you skipped the Rectangle mask step.
- Text is connected but invisible. Load Text+ into a viewer and check that it contains text, has visible alpha and sits inside the frame. Then check the Merge foreground connection and Blend. Viewing Text+ alone previews that node; it does not choose what MediaOut returns to the timeline.
- The tracker drifts partway through the clip. Retrack using a sharper, higher-contrast area of the frame, and avoid regions with motion blur.
Fusion vs the Edit Page: When to Actually Use It
Skip Fusion for a title that only has to sit centered on screen for 4 seconds. The Edit page's Text+ tool does that with fewer clicks and no node graph. Fusion earns its place when text has to track a surface, when you're keying footage, or when an animation needs more control than the Inspector's basic keyframe row gives you. Not sure which text tool fits your shot? Our guide to Text, Text+ and titles shows exactly where the Edit page stops being enough.
Saving Fusion Templates in Resolve 21.1
In the current Macro Editor, the Save to dropdown sits to the left of the Macro Name field. Pick a plain .setting file or the right template category; an older tutorial may show Save to Edit Template instead. The Resolve 21.1 Reference Manual documents the current layout and the exported controls. If you want an audio-reactive graphic, Fairlight Animator can drive an animatable numeric control from audio analysis. Neither feature changes the source, Merge and MediaOut connections in these exercises.
Fusion Performance: Why Comps Crawl on Some Machines
Fusion evaluates the graph frame by frame, so 4K media, keys, blurs and tracking can make interactive playback crawl. Build with the viewer's half- or quarter-resolution proxy, then switch back to full resolution for edge and quality checks. For Edit-page playback, use the clip's Render Cache Fusion Output > On command with the right cache mode; inside Fusion, Cache to Disk is the node-level alternative. The slow playback troubleshooting guide separates Fusion caching from proxy, optimized-media and general timeline problems.
Fusion FAQ
Is Fusion included in the free version of DaVinci Resolve?
Yes. Resolve Free includes the Fusion page and every tool used here: Merge, Text+, masks, Delta Keyer and Planar Tracker. The separate 3D Camera Tracker requires Studio, as Blackmagic's September 2026 Studio and iPad features sheet shows, and so does the IntelliTrack Point Tracker. For a flat surface, stick with the Planar Tracker workflow from Comp 1; don't swap in the Camera Tracker and expect it to run in Free.
Do I need to learn Nuke or After Effects first?
No. Fusion's node logic is closer to Nuke's than to the After Effects layer stack, but nothing here assumes you've used compositing software before. The Merge node's color-coded inputs, orange background, green foreground and blue mask, are the one thing worth memorizing first.
What does the Merge node do in DaVinci Resolve Fusion?
The Merge node combines a foreground image with a background image. The orange input is background, the green input is foreground, and the blue input is an optional effect mask.
Why does my tracker fail on a shot with motion blur?
Planar and point trackers need stable image detail, and heavy motion blur, occlusion or a low-contrast surface can wipe it out. Pick a sharper region, use a better reference frame and look over the complete track; difficult frames may need repair or some manual help.
Can I reuse a Fusion comp on other clips?
Yes. Keep the comp in the project for one-off reuse, or build a Macro and save it in the right Fusion Templates category when it should show up on the Edit or Cut page. Expose only the controls that need to change, then test it on a different clip and duration.
Why isn't my Fusion comp showing on the Edit page?
Check that the final branch you want rendered is connected to MediaOut. Selecting a node in a Fusion viewer only changes that preview; it doesn't pick the timeline output. MediaOut is what returns the connected Fusion result to the Edit page.
Is Fusion better than the Edit page for titles?
Use Fusion when a title needs tracking, complex animation, masking or reuse as a template. For a static title with a simple fade, the Edit page is quicker and easier to maintain.
