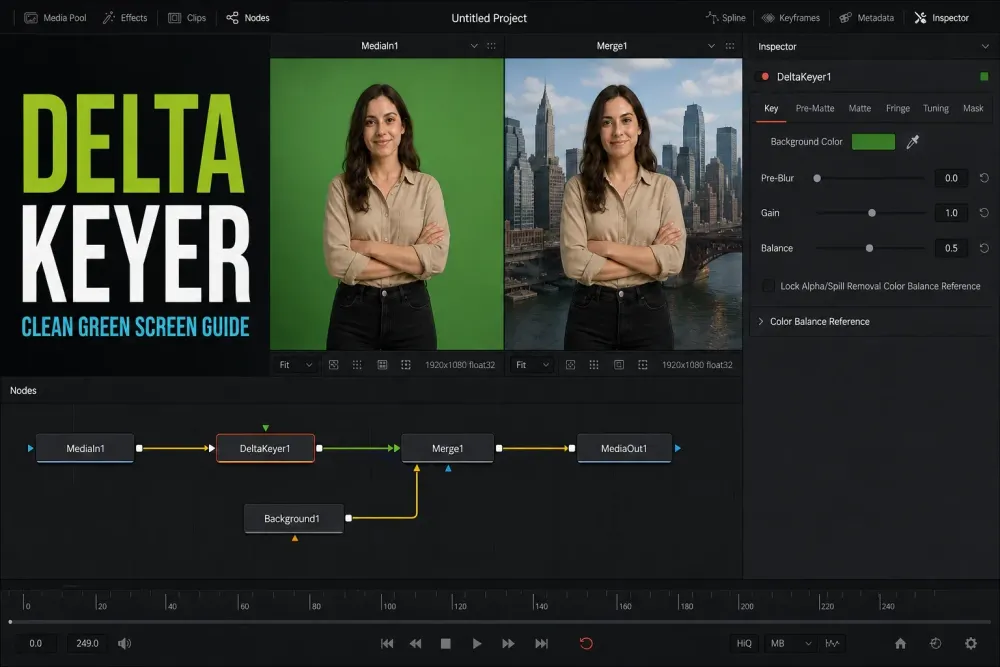
To remove a green screen, connect the clip to Delta Keyer, sample the screen with Background Color, and feed the keyed result into a Merge foreground. Your replacement background goes into the Merge background, and Merge goes to MediaOut. Refine the alpha before you adjust spill or edge color.
Every control name on this page matches the September 2026 Resolve 21.1 Reference Manual. If you'd like to watch the basic setup first, Blackmagic shows it in its Fusion green-screen overview.
Start with the node connections below, then work through the tabs to fix an uneven backing, holes in the subject and contaminated edges. Judge the result over the replacement background and through the full shot. One convenient frame proves very little.
If nodes still feel foreign, the Fusion beginner tutorial covers MediaIn, Merge and viewers. This page stays on the key itself.
Set Up Delta Keyer and the Replacement Background
Select the green-screen clip on the Edit timeline and open Fusion. Select its MediaIn node, press Shift+Space, search for Delta Keyer and add it. Then check that MediaIn really feeds the orange Input on Delta Keyer. Automatic insertion doesn't always make the connection you had in mind.
For a complete composite in Fusion, drag the replacement background from the Media Pool into the node area and add Merge. Connect Delta Keyer to the green Foreground input and the background MediaIn to the orange Background input, then connect the Merge output to MediaOut. View Merge to judge the composite. View Delta Keyer separately to inspect its alpha; click in the viewer and press C to flip between color and alpha.
You can also send the keyed Delta Keyer output directly to MediaOut and place the replacement background below that clip on the Edit timeline. You don't need an opaque background inside Fusion and a second background below it. And a black viewer alone doesn't prove the key failed. Inspect the alpha, then confirm where the replacement background enters.
Sort out the source encoding before keying. In a color-managed project, don't add a log-to-linear transform just because an unmanaged tutorial uses one. Follow the RCM and CST workflow so you don't apply the same conversion twice.
DaVinci Resolve Delta Keyer Workflow: The Fast Order
This order is diagnostic, and not every control in it needs a turn. An even screen may need only a sample and small matte adjustments. Add masks before you make the final alpha judgment, and go back a stage if an edge disappears.
- Key tab: sample the screen color and adjust Gain and Balance just enough to get a workable first alpha.
- Pre-Matte or Clean Plate: even out the screen color before you push the main key any harder.
- Matte tab: refine the alpha with Threshold, Restore Fringe, Clean Foreground and Clean Background.
- Mask tab: set how connected solid and garbage mattes combine with the key, then inspect the final alpha.
- Fringe tab: remove green or blue spill once the matte is solid enough to protect edge detail.
- Tuning tab: adjust shadows, midtones and highlights separately, and only when one tonal range keeps breaking.
Delta Keyer Key Tab: Gain, Balance and Background Color
Select Delta Keyer and drag the Background Color eyedropper onto a clean, representative patch of green or blue in the viewer. Stay away from skin, reflections and motion-blurred edges. While you drag, a floating tooltip shows the color under the pointer, so you can see what you're really picking. The keyer compares the dominant screen channel with the other two channels to produce an initial alpha.
Two sliders do the real work once that first pick is in. Gain increases the influence of the sampled screen color, pushing more of the background toward full transparency. Push it too far and edges around hair or motion blur start disappearing along with the green.
Balance sets the mix between the other two color channels the keyer compares against: 0 uses their minimum, 1 uses their maximum, and 0.5 uses half of each. On a green screen, that tints the foreground toward red or blue. Make small moves and compare the alpha and the composite, because a setting that clears the backing can also change foreground transparency.
Pre-Blur applies a blur before the alpha is generated. It can help with certain noise, edge-enhancement and source artifacts, but too much costs you fine detail. Uneven screen color is a separate problem and a reason to try Pre Matte or Clean Plate. Not every edge defect starts at that stage.
Delta Keyer Pre-Matte Tab and the Clean Plate Node
Pre-Matte exists because one background color pick rarely matches every patch of a real screen. Shadows, wrinkles and uneven lighting all read as slightly different shades.
Switch View Mode to Pre Matte and box-select the screen areas that differ from your first pick. Soft Range expands the selection, and Erode keeps the range from clipping subject edges. Once the range is established, turn on Lock Color Picking so a stray drag in the viewer can't expand it. Every other control stays editable.
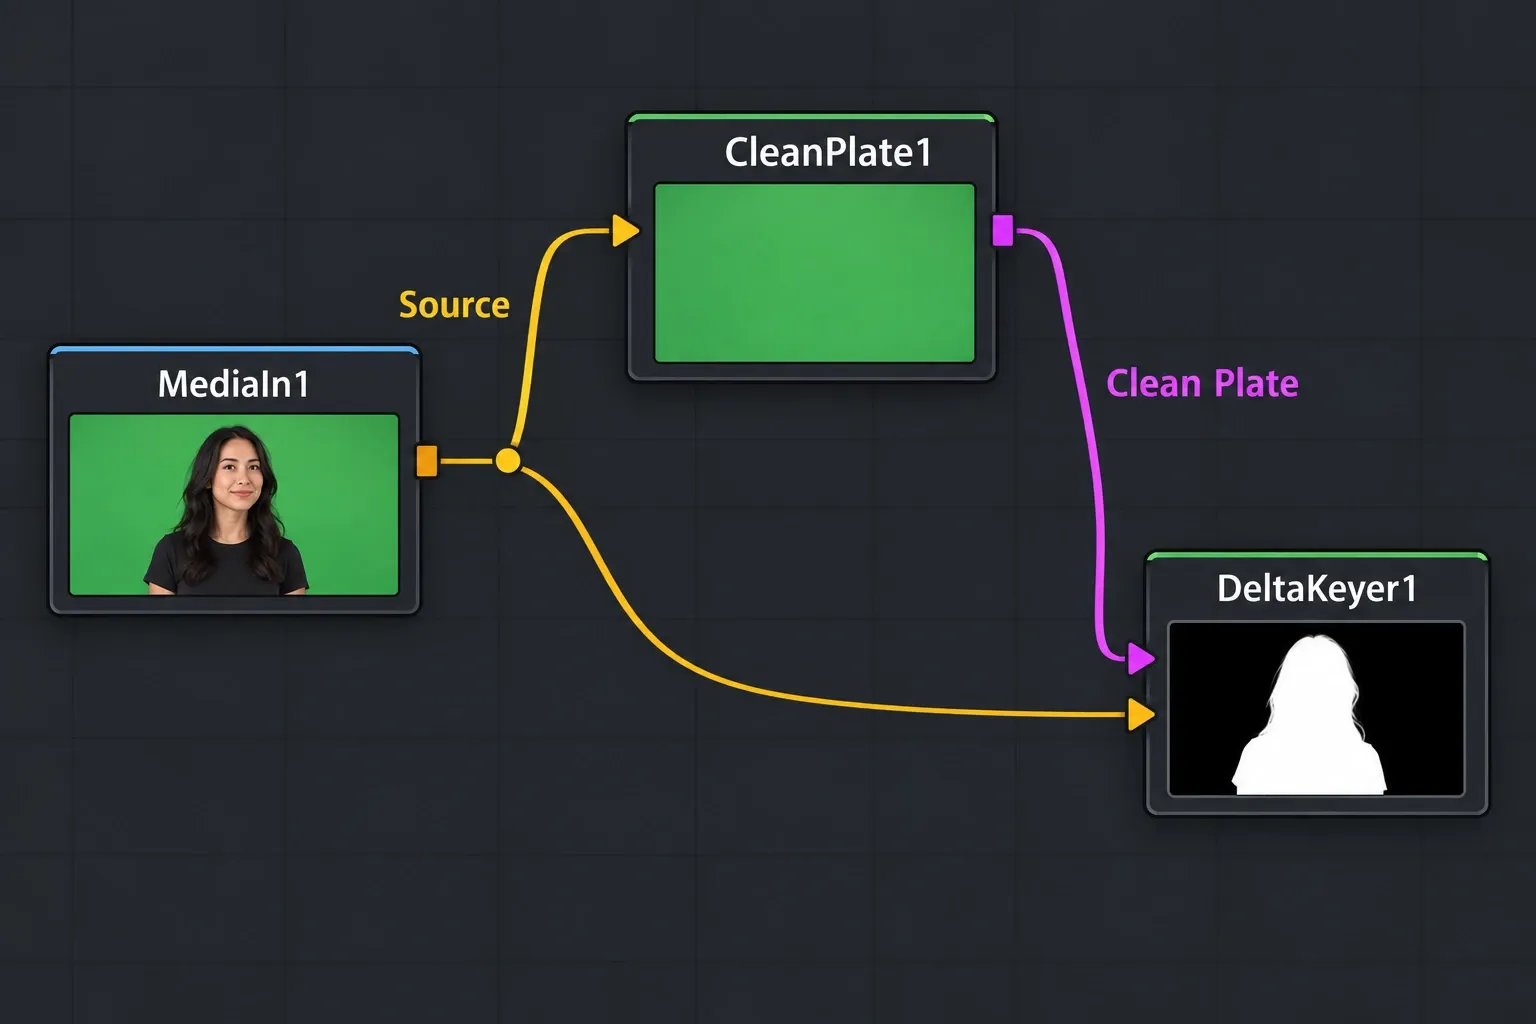
A Clean Plate node solves the same problem from a separate branch. Feed the green- or blue-screen source into both Clean Plate and Delta Keyer, then connect the Clean Plate output to Delta Keyer's magenta Clean Plate input.
Inside Clean Plate, Method offers Color for an even screen or Ranges for a shadowed or mixed screen. Matte Threshold, Erode, Grow Edges and the Fill checkbox build the plate. Under Time Mode, Sequence generates a new plate every frame, while Hold Frame keeps the plate from one frame. A separately recorded empty screen only helps when camera, focus, screen and lighting still match the performance shot.
When you generate a plate, select the screen, not the person. Erode removes non-screen pixels at the selection boundary, then Grow Edges and Fill extend screen color into the subject-shaped gap. Look at the plate itself before you trust it: leftover foreground-colored contamination can undermine the key. Hold Frame only makes sense if that single plate stays valid through the shot.
A matching clean plate helps even out uneven screen color, wrinkles, gradients, reflections and screen variation behind fine hair, smoke or motion blur, so the keyer can preserve delicate transparency without choking the matte. What it can't do: remove green light already cast onto skin, restore foreground detail Threshold already clipped, or compensate for a plate whose camera or lighting no longer matches the shot.
I'd keep a clean plate only when it improves the alpha across the full shot. A good direct key on an even screen doesn't need one, and a mismatched or overgrown plate can introduce new edge and transparency errors.
Delta Keyer Matte Tab: Threshold, Erode and Restore Fringe
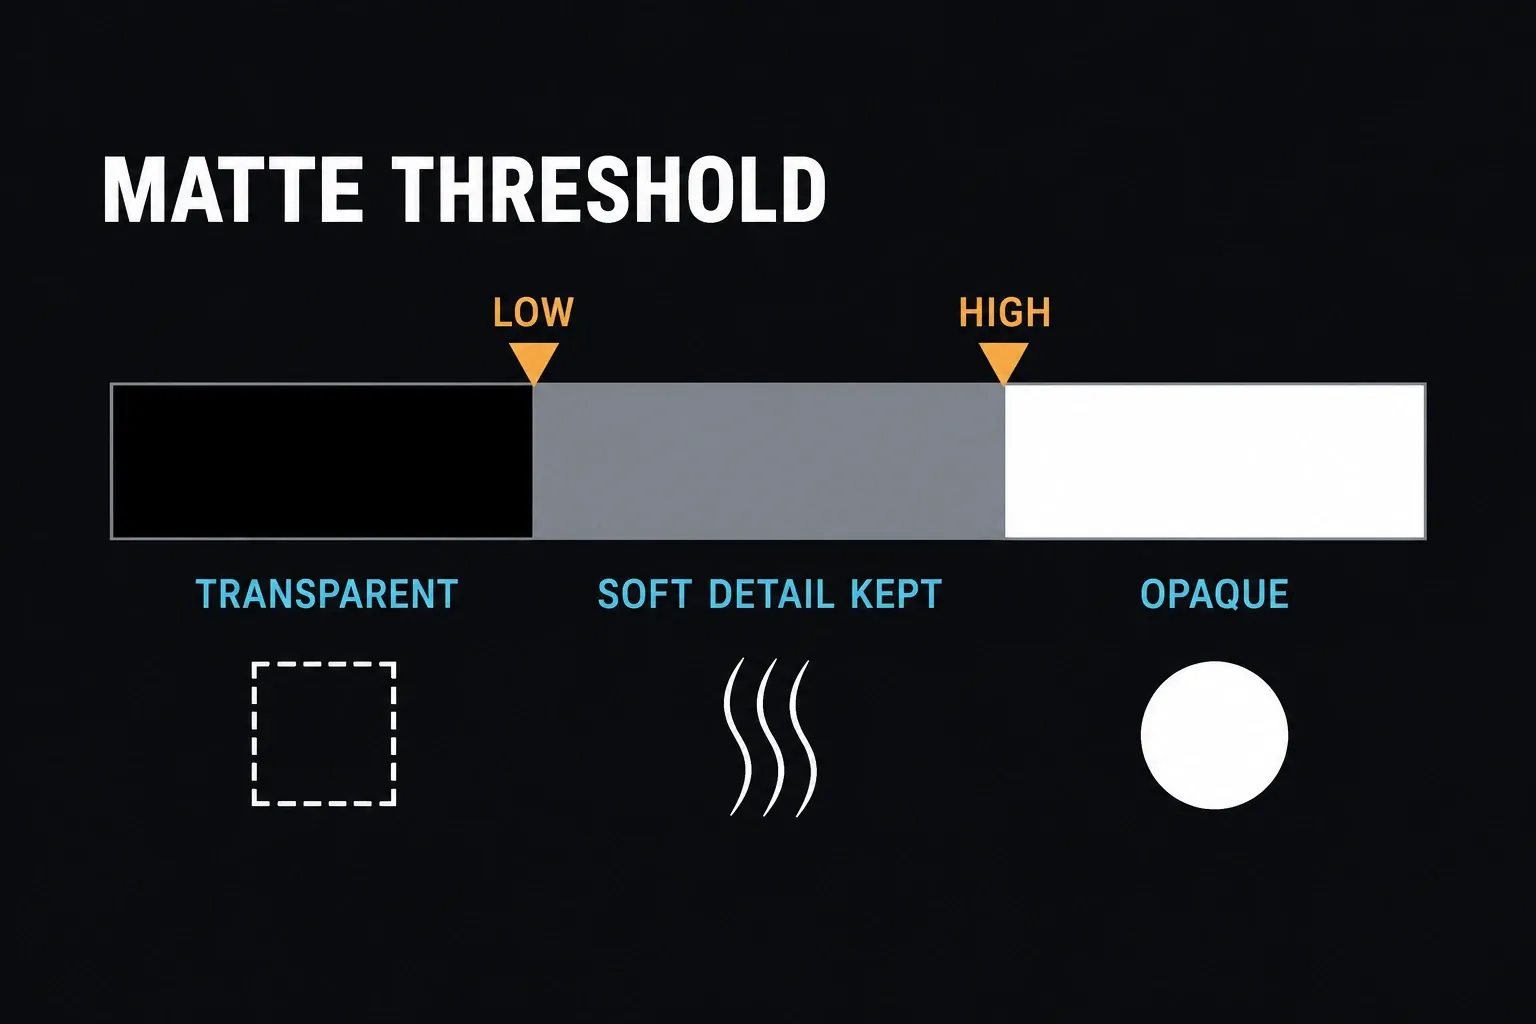
In the Matte tab, inspect the alpha channel of the Final Result output before you touch Threshold. View Mode Matte is a diagnostic view of the key before solid and garbage masks are combined, so it isn't the finished masked alpha. The lower Threshold handle turns values below it black and transparent; the upper handle turns values above it white and opaque. Values between them keep their relative transparency. Move only as far as the shot needs, because aggressive thresholds can eat hair or make soft detail look unnaturally solid.
Restore Fringe brings back legitimate soft edge detail lost during thresholding, typically around hair, while keeping the matte core solid. Erode/Dilate expands or contracts the matte, and Blur softens it.
Clean Foreground fills slightly transparent, light-gray areas that should be opaque. Clean Background clips the lower dark range that should be transparent. Make small changes while you watch both the alpha and Final Result. None of these controls knows which gray pixels are hair and which are noise; that call is yours.
Replace Mode decides how matte adjustments restore color: None makes no color replacement, Source uses the original image, Hard Color uses a solid replacement color, and Soft Color weights that color by how much background was removed. Choose by looking at the final composite. A mode that fills the alpha but adds noisy or artificial edge color isn't a clean result.
Delta Keyer Mask Tab: Solid and Garbage Mattes
Delta Keyer has five inputs. The orange Input takes your green- or blue-screen image. The gray Garbage Matte input makes masked areas transparent, and the white Solid Matte input makes them opaque. The magenta Clean Plate input receives the generated screen plate. Hover over a connector to read its name; don't rely on its position.
Connect a Polygon or B-Spline to Garbage Matte to remove a light stand, a microphone or an area outside the backing. If you drew around the subject and not the unwanted area, use Garbage Mask Invert so the outside is removed. Connect a separate shape to Solid Matte to fill an opaque core, and keep it inside the subject, away from hair and motion blur.
The Mask tab decides how the connected solid and garbage mattes combine with the key. Solid Source Alpha can ignore, add or subtract the source alpha. Solid Replace Mode and Solid Replace Color control how forced-opaque areas get their color back, and Garbage Mask Invert swaps which side is removed. None of it controls the Clean Plate node's Grow Edges or Fill operations.
The blue Effect Mask input limits where the keying operation runs. It's not a substitute for Garbage Matte: outside an effect mask, unkeyed source can stay visible. Scrub the full shot and animate auxiliary masks when the subject moves beyond them.
For moving auxiliary shapes, use the Fusion rotoscoping workflow. Magic Mask subject isolation is a different tool family, useful when color separation alone can't isolate a region. Neither one replaces a close look at fine transparency along the key edge.
Delta Keyer Fringe Tab: Spill Suppression Settings
Spill is screen color visible through semi-transparent edge pixels or reflected onto the subject. The Fringe tab handles most Delta Keyer spill suppression. Spill Method chooses the algorithm strength: Rare is the lightest, Medium is documented for green screens, Well Done for blue screens, and Burnt for troublesome blue-screen material. Spill Suppression sets the amount. Raise it only until the unwanted screen color recedes, because excessive suppression can bleach legitimate foreground color.
Fringe Gamma adjusts the brightness of the fringe or halo. Fringe Size expands or contracts that region, and Fringe Shape pushes it toward the outer or inner edge; Shape is most noticeable when Fringe Size is large. The Cyan/Red, Magenta/Green and Yellow/Blue controls color-correct the remaining semi-transparent edge pixels toward the new background. These are different jobs, so change one at a time while you compare the alpha and final composite.
Don't mix Delta Keyer labels with the 3D Keyer terminology on the Color page. Matte Finesse belongs to the Color-page workflow; Delta Keyer exposes Matte and Fringe controls under different names. When the task is a selection and not a Fusion key, the Color grading guide covers qualifiers and windows.
Separate Despill When the Alpha Is Already Good
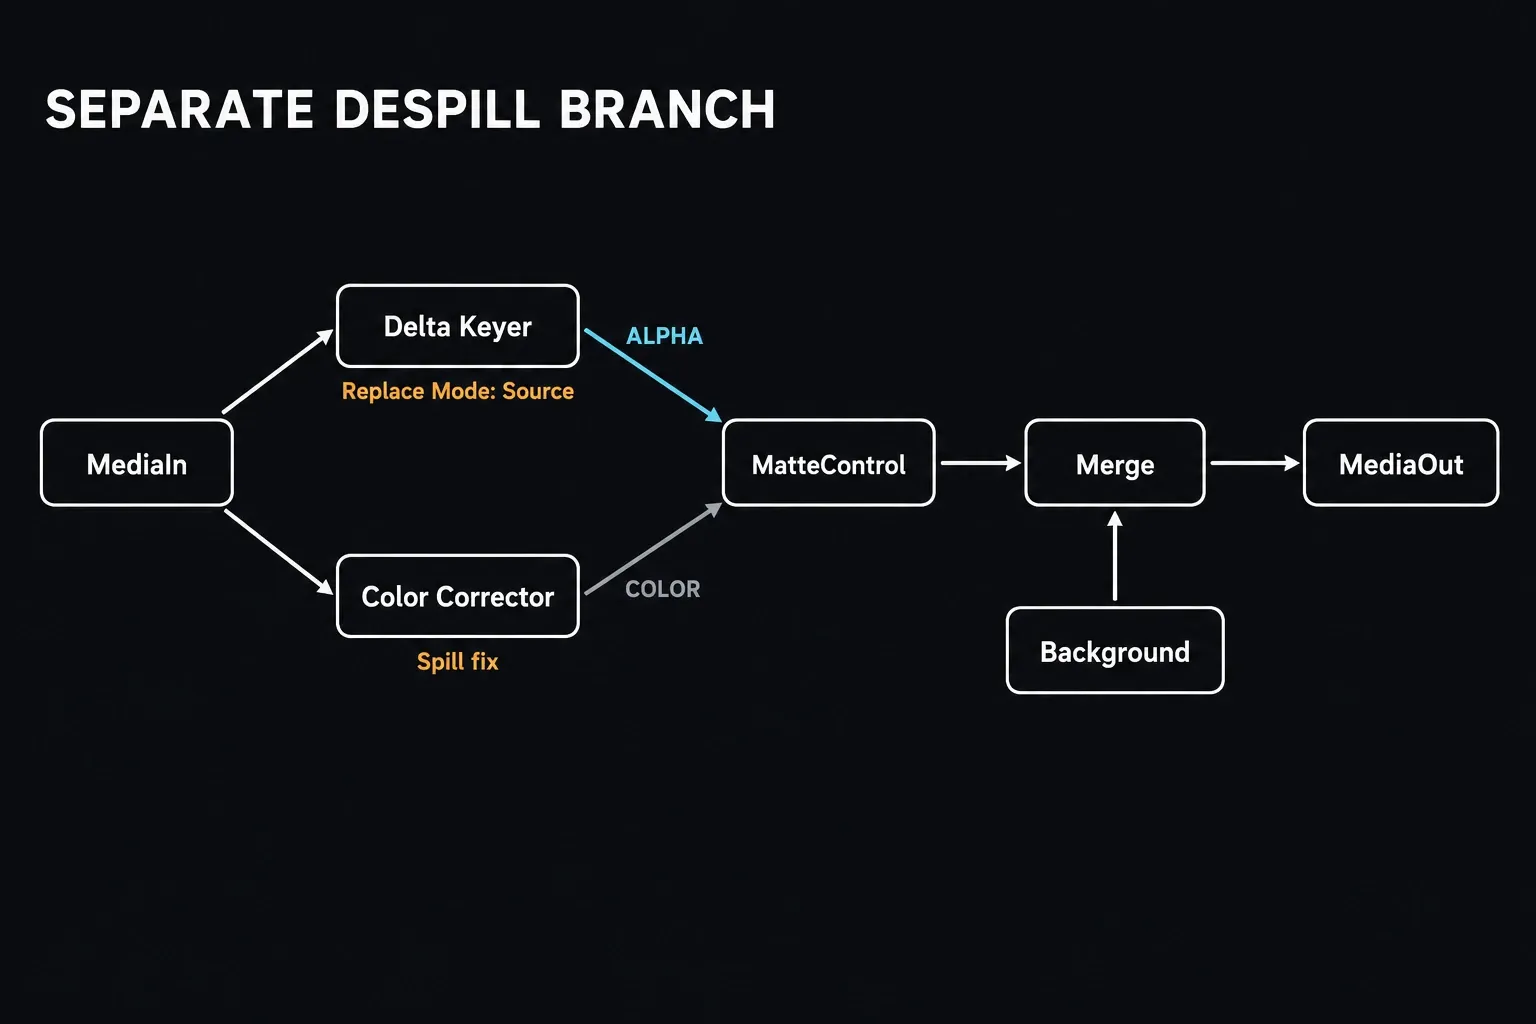
If spill correction damages otherwise correct color, Blackmagic documents another way to deal with it. In Delta Keyer, open Matte and set Replace Mode to Source, which effectively switches off the keyer's own spill correction. Then handle spill with a color correction node right after Delta Keyer, or on a separate source branch combined through MatteControl. See Dealing with Spill in the current manual. It's an alternative, not an invitation to stack every despill method on one shot.
Delta Keyer Tuning Tab: Shadows, Midtones and Highlights
Tuning divides the image into shadow, midtone and highlight ranges and lets matte strength and spill suppression vary by tonal value. Save it for after Key, Pre Matte/Clean Plate, Matte and Fringe are behaving. Dark hair, bright edges or noisy midtones can still come from a bad sample, a clipped Threshold or an uneven screen; they aren't automatically Tuning problems.
Lock Alpha/Spill Removal Tuning applies the same tonal ranges to alpha generation and spill removal while it's enabled. Disable it when the two jobs need different ranges, for example stronger alpha work in the shadows without equally strong color subtraction there. Simple sets linear ranges; Smooth creates a smoother tonal gradient. Try those shapes before you hand-adjust every range control.
On a well-lit shot, I'd leave this tab alone. It earns its place only when a specific tonal range keeps breaking after Matte and Fringe are already dialed in.
Edge Integration After the Key
Delta Keyer finishes the alpha and spill work, but it won't match the subject to a new background for you. Once the key is stable, compare black level, white balance, contrast, sharpness, grain and edge light with the destination plate. Make those adjustments on clearly labeled downstream branches so the matte stays easy to inspect.
Check premultiplication when a color correction creates dark or bright fringes. A premultiplied image already has its RGB weighted by alpha. For color tools that need straight RGB, use their Pre-Divide/Post-Multiply option, or put Alpha Divide before the correction and Alpha Multiply after it. Don't add another multiply to an already premultiplied result as a generic edge fix. Delta Keyer Final Result is the ready-to-merge output; the intermediate views are for diagnosis or deliberate downstream processing.
A subtle background-colored edge treatment can help when the destination really casts that light, but it has to follow the new scene's direction, color and softness. If it creates a glowing outline or hides a broken alpha, remove it and repair the Matte or Fringe stage. I won't hand you one universal light-wrap node recipe, because the right build depends on the shot and the composite.
Green Screen Lighting Mistakes That Break the Key
A difficult screen can eat far more cleanup time than a well-prepared one. Uneven illumination, wrinkles, reflective contamination and subject shadows all create screen colors that one sample may not cover. Reduce those differences on set, keep the backing out of focus where the shot allows, and record a matching clean reference when the setup is static enough for it to be useful.
Subject-to-screen distance matters because a subject close to the backing usually picks up more green or blue bounce on skin, hair and clothing. Move the subject far enough from the backing for your own lens, screen size, room and lighting setup; no universal distance guarantees a clean result. Light the screen and the subject as separate jobs, and keep subject shadows off the backing whenever you can.
A matching clean plate can help with shadows and uneven color on the backing. It can't relight the subject or remove reflected green light by itself. Separate screen variation from foreground spill before you choose the next correction.
Delta Keyer Performance on Heavier Composites
A larger keying tree can slow interactive playback, especially with multiple keyers, a Clean Plate branch, edge work and high-resolution footage. Use a lower viewer proxy only while you adjust, then inspect the full-resolution alpha and final composite before approval. The Resolve system-requirements guide covers the wider decode, memory and GPU picture. Smooth proxy playback doesn't prove that fine hair, motion blur or noise survived the key.
Once the matte, spill correction and edge integration are locked, the composite returns to the Edit page like any other shot. The DaVinci Resolve export workflow picks up the delivery stage from there; recheck the full-resolution composite before rendering.
Troubleshoot the Symptom Before Changing Settings
Black background: inspect the Delta Keyer alpha, then the Merge inputs or the lower Edit track. If the alpha is transparent where expected, the fix is supplying the replacement background, not more Gain. If the Edit page shows no change, confirm the finished output reaches MediaOut.
Missing hair or motion blur: back off Threshold and aggressive cleanup, compare Restore Fringe, and make sure a solid or garbage mask isn't cutting through the soft edge. You don't want every gray alpha pixel forced to black or white.
Holes in clothing: try conservative Clean Foreground or an interior Solid Matte. If one setting can't retain both the core and the hair, use a separate hard core key feeding the soft key's Solid Matte input, the two-keyer setup shown in the manual. Keep the core away from the soft perimeter.
Green fringe or dark outlines with a sound alpha: compare spill correction, replacement color and premultiplication. Eroding the matte may hide an outline by removing the subject edge. When the alpha already follows the subject, fix the color contamination.
Flickering edges: play the entire shot at full resolution. Check for changing screen illumination, source noise, a held plate that no longer matches and masks that don't follow the movement. One clean still frame isn't enough evidence of a stable key.
Delta Keyer FAQ
What's the difference between the Delta Keyer and the Chroma Keyer in Fusion?
Delta Keyer is an advanced color-difference keyer optimized for blue and green screens, with Pre Matte, Matte, Fringe and Tuning controls plus a Clean Plate input. Chroma Keyer works equally well with any chosen color and has a simpler control set. For blue- or green-screen shots, the manual itself points you to Delta Keyer over the more general-purpose Chroma Keyer.
Do I need a clean plate for every green screen shot?
No. A Background Color sample can handle an even screen. Reach for a matching Clean Plate when screen variation would otherwise force aggressive matte cleanup and the plate preserves useful soft detail. It can't restore detail already clipped by Threshold or remove screen-colored light reflected onto the subject.
Why does my key still show green on hair after adjusting the Fringe tab?
Inspect the alpha first. If Threshold removed the hair detail, use less aggressive thresholding and Restore Fringe before you raise spill suppression. Once the matte contains the legitimate semi-transparent edge, use the Fringe controls to correct the remaining screen color.
Can the Delta Keyer key a blue screen the same way it keys green?
Yes. Sample the blue screen and use the same Key, Pre Matte or Clean Plate, Matte, Mask, Fringe and Tuning workflow. The settings stay shot-specific. Blackmagic lists Well Done for blue screens and keeps Burnt for troublesome blue-screen material.
Why does my Delta Keyer key show black splotches or noisy edges?
Compare the alpha with the color result. If the alpha has holes or chatter, look at source noise, Pre Matte and Threshold first. If the alpha is sound but black or discolored pixels show up in the composite, compare the spill settings or try a separate despill branch. Pre-Blur and stronger cleanup aren't universal fixes.
Is the Delta Keyer available in the free version of DaVinci Resolve?
Yes. The core Delta Keyer and Clean Plate workflow is available in Resolve Free. The current Resolve manual documents these nodes without the Studio Version Only label that marks restricted nodes such as Cryptomatte in the same chapter. Other tools in your composite may still require Studio; the Resolve Free versus Studio guide covers those separate limits.
