Quick answer: start Fairlight dialogue EQ flat, name the audible problem, make one move, and compare at matched loudness. Use clip EQ for one recording that differs, track EQ for a consistent speaker, microphone, and room, and bus EQ only for a broad change to a controlled stem.
A high-pass filter can reduce rumble or hollow a low voice; the curve shows what you set, not whether the dialogue still sounds believable.
Clip EQ vs Track EQ in DaVinci Resolve
| Placement | Use it for | Avoid it when |
|---|---|---|
| Clip EQ | One take, one microphone change, or one edit that differs from the track | Dozens of clips need exactly the same baseline curve |
| Track channel EQ | A consistent speaker, microphone, and room across many clips | The track mixes lav, boom, phone, ADR, and different locations |
| Bus EQ | A gentle broad adjustment to a controlled dialogue stem | Individual sources still have different defects |
| Automation or dynamic EQ plug-in | A frequency problem appears only on certain words or moments | A static, subtle cut already solves it |
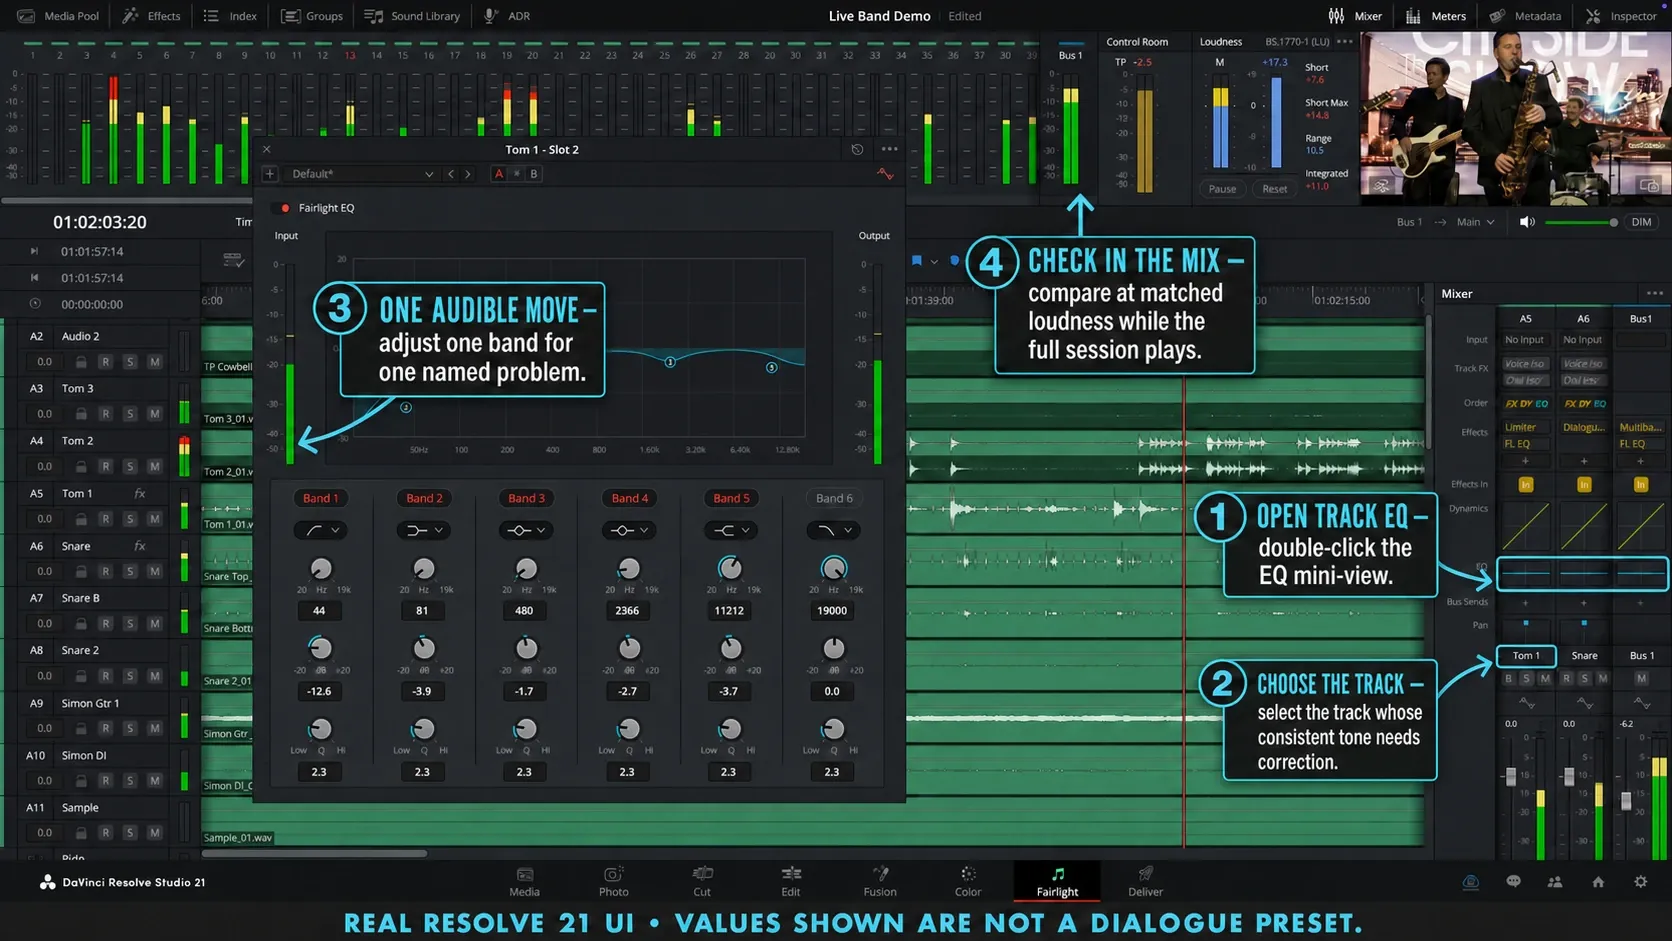
For one clip, select it and open Inspector, Audio, Equalizer. For a whole track, double-click its EQ area in the Fairlight Mixer. The current Fairlight product page describes six-band EQ for clips as well as Mixer channels. A channel EQ affects every clip routed through that track, not only the selected clip.
The September 2026 Resolve 21.1 Reference Manual documents six-band clip EQ on pages 930–931 and six-band channel EQ on pages 3949–3952. Its Fairlight Inspector section still says four-band on page 3912. That wording conflicts with the current product page and the six-band clip description in Blackmagic’s training book; do not assume the Inspector must have only four bands.
The official Fairlight dialogue EQ lesson teaches clip, track, and bus EQ using particular recordings. The book linked from Blackmagic’s training page is for Resolve 20, while the rolling reference manual checked September 16, 2026 is for 21.1. Use its exercises to learn what to listen for, not as a curve to copy onto every voice.
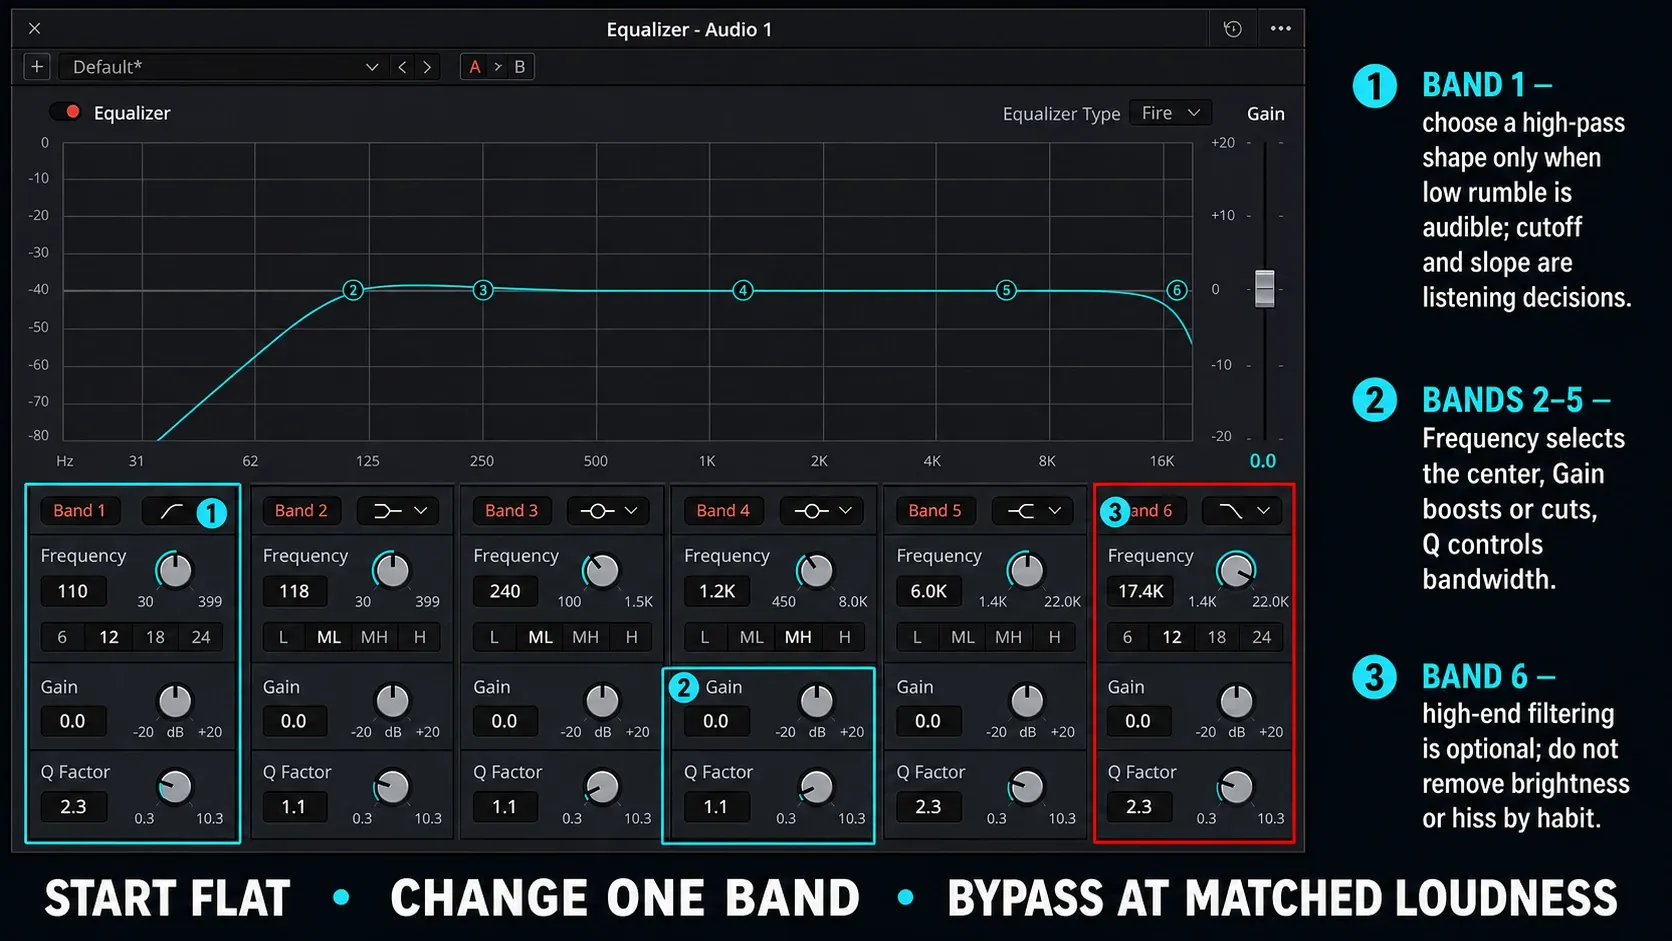
In the channel EQ controls, Band 1 offers a high-pass filter (low cut), and Band 6 offers a low-pass filter (high cut). High-pass reduces lows; low-pass reduces highs. Both also offer bell and shelving shapes. Bands 2–5 offer shelves, a peaking/bell curve, and notch. A shelf changes a broad end of the spectrum; a bell boosts or cuts around a center; a notch rejects a narrow region. Available controls depend on the selected shape, so not every band exposes Gain, Q, and slope at once.
For bell EQ, lower Q widens the affected range and higher Q narrows it. Gain sets boost or cut, while filter slope sets how quickly a high- or low-pass filter rolls off. The channel manual lists 6–24 dB/octave slopes, ±20 dB bell/shelf gain, and Q 0.3–10.3 where available. These are control limits, not dialogue settings. It documents Bands 1 and 6 as off by default and Bands 2–5 as on; check a reused track for saved settings instead of assuming it is flat.
If substantially different recordings share one track, move them before equalizing. The organization steps in our Fairlight routing guide make later EQ, compression, automation, and delivery much easier to verify.
Dialogue Frequency Ranges: Starting Clues, Not Presets
| Approximate area | What you might hear | Possible move |
|---|---|---|
| Below 60–100 Hz | Handling noise, traffic vibration, plosives, HVAC rumble (clean the dialogue first) | High-pass only until the problem improves |
| 200–500 Hz | Warmth or mud, depending on voice and room | Small broad cut if congested; do not remove body blindly |
| 250–750 Hz | Mud, enclosure, room coloration | Search for a resonance, then use a modest cut |
| 600 Hz–1.1 kHz | Nasal or honky tone | Narrow-to-medium cut only after confirming it in context |
| 2–5 kHz | Intelligibility, presence, or harshness | Broad small boost for clarity or cut for harshness |
| 5–8 kHz | Sibilance, hiss, consonant detail | De-esser or automation for changing S sounds |
| 9–15 kHz | Air, brightness, or broadband hiss | Very gentle shelf; avoid lifting noise |
These overlapping areas are listening clues, not boundaries or prescribed cuts. The training book’s dialogue frequency guide places warmth and boxiness around 200–500 Hz, mud around 250–750 Hz, and sibilance around 5–8 kHz. Voices, microphones, proximity, rooms, and monitoring can move the problem. A preset that specifies a cut before hearing the recording cannot choose it for you.
A Repeatable Fairlight Dialogue EQ Workflow
- Choose a representative loop. Include vowels, consonants, a breath, and some room tone. Also mark the worst phrase for later checking.
- Set clip gain first. Large level differences bias tonal judgment and change how later compression behaves.
- Listen in the mix. Solo helps identify a defect; music, effects, and other speakers decide whether it matters.
- Enable a high-pass filter only for audible low-frequency contamination. Raise the cutoff slowly, then back down when the voice loses weight.
- Find one resonance. Use a modest temporary narrow boost at a comfortable monitoring level and sweep cautiously. When the offending ring or boxiness jumps forward, turn the boost into a small cut and lower Q to widen the cut if that sounds more natural.
- Reduce masking before boosting clarity. A modest low-mid cut often reveals speech without adding hiss or sibilance.
- Add broad tone only if needed. A small shelf or presence move should survive matched-bypass listening.
- Check other words and edits. A curve that fixes one vowel can damage another.
- Render a difficult passage. Listen away from the on-screen curve and judge the rendered audio on ordinary playback.
Remove the temporary search boost before judging the final cut. Keep the monitoring level comfortable and the boost modest; a louder sweep is not better evidence. Add another corrective band only when you can name the problem it solves.
Set the High-Pass Filter by Ear
There is no correct universal dialogue cutoff, and a speaker’s gender does not choose it. Low voice fundamentals and useful body can overlap the region you want to remove. Start below the useful voice, raise the cutoff until the low disturbance improves, then retreat if the voice loses weight. Compare the lowest notes, not only an average phrase. If no rumble is audible, leave the filter off.
Check plosives separately. A high-pass filter may reduce the low-frequency burst, but a cutoff high enough to erase it completely can thin the entire sentence. Clip-specific EQ, a short gain envelope, or dedicated repair can be cleaner than sacrificing every vowel.
Cut Mud and Resonance Without Hollowing the Voice
Mud is usually broad congestion; resonance is a narrower ring. Treat them differently. For broad buildup, start with a low-Q, small cut and listen in context. For a ring, search with a narrower Q, then reduce the gain and widen the final cut until it stops calling attention to itself.
If every clip needs a deep 400 Hz notch, question the room, microphone, or track assignment. EQ can improve coloration, but it cannot remove the time smear of strong reflections.
If the defect is steady hiss, hum, or broadband noise rather than tone, use the background-noise cleanup workflow before cutting wide frequency ranges. Voice-restoration tools have different limits; our Voice Isolation vs Dialogue Leveler guide explains when separation or leveling is the actual task.
For electrical hum, identify the fundamental and harmonics: a 50 Hz hum can include 100, 150, and 200 Hz; a 60 Hz hum can include 120, 180, and 240 Hz. Those are multiples, not all octaves. A single notch may leave the higher buzz. The De-Hummer controls target that structure and include Listen to Hum only to check what is being removed. Return to normal monitoring before judging the result.
EQ changes frequency balance wherever it is applied; it does not separate speech from noise sharing those frequencies. Noise Reduction targets noise, Voice Isolation separates a voice from competing sound, and a gate lowers material below its threshold. A gate cannot remove noise under speech while it is open. Compression controls changing level, while a de-esser controls excessive sibilance. Choose the defect first rather than applying all these tools.
Presence, Harshness, and Sibilance
The 2–5 kHz area can bring speech forward or make a recording sound harsh. If dialogue is buried under music, first lower or automate the music. A large presence boost consumes headroom and can exaggerate consonants without solving the competing sound.
Sibilance changes word by word, so a static high-frequency cut is often too blunt. Undo the clarity shelf, identify the S range, then use a de-esser or clip automation. Always check T, F, and breath detail afterward; removing every bright consonant makes speech dull and less intelligible.
EQ Before or After Voice Isolation and Compression?
Start with this logic:
- Use clip gain before processors so they receive a workable level.
- Correct audible low rumble on the clip when needed, then reassess any later restoration or compression.
- Run Voice Isolation before final tonal shaping when it substantially changes the spectrum.
- Use corrective EQ before compression if an ugly resonance would trigger the compressor.
- Use gentle tonal EQ after restoration when you need to restore body or clarity.
- Compress after corrective work, then recheck tone because compression changes spectral balance perceptually.
The documented channel signal path places Track FX before ordinary inserts, Dynamics, and EQ. The Effects Order menu changes the order of those last three groups; its default is FX, Dynamics, EQ. Moving channel EQ before Dynamics does not move it ahead of Track FX such as Voice Isolation.
Treat that list as listening decisions, not a claim that the channel Order menu can arrange every processor. Clip EQ can correct an individual source before it reaches channel processing. Change one stage at a time, recheck Voice Isolation for artifacts, and use the dialogue compression guide when uneven levels, rather than tone, are the problem.
Match Two Microphones Without Chasing Identical Curves
- Align clip gain and compare the same speaker and performance energy.
- Use the cleaner, more natural microphone as the reference.
- Remove each microphone’s obvious defect independently.
- Make one or two broad tonal moves on the mismatched source.
- Cut between the mics in context, then listen to both the voice and the room tone.
- Add consistent ambience and crossfades where the acoustic background changes.
EQ can move timbre closer, but it can't make a distant boom share the perspective, noise, and reflections of a close lav. A slightly imperfect but stable transition is better than two aggressively processed voices that change room at every cut.
Fairlight EQ in Free vs Studio
Built-in Fairlight EQ is available in DaVinci Resolve Free and Studio. You do not need Studio or a third-party plug-in for ordinary high-pass, low-pass, bell, notch, shelf, frequency, gain, and Q work. Voice Isolation is explicitly Studio-only; built-in EQ isn't. Studio changes access to specific AI and advanced tools, but it doesn't turn a copied curve into a correct listening decision.
Troubleshooting Dialogue EQ
The voice becomes thin
Lower the high-pass cutoff, reduce the low-mid cut, and check at matched loudness. Restore the last move rather than adding a new bass boost to compensate.
EQ sounds good solo but disappears in the mix
Make the final decision with music and effects playing. The voice may be masked, not badly equalized. Lower or automate the competing element. If the track is silent or its meters stop moving, EQ isn't the fix; use the no-audio routing and monitoring checklist instead.
Sibilance gets worse
Remove the high shelf or presence boost and use a de-esser or phrase automation. Don't darken every word to repair a few S sounds.
Room tone changes at each cut
Use clip EQ or separate tracks for the mismatched microphone, then add consistent room tone and crossfades. Track-wide EQ can't reconcile unrelated acoustic spaces.
The mix clips after an EQ boost
Reduce band gain or channel output and inspect the next bus. Boosts consume headroom. Verify the final program with our LUFS and true-peak checklist.
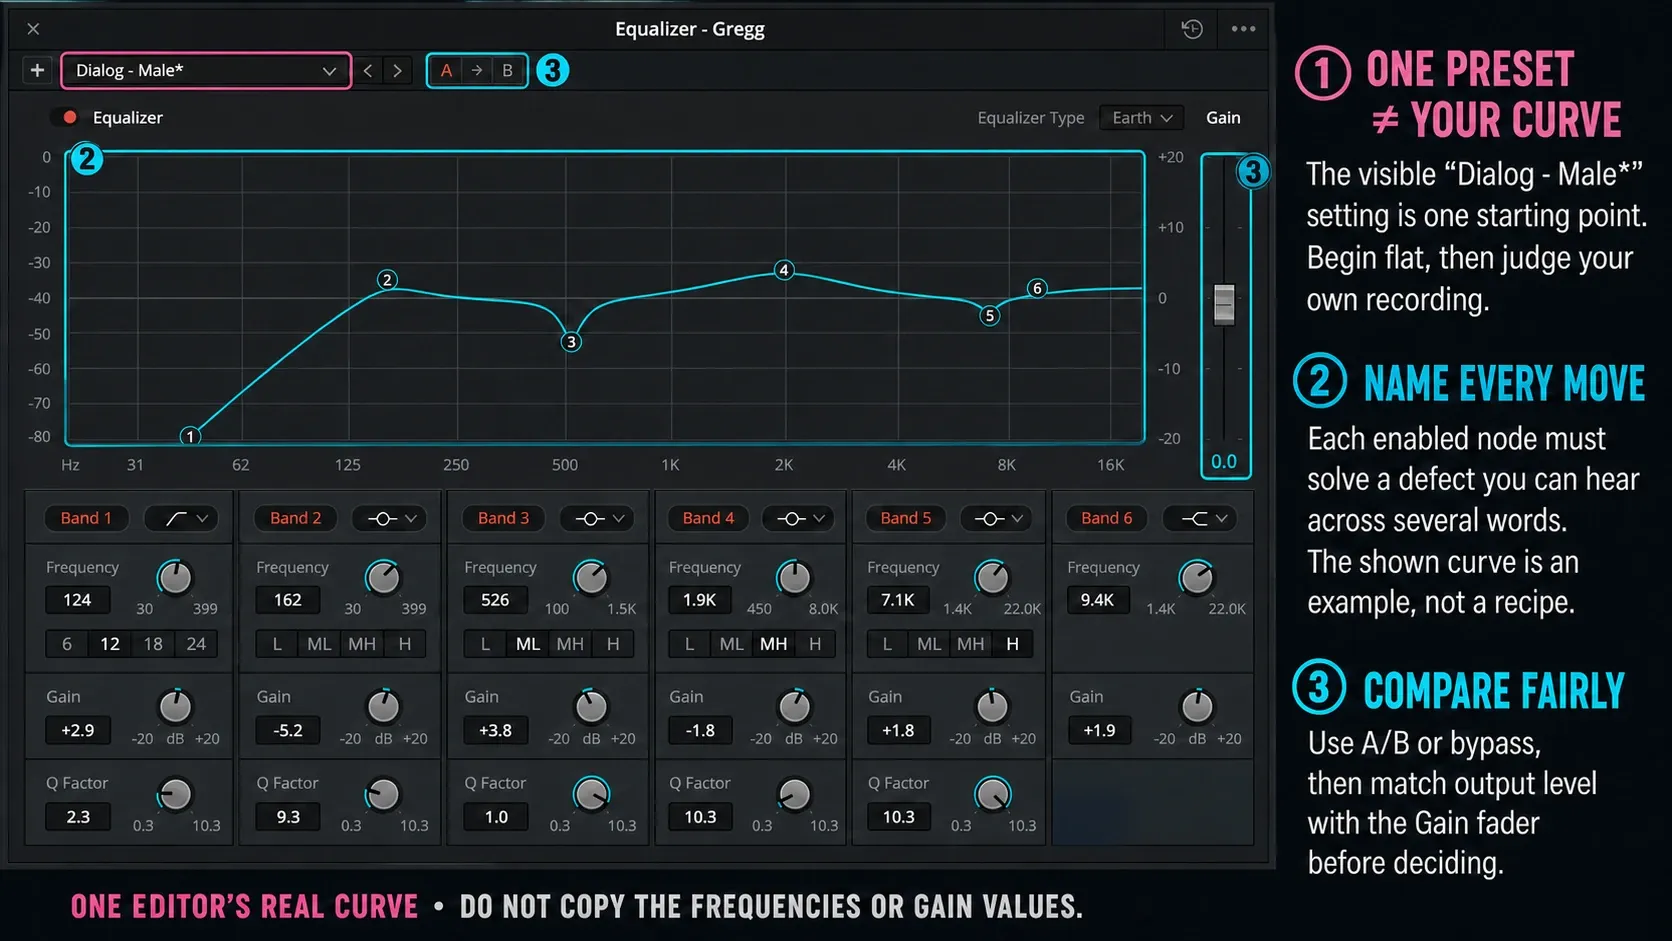
Loop the same phrase, keep your monitor volume fixed, and compensate with the channel’s post-EQ Gain control so processed and bypassed speech have similar perceived loudness. Then toggle EQ off and on. A/B compares two settings states where available; it is not automatically an untreated-versus-treated test or an automatic loudness match. Use the EQ’s own enable/bypass control, because Effects In does not bypass built-in channel EQ. Check meters for headroom as well as listening.
Check headphones and speakers at a consistent, comfortable level, then listen in mono. If a voice becomes hollow only when two microphones play together, check timing, polarity, and channel mapping before adding EQ. Fairlight’s Phase Meter can help diagnose cancellation on a bus, but it cannot decide which microphone sounds natural. Compare each source alone and together; do not invert polarity blindly or boost bass to hide a cancellation.
Final EQ Check
- Every enabled band solves a named audible problem.
- The high-pass filter removes rumble without thinning the lowest useful voice notes.
- No temporary search boost remains.
- Bypass is compared at matched loudness.
- Dialogue still works with music and effects.
- Every speaker, microphone change, and edit boundary has been checked.
- The mix translates to speakers, headphones, and a small mono device.
- A rendered test matches the timeline; the audio export workflow covers that verification.
Keep only changes that improve the words in context. If the untreated voice sounds more natural at the same loudness, undo the EQ move rather than adding another band to compensate.
For the next stage, the Fairlight audio hub links to routing, cleanup, compression, loudness, recording, and export guides.
Fairlight Dialogue EQ FAQ
What frequencies make dialogue muddy?
Mud can occur in the low mids; Blackmagic’s training guide lists 250–750 Hz as a possible muddy area. The exact buildup depends on voice, microphone, proximity, and room. Confirm the sound, then try a small broad cut without removing useful body.
Where should I set a high-pass filter for speech?
There is no universal cutoff. Raise it only until audible rumble improves, then back down before the voice loses body. Check every speaker and microphone.
Should I boost 3 kHz for dialogue clarity?
Not automatically. The 2–5 kHz area can improve intelligibility or create harshness. Reduce masking first, then test a small broad move in the full mix.
Is EQ better on clips or tracks?
Use clip EQ for one take, microphone change, or edit that differs. Use track EQ when the speaker, microphone, and room stay consistent. Use bus EQ only for a gentle broad change after the individual sources are controlled.
Can EQ remove room echo?
No. It may reduce a prominent ring, but reflections overlap the voice across time and frequency. Better microphone choice, editing, ambience, restoration, or rerecording may be required.
Should EQ come before compression?
Corrective EQ often comes before compression so rumble or resonance doesn't trigger it, but Fairlight lets you reorder insert effects, Dynamics, and EQ. The default track order is FX, Dynamics, EQ; compare the actual source.
Does Fairlight EQ work in DaVinci Resolve Free?
Yes. Built-in Fairlight EQ works in Resolve Free and Studio. Voice Isolation is explicitly Studio-only, but ordinary high-pass, low-pass, bell, notch, shelf, frequency, gain, and Q work doesn't require Studio.
