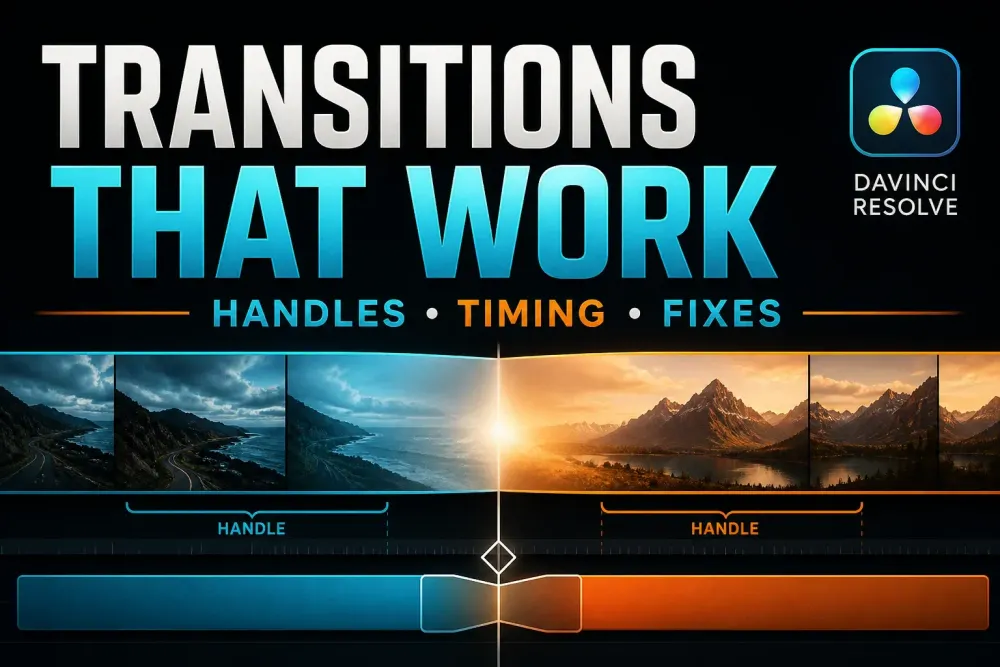
A Cross Dissolve that won't sit on the cut isn't asking for a different preset. Usually it's asking for frames. A transition borrows source material from past the visible end of the outgoing shot and from before the visible start of the incoming one.
So get the handles and the edit timing right first; picking the effect is the easy part. If this is one step in your first project, follow the Resolve tutorial map so the cut, the sound and the export come in the order you'll actually need them.
Most DaVinci Resolve transitions use this same edit-point logic, and everything here happens on the Edit page. I rechecked the workflow on October 1, 2026 against the current DaVinci Resolve 21 Reference Manual for Resolve 21.1; that's a documentation check, not a claim that I rebuilt each example.
The core video and audio transitions ship with Resolve Free. Resolve FX, Fusion templates and third-party transitions can carry their own Studio, hardware or licensing requirements, so check the specific item instead of assuming the whole library follows one rule.
Add a transition between two clips
- Place two clips next to each other on the same video track.
- If either clip already uses its first or last recorded frame, shorten the outgoing tail and the incoming head, then close the gap. That creates handles without touching the source files.
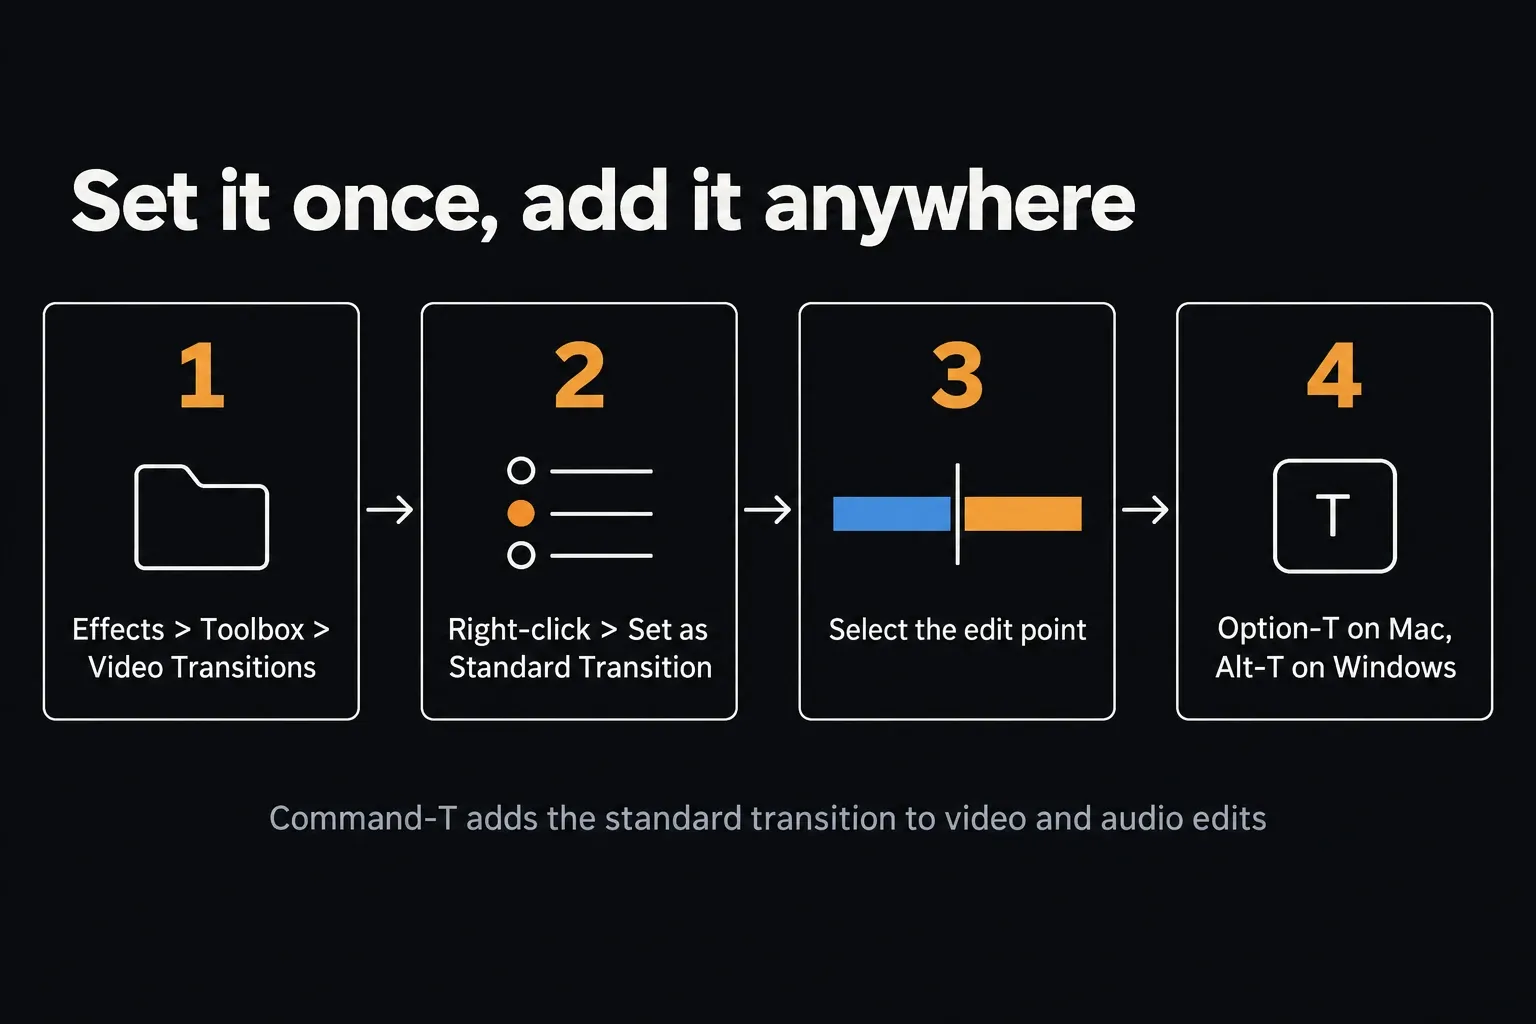
- Open Effects > Toolbox > Video Transitions.
- Drag Cross Dissolve onto the edit point, or select the video edit and choose Timeline > Add Video Only Transition.
- Select the transition and set its Duration and Alignment in the Inspector. Leave the effect-specific controls alone until the timing works.
- Play through the cut with the sound on, then step through every frame the transition reveals.
For a video-only transition, select the video edit point and choose Timeline > Add Video Only Transition. The default shortcut is Option-T on macOS and Alt-T on Windows; Blackmagic's DaVinci Resolve 20 Beginner's Guide gives both keys, and the 21.1 manual still lists Option-T for the same command.
Timeline > Add Transition (Command-T on the Mac) is a different command: it can add the standard transition to selected video and audio edits. If a shortcut behaves differently, open Keyboard Customization; an imported keyboard map can override the defaults. Shift-Space opens Effects Search, which applies the transition you click to the nearest edit point.
Understand handles before Resolve trims for you
A handle is recorded source material outside the part of the shot you can see in the timeline. Say a ten-second shot is cut off at eight seconds: that unused tail can feed the outgoing side of a transition, and the source file stays exactly as it was. If trimming itself still feels unfamiliar, work through the split-and-trim guide before adding effects.
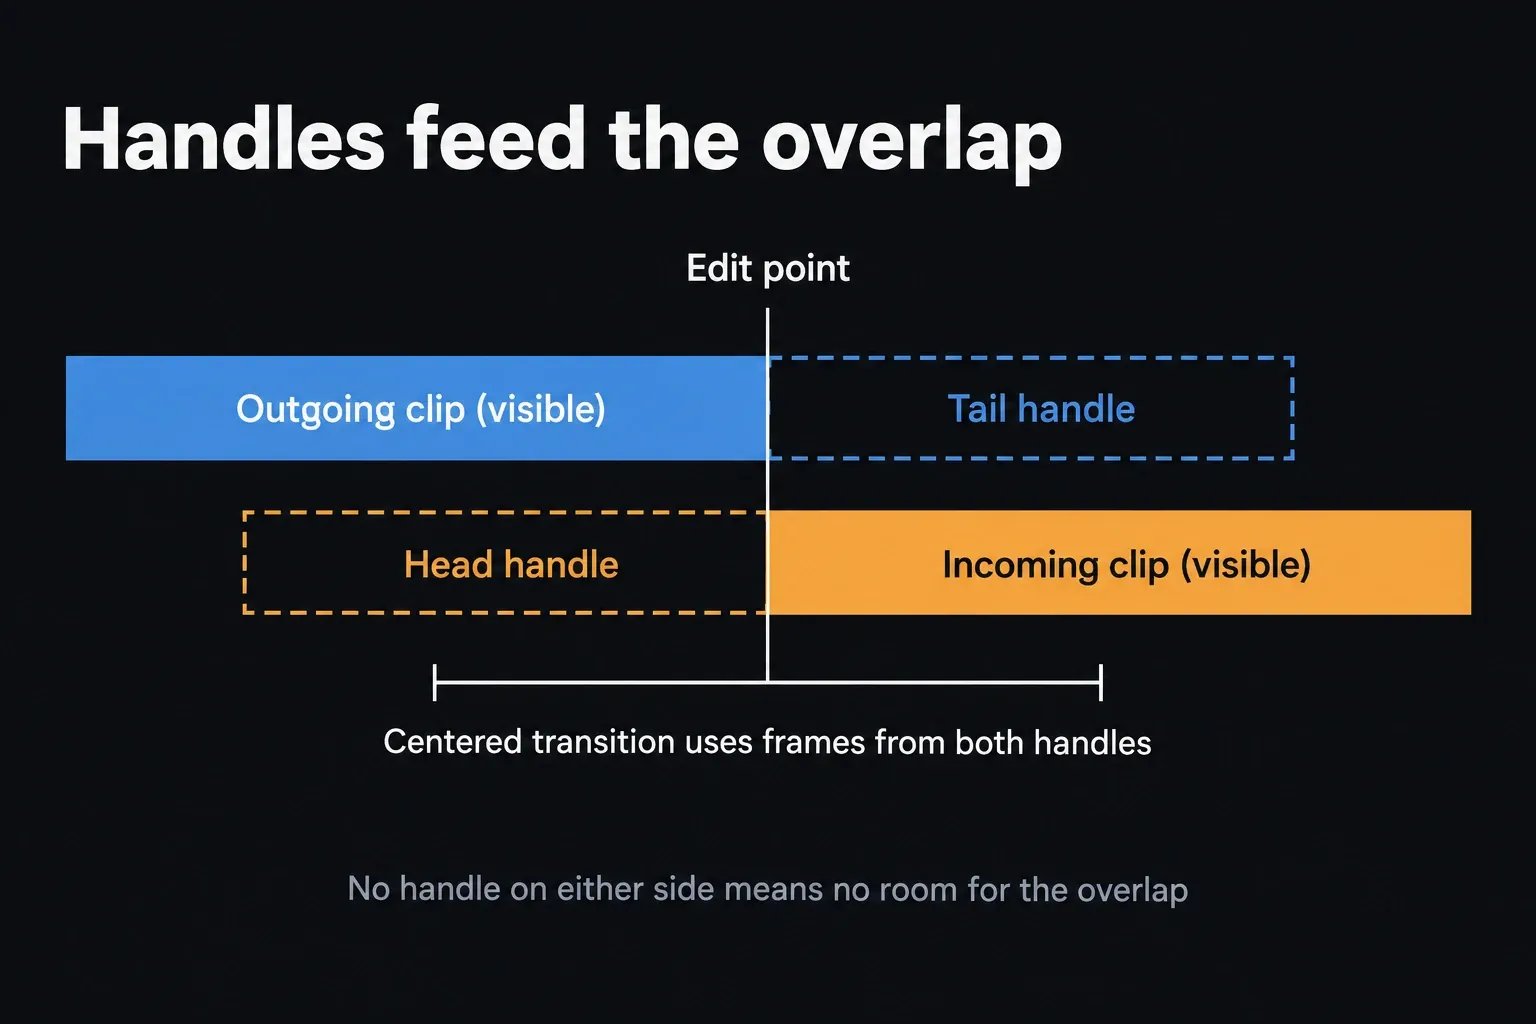
A centered transition divides its overlap around the edit, so both sides need enough unused frames for their part of the duration. If a clip already uses its first or last recorded frame, Resolve can't invent the missing action.
You can fake the overlap with a freeze or a repeated frame in some other construction, but it won't move the way a real handle does.
| Edit condition | What a centered transition needs | Best decision |
|---|---|---|
| Both clips have handles | Unused frames on both sides | Add the transition, then inspect revealed action |
| Only outgoing clip has a handle | Incoming frames are missing | Shorten or realign the transition, or trim the incoming clip |
| Neither clip has handles | No overlap is available | Change the edit, shorten the transition, or use a different construction |
| Still image | Duration rather than recorded frames controls the edge | Extend the still and test the edit point |
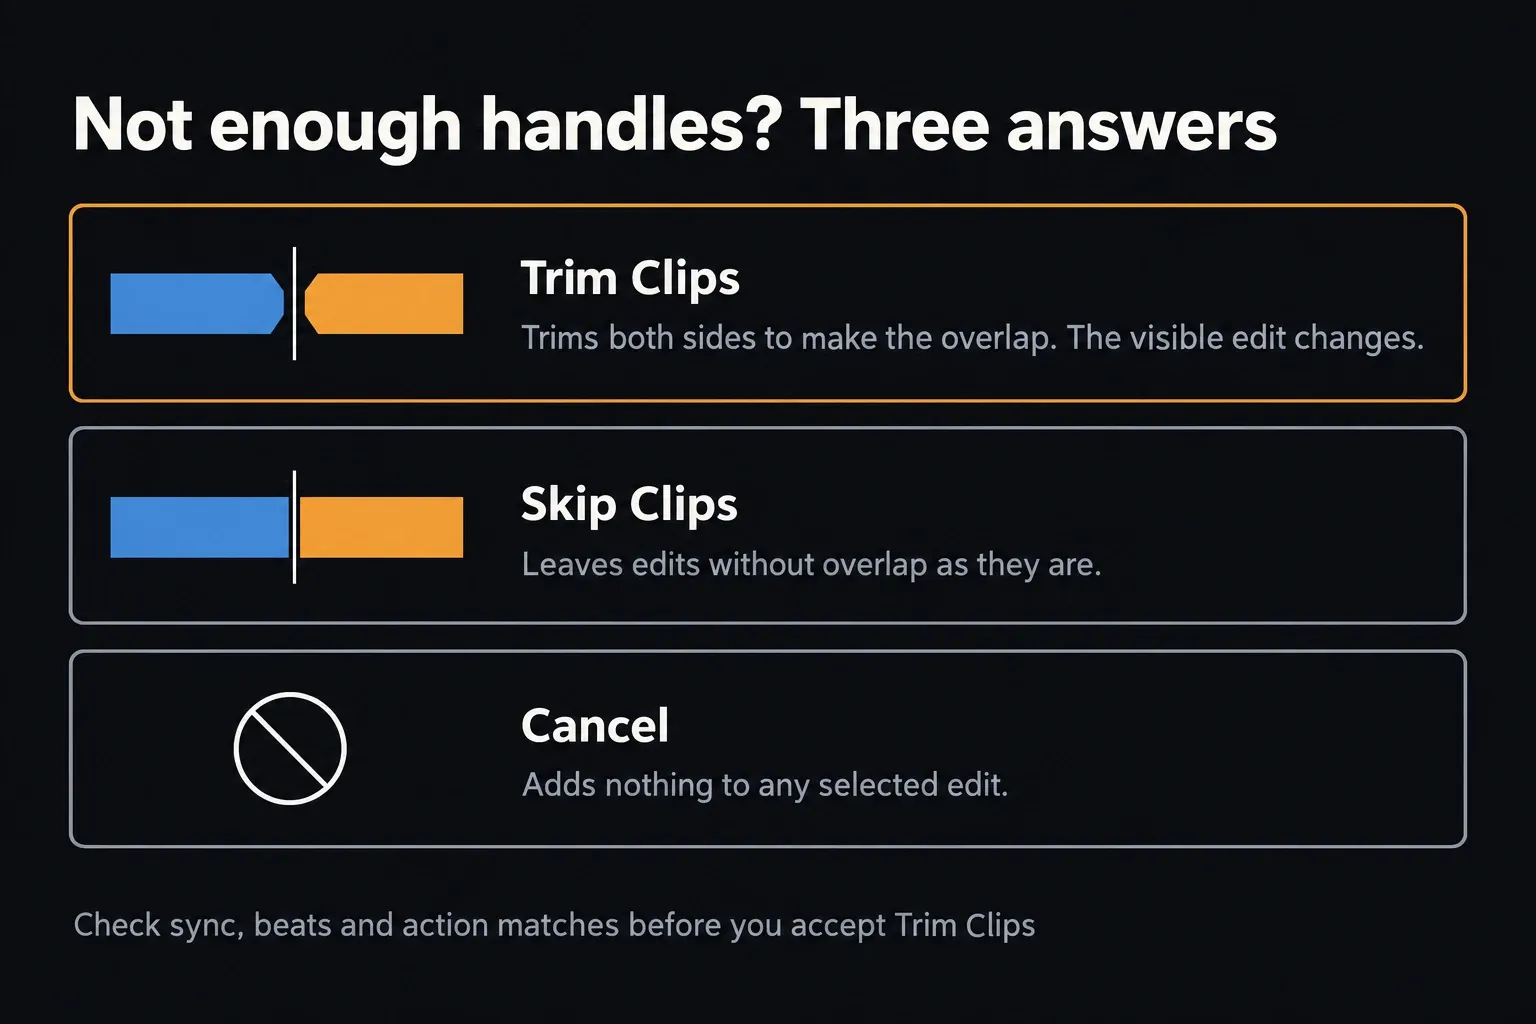
When Resolve offers Trim Clips, read the dialog literally. It trims the incoming and outgoing sides of each selected edit point to create the missing overlap, which means the visible edit changes. Skip Clips leaves the edits that lack overlap as they are; Cancel abandons the whole batch.
Before accepting Trim Clips, check dialogue sync, beats, action matches and any downstream timing that depends on the cut. To pick the frames yourself, hold Option-Shift while dragging an edit point or a whole clip over its neighbor to create the overlap.
Choose start, center, or end alignment deliberately
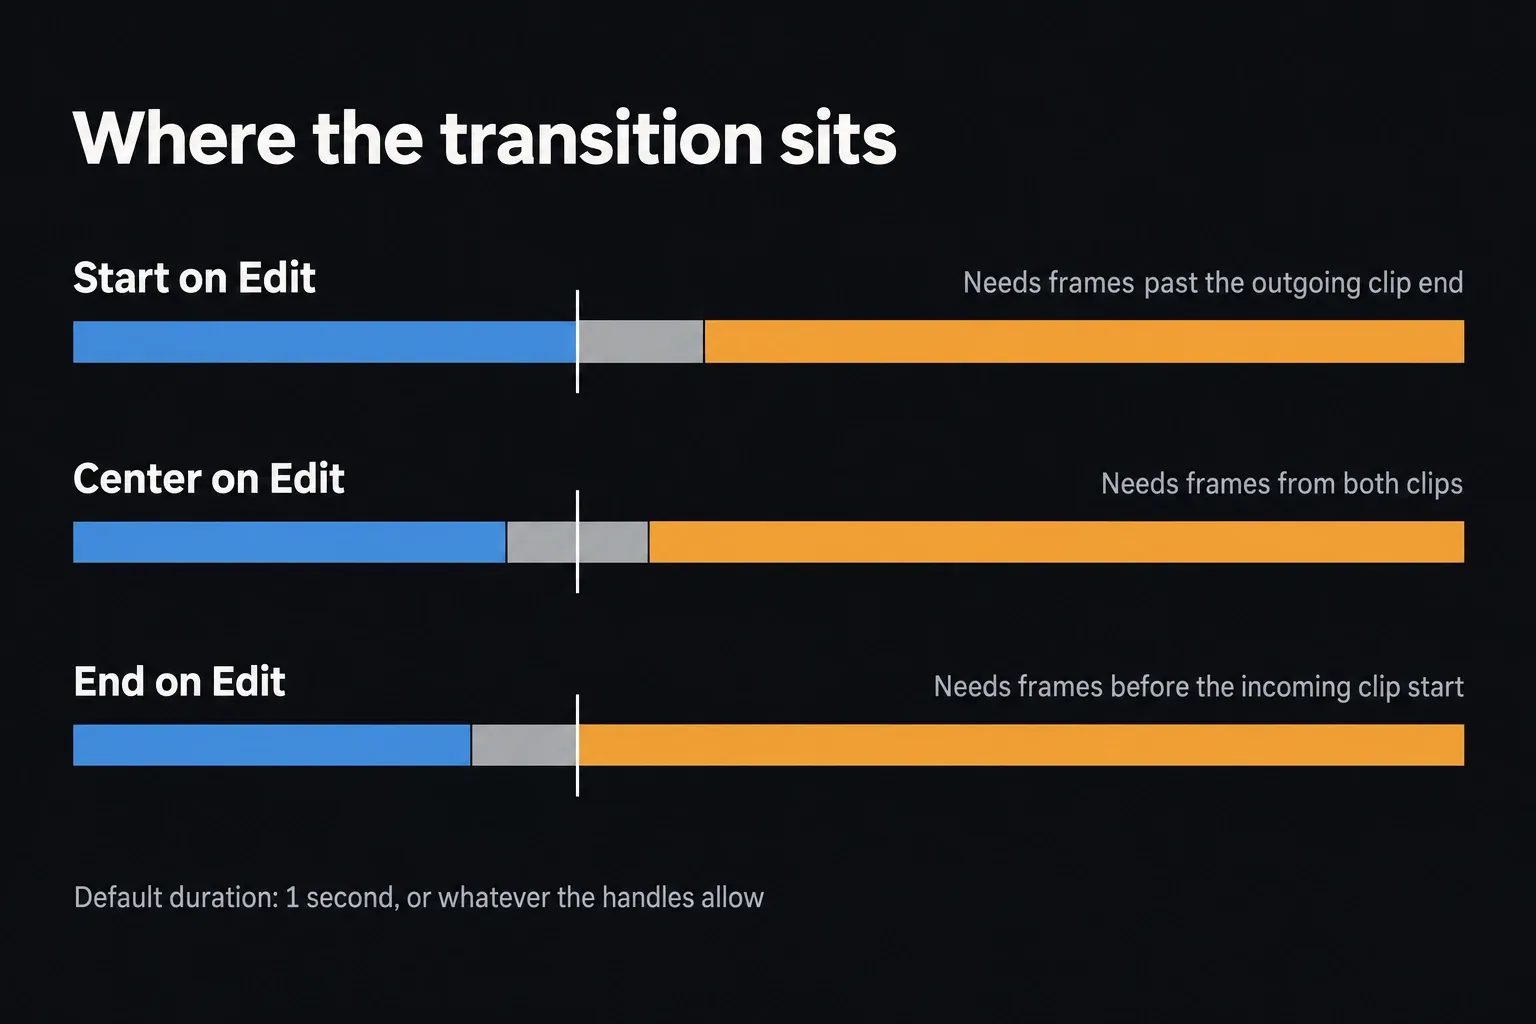
Resolve names the three positions Start on Edit, Center on Edit and End on Edit. Center uses frames from both sides.
Start on Edit runs the effect over the incoming shot, so the outgoing clip must keep playing past its out point. End on Edit runs over the outgoing shot and needs frames from before the incoming clip's start. From the keyboard, select an edit, press U to pick its start, center or end, then press Command-T: the start gives a transition that ends on the edit, the end gives one that starts on it.
Alignment changes which real frames the audience sees. If a spoken word, a kick drum, a hand movement or a screen action has to land on the cut, replay from before the transition after every alignment change. A dissolve can look perfectly smooth while moving the story beat onto the wrong frame.
Change transition duration and the default length
To change how long a transition runs, find it on the Edit page timeline and use whichever method fits the edit:
- Drag either edge of the transition. It grows or shrinks evenly around the cut; hold Command on macOS or Ctrl on Windows and Linux while you drag to change only one side.
- For an exact length, right-click the transition, choose Change Transition Duration (Command-D on macOS, Ctrl-D on Windows and Linux), type the new duration and click Change.
- Double-click the transition to open it in the Inspector, then enter a Duration in seconds or frames.
New transitions use the Standard transition duration in DaVinci Resolve > Preferences > User > Editing, and the factory value is one second. Change it there in seconds or frames and click Save; transitions already in the timeline keep their length. When you add one by right-clicking an edit point, Resolve also offers a quarter second, half a second, one second and two seconds, and it still shortens any new transition that the handles can't cover.
If a short transition is hard to grab, zoom into the timeline first. At a wide zoom level a few-frame dissolve is only a sliver on the cut.
Treat the one-second default as a convenient insertion value, then set the real duration from the rhythm and purpose of the shots.
| Editorial purpose | Useful starting thought | Review for |
|---|---|---|
| Hide a tiny visual discontinuity | Use the shortest duration that solves it | Ghosting or a visible softness pulse |
| Suggest time passing | Let both shots remain readable during the overlap | Double exposure that becomes visually messy |
| Fade from or to black | Use the clip fade handle or Dip to Color | Whether tracks below become visible |
| Music or dialogue edit | Build an audio crossfade independently | Phase, room tone, consonants, and the beat |
Use a fade handle when no second clip is needed
A fade handle is the cleaner choice when there's no second video clip to overlap. Drag the small white handle at the clip's upper left or upper right corner inward to fade its opacity toward or away from whatever is underneath; Trim > Fade In to Playhead and Fade Out to Playhead do the same from the playhead. That's different from a two-shot Cross Dissolve, which mixes real frames from both clips.
Use Dip to Color when the edit should pass through a defined color, and Cross Dissolve when both images should overlap. Don't leave a one-frame gap as a substitute for handles: depending on the tracks below, the transition may reveal transparency or flash black.
Add audio transitions separately
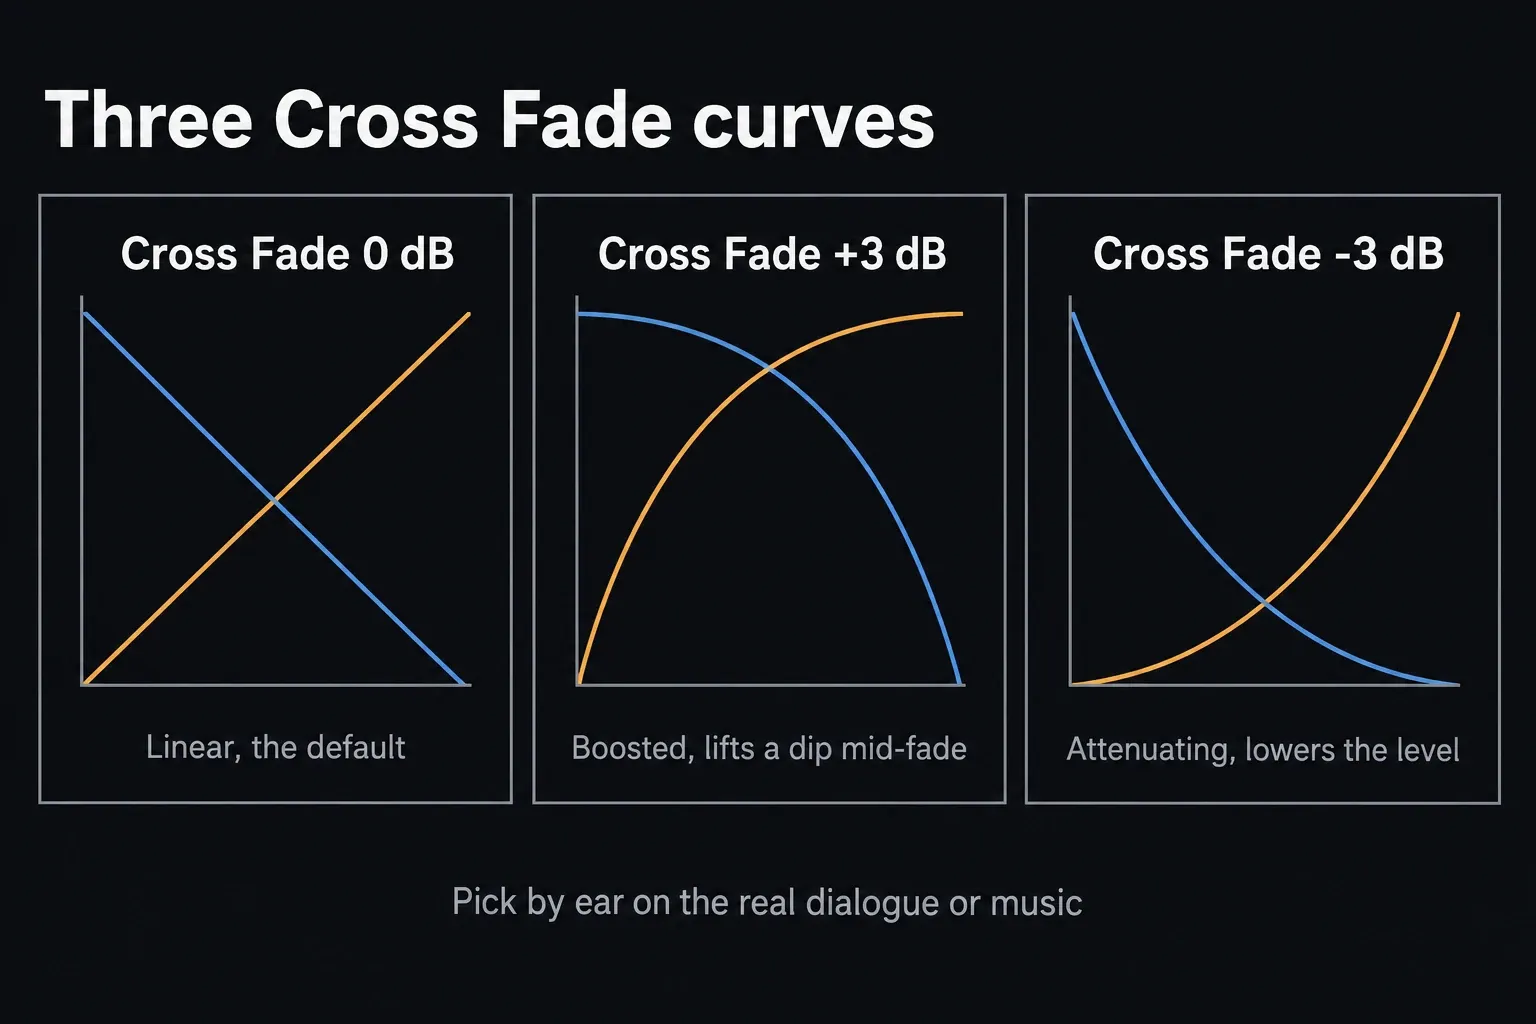
Open Effects > Toolbox > Audio Transitions. Resolve 21 provides Cross Fade +3 dB, -3 dB and 0 dB.
To add the standard audio transition to selected audio edits, choose Timeline > Add Audio Only Transition or press Shift-T on the default keyboard map. With Linked Selection on, a video transition also puts a crossfade on the linked audio. The three Cross Fade curves are different gain relationships through the overlap, not quality tiers, so start with the one that best holds the perceived level and listen on the real material.
- Cross Fade 0 dB: the default linear fade. Start here, especially when both sides come from the same recording and the middle of the fade doesn't build or dip.
- Cross Fade -3 dB: an attenuating curve that deliberately lowers the level through the overlap. Audition it against room tone, music and ambience when the middle of the fade sounds too loud.
- Cross Fade +3 dB: a boosted curve. Applied to both halves, it can make up for a hollow or a level dip in the middle of the crossfade; confirm that by ear and on the meters.
Listen rather than choosing by name. On dialogue, check consonants, breaths and room tone; on music, check the beat, phase relationship and transients. Double-click a Cross Fade to set its Fade In and Fade Out levels separately in the Inspector. For track-level control rather than one clip overlap, continue in the Fairlight task map.
Before reaching for a picture effect, try an L-cut or J-cut. Letting the outgoing sound run under the incoming picture, or bringing in the next sound first, often hides the edit more naturally than matching the audio and video transition lengths.
Preview and customize without losing the cut
Hover Scrub Preview, switched on in the Transitions option menu, plays a transition in the Viewer on the two clips nearest the playhead as you move across its thumbnail. Park the playhead on the cut you're judging and treat the scrub as a shortlist, not a verdict. In the Inspector, Duration and Alignment are the common controls; style, ratios, ease and curves vary by transition type.
Duplicate the timeline before applying a styled transition across many edits. Repetition is fast, but it can expose five different bad handles or turn every cut into the same visual punctuation. Approve one representative edit, then check each batch result at full speed and frame by frame.
Additive Dissolve versus Cross Dissolve
Both sit in Effects > Toolbox > Video Transitions under Dissolve. Cross Dissolve fades the outgoing shot out while the incoming one fades in. Additive Dissolve adds the incoming shot first and then fades out the outgoing one, and Blackmagic's description of the additive mode compares that to the look of a standard film dissolve. In practice the middle of the transition reads brighter than a Cross Dissolve.
That glow can suit a dreamy change of scene. On bright exteriors or white backgrounds, park the playhead in the middle of the transition and check the waveform for highlights flattening out. Additive Dissolve's own Inspector controls are Start Ratio and End Ratio, which set how far along the transition is when it begins and how far it gets by the end. Cross Dissolve has a Style menu with Video, Film, Additive, Subtractive, Highlights and Shadows, so you can try the additive look without swapping the transition.
Set and change the standard transition
Right-click the transition you actually use and choose Set as Standard Transition; the Effects Library marks it with an orange indicator to the left of its name. The command changes what Resolve inserts with the standard-transition commands, not the transitions already in the timeline. The default duration is controlled separately in Preferences > User > Editing.
Select several edit points only after checking their handles and track selection. A batch can create valid-looking icons while revealing rejected frames at half the cuts. If Resolve reports insufficient handles, use Skip Clips to preserve timing and fix those edits one by one; Timeline > Select Transitions then grabs them all for review.
Fix a transition that will not apply
There are no usable handles
Shorten the outgoing tail and the incoming head, close the gap, then try again. If the cut can't move, reduce the duration or align the effect to the side with usable frames. When neither side has real handles, keep the straight cut or redesign the edit instead of forcing a fake overlap.
The transition lands on only one clip edge
Zoom in and target the edit point between two adjacent clips on the same track. Confirm there's no tiny gap and that the intended track is selected. A transition dropped on the head or tail of a single clip behaves as an edge transition, not as a centered blend between two shots.
The transition reveals a bad frame
The transition is showing you real frames from the handles. Roll the edit, trim a different section, shorten or realign the transition, or go back to the cut. Don't blame the effect for revealing a focus pull, a camera bump or a mouth movement that lives just outside the visible edit.
Playback stutters over the transition
If playback drops frames only over the effect, cache that section or lighten the preview load before you judge the timing. A demanding transition can miss real-time playback without proving the render is bad. Use the slow-playback checklist for the performance side, then inspect the exported frames and audio around the edit.
A nested timeline or compound clip changes size
Test the same effect on the underlying clips. If that works, compare timeline resolution, scaling, compound-clip transforms and the order of other effects. A nested timeline or compound clip presents a new raster and a new handle boundary, so the transition may be processing different material than the original edit suggests.
Use transitions as editorial grammar
Start with the straight cut. Add a dissolve to connect moments or imply time, Dip to Color to separate sections, a wipe when the direction itself carries meaning, and Smooth Cut only for small jump cuts within one shot; Blackmagic says 2- to 6-frame Smooth Cuts often work best there. The name of the preset isn't a reason to use it.
Finally, hide the interface and watch from several seconds before the edit. If you notice the preset before the story beat, shorten it or remove it. Then listen once without watching: room tone, dialogue and music often decide whether a cut feels smooth long before any video effect does.
Frequently Asked Questions
Why can’t I add a transition in DaVinci Resolve?
Usually the edit lacks unused source frames, called handles. Shorten the outgoing clip before its recorded end and the incoming clip after its recorded start, close the gap, then add the transition or make it shorter. If Resolve offers Trim Clips, remember that accepting it trims both sides of the edit and changes what plays at the cut.
How do I change the duration of a transition in DaVinci Resolve?
Drag either edge of the transition in the timeline, or right-click it and choose Change Transition Duration (Command-D on macOS, Ctrl-D on Windows and Linux) to type an exact length. You can also double-click it and set Duration in the Inspector. For new transitions, change Standard transition duration in Preferences > User > Editing; the default is one second.
How do I add the same transition quickly?
Set the effect as the Standard Transition, select the video edit point, then choose Timeline > Add Video Only Transition. On the default map that's Option-T on macOS or Alt-T on Windows. Timeline > Add Transition is a different command that can add the standard transition to selected video and audio edits.
Why does a dissolve show frames I cut out?
A dissolve overlaps source frames beyond the visible edit. Those handles can contain the movement, focus change or unwanted frame you removed from the straight cut. Roll the edit, shorten or realign the transition, or keep the cut.
What is the best transition for most edits?
A straight cut is the safest default. Use Cross Dissolve when an overlap means something editorially, Dip to Color for a deliberate separation, and an audio crossfade only after listening to the room tone, phase and level through the edit.
Are transitions available in DaVinci Resolve Free?
The core video and audio transition workflow is available in Resolve Free. Some individual Resolve FX, Fusion templates or third-party plugins can have Studio, hardware or license requirements, so check the label and the vendor's requirements for that specific item.
What's the difference between Additive Dissolve and Cross Dissolve?
Cross Dissolve fades one shot out as the next fades in. Additive Dissolve adds the incoming shot before the outgoing one fades, so the middle of the transition looks brighter, closer to a classic film dissolve. Cross Dissolve's Style menu also includes an Additive option.
