A reliable multicam edit starts before the first camera switch. Put the angles into one properly synced multicam clip, decide which audio should remain continuous, and only then perform the switching pass.
If you skip that setup, every later correction becomes a fight with sync, duplicate audio, or cuts that change the microphone along with the picture.
This workflow is written for DaVinci Resolve 21. On September 5, 2026, Blackmagic's Edit page and the current Resolve 21 Reference Manual still documented the standard multicam viewer, waveform, timecode, in/out-point and marker sync, plus separate video- and audio-switching controls.
Multicam SmartSwitch requires Studio. The manual describes SmartSwitch as a first pass to finesse, not a substitute for checking speaker choice, rhythm and continuity. It also documents the four audio structures and full-clip-extents control used below.
Use multicam when the cameras share the same event
Multicam is the right structure when two or more cameras recorded the same interview, performance, ceremony, class, or podcast at the same time.
Resolve keeps those sources aligned inside one clip and lets you choose which angle appears at each moment. You can trim a switch or replace an angle later without manually sliding the original camera files.
Don't build a multicam clip just because a project contains footage from several cameras. B-roll captured at another time belongs in normal bins and timeline tracks. A multicam clip is for simultaneous coverage that shares a sync reference.
| Footage | Best structure | Reason |
|---|---|---|
| Two-person interview with three cameras | Multicam clip | Every angle covers the same conversation |
| Concert with shared timecode | Multicam clip | Long continuous angles can stay frame-aligned |
| Talking head plus unrelated B-roll | Main camera on timeline, B-roll above | The B-roll has no continuous sync relationship |
| Several takes of one scripted line | Source tape, take selector, or stacked clips | The takes happened at different times |
Prepare the source clips before synchronization
Create one bin for the shoot and use camera or scene metadata consistently. If a camera stopped and restarted, keep its spanned clips together and inspect their timecode before selecting everything. Renaming clips carelessly can make angle ordering harder to read later, so preserve the original filename in metadata if you add friendlier display names.
Check three things before Resolve analyzes anything:
- Frame rate: confirm the sources have the expected recorded frame rate. A genuine off-speed recording shouldn't be forced into sync as if it were normal-speed coverage.
- Audio reference: every camera used for waveform sync needs a recognizable version of the same sound. A scratch mic is enough when it captured the room clearly.
- Timecode: use timecode only when the cameras or recorder were actually synchronized. Similar-looking clock values aren't proof of jam sync.
If decoding several angles at once makes the viewer stutter, solve playback before judging sync. The Proxy Media workflow explains when to use proxies, optimized media, timeline proxy resolution, or render cache. Multicam is hard enough to review without dropped frames pretending to be bad cuts.
Choose the sync method from the material you recorded
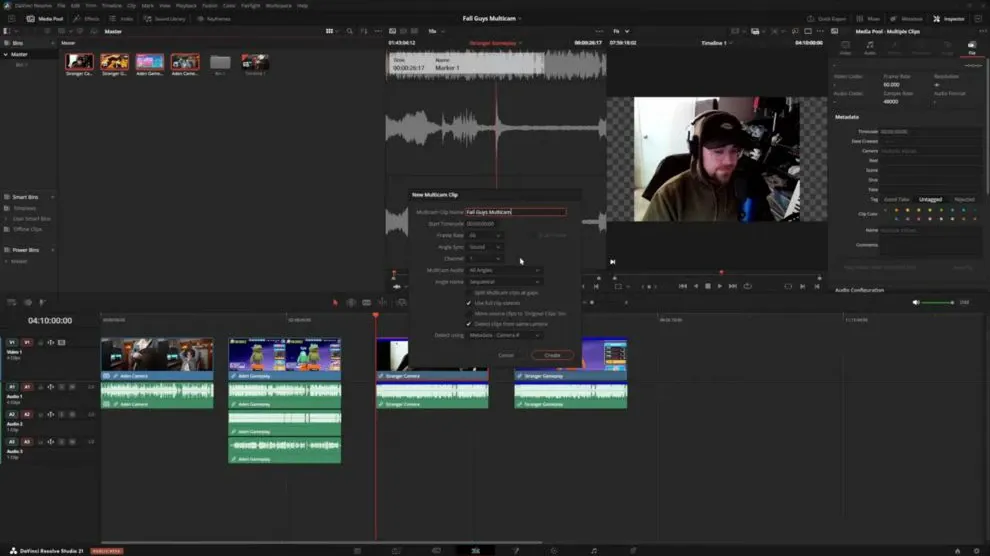
Select the simultaneous source clips in the Media Pool, right-click, and choose Create Multicam Clip Using Selected Clips. The creation dialog is where you choose the synchronization method and angle ordering.
The real Resolve 21 interface below comes from Adens Archive’s May 2026 multicam walkthrough; the menu labels were checked against Blackmagic’s latest manual.
| Sync method | Use it when | Verify afterward |
|---|---|---|
| Timecode | All cameras and the audio recorder shared reliable timecode | A slate close and a late-program sync point |
| Sound | Each angle recorded the same usable reference audio | Hard consonants, claps, or visible impacts |
| In points | You manually marked the same event on every source | The exact marked frame and a later point |
| Out points | The shared reference is near the end of the clips | The marked frame and the beginning of usable action |
Timecode is the cleanest choice only when the cameras were genuinely jam-synced. Sound is practical when every angle recorded the same clear event.
In or Out points work when you marked one matching frame in every source, while Marker sync uses a matching manual marker on each clip.
If scratch audio is weak, place the same In, Out or Marker sync point on a visible slate close, hand clap or camera flash. Never accept a multicam clip just because Resolve created it without an error.
Create the clip without losing the audio you need
Name the multicam clip for the scene or recording rather than leaving a generic generated name. Set video angle ordering so Camera A, Camera B, the wide shot, and any presentation feed appear in a predictable order. The order matters because viewer tiles and keyboard angle commands become much easier to remember.
The audio choice deserves more attention than most tutorials give it:
- Reference Audio/Angle 1 is useful when one recorder or camera angle should provide the continuous master sound.
- All Angles, added as a creation option in Resolve 21, carries all audio tracks from the selected angle sources into the multicam clip. Use it when you genuinely need access to several isolated microphones, not merely because it keeps more data.
- A dedicated mix placed on its own timeline track is often simpler for interviews. Lock that audio and switch video only.
Resolve 21 documents four Multicam Audio choices: Source Audio Channels, Reference Audio, Adaptive Tracks and All Angles. The Resolve 21 New Features Guide spells out that All Angles includes every audio track from every angle and that Use full clip extents preserves the selected sources’ full lengths.
A three-camera podcast with two channels per camera can therefore become an unnecessarily crowded structure. Keep every track only when you have a routing and mixing plan for it.
Verify sync before you edit the program
Open the multicam clip in its own timeline or place it in a short test timeline. Find a sharp sound with visible movement: a clap, a hand hitting a table, a slate closing, or a word with a clear mouth movement. Check the first useful minute and another point near the end.
If the beginning is aligned but the end drifts, investigate source frame rate, variable-frame-rate recordings, audio clock differences, or an incorrect interpretation setting. A single nudge can fix a constant offset; it can't repair progressive drift. Rebuild or correct the source rather than hiding a changing sync error under frequent camera cuts.
When one angle is wrong, open the multicam clip and correct that source against the others. Do not slip random segments on the finished program timeline unless you intend to create a deliberate local offset.
Cut camera angles while keeping the sound stable
Place the multicam clip on a timeline and switch the source viewer to multicam mode so you can see the angle grid. During playback, click an angle or use the assigned multicam angle commands to create switches in real time. The beginner editing workflow and keyboard-shortcuts guide cover the viewer and angle commands.
If you need ordinary blade edits before switching live, use the split-video guide first; it keeps that basic timeline intent out of this multicam workflow.
For an interview or podcast, switch video only while the clean recorder mix continues underneath. Switching video and audio together can be right for a performance where each angle carries a purposeful source, but it's a poor default for speech. Camera cuts shouldn't make room tone, microphone character, or dialogue level jump.
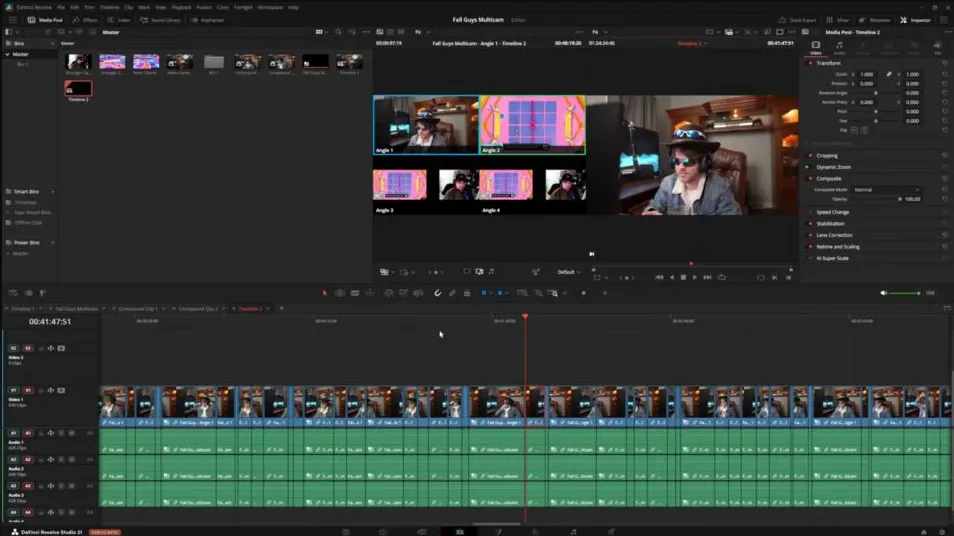
Your first pass should favor content over polish. Follow the speaker, use the wide shot to reset geography or cover overlaps, and leave enough shot duration for the viewer to read an expression. Then replay the sequence and trim switches away from blinks, camera bumps, mid-gesture mismatches, and words that need reaction shots.
Replace a bad angle without rebuilding the edit
A multicam switch is editable. Select a segment and choose a different multicam angle to replace the picture while preserving the segment's timing. Trim the edit point when the correct camera is already selected but the cut lands early or late. This is safer than flattening the entire sequence just to change one choice.
Use match frame when you need to identify the underlying source. The Resolve 21 feature guide says Match Frame to Source Clip now finds the underlying source for multicam and nested clips automatically. Keep a duplicate timeline before structural changes so you can compare the revised cut with the previous pass.
Use SmartSwitch as a Studio first pass
SmartSwitch is available in Studio, not the free edition. Blackmagic’s official SmartSwitch guide says it analyzes the active speaker, audio, lip movement and whether an angle is wide or close.
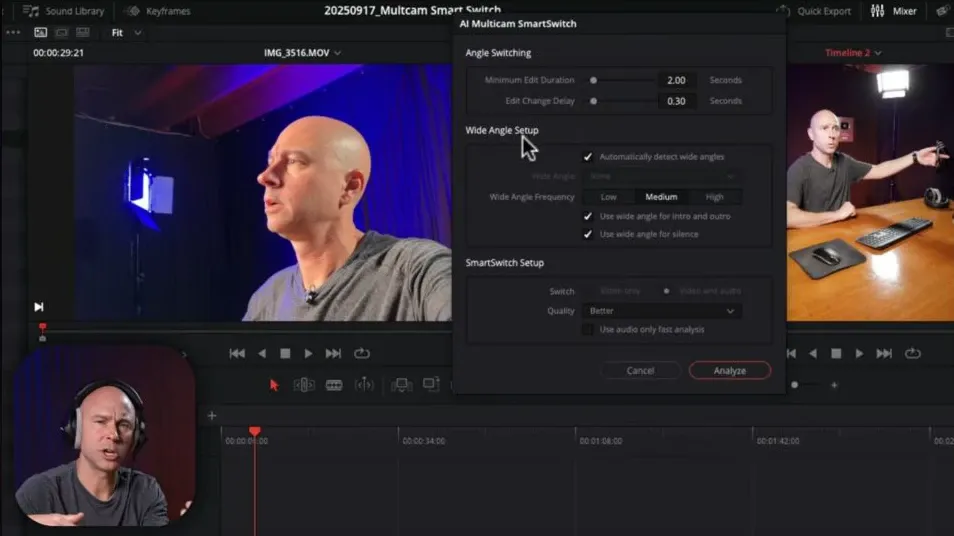
The result is a starting timeline, not a finished edit. The real settings and result below come from Jason Yadlovski’s Resolve 20 walkthrough; those controls remain part of the Resolve 21 workflow documented in the current manual.
- Create and verify the multicam clip.
- Edit that multicam clip into a timeline.
- Right-click the timeline clip and choose Multicam SmartSwitch.
- Set Minimum Edit Duration, Edit Change Delay and wide-angle behavior. Choose Video Only or Video and Audio, choose Quality: Faster or Better, and enable Use Audio Only Fast Analysis only when an audio-only decision pass fits the material.
- Run Analyze, then duplicate or version the resulting timeline before manual review.
| Control | What it changes | Practical starting judgment |
|---|---|---|
| Minimum Edit Duration | Prevents another switch before the duration expires | Raise it when the result feels nervous or overcut |
| Edit Change Delay | Offsets the cut after speech begins | Use a small delay when immediate switches feel mechanical |
| Wide Angle Frequency | Controls how often the wide shot returns | Use the wide as punctuation, not a timer |
| Video Only | Keeps timeline audio from changing with every camera cut | Preferred for a continuous interview mix |
| Quality: Faster or Better | Trades analysis speed for accuracy | Test a short representative section before a long session |
| Use Audio Only Fast Analysis | Uses audio without video analysis and runs faster | Use only when lip movement and shot type are not needed for the decision |
Review SmartSwitch in three passes
First, check speaker accuracy. SmartSwitch can misunderstand an off-camera voice, overlapping speech, laughter, a silent reaction, or an angle without useful audio. Replace incorrect speaker shots before worrying about rhythm.
Second, check pacing. An automatic cut can be logically correct and still feel impatient. Extend reactions, remove repetitive ping-pong switching, and let the wide shot establish the space. A podcast edit needs editorial listening alongside active-speaker detection.
Third, check continuity and technical quality. Watch for blinks, focus searches, camera bumps, exposure changes, or an angle that was never meant to be used during a reset. SmartSwitch analyzes the available choices; it does not know the director's intention.
Blackmagic notes that SmartSwitch analysis time depends on the program length and number of camera angles. On a long event, test a representative excerpt on a duplicate timeline first. That reveals whether speaker choices, wide-shot frequency and edit duration suit the material before you analyze the full program.
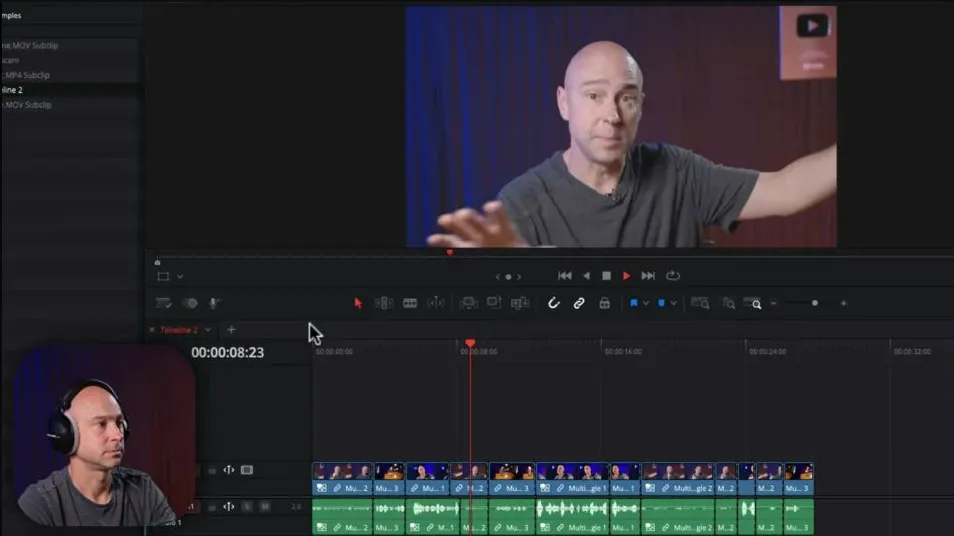
Finish color, audio, and export without breaking the structure
You don't need to flatten immediately. Keep the multicam structure while angle changes are still likely. For color, open the multicam clip to correct an underlying angle consistently, or grade timeline segments when the shot needs local work. Duplicate the timeline before flattening because flattening removes the convenient multicam relationship from those timeline segments.
Move dialogue cleanup and mix decisions into a deliberate audio pass. The Fairlight task map routes noise, EQ, compression, routing, and loudness work without forcing all of it into the multicam stage. When the sequence is approved, choose the delivery target through the export settings hub and watch the rendered file outside Resolve.
Fix the failures that waste the most time
The angles are offset by a constant amount
Open the multicam clip, line up a strong visual and audio event, and move the incorrect source by the fixed offset. Verify another point later. If the offset stays constant, the correction is valid.
The angles drift farther apart
Check frame-rate interpretation, variable-frame-rate media, and recorder clock behavior. Re-encoding troublesome phone or screen recordings to a stable edit codec may be necessary. A fixed nudge can't solve progressive drift.
Every camera cut changes the sound
Switch video only and keep the chosen recorder mix on a continuous track. If you need isolated microphones, use Resolve 21's All Angles audio option deliberately and route the channels in Fairlight instead of allowing camera choices to control the mix.
The multicam viewer stutters
Reduce the decoding and processing load before judging the edit. Use the proxy decision workflow, lower timeline proxy resolution, or cache effects that are expensive after decoding. Don't confuse dropped playback frames with sync drift.
SmartSwitch ignores or overuses the wide shot
Choose the wide angle manually in the SmartSwitch setup, adjust its frequency, and decide whether it should cover silence, intro, or outro. Then review every occurrence. Automatic detection is a convenience, not an instruction to accept every wide-shot choice.
Frequently Asked Questions
Is multicam editing available in DaVinci Resolve Free?
Yes. You can create multicam clips, synchronize angles, use the multicam viewer, and switch angles in the free edition. Multicam SmartSwitch is different: Blackmagic lists it as a Studio-only feature.
Should I synchronize multicam clips by sound or timecode?
Use timecode when the cameras and recorder were genuinely synchronized during production. Use sound when every angle captured a clean version of the same event. Whichever method you choose, verify sync near the beginning and end of the usable recording.
How do I keep one microphone while switching cameras?
Place the clean recorder or reference mix on a continuous timeline track and switch video only. Resolve 20 added the Reference Audio/Angle 1 choice, while Resolve 21 added All Angles when a more complex mix genuinely needs every source track.
Does SmartSwitch finish a multicam edit automatically?
No. It creates a first-pass cut based on speaker and shot analysis. You still need to correct speaker choices, improve rhythm, protect reaction shots, remove unusable camera moments, mix audio, grade the program, and review the export.
Should I flatten the multicam clip before color grading?
Not automatically. Keep the multicam structure while angle changes remain likely. Correct underlying angles inside the multicam clip or grade timeline segments as needed. Duplicate the timeline before flattening so the editable multicam version remains available.
This workflow belongs to the DaVinci Resolve tutorial map. Return there when multicam is only one stage in a larger path through editing, color, audio and delivery.
