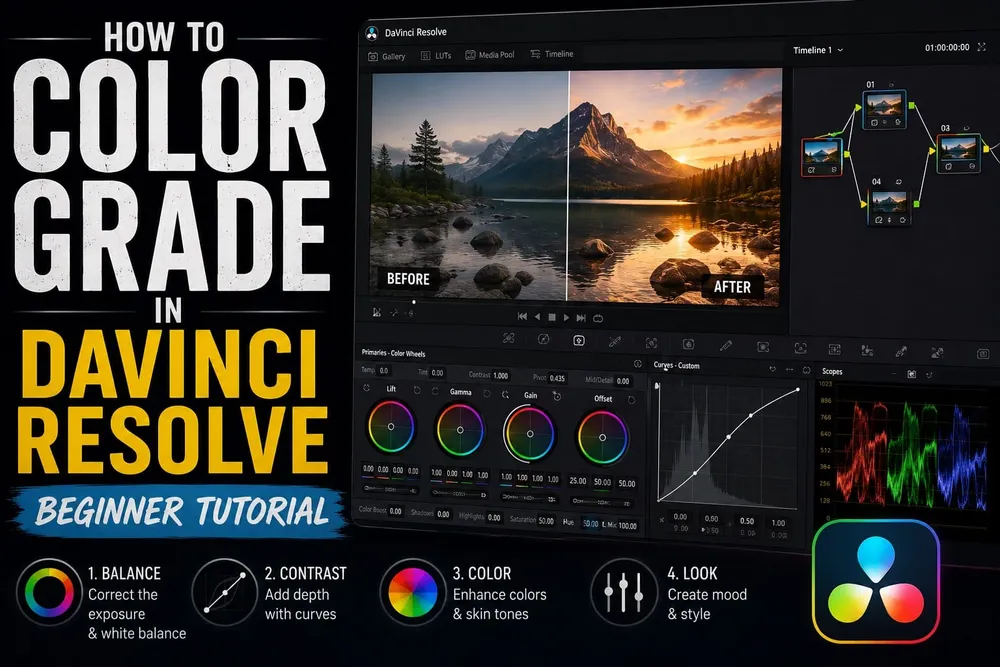
Quick answer: Decide how the footage is color-managed before you touch a wheel. After that, correct exposure and color balance, shape contrast, match the shots, build the look, isolate only what still needs local work, and check the result through the intended output transform. The waveform, RGB parade and vectorscope are measurements; the picture still gets judged on a display you trust. A beginner doesn't need a giant node tree, and doesn't need a LUT on every clip either.
The Beginner Color-Grading Order
Treat this sequence as a diagnostic order, not a rigid recipe:
- Confirm the clip's input color space and the project's output target.
- Open the Color page and scopes.
- Correct exposure, neutral balance and obvious shot-to-shot differences.
- Shape contrast and color with primaries or curves.
- Match adjacent shots before polishing a hero frame.
- Build the creative look.
- Add qualifiers, Power Windows or tracking only where global controls can't solve the problem.
- Review the full sequence, then render a short test in the actual delivery format.
“Correction” and “grading” are handy labels, not separate engines inside Resolve; the same controls do both jobs. Where the split earns its keep is debugging. First make the image technically coherent with the rest of the sequence, then make the deliberate creative choices. If the look falls apart when the next clip comes up, go back to the correction or the color-management decision instead of piling another node on top.
How to Know Each Pass Is Finished
- Color management: Primary controls respond predictably, and a technical LUT or CST is not applying a second transform.
- Correction: There is no unexplained cast or clipping, while intentional lighting and color remain intact.
- Matching: Adjacent shots no longer jump in exposure, balance or saturation.
- Look: Bypassing the look reveals a clear creative change without breaking continuity across the scene.
- Secondary corrections: Keys, windows and tracking stay clean through the full clip, without visible drift or distracting edges.
- Delivery: A short export keeps the expected contrast and color in the target viewing setup.
Step 1: Set Color Management Before You Grade
Flat log footage isn't an invitation to drop on the first LUT you find. Resolve needs to know what the source represents, which working space the grade lives in and what the output should be. In Resolve Color Management, those jobs belong to the Input, Timeline and Output color spaces. Blackmagic Design's official Color page documents color management right alongside primaries, nodes and scopes.
For a simple managed project, open Project Settings > Color Management, set Color science to DaVinci YRGB Color Managed, and pick an automatic or manual setup that suits the job. Automatic Color Management keeps the common cases simple; a manual preset gives you more control. Set the Output color space to the delivery and monitoring target, not to whichever option looks punchiest in the menu.
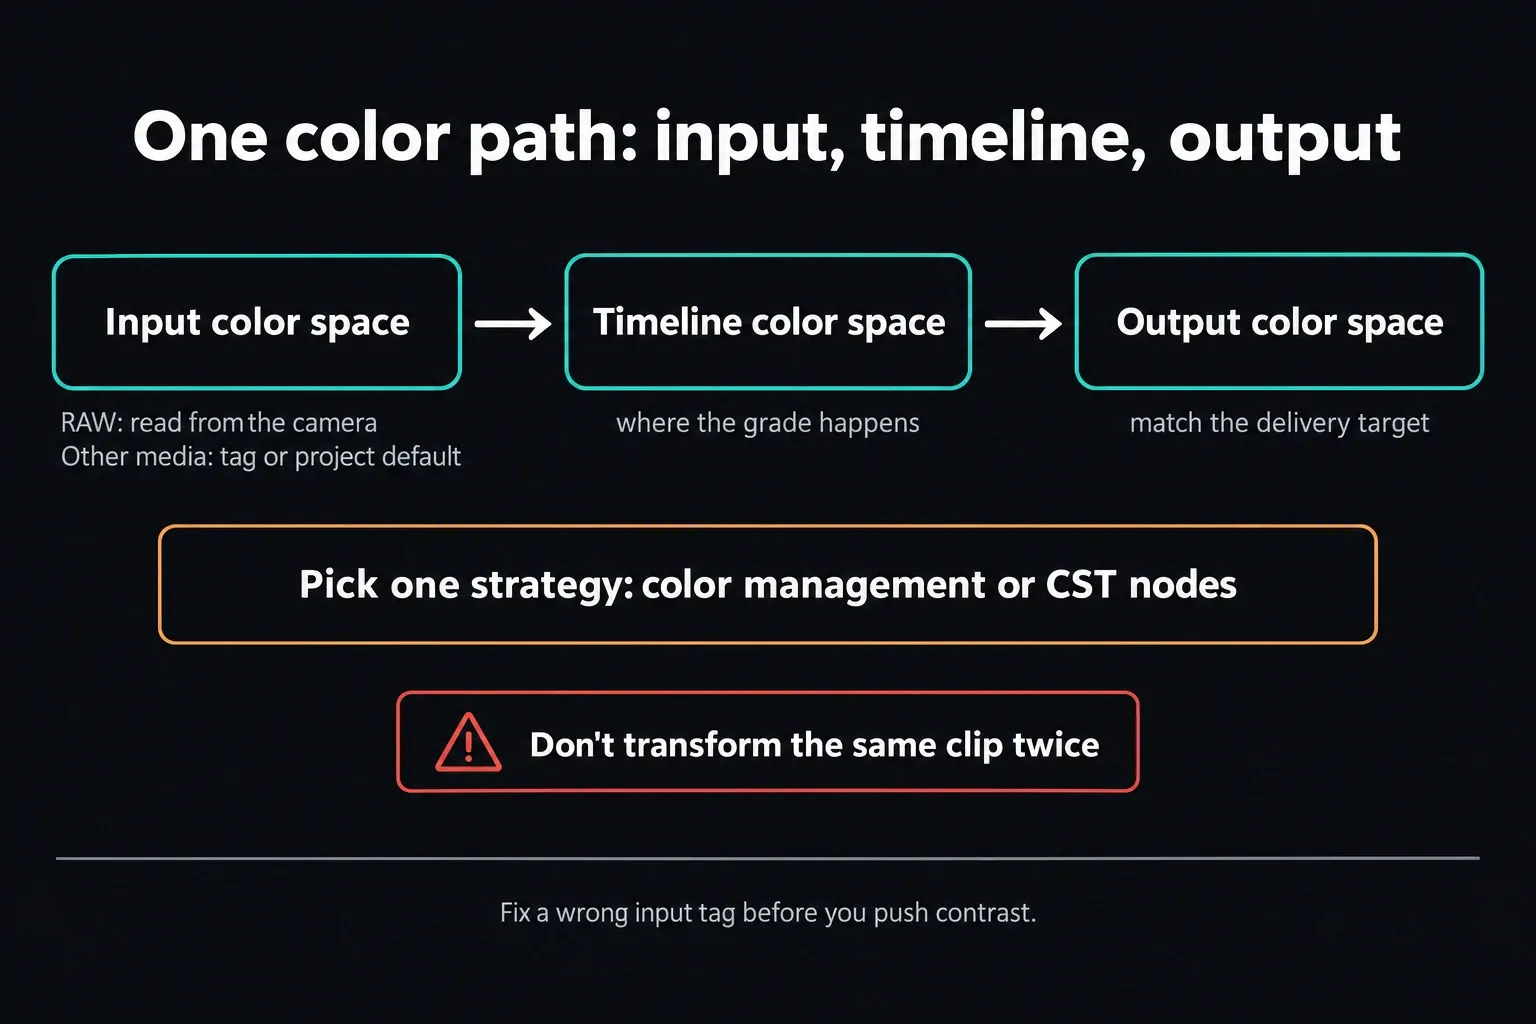
Then check the clips themselves. For a camera RAW clip, RCM takes the input color information from the camera manufacturer's specifications, and you can't override that clip's Input Color Space by hand. Non-RAW media may carry embedded metadata or fall back to the project's default input. If a non-RAW log clip has been interpreted wrongly, select it in the Media Pool and check its Input Color Space assignment. Fix the tag first; extreme contrast and saturation won't fix it for you.
A manual DaVinci YRGB project can use Color Space Transform nodes or suitable technical LUTs instead. That's a valid pipeline, not a beginner mistake. The mistake is stacking transforms without knowing what each one expects, such as an input CST in the node tree on media that RCM has already transformed. Choose one deliberate normalization strategy and test it before you grade the timeline.
You also don't need to turn every clip into a “normal Rec.709 image” before useful work can start. A managed project can grade in a wide-gamut timeline space and convert to the chosen output later. If that boundary still feels fuzzy, the Color Grading hub keeps the color-management, node, scope and LUT guides together in one learning path.
Step 2: Open the Color Page and Scopes
Click Color in the page bar. From here, the viewer, clip thumbnails, Node Editor and grading palettes all describe one selected clip. To open floating scopes from the Media, Color or Deliver page, choose Workspace > Video Scopes > On/Off. Resolve can also put the scopes in a dual-screen layout.
Start with three measurements:
- Waveform: shows signal level across the horizontal position of the frame. Use it to find exposure, contrast and clipping, not to force every image to fill the scale.
- RGB Parade: shows channel strengths side by side. It helps you spot a cast, but you should only expect equal channels in neutral parts of the scene.
- Vectorscope: plots hue by angle and saturation by distance from the center. The optional skin-tone indicator is a general reference for average skin hue, not an order to rotate every face onto one line.
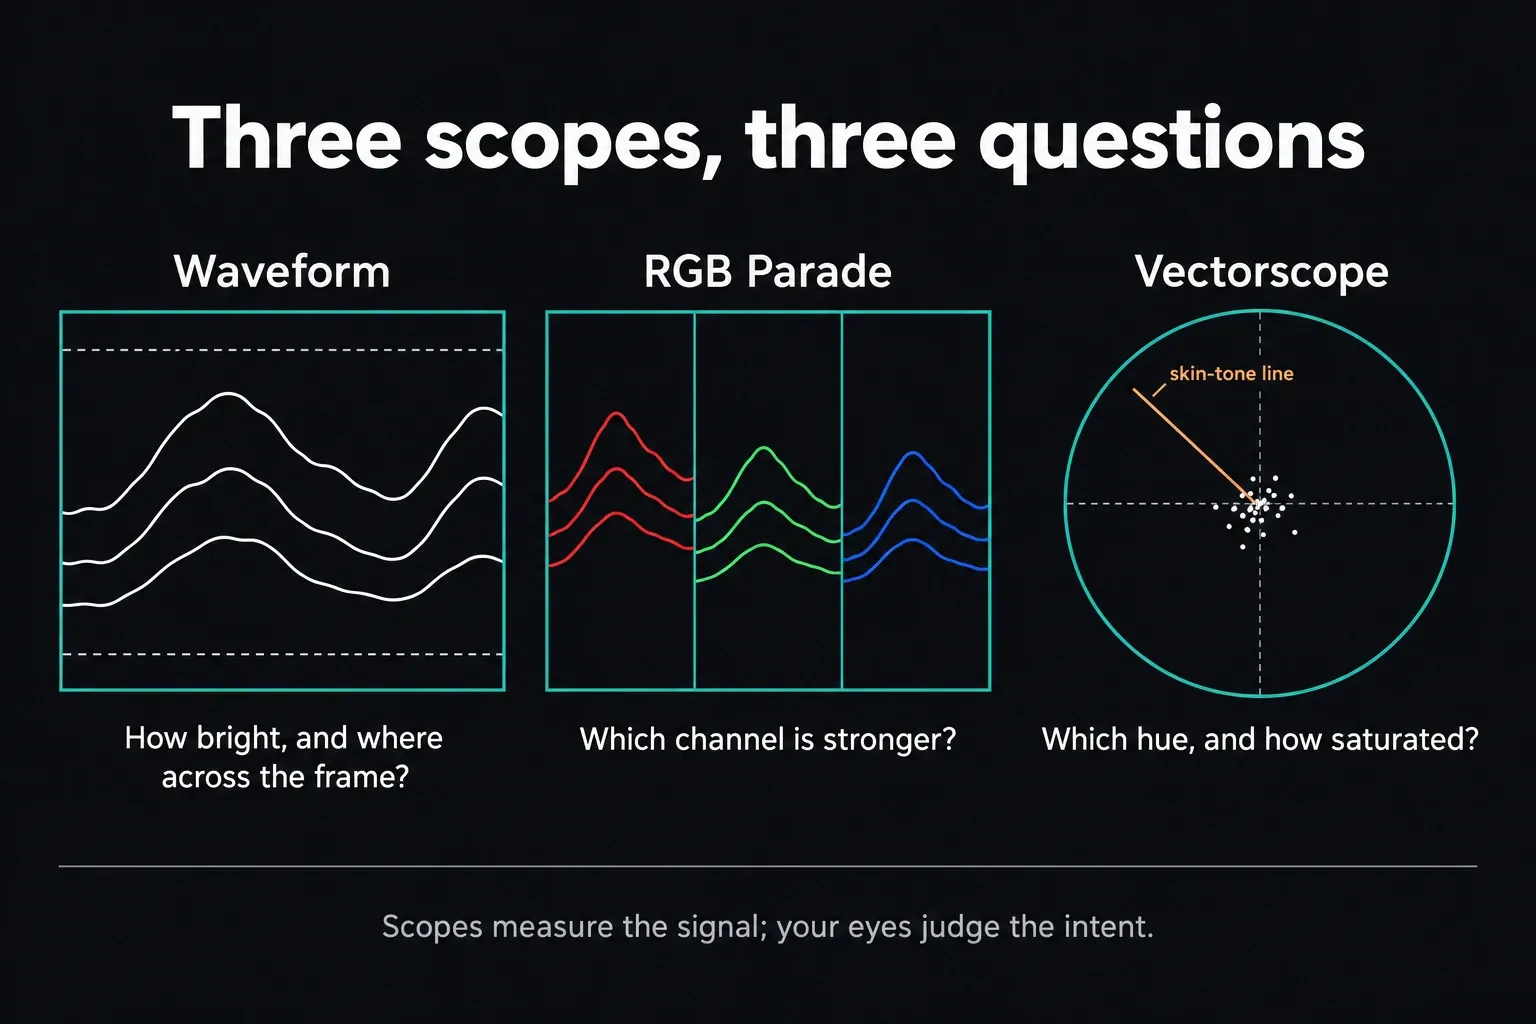
Scopes measure the image signal. They have no idea whether the scene is meant to be blue at night, warm at sunset or lit by a colored sign, so don't “neutralize” intentional lighting just because a graph looks uneven. The reverse holds too: your computer viewer isn't proof of accurate output. Dependable finishing needs a display path and monitor suited to the target. The detailed Resolve scopes guide goes through what each graph can and can't tell you.
Step 3: Build a Node Tree You Can Debug
One Corrector node can hold several Color page operations; Resolve doesn't demand one tool per node. Splitting responsibilities still pays off when order matters, or when you want to bypass one decision without switching off everything else.
A tidy beginner chain might use Balance, Contrast, Subject and Look. Those labels describe jobs, not fixed positions for every pipeline. A technical transform may sit somewhere else or be handled by RCM; a simple clip may need only two nodes; a complex shot may need branches and mixers.
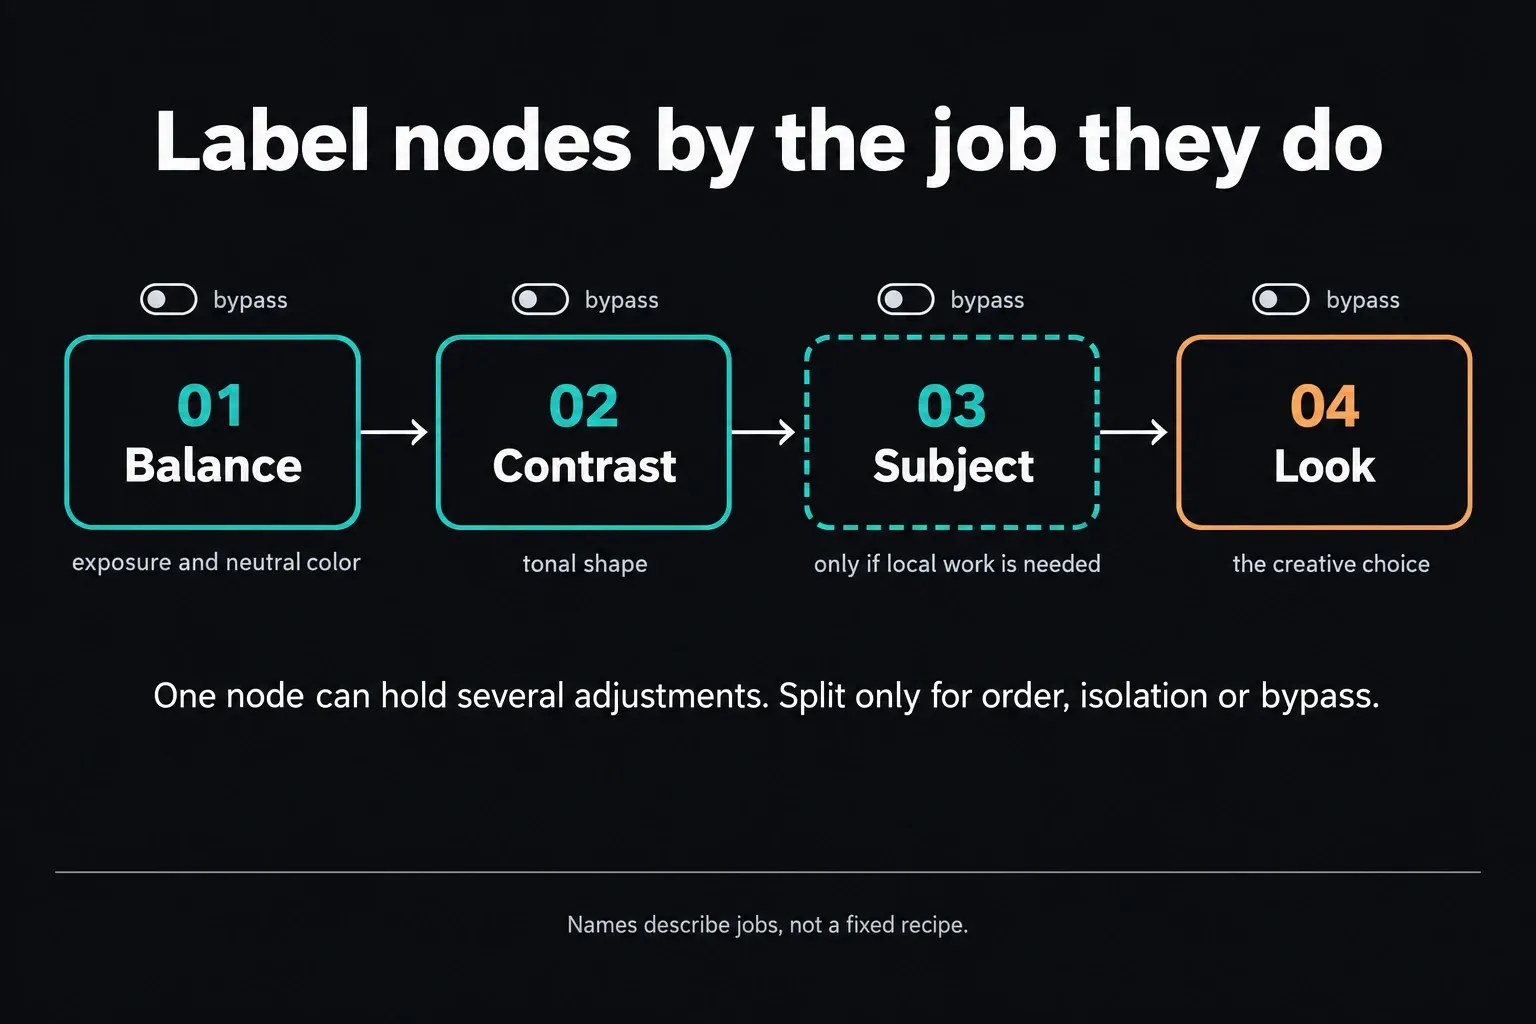
To add a serial node, choose Color > Nodes > Add Serial or press Option-S on a Mac. Right-click a node and choose Change Label to name it. Before you add another node, ask one question: does this change need its own order, isolation or bypass point? If it doesn't, the current node is probably enough.
Node order changes the image every downstream tool receives. A qualifier placed after a strong hue shift or saturation change samples different values than the same qualifier placed before it. A LUT also sees whatever the upstream nodes hand it. The Color nodes guide walks through serial, parallel, layer, Outside and Key Mixer behavior without forcing an artificial node count on you.
Step 4: Correct Exposure and Color Balance
Select the Primaries Wheels palette. Lift, Gamma and Gain aren't hard boxes for shadows, midtones and highlights; their tonal ranges overlap broadly. In practice:
- Lift alters the black point and perceived shadow density.
- Gamma redistributes much of the midrange between the black and white points.
- Gain alters the white point and highlight level.
- Offset moves the whole image more globally.
Make small moves and watch both the waveform and the picture. Set the black and white relationships the shot needs, then place the important midtones. A bright high-key interview shouldn't be graded like a night exterior just because both can be pushed to touch the same scope limits.
For a visible color cast, first ask whether anything in the scene should actually be neutral. Temperature and Tint can fix broad camera-balance errors; Offset or the color wheels can rebalance the image when you need a different kind of control. The RGB parade makes channel differences easier to see, but a blue sky and a warm lamp naturally produce unequal traces. Sample in context before you chase symmetry.
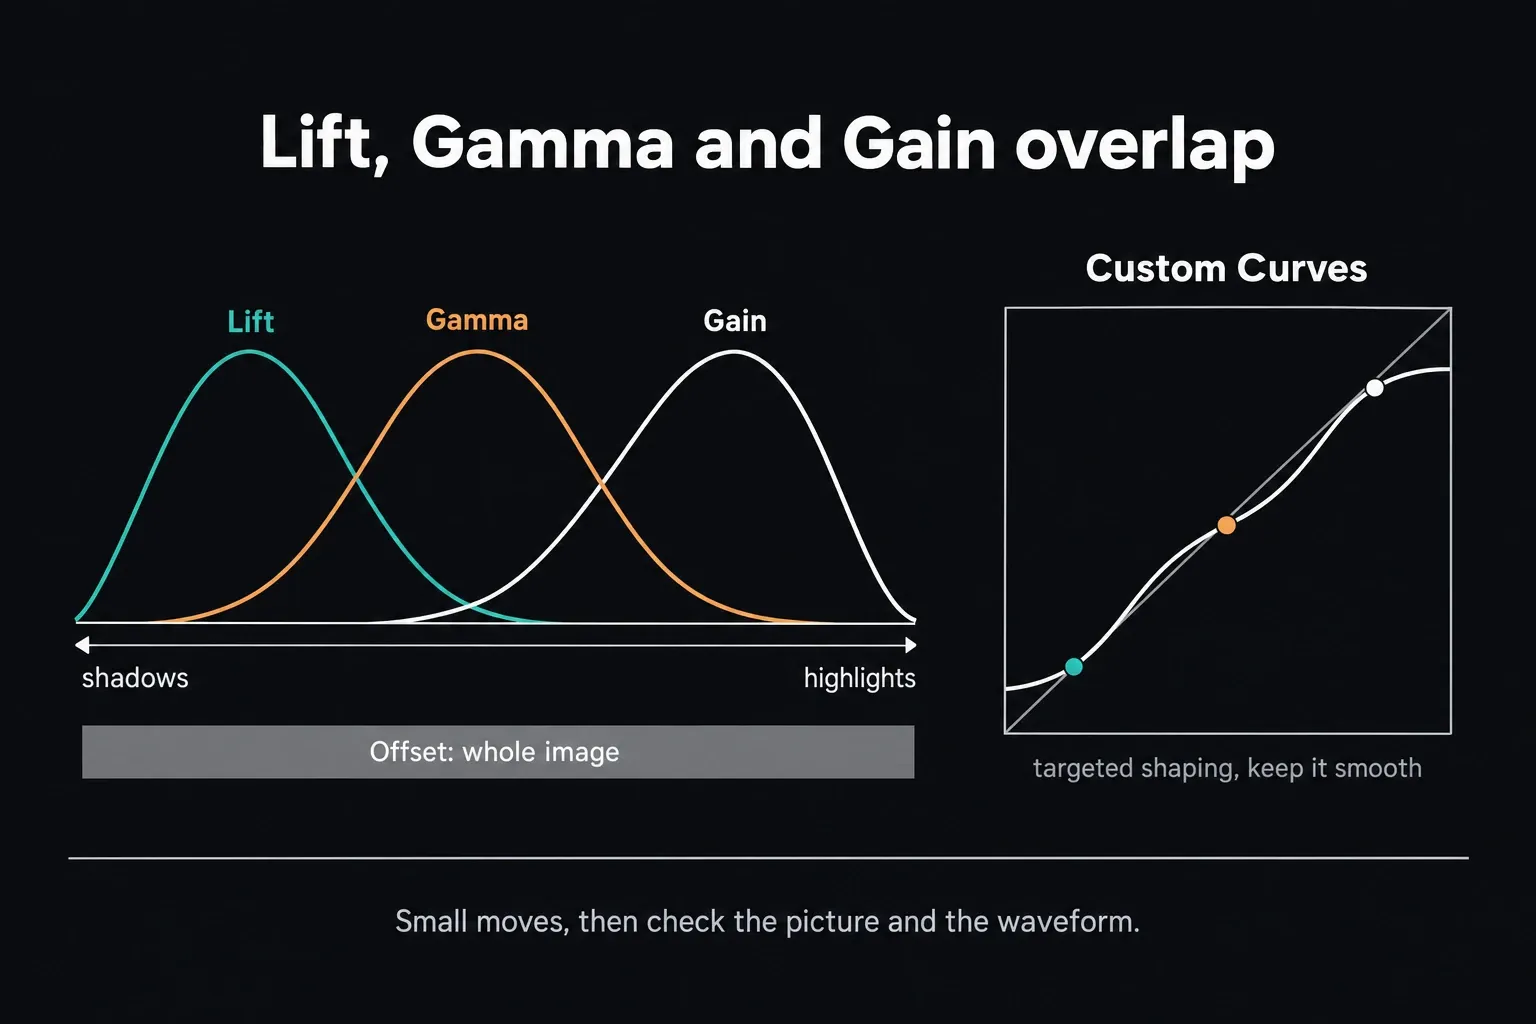
Contrast and Pivot shape the overall tonal relationship quickly. Custom Curves give you more targeted control: place points on purpose, keep the curve smooth, and don't put a kink in it just because S-curves are fashionable. More contrast isn't automatically more cinematic. If faces turn brittle, highlights flatten or shadows lose useful separation, back off and compare with the node bypassed. When the broad Primary Wheels overlap too much for the area you're adjusting, HDR Color Wheels give you adjustable tonal zones. Check the transitions between zones as you go.
Step 5: Match the Sequence Before Building the Look
Color grading isn't a collection of pretty still frames. Play the cut. Compare adjacent angles, coverage from different cameras and shots captured while the light was changing. A polished close-up that jumps against the wide shot is still a failed sequence.
Pick one representative reference shot for the scene. Correct it, then compare its neighbors by switching between clips or using Gallery stills and split-screen tools. Match the big relationships first: exposure, black level, white balance, contrast and saturation. Leave small skin or background refinements for later.
Copying a grade gives you a starting point, not an automatic match. Camera exposure, lens, lighting and framing can make identical settings behave differently. The copy color grades guide covers stills, middle-click workflows and ways to keep shared looks separate from clip corrections.
Step 6: Create the Look Without Losing the Correction
Once the scene holds together, decide what the look is doing for the story. A useful creative change has a direction you can put into words: cooler shadows with believable skin, softer highlight contrast, restrained saturation, a palette leaning toward a production design color, or cleaner commercial separation. When the change should follow one hue rather than the whole frame, use the Color Warper grid and keep an eye on neighboring colors and skin while you move it.
Put the look in a node or group you can bypass. Toggling it answers a better question than “does it look cinematic?”: does the look improve focus, mood and continuity without hiding technical problems? Play it in motion, and don't judge only the most flattering frame.
LUTs Need an Expected Input
A LUT maps input values to output values. It doesn't inspect the camera, guess the scene or repair a wrong color-space tag. A technical camera LUT expects a particular input encoding; a creative LUT may expect an image that's already normalized or managed in a specific way. Put it only where the node receives that expected input.
If RCM or a CST has already transformed the clip, adding another camera-to-Rec.709 LUT can give you an accidental double transform. If a LUT clips or crushes data, an upstream adjustment may change what goes into it, but that's no reason to guess the order. Read the LUT's documentation and check the pipeline. The Resolve LUT guide covers installation, node placement and blending in detail.
Step 7: Use Qualifiers and Power Windows Only Where Needed
Global tools are stable and fast. Reach for a secondary correction when one region needs different treatment: a face under mixed light, an oversaturated product color, a bright window stealing attention, or a background that should sit back.
The Qualifier builds a key from sampled color values. Turn on Highlight view and look at the matte itself instead of trusting the final picture. Go easy on the Matte Finesse controls; a perfectly white face surrounded by crawling holes, hair contamination and noisy edges won't survive playback.
A Power Window limits the correction to one area of the frame. Draw it larger and softer than the feature when you can, so the adjustment blends into the shot. For a moving subject, open the Tracker palette in Window mode, start on a frame with reliable detail, and track forward and reverse as needed.
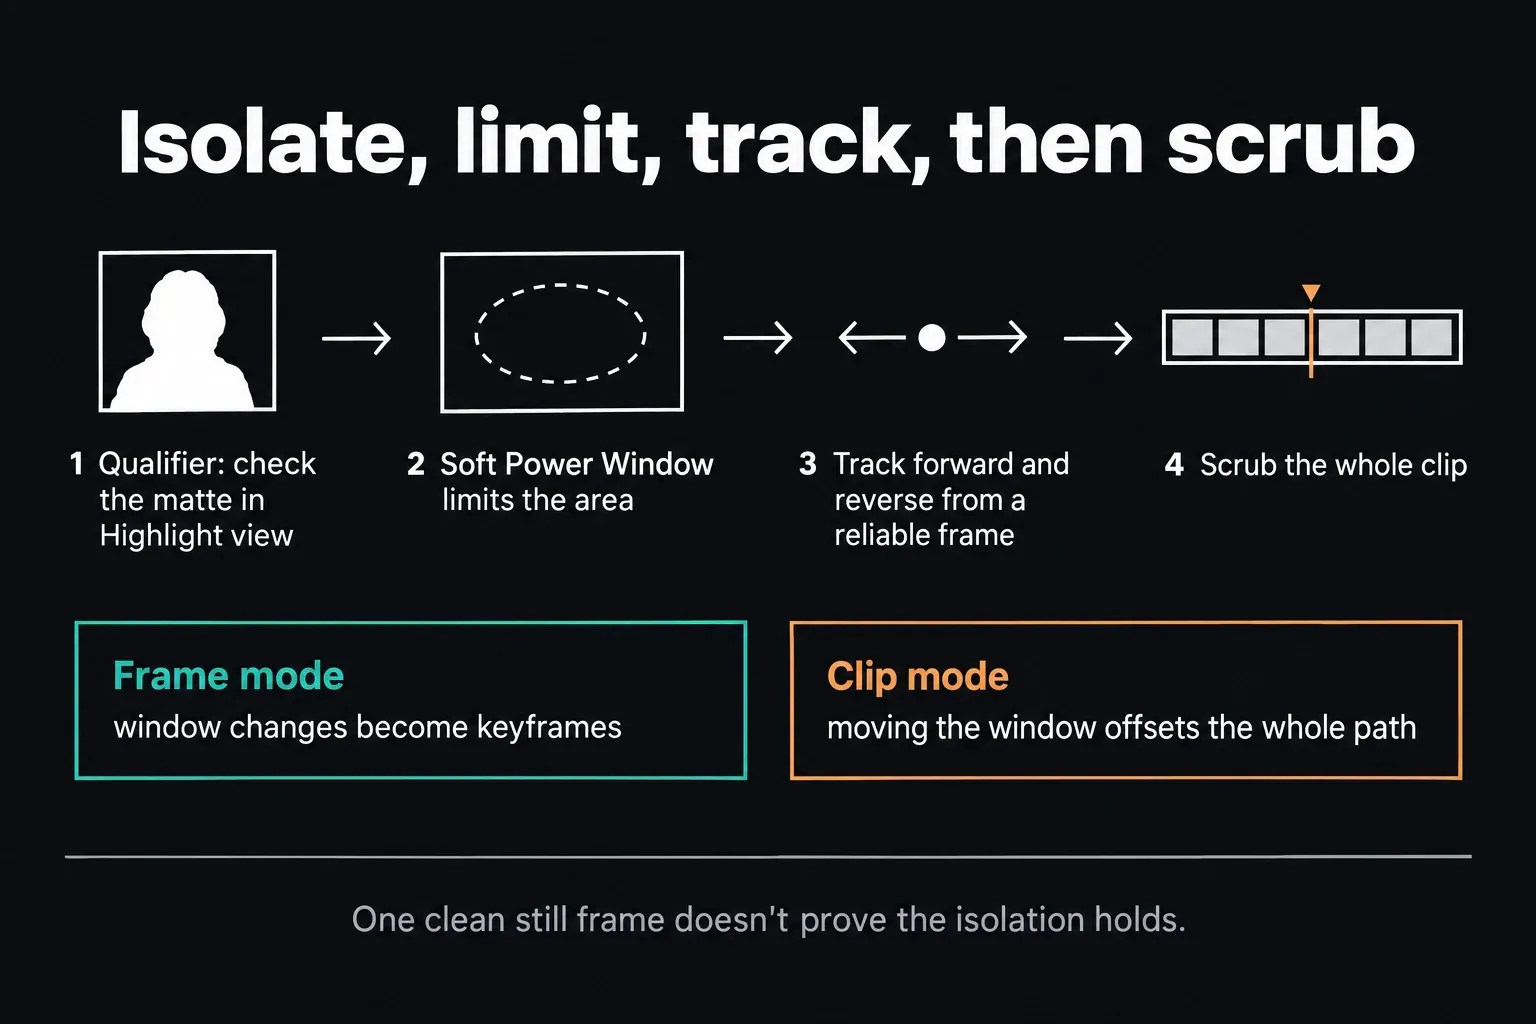
Then scrub the entire clip. Watch for occlusions, motion blur, turns, reframing and objects crossing the window. To correct specific frames, switch the Tracker to Frame mode and adjust the window; those changes become keyframes. In Clip mode, moving the window offsets the whole tracked path instead. You can also retrack a failed section, but the new tracking data overwrites what was there, so check the surrounding frames after either repair. A secondary that looks clean on one still but flashes at frame 87 isn't finished.
Step 8: Check Free vs Studio Without Blocking the Workflow
The free edition covers the core beginner Color page workflow: nodes, primary wheels, curves, standard scopes, qualifiers, Power Windows, tracking, LUT support and Resolve Color Management. You can learn and finish a conventional SDR grade without buying Studio.
Studio adds temporal and spatial noise reduction, Magic Mask, extra Resolve FX, HDR scopes with nit scales, and Dolby Vision/HDR10+ grading and rendering. Advanced Dolby Vision trim controls need a separate Dolby license, as the official Studio feature overview explains. Free Resolve already has HDR grading tools, so HDR isn't an all-or-nothing paywall. For feature-level decisions, use the Free vs Studio comparison.
If a tutorial depends on a Studio-only control, don't swap in a random LUT and hope. Solve the underlying task instead. Noise may call for cleaner acquisition or restrained temporal work elsewhere; an AI isolation can often be replaced with a qualifier and a tracked window; a licensed HDR deliverable needs a properly monitored HDR pipeline, and making the image brighter doesn't create one.
Step 9: Review and Export a Test
Compare one node at a time with its correction on and bypassed, then switch it back on before you check the next one. Make sure each label still describes what that node changes. Before rendering, confirm the intended grade is enabled. Play the whole scene at normal speed and check skin, neutrals, saturated colors, shadow detail, highlight roll-off and the transitions between shots. Watch for qualifiers that chatter and windows that give themselves away.
Check the project's Output color space and the export settings for the destination. A render can look different in another player because the display, the player and the metadata interpretation are all part of the viewing chain; that's no reason to flip gamma tags at random until one app looks right. Render a short representative section and judge it where it will actually be watched. The export guide covers the Deliver page on its own.
A Repeatable Beginner Checklist
- Identify source color space; don't grade around a wrong input tag.
- Choose one deliberate managed or manual transform strategy.
- Match the output color space to the delivery target.
- Open waveform, RGB parade and vectorscope.
- Correct exposure and broad balance before building the look.
- Use labeled nodes only where order, isolation or bypassing benefits.
- Match adjacent shots before polishing one frame.
- Verify every LUT's expected input and output role.
- Inspect qualifier mattes and track windows through the whole clip.
- Review the sequence in motion and render a short delivery test.
DaVinci Resolve Color Grading FAQ
What is the difference between color correction and color grading?
Color correction is the practical work of making exposure, balance and shot-to-shot relationships coherent. Color grading adds the creative shaping of mood and palette. Resolve uses the same Color page tools for both, so the split is a workflow convention rather than a hard software boundary.
Should I use Resolve Color Management or CST nodes?
Both are valid. Resolve Color Management handles input, timeline and output transforms at the project pipeline level, while CST nodes let you place transforms explicitly in a manual node workflow. Pick one deliberate design, tag sources correctly, and don't apply a second transform to media that's already normalized.
Do I need to convert log footage to Rec.709 before grading?
Not always. A color-managed project can transform log or RAW input into a chosen timeline working space and convert the grade to the output space later. A manual workflow can use CSTs or suitable technical LUTs. What matters is a known input, working and output path, not a universal Rec.709-first rule.
What scopes should a beginner use in DaVinci Resolve?
Start with the waveform for signal levels, the RGB parade for channel balance and the vectorscope for hue and saturation. Read them alongside the image: scopes measure the signal, but they don't know the intended lighting, mood or subject.
Should every correction have its own node?
No. One Corrector node can hold several operations. Split them into separate nodes when order matters, when an adjustment needs its own isolation, or when bypassing and revising it on its own will make the grade easier to debug.
Where should a LUT go in the node tree?
Put a LUT where its expected input matches the image reaching that node. A camera technical LUT, a display transform and a creative LUT may each need a different position. Don't add a camera-to-Rec.709 LUT after RCM or another transform has already normalized the clip.
Is the skin-tone line a target for every face?
No. Resolve's manual calls it a general guidepost for average skin-tone hue. Lighting, creative intent, makeup, reflections and the skin sample you picked all affect the trace. Treat the vectorscope as evidence, then judge the actual face and scene.
Can I color grade in the free version of DaVinci Resolve?
Yes. The free edition includes nodes, primaries, curves, standard scopes, qualifiers, Power Windows, tracking, LUTs, color management and HDR grading. Studio adds temporal and spatial noise reduction, Magic Mask, extra Resolve FX, HDR scopes with nit scales, and Dolby Vision/HDR10+ grading and rendering. Advanced Dolby Vision trim controls need a separate Dolby license.
