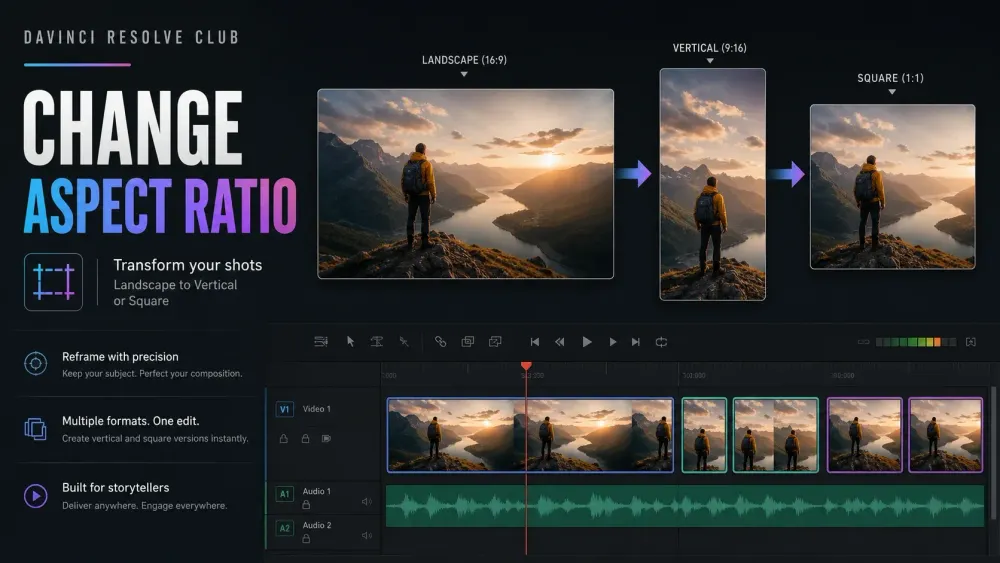
Timeline resolution sets the editing canvas; aspect ratio describes its shape, and output resolution sets the rendered pixel dimensions.
For a vertical or square version, duplicate the timeline, choose Use Custom Settings, set the target resolution, and reframe the clips there. Keep the Deliver page on Match timeline settings unless the delivery brief requires different output dimensions.
Pixel aspect ratio is a separate setting. Normal web and social delivery uses square pixels; change pixel aspect only when a documented anamorphic or broadcast workflow requires it. It isn't a shortcut for turning a 16:9 edit into 9:16.
Common Aspect Ratios and Timeline Resolutions
| Aspect ratio | Common resolution | Typical use |
|---|---|---|
| 16:9 | 1920 × 1080 or 3840 × 2160 | Standard landscape video |
| 9:16 | 1080 × 1920; 2160 × 3840 only when the destination and format support it | Vertical Shorts, Reels, and TikTok-style video |
| 1:1 | 1080 × 1080 | Square social posts |
| 4:5 | 1080 × 1350 | Portrait feed posts |
| 2.39:1 | Custom canvas or output blanking | Widescreen delivery or a letterboxed look |
These are practical starting points, not permanent platform laws. Check the destination’s current upload specification before delivery. Keep the project frame rate unchanged unless the brief also calls for a frame-rate conversion; changing shape and cadence at the same time creates an avoidable second problem.
Timeline Resolution, Output Resolution, and Clip Reframing
I separate aspect-ratio work into three layers:
- Timeline resolution defines the canvas you edit and judge.
- Output resolution and scaling can override or resize the finished canvas for delivery, but they don't choose the composition inside the frame.
- Clip transforms decide which part of each source shot appears inside the canvas.
For a dedicated vertical version, change the timeline and edit inside the vertical Viewer. Don't leave the timeline landscape and rely on Deliver to crop it at the end. You need to see missing faces, clipped titles, and empty areas while you still have time to fix them.
Checked September 5, 2026, the final DaVinci Resolve 21 Reference Manual documents individual timeline settings, Use Custom Settings, Use vertical resolution, mismatched-resolution rules, Inspector transforms, Smart Reframe, and sizing/blanking delivery behavior. Blackmagic’s official Edit page provides the current editing overview.
Change the Aspect Ratio of One Timeline
- Duplicate the original timeline. Right-click it in the Media Pool and choose Duplicate Timeline. Name the copy by destination, such as
Cut_Vertical_9x16. - Open Timeline Settings. Right-click the duplicated timeline and choose Timelines, then Timeline Settings.
- Choose custom controls. Select Use Custom Settings so this duplicated timeline can use its own Format, Monitoring, Output, and Color settings.
- Enter the target resolution. Set 1080 × 1920 for a common Full HD 9:16 canvas, 1080 × 1080 for square, or the dimensions required by the delivery brief. When a landscape preset only needs its axes swapped, enable Use vertical resolution.
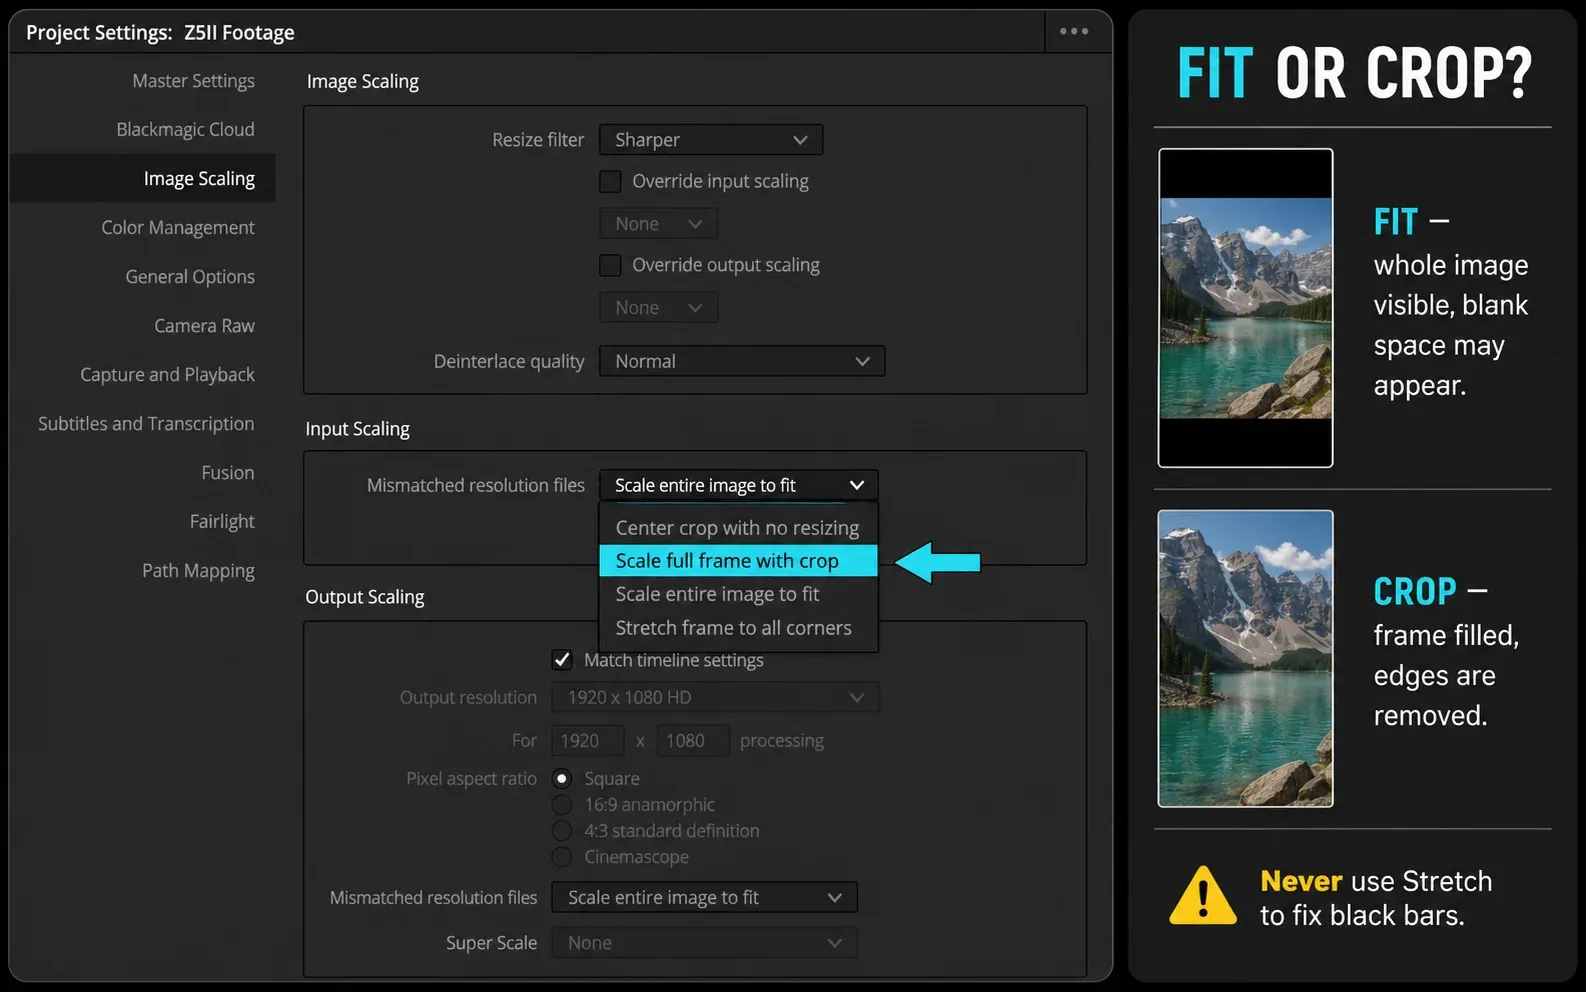
- Choose mismatched-resolution handling. Use Scale full frame with crop when the frame must be filled, or Scale entire image to fit when retaining every edge matters more than avoiding bars.
- Save and inspect the Viewer. Confirm that the Viewer itself has the new shape before reframing clips.
If you're starting a project that will only ever be vertical, you can set the project timeline resolution before editing.
If you already have a finished 16:9 cut, always work from a duplicate. That keeps the landscape master intact and lets the two versions diverge where a vertical edit needs a different shot, title, or cut point.
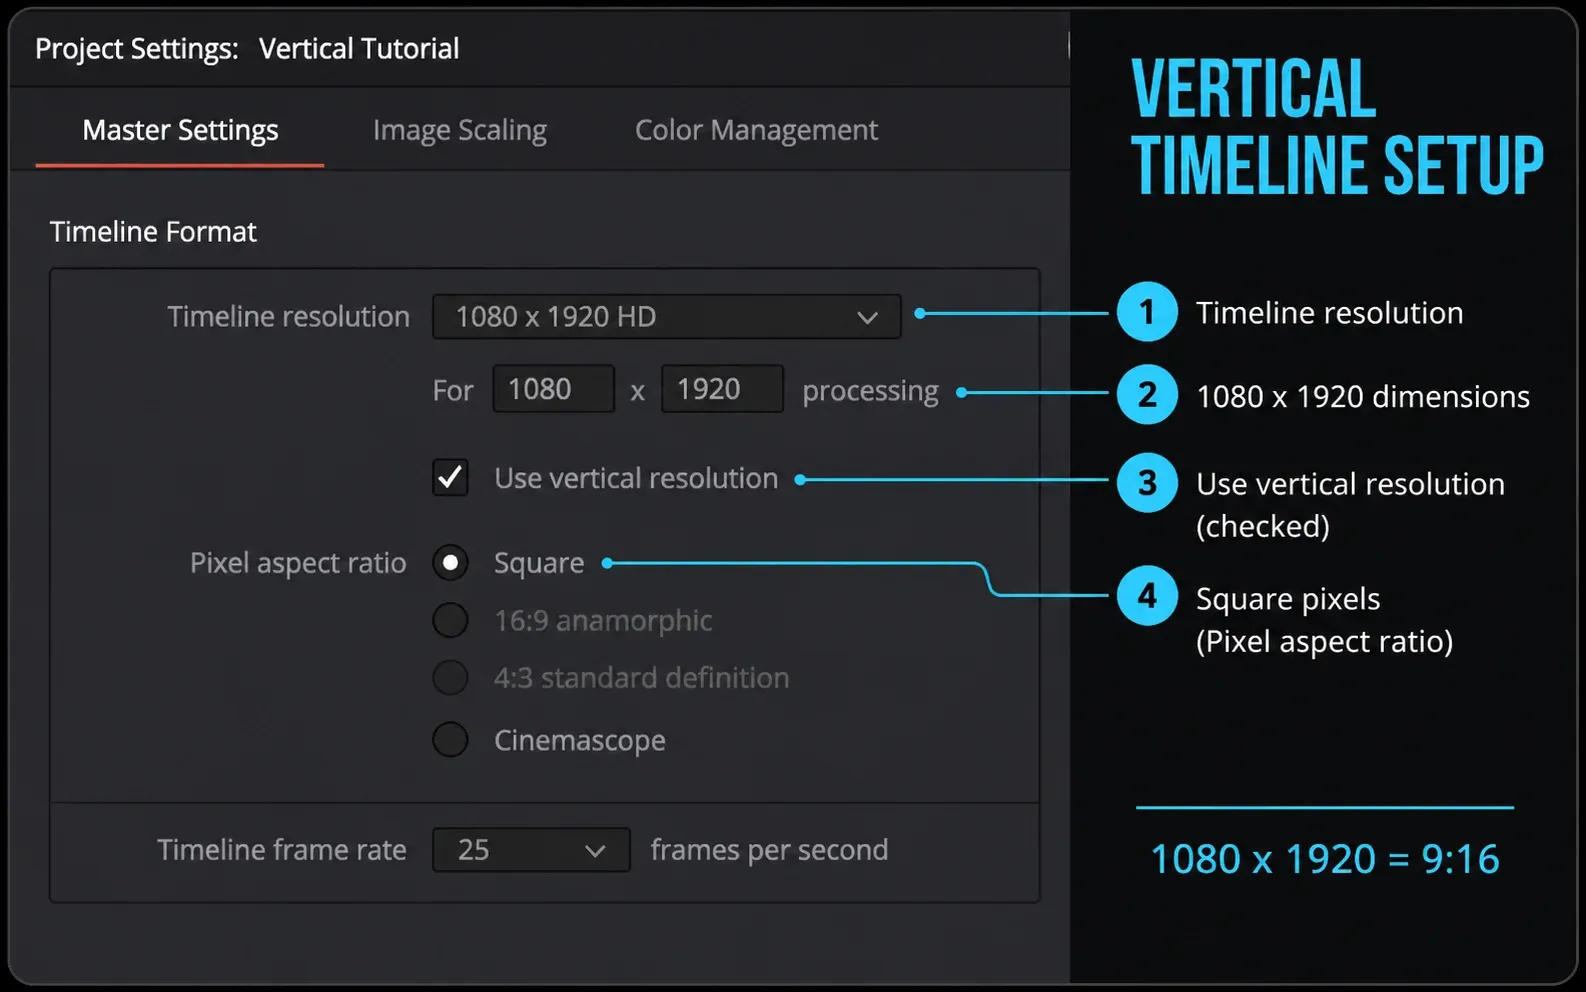
Resolve 20.1 and later also exposes a Timeline Resolution control in the Cut, Edit and Color viewers. The official Resolve 20.1 guide shows Full HD, Ultra HD, Portrait, Square and Custom Timeline Settings. Use that menu as a shortcut to the active timeline, then still review its mismatch rule and the queued Deliver resolution.
Choose Fit, Crop, or Manual Reframe
| Scaling choice | What Resolve does | Use it when |
|---|---|---|
| Scale entire image to fit | Shows the whole source and adds blank space when shapes differ | No edge can be lost |
| Scale full frame with crop | Fills the canvas and crops the excess dimension | A full-bleed frame matters |
| Center crop with no resizing | Keeps source scale and crops pixels outside the canvas | You need deliberate pixel-for-pixel framing |
| Stretch frame to all corners | Distorts width or height to fill the canvas | Usually only for a specific anamorphic workflow |
For wide footage in a vertical timeline, I normally start with full-frame crop and then reframe every shot that contains a face, product, text, or meaningful action. Stretching a normal shot isn't a shortcut; it changes people’s proportions and makes graphics look wrong.
Reframe Each Clip with Zoom and Position
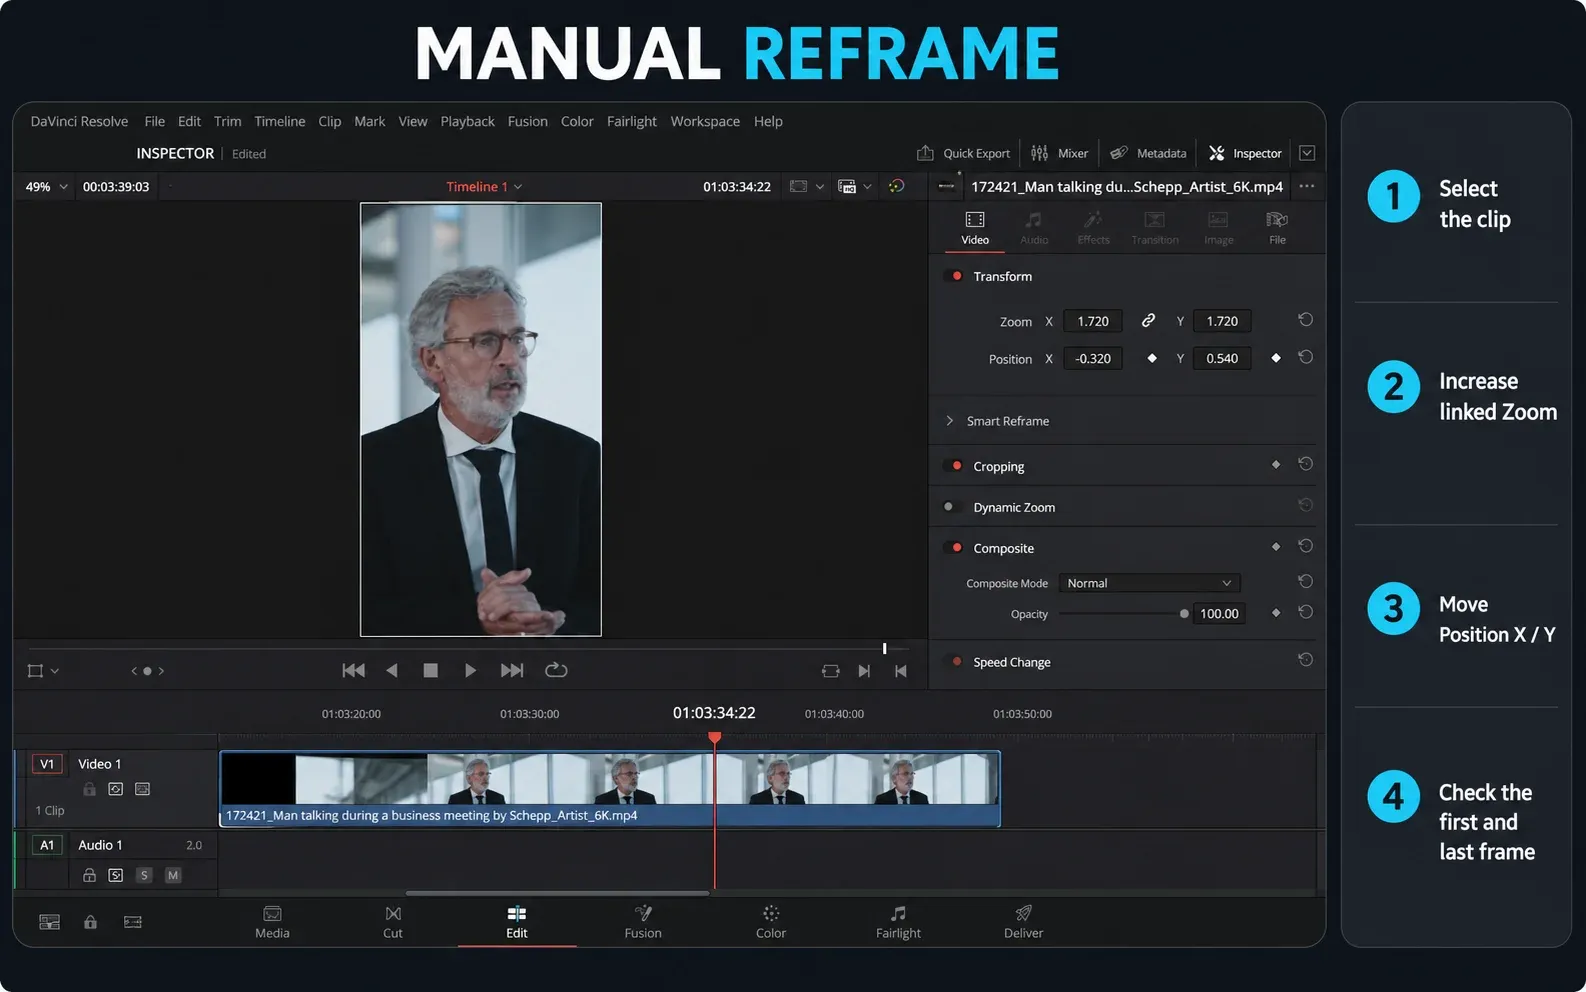
- Select a clip on the Edit timeline.
- Open Inspector, then Video, then Transform.
- Adjust Zoom until the image fills the new canvas without unwanted bars.
- Use Position X to choose which part of a wide shot remains visible. Use Position Y only when the vertical composition also needs to move.
- Play the entire clip. Its first frame cannot reveal every framing problem.
When several clips have genuinely similar composition, copy the transform and use Paste Attributes. Don't batch-paste one crop across an interview, a two-shot, a screen recording, and a product close-up. The DaVinci Resolve Inspector guide explains the transform controls and reset buttons if stacked adjustments become confusing.
Follow a Moving Subject with Keyframes
A centered crop works only while the subject stays near the center of the source. If a person walks across a landscape frame, place the playhead where the reframe should begin and enable the diamond beside Position. Move forward, change Position X to follow the action, and Resolve creates the next keyframe.
Use as few keyframes as the shot allows. A constant series of small corrections feels like a nervous camera operator. I place keyframes around real direction changes, then watch the move at normal speed and adjust easing if the crop accelerates abruptly.
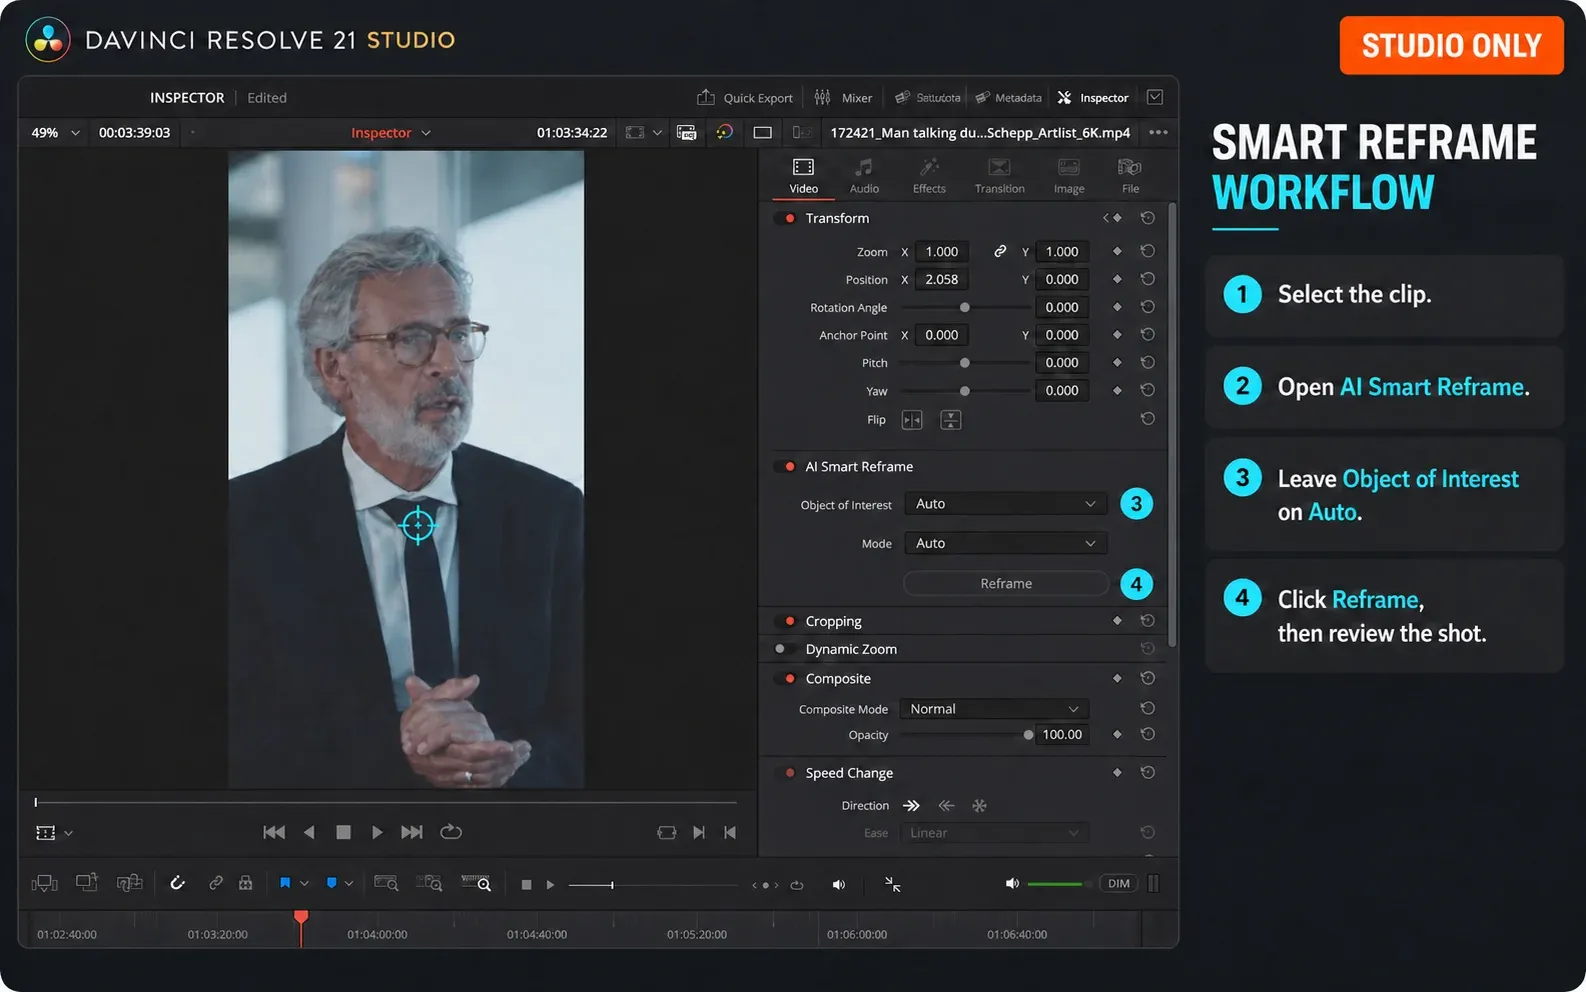
AI Smart Reframe is Studio-only in Resolve 21. It can make a useful first pass when converting 16:9 material to 9:16, but it still needs shot-by-shot review when subjects cross, graphics enter, or the important object isn't the automatically chosen target.
Cinematic Widescreen: Canvas or Output Blanking?
If you want a 2.39:1 letterboxed look inside a standard 16:9 delivery, use Timeline > Output Blanking. It masks the top and bottom of the image; it doesn't change the timeline or encoded file resolution.
A 1920 × 1080 timeline rendered at 1920 × 1080 remains a 1920 × 1080 file with the bars in the picture unless sizing and blanking output is disabled.
If the distributor requests a native wide raster with no encoded bars, set the actual timeline and Deliver dimensions to that specification. These are different deliverables.
In Deliver Advanced Settings, leave Disable sizing and blanking output off when approved sizing and blanking must be baked into the rendered picture; if it is on, those operations aren't rendered. Confirm this switch before queueing the final job.
Protect Titles, Captions, and Graphics
A frame can be technically 9:16 and still fail on a phone because interface controls cover the lower caption line or a username sits under an overlay. Keep critical text away from extreme edges, preview the file on the target device, and make a private test upload when the platform UI matters.
Check compound clips, Fusion compositions, and adjustment clips separately. Their transforms can react differently from the source clips after a canvas change. If an adjustment layer carries a global effect, review the boundaries using the adjustment clips guide before copying it to the vertical version.
Match the Deliver Page to the New Timeline
Open Deliver and verify the queued job as well as the active timeline.
The resolution should match the intended canvas, the correct vertical or square timeline should be open, and frame rate should match the edit unless the delivery brief separately requires conversion. Recheck Disable sizing and blanking output: off bakes approved sizing/blanking; on omits it.
Render a short representative section first. Inspect the file’s pixel dimensions, watch it outside Resolve, and check that no black bars were added by an unintended scaling option. Then use the Resolve export settings guide for codec and bitrate decisions.
For a complete render walkthrough, the video export guide covers the Render Queue and final file checks.
Resolve Free vs Studio
DaVinci Resolve Free can create custom vertical, square, landscape, and widescreen timelines. It also includes manual Zoom, Position, cropping, keyframes, scaling rules, and ordinary exports within the free version’s format limits.
Studio isn't required for a 9:16 timeline.
Resolve Free includes custom vertical, square and widescreen canvases plus manual Zoom, Position, crop and keyframes. Blackmagic's current Free specification promises resolutions as high as Ultra HD 3840 × 2160 at up to 60 fps, but it does not explicitly guarantee 2160 × 3840 vertical.
Verify that exact workflow before committing to it, and use Studio when UHD vertical delivery is a hard requirement.
Fix Aspect-Ratio Problems
Black bars appear after changing resolution
The current mismatch rule is preserving the complete source frame. Choose Scale full frame with crop, or zoom and reposition that clip manually if the frame must be filled.
The subject is cut off in vertical video
Select the clip and change Position X in the Inspector. Add position keyframes if the subject moves. An automatic center crop can't preserve off-center action.
The export is still landscape
Confirm that the correct timeline is active and that the queued render job shows vertical dimensions. A queue can retain an earlier job made from the landscape timeline.
The image looks soft
Check the source resolution and how far you zoomed. Avoid scaling the same image at the clip, timeline, and output layers without a reason. Judge sharpness in the rendered file at its actual display size.
The timeline settings are locked
Choose Use Custom Settings in the individual Timeline Settings window. If the resolution controls still don't respond, confirm you opened the duplicated timeline’s settings rather than changing project-wide Master Settings.
Captions are covered on the phone
Move them into a conservative safe area and test the final upload interface. Resolve’s clean Viewer can't predict every platform overlay.
My Final Reframe Check
I watch the vertical or square timeline full-screen without the Inspector open. On every cut I check faces, hands, products, subtitles, lower thirds, and motion entering from the cropped edges. Then I compare the rendered pixel dimensions with the destination requirement and watch the file on a phone.
A vertical version is a new edit, not an export checkbox. A duplicated timeline plus shot-level framing takes longer than a blind center crop, but it's the difference between a recycled landscape video and a version that actually belongs on a vertical screen.
If the destination is YouTube, finish with the current YouTube export settings.
For the broader sequence from timeline setup through delivery, follow the task-first DaVinci Resolve tutorial roadmap.
DaVinci Resolve Aspect Ratio FAQ
What resolution should I use for 9:16 video?
1080 × 1920 is a common Full HD 9:16 canvas. Blackmagic publishes Resolve Free for resolutions as high as Ultra HD 3840 × 2160 at up to 60 fps, but doesn't explicitly guarantee 2160 × 3840 vertical.
Verify that exact workflow before committing to it, and use Studio when UHD vertical delivery is a hard requirement.
How do I make a square video in Resolve?
Duplicate the timeline, open Timeline Settings, choose Use Custom Settings, and set 1080 × 1080. Then choose fit, crop, or manual reframe for the clips and match the Deliver resolution.
Why do I get black bars after changing aspect ratio?
Scale entire image to fit preserves the whole source and adds unused space when the shapes differ. Use full-frame crop or a manual Zoom and Position adjustment to fill the canvas.
Can I keep vertical and landscape versions in one project?
Yes. Give each version its own timeline and custom timeline settings. This protects the original composition and keeps their edits and exports separate.
Does changing aspect ratio reduce quality?
The new shape doesn't automatically reduce quality. Heavy zooming, insufficient source resolution, stacked scaling, and another platform encode can make the final image softer.
Do I need Resolve Studio for vertical video?
No. Custom vertical timelines and manual reframing work in Resolve Free. Smart Reframe requires Studio; availability of other AI tools varies by feature and platform.
