Relight is a Studio-only Resolve FX on the Color page that adds a virtual light to a shot that's already been filmed. Drag it from the Resolve FX Refine group of the Open FX library onto a corrector node, place the light with its handles in the Viewer, then raise Gain in that same node. The effect only maps where the light falls, so the picture doesn't change until you grade. For real work, split it into two nodes: one builds the Surface Map with Node Cache on, the other holds the light, and dragging the light stays fast.
Relight runs in DaVinci Resolve Studio, the $295 one-time license, on Windows, macOS and Linux. On the iPad it needs the Studio in-app upgrade and an iPad Pro with 16 GB of memory. The free edition lets you apply it and stamps a watermark on the result. It reads the shapes of faces and objects and shades them, but it can't cast shadows or work out which object stands in front of another.
I'd build the two-node version from the first light, even for a quick fix, because the analysis is the slow part and you'll move the light many times before it sits right.
What Relight does and what it can't do
The Relight section of the DaVinci Resolve 21.1 manual describes an effect that works differently from a Power Window. A window keeps a fixed shape on screen. Relight analyzes the people and objects in the frame, builds a Surface Map of which way each surface faces, and reflects a light off that map, so the light follows a cheekbone or the curve of a car door and fades into the shadow side. Blackmagic lists three jobs for it: the light you wish you'd had on set, a stronger existing light to match another shot, and more believable day-for-night.
The same page sets the limits. Relight gives an illusion of depth, but it doesn't calculate how objects relate in 3D, shapes can't cast shadows and it produces no depth information. A light that should throw a nose shadow across a cheek won't, so it works best as a fill, a kicker or a warm wash on a subject who is already lit reasonably well. Relight arrived with DaVinci Resolve 18.5, and it's built on the DaVinci Neural Engine.
- Windows, Mac and Linux: DaVinci Resolve Studio. The DaVinci Resolve Studio 21 features list marks Relight as a Studio feature on desktop.
- Free edition: the DaVinci Resolve 20 Beginners Guide says Studio-only Resolve FX can be applied in the free version to test them, with a watermark. The free version feature list covers what else stays locked.
- iPad with an M-series chip: Studio through the in-app purchase, and Relight needs an iPad Pro with 16 GB of memory. The DaVinci Resolve for iPad guide covers the rest of that edition.
- iPad with an A-series chip: no Relight, with or without Studio.
Quick start: one node, one light
- Open the Open FX panel. On the Color page, click Open FX in the toolbar at the top. Relight sits in the Resolve FX Refine group of the Library, or type its name into the search field.
- Drop it on a node. Drag Relight onto an empty corrector node, or into empty space in the Node Editor to create a new node for it. The manual's Open FX chapter allows one plugin per node, and the node shows an FX badge.
- Pick the light type. In the Settings list, choose Directional, Point Source or Spotlight. The next section explains which suits what.
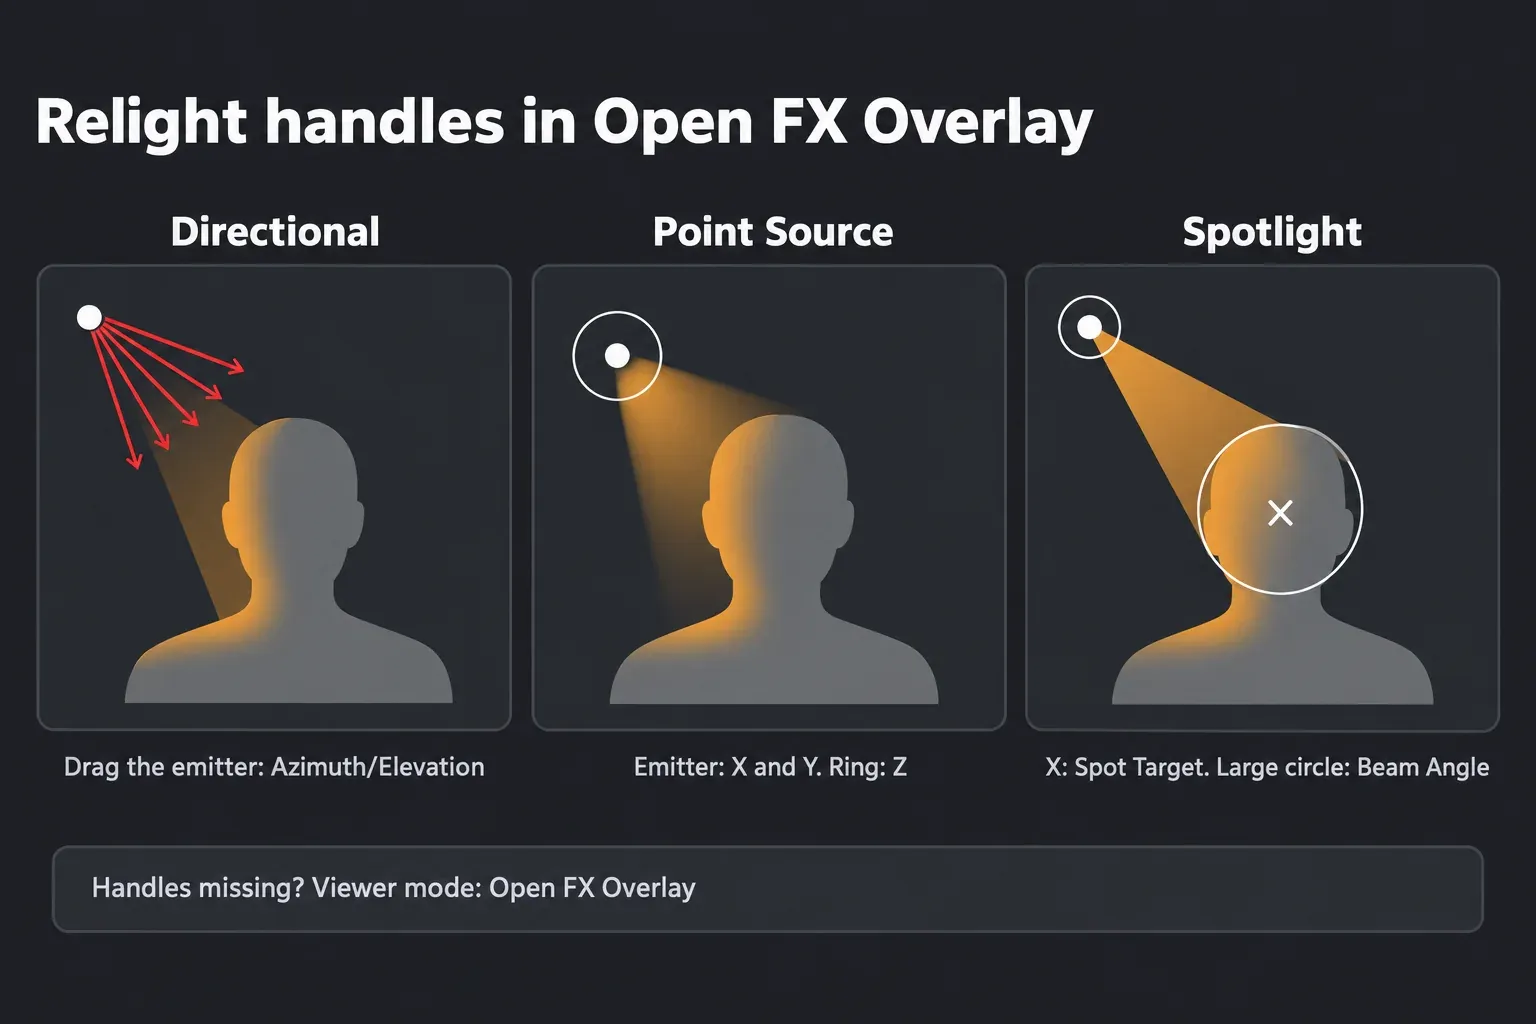
- Place the light. Selecting the node switches the Viewer to Open FX Overlay on its own, so the light's handles appear on the image. Drag them until the light comes from the side you want. If the handles are missing, choose Open FX Overlay from the mode menu at the lower left of the Viewer.
- Check the map. Turn on Relighting Map Preview to see the light as a grayscale map, then turn it off again.
- Grade the light. With the preview off, raise Gain on the Primaries wheels of this node, or push the Gain wheel toward a color. Gamma and saturation changes often help too.
Step six is where most first attempts stall. The manual's Using Relight section explains that the light map lives in the node's Alpha channel, ready for the grading tools, so the image looks untouched until you grade it. The Brightness slider in Relight's own settings doesn't brighten anything either: it scales the grade you've made in that node. Once the light is in place, the color grading walkthrough covers matching it to the rest of the scene.
The fast setup: a cached Surface Map node and a Lighting node
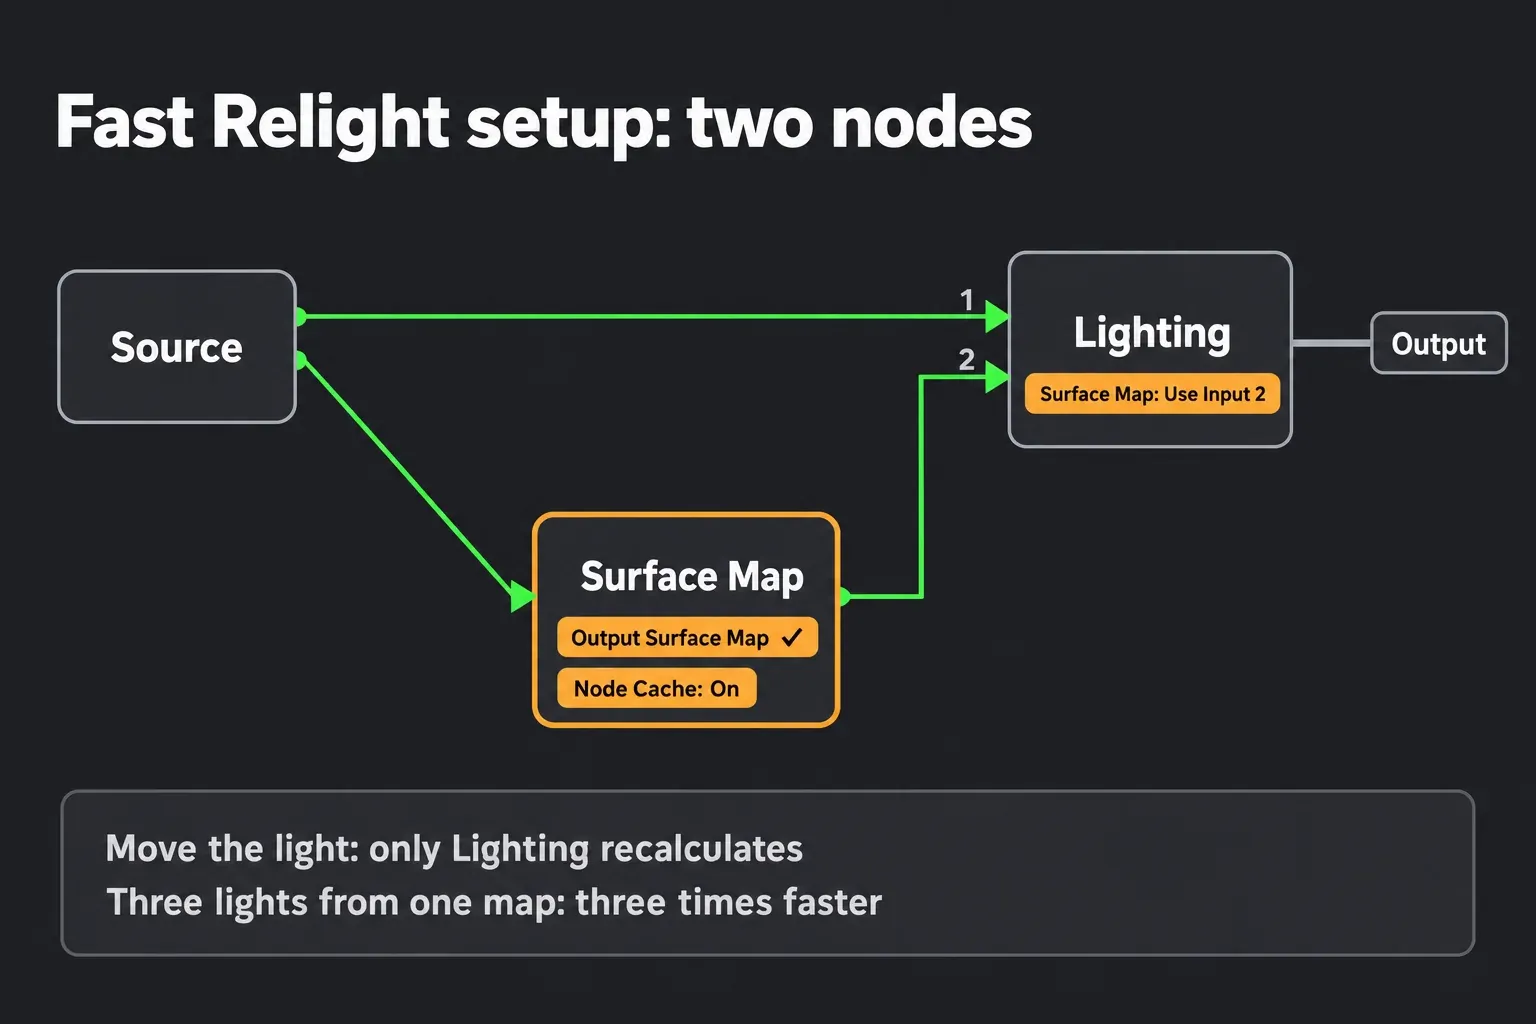
The manual's setup notes put the speed problem plainly. Building the Surface Map is very computationally intensive, while lighting an existing map is comparatively very fast. One Relight node does both, so every drag of the light reruns the analysis. Splitting the work keeps the map cached in one node and leaves only the fast part for the node you keep adjusting. The wiring on the next manual page looks like this:
- Add two nodes and apply Relight to each. Label the first one Surface Map and the second Lighting so the tree stays readable.
- Feed both from the source. Connect the source, or the node before them, to the top green RGB input of both Relight nodes.
- Turn the first node into an analyzer. In the Surface Map node, check Output Surface Map. The node switches to analysis-only mode and its light controls disappear. Its Viewer output turns into a multicolored map.
- Cache the map. Right-click the Surface Map node and choose Node Cache > On. Resolve then renders the map in the background, and the render cache guide explains where that cache lives and when to clear it.
- Connect the map to the light. Drag the Surface Map node's RGB output to the bottom green input, the second RGB input, of the Lighting node.
- Switch the Lighting node to the cached map. In the Lighting node, change Surface Map from Use Internal to Use Input 2. Place and grade the light here.
Step six is the trap in this setup. Left on Use Internal, the Lighting node keeps building its own map and the split buys nothing. The same map can feed more Lighting nodes, and the manual says three lights reusing one analysis run three times faster than three separate analyses. If the inputs and outputs are new to you, the node types guide explains serial nodes and the extra RGB and Alpha inputs.
Pick a light type and place it
Each light type has its own handles in the Viewer, described in the manual's on-screen controls section. They only show while the Viewer is in Open FX Overlay mode.
| Light type | What it emits | Handles in the Viewer | Position controls |
|---|---|---|---|
| Directional | Light from one direction at an infinite distance | Drag the emitter with red rays to set the angle | Azimuth/Elevation XY |
| Point Source | Light from a central point | Move the emitter for X and Y, and the circle for Z | Light Source XYZ, Source Follows FX Tracker |
| Spotlight | A point source aimed into a cone | The emitter and Z circle, plus an X for the target and a large circle for the cone angle | Light Source XYZ, Spot Target XY, both Follows FX Tracker options, Beam Angle |
For sunlight, a window or any source well outside the frame, I'd start with Directional, because it has no distance to set and two handles cover everything. Point Source and Spotlight earn their extra controls when the light has to sit near the subject, like a lamp in the scene, or follow someone through the shot.
The Relight settings reference lists two sets of names for the light's strength and falloff. Your Settings panel shows one set or the other, and they do the same jobs:
| Job | Control names | What it changes |
|---|---|---|
| Strength | Brightness | Scales the grade you make in the node; on its own it adds no brightness |
| Edge of the light | Softness or Contrast | How harsh or gentle the transition from light to dark is; Softness does it by changing the size of the emitter |
| Falloff | Distance Falloff or Reach | How fast reflections dim with distance from the light |
| Shine | Glossiness and Specularity | A metallic sheen on reflective surfaces, and how shiny that sheen looks |
| Shadow fill | Shadow Softness | How far the light reaches into shadows through ambient reflections |
| Spotlight cone | Beam Angle and Edge Softness | The width of the cone and the softness of its edge |
Keep the light on one person with Magic Mask
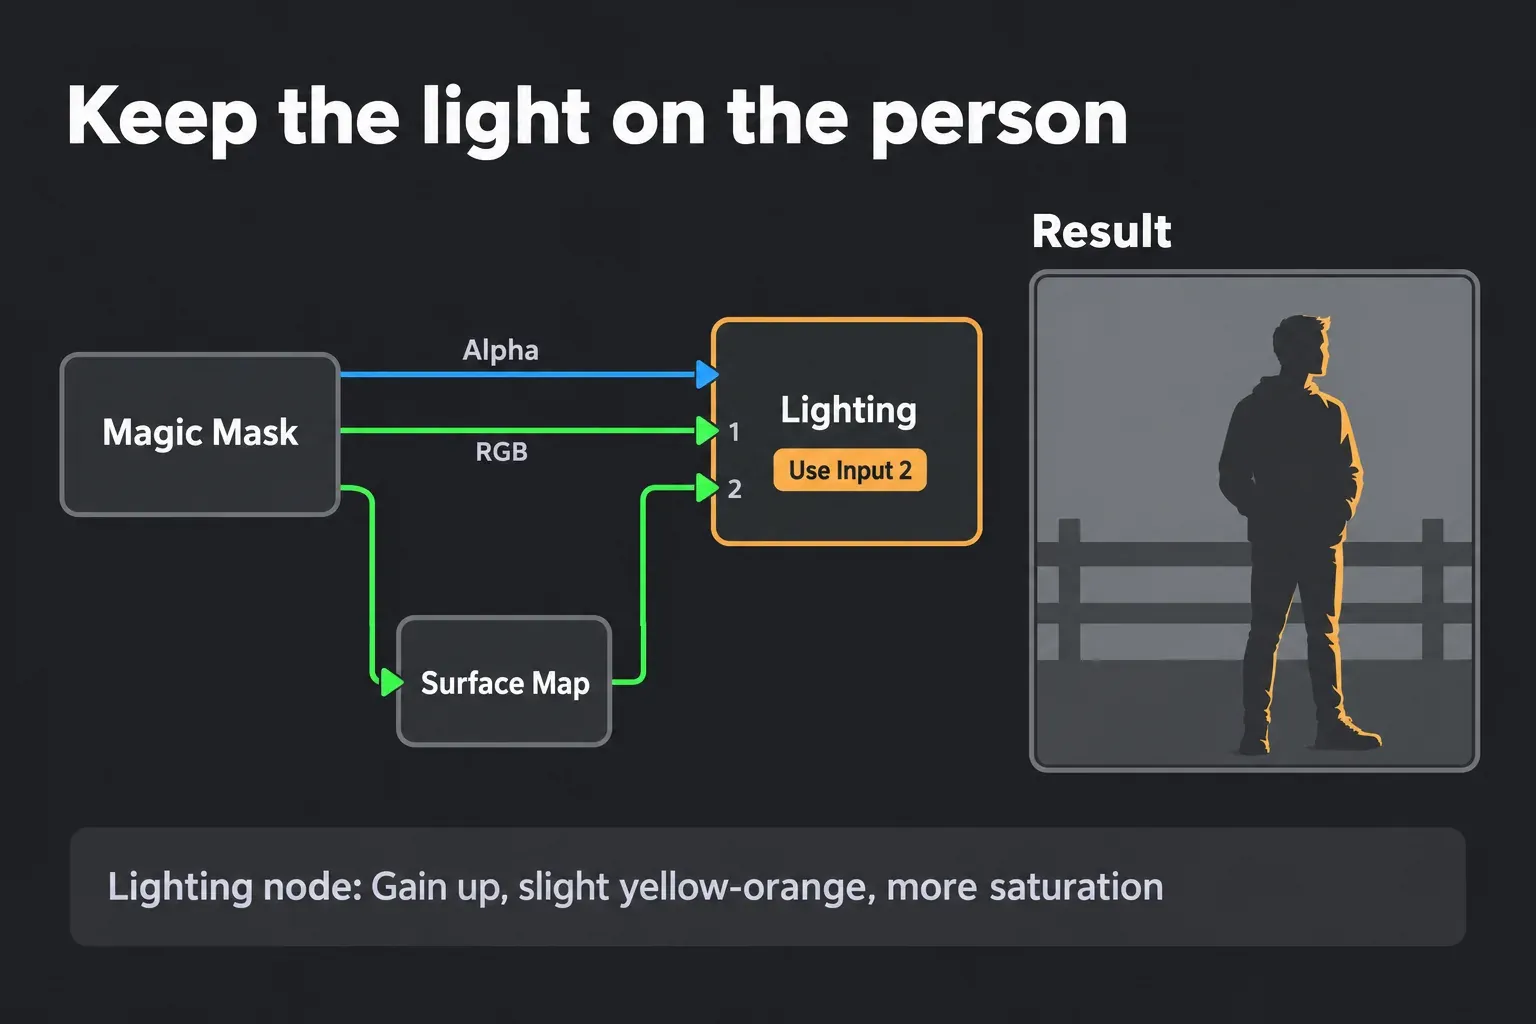
A light that spills onto the wall behind your subject gives the trick away. Relight accepts Power Windows, qualifiers and masks on either node, or a mask from a separate node through the top blue Alpha input. The manual's worked example on pages 3630 to 3632 adds a sunbeam to a model standing by a fence on an overcast day:
- Isolate the subject. Build a Magic Mask on the person in its own node. The Magic Mask guide covers the strokes and tracking.
- Feed both Relight nodes. Connect the Magic Mask node's RGB output to the top RGB input of both the Surface Map and the Lighting node, and its Alpha output to the Lighting node's Alpha input.
- Set up the pair. Surface Map node on Use Internal with Output Surface Map checked and Node Cache on, its RGB output into the bottom RGB input of the Lighting node, which is set to Use Input 2.
- Aim a Directional light. Use Relighting Map Preview and the on-screen handles to bring the light in from the side the sun should come from.
- Grade the beam. Turn the preview off, raise Gain on the Primaries wheels, tint it slightly toward yellow and orange, and add saturation for a golden-hour feel.
Day-for-night with Relight
The manual's route for day-for-night inverts the Alpha so the grade darkens the whole scene except the lit areas, which keep the original exposure and play the part of the light. I'd build it with a separate darkening node instead: grade the night look in a node that feeds the Lighting node's top RGB input, keep the Surface Map node fed from the original source, and bring the light back with Gain in the Lighting node. Each job then sits in its own node, so you can lower the night level later without touching the light. A cool tint and lower saturation in the darkening node, plus a warmer light, sells the contrast between moonlight and a lamp.
Make the light follow a moving subject
Point Source and Spotlight can attach to Resolve's FX tracker through Source Follows FX Tracker and Spot Follows FX Tracker. Directional has no position to track, only an angle. Per the manual's FX tracking steps:
- Select the Lighting node. Tracking happens on the node that carries the effect.
- Open the FX tracker. Open the Tracker palette and click the FX icon at its upper right.
- Add a point. Click Add Tracker Point at the bottom left of the palette and drag its crosshairs onto a high-contrast detail on the subject.
- Track. Click Track Forward, and track backward too if the shot starts mid-move.
- Attach the light. Check Source Follows FX Tracker, and Spot Follows FX Tracker for a spotlight target, then offset the light from the tracked point.
I wouldn't hand-keyframe a light on a walking subject when the tracker can carry it, because a track updates the position on every frame while keyframes only interpolate between the frames you set. Keyframes still suit the rest of Relight, since most of its controls are keyframable: fading Brightness up as a door opens is a two-keyframe job, covered in the keyframes and curve editor guide.
Relight on the Fusion page
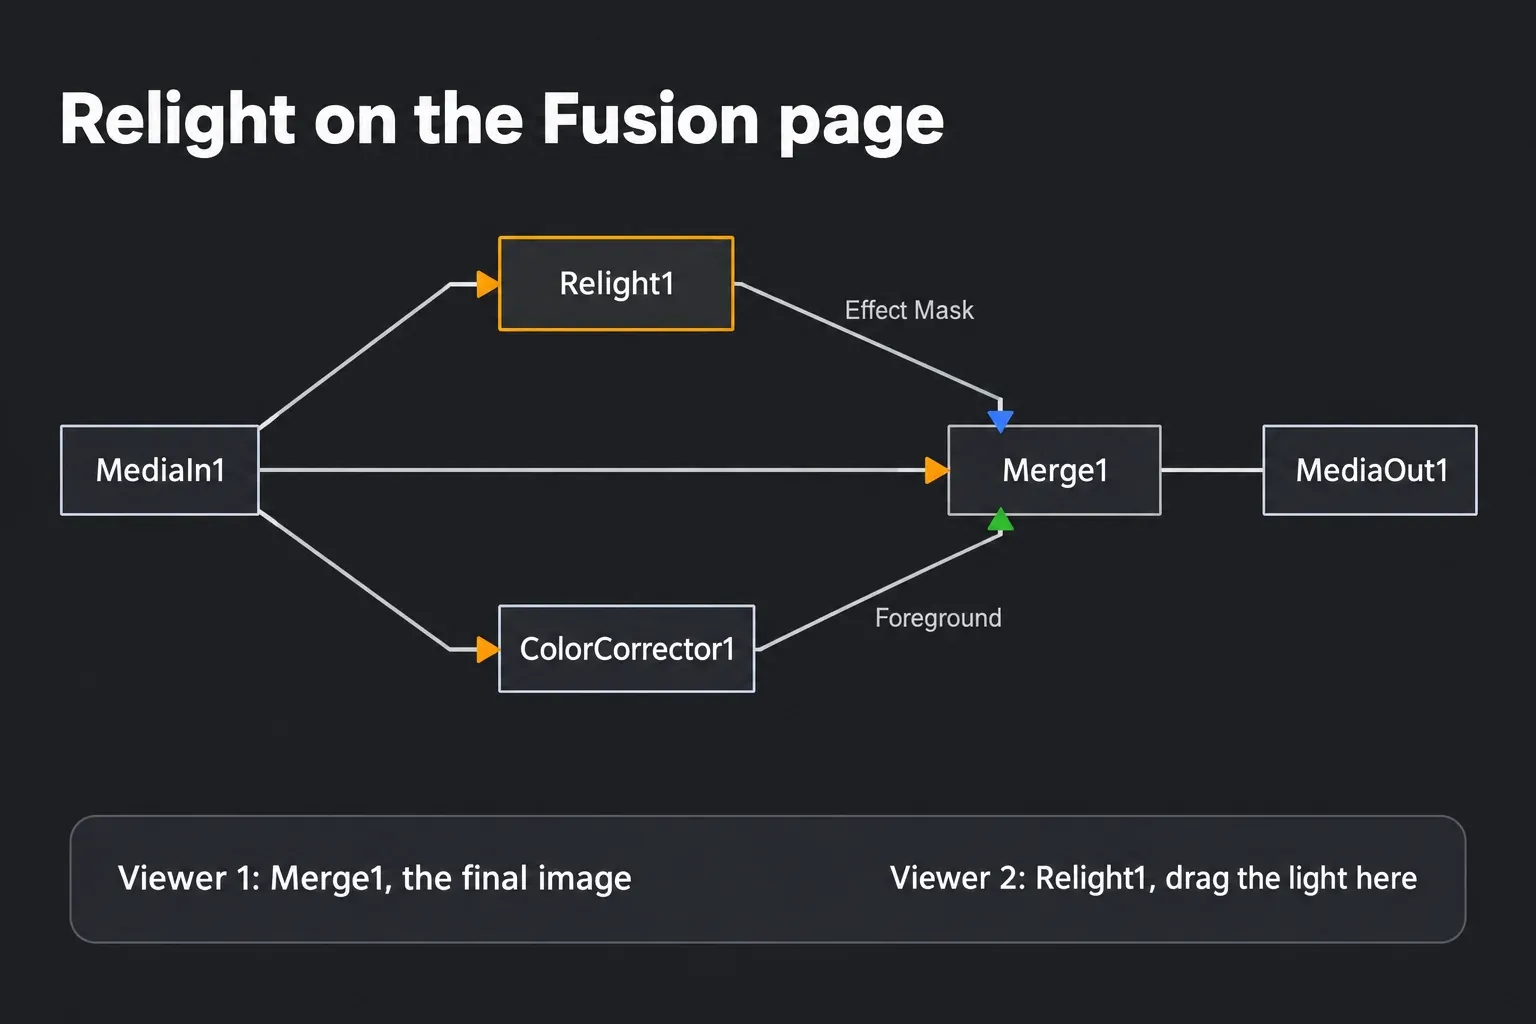
Fusion has its own Relight node with the same analysis and the same limits. The Fusion Relight [RLT] reference lists three inputs: the orange Input for the image, a blue Effect Mask, and a green Normals input for an external normal map. Its basic setup, from the next manual page:
- Add the nodes. Add a Relight node, a ColorCorrector (or another color effect) and a Merge.
- Feed them all. Connect MediaIn to the orange inputs of Relight, ColorCorrector and Merge.
- Build the composite. Connect the ColorCorrector output to the Merge green foreground input, and the Relight output to the Merge blue effect mask.
- Split the viewers. Show the Merge in Viewer 1 for the final result, and Relight in Viewer 2, where you drag the light.
The ColorCorrector does the brightening here, and Relight decides where it shows through the Merge mask. The Fusion beginners guide explains MediaIn, Merge and viewer assignment if the page is new to you.
How heavy Relight is: the test results
No published test times Relight on its own. The Puget Systems GPU analysis for Resolve 18.6 lists Relight among the AI effects processed during playback and export in the AI score of PugetBench for DaVinci Resolve, next to Super Scale, Person Mask, Depth Map and Optical Flow (Speed Warp), so that score is the closest measure of how a graphics card handles it. The table pools the AI score (Extended preset) from two platforms. The public PugetBench results database aggregates user uploads on mixed systems in its Resolve 20.0 to 20.3 group. ComputerBase's RTX 5070 Ti review ran one fixed test PC with a Resolve 19 Studio build. Each gap below is computed inside one source, and the last column pools them as a median.
| Graphics | AI score, PugetBench database | AI score, ComputerBase | Gap to RTX 5070 Ti, median (range) | Sources |
|---|---|---|---|---|
| RTX 5090 | 137.94 | 126 | +31.1% (+23.5% to +38.7%) | 2 |
| RTX 4090 | 120.35 | Not in this test | +21.0% | 1 |
| RTX 5080 | 110.62 | 109 | +9.0% (+6.9% to +11.2%) | 2 |
| RTX 5070 Ti | 99.48 | 102 | Baseline | 2 |
| RTX 5070 | 85.08 | Not in this test | −14.5% | 1 |
| RTX 4070 Ti | 80.53 | Not in this test | −19.0% | 1 |
| RTX 5060 Ti (8 GB and 16 GB pooled) | 71.34 | Not in this test | −28.3% | 1 |
| RX 9070 XT | 64.21 | Not in this test | −35.5% | 1 |
| Apple M4 Max, 40-core GPU | 48.5 | Not in this test | −51.2% | 1 |
| Apple M4 Pro, 20-core GPU | 31 | Not in this test | −68.8% | 1 |
Puget's lab reviews point the same way. Its Radeon RX 9070 XT review called the card "essentially unusable" in AI workloads. In the 18.6 analysis, the RTX 4060 Ti and the RTX 2080 Ti performed about on par with the Radeon RX 7900 XTX in AI tests, the RTX 4080 SUPER ran 35% faster than the RTX 4070 SUPER, and the RTX 4090 ran 14% faster than the 4080 SUPER.
A second graphics card helps less than the price suggests. Across three Puget multi-GPU campaigns, a second card added 15% with RTX 4090s in the 18.6 tests, 25% with a pair of Radeon AI PRO R9700 cards in the Resolve 20 GPU scaling analysis, and 60% on selected AI tests with two RTX PRO 6000 Blackwell Max-Q cards: a median of 25%, ranging from 15% to 60%. Puget's 18.6 write-up adds that many AI features don't scale at all past one GPU.
If Relight and the other AI effects show up in most of your grades, I'd put the money into an RTX 5070 Ti class card. The RTX 5080 adds a median 9% on this score, and only the RTX 5090 is a real step up at 31%. The RX 9070 XT trails the 5070 Ti by about a third, and an M4 Max lands near half of it, so on those machines the cached two-node setup matters even more. The best GPU guide for DaVinci Resolve weighs AI scores against effects, Fusion and export.
Relight not working? Fixes
- Nothing changes on the image. The light only lives in the node's Alpha. Turn off Relighting Map Preview and raise Gain or add color in that node; the Brightness slider just scales that grade.
- A watermark covers the frame. You're on the free edition, where Studio-only effects render with a watermark. The free vs Studio comparison lists what the license adds.
- Dragging the light is slow. A single Relight node reruns the Surface Map analysis on every move. Split it into a cached Surface Map node and a Lighting node set to Use Input 2. For general stutter, the slow playback fixes cover proxies and render cache.
- The handles don't show in the Viewer. Select the Relight node and set the Viewer to Open FX Overlay from the menu at its lower left.
- Objects melt into black bars. Letterbox or pillarbox bars baked into the footage confuse the analysis, which treats the black as objects. In the Surface Map node, open Advanced Options > Blanking Regions and choose Auto + Extra Crop, the setting the manual recommends for cropping away black bars. Letterboxing that Resolve adds itself needs no fix.
- An external normal map lights the wrong side. With Surface Map on Use Input 2, try Reinterpret Left/Right or Reinterpret Up/Down. Rescale Oversaturated helps when another app scales its map differently.
- The light spills past the subject. Add a window or qualifier in the Lighting node, or feed a Magic Mask into its top blue Alpha input.
- Resolve reports a GPU memory error during the render. The GPU memory full guide walks through the fixes in order.
- Relight is missing on the iPad. It needs an M-series iPad Pro with 16 GB of memory and the Studio upgrade; A-series iPads don't get it.
Questions about Relight in DaVinci Resolve
Is Relight available in the free version of DaVinci Resolve?
Relight is a Studio feature. The free version lets you apply it to try it out, but the result carries a watermark until you upgrade to Studio.
Which version of DaVinci Resolve added Relight?
DaVinci Resolve 18.5 added it, and it remains part of Resolve Studio 21.1 on Windows, Mac and Linux.
Can Relight cast shadows?
No. Relight shades surfaces by the way they face, but it doesn't work out 3D relationships between objects, so it can't throw a shadow from one object onto another.
Why is Relight so slow?
Building the Surface Map is the heavy step, and a single Relight node rebuilds it each time the light moves. A cached Surface Map node feeding a Lighting node set to Use Input 2 keeps only the fast lighting step live.
Can you use more than one light?
Yes. Feed one Surface Map node into several Lighting nodes, one light each. Reusing one analysis for three lights runs three times faster than three separate analyses.
Can Relight use a normal map from 3D software?
Yes. Connect the map to the second RGB input of a Relight node set to Use Input 2. Normals formats differ between applications, so the Rescale Oversaturated and Reinterpret options are there to match the map to Relight.
Does Relight work on the iPad?
It runs on an iPad Pro with an M-series chip and 16 GB of memory after the Studio in-app upgrade. iPads with A-series chips don't support it.
Verdict: when Relight is worth the render time
Relight is the quickest way in Resolve to add a fill, a kicker or a warm sunbeam to a face that the original lighting left flat, as long as the subject was lit reasonably well to begin with. It can't invent shadows or depth, so it won't rescue a shot that needs a new key light. Set it up as a cached Surface Map node and a Lighting node, do the actual brightening with Gain, keep the light on the subject with Magic Mask, and let the FX tracker carry it when people move. For hardware, the test results favor NVIDIA, with the RTX 5070 Ti as the value point. For the wider grading picture, the DaVinci Resolve color grading hub collects the rest of the toolset.