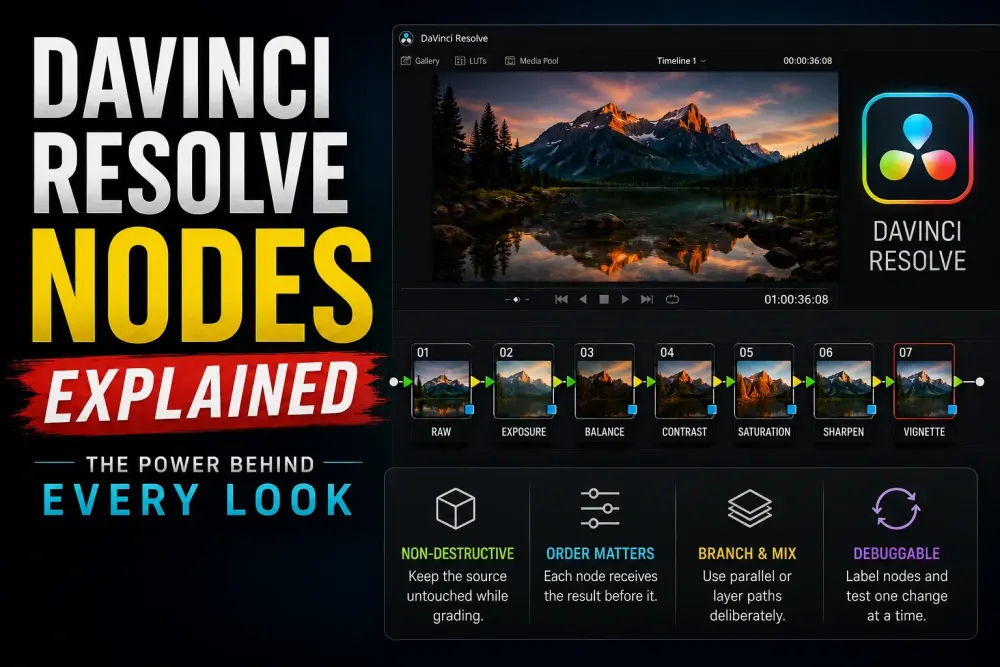
Quick answer: A node on the Color page is one processing container inside a grade. Serial nodes run in sequence. Parallel nodes start from the same image state and mix with equal weight. Layer Mixer inputs follow an overlap priority. Outside nodes invert an incoming key, Key Mixer combines keys, and Splitter/Combiner separates the RGB channels. Begin with serial nodes, branch only when the way two corrections interact demands it, and read the green image path apart from the blue key path.
DaVinci Resolve Nodes: The Decision Map
- Serial: one operation after another, and the structure most grades start from.
- Parallel: several branches take the same upstream image and mix with equal priority.
- Layer Mixer: for overlapping branches that need a priority order or a composite mode.
- Outside: reuses the inverse of an existing key or Power Window isolation.
- Key Mixer: combines, subtracts or intersects several keys ahead of one downstream correction.
- Splitter/Combiner: processes red, green and blue channel branches separately.
- Compound: nests a section of a large graph and leaves its internal order alone.
This page is about Color nodes. The full correction workflow is in How to Color Grade in DaVinci Resolve, and the Color Grading hub maps the wider learning path. The job here is smaller and more specific: knowing what the image and key signals do when you connect, reorder or mix nodes.
What a Color Node Actually Contains
A Corrector node can carry a single Color page operation or a whole stack of them: primaries, curves, a qualifier, Power Windows, a LUT, Resolve FX and key controls. An RGB image goes in, Resolve applies those adjustments in its own internal order, and a new image comes out. The Node Editor draws the order between those containers as a graph you can actually look at.
You're never forced to split operations into separate nodes, and Blackmagic explicitly allows several adjustments inside one. A separate node earns its place when it enforces an order you need, isolates a decision you'll probably revisit, or makes later revisions easier. My own rule is one clear purpose per labeled node. Resolve doesn't ask for that, but it means bypassing Balance, Skin Key or Look shows you at a glance what changed.
Read Green RGB Paths and Blue Key Paths Separately
Green connections carry the image through the grade. Blue ones carry key data: the matte from a qualifier, Power Window, Magic Mask or some other isolation. One node can take its image from one place and its key from somewhere else. That explains why a Key Mixer never mixes images, and why an Outside node needs both the RGB connection and the key relationship back to the source isolation.
When a result looks wrong, trace one color at a time. Follow green from input to output first and confirm the image order. Then follow blue and confirm which matte is limiting the selected node. Disable nodes one by one, and leave the graph alone until you know whether the surprise lives in the image path, the key path or the mixing rule.
Serial Nodes and Order of Operations
Serial is the simplest structure and the one you'll use most. Each node's RGB output feeds the next, so node 03 never sees the untouched source. It sees whatever nodes 01 and 02 handed it. That matters every time a downstream tool samples image data. Put a qualifier after a heavy desaturation, white-balance shift or look transform and it samples a different image from the same qualifier placed earlier.
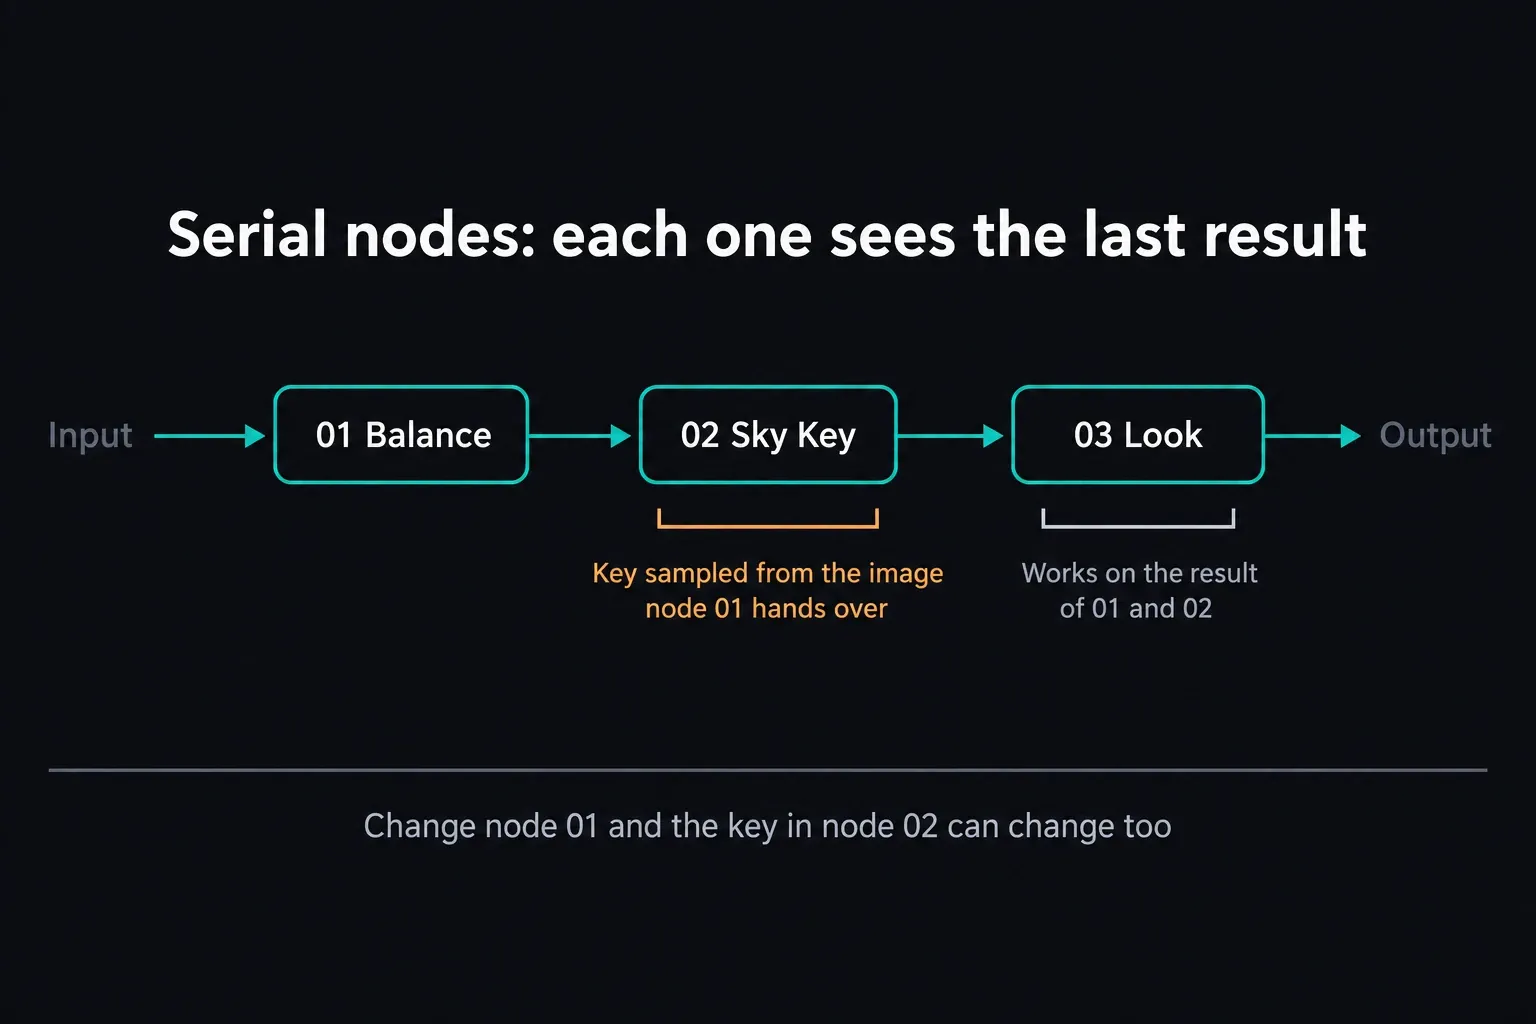
Use serial order deliberately. A balance can hand later work a neutral input, a clean secondary can be pulled before a creative operation destroys the separation it relies on, and an output trim can sit after the look. No seven-node recipe fits every color-managed pipeline, so give each node a stated purpose and skip any diagram whose assumptions you can't see.
How to Add and Label Color Nodes
With a node selected, Color > Nodes offers the same commands as the shortcuts. The manual writes Option for macOS, and Windows layouts usually show Alt as the equivalent modifier. Shortcuts can be remapped, so if one has been changed, trust the menu command. I rechecked every command below against the 21.1 manual on October 4, 2026.
- Add Serial after selected: Option-S / Alt-S; Color > Nodes > Add Serial.
- Append Serial to the end: Option-K / Alt-K; Color > Nodes > Append Node.
- Add before selected: Shift-S; Color > Nodes > Add Before Current.
- Add Parallel: Option-P / Alt-P; Color > Nodes > Add Parallel.
- Add Layer: Option-L / Alt-L; Color > Nodes > Add Layer.
- Add Outside: Option-O / Alt-O; Color > Nodes > Add Outside Node.
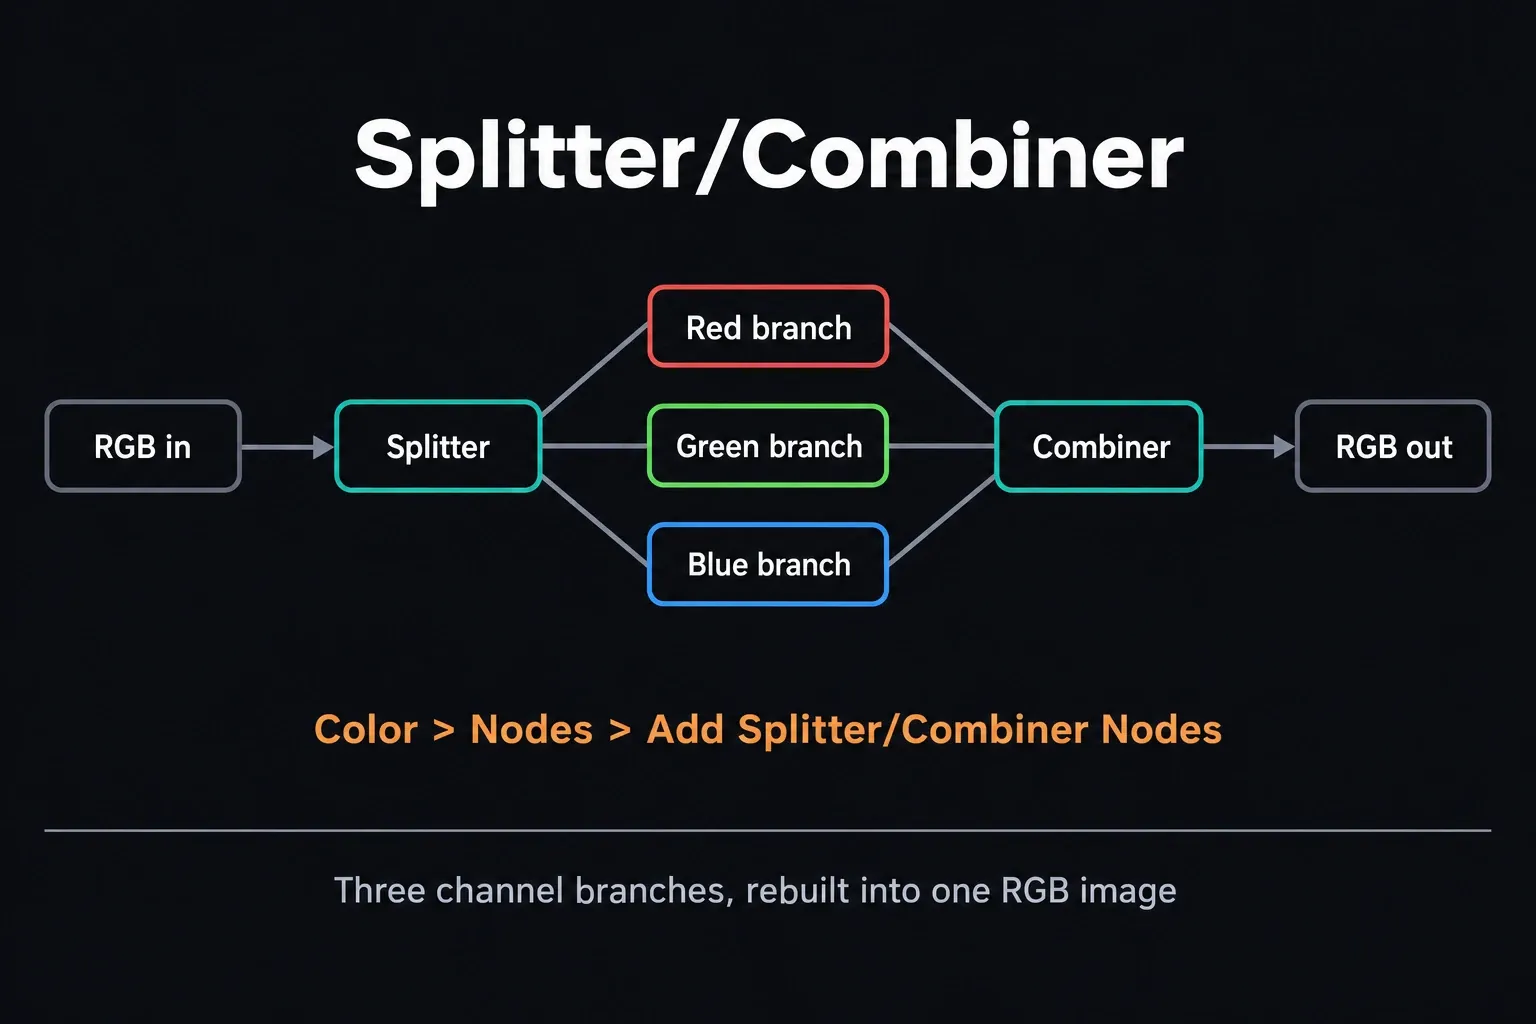
- Add Splitter/Combiner: Option-Y / Alt-Y; Color > Nodes > Add Splitter/Combiner Nodes.
To label a node, right-click it, choose Change Label, type the name and press Return. Resolve numbers nodes in the order you created them, whatever their left-to-right position, so a node you insert later can carry a higher number. A clear label means that numbering is never the only description of the grade.
Parallel Mixer vs Layer Mixer
A Parallel node usually takes the same upstream image as the selected branch. The branches feed a Parallel Mixer, which combines every input with equal processing priority however they're stacked vertically. That's exactly what you want when several secondaries should start from the same image state. Their keys ignore changes in sibling branches, although anything you adjust before the shared input still changes all of them.
A Layer Mixer looks almost identical and follows a priority rule: the lowest overlapping input wins and can hide the adjustments above it. It also supports composite modes. Priority comes from the input connection, and where you drag a Corrector on the canvas makes no difference. Test it with two obvious overlapping Power Windows before you trust it on a subtle grade.
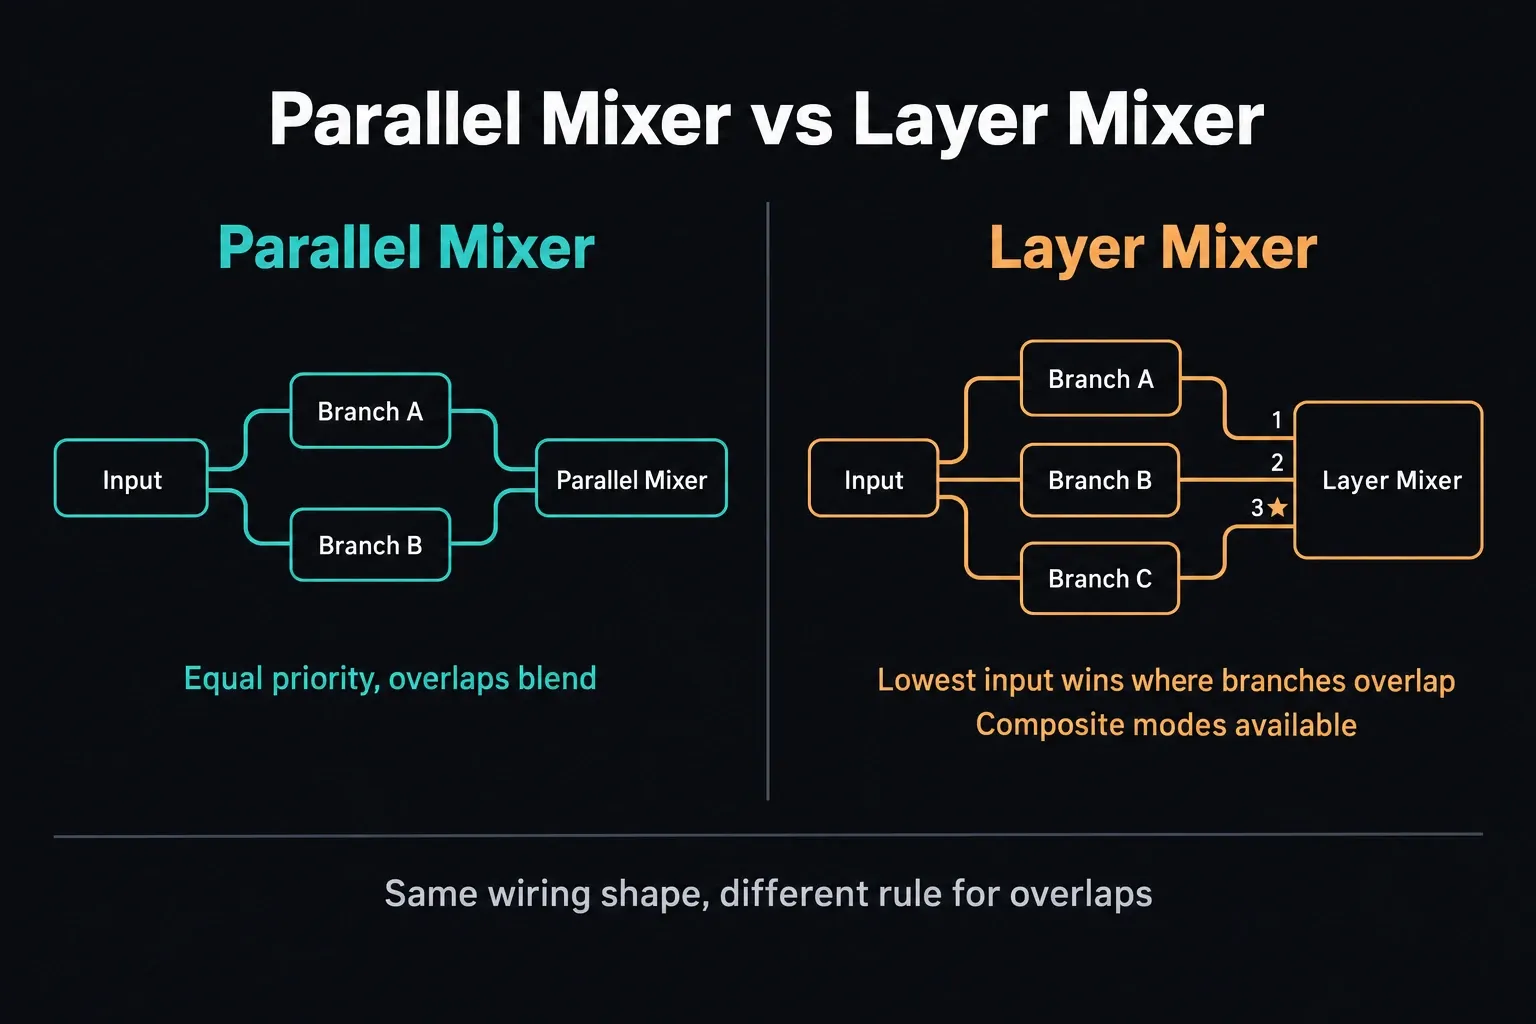
Pick Parallel when equal-priority mixing from a shared source is the result you want. Pick Layer Mixer when one isolated correction has to override another branch, or when you need a composite mode. To convert, right-click a Parallel Mixer and choose Morph Into Layer Mixer Node; on a Layer Mixer, choose Morph Into Parallel Node, which also drops the composite modes. Then inspect every overlap, because familiar wiring is no guarantee of the same result.
Equal priority doesn't lock every branch at full strength. Select a Corrector feeding either mixer, open the Key palette and lower Key Output Gain to pull back that branch's contribution. Make that change on the Corrector itself. Layer and Parallel Mixers have no Key-palette controls of their own.
Outside Nodes and Key Mixer
Select a node limited by a qualifier or Power Window, then choose Color > Nodes > Add Outside Node. Resolve creates a Corrector after the selected node, connects the source image and key, and enables Key Input Invert. So the new node works on the inverse region. Change the original isolation and the Outside relationship follows that key, because it was never a separately drawn mask.
Key Mixer solves a different problem. It takes key outputs from several Correctors and produces one key output. Right-click the Node Editor background and choose Add Node > Key Mixer. Give the source Correctors the right RGB image, connect their blue key outputs to the Key Mixer, then run its blue output into the blue input of the Corrector you want to limit. Only matte data travels through the Key Mixer; the corrected RGB image never passes through it.
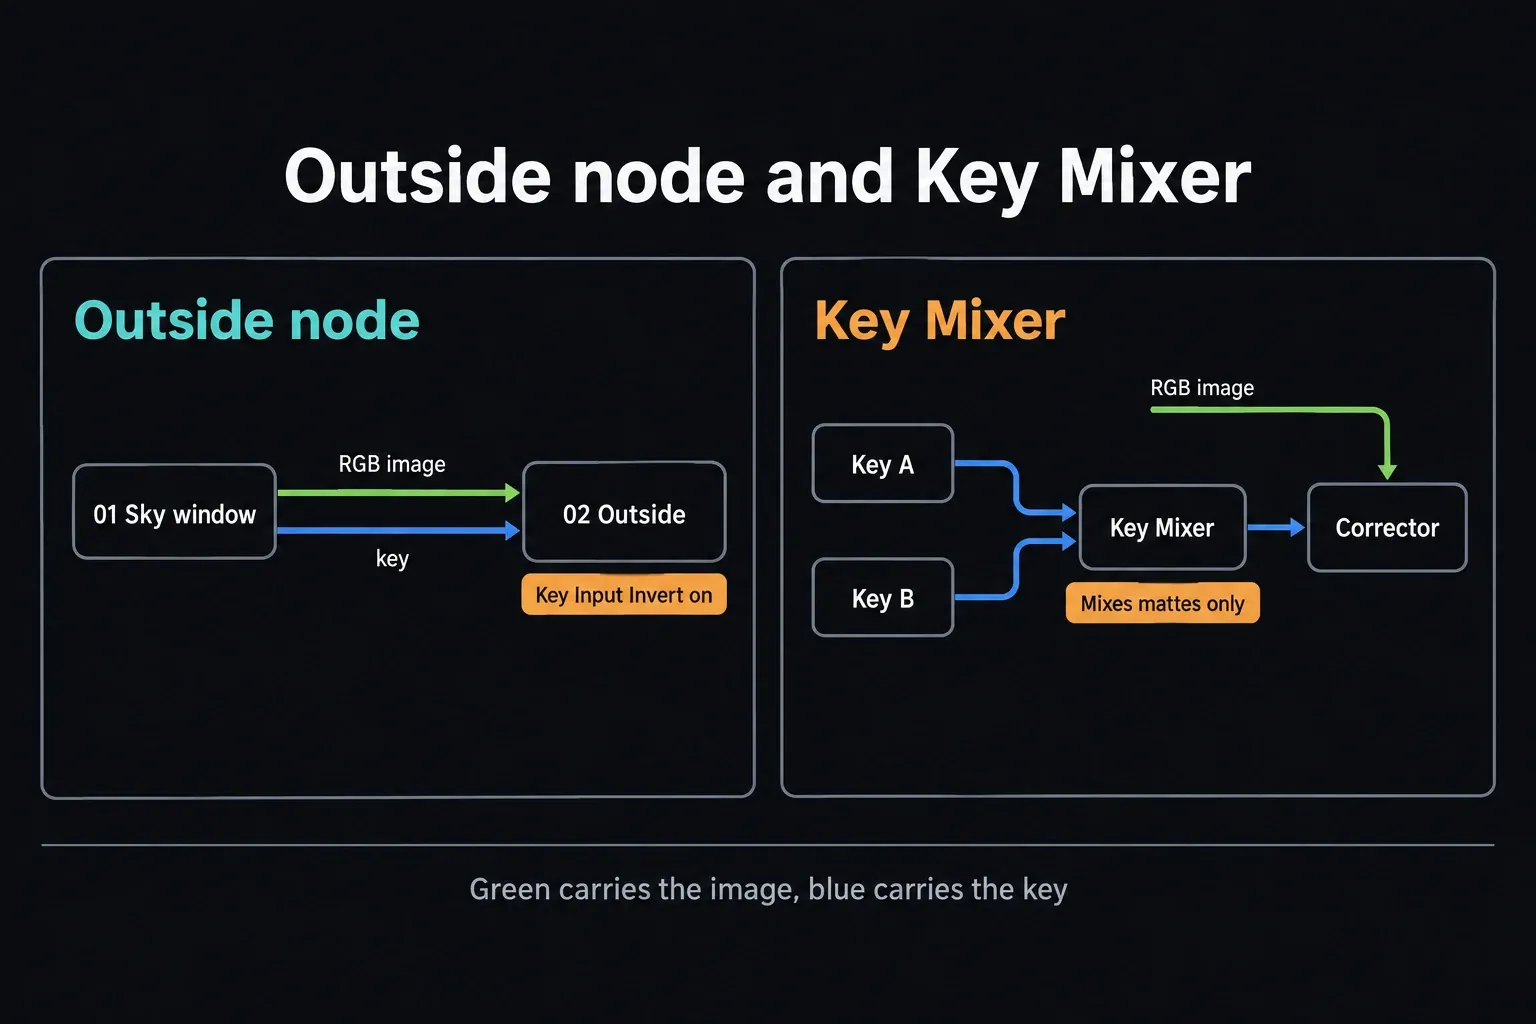
The blue mask path is just one connection in this node graph. In Resolve the destination Corrector also needs its own green RGB input. Keep RGB images out of the Key Mixer, and don't expect its blue output to stand in for the destination's image connection.
Try it with two overlapping window keys. Double-click the Key Mixer and open the Key palette to see Input Link 1 and Input Link 2. The additive setup combines both selected areas. Turn on Key Input Matte for either input to keep only the intersection. To subtract the second key from the first, turn on both Key Input Matte and Key Input Invert for Input Link 2, and use Input Link 1 to reverse the subtraction. Look at the resulting matte before you judge the correction. Each input has its own controls, and you won't find an Add/Subtract/Intersect dropdown anywhere.
Splitter/Combiner and Compound Nodes
Color > Nodes > Add Splitter/Combiner Nodes builds a premade RGB structure. The Splitter sends red, green and blue down separate Corrector branches, and the Combiner takes those channels and rebuilds one RGB image. It's meant for channel-specific work, such as alignment or a deliberate channel effect. It won't split into YUV, HSL or Lab on its own, and you shouldn't decide any channel is the noisy one until you've looked at the actual footage.
Compound nodes organize the graph and never mix channels. Select nodes, right-click one and choose Create Compound Node. Double-click the compound or choose Show Compound Node to edit inside it, and Decompose Compound Node puts its contents back into the parent graph. Adjustments made on the compound itself run after its internal nodes, and they disappear when you decompose it. To keep that finishing adjustment, copy it before decomposing and paste it onto a new serial node after the former contents.
A Beginner Node Tree You Can Actually Debug
Start with a short serial chain and add complexity only when the image asks for it. The names below describe the job each node does; where each one sits can change with your color-management setup:
- Balance: exposure and the neutral starting decisions.
- Contrast: tone-shape work you may want to bypass on its own.
- Subject key: a qualifier or window for the person or product.
- Background: a separate environment correction, when the shot needs one.
- Look: the creative treatment or a deliberately placed LUT.
- Output trim: a final adjustment, only when the pipeline calls for it.
Where a LUT belongs depends on the input it expects and what should happen before or after it. The dedicated LUT workflow guide covers that boundary. The test here is simple: bypass one labeled node. If the picture changes in more ways than the label promises, rename the node honestly or split the responsibilities apart.
Three Tests That Make Node Behavior Visible
1. Prove serial order with a qualifier
In node 01, make an obvious saturation change. In node 02, qualify one color and view the key highlight. Swap the two nodes and inspect the matte again. The node in second position samples the output of the first, so the key can change even though nobody touched its qualifier controls. Put the nodes back in the useful order and label both.
2. Prove mixer behavior with overlapping windows
Make two branches from the same input, give each a large overlapping Power Window and apply tints nobody could confuse. Compare a Parallel Mixer with a Layer Mixer. Parallel blends the overlaps with equal priority. In Layer Mixer, reconnect the branches to different inputs and watch the lowest overlapping input take over. Learning the rule this way is far safer than discovering it on a subtle skin correction.
3. Prove key routing without changing RGB
Make two window keys, send their blue outputs to a Key Mixer, and connect the mixed blue output to a third Corrector. Keep every Corrector on the RGB image path and give only the third one an exposure change. In the Key Mixer's Key palette, compare the additive setup with Matte enabled on one input, then turn on Invert for that same input to subtract. The corrected image changes because its limiting matte changed. At no point did the Key Mixer turn into an RGB image branch.
How Many Nodes Do You Need?
Resolve sets no node-count limit. The current manual points out that some leading colorists get stunning results from three or four nodes, while others routinely build organized trees of ten to twenty or more. Neither range is a target. Footage, schedule, deliverables, reuse and revision needs shape the tree. Use as many nodes as the grade needs, and stop there.
A big graph isn't advanced just because it's big, and a small one isn't automatically clean. Aim for visible signal flow, labels that state a purpose and a bypass test whose result you can predict. Reach for Compound nodes when a section is logically finished. An arbitrary node count on screen is a poor reason to nest anything.
Resolve 21 Layer List Is a View, Not a New Processing Model
Resolve 21 introduced Layer List as another view of the node graph. In the current 21.1 manual, its icon sits at the upper right of the node graph. The list shows the existing node order as a stack: Node 1 is the bottom-most layer, and nodes added or rearranged later appear above it. Each row carries a preview thumbnail, tool icons and controls to enable, disable, lock, add or remove nodes.
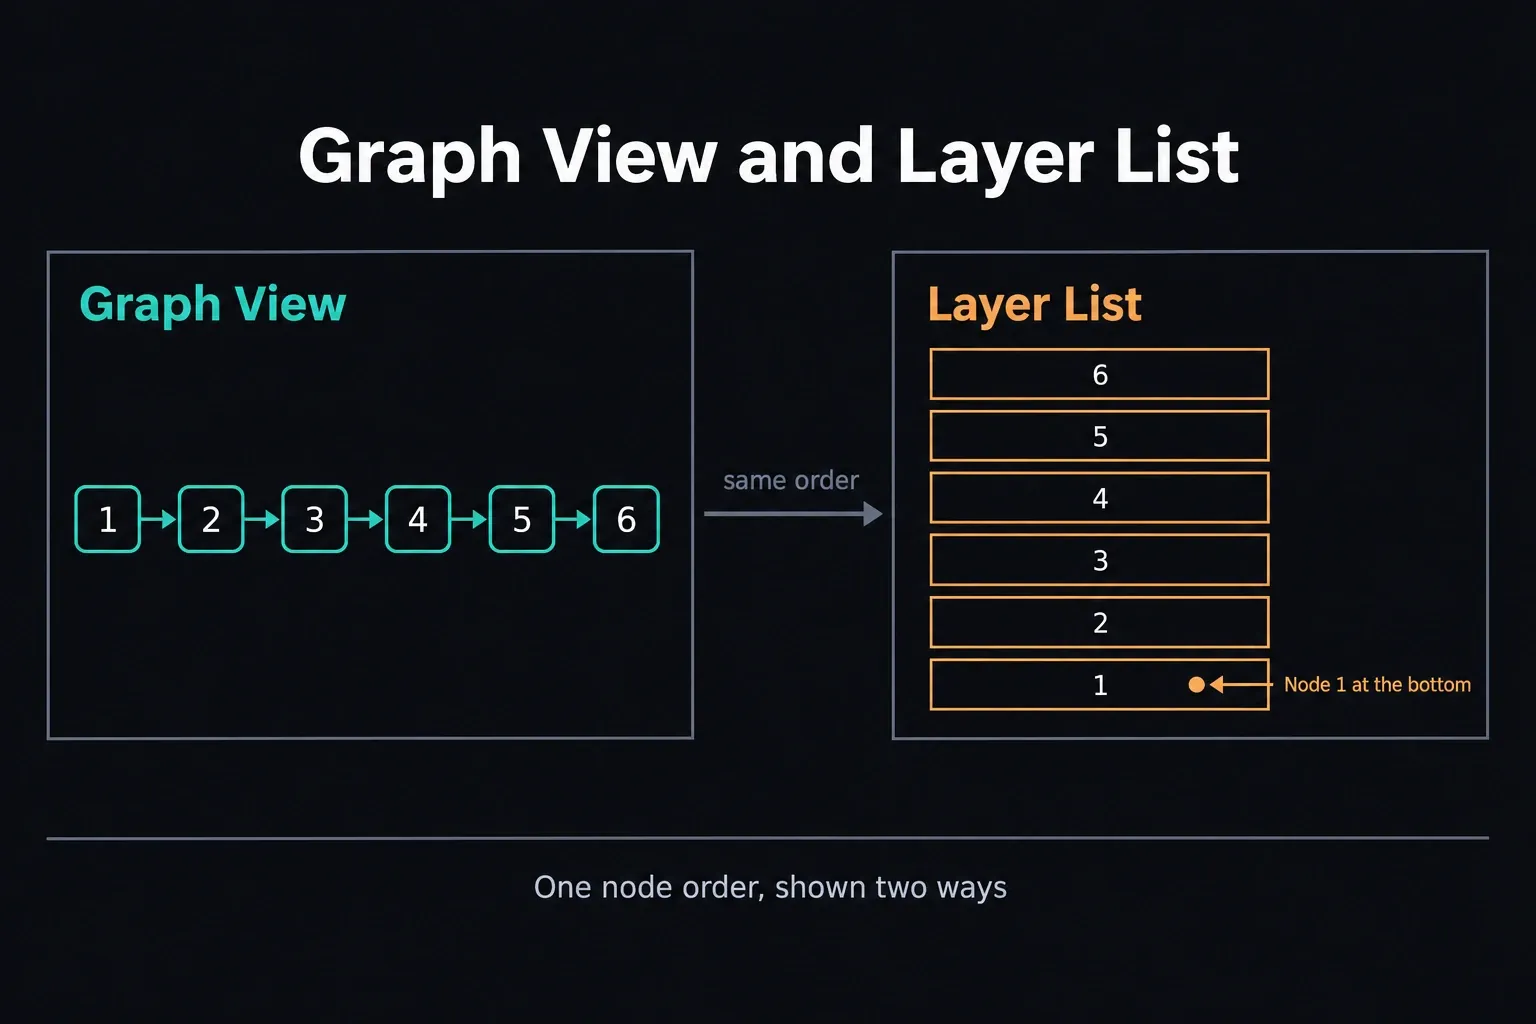
Layer List doesn't replace Graph View, and it has nothing to do with the Layer Mixer. Graph View shows the wiring. Layer List gives you a compact management view of that same graph. Layer Mixer is a node with its own priority and compositing behavior. The original Resolve 21 New Features Guide documents the interface addition, and the Resolve 21.1 Reference Manual remains the detailed source for node processing.
The same Color node logic carries over to stills on the Resolve 21 Photo page. For the rest of this release, see What's New in DaVinci Resolve 21.
Color Nodes vs Fusion Nodes
Both pages use connected nodes, but the node types don't move between them. Color nodes organize grading, keys, windows, LUTs and Color page effects around a clip's grade. Fusion nodes build image-processing and compositing flows from MediaIn, Merge, masks, transforms, generators and MediaOut. Reading connections is the skill they share; the tools, the data flow and the page behavior all differ.
If you're building a title, a green-screen composite, a tracked graphic or a particle effect, go to the Fusion beginner tutorial.
Blackmagic calls nodes the building blocks of color correction on its current Color page product overview. In day-to-day grading the rule is simpler still: trace the image, trace the key, work out the mix rule, and change one connection at a time.
DaVinci Resolve Nodes FAQ
What is a node in DaVinci Resolve?
A Color page node is one part of a grade's processing graph. A Corrector receives an image and applies adjustments, while mixers combine images or keys depending on their type. The connections set the processing order and the branching.
What is the difference between serial and parallel nodes?
Serial nodes run one after another, so every downstream node sees the result of the one before it. Parallel nodes usually read the same upstream image and feed a Parallel Mixer, which combines their adjustments with equal priority. Use serial for a deliberate sequence, and parallel when several adjustments should start from the same image state.
What is the difference between Parallel Mixer and Layer Mixer nodes?
A Parallel Mixer combines input corrections with equal priority whatever their vertical position, and Key Output Gain on each feeding Corrector sets that branch's strength. A Layer Mixer gives priority to the lowest overlapping input and also supports composite modes. Choose Layer Mixer when overlap priority or compositing is part of the result you're after.
What does an Outside node do in DaVinci Resolve?
An Outside node is a Corrector with Key Input Invert switched on. Added from a node that's limited by a qualifier or Power Window, it receives that node's image and key paths and applies its adjustment to the inverse region.
What is a Key Mixer used for?
A Key Mixer combines key outputs from several Corrector nodes into one key. Select it and open the Key palette: the Matte and Invert controls on each input let you intersect or subtract keys, while the default setup adds them. Connect its blue output to the downstream Corrector's blue key input. It mixes matte data only and never handles RGB images.
What does a Splitter/Combiner node do?
Splitter/Combiner splits an RGB image into red, green and blue branches, lets you process each channel branch, and recombines them into one RGB image. Add the premade structure with Color > Nodes > Add Splitter/Combiner Nodes.
What is a Compound node?
A Compound node nests selected nodes inside one container so a complicated graph is easier to move around. You can open it to edit the nodes inside, label it, nest compounds within compounds, or decompose it later. Adjustments made on the compound itself happen after its internal nodes.
How many Color nodes should I use?
There's no fixed number, and Resolve sets no node-count limit. Use as many as the grade needs, then stop. A handful of well-labeled nodes can handle a clean shot, while a difficult shot or a reusable template may need many more. Readability and a predictable order count for more than the total.
How do I rename a node in DaVinci Resolve?
Right-click the node, choose Change Label, type the label and press Return. Labels like Balance, Skin Key and Look say what a node is for far more clearly than default node numbers do.
Did DaVinci Resolve 21 replace nodes with layers?
No. Resolve 21 added Layer List as another way to view and manage the existing Color node graph. It shows nodes as a bottom-to-top list with previews and controls, while Graph View stays in place and the grade keeps the same node-based processing model.
