Quick answer: Use a subtitle track for readable captions you can edit, restyle and export. Import an SRT if the text is already timed, add cues manually if it isn't, or use Create Subtitles from Audio in Resolve Studio.
Finish the edit before final timing, then choose a separate subtitle file, embedded captions or permanent burn-in on the Deliver page.
Subtitles are easy to add and surprisingly easy to finish badly. A clean-looking track in the Edit page can still export an hour out of sync, lose its styling in an SRT file or disappear because the wrong subtitle track was enabled.
The fix is to treat captions as four separate jobs: text, timing, presentation and delivery.
This guide covers the subtitle-track workflow in DaVinci Resolve 21. On September 5, 2026, Blackmagic's current Resolve 21 Reference Manual still documented the import, speech-to-text, timing, styling and delivery labels used below, while the current Edit page confirmed the broader subtitle-track workflow.
The important boundary is between ordinary captions, Studio speech-to-text tools and Text+ graphics: choosing the wrong route at the start creates most of the avoidable work later.
Choose the Right Caption Workflow First
Resolve offers three routes that look related but do different jobs. Pick from the output backward:
| You need | Use | Why |
|---|---|---|
| YouTube captions, localization files or accessible on/off subtitles | Subtitle track | Cues keep timecode and can export as SRT, VTT or TTML. |
| Fast first-pass captions from spoken audio | Create Subtitles from Audio | Resolve Studio generates timed cues that you correct on a subtitle track. |
| Animated words, kinetic typography or free placement | Text+ or a Fusion title | These are graphics, not normal caption cues, so they allow deeper animation and design. |
The subtitle track is the default for long-form work because it keeps hundreds of cues manageable. Track style lets you change the common font, size, position, color, outline and background without rebuilding every line.
Resolve supports several subtitle tracks for different languages or uses, but only one can be visible at a time. Name each track clearly before delivery because Resolve uses subtitle track names during export and encoding.
Do not build a 20-minute caption job from separate Text+ clips just because a social tutorial demonstrates animated words. Use graphics only when the animation is part of the creative brief. Our Text and Text+ guide covers that separate workflow.
Add a Subtitle Track and Create Captions Manually
- Open the finished timeline on the Edit page.
- Right-click in the track-header area at the left of the timeline and choose Add Subtitle Track.
- Move the playhead to the first spoken line.
- Right-click the subtitle track and add a subtitle, or use the subtitle command available in your workspace menu.
- Select the cue and open Inspector > Caption to type or correct the text.
- Drag the cue's left and right edges until it enters and leaves with the spoken phrase.
Keep captions as short reading units rather than transcribing punctuation mechanically. Break a line at a natural phrase boundary, not between an article and noun or a person's first and last name. Two balanced lines are usually easier to scan than one line that stretches across the frame.
Lock picture before the detailed timing pass. If you trim dialogue after captions are finished, downstream cues may no longer match the speech. For a late edit, inspect every caption after the cut instead of assuming the track followed the editorial change correctly.
Import an SRT Without Losing the Timing
Resolve 21 imports subtitle files in SRT, SRTX, VTT, XML and TTML formats. SRT is the common interchange choice: it contains numbered cues, start and end timestamps, and plain text, but it does not carry your Resolve font, outline, screen position or animation.
That separation is useful because timing and language can move between platforms while presentation stays under control in the project or player.
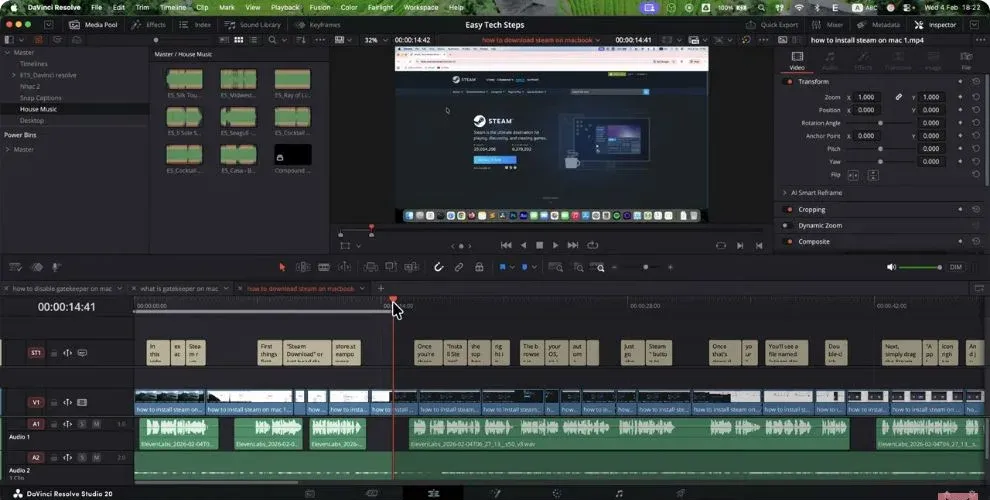
- Open the Media Pool, right-click a bin or its background, choose Import Subtitle, then select the subtitle file.
- Create a subtitle track if the timeline doesn't have one, or drag the file into the unused gray area above the video tracks and let Resolve create the track.
- For manual placement, drag the file onto a subtitle track. Resolve places the cues relative to the first subtitle and the point where you drop the file.
- When the subtitle file was authored against the same program timecode, right-click it and choose Insert Selected Subtitles to Timeline Using Timecode.
- Play the first, middle and last cues before styling anything, then rename the track for its language or use.
The classic failure is a zero-based SRT whose first cue starts near 00:00:01,000 and a timeline that starts at 01:00:00:00. Absolute timecode placement puts them in different ranges. Either align the timeline start and SRT timestamps, or place the file relative to the playhead when that matches your intended workflow.
If accented or non-Latin characters arrive as boxes or nonsense, save the subtitle file as UTF-8 and test a font that contains the required glyphs.
If cues drift progressively rather than remaining a fixed distance early or late, check the source timing and whether the video was retimed or re-edited after the subtitle file was created.
The real interface frame below comes from Easy Tech Steps' February 2026 SRT export walkthrough; it shows Resolve Studio 20, and the placement behavior was checked against the Resolve 21 manual.
Generate Captions from Audio in Studio
Resolve Studio can turn timeline speech into a first-pass subtitle track. Build and clean the dialogue first, then use Timeline > AI Tools > Create Subtitles from Audio.
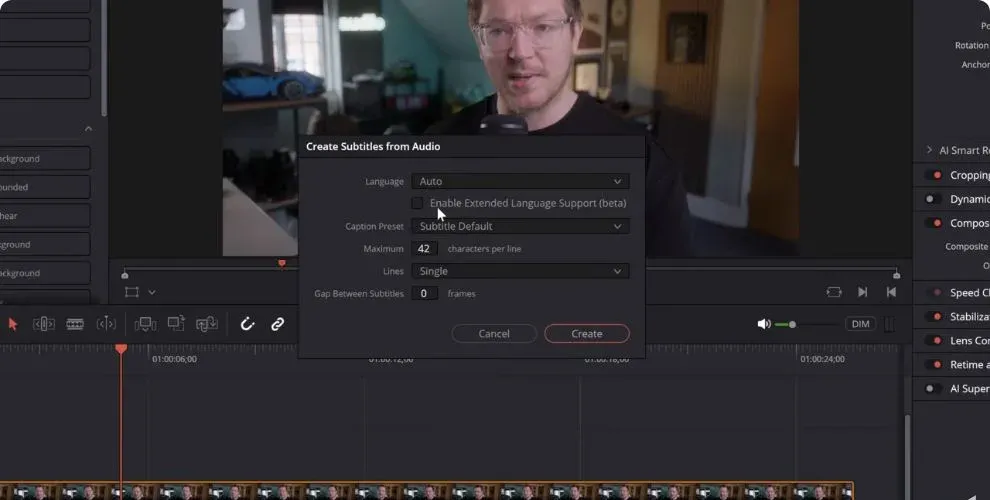
Choose the language, caption preset, maximum characters per line, one or two lines, and the gap between cues. Generate the track, then correct it against the actual audio.
The interface frame below comes from MrAlexTech's automatic-subtitles walkthrough; it shows Resolve Studio 20, and every visible dialog control was checked against the current Resolve 21 manual.
This speech-to-text route is a Studio feature. The free edition can still create manual subtitles, import an SRT, style the track and deliver captions. If the automatic command is absent, confirm which edition is installed before troubleshooting menus or reinstalling.
Automatic captions aren't a final transcript. Check names, numbers, homophones, acronyms and speaker changes.
Blackmagic specifically warns that overlapping dialogue on multiple audio tracks can defeat the analysis; mute tracks you do not want analyzed before generating captions. If transcription itself is the main job, use the full Resolve 21 transcription workflow rather than duplicating that process here.
Time and Style the Subtitle Track
Select a cue and use the Caption controls for its words and cue-level settings. Select the track and use Inspector > Track when you want the same presentation across every cue. Enable Customize Caption only for a deliberate cue- or word-level exception.
The editorial rule is simple: global consistency belongs at track level; a specific exception belongs on the cue.
Start with these checks:
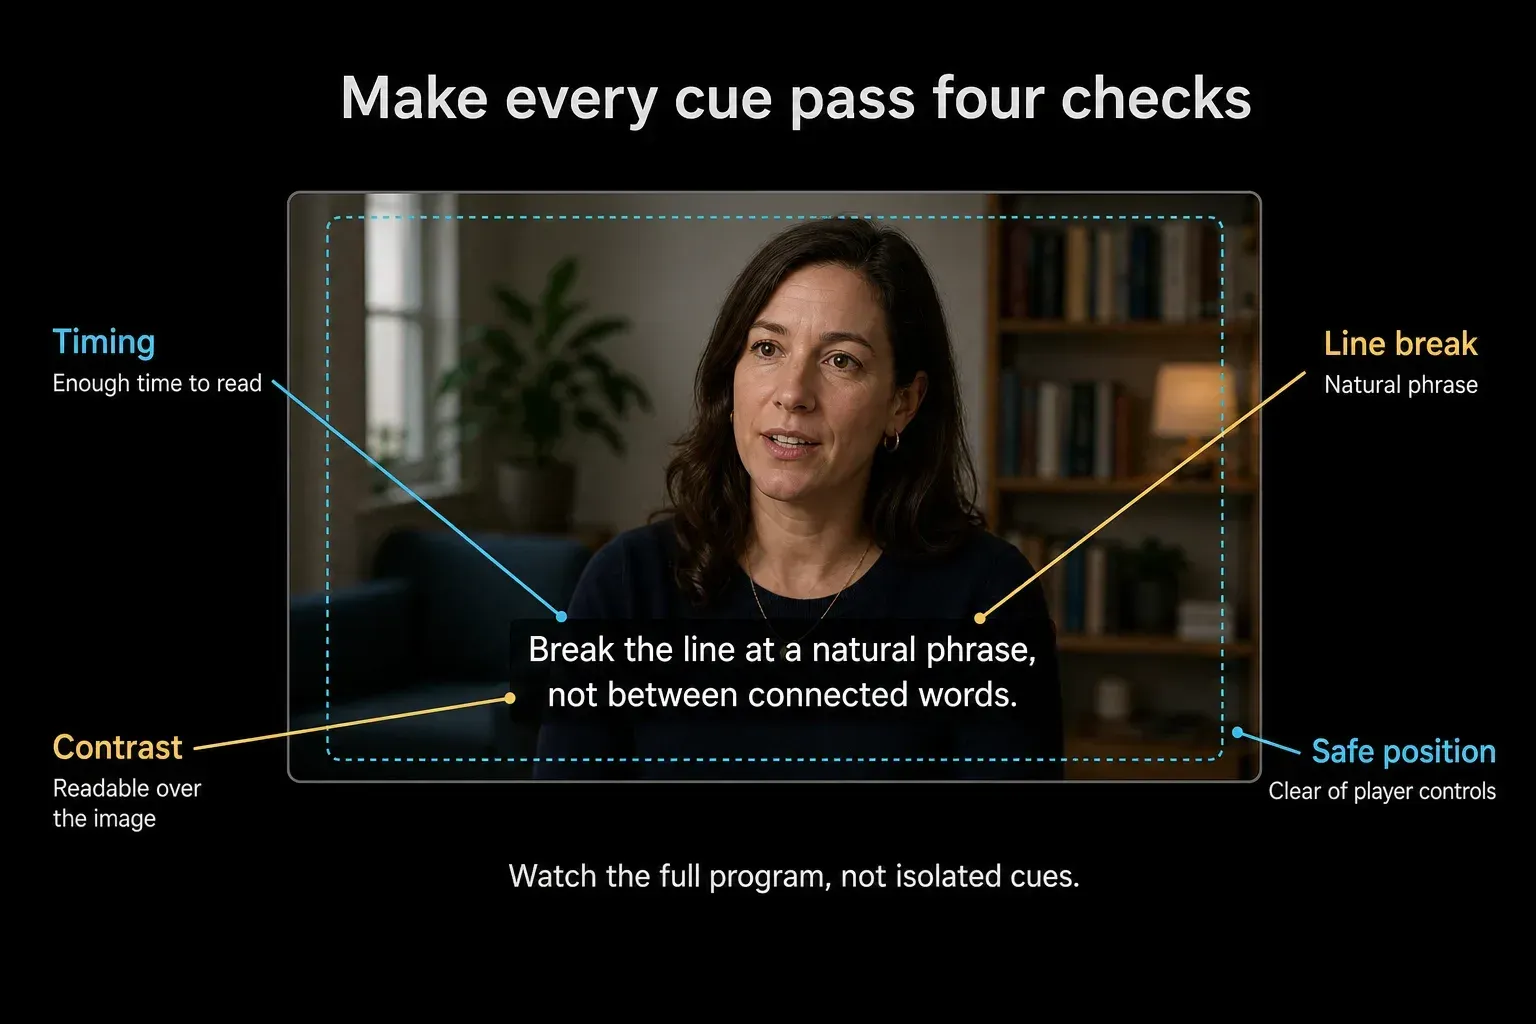
- Position: keep captions inside a safe area and above player controls, lower thirds or burned-in platform UI.
- Contrast: use a restrained outline, shadow or background so light footage doesn't erase white text.
- Line breaks: preserve meaning and avoid a single short word stranded on the second line.
- Duration: give the viewer time to read without leaving an old caption over the next thought.
- Case: sentence case is usually faster to read than long blocks of all caps.
Set measurable warnings before the QC pass. In Project Settings > Subtitles, Resolve can flag Characters Per Line, Minimum Caption Duration and Maximum Characters Per Second; the CPS value turns red when a cue exceeds the current threshold.
For a language track that needs different limits, select the track, open Inspector > Track > Subtitle Settings, disable Use Project Settings, then set Max Line Length, Min Duration and Max CPS for that track.
Resolve 21 adds finishing tools documented in Blackmagic's New Features Guide.
The subtitle Inspector can find and replace a name across the track. Manually entered or imported captions can run Update Word Timings, and a track-header command can Synchronize Word Timings for the whole track.
Subtitle clips also have fade handles. AI Animated Subtitles templates are a Studio feature; ordinary subtitle timing, styling and delivery don't require those animated templates.
Run a Real Caption QC Pass
Don't proof captions only while stopped on individual frames. Watch the program at normal speed with sound, then watch difficult sections muted. The first pass checks fidelity to speech; the muted pass exposes whether the text can stand on its own.
- Correct spelling, names, numbers and technical terms.
- Check that each cue begins with the phrase and clears before the next speaker or idea.
- Remove accidental double spaces and inconsistent punctuation.
- Identify meaningful non-speech audio when the delivery requires accessible captions.
- Check captions over the brightest and busiest shots.
- Confirm that every active language track has the intended label and content.
- Export a short test and inspect the actual output outside Resolve.
Find and Replace is excellent for a consistently misspelled surname, but review replacements in context before using Replace All. A short word can be part of a longer word, and capitalization may differ at the beginning of a cue.
Export SRT, Embedded Captions or Burned-In Subtitles
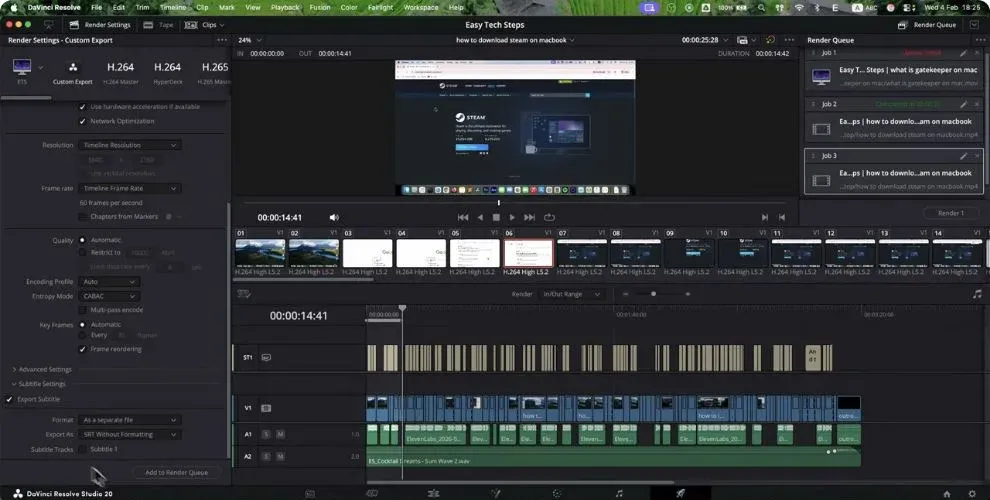
Move to the Deliver page and open Subtitle Settings. Enable Export Subtitle, choose the correct subtitle track, then match the mode to the destination.
The real interface frame below comes from Easy Tech Steps' February 2026 walkthrough; it shows Resolve Studio 20, while the current Resolve 21 manual confirms the same separate-file, burn-in and embedded delivery labels.
| Delivery | Best for | Main tradeoff |
|---|---|---|
| Separate file such as SRT or VTT | YouTube, review, localization and accessible playback | Styling is limited and the file must stay paired with the video. |
| Embedded captions | A compatible broadcast or professional master specification | Support depends on the chosen container, codec and destination. |
| Burn into video | Social feeds, review copies and guaranteed on-screen text | The viewer cannot turn captions off or switch languages. |
For a separate file in Deliver, Resolve 21 lists IMSC1, DFXP, SRT and WebVTT. File > Export Subtitle and the subtitle-track header Export Subtitle command offer SRT and VTT.
SRT is broadly accepted but plain; don't expect it to preserve the exact Resolve typeface or background box. For a permanent result, choose Burn into video and inspect the rendered file for clipping, line wrapping and timing.
Embedded delivery is container-specific. Resolve 21 documents CEA-608 inside MXF OP1A and QuickTime, with Text or CEA-608 codec choices where supported. Confirm the receiver, container, caption standard, language metadata and frame rate before rendering a long master. The general video export guide covers codecs and render settings; this page stays focused on the subtitle payload.
Fix Common Subtitle Problems
The imported subtitles are missing
Zoom out and compare the SRT's first timestamp with the timeline start timecode. The cues may have been inserted correctly at a time your current timeline doesn't reach. Also confirm the subtitle track is visible and enabled.
Every cue is early or late by the same amount
That's usually an offset, not drift. Move the imported group together or correct the zero point in the SRT workflow. Don't retime every cue separately.
The error grows toward the end
Progressive drift points to a duration or timing-base mismatch. Check whether the program was speed-changed, frame-rate converted or re-edited after the subtitle file was generated.
The font and box disappear from the exported SRT
That's expected. SRT stores cue timing and text, not Resolve's complete visual design. Burn the subtitle track into the picture when exact appearance is mandatory, or use a delivery format and player that support the required styling.
Automatic subtitles are not available
Built-in speech-to-text subtitle creation requires Resolve Studio. Manual cues, SRT import, track styling and subtitle delivery don't require the AI generation step.
Frequently Asked Questions
Can the free version of DaVinci Resolve add subtitles?
Yes. The free edition can create a subtitle track, add cues manually, import SRT files, adjust timing and style, and export or burn subtitles. Create Subtitles from Audio is part of the Studio speech-to-text toolset.
How do I import an SRT file into DaVinci Resolve?
In the Media Pool, right-click a bin or its background and choose Import Subtitle, then place the imported subtitle clip on a subtitle track. Check the first cue, timeline start timecode and last cue before styling the track.
Why are imported subtitles one hour out of sync?
The SRT may start near zero while the timeline starts at 01:00:00:00, or the reverse. Align the timecode ranges for absolute placement, or place the SRT relative to the playhead when that matches the project.
Does SRT preserve subtitle fonts and styling?
No. Standard SRT primarily carries cue numbers, timestamps and text. Burn subtitles into the video when their exact font, position, outline or background must survive delivery.
Should I use subtitles or Text+ for animated captions?
Use the subtitle track for long, exportable captions and multiple languages. Use Text+ or Fusion titles when per-word animation and free graphic placement matter more than caption-file export.
Can DaVinci Resolve translate subtitles automatically?
Do not plan around a native translation step unless your exact Resolve build and documentation confirm one. A reliable localization workflow is to export a timed subtitle file, translate and review it externally, then import the translated file onto a separate language track.
This guide belongs to the DaVinci Resolve tutorial map. For the next step, use the transcription guide when audio must become text, the Text+ guide for animated graphics, or the export settings hub when the subtitle decision is part of a larger delivery workflow.
