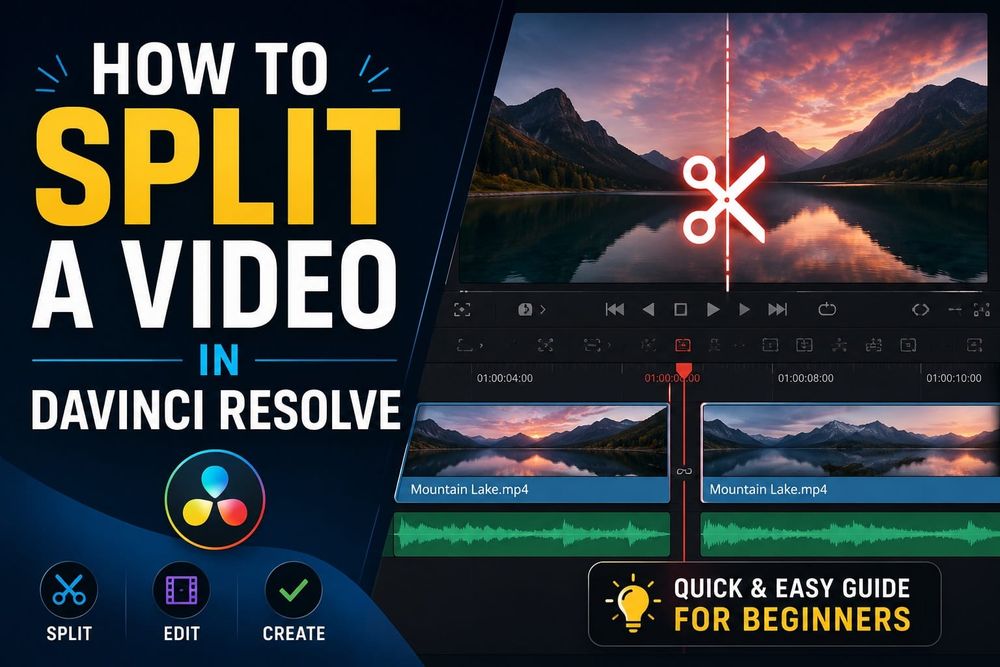
Three hours into editing a 47-minute rough cut, I ran into the same problem I've had on dozens of projects: a talking-head clip with a cough buried near frame 441. I needed to split it clean, remove 3 seconds, and close the gap without shifting anything else on the timeline. That's the moment I stopped reaching for the Blade tool icon and memorized the playhead shortcut for good. If you want to know how to split a video in DaVinci Resolve, there are several distinct methods worth knowing, and which one you reach for depends on what you're actually trying to do.
Quick answer: Select the clip, move the playhead to the cut point, and press Cmd+\ (Mac) or Ctrl+\ (Windows). To use the Blade tool instead, press B, click the clip, then press A to return to the Selection tool. To remove the unwanted section and close the gap, use Shift+Delete or Shift+Backspace for Ripple Delete, depending on your keyboard and shortcut preset.
Which method to use:
- Use the Blade tool (B) to click a specific clip manually without affecting adjacent tracks.
- Use Cmd+\ / Ctrl+\ for the fastest split at the playhead position.
- For multi-track cuts, use the Razor command with Auto Select enabled on the tracks you want to cut.
- Unlink only when you need to edit audio and video tracks independently.
- Use Scene Cut Detection only for pre-edited flattened exports, not for general timeline splits.
How to Split a Video in DaVinci Resolve Using the Blade Tool
The Blade tool is what most editors reach for first. Visible, familiar, and easy to understand on day one.
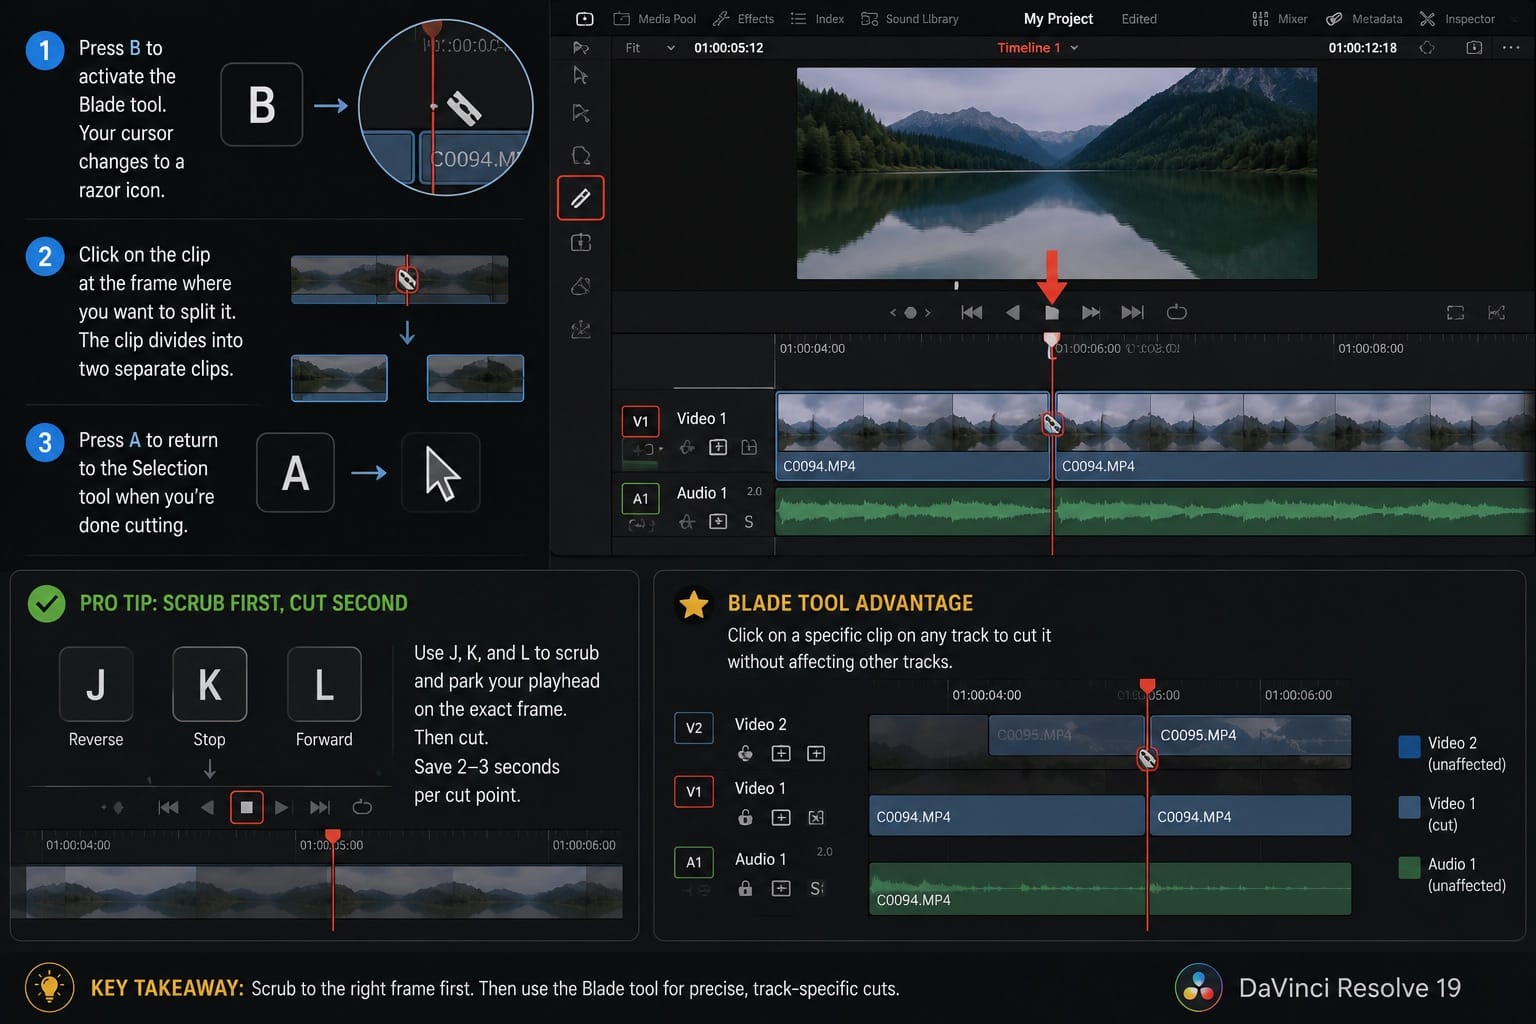
On the Edit page:
- Press B to activate the Blade tool. Your cursor changes to a razor icon.
- Click on the clip at the frame where you want to split it. The clip divides into two separate clips.
- Press A to return to the Selection tool when you're done cutting.
If you're working through your first project, our DaVinci Resolve beginner tutorial covers the full Edit page interface before you start making cuts.
Most tutorials tell you to zoom in before cutting for precision. That's the wrong order of operations. Get comfortable using J, K, and L to scrub the timeline and park your playhead on the right frame first, then cut. You'll drop 2-3 seconds per cut point, which adds up fast across an 89-clip assembly.
One real advantage of the Blade tool over the keyboard shortcut: you can click on individual clips across different tracks without affecting others. If you only want to cut the video track and leave the audio intact, this is your method. Everything else, use the shortcut.
How to Split a Video in DaVinci Resolve with a Keyboard Shortcut
I use this method on every project. No tool switching, no cursor movement.
- Scrub to the frame where you want to make the cut.
- Click the clip once to select it.
- Press Cmd+\ (Mac) or Ctrl+\ (Windows). The clip splits at the playhead position.
Depending on your keyboard preset and Resolve version, this shortcut may also work on the Color page. If it does, you can split a clip mid-grade without switching pages to make the cut.

After splitting, press Delete or Backspace to remove the selected clip and leave a gap in the timeline. For Ripple Delete, which removes the clip and closes the gap automatically, use Shift+Delete or Shift+Backspace. Exact behavior can vary by platform and keyboard mapping. Verify yours in DaVinci Resolve > Keyboard Customization. For the full keyboard shortcut reference, the official DaVinci Resolve 20 Beginner's Guide has the complete list.
On a 41-minute interview edit, I processed the entire rough cut using nothing but this shortcut and Ripple Delete. On dialogue-heavy timelines, Ripple Delete is almost always the right call.
If you're switching from Premiere Pro, the DaVinci Resolve vs Premiere Pro comparison covers the key workflow differences worth knowing.
How to Cut Multiple Tracks in DaVinci Resolve at Once
The standard split only cuts whichever clip is selected. On a multi-track timeline with video on V1, dialogue on A1, music on A2, and room tone on A3, that's usually the right behavior. For structural edits where you need all tracks cut at the same point, the approach is different.
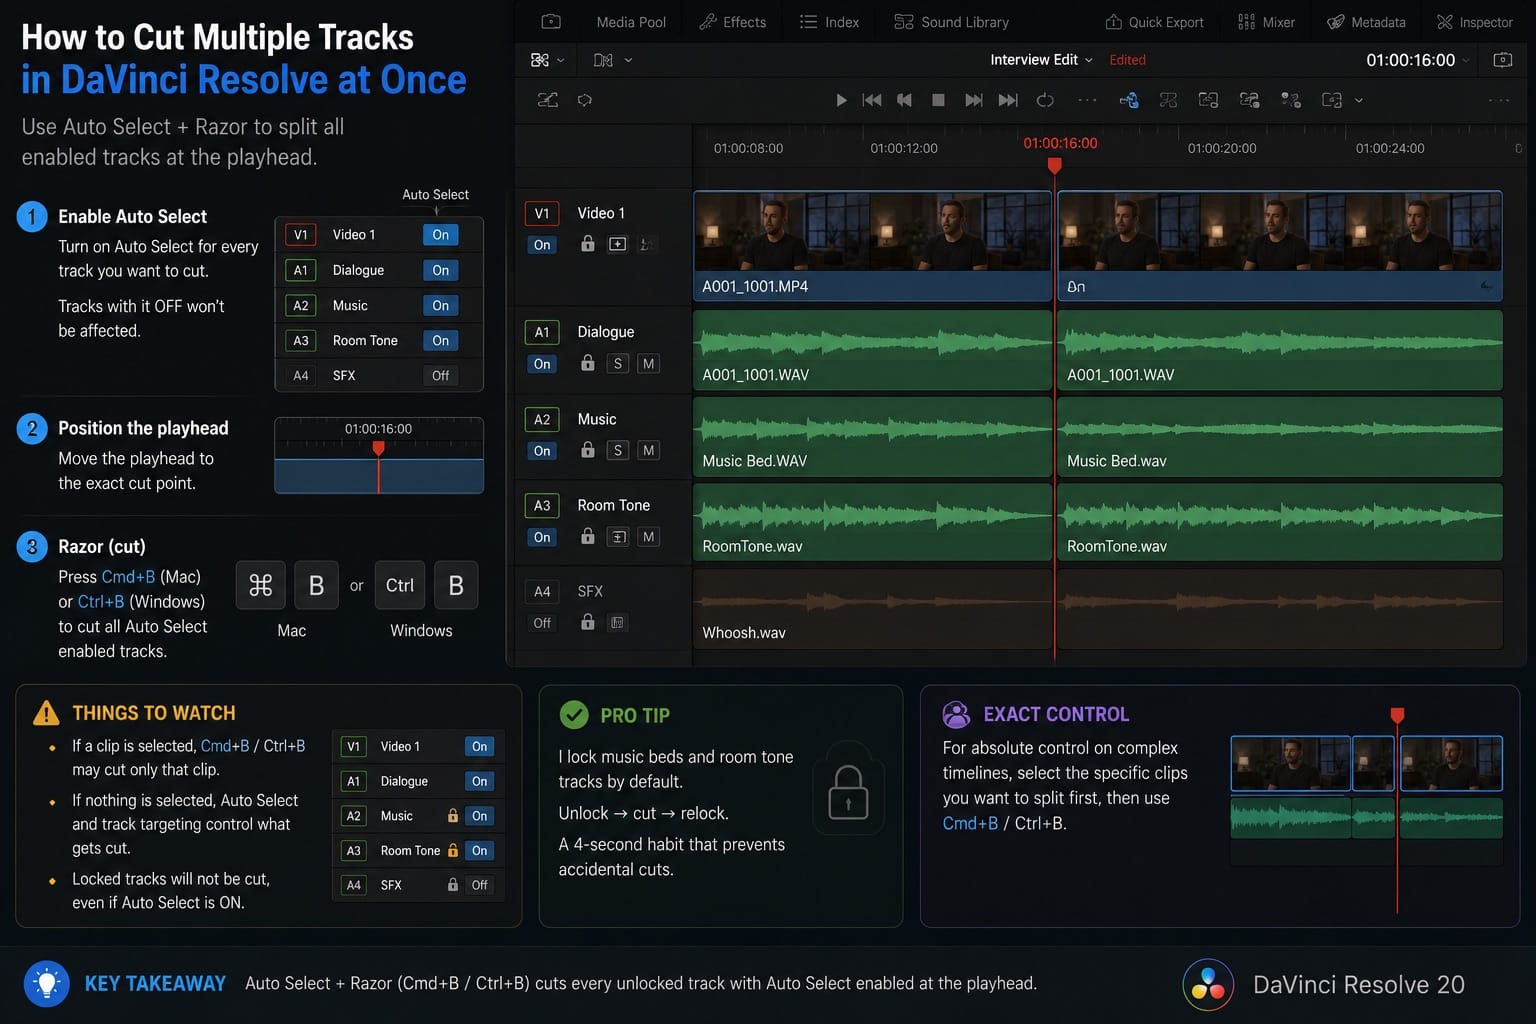
DaVinci Resolve does not treat multi-track cutting as a separate universal shortcut. It depends on selection, Auto Select, track targeting, and locked tracks:
- Enable Auto Select on every track you want to cut. Auto Select buttons sit in the track header to the left of the timeline. Tracks with Auto Select off won't be affected.
- Position the playhead at the cut point.
- Use Cmd+B (Mac) or Ctrl+B (Windows) to execute the Razor command, which adds a cut at the playhead position on all tracks with Auto Select active.
One thing to watch: if a specific clip is already selected when you run Cmd+B / Ctrl+B, Resolve may cut only that clip regardless of Auto Select settings. If nothing is selected, Auto Select and track targeting control what gets cut. Track locks also apply. Any track locked in the timeline header won't be cut regardless of Auto Select state. I lock music beds and room tone tracks by default on most projects, so a quick unlock-cut-relock cycle handles full structural splits. The 4 seconds it takes is worth not accidentally slicing a music track mid-bar.
For absolute control on complex timelines, select all the specific clips you want to split first, then execute the split. That limits the cut to exactly the clips you've selected, regardless of track targeting settings.
How to Split Audio and Video Separately in DaVinci Resolve
By default, audio and video in each clip are linked. Split one, both split at the same point. That sync is the right behavior for 90% of cuts.
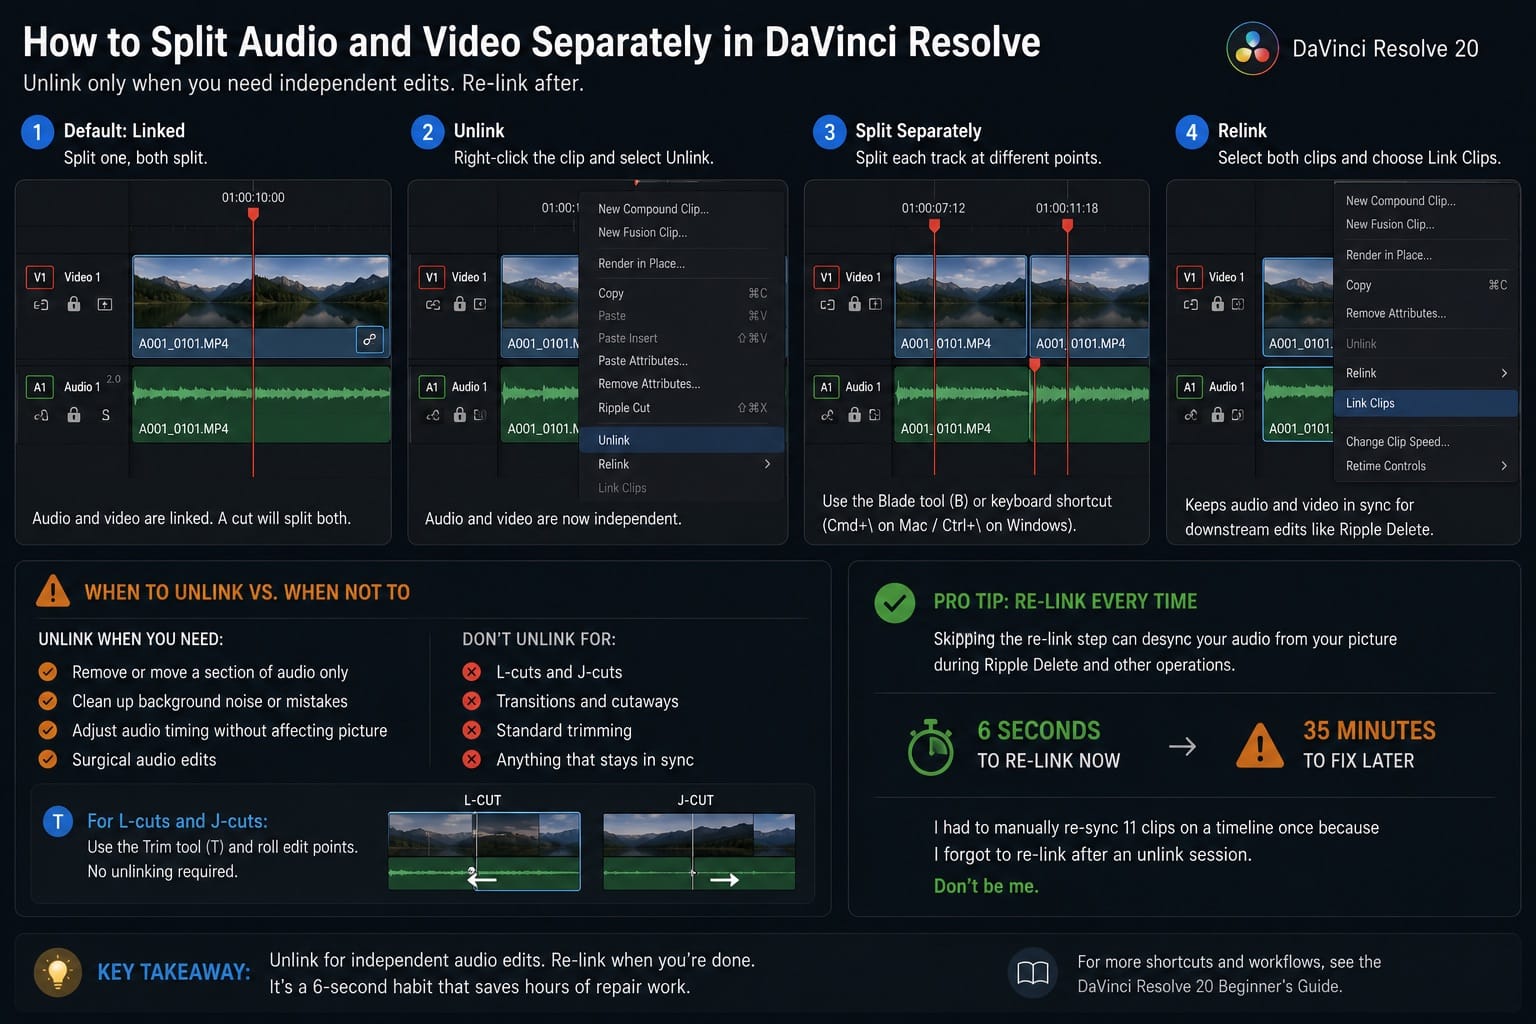
The mistake most editors make is unlinking clips before they actually need to. Only unlink when you need to move or delete an audio section that the video track isn't involved with.
To unlink and split independently:
- Right-click the clip on the timeline and select Unlink. Audio and video tracks become independent.
- Split each track separately using the Blade tool or keyboard shortcut.
- After editing, select both the video and audio clips you want to reconnect, then right-click and choose Link Clips.
That re-link step matters. Skip it and downstream operations like Ripple Delete can desync your audio from your picture. I had to manually re-sync 11 clips on a timeline once because I forgot to re-link after an unlink session. It's a 6-second habit that prevents 35 minutes of repair work.
For L-cuts and J-cuts, you don't need to unlink at all. Use the Trim tool (T) and roll individual edit points instead. Unlink is for surgical audio-only edits, not for standard cutaway or transition work.
How to Split Clips on the DaVinci Resolve Cut Page
Everyone tells beginners to learn the Edit page first. The Cut page is faster for assembly work: high shot counts, event footage, anything where you're moving through material quickly rather than sculpting it frame by frame.
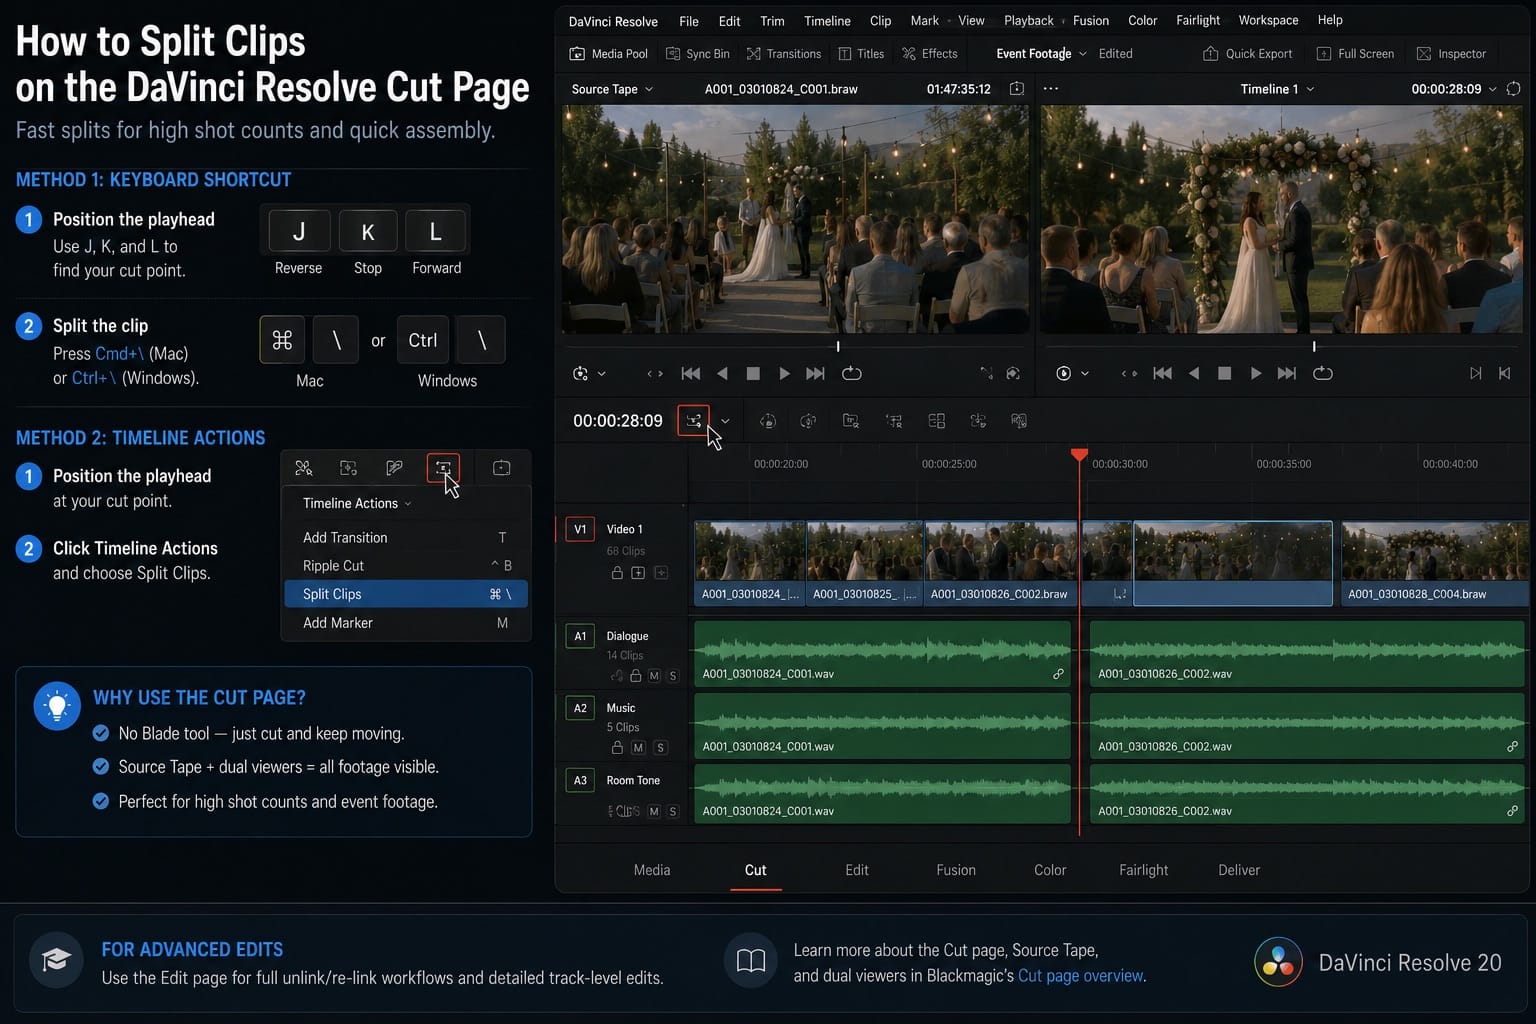
On the Cut page, there is no Blade cursor tool. To split a clip, you have two options:
- Position the playhead using J, K, and L, then press Cmd+\ (Mac) or Ctrl+\ (Windows).
- Or click the Timeline Actions icon in the Cut page toolbar and choose Split Clips.
On a large event coverage project, the Cut page got me through assembly in roughly half the time the Edit page would have taken. The Source Tape concept, combined with the dual-viewer layout, keeps all your footage visible while you work. Blackmagic's Cut page overview explains the Source Tape and dual-viewer concepts in more detail.
For full unlink and re-link workflows, use the Edit page. The Cut page supports audio-only trims for split edits and L/J-cuts, but detailed track-level surgery is easier and safer on the Edit page.
How to Automatically Split Clips Using DaVinci Resolve Scene Cut Detection
Use this only when you receive a pre-edited flattened export and need Resolve to detect existing cuts. This is not a general clip-splitting method. It's a workflow for working with finished video files where scene changes are already baked in.
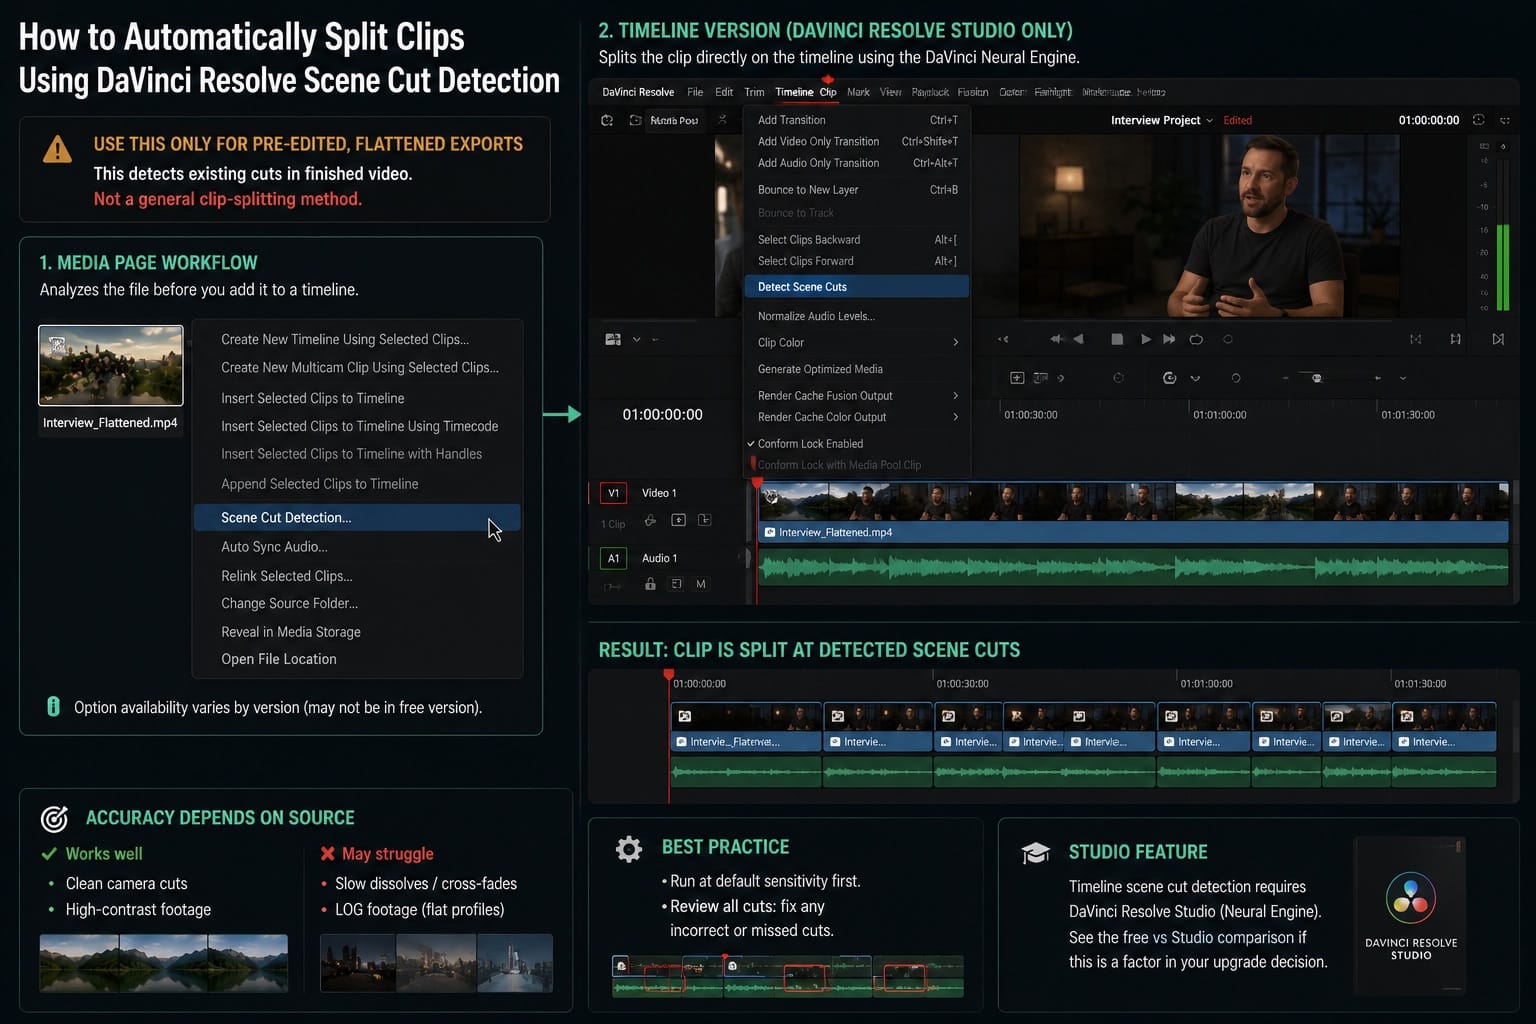
DaVinci Resolve has two scene-detection workflows:
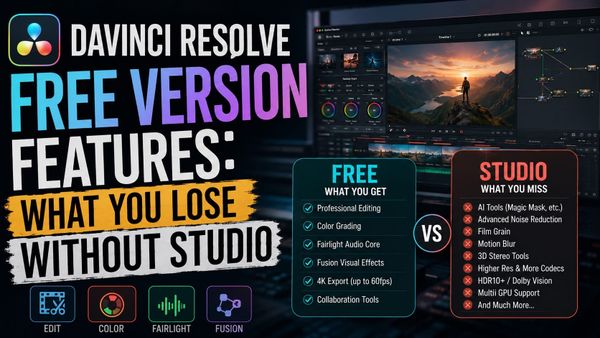
Media Page workflow: In the Media Pool, right-click the imported clip and look for Scene Cut Detection. This older workflow analyzes the file before you add it to a timeline. If you're on the free version, check whether this option appears in your installed build before building a workflow around it, as availability can vary between versions.
Timeline version (DaVinci Resolve Studio only): Place the clip on a timeline, select it, and go to Timeline > Detect Scene Cuts. The DaVinci Neural Engine splits the clip directly on the timeline. This is a Studio-only feature. See the free vs Studio comparison if the Neural Engine features are a factor in your upgrade decision.
Accuracy depends on the source. Clean camera cuts in high-contrast footage work reliably. Slow dissolves, cross-fades, and LOG footage with flat profiles trip it up. Run it at default sensitivity first, then manually review and fix any cuts it adds or misses.
Frequently Asked Questions
What is the keyboard shortcut to split a clip in DaVinci Resolve?
Press Cmd+\ (Mac) or Ctrl+\ (Windows) to split at the playhead while the Selection tool is active. To use the Blade tool manually, press B to activate it, click where you want to cut, then press A to return to the Selection tool.
How do I split a clip on the DaVinci Resolve Cut page?
Use Cmd+\ (Mac) or Ctrl+\ (Windows) with the playhead on the cut frame. There is no Blade cursor tool on the Cut page. You can also click the Timeline Actions icon in the toolbar and choose Split Clips. Use J/K/L to position the playhead precisely.
How do I delete a section after splitting in DaVinci Resolve?
Select the clip. Press Delete or Backspace to remove it and leave a gap. Use Shift+Delete or Shift+Backspace for Ripple Delete, which removes the clip and closes the gap automatically. Exact shortcut behavior can vary by platform. Check DaVinci Resolve > Keyboard Customization to confirm your mapping.
Can I split audio and video separately in DaVinci Resolve?
Yes. Right-click the clip and select Unlink. Audio and video tracks are now independent, and you can split or delete each one separately. Re-link them after editing by selecting both clips and choosing Link Clips from the right-click menu.
Is Scene Cut Detection available in the free version of DaVinci Resolve?
The timeline-based Detect Scene Cuts command uses the DaVinci Neural Engine and requires DaVinci Resolve Studio. An older Media Page detection workflow may be present in some builds before import, but availability in the free version can vary. Check your installed build before building a workflow around it.
How do I rejoin two split clips in DaVinci Resolve?
Go to Timeline > Join Clips. Both clips must come from the same original source clip. If they came from different sources, the option will be greyed out.