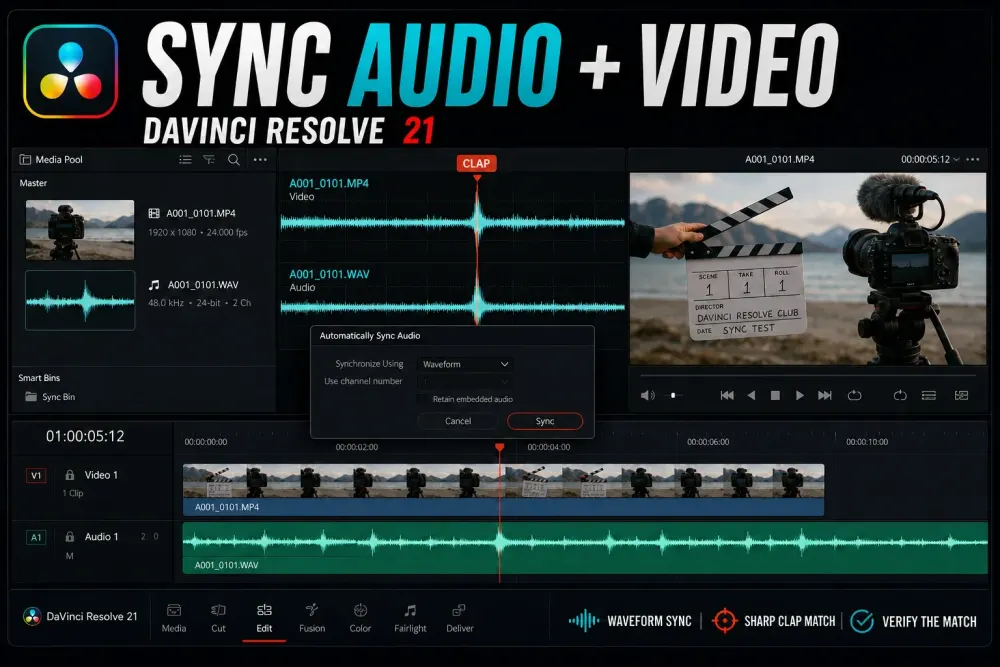
Quick answer: for a camera clip with scratch audio and a matching external WAV, select the pair (or their organized bins) in the Media Pool, right-click and choose Auto Sync Audio. Set Synchronize Using to Waveform. Enable Retain embedded audio if you want the camera scratch track to stay next to the production recording, then click Sync. Before the take goes into a timeline, look at the associated audio channels, listen around the clap and check the beginning, middle and end of anything long.
Don’t skip that last check. Auto Sync finds the starting match, but it has no way to make two unsynchronized recorder clocks run at the same speed. A constant offset, a waveform match that fails and drift that grows through the take are three separate problems, and each one has its own fix.
I checked the menu names and sync behavior against the DaVinci Resolve 21 Reference Manual on September 5, 2026, and went back over them in the 21.1 manual on October 2, 2026. For the steps around this one, the Resolve Workflow hub covers ingest, proxies, multicam and project organization.
Choose the sync method from the reference you actually recorded
| Reference available | Resolve method | Best use |
|---|---|---|
| Camera and recorder share synchronized timecode | Auto Sync Audio > Timecode | Fast batch sync for organized production sound and Broadcast WAV files. |
| Camera scratch audio matches the external recording | Auto Sync Audio > Waveform | Single-camera interviews, podcasts and location work without matching timecode. |
| Both clips have a matching In, Out or Marker | Auto Sync Audio > In / Out / Marker | One pair at a time when there is a known clap or cue but waveform analysis fails. |
| A visible clap and audio spike | Manual Media-page sync | Precise pair-by-pair control and difficult recordings. |
| Clips are already placed on separate timeline tracks | Auto Align Clips | Move overlapping timeline items to the lowest-numbered selected reference track. |
One camera and one external recorder don’t need a multicam clip. Reach for the Resolve multicam guide when you’re syncing several camera angles and cutting between them. Stay on this page when the main job is attaching production audio to source video.
Auto-sync by waveform in Resolve 21
- Put only the matching camera and audio files in one bin, or multi-select the matching video and audio bins. Smaller groups by day or scene give Resolve fewer false candidates and cut the analysis time.
- Right-click the selected clips or bins and choose Auto Sync Audio.
- Set Synchronize Using to Waveform.
- Leave Use channel number on Auto for the first try. Switch to Mix, or to the specific channel that carries the useful reference, when the other channels are silent or noisy.
- Enable Retain embedded audio if you want camera scratch audio available after sync.
- Enable Retain Video Metadata only when the camera’s scene and take metadata should win over matching metadata in the audio file.
- Click Sync, write down any clips Resolve reports as unmatched, then check one pair that succeeded.
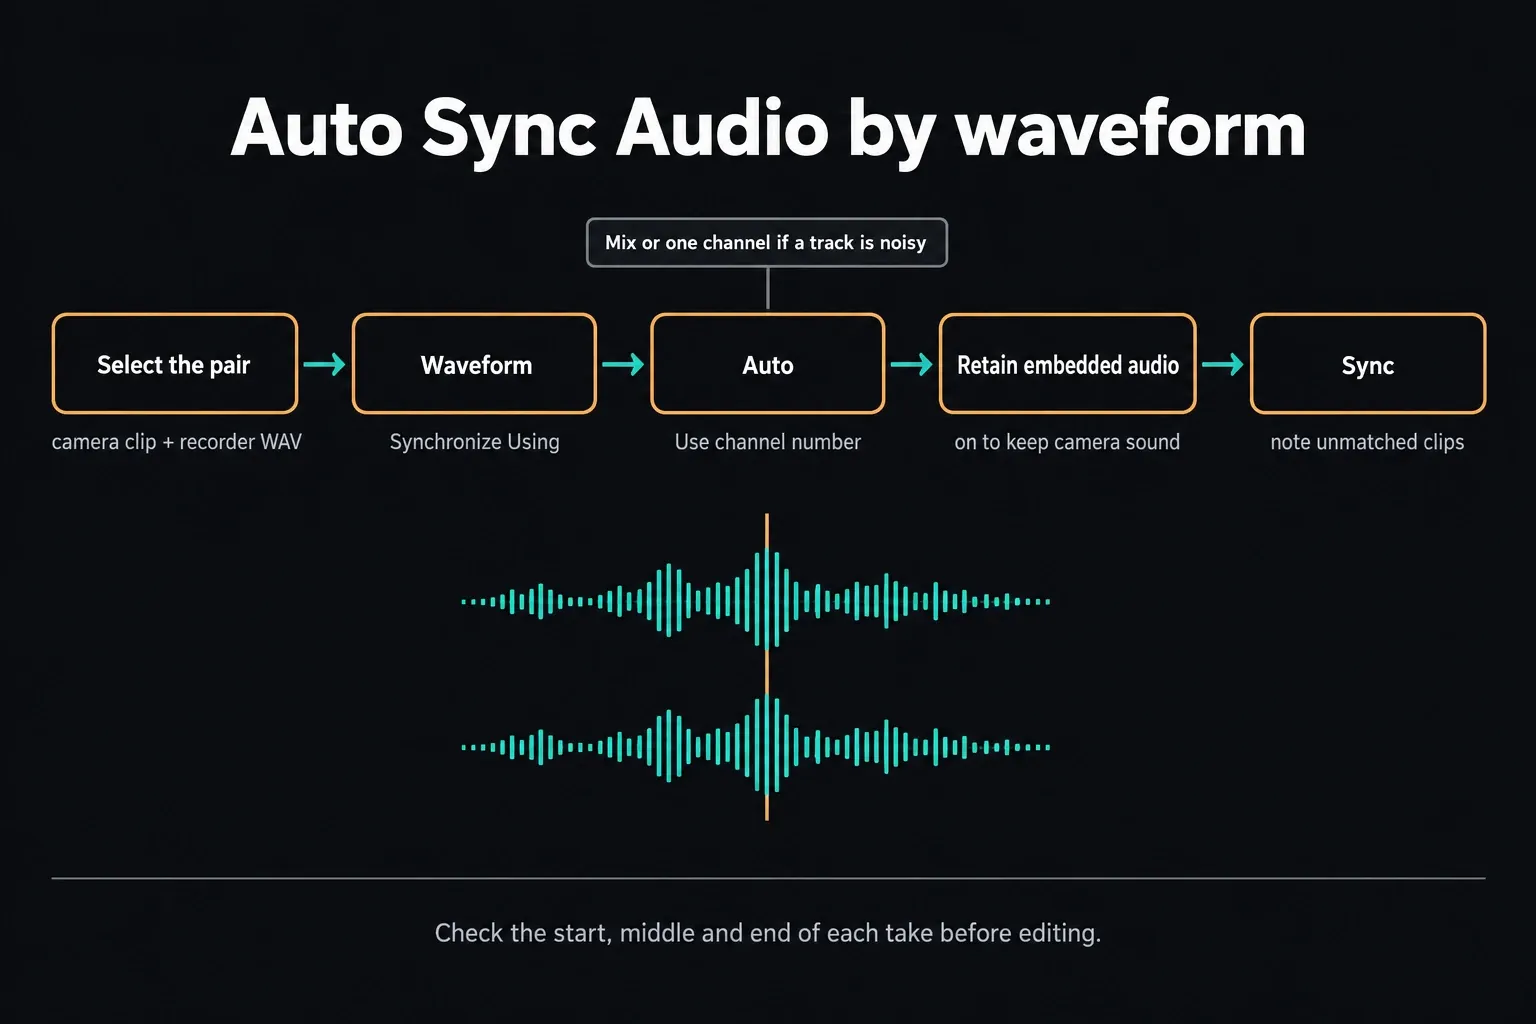
Waveform matching needs sound that both devices recorded. A camera file with no usable reference audio has nothing to match, and a muted timeline track is a different thing from a silent source file. Heavy clipping or noise makes matching less dependable. Re-recorded ADR won’t reliably line up with the original performance just because the words are the same.
Retain Embedded Audio vs the old “Append Tracks” wording
Older Resolve tutorials usually offer two commands: replace the camera audio, or choose “Based on Waveform and Append Tracks.” In the current Resolve 21 dialog, that decision lives in one checkbox, Retain embedded audio.
- Retain off: the newly synced production audio replaces the video clip's previous audio-channel result.
- Retain on: Resolve adds the production channels and keeps the original camera audio available as extra channels. Edit the clip into a timeline and the two recordings land on separate audio tracks.
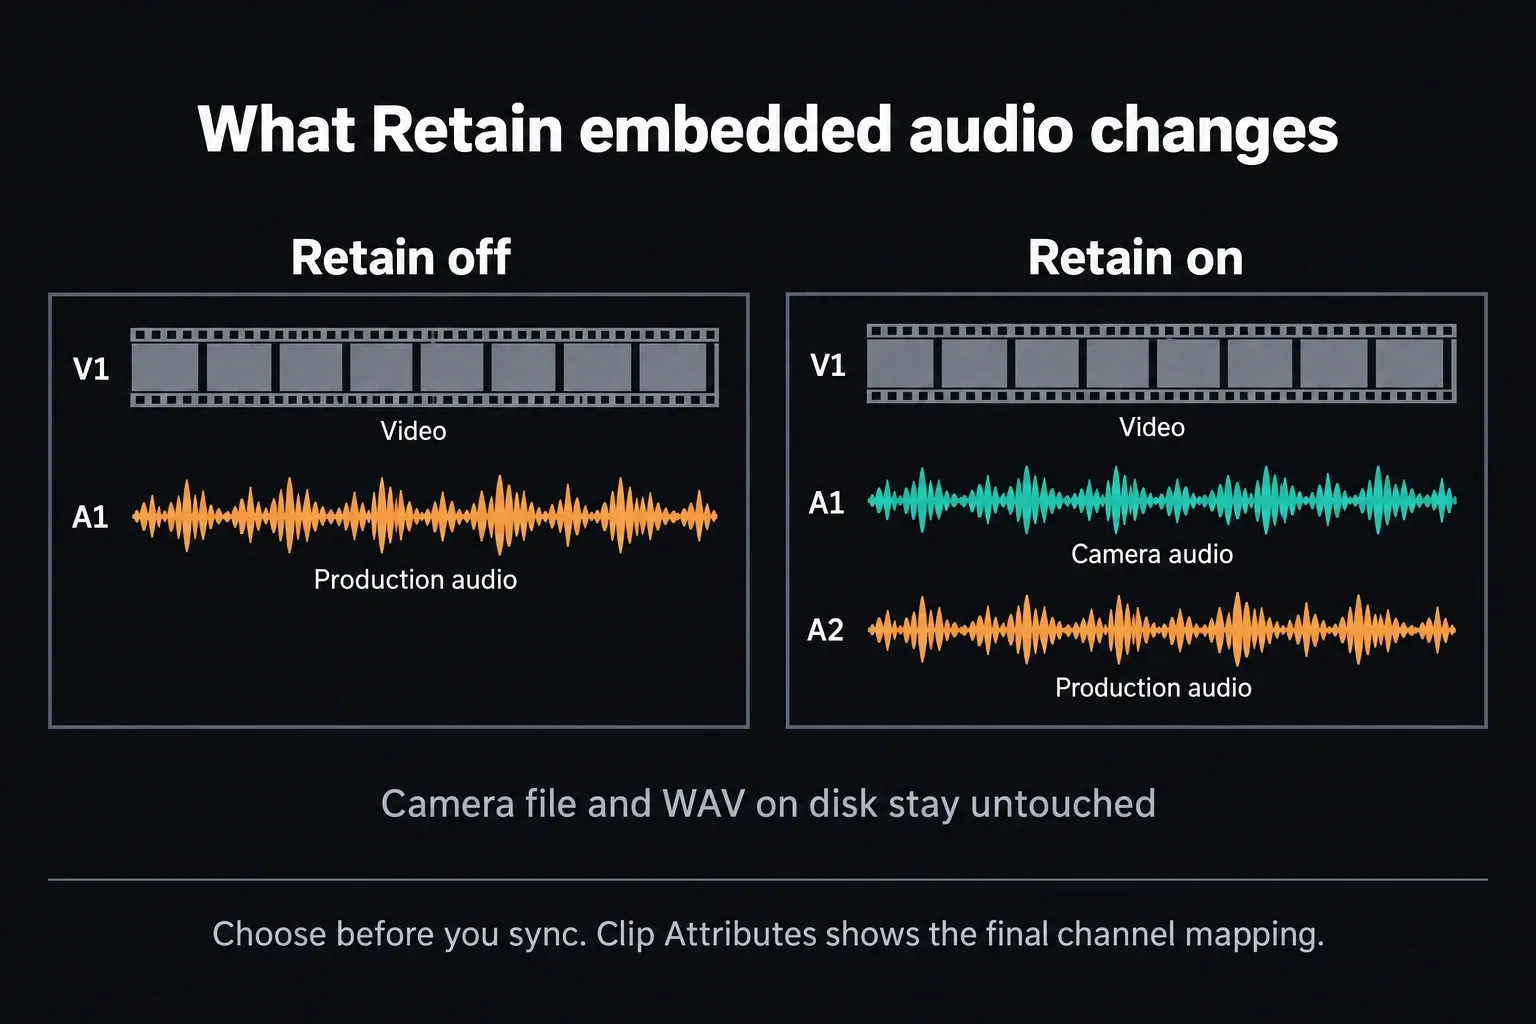
Neither setting deletes the camera source file or the external WAV from disk. What changes is the audio attached to the synced Media Pool clip. Right-click the synced clip, open Clip Attributes > Audio and read the channel mapping there. A second timeline lane is no proof that it holds the right microphone.
Batch-sync by timecode
Use Timecode when the camera and sound recorder were jam-synced or otherwise recorded matching code. Right-click the organized bins, choose Auto Sync Audio, select Timecode, decide whether to keep embedded audio and video metadata, then click Sync. When several Broadcast WAV files overlap with matching code, Resolve syncs every one of them onto extra tracks. Turn on Limit media pool audio sync to first timecode match in Preferences > User > Editing if you’d rather it pick the single most likely file.
Matching numbers don’t prove the devices were actually in sync on set. Spot-check the slate and the lips. If the code is consistently wrong, switch to waveform or a marked clap. Professional-looking metadata can still be wrong.
Manually sync a clap in the Media page
- On the Media page, set the Audio Panel to Waveform before selecting the source clips.
- Select the camera clip and park the Viewer on the frame where the slate closes, a hand clap lands or another sharp visual cue occurs.
- With the video Viewer parked there, select the matching WAV in the Media Pool. Its waveform opens in the Audio Panel.
- Scrub the audio to the matching sharp spike. Listen to confirm it’s the clap; a nearby peak might just be room noise.
- Before you link anything, open the three-dot menu in Audio > Waveform and set Retain embedded audio and Retain video metadata to match what you want to keep.
- Click Link/Unlink Audio in the Audio Panel to attach the aligned recording to the video clip.
You can also mark matching In points, Out points or Markers on one video and audio pair, then choose Audio Sync > Auto Sync Audio and pick that point type. Both clips need the same kind of point. You still identify the sync moment by hand, and Resolve handles the final association the same way every time.
Sync clips already on the timeline with Auto Align
Media Pool Auto Sync changes which audio belongs to the source clip in future edits. Auto Align Clips moves items that are already on the timeline. Put one clip on each track, make sure their timecode or waveforms overlap, select them, right-click and choose Auto Align Clips > Based on Timecode or Based on Waveform.
Every selected clip slides to line up with the selected clip on the lowest-numbered video or audio track. Clips with no overlapping timecode or matching waveform stay put, and the warning box lists them. When waveform alignment asks for a reference track, pick the recording whose waveform should be compared. Check the result before you keep editing.
Verify the sync before cutting
- After Auto Sync finishes, note any clips reported as unmatched.
- Open Clip Attributes and confirm the intended production channels are mapped.
- Listen to the slate or first hard consonant with camera scratch and production audio both available.
- Check lips, impacts or another clear event near the beginning.
- Check identifiable events in the middle and near the end of a long take. An audio badge on the clip proves nothing about sync, so confirm the recorder channels and listen.
A fixed offset is not drift
If the audio is early or late by the same amount at the beginning, middle and end, correct that fixed offset and leave the recording’s length alone. Resolve 21’s Trim > Slip Audio commands move audio by whole frames or by 1/10-frame subframes. Pick a clear transient or consonant, make the smallest correction that fixes the mismatch, and check all three points again.
If a slate is hard to find in a big shoot, the Resolve 21 Slate Finder guide shows how to locate slates and use their metadata. Listen to the matched result anyway before you start cutting.
Why Auto Sync fails
No matching reference audio
Waveform sync has nothing to grab in silence, unrelated room tone or a different performance. Use timecode, matching markers or In/Out points, or a manual visual and audio cue.
The useful sound is on another channel
Set Use channel number to the channel that actually holds the scratch audio, or try Mix when one channel has long gaps. Channel 1 isn’t automatically the right one to analyze, especially when it’s the noisy one.
Too many unrelated files are selected
Split the media by day, scene or known pair and rerun the failed clips in smaller batches. The completion warning names the pairs that need another method. Everything else in the batch may have synced fine.
The clip synced but plays no sound
Inspect Clip Attributes, track mute/solo, bus routing and output. If unrelated timeline clips are silent too, leave the sync workflow and use the Resolve no-audio diagnostic.
Audio starts in sync, then drifts
If the clap matches at the start but the lips are late by the end, a single offset can’t fix both points. Check an event in the middle too. A gap that grows steadily suggests drift, and a sudden jump calls for a close look around that spot. Two endpoint checks alone won’t tell you which problem you have.
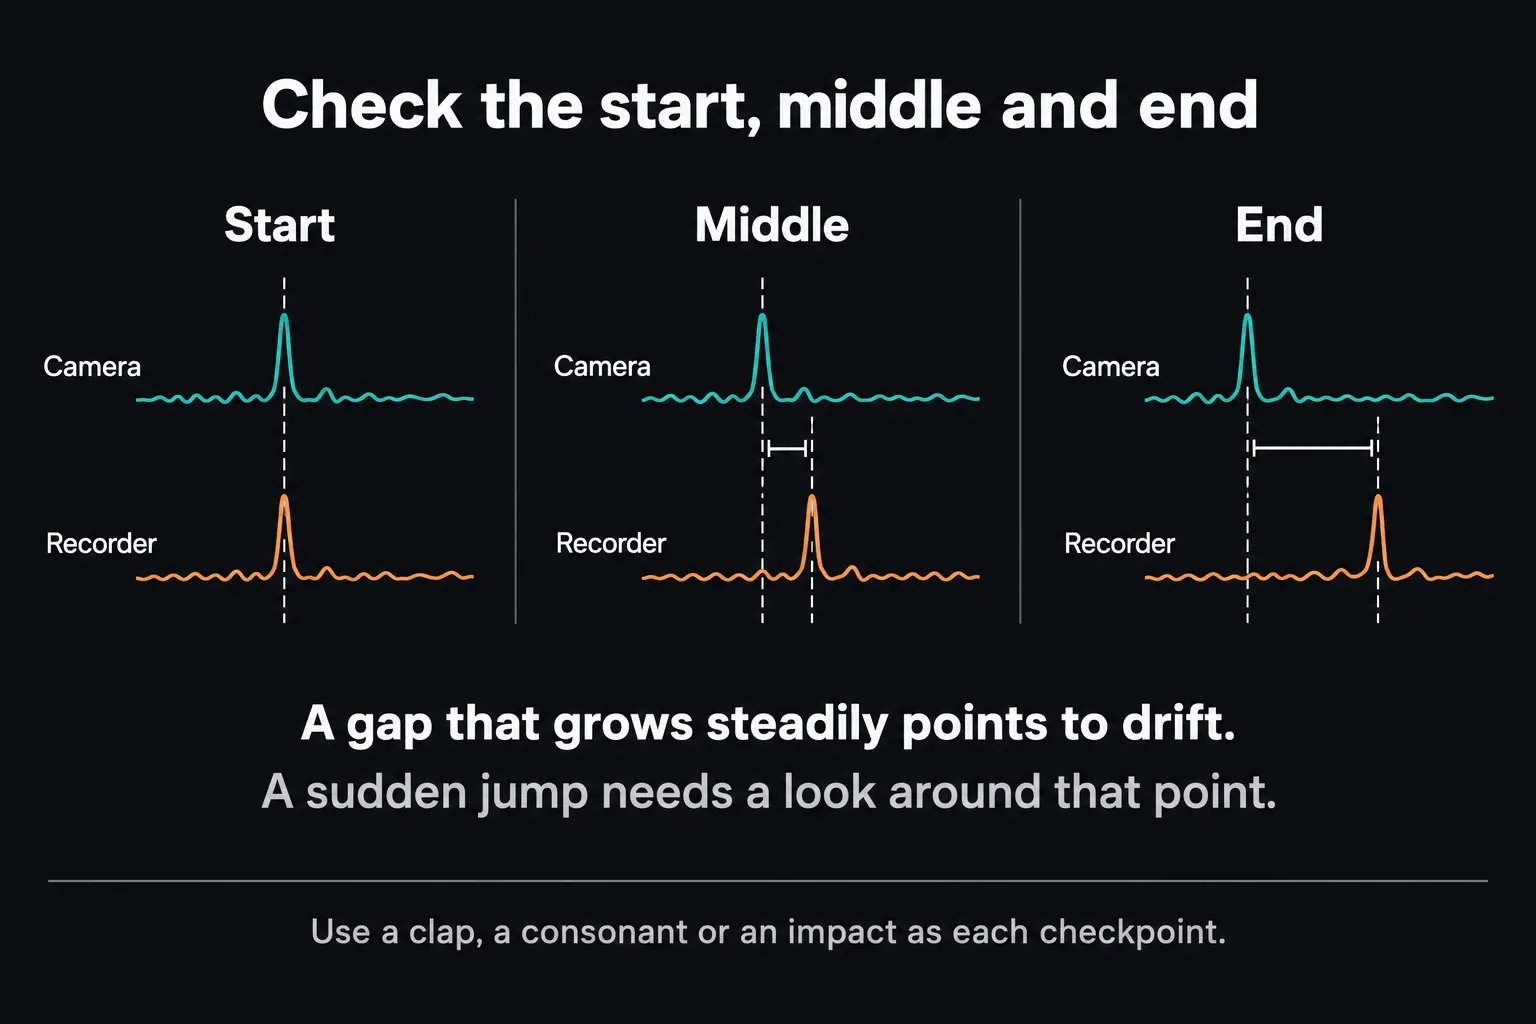
Independent device clocks can drift apart even after a perfect starting alignment. Sound Devices explains why locking recording clocks prevents drift. Irregular source timing and dropped or duplicated frames are other things to investigate. The file extension won’t diagnose any of them.
Resolve sets project audio to 48 kHz by default and automatically resamples imported audio at other rates to the timeline sample rate. So a 44.1 versus 48 kHz difference alone doesn’t explain drift.
A variable-frame-rate phone or screen recording deserves a look when its timing seems irregular, though VFR on its own doesn’t prove a fault. If source timing is the suspect, keep the original and test a constant-frame-rate copy.
When you’ve measured a steady rate mismatch, a controlled duration correction can be the right move. Check several events afterwards, because one stretch won’t repair every discontinuity.
Only the rendered file is out of sync
If the timeline stays aligned and only the delivered file is off, running Media Pool Auto Sync again won’t help. Re-import a short render into Resolve and compare a visible impact or spoken consonant against the source timeline. A correct re-import points to the external player or delivery path. A wrong one sends you to the rendered file and its export settings. Once the source pair is stable, the Resolve export hub helps you check codecs, audio export and delivery settings.
Leave the project timeline FPS alone when one take drifts. The Resolve frame-rate guide explains when timeline rates should be set. For a single drifting take, start with the source recordings.
Free vs Studio
The manual documents Media Pool Auto Sync, the waveform and timecode methods, manual linking and timeline Auto Align without a Studio-only marker, so the core workflow is the same in Free and Studio. Hardware timecode, recorder accuracy and the quality of the camera scratch audio shape the result far more than the edition badge.
Once the sync holds, the Fairlight audio hub covers cleanup, EQ, dynamics, buses and loudness. Confirm the correct recording stays aligned for the whole take before you start mixing.
DaVinci Resolve audio and video sync FAQ
How do I auto-sync audio and video in DaVinci Resolve 21?
Select the matching camera and audio clips or bins in the Media Pool, choose Auto Sync Audio, pick Waveform or Timecode, and decide whether to keep the embedded camera audio and video metadata. Click Sync, then check the result.
Should I use Waveform or Timecode?
Use Timecode when camera and recorder captured genuinely synchronized code. Use Waveform when both files contain the same reference sound. If neither exists, use matching markers/In-Out points or align a visible clap manually.
What happened to “Based on Waveform and Append Tracks”?
In Resolve 21 that choice is the Retain embedded audio checkbox in the Automatically Sync Audio dialog. Turn it on to keep the camera audio next to the newly synced production channels.
How do I sync clips already on the timeline?
Put one selected clip per track with overlapping timecode or audio, then choose Auto Align Clips based on Timecode or Waveform. Resolve lines the selected items up with the clip on the lowest-numbered selected track. Pick the waveform reference track if asked, then check the alignment.
Why does waveform sync fail?
The sources may lack matching sound, the useful reference may be on another channel, or the batch may contain unrelated files. Select the correct channel or Mix, reduce the batch, or use timecode, markers or manual clap sync.
Why is audio synced at the start but not the end?
Check events near the beginning, middle and end. A gap that grows steadily points to drift, and a sudden jump suggests a timing discontinuity. Look at device clocks and source timing before you apply any duration correction, because one fixed offset can’t correct a changing gap.
Does Auto Sync delete the original camera audio?
No source media gets deleted. Retain embedded audio decides whether the camera channels stay attached next to the synced production audio. The original camera file and the external WAV stay on disk.
