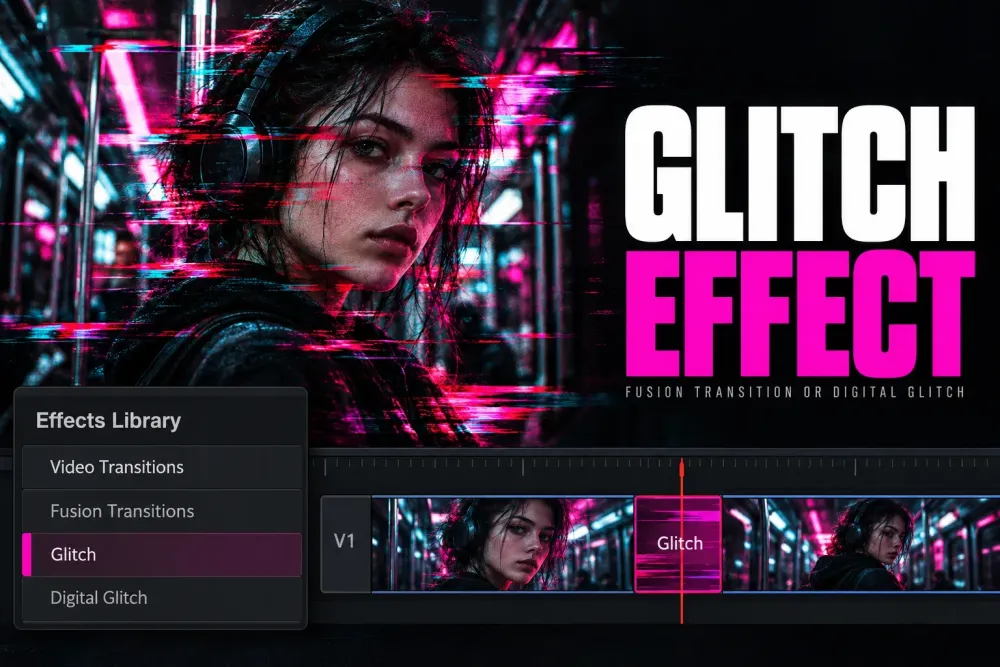
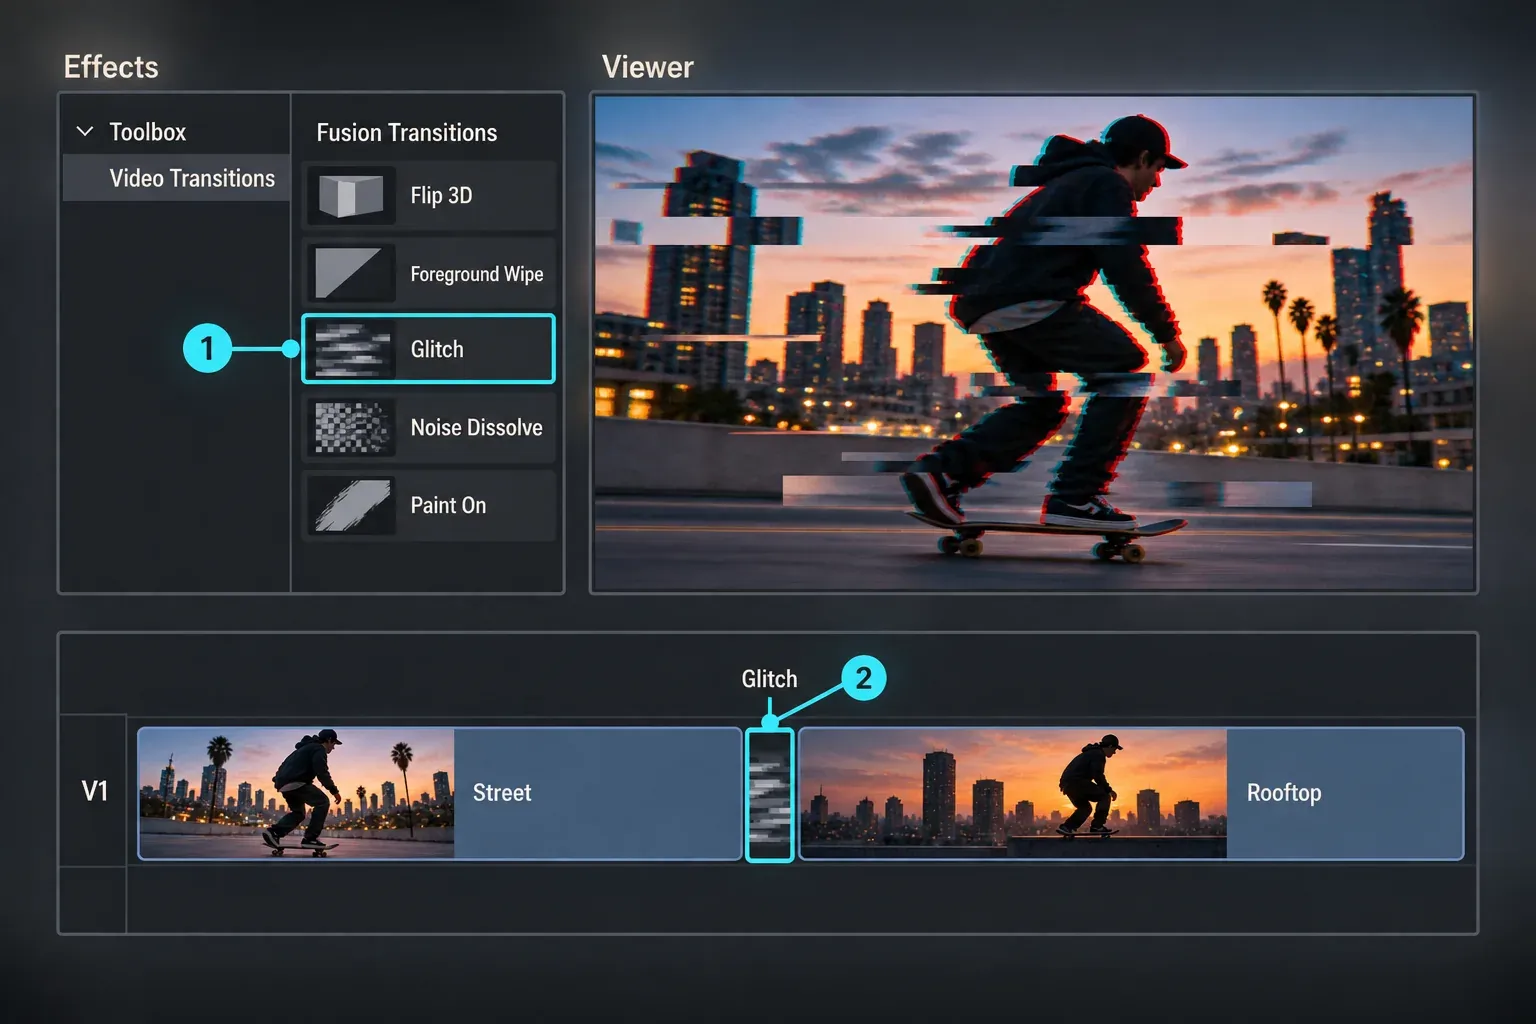
DaVinci Resolve has two built-in glitches, and both sit in the Effects Library. For a cut, drag Toolbox > Video Transitions > Fusion Transitions > Glitch onto the edit point and keep it a few frames long. For one moment inside a clip, blade off a short segment and drop Toolbox > Effects > Fusion Effects > Digital Glitch on it, because the effect covers the whole clip it lands on. Add texture with the free JPEG Damage and Prism Blur filters; Analog Damage and Camera Shake need Studio.
The manual describes the Glitch transition as a digital breakup that's best used in very short durations of a few frames. I'd start with those two because both are drag-and-drop, and BeginnersApproach's free-version VHS recipe is built on Digital Glitch. The RGB split, the Fusion build and the packs come in when you want more control or more variety.
Pick a glitch route
Eight routes give you a glitch in Resolve. They differ in where you work, what each edition allows and how much control you keep:
| Route | Where | Edition | Best for |
|---|---|---|---|
| Glitch transition | Effects Library > Toolbox > Video Transitions > Fusion Transitions | Free | A fast breakup on a cut |
| Digital Glitch | Effects Library > Toolbox > Effects > Fusion Effects | Used in free-version recipes | A glitch at one moment inside a clip or title |
| JPEG Damage, Prism Blur, Scanlines, Mosaic Blur, Stop Motion | Effects Library > Open FX, or Open FX on the Color page | Free | Blocks, color fringes, rolling lines and stutter |
| Analog Damage, Camera Shake | Effects Library > Open FX | Studio | VHS damage and jolts |
| Splitter/Combiner with Node Sizing | Color page | Free | An exact RGB split you can keyframe |
| Displace fed by Fast Noise | Fusion page | Free | A breakup of your own, saved as a macro |
| Cut-based stutter | Edit page timeline | Free | Time jumps with no effect applied |
| Glitch pack | Third-party transitions and overlays | Depends on the pack | Many variations without building them |
A full VHS look with tracking shifts and color bleed is Analog Damage territory, which means Studio. In the free version, one route is the Digital Glitch recipe with Scanlines on top.
Add the Glitch transition to a cut
Fusion Transitions are Fusion effects packaged as transitions. Once one is on the timeline, it trims like any other transition and shows its parameters in the Inspector, as the manual's Fusion Transitions section explains.
- Open the Effects Library on the Edit page and go to Toolbox > Video Transitions. Scroll to Fusion Transitions and find Glitch.
- Drag it onto the cut. The edit point needs overlapping clip handles, and you can drop the transition so it ends on, centers on or starts on the cut.
- Select the transition and type a few frames into Duration in the Inspector. A dropped transition takes the standard duration from your editing preferences, which is 1 second by default.
- To change how the breakup is built, right-click the transition and choose Open in Fusion Page. Its nodes open there, and changes are saved automatically when you go back to the Edit page.
Noise Dissolve sits in the same list and uses Fusion's FastNoise tool as the transition, so it's the softer choice when Glitch feels too harsh for the cut. If the transition refuses to drop or trims oddly, the transitions guide covers handles and the usual fixes.
Glitch one moment with Digital Glitch
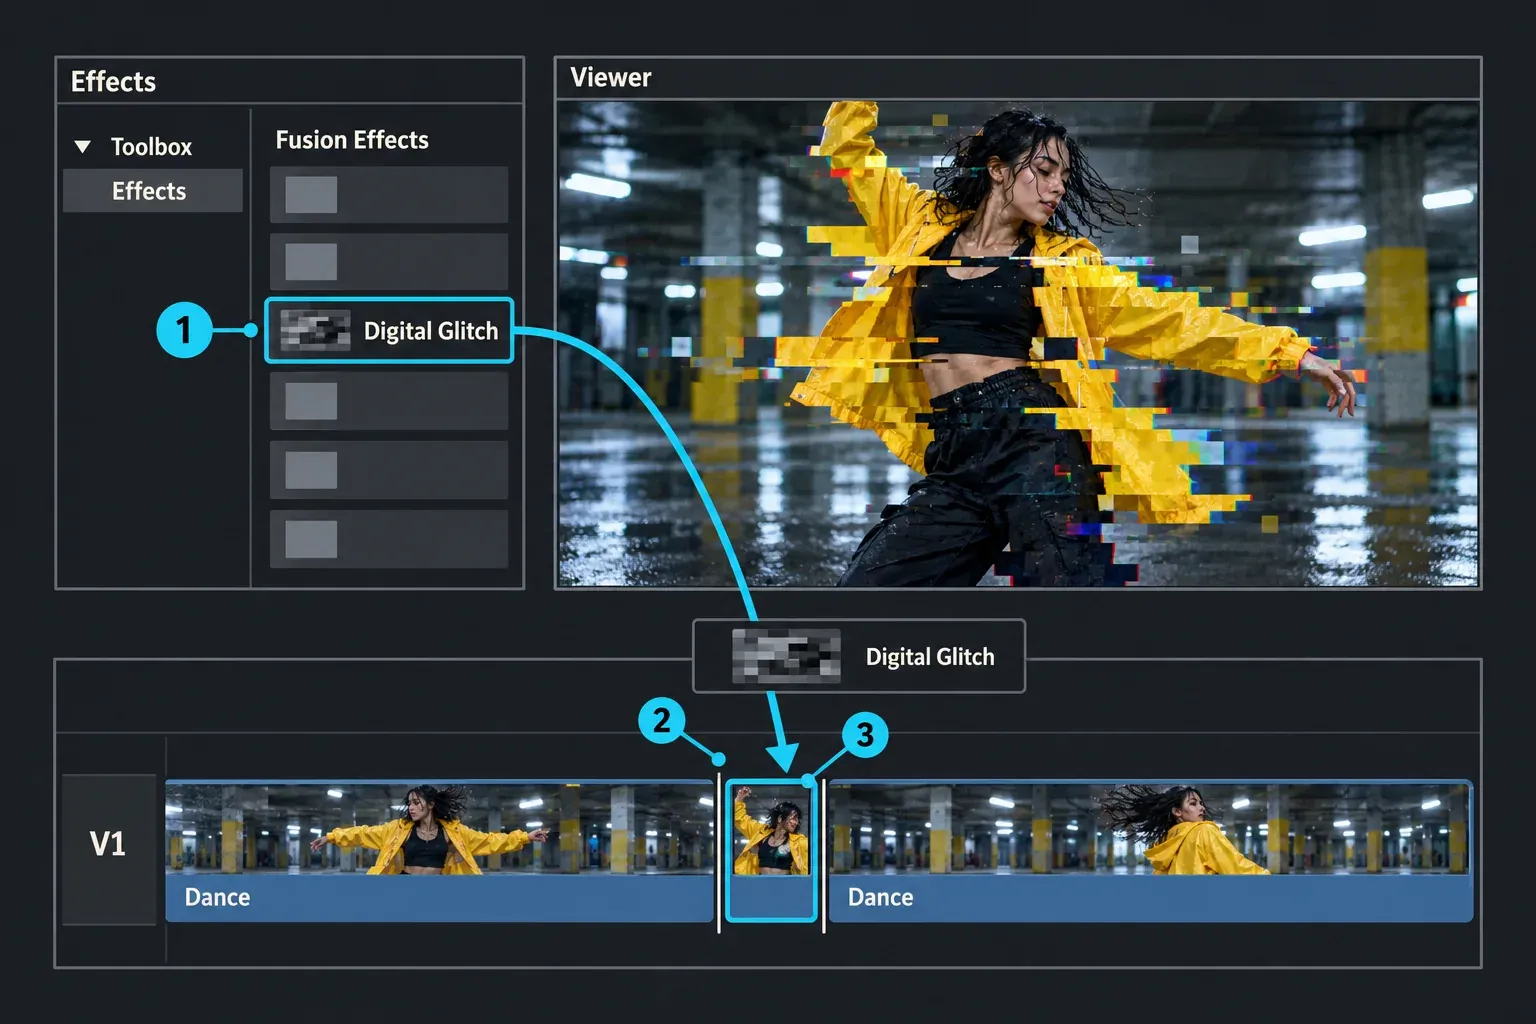
Digital Glitch is a Fusion Effect, so it lives in the Effects Library under Toolbox > Effects > Fusion Effects, and searching Open FX won't find it. It applies to the full length of whatever clip it lands on, which is why the published recipes cut a short piece first.
- Park the playhead where the glitch should start, press B for the Blade tool and click the clip. Alternatively, the default Command-Backslash shortcut (Ctrl-Backslash on Windows) cuts at the playhead without switching tools; check which tracks have Auto Select enabled first.
- Press the Right Arrow key six times to move six frames, then cut again. Press A to go back to the Selection tool.
- Drag Digital Glitch from Fusion Effects onto the short segment.
- Repeat at the next moment. BeginnersApproach uses many 5 to 6 frame sub-clips to get many glitches in one shot.
The effect's controls appear in the Inspector's Effects tab. An Edit in Minutes lesson lists Glitch Position X/Y, Glitch Width/Height and Glitch Chroma Scale, and describes the effect as resource-intensive. A short segment limits how much of the edit uses the effect; it doesn't guarantee faster processing of each affected frame. If playback stalls, use the caching steps below.
BeginnersApproach's free-version recipe uses Digital Glitch and warns that Studio-only effects such as Analog Damage add a large watermark in the free version. Check the effect in your installed version before building the edit around it. If it is unavailable or a Studio watermark appears, use the free Resolve FX or Fusion routes below.
For a title, make the text a compound clip first, then blade and glitch the compound the same way; BeginnersApproach runs its sub-clip trick on a compound text clip. The compound clips guide shows how to make one.
Build a free glitch stack with Resolve FX
Resolve FX are in the Effects Library on the Cut, Edit and Fusion pages and in the Open FX browser on the Color page. Six of them carry no Studio marker in the manual and cover most glitch textures, and two more need Studio:
| Filter | What to push | Edition |
|---|---|---|
| JPEG Damage | Lower Quality to reduce bit depth; raise Resolution for bigger macroblocks | Free |
| Prism Blur | Blur Strength to 0, then Aberration Distance and Aberration Strength for a color fringe | Free |
| Scanlines | Animate Line Shift for rolling lines | Free |
| Mosaic Blur | Pixel Frequency for a pixelated hit | Free |
| Stop Motion | Frame Repeat (1 to 10) for a staggered cadence, Sampling Variation for uneven motion | Free |
| Fast Noise | Use to Warp Image, so the noise distorts the picture | Free |
| Analog Damage | A preset, then Ghosting, Chroma Misalignment and the Scan shifts | Studio |
| Camera Shake | A short, strong shake for a jolt | Studio |
Filmmaking Elements' first glitch recipe stacks Camera Shake and JPEG Damage on a duplicate on V2, with Motion and Speed Scale at 1.4 as a starting point, and Graphic Design Resource pairs the same two filters and keyframes them in. Camera Shake is Studio-only in the 21.1 manual, so in the free version swap it for Stop Motion or for a few keyframed Position jumps in the Inspector.
Analog Damage is the VHS filter, with presets plus controls for ghosting, chroma misalignment and scan shifts. Fusion's older TV node does a similar job, but the manual calls it "mostly obsolete" next to Analog Damage.
To glitch several clips at once, put the filters on an adjustment clip above them. The adjustment clips guide covers the setup; read the lag fix below before you put Digital Glitch on one.
Make an RGB split
An RGB split offsets the red, green and blue channels so edges pick up color fringes. Resolve gives you three ways to build one, from a single slider to a node tree.
Fast: Prism Blur on the Edit page
Filmmaking Elements' RGB split guide sets Prism Blur's Blur Strength to 0 so only the fringe remains, then raises Aberration Distance and Aberration Strength. Keyframe Aberration Distance up for a few frames and back to zero, and the split hits and disappears like a glitch.
Exact: Splitter/Combiner on the Color page
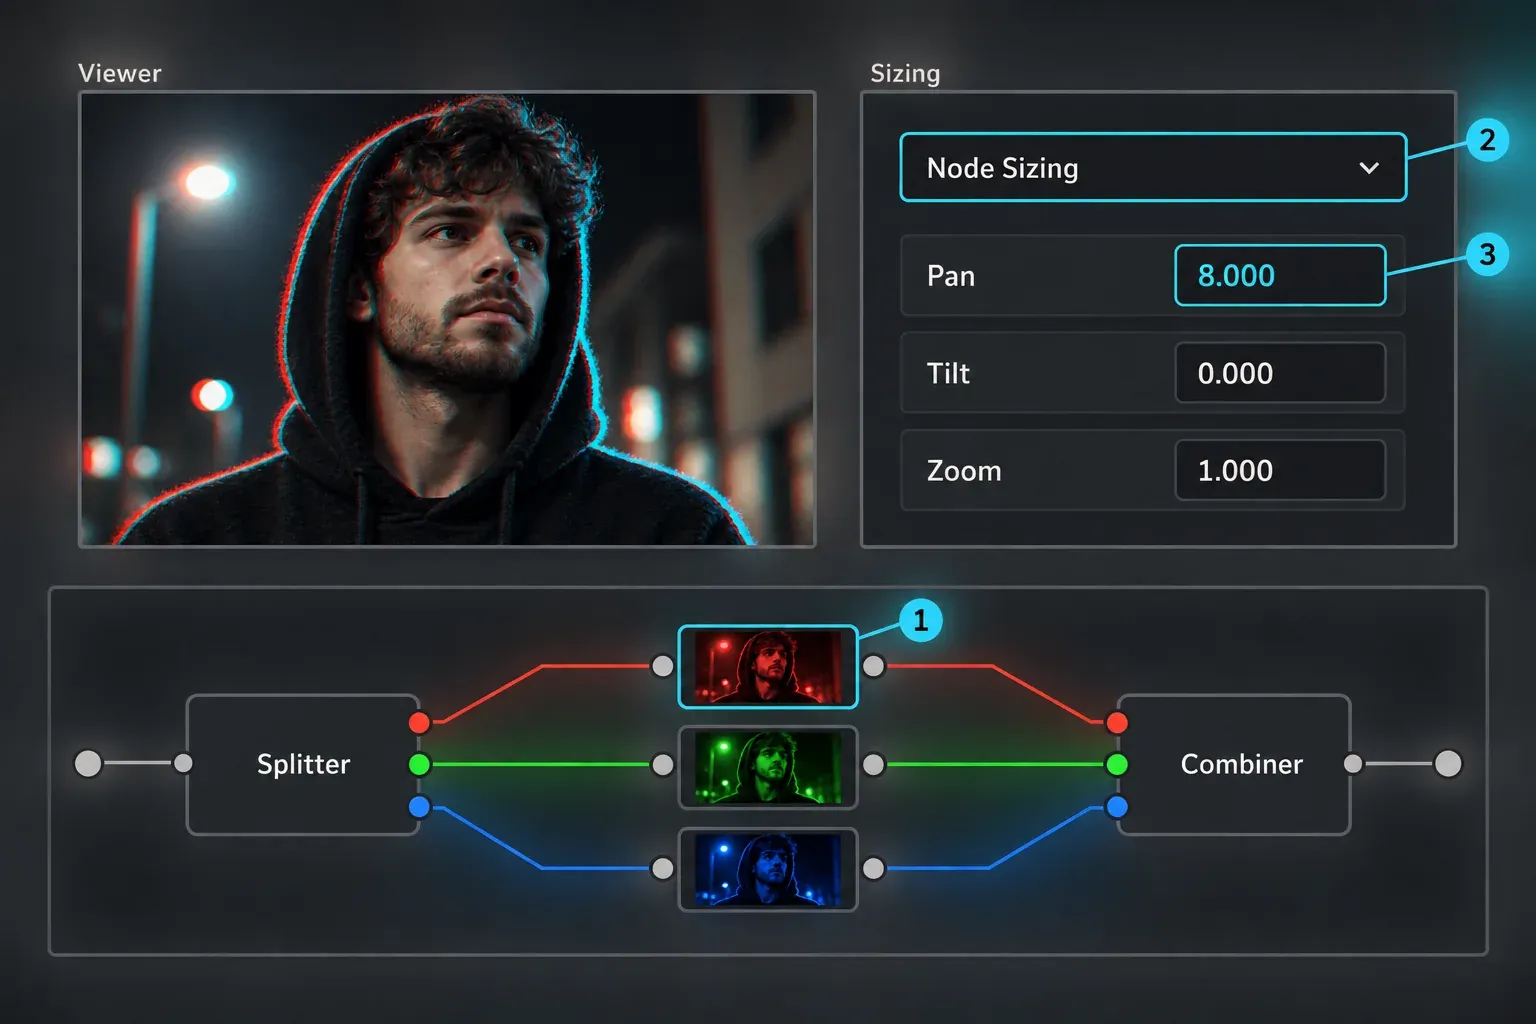
- On the Color page, choose Color > Nodes > Add Splitter/Combiner Nodes (Option-Y on Mac, Alt-Y on Windows). Resolve adds a Splitter and a Combiner already connected to three Corrector nodes, one per color channel.
- Select the red channel's node, open the Sizing palette and switch it to Node Sizing.
- Set Pan for that node. BeginnersApproach uses a Pan of 8 on its first node; give the blue node the opposite value if you want fringes on both sides.
- Keyframe Pan so the split jumps on and off. Node Sizing keyframes land in that node's Node Format track in the Keyframe Editor.
I go here when the offset has to be exact or keyframed, because Node Sizing takes typed values per channel and the manual names channel realignment as one of its two main uses. If the Splitter layout is new to you, the nodes guide explains how the node tree reads.
Flexible: Channel Booleans in Fusion
The same Filmmaking Elements guide builds the split from three Channel Booleans nodes, each keeping one channel with the others set to Black, then recombines them through two more Channel Booleans nodes set to Add and adds a Perturb modifier on a Transform's Center for jitter. The Channel Booleans menus choose which input channel supplies each output channel.
Build a reusable glitch in Fusion
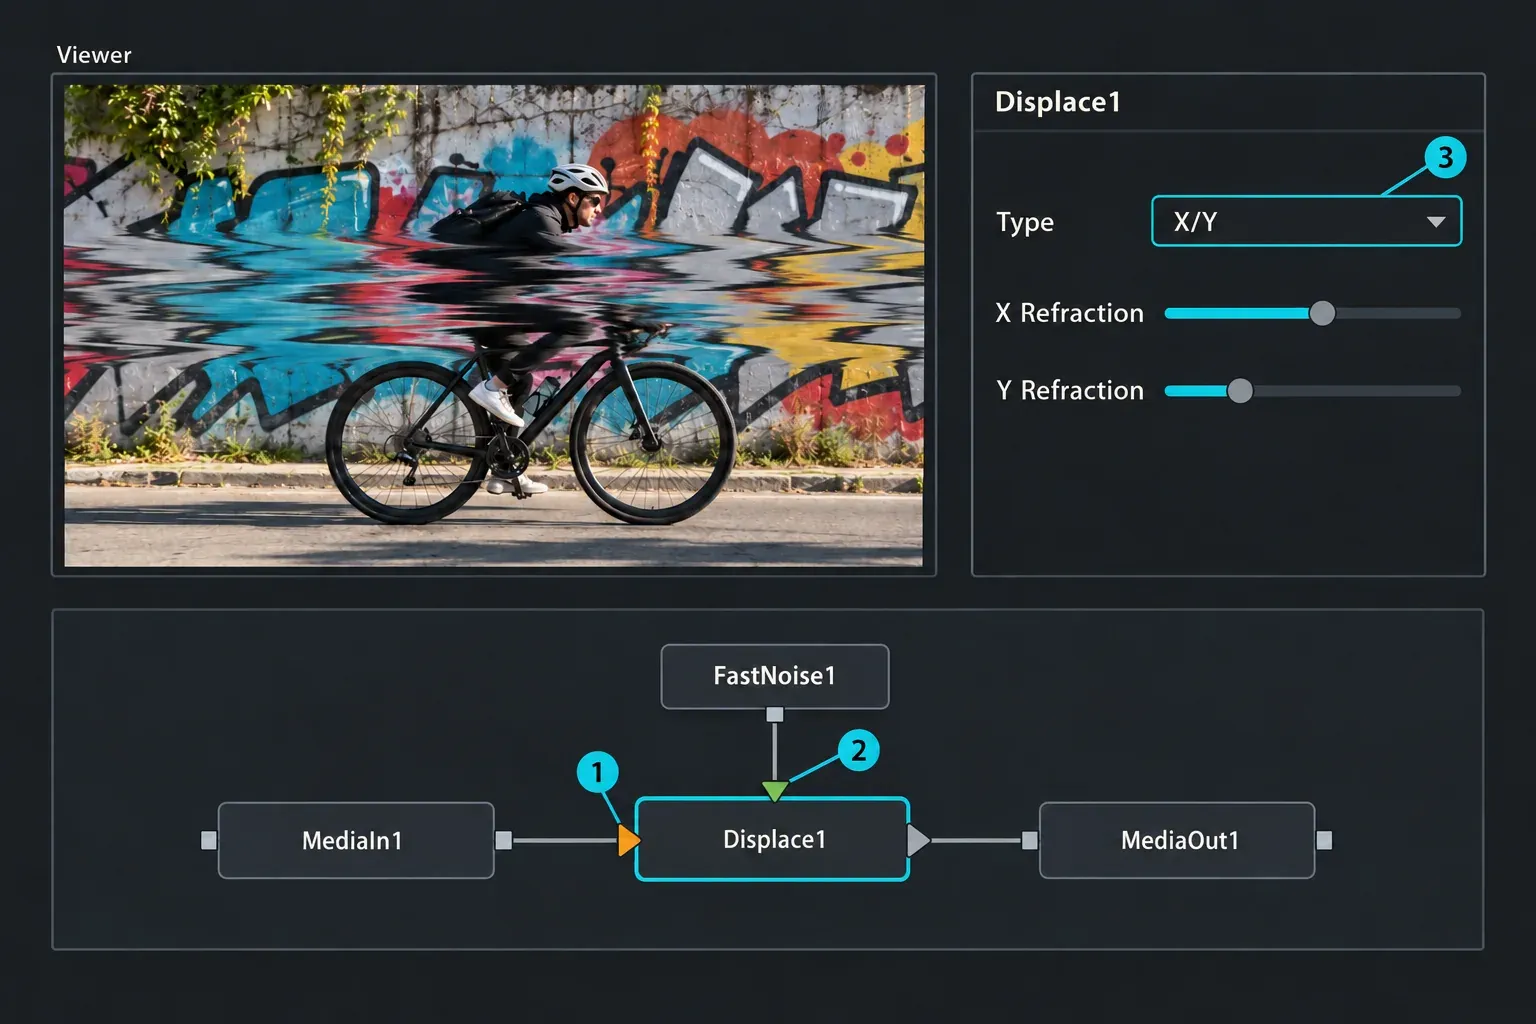
Fusion's Displace node pushes pixels around using another image as a map. Feed it noise and you get a digital breakup you can animate, save and reuse on any clip.
- Select the clip on the Edit page and open the Fusion page. MediaIn1 is already connected to MediaOut1.
- Add a Displace node between them, so MediaIn1 feeds its orange input, the primary image.
- Add a FastNoise node and connect it to Displace's green Foreground input, the image that drives the displacement.
- In Displace, set Type to X/Y, pick a Refraction Channel for each axis and raise the X Refraction and Y Refraction sliders a little.
- In FastNoise, click the Lock X/Y checkbox above Scale to split it into separate X and Y sliders, then set the two far apart so the noise stretches into streaks. Seethe Rate makes the pattern drift over time without keyframes.
- Keyframe X Refraction from zero up and back over a few frames. In the Spline Editor, select those keyframes and click Step In, which the manual describes as similar to a hold keyframe, so the breakup snaps on instead of easing in.
Glitchology gives the same timing advice from the editing side: hold an offset for 1 to 2 frames, then snap to the next, to create an abrupt tear. FreeVisuals' Displace walkthrough adds a Color Corrector and a Brightness Contrast node after the displacement for color distortion and flicker.
I'd save the finished nodes as a macro, because a macro saved to Templates/Edit/Effects shows up in Fusion Effects on the Edit page and then drops onto any clip the way Digital Glitch does. The macros guide walks through saving one, the Fusion beginner's guide covers connecting nodes, and the keyframes guide explains interpolation on the Edit page.
Glitch packs and footage
Packs trade control for speed. These five show what free and paid options include:
| Pack | Glitch items | Price | Notes |
|---|---|---|---|
| Video Editor Studio Glitch Transitions | 20 transitions | $19 | Resolve 19 to 21, Free and Studio; not for the iPad version |
| ResolveX free transitions | 1 Glitch among 10 | Free | Listed for Resolve 21 and earlier |
| GR Seamless Transitions free pack | Glitch category within the announced 630+ free transitions | Free | Author's forum announcement: Free/Studio 18.6+, 20.1.1+ on version 20; listed frame rates from 23.976 to 60 fps. Check the current download. |
| TuneSquid VHS Glitch and VHS Glitch Chroma | 2 transition products; VHS Glitch lists 2 presets | Free | DRFX files; vendor says drag onto the Fusion page and restart. Verify download availability. |
| Motion Array Glitch Effects | 100 collections of glitch overlay effects | Subscription | Resolve template, adjustable colors, 1920x1080; created for Resolve 18, newer-version compatibility may vary |
Glitch overlay clips work like any other overlay. Put the clip on the track above and set Composite Mode to Screen, which the manual recommends for lighter elements in a field of black such as noise, grain or damage layers. Mixkit's glitch clips download free without a watermark, but the Mixkit license comes in a free and a restricted version, so check each item. The Pixabay license allows use without attribution but prohibits commercial use relating to goods and services when the content contains recognizable trademarks, logos or brands. The Vecteezy Free License requires attribution and limits video, film or production projects to budgets of $1,000. The free templates roundup lists more packs.
Published glitch recipes and pack specifications compared
These five published examples use frame counts for different jobs: an effect segment, a source offset, a repeated frame or a held keyframe. Their settings help explain the techniques, but do not establish one ideal glitch duration. The pack specifications come from the product pages and the GR author announcement above.
| Recipe | What happens | Frame setting and meaning |
|---|---|---|
| BeginnersApproach Digital Glitch sub-clip | Digital Glitch on a bladed segment | 6-frame effect segment; 5 to 6 frames for repeated segments |
| Filmmaking Elements time skip | Duplicate shifted earlier before cutting and alternating sections | 3-frame temporal offset; total burst length is not specified |
| Filmmaking Elements stutter-back | A cut section extended backward and aligned with the preceding clip | 4-frame backward extension; no separate reverse-playback command is described |
| Filmmaking Elements time stutter | One-frame sections sampled with gaps, then grouped and repeated | 1-frame source sections, with 3 frames skipped between samples; repetitions set the total length |
| Glitchology screen tear | Keyframes held before a horizontal offset changes | 1 to 2 frames per held offset; not the total effect duration |
At 24 fps, a 6-frame segment lasts a quarter second; at 60 fps it lasts a tenth of a second. That is why the same frame count can feel different on different timelines. BeginnersApproach uses six-frame segments, while the manual recommends a few frames for the Glitch transition. Adjust the duration while watching the cut in motion.
Video Editor Studio's pack contains 20 transitions for $19, or $0.95 per included transition. ResolveX includes one Glitch variation among ten free transitions. TuneSquid lists two free VHS-glitch transition products, and the GR announcement lists a Glitch category without a separate item count. The Motion Array product is a template collection of overlay effects, so its count is not directly comparable with a transition count.
My starting point is a short Glitch transition on a cut, because that's the use the manual describes. For Digital Glitch, the six-frame BeginnersApproach segment is a concrete example to try, then shorten or extend it for the shot and frame rate. A saved Fusion macro is useful when the same custom look recurs; a paid pack makes sense when the edit needs many distinct transitions quickly.
Fix common glitch problems
Digital Glitch crawls on an adjustment clip
In a Blackmagic forum report on Digital Glitch lag, a user observed about 0.125 fps, roughly eight seconds per frame, on an adjustment clip. The poster linked that slowdown to a Fusion frame range starting at a high number and described this workaround: put a fresh, empty adjustment clip on the timeline, drag it into the Media Pool, remove that empty timeline instance, then drag the Media Pool copy back. The reported frame range then began at 0; that copy could be reused or kept in a Power Bin. Use a fresh empty clip for this workaround so an existing adjustment setup stays intact.
The Edit page goes black
In the same thread, the poster reported that saving the project and restarting Resolve cleared a black Edit page. In another thread on Studio 18.1.4, a Fusion comp with MediaIn set to the timeline background plus Digital Glitch was black on the Edit page and fine on the Fusion page. That poster reported that replacing the background MediaIn with a media clip made the effect visible. These reports describe their particular setups, so match the symptom before trying the workaround.
The glitch ignores the zoom
In a 2022 thread on Studio 17.4.5, Digital Glitch went full frame when the clip was zoomed in the Inspector. The fix the poster confirmed: apply Open FX > Resolve FX Transform > Transform and do the zoom in the Effects tab instead. A 2024 reply on 18.6 notes that the Transform zoom also shrinks text on the same clip. The Transform filter has Position, Tilt, Zoom and Rotate plus an Edge behavior setting.
The glitch stays inside the letters
JPEG Damage and Prism Blur on a text clip only process the letters, as a 2020 forum thread on glitching text found. The thread suggested a compound clip containing Text and Solid Color, then moved to Fusion options when the poster still needed a transparent background: FastNoise with Displace, or JPEG Damage after MediaIn. A solid background fills the frame; use the Fusion route when transparency must remain.
Playback stutters
Set Playback > Render Cache to Smart and leave the clip's Render Cache Fusion Effect Filter option on Auto so Fusion effects and templates cache automatically. Wait for caching before judging playback. Shift-D toggles the configured grade/Fusion bypass; its menu chooses which processing to bypass. Re-enable the effects before checking the final look. The render cache guide and the slow playback guide go further.
A watermark appears over the viewer
Check for a Studio-only filter in the stack, such as Analog Damage or Camera Shake, when using the free version. Remove it, or swap in JPEG Damage, Stop Motion or the Fusion build. The free vs Studio comparison lists what else needs Studio.
Glitch effect FAQ
Does DaVinci Resolve have a built-in glitch effect?
Yes, two: the Glitch transition under Fusion Transitions and the Digital Glitch Fusion Effect. JPEG Damage, Prism Blur, Scanlines and Mosaic Blur add glitch texture, and Analog Damage adds VHS damage in Studio.
Can I make a glitch effect in the free version?
Yes. The Glitch transition, JPEG Damage, Prism Blur, Scanlines, Stop Motion, the Splitter/Combiner split and the Fusion Displace build carry no Studio marker in the manual, and BeginnersApproach's free-version recipe uses Digital Glitch. Analog Damage and Camera Shake need Studio.
How many frames should a glitch last?
Start with a few frames for the Glitch transition. BeginnersApproach uses a six-frame Digital Glitch segment and suggests 5 to 6 frames for repeated bursts. At 24 fps, six frames is 0.25 seconds; at 60 fps it is 0.1 seconds. Adjust for the shot and timeline frame rate.
How do I glitch text?
For Digital Glitch, make a compound clip of the title, blade short segments and apply the effect to those segments. If another filter remains inside the letters, a Solid Color clip inside the compound gives it a full-frame background. Use the Fusion approach above when the glitched text needs to keep transparency.
Why can't I find Digital Glitch?
It isn't in Open FX. Look in the Effects Library under Toolbox > Effects > Fusion Effects, or type "glitch" into the Effects Library search.
Final verdict: short bursts first, Fusion for a look you reuse
For most edits, I'd use the Glitch transition on cuts and Digital Glitch on short bladed segments, since both are drag-and-drop and the cuts control where the effect appears. Add JPEG Damage or a Prism Blur fringe for texture, move to the Color page Splitter/Combiner when the RGB offset must be exact, and build the Displace comp once and save it as a macro when you want a look of your own. Keep Analog Damage and Camera Shake for Studio, and reach for a pack when an edit needs many different glitch transitions fast. The Learn Resolve hub collects the rest of the editing guides.