
Quick answer: To export transparent video from DaVinci Resolve 21, first confirm that the empty area is genuinely transparent, not filled by a black clip or an opaque Fusion Background node.
On the Deliver page choose Single Clip for the completed composition, select an alpha-capable format/codec/type combination that your installation exposes, enable Export Alpha, and render a short test. If Export Alpha doesn't appear, the current output cannot carry alpha. Reimport the file above a bright layer before trusting it.
A checkerboard in Fusion is only the first gate. The composition must reach MediaOut with alpha, the output codec must store RGBA, and Resolve must be told to write the alpha channel. These Resolve 21 controls and codec examples were rechecked on September 5, 2026 against Blackmagic's current Reference Manual.
Miss any one of those steps and transparent pixels become ordinary black pixels in the file.
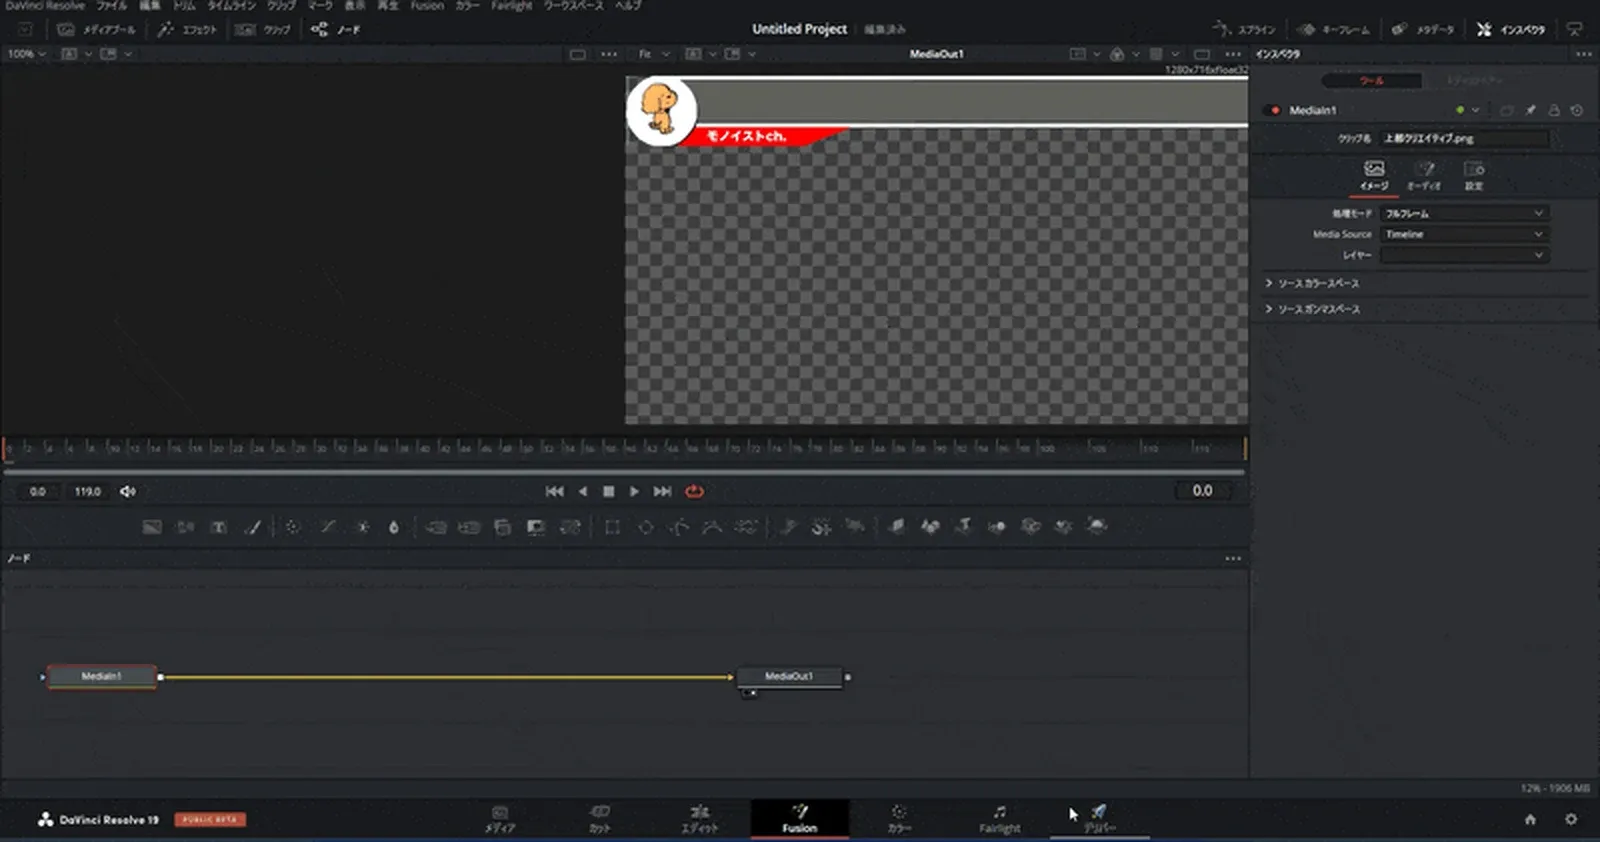
Confirm the Timeline Contains Real Transparency
Before changing render settings, prove that the frame has transparent pixels. Hide every video track that shouldn't be part of the overlay. Remove Solid Color generators, full-frame adjustment graphics and background plates that fill the frame.
In Fusion, follow the final pipe into MediaOut. A black Background node isn't automatically transparent. Select it and check its Alpha value: zero is transparent, while a value above zero creates opaque or partially opaque black.
If a Merge node is used, the transparent image should remain the background canvas and the title, key or graphic should enter the foreground input.
- Open the final clip or Fusion composition.
- View the node connected directly to MediaOut.
- Toggle the viewer from RGB to Alpha and look for white/gray content against black transparent areas.
- Return to the Edit page and make sure no lower track fills the intended empty area.
- Render a short two-second test before committing a long sequence.
If you still need to create the cutout, use the Fusion rotoscoping workflow or follow the Delta Keyer settings guide first. Export settings preserve an existing matte; they don't remove a background on their own.
Choose Single Clip or Individual Clips
| Render mode | Use it for | What the alpha represents |
|---|---|---|
| Single Clip | A finished title, lower third, keyed composite or complete transparent timeline | One alpha channel for the composited timeline output |
| Individual Clips | Round-trip source clips, keyed shots or separate VFX plates | Each source clip's embedded alpha or Color-page Alpha Output |
For a finished motion-graphics overlay or transparent timeline, choose Single Clip. Resolve 21 has a dedicated Single Clip alpha workflow when the selected codec supports a fourth channel. Choose Individual Clips when each source needs its own file, source naming, handles, embedded source alpha, or Color-page Alpha Output.
This distinction matters because some older tutorials still say alpha works only in Individual Clips. That advice is incomplete for Resolve 21. Single Clip writes one alpha channel for the composited timeline; Individual Clips preserves or creates alpha separately for each delivered source clip.
Pick a Format and Codec That Can Store Alpha
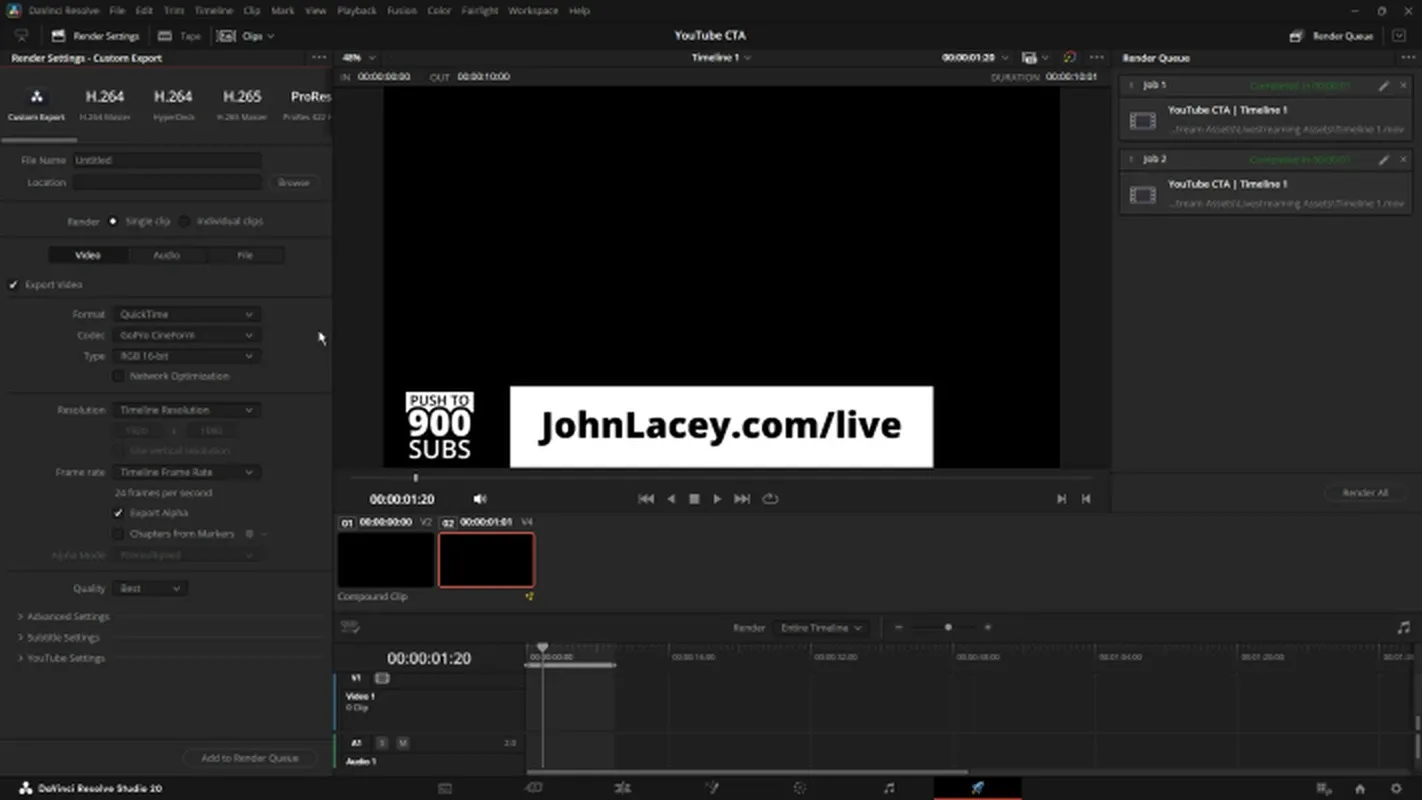
The container and codec are different choices. QuickTime is a wrapper; ProRes 4444, ProRes 4444 XQ and DNxHR 444 are codecs that can carry alpha in supported Resolve configurations. ProRes 422, H.264 and the usual H.265/MP4 delivery choices aren't substitutes for ProRes 4444 just because they appear in the same Format menu.
| Output | Best fit | Tradeoff |
|---|---|---|
| QuickTime + ProRes 4444 | High-quality motion graphics and NLE handoff | Large files; encoder availability depends on system/install |
| QuickTime + ProRes 4444 XQ | Higher-data-rate mastering when the pipeline requires it | Usually unnecessary for simple web overlays |
| QuickTime + DNxHR 444 | RGBA interchange when DNxHR suits the receiving system | Confirm import support and alpha interpretation downstream |
| OpenEXR or TIFF sequence | VFX interchange, long renders and frame-level recovery | Many files and more storage management |
Blackmagic's Resolve 21 Reference Manual names TIFF, OpenEXR, ProRes 4444, ProRes 4444 XQ and DNxHR 444 as RGBA examples in the Deliver alpha workflow. These are examples, not a promise that every encoder appears on every operating system or Resolve installation.
Use the options actually shown by your Resolve installation. Operating system, Resolve edition, hardware and codec support can change the Format, Codec and Type menus. Don't force a tutorial's exact preset when it's absent. Choose another exposed RGBA combination and test one short file in the application that will receive it.
Use the Correct Deliver Settings
- Open the Deliver page and set the intended render range.
- Choose Single Clip for a completed transparent composition, or Individual Clips for source-by-source output.
- Select an alpha-capable Format, Codec and Type.
- Match resolution and frame rate to the destination.
- Enable Export Alpha.
- Choose Straight or Premultiplied only when the receiving application's requirements are known. Premultiplied is Resolve's documented default in Single Clip mode.
- Add the job to the Render Queue and render a short test.
If the Export Alpha checkbox is missing, stop. Resolve only shows it when the selected output supports alpha. Changing the filename extension or placing transparent pixels in Fusion can't make an RGB-only codec carry a fourth channel.
For ordinary opaque delivery, use the broader export settings guide. An alpha master is normally an intermediate asset for another editor, compositor, live graphics tool or web conversion step, not the final YouTube upload.
Keep the Fusion Pipe Transparent
A reliable title setup can start with a Background node whose Alpha is zero, then merge the title or foreground over it and send the result to MediaOut. A keyed subject can carry alpha from the keyer or matte tools.
Inspect the Alpha channel on the node connected to MediaOut, because a later Merge, effect or opaque background can fill or alter it.
If you're new to the page, the Fusion beginner tutorial explains the MediaIn, Merge and MediaOut flow. For a transparent export, the important addition is to inspect the fourth channel at the end of that flow.
Do not confuse black RGB with opaque black
Transparent pixels still have RGB values. A viewer may display those pixels against black even when their alpha value is zero. That's why the appearance of a standalone file in a player isn't a sufficient test.
Avoid unnecessary full-frame effects
Adjustment clips, background generators and some effects can change the result or its edges. If an alpha render develops a black rectangle or fringe, bypass downstream effects one at a time and inspect the final Alpha view again.
Choose Straight or Premultiplied Alpha Deliberately
Straight and Premultiplied aren't stronger and weaker transparency. They describe how RGB values around semitransparent edges relate to alpha.
- Straight: RGB remains unmultiplied by alpha. It preserves full edge color but must be interpreted correctly by the receiver.
- Premultiplied: RGB has been multiplied by alpha. Fusion's Merge expects a premultiplied foreground, and Resolve documents Premultiplied as the Single Clip export default when the codec offers the choice.
A mismatch can create a dark halo, a bright fringe or washed semitransparent pixels. Start with the destination's documented expectation. If there is no specification, export a short test with the default, reimport it, and try the other mode only when the edge proves wrong.
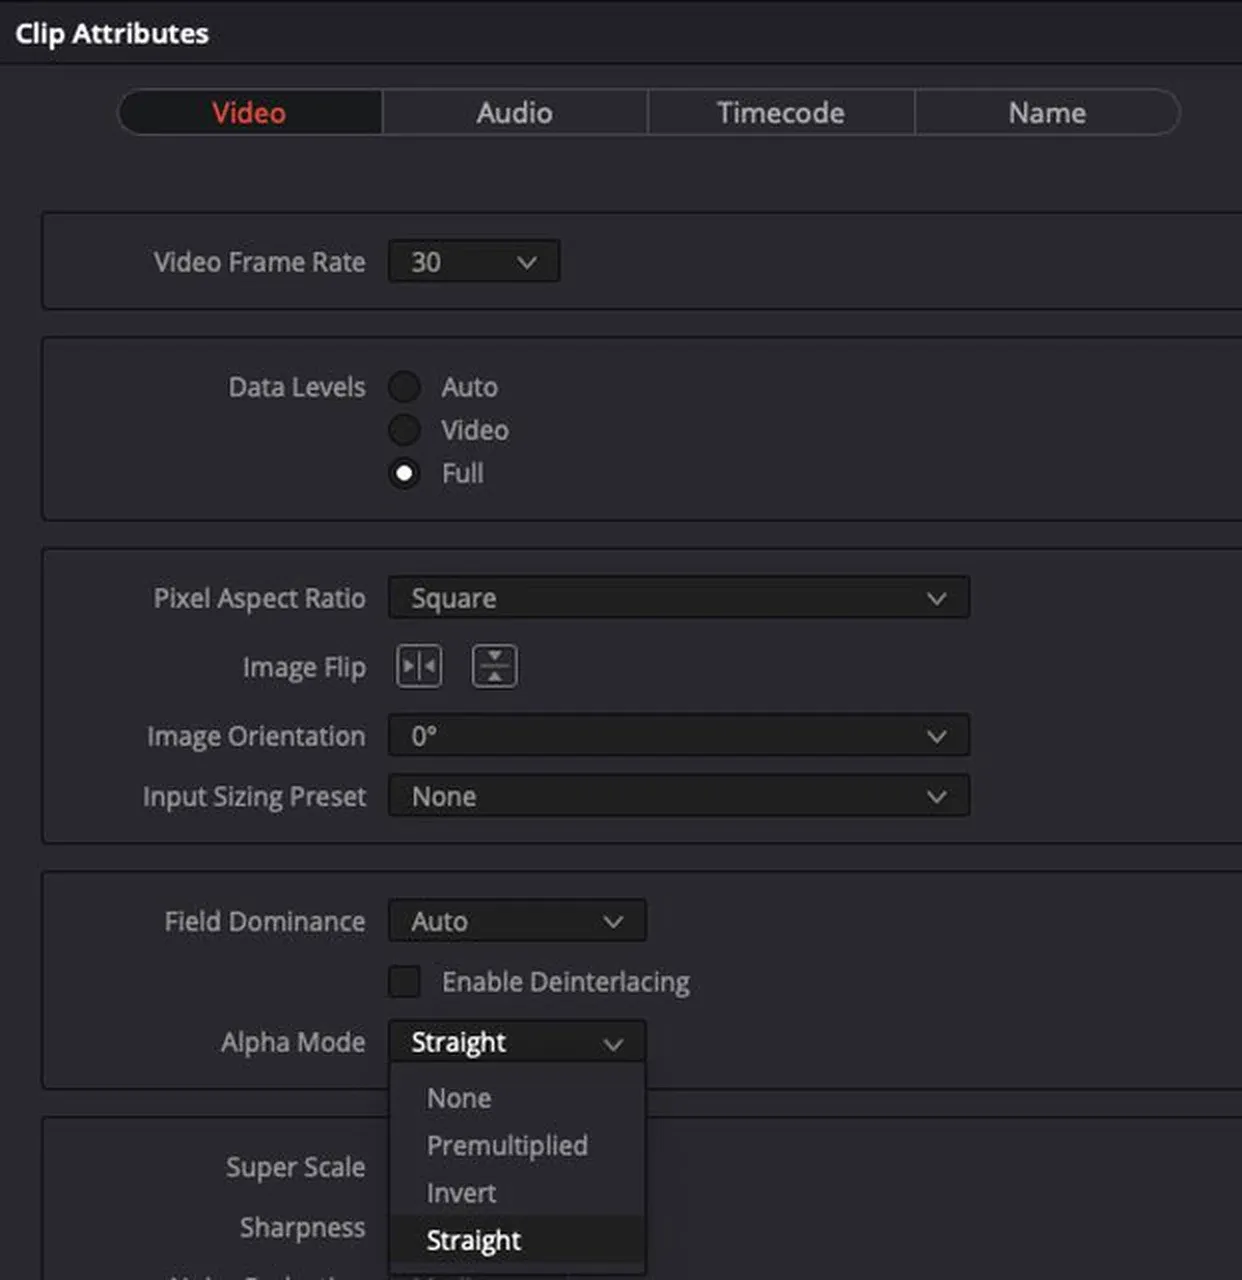
When an imported file has the wrong edge behavior, right-click it in the Media Pool, open Clip Attributes, and change Alpha Mode rather than rebuilding the key. Resolve 21 documents None, Premultiplied, Invert and Straight/nonpremultiplied handling. Judge the setting over a visible layer at 100%, not from the file thumbnail.
Verify Transparency Instead of Trusting the Player
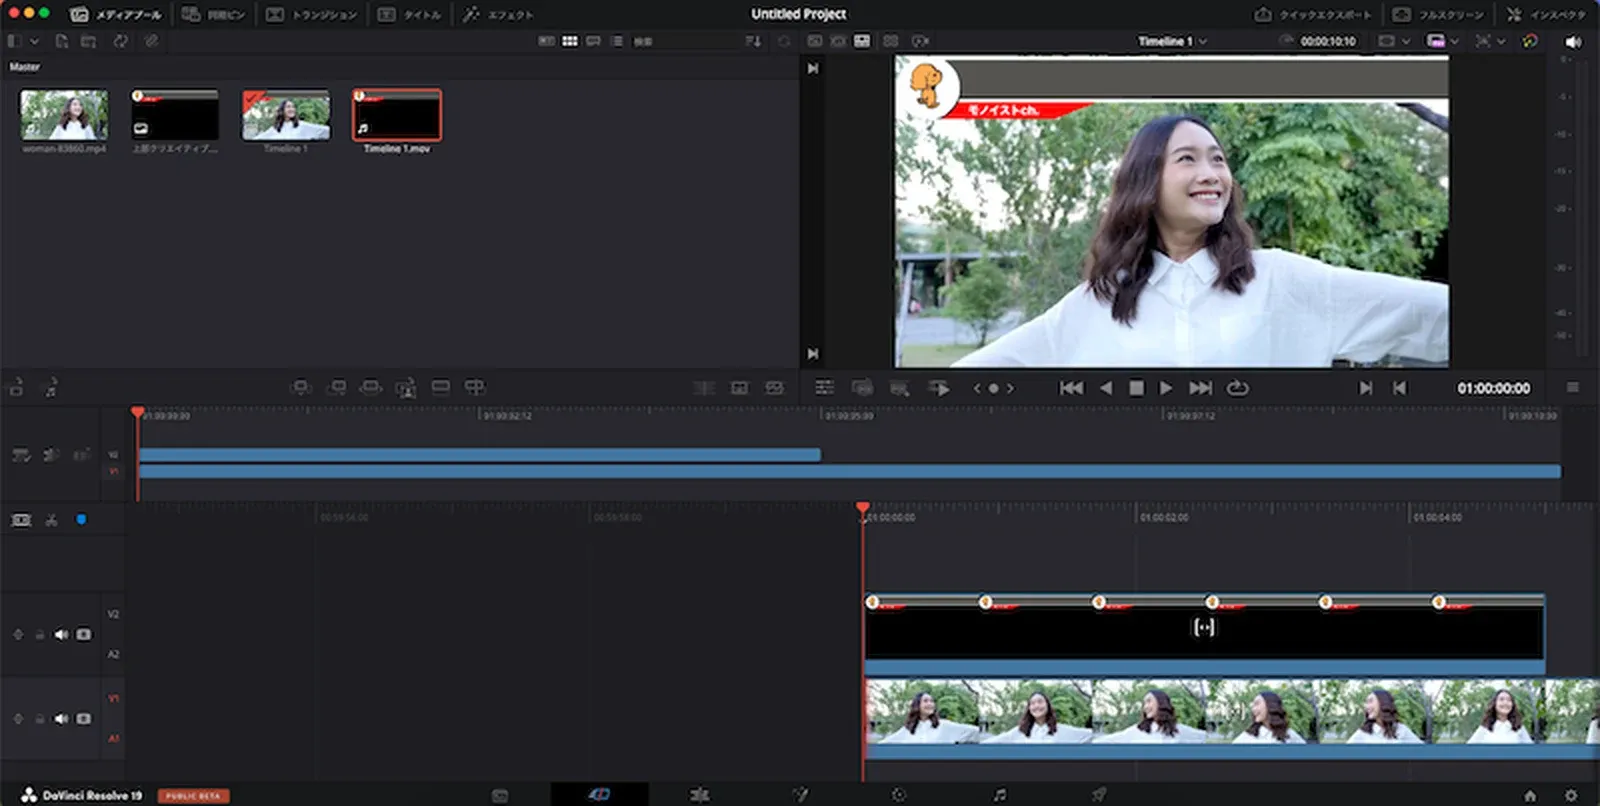
- Create a new empty timeline or use a clean section away from the source composition.
- Place a bright Solid Color generator on V1.
- Import the rendered file and place it on V2.
- Confirm that the color is visible through the transparent area.
- Inspect edges at 100% and during motion.
- Check Clip Attributes if the alpha appears inverted or fringed.
This test is stronger than playing the file by itself. Some players composite transparency over black; others don't expose video alpha at all. If the V1 color shows through cleanly, the file contains usable transparency even if its thumbnail looks black.
Fix the Common Alpha Export Failures
Export Alpha is missing
The selected format/codec/type combination isn't alpha-capable in the current installation. Choose an exposed RGBA option such as ProRes 4444, ProRes 4444 XQ, DNxHR 444, TIFF or OpenEXR. ProRes 422 and ordinary H.264/H.265 delivery outputs don't gain alpha just because the source is transparent.
The render is truly opaque black
Return to the final composition. Hide lower video tracks, set any intended transparent Background node to Alpha 0, and inspect the Alpha channel on the node connected to MediaOut. Then confirm Export Alpha is enabled.
The player shows black but Resolve composites correctly
The player is displaying transparent pixels against black. The alpha is present. Test in the destination application rather than converting the file blindly.
There is a dark or bright edge
Check whether the receiving app expects Straight or Premultiplied alpha. Also bypass color corrections or effects applied after premultiplication. In Fusion, color work on premultiplied RGBA may require Pre-Divide/Post-Multiply so edge RGB is treated correctly.
The destination does not accept the alpha master
Keep the verified RGBA master, then make a separate destination-specific conversion that explicitly preserves alpha. Do not overwrite the working master. For a long render or uncertain VFX pipeline, an OpenEXR or TIFF sequence makes failed-frame recovery easier than restarting one large movie file.
Use This Handoff Checklist
- Timeline or Fusion output contains genuine transparent pixels.
- MediaOut receives the final RGBA pipe.
- Single Clip or Individual Clips matches the intended deliverable.
- Codec/type supports alpha in this Resolve installation.
- Export Alpha is enabled.
- Straight/Premultiplied matches the destination or passes a short test.
- Resolution, frame rate and duration are correct.
- The exported file has been reimported above a bright background.
- Edges and semitransparent motion are clean at 100%.
- The verified alpha master is retained before any web or playback conversion.
Frequently Asked Questions
Which DaVinci Resolve codec exports a transparent background?
Resolve 21 documents ProRes 4444, ProRes 4444 XQ and DNxHR 444, plus RGBA image sequences such as TIFF and OpenEXR. Use an alpha-capable format/codec/type combination that your installation actually exposes.
Why is Export Alpha not showing in DaVinci Resolve?
Resolve only displays Export Alpha when the selected format, codec and type support an alpha channel. Change to an RGBA-capable option; renaming an RGB-only output won't add transparency.
Can DaVinci Resolve export alpha as Single Clip?
Yes. The Resolve 21 manual documents Single Clip alpha export when the selected codec supports it. Use Single Clip for a finished transparent composition and Individual Clips for separate source or round-trip files.
Why does a transparent video look black after export?
The alpha may be missing, or the player may simply display transparent pixels over black. Reimport the file above a bright solid layer. If the color shows through, the alpha is present.
Should alpha be Straight or Premultiplied?
Use the mode required by the receiving application. Premultiplied is Resolve's documented default for Single Clip when available. Change modes only when the destination or an edge test shows an interpretation mismatch.
Can I export transparent H.264 or MP4 from Resolve?
Don't use the ordinary H.264/H.265 MP4 delivery path for this workflow. Export an alpha-capable master or image sequence first, verify it, then create a separate destination format that explicitly preserves alpha if needed.
This workflow sits inside the export hub. Continue with the Fusion learning map when the real problem is building or refining the matte rather than writing it to a file.
