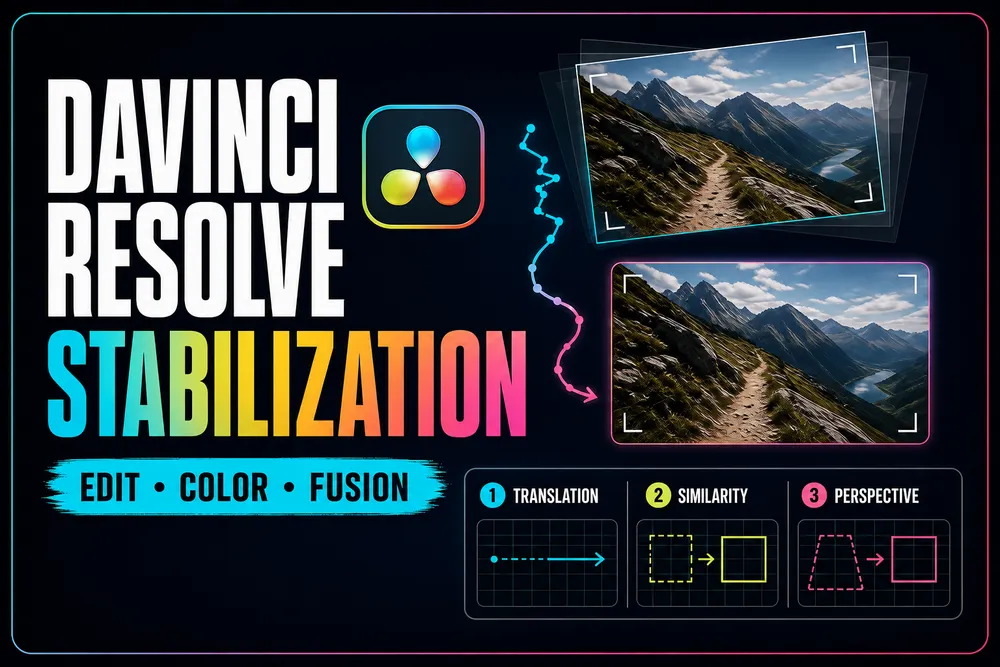
Quick answer: Select the finished timeline clip, open Inspector > Video > Stabilization, and start with Translation when the unwanted movement is only horizontal or vertical.
Leave Zoom on for a normal full-frame result, click Stabilize, and watch the entire shot. Use Similarity when rotation or scale must be corrected; try Perspective only when its perspective model improves the shot without bending the image.
Stabilization trades movement for transformed frame area. Zoom can hide the blank edges created by correction, but stronger correction usually means more crop. These Resolve 21 steps were rechecked on September 5, 2026 against the current Reference Manual; every mode or Smooth/Cropping Ratio change requires another click on Stabilize.
The goal isn't to make every handheld shot look bolted to a tripod. It's to remove the high-frequency shake, bump or drift that pulls attention away from the subject while preserving the move that belongs in the shot.
Prepare the Shot Before You Stabilize It
- Finish the clip's in and out points. Stabilize the duration that will actually be used.
- Remove speed ramps or confirm their final timing before analysis.
- Correct lens distortion first when it's severe enough to bend the motion model.
- Check whether the problem is camera shake, subject movement, rolling shutter or motion blur.
- Duplicate the timeline or keep an unstabilized version for comparison.
A stabilizer can't reconstruct detail lost to motion blur, undo rolling-shutter skew perfectly or invent the frame edges that move out of view. It may hide some of those symptoms, but asking it to remove motion that's baked into each exposure often creates a sharper-looking path with visibly distorted frames.
Analyze the final edit. Trimming or retiming a clip after stabilization can change the frame range and motion behavior that should be evaluated. Reanalyze when the used section changes.
Use the Edit Page Stabilizer First
- Select one clip on the Edit-page timeline.
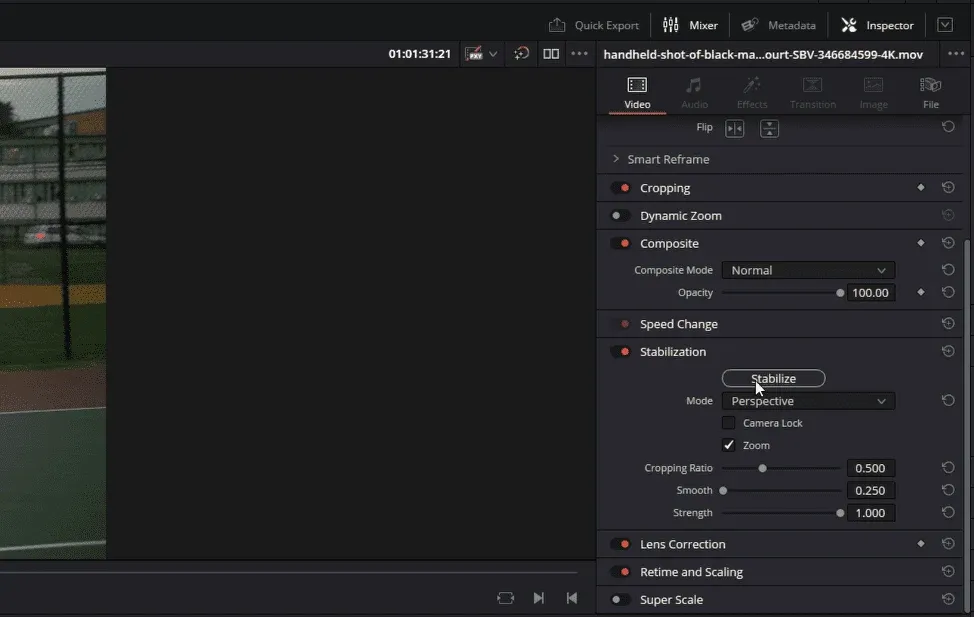
- Open the Inspector and expand Stabilization.
- Choose a mode, starting with the simplest model that matches the unwanted movement.
- Leave Zoom enabled for a normal full-frame result.
- Click Stabilize and wait for analysis.
- Play the whole shot at normal speed and compare stabilization on/off.
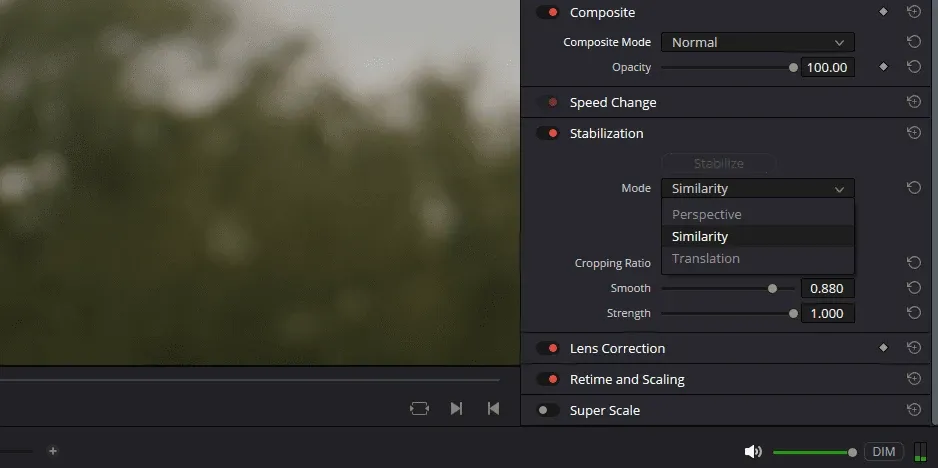
The current Edit page documentation describes the same controls for reducing handheld shake, removing a bump or attempting a static lock-off.
The real Edit and Color interface captures below come from Storyblocks' May 2025 Resolve 20 walkthrough, updated in April 2026; every label and behavior used here was rechecked against Resolve 21. Don't judge from the first and last frames. Watch the middle, where crop, warping and recovery errors are easiest to spot.
Choose Translation, Similarity or Perspective
| Mode | Models | Start here when | Watch for |
|---|---|---|---|
| Translation | Horizontal and vertical movement | The frame jitters in X/Y with little rotation or scale change | Residual rotation or zoom movement |
| Similarity | Translation, rotation and scale | The camera rotates slightly or the subject distance changes | Crop pressure and scale breathing |
| Perspective | Broader perspective-aware motion | The shot genuinely needs the more flexible model | Rubbery edges, faces bending and parallax errors |
Start with Translation, then escalate. Perspective is not automatically the highest-quality setting; it simply allows a more complex correction. A simpler model can be more stable when the scene contains moving people, foreground parallax, water, foliage or a large object crossing the frame.
Resolve 21 defines Translation as pan-and-tilt analysis, Similarity as pan, tilt, zoom and rotation, and Perspective as adding perspective analysis. Each mode changes the analysis and must be followed by another click on Stabilize; switching the menu during playback doesn't reuse an equivalent track.
If eligible footage from a Blackmagic Cinema Camera contains embedded gyroscope data, Camera Gyro appears as another mode. It stabilizes from that recorded motion data.
The option is conditional, so its absence on another camera file is expected rather than a missing Resolve control. Compare its full-shot result with image-based stabilization instead of assuming either source is automatically better.
Tune Crop, Smoothness and Strength
- Zoom: enlarges the image enough to hide blank edges created by the correction. Disable it when a compositor needs the complete moving frame and will fill edges separately.
- Cropping Ratio: limits how aggressively stabilization can work. At 1.0 no stabilization is applied; progressively lower values allow more correction and therefore more blanking or automatic zoom pressure.
- Smooth: controls how much analyzed motion is smoothed while allowing intended movement to remain.
- Strength: scales how tightly the analyzed correction is applied.
- Camera Lock: attempts to remove all camera movement and disables the normal smooth-motion tradeoff controls.
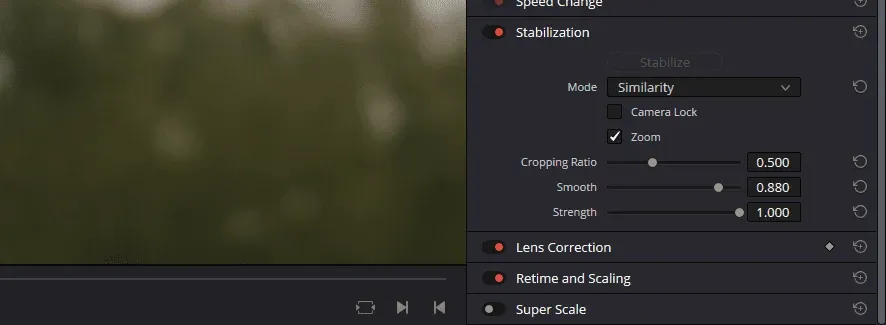
Change one control at a time. Mode, Cropping Ratio and Smooth require another click on Stabilize because they change the analysis; Strength scales the correction from the current analysis.
If a result is smooth but visibly warped, reduce Strength or use a simpler mode before sacrificing more frame. If the ugly jitter is gone while some intended handheld movement remains, that may already be the best result.
Camera Lock suits a shot that was supposed to be static, such as a tripod interview bumped by wind. It's usually the wrong first choice for a deliberate pan, push-in or walking shot because it tries to erase the move rather than clean it.
Edit and Color Use the Same Stabilizer
The Color page isn't a second automatic algorithm to stack after Edit. Blackmagic's Editors Guide states that the Inspector controls are the same stabilizer found in the Color-page Tracker palette and that the result carries between them. Color adds the tracker graph and deeper inspection.
- Open the clip on the Color page.
- Open the Tracker palette and select its Stabilizer controls.
- Inspect the analyzed path and compare the same mode/settings used from Edit.
- Use the graph or classic controls only when they provide a specific correction you can't make from the simple Inspector view.
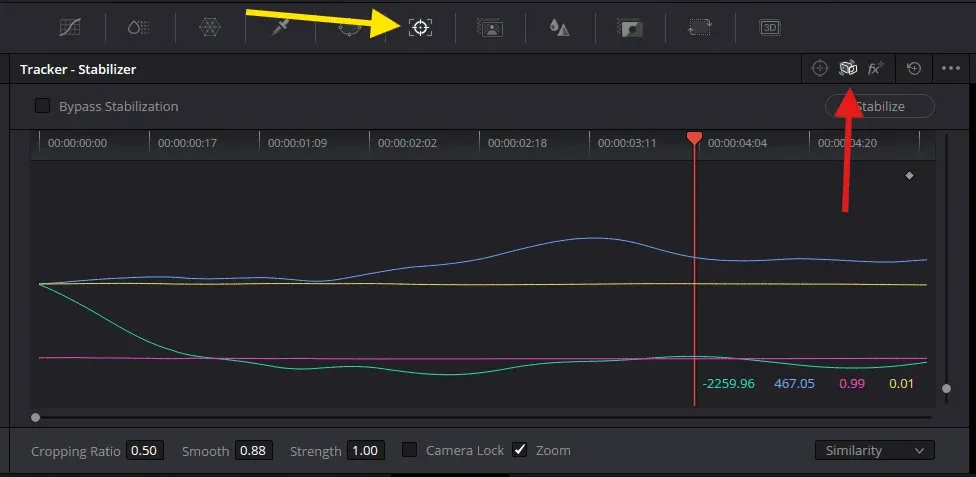
Don't stabilize once in Edit and again in Color expecting twice the quality. You're looking at the same clip-level process. If the automatic tracker follows the wrong motion, move to a workflow where you choose the tracked feature instead of piling on another pass.
Move to Fusion When You Need a Chosen Target
Use Fusion when automatic whole-frame analysis follows the wrong subject or when the shot needs an explicitly chosen track.
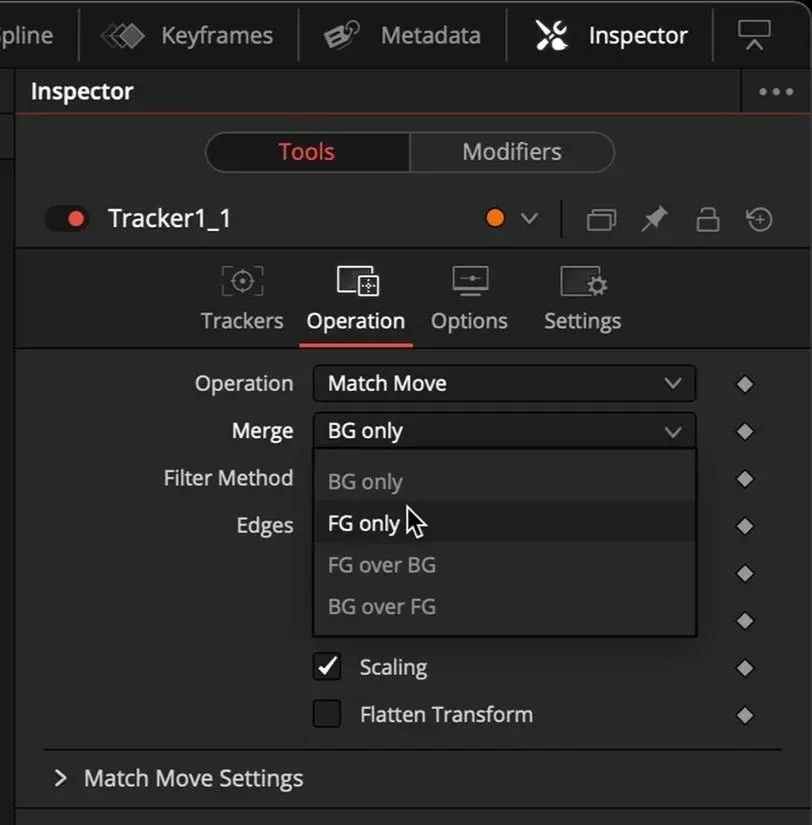
The standard Tracker is the documented route for removing or smoothing camera motion from the background. Its real Operation tab below comes from Creative Video Tips' practical Tracker walkthrough; Match Move and BG only were rechecked against the Resolve 21 manual.
A Planar Tracker serves a narrower purpose here: Steady is strong for checking a planar track or temporarily locking a surface while an effect is applied, but Blackmagic says it isn't very useful as the default full-shot stabilizer. The Fusion tracking guide covers the wider tracking toolkit.
Point-tracker route for shot stabilization
- Add a Tracker with the clip connected to its yellow background input and place one or more patterns on sharp, persistent background features.
- Track from a clear reference frame in both directions and repair every slip before using the motion.
- In the Operation tab, choose Match Move and set Merge to BG Only for stabilization.
- One pattern can correct position. Use at least two patterns when rotation or scale must also be corrected.
- Choose Start or End for a fixed reference, or Start & End when the goal is to smooth a deliberate camera move rather than freeze it.
- Inspect frame edges, crop and sharpness through the complete shot; stabilization can't restore image data that leaves the frame.
Planar Steady route for a locked effect workspace
- Track one rigid, textured plane and exclude moving foreground objects or details at another depth.
- Switch to Steady and inspect the tracked surface closely. Residual movement indicates a slipping track or a surface that wasn't actually planar.
- For paint or another effect that needs a temporarily fixed plane, place the effect after the Steady Planar Tracker.
- Use a second Planar Tracker with Invert Steady Transform after the effect to restore the original movement.
- Keep Clipping Mode set appropriately for off-frame image data and remember that the steady/invert pair resamples the image.
Don't confuse track inspection with final stabilization. Planar Steady is excellent for revealing drift: the chosen plane should stop moving while the rest of the frame distorts around it. For a normal full-shot correction based on selected features, use the point Tracker Match Move route.
Fix Common Stabilization Failures
The image bends or looks like jelly
Switch from Perspective to Similarity or Translation, reduce Strength and inspect rolling shutter or parallax. A flexible warp cannot make foreground and background obey one camera plane when they move differently.
The clip zooms in too far
Use a higher Cropping Ratio or reduce Strength/Smooth, then reanalyze. Turn Zoom off temporarily to see the actual blank-edge movement. You can reframe after stabilization, but no anchor-point adjustment can restore image data that left the frame.
The wrong subject appears locked
A large moving person or car may dominate the automatic analysis. Shorten the clip, use a simpler motion model or track a chosen background feature/plane in Fusion.
The result has micro-jitters
Try a simpler mode, shorten the analyzed section and check whether the source itself has dropped frames, optical-stabilizer jumps or shutter artifacts. Higher Smooth is not always the fix when the track is wrong.
Black edges enter the frame
Enable Zoom for an automatic crop, reduce correction, or keep Zoom off and create a controlled dynamic reframe. For VFX work, preserve the edges and fill them downstream rather than hiding them with a large static zoom.
The long shot works in one section and fails in another
Split the used shot into motion phases and stabilize each section independently, hiding the cut where editorially safe. A single model may not fit a lock-off, fast pan and walk-and-talk inside the same long clip.
Run a Playback and Export QC Pass
- Compare stabilized and original playback at normal speed.
- Watch faces, vertical lines and frame edges for warping.
- Check the sharpest and most blurred moments.
- Inspect the amount of crop against your delivery framing and captions.
- Render a short range and check it outside Resolve.
- Keep the original when the artifact is more distracting than the shake.
Stabilization can make playback heavier while Resolve analyzes or renders effects.
If the correction is good but editing becomes slow, use the proxy and optimized-media workflow for responsiveness rather than weakening the final effect just to make the timeline play. If proxies don't solve it, follow the broader slow playback diagnostic to separate decoding, GPU and effect bottlenecks.
Frequently Asked Questions
What is the best stabilization mode in DaVinci Resolve?
There's no universal best mode. Start with Translation, use Similarity when rotation or scale must be modeled, and try Perspective only when the broader correction improves the shot without warping it.
Is Color-page stabilization better than Edit-page stabilization?
No. They expose the same clip stabilizer and result. The Color Tracker adds a graph and deeper controls, but it isn't a separate pass to stack on top of Edit.
Why does stabilization crop the video?
Correcting motion moves and warps the frame, exposing blank edges. Zoom enlarges the image to hide them. More aggressive correction usually needs more crop.
Should I enable Camera Lock?
Use Camera Lock when the shot should have been static and you want to remove all camera motion. Leave it off for deliberate pans, pushes and handheld movement you only want to smooth.
When should I stabilize in Fusion?
Move to Fusion when automatic full-frame analysis follows the wrong subject or you need a chosen feature to define the motion. Use the standard Tracker in Match Move with BG Only for full-shot stabilization. Use Planar Tracker Steady mainly to inspect or temporarily lock a rigid plane for an effect, then invert that transform afterward.
Can stabilization fix motion blur or rolling shutter?
It can reduce the path of the movement, but it can't fully reconstruct detail blurred during exposure or guarantee removal of rolling-shutter skew. Aggressive correction can make those artifacts more visible.
This guide belongs to the DaVinci Resolve tutorial map. Use the Fusion hub when the job changes from automatic cleanup to deliberate tracking, paint or compositing.
