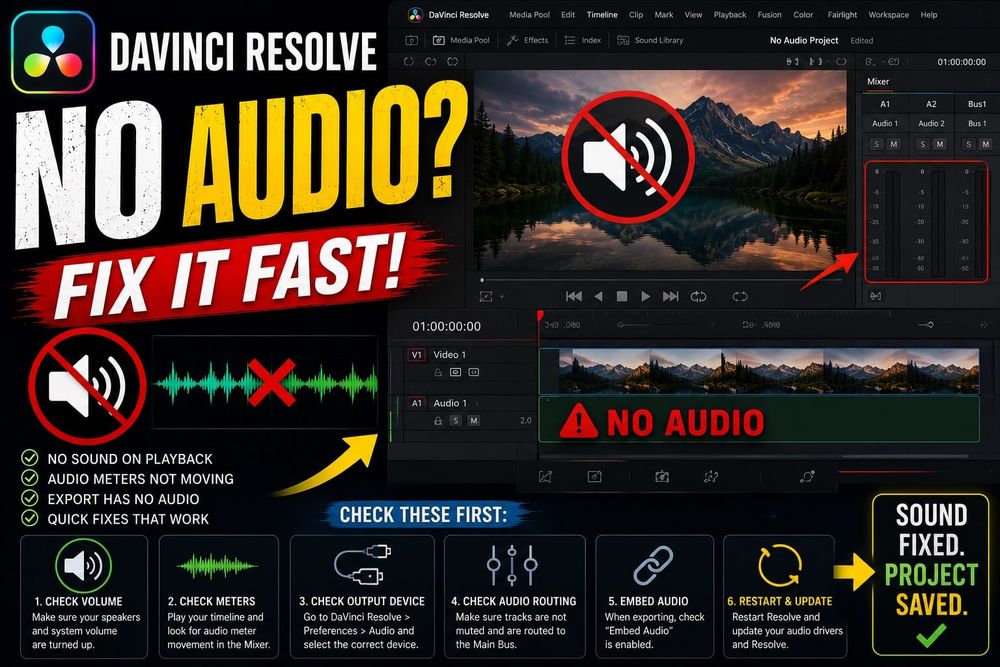
I had a client review scheduled in 40 minutes when my timeline went dead silent. Meters jumping, waveforms visible, video playing fine. No sound. My main bus had gotten muted somewhere between yesterday's session and today's, and I never touched it. If your timeline has gone silent during playback or monitoring, work through the checks below in order. Most take under a minute each, and the fix usually sits near the top of the list.
This guide covers sound that goes missing while you're working: in the timeline, on the Edit or Fairlight page, through your speakers or headphones. If your exported file has no audio but the timeline sounds fine, that's a separate problem with a separate fix. Check the DaVinci Resolve export settings guide for that instead.
DaVinci Resolve No Audio: Quick Symptom Map
Match what you're seeing against the list below, then jump to the matching section.
- Waveforms visible, meters not moving: check Clip Attributes for a disabled audio track, an unsupported codec, or clip volume sitting at -100 dB.
- Meters moving, no sound: check DIM, master mute, bus routing, Patch Input/Output, and your output device in Preferences.
- Source Viewer has sound, timeline does not: suspect timeline track mute, bus routing, a disabled track mapping, or a timeline-specific configuration problem.
- Only one clip is silent: check Clip Attributes and transcode that file's audio to WAV or PCM if needed.
- Audio disappears after switching headphones or speakers: restart Resolve, then check your output device under Video and Audio I/O.
Before touching any Resolve preference, rule out the two things that aren't Resolve's fault. Play the source file in VLC or QuickTime. If it's silent there too, the file itself has no audio track, or it uses a codec Resolve can't read cleanly. Then check your system volume and confirm the right output device is selected at the OS level. I've lost count of how many "broken" sessions turned out to be a Mac that quietly switched output to a monitor with no speakers after a second display got connected.
Once those two are confirmed fine, the problem is inside Resolve.
Unmute the DaVinci Resolve Master Volume and Clear DIM
Above the timeline on the Edit page, there's a speaker icon and a volume slider. If the speaker icon shows red or has a line through it, click it to unmute. If the slider looks yellow instead of green, the DIM button is active and cutting your level by roughly half. Click DIM to turn it off. This single control causes more "my audio just vanished" reports than anything else on this list, and it's easy to click by accident while reaching for something next to it.
DaVinci Resolve No Audio: Check Track and Clip Mute States
Next, look at the track headers in your timeline. Each track has its own mute button, separate from the master volume. A track can end up muted without anything else in your session changing, especially after copying a timeline or checking a track out to Fairlight and back. One editor on the Blackmagic forum described exactly that: audio worked fine, they used Fairlight to check out a track, and when they returned to the main timeline that track was muted with no memory of touching it.
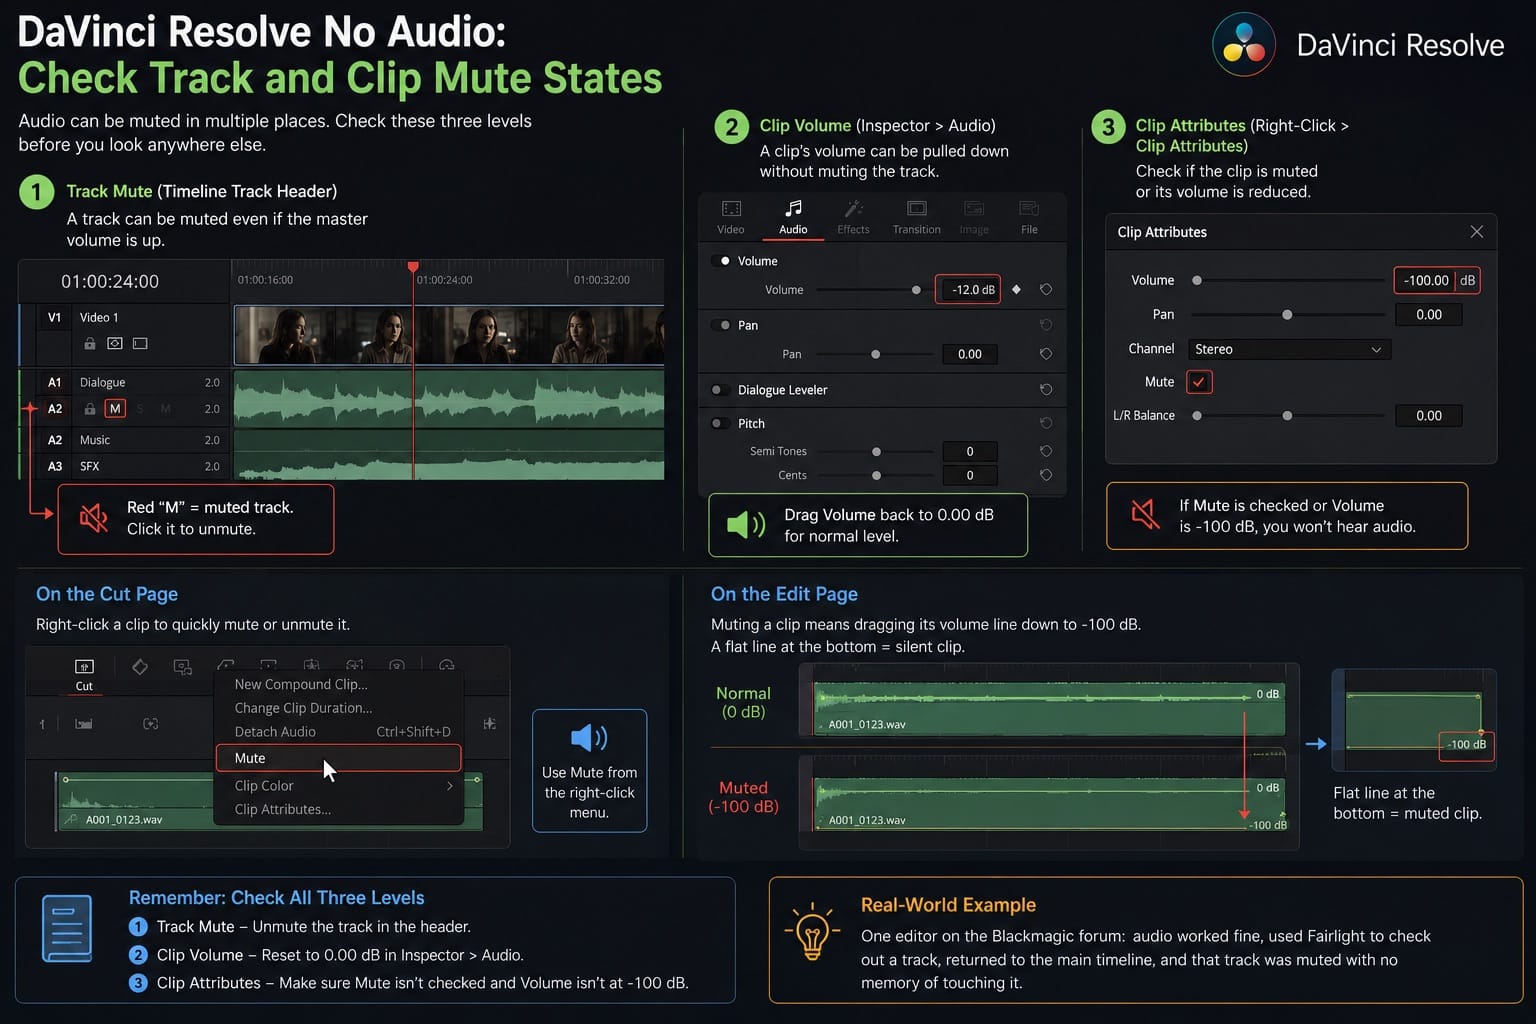
Check three levels: the track mute button in the header, the clip's own volume in the Inspector's Audio tab (drag it back to 0 dB if it's been pulled down), and Clip Attributes if you right-click the clip directly. On the Cut page, right-click gives you a Mute option directly. On the Edit page, muting a clip means dragging its volume line down to -100 dB, so a flat line sitting at the bottom of a clip is your silent clip. The guide to muting and splitting audio covers every mute control on both pages if you want the full picture.
Confirm Track Routing to the Monitored Bus
For a normal beginner stereo project, each track should route to Bus 1, and Bus 1 should be the bus you're monitoring. If you've built a custom Fairlight mix with extra buses, the exact bus name might differ, since Resolve's routing system, FlexBus, lets tracks and buses feed almost any destination you set up. The diagnostic rule stays the same either way: track meters have to feed the bus you're actually monitoring, and that bus has to reach your audio output.
Go to the Fairlight page and open the Mixer. Check that each track strip's output points to the bus you're monitoring. If a track got reassigned to a different bus, or a new bus got created and tracks scattered across it during editing, audio can flow somewhere that never reaches your speakers. If your track meters are moving but the monitored bus meter isn't, that's your answer: audio, wrong destination.
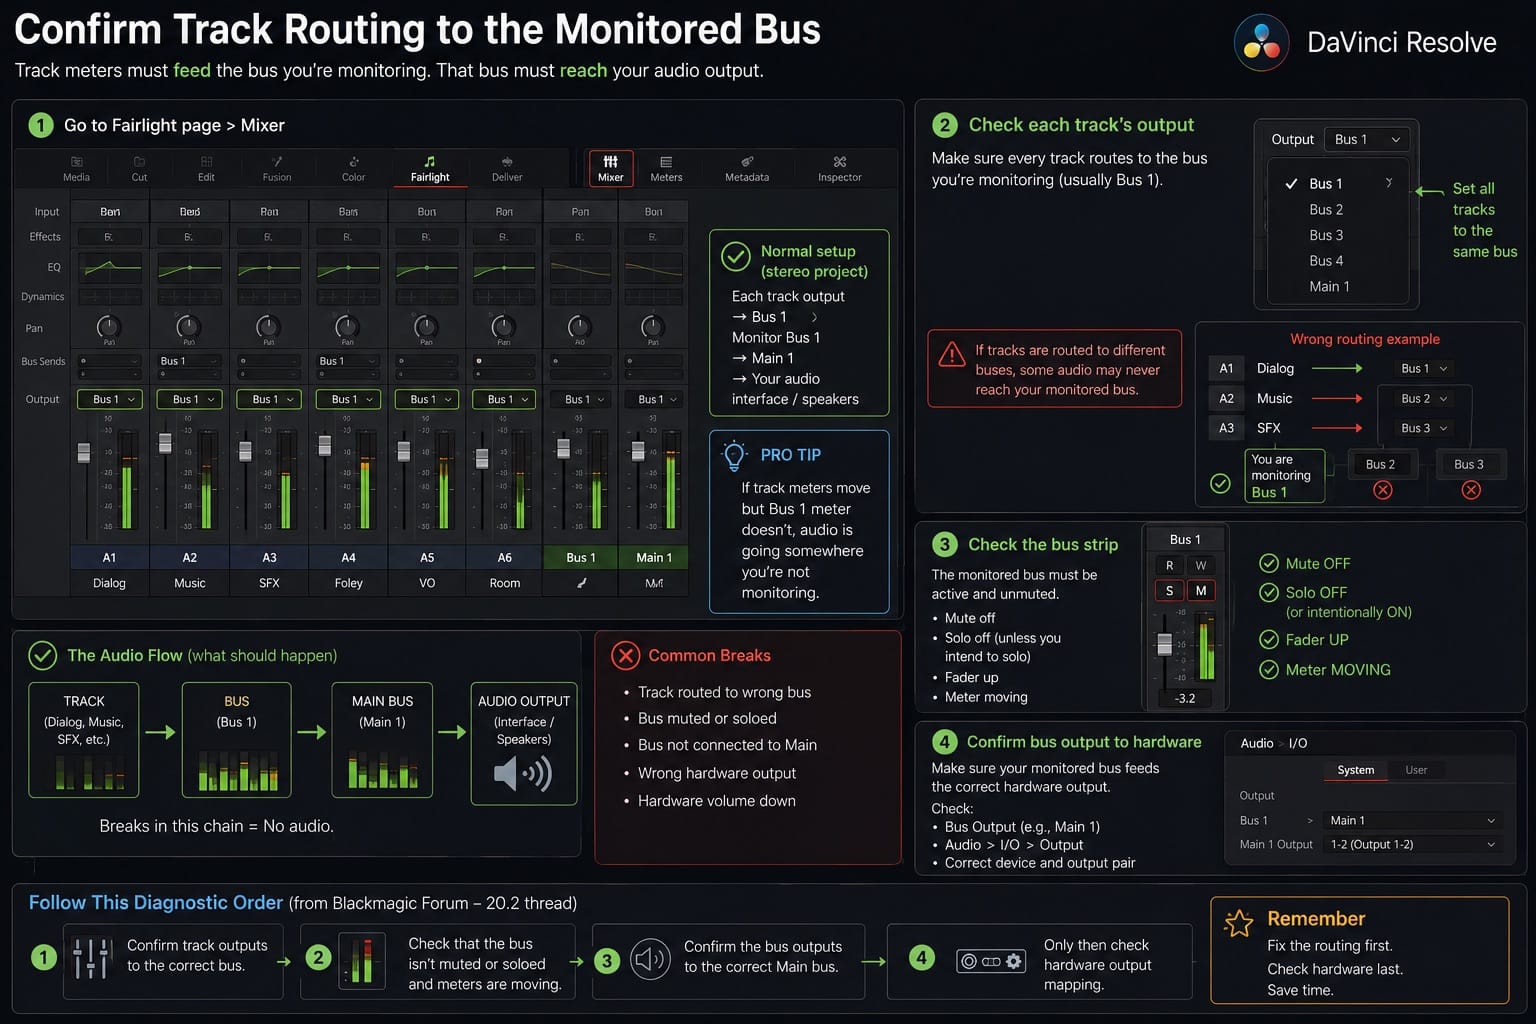
A Blackmagic forum thread from a 20.2 update laid out the diagnostic order for exactly this: confirm the track outputs to the correct bus, check that the bus itself isn't muted or soloed, and only then look at the hardware output mapping. Follow that order. Checking hardware first when the real problem is a bus assignment wastes time.
Patch the Monitored Bus to Your Output Device
If your track meters move but the monitored bus doesn't, fix routing first using the section above. If the monitored bus receives signal but you still hear nothing, check Patch Input/Output next. On the Fairlight page, open Fairlight, select Patch Input/Output, set Source to Bus Outputs and Destination to Audio Outputs, then confirm the left and right channels of your monitored bus are patched to the actual speakers, headphones, or interface outputs you're using.
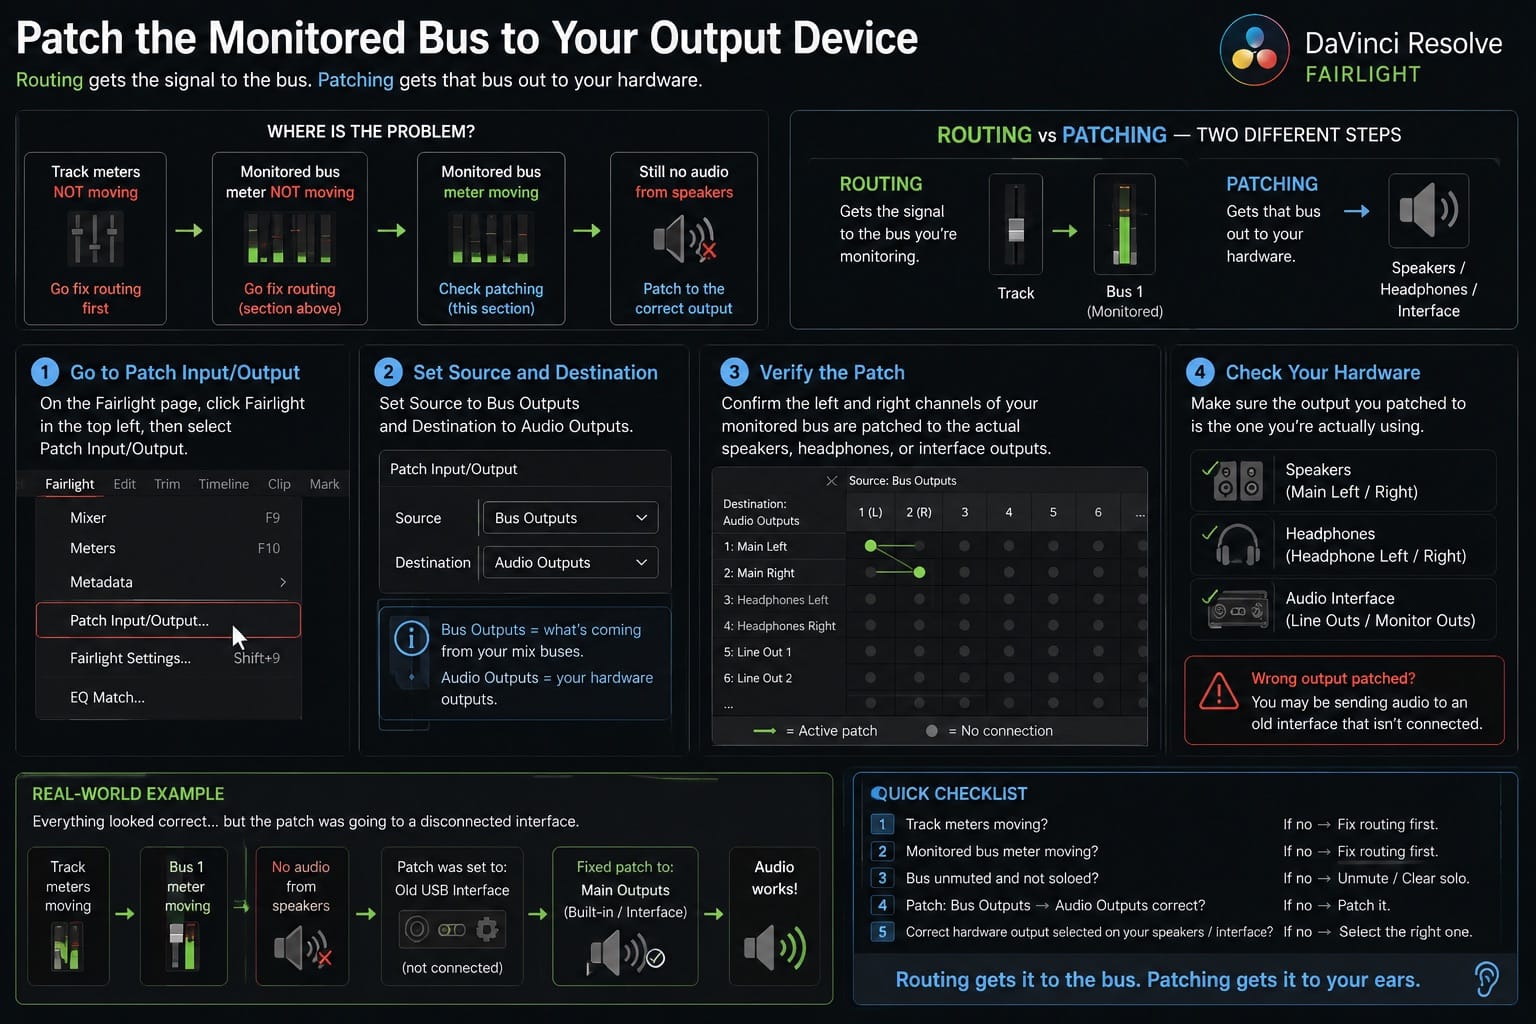
Routing and patching are two separate steps. Routing gets the signal to the bus you're watching. Patching gets that bus out to your hardware. Both have to be correct, and I've watched an experienced editor get stuck on exactly this combination: track routed correctly, bus unmuted, meters moving, still silence, because the patch pointed at an old USB interface that wasn't even connected anymore.
Check DaVinci Resolve Preferences for the Wrong Output Device
Go to the DaVinci Resolve menu (Mac) or the hamburger menu (Windows), then Preferences, System, Video and Audio I/O. Under Speaker Setup, Speaker Configuration usually sits on "Use System Setting," which mirrors whatever your OS has selected as default output. That's convenient until you switch from speakers to headphones or plug in a new interface, because Resolve doesn't always pick up the change without a restart.
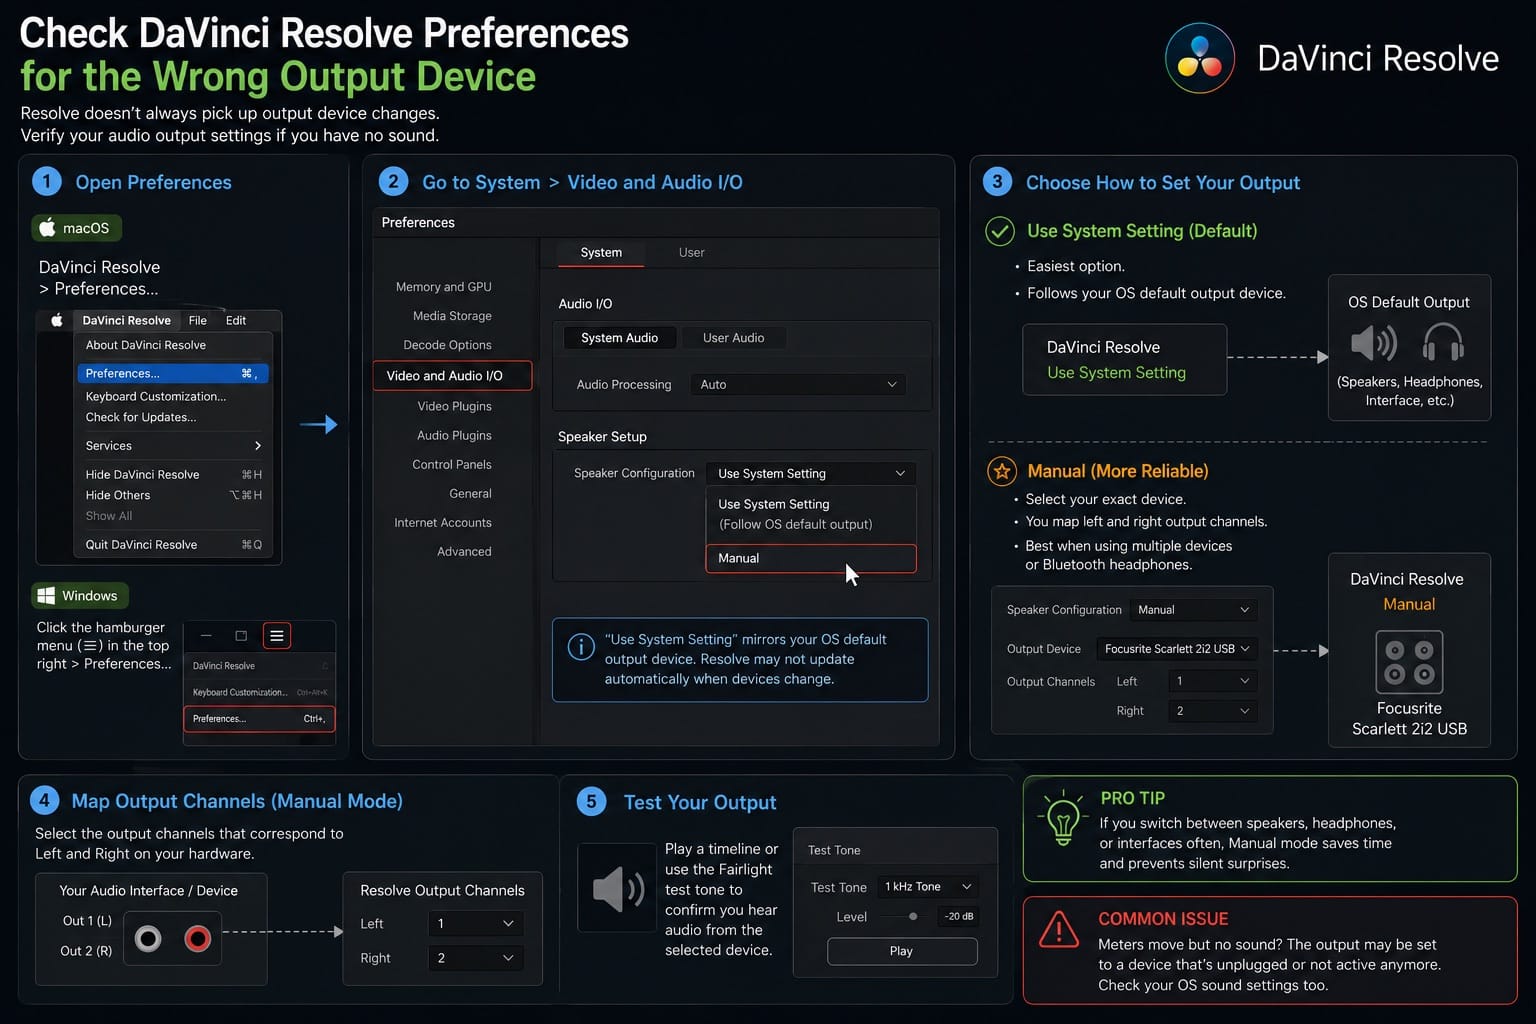
If "Use System Setting" isn't working reliably for you, especially with Bluetooth headphones, switch to Manual and select your exact device from the dropdown. You'll then map left and right output channels yourself, since Resolve doesn't remember every device switch the way your OS does. It takes an extra minute, but it's the more reliable option once you're juggling more than one output device on a regular basis.
DaVinci Resolve No Audio After Switching Headphones or Bluetooth Devices
If Resolve goes silent right after you switch from speakers to headphones, connect Bluetooth earbuds, or unplug an audio interface, restart Resolve first. The app doesn't always refresh output devices on the fly. If the restart fixes it, the issue was device handoff, not timeline routing. If it doesn't, go back to Preferences, System, Video and Audio I/O and select the output manually instead of relying on Use System Setting.
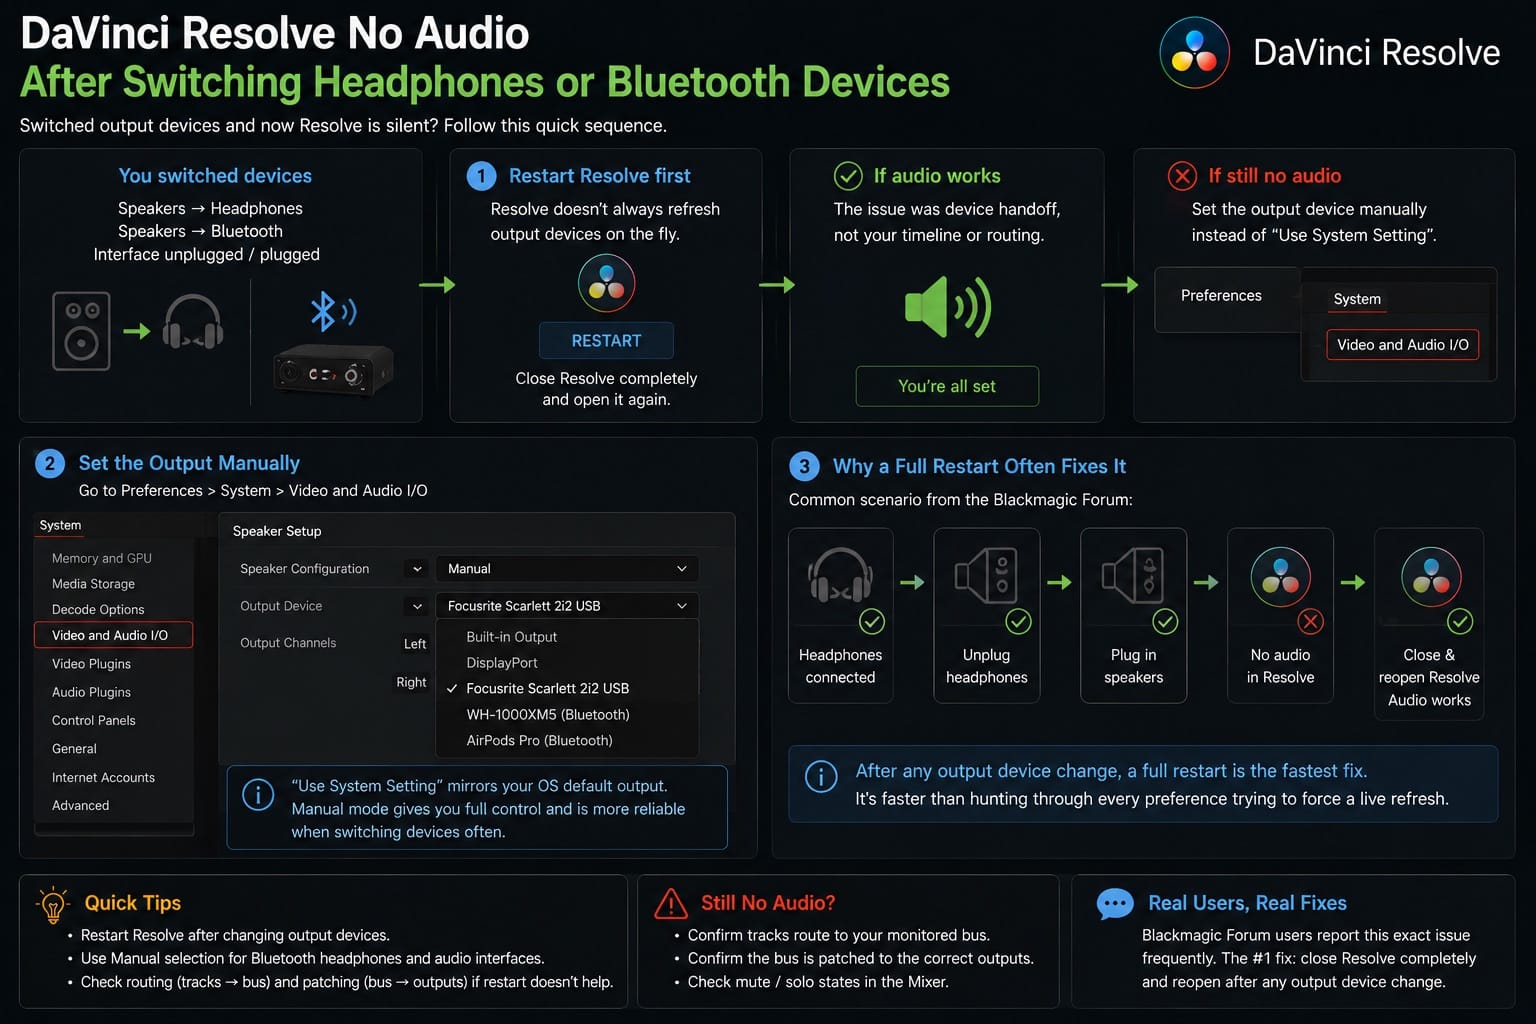
This pattern shows up repeatedly on the Blackmagic forum: someone unplugs headphones, plugs in speakers, and Resolve stays silent until the app is fully closed and reopened. A full restart after any output device change remains the fastest fix for that specific case, faster than digging through every preference trying to force a live refresh.
DaVinci Resolve No Sound After Sample Rate Mismatch
This one gives you zero warning. No error, no red icon, meters that can even move normally. Go to File, Project Settings, Fairlight tab, and check Timeline Sample Rate. It's typically 48000 Hz for video work, sometimes 44100 Hz if you're coming from a music background. Now check what your OS expects from your audio device: on Windows, right-click the speaker icon, open Sound Settings, go to your device's Properties, then the Advanced tab, and look at the Default Format. On Mac, open Audio MIDI Setup from Applications, Utilities, and check the output device's sample rate.
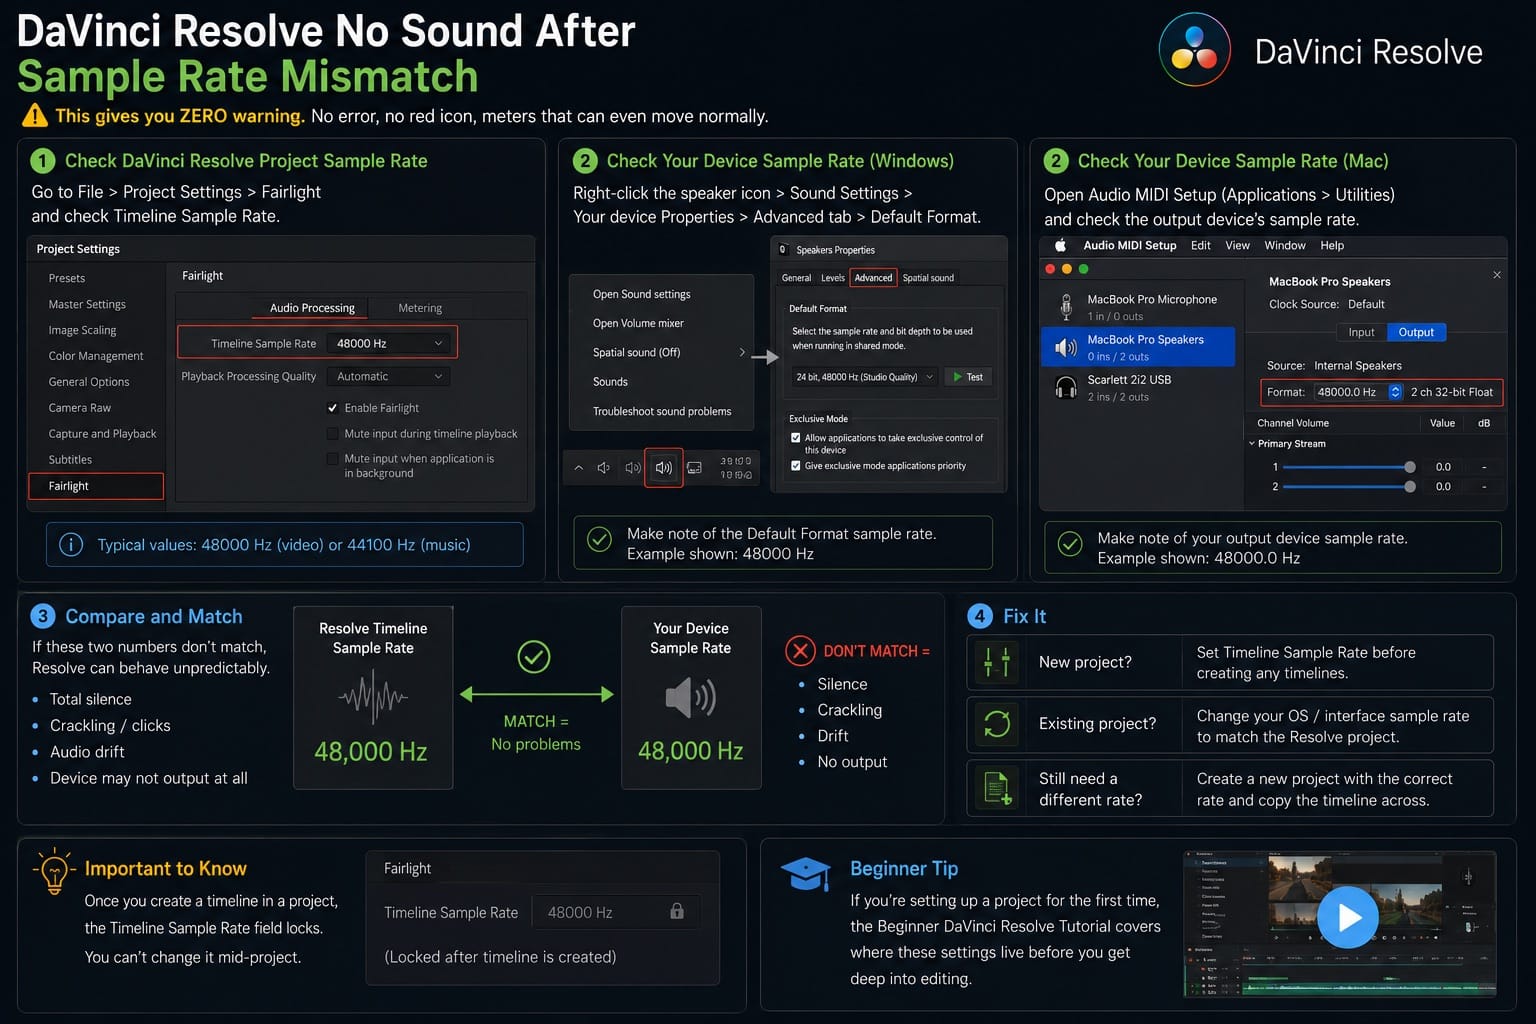
If those two numbers don't match, Resolve can behave unpredictably. You might get total silence, crackling, drift, or a device that refuses to output at all, depending on your interface and driver. For a new project, set the Fairlight timeline sample rate before you create any timelines. For an existing project where the timeline sample rate is already locked, it's often easier to match your OS or audio interface sample rate to the Resolve project, or to create a new project with the correct rate and copy the timeline across.
Worth knowing before you hit this wall: once you create a timeline in a project, the Timeline Sample Rate field locks. You can't just flip it mid-project. If you're setting up a project for the first time, the beginner DaVinci Resolve tutorial covers where these settings live before you get deep into editing.
DaVinci Resolve No Audio: Rule Out an Unsupported Codec or Corrupted Cache
If a specific clip is silent while everything else plays fine, right-click it in the Media Pool, open Clip Attributes, and check the Audio tab. Resolve supports common formats like PCM, AAC, and MP3 in supported containers, but whether a given file actually decodes depends on the container, the metadata, your operating system's own codec support, and the exact codec variant used. Blackmagic's own Supported Formats and Codec List confirms this directly: embedded audio in a video container decodes only if it's one of the listed formats with valid header metadata. MKV files, camera files, screen recordings, or phone clips can show a visible audio stream in Resolve and still fail to decode cleanly during playback.
The safest fix is to transcode that one file's audio to uncompressed WAV or Linear PCM, then relink or replace the clip. If you need to transcode the video too, use an edit-friendly container like MOV with PCM audio rather than trying to rescue the original container in place.
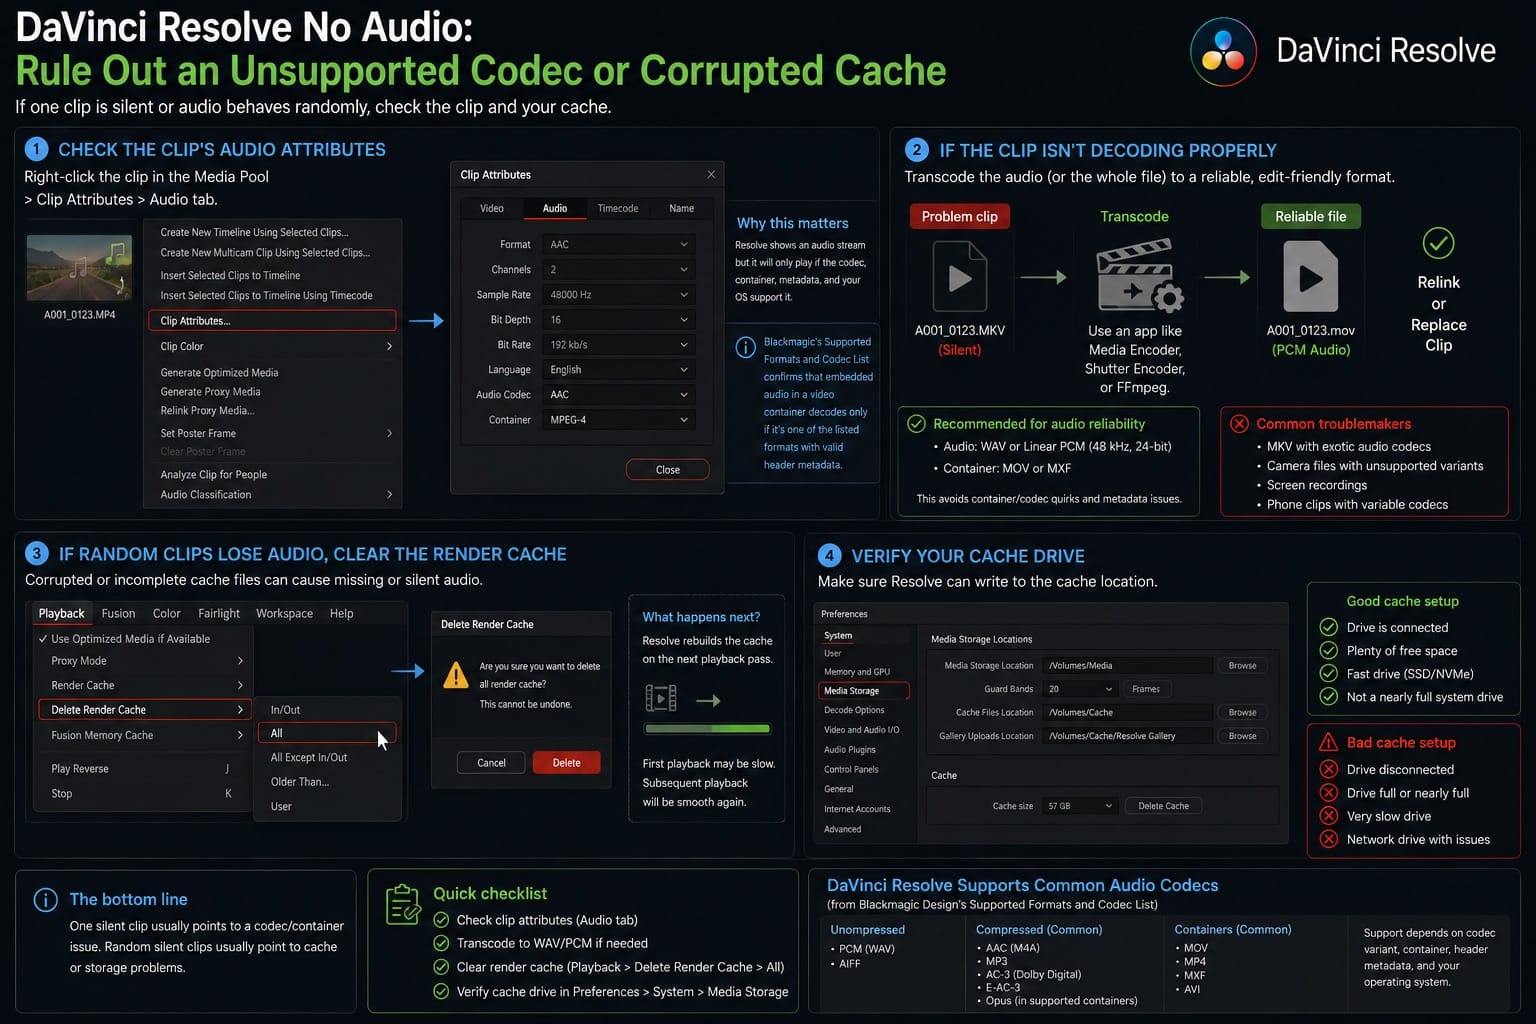
If it's not one clip but seems to affect random clips inconsistently, clear the render cache. Go to Playback, Delete Render Cache, All, confirm, and let Resolve rebuild it from scratch on your next playback pass. Before you do, check Preferences, System, Media Storage to confirm your cache drive is connected and has free space. A cache trying to write to a full or disconnected drive causes exactly this kind of random, hard-to-pin-down silence.
DaVinci Resolve No Audio in Timeline But Fine in Source Viewer
If a clip plays sound in the Source Viewer but goes silent the moment it's on the timeline, the clip itself is fine and the problem sits in the timeline's audio chain. Try dragging the same clip onto a brand new track. If it plays there, the original track had a routing or mute issue independent of the clip. If it's still silent on a new track, close the timeline entirely, create a fresh one, and drag the clip in again. This isolates whether the problem lives in the timeline's configuration or somewhere upstream in the project.
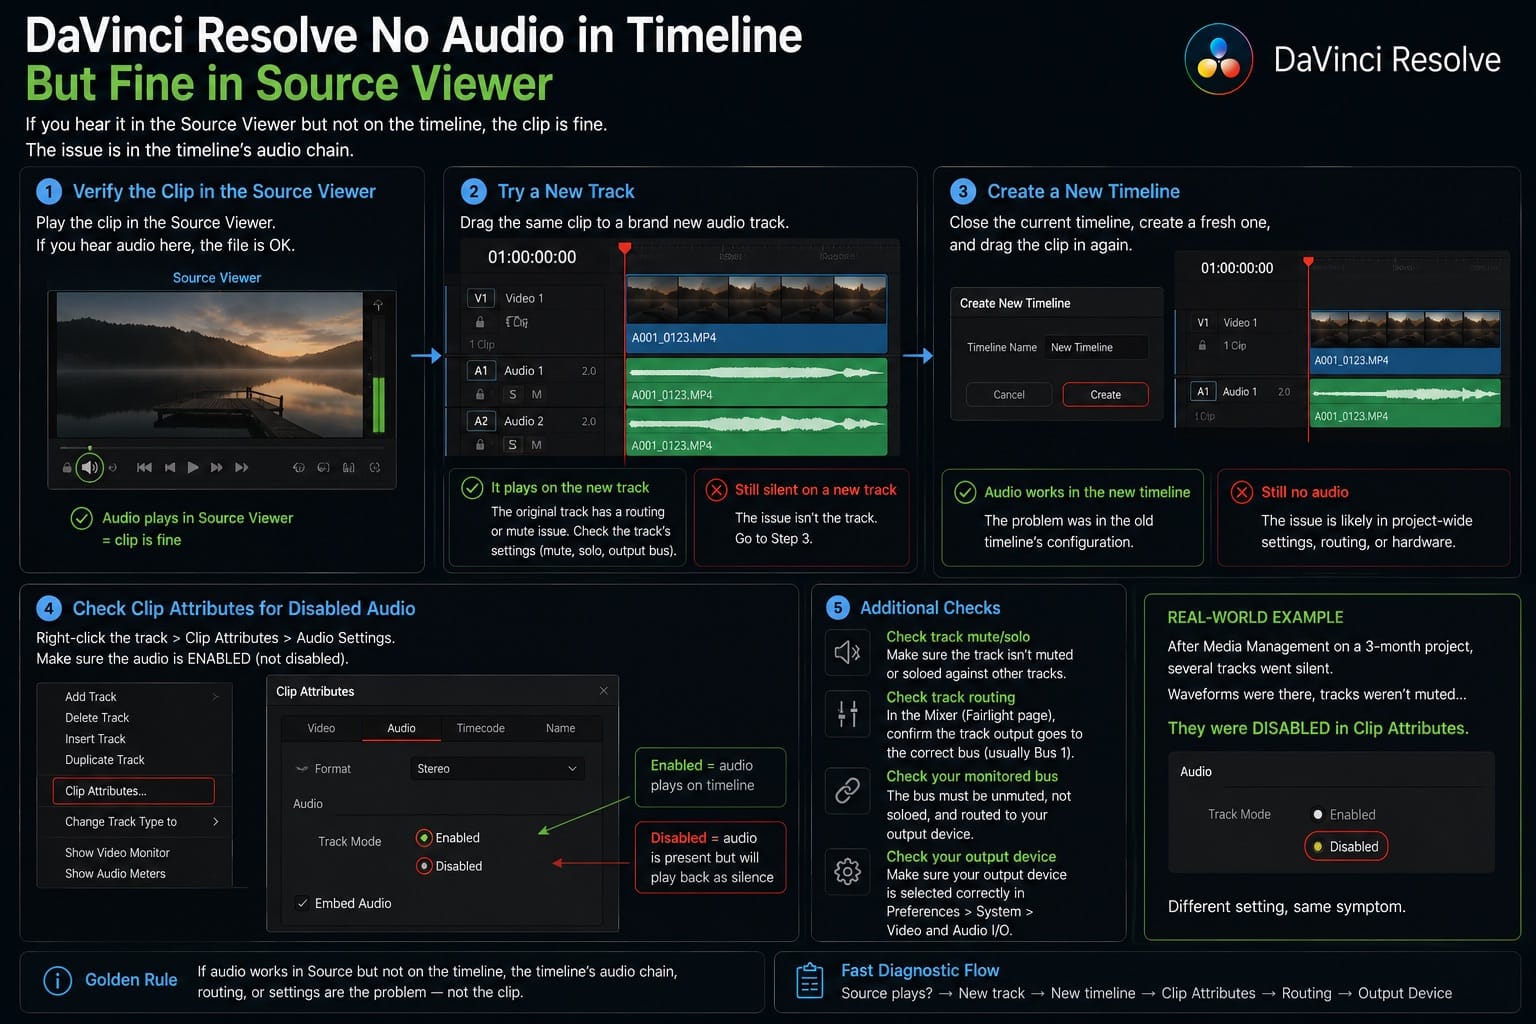
I ran into a version of this after a heavy Media Management pass on a 3-month project. Audio tracks looked normal, waveforms present, but several played back as flat silence. Media Management had left a handful of tracks disabled in Clip Attributes during the consolidation. Not muted, disabled. Different setting, same symptom. Right-click the track, open Clip Attributes, check Audio Settings, and confirm it's not sitting on disabled.
Fast DaVinci Resolve No Audio Checklist
- Master volume speaker icon unmuted, DIM off
- Track mute buttons off, clip volume not at -100 dB
- Every track routed to the bus you're monitoring, in the Fairlight Mixer
- Monitored bus not muted or soloed, and not accidentally isolated by another track's solo
- Monitored bus patched to your actual output device in Patch Input/Output
- Preferences, Video and Audio I/O pointed at the correct device
- Timeline sample rate and OS/audio interface sample rate are compatible
- Clip Attributes confirm the audio codec is supported and the track isn't disabled
- Render cache cleared if silence is inconsistent across clips
DaVinci Resolve No Audio FAQ
Why does DaVinci Resolve show audio meters moving but I hear nothing?
Meters moving means signal is present somewhere in the chain, so the problem sits downstream: a bus routed to the wrong destination, the monitored bus muted, or a patch pointing at a device you're not using. Start at the Fairlight Mixer and confirm the routing before touching any hardware settings.
Does restarting DaVinci Resolve actually fix audio device issues?
Often, yes, specifically after switching between speakers and headphones or connecting a new audio interface. Resolve doesn't always detect device changes live, even with Automatic Speaker Configuration on. It's a workaround, not a real fix, but it's frequently the fastest path back to sound.
Can a sample rate mismatch really cause silence with no error message?
Yes. If your Project Settings Fairlight sample rate doesn't match what your OS expects from your output device, Resolve can go silent, crackle, or drift, with meters and waveforms looking completely normal. Check both values directly rather than assuming they match.
Why is only one clip on my timeline silent when everything else plays?
Check that clip's Clip Attributes for an unsupported codec, and confirm the track it sits on isn't disabled in Audio Settings. A disabled track and a muted track look similar in effect but are fixed differently.
Should I check bus routing before or after checking my output device in Preferences?
Before. If a track isn't routed to the bus you're monitoring, no output device setting will fix it, since the signal never reaches the point where hardware output matters. Confirm routing first, then patching, then hardware preferences last.
Why do I see waveforms but hear no audio in DaVinci Resolve?
Visible waveforms only prove the clip has audio data. If you hear nothing, check clip volume, disabled audio mapping in Clip Attributes, track mute, bus routing, and whether the monitored bus is patched to your output device.
Why did DaVinci Resolve lose audio after I changed headphones?
Resolve doesn't always refresh output devices live. Restart Resolve first, then check Preferences, System, Video and Audio I/O and manually select the correct speakers, headphones, or interface if Use System Setting doesn't update.
Related guides
- Fairlight Audio in DaVinci Resolve: the hub: the rest of the audio cluster, from loudness to cleanup.
- How to Mute and Split Audio in DaVinci Resolve: the deliberate mutes this guide rules out one by one.
- How to Export Video in DaVinci Resolve: if sound plays fine but the exported file is silent.
- How to Remove Background Noise in DaVinci Resolve: when the problem is noise on top of the dialogue rather than missing sound.
This article covers playback and monitoring audio problems. For Media Offline, render failures, slow playback, and crash recovery, start from the Fix DaVinci Resolve troubleshooting hub.
