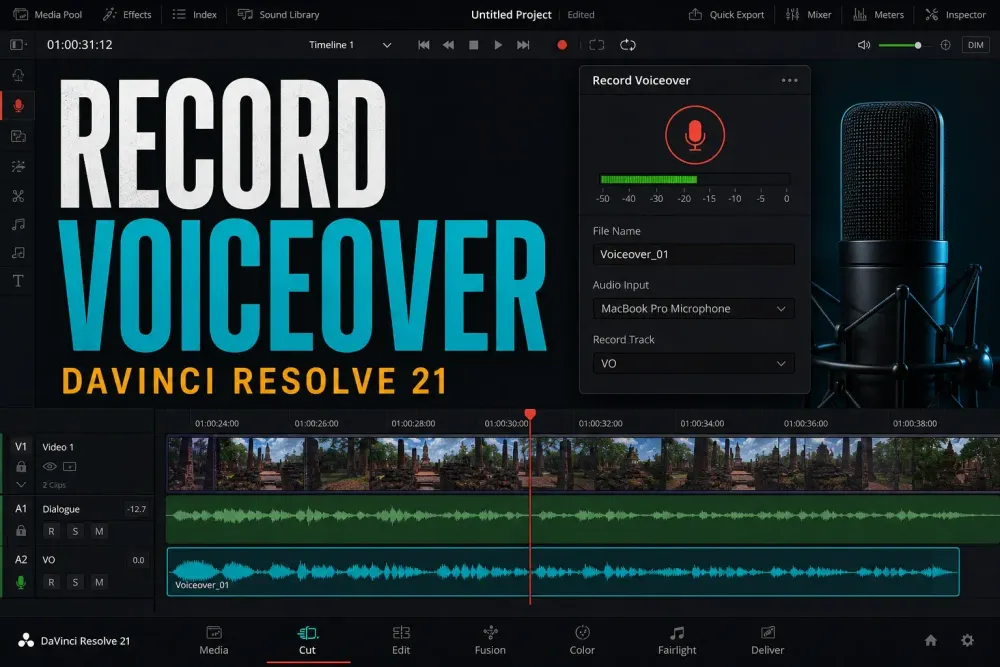
Quick answer: on the Cut page, open the microphone-shaped Voiceover tool under the Viewer. Choose the real microphone under Audio Input, leave Record Track on the new VO track or pick your own mono track, and speak one test line before you record anything.
If the input meter doesn't move, stop right there and fix the device or the permission; no amount of timeline volume can repair a missing input. Put on headphones, park the playhead or set an In point where the line should begin, then click Record.
That route covers most narration, scratch tracks and timed pickup lines. Resolve 21 also keeps a compact Voiceover palette on the Edit page, and Fairlight gives you explicit input patching, multiple armed tracks, layers and ADR when you need them.
I rechecked the controls below on October 1, 2026 against the current DaVinci Resolve 21 Reference Manual, which now covers 21.1. On October 5, Blackmagic's support center listed DaVinci Resolve 21.1.1, posted October 2, as the current update; its release notes don't list changes to these recording controls.
If you're learning the wider audio path rather than fixing this one recording job, the DaVinci Resolve Fairlight hub links out to recording, cleanup, mixing and delivery guides.
Choose the recording route before you set up the mic
| What you need | Use this route | Why |
|---|---|---|
| One narration or scratch track, fast | Cut Voiceover | Current Resolve 21 palette includes input, destination track, monitoring, countdown, recording location and a prompter. |
| A compact panel while editing | Edit page: Timeline > Record Voiceover | File name, input, track and Record stay in a small tool; extra options cover monitoring, countdown and stereo input. |
| Explicit routing, multiple microphones or preserved layered takes | Fairlight track recording | You patch inputs to tracks, arm the exact tracks, and record from the transport. |
| Cue lists, pre-roll, beeps, streamers and repeated dialogue replacement | Fairlight ADR | ADR is a session workflow, not merely another Record button. |
Don't build the Fairlight route just because an old tutorial starts there. The simple tool skips several setup steps. Move to Fairlight when you need its control, not because recording a microphone is supposed to feel complicated.
Record a voiceover on the Cut page
- Open an active timeline and switch to Cut.
- Click the microphone-shaped Voiceover icon below the Viewer.
- Under Audio Input, choose the microphone or audio-interface input you're actually using.
- Under Record Track, keep the VO track Resolve creates or choose another suitable audio track.
- Speak at the level you'll use for the real take. The miniature meter should respond before you press Record.
- Pick a monitoring mode, put on headphones, and set a short countdown if it helps you.
- Place the playhead at the start, or set an In point when you want a cue you can repeat.
- Click Record, perform the line, then click Stop.
These Voiceover settings run two separate paths: Audio Input decides what Resolve records, and Monitoring decides what you hear during the take.
A working headphone mix doesn't prove the selected microphone is reaching the recording track. The input meter is the faster check, and it's the one I trust.
The Cut palette offers Timeline & Microphone, Timeline Audio Only, Microphone Audio Only and Mute Monitoring When Recording. There's no universally correct choice. A narrator following music may need the timeline in their headphones; someone on a laptop without headphones may need monitoring muted to avoid feedback.
Use No Countdown, 3 Secs Countdown or 5 Secs Countdown depending on the performer. The countdown is only a visual cue to get ready. It won't fix a late script start, room echo or input latency.
Use the prompter and keep alternate takes
The Cut Voiceover tool can load a plain-text .txt script and show it over the Viewer.
Enable the Prompter Overlay, load the file, then adjust font size, line spacing, side margin and background opacity until you can read the script without it covering the part of the frame you need to judge.
Set In and Out points around the voiceover range when timing matters. Resolve uses that range to pace the scroll; without it, the script spreads across the whole timeline. The Cue button sends the playhead back to the initial recording In point, so you can repeat a line without dragging the playhead back by eye.
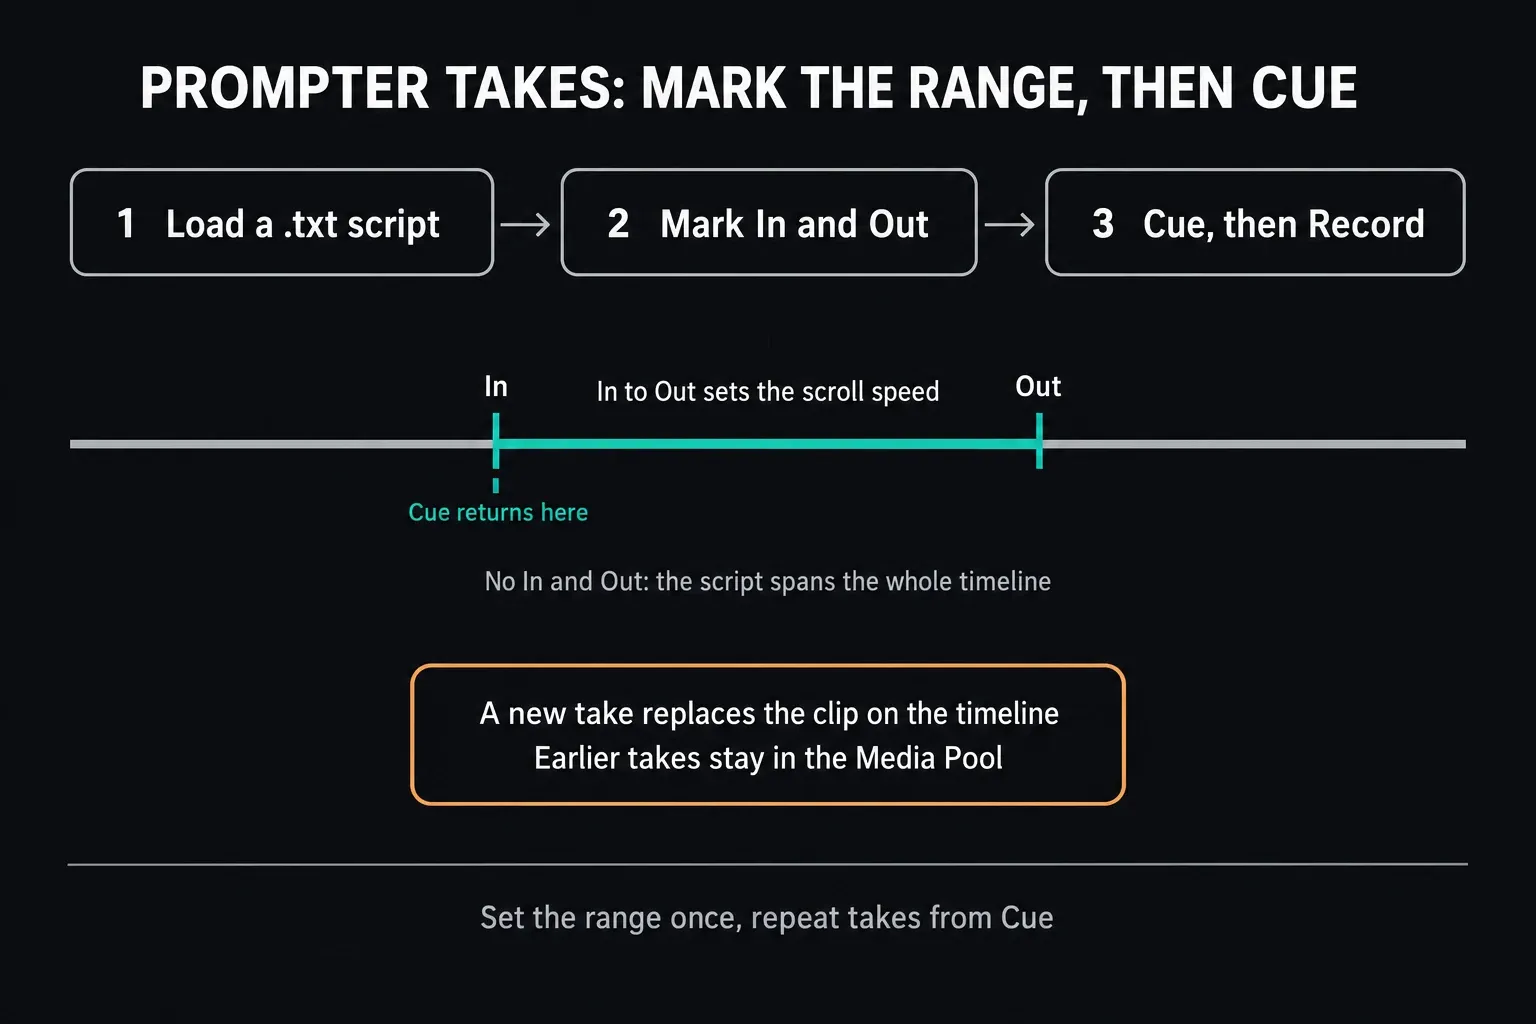
When you stop, the playhead jumps back to the starting position so you can review the take.
Recording a new take at the same spot replaces the earlier clip on the timeline, but Resolve keeps the previous takes in the Media Pool. That's an editorial swap, not a deletion of recorded media. Name the recording clearly and keep the destination bin selected so the good alternates are easy to find later.
Use the compact Edit-page Voiceover tool
On the Edit page, choose Timeline > Record Voiceover or click the small microphone on the Timeline toolbar. Type a useful File Name, choose the Audio Input, then choose a Record Track.
Auto lets Resolve pick a track from the current layout. In a crowded timeline I'd select the VO track myself, because that's easier to verify.
The three-dot menu adds Input Monitoring, a three-second visual countdown, Mute Timeline Audio While Recording, Stereo Input and Hide Options.
Blackmagic notes that software input monitoring can lag a little. If that delay pulls your delivery off time, monitor directly through the audio interface when it supports that, or turn software monitoring off and keep only the picture or guide audio you actually need.
Stereo Input is for a genuinely stereo microphone or stereo source. Most spoken-word microphones are mono. Selecting stereo out of habit can create needless channel confusion, and it's one reason to inspect the recorded clip when speech appears on only one side.
Move to Fairlight when routing must be explicit
Use Fairlight when the simplified palette can't describe the session: several microphones, separate performers, manual input assignments, overlapping takes or a controlled ADR pass. The official Fairlight overview treats track recording and ADR as full audio-post workflows, not hidden voiceover preferences.
- Create or select a suitable mono VO track.
- Choose Fairlight > Patch Input/Output.
- Set Source to the physical microphone input and Destination to the VO track input, then click Patch.
- Click the track's red R button to arm it. An audio track can't be record-armed until an input is patched, either by hand or through a default input.
- Place the playhead, click the transport Record button, and watch the waveform draw in real time.
- Click Stop or press Spacebar, then disarm the track before normal playback.
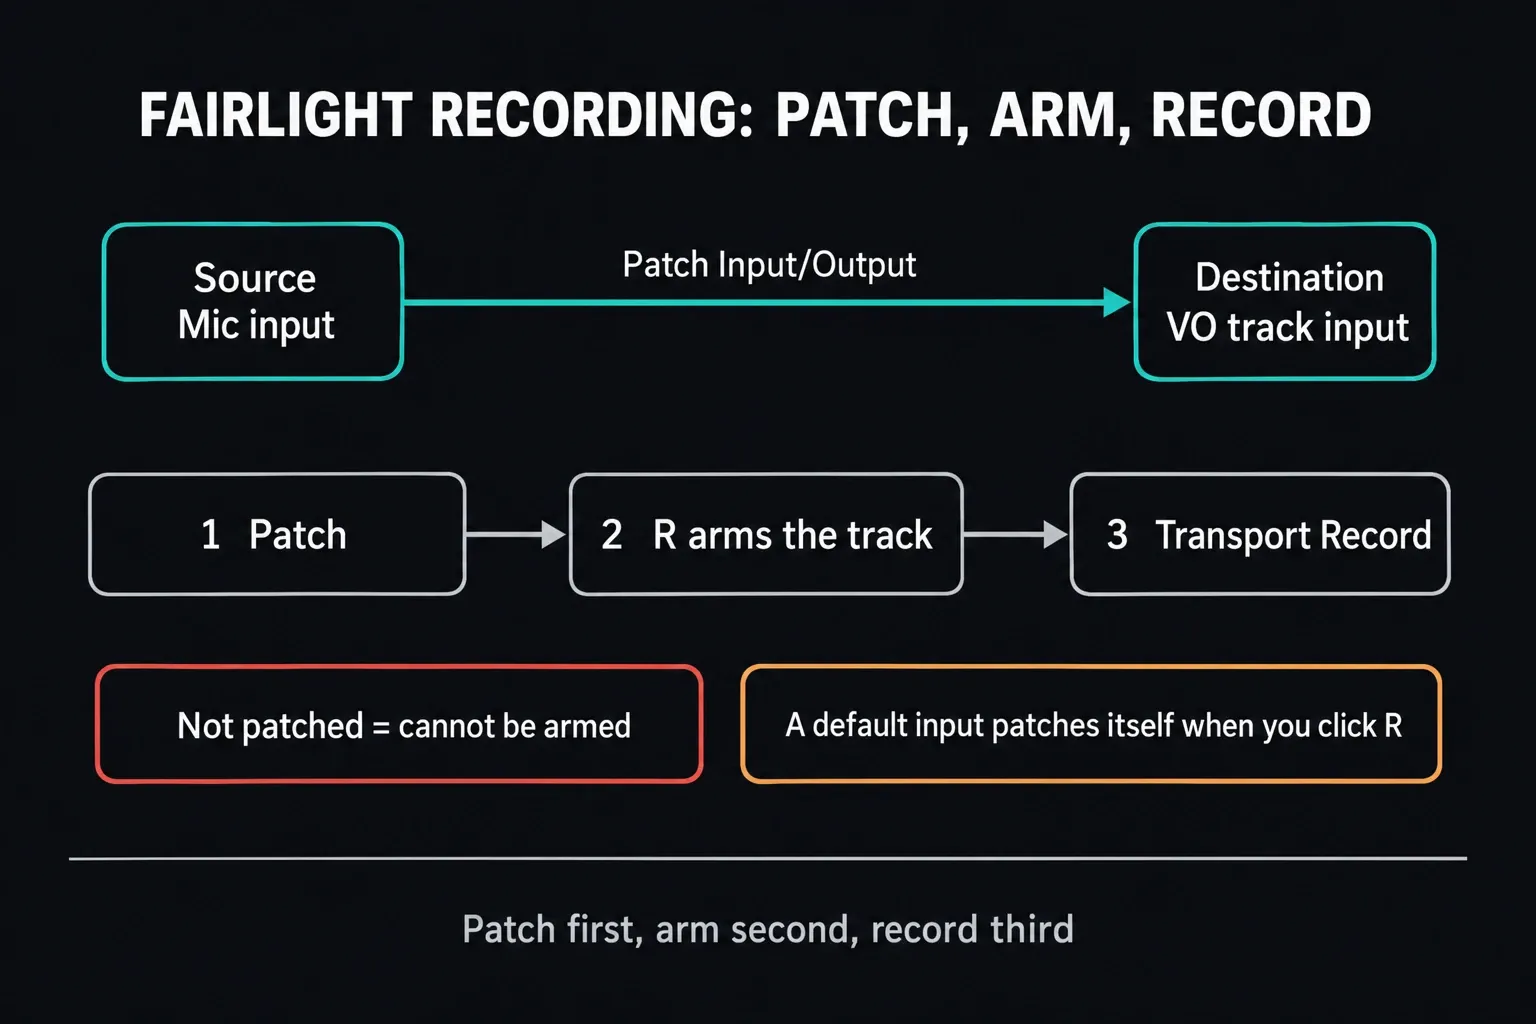
Fairlight can designate a default audio input that auto-patches whenever you arm a track. That's handy on a stable workstation, but it doesn't replace a quick look at the source shown in the Mixer.
Recordings are written to File > Project Settings > Master Settings > Working Folders > Project media location, while the selected Media Pool bin decides where the new clips appear inside the project.
For cue lists, pre-roll, post-roll, beeps and streamers, open the ADR interface instead of stretching a simple voiceover panel into an ADR session. AI Create ADR Cues is Studio-only, but you can build a cue list by hand and record ADR without that AI feature.
DaVinci Resolve voiceover not working: find the first missing signal
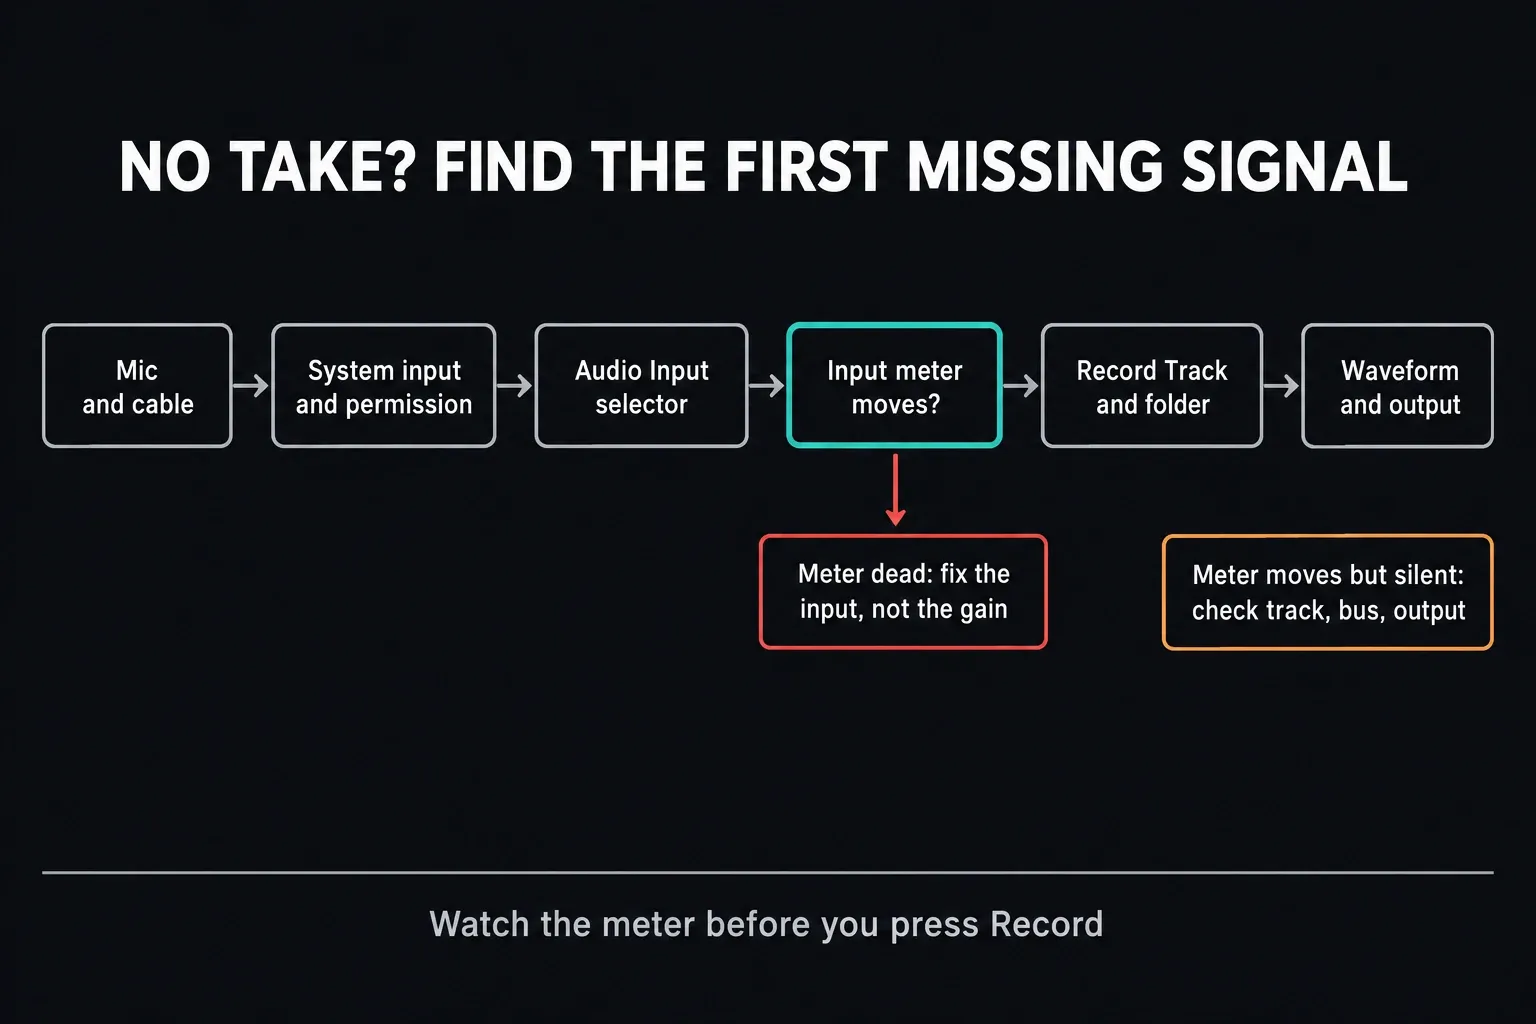
No meter movement
Don't keep pressing Record. Confirm the microphone is powered and not physically muted, that the operating system can see it, that Resolve has microphone permission, and that the Voiceover Audio Input points to that device rather than a laptop mic or a stale interface.
Reconnect or reselect the device, then speak again. A dead meter is an input problem; raising clip gain, a track fader or LUFS later in the chain can't create missing samples.
The meter moves, but no clip appears
Confirm an active timeline is open, choose a real Record Track instead of trusting an ambiguous Auto result, verify the recording location is writable and has free space, then do a five-second test.
In Fairlight, confirm the source is patched to the track input, the track is armed, and you pressed the transport Record control rather than only Record Arm.
A clip exists, but playback is silent
A clip exists, but it may hold nothing but silence. Look at its waveform first. If there's no recorded signal, go back to the input checks; if speech is visible in the waveform, check clip mute, track Mute/Solo state, track fader, bus assignment and the output device.
If other clips are silent too, switch to the broader Resolve no-audio diagnostic. If only the VO track vanishes somewhere between the Mixer and the speakers, the Fairlight bus-routing guide walks through that signal path.
Fix echo, feedback and delayed monitoring
Feedback happens when a live microphone hears its own monitored output through speakers and feeds it back into the system. Use headphones, lower the monitor level, or choose a monitoring mode that doesn't send the mic back to the speakers. Muting the timeline isn't the same as muting microphone monitoring, so work out which signal is causing the loop.
A delayed copy of your voice in the headphones is monitoring latency. The Edit tool openly warns that Input Monitoring can have lag.
Reduce the audio buffer only if the system stays stable, use direct hardware monitoring when the interface offers it, or switch off the software return. Don't drag a correctly recorded clip earlier to make up for a delay you heard only in headphones; compare the waveform with the picture first.
Fix voiceover that plays in only one ear
Start at the source format. A single spoken-word microphone normally belongs on a mono track. If a mono signal landed on only one side of a stereo clip, open Clip Attributes and map the active channel deliberately, or rerecord to a mono destination when you can.
Don't duplicate the active channel until you've confirmed the file really holds one valid side and not a damaged cable or the wrong interface input.
If the source channels are mapped correctly but playback still leans to one side, check the track pan and bus format. “Only one ear” is a symptom shared by source mapping, track panning and output routing; the waveform and meters tell you which stage owns it.
Fix a voiceover that is too quiet without clipping it
Set the microphone or interface preamp so ordinary speech produces a healthy meter with room for louder words. There's no single record level that fits every voice, microphone and delivery spec. Avoid clipping at the input; turning down a clipped timeline clip can't bring the lost peaks back.
After recording, keep cleanup and loudness apart. Clip gain and the track fader set level, EQ shapes tone, dynamics control range, and the final loudness check belongs near delivery. For the cleanup half beyond Fairlight's own tools, see clean dialogue in RX.
Open the Voice Isolation versus Dialogue Leveler guide only after you have a real recording; Voice Isolation is Studio-only, and neither tool replaces good microphone placement. Then use the Resolve LUFS and audio-level guide for the destination measurement instead of chasing a generic recording number.
DaVinci Resolve Free vs Studio for voiceover
The base Cut/Edit Voiceover recording controls and the Fairlight track-recording workflow are documented without a Studio-only marker, so recording a live microphone is available in both Free and Studio.
Studio adds AI capabilities around the recording workflow; Voice Isolation is explicitly Studio-only, and so is AI Speech Generator, which creates speech from typed text. You don't need either one to record your own microphone.
For a wider beginner route through the whole application, go back to the DaVinci Resolve tutorial hub. For this task the finish line is smaller: the correct microphone moves the meter, the take lands on the intended track, and the recorded waveform plays through the expected bus.
DaVinci Resolve voiceover FAQ
How do I record a voiceover in DaVinci Resolve 21?
Open the Cut page Voiceover tool, choose the microphone under Audio Input, choose a VO track, confirm the meter moves, put on headphones, place the playhead or an In point, then press Record. The Edit page has a compact version under Timeline > Record Voiceover.
Why is DaVinci Resolve not recording my microphone?
If the Voiceover meter doesn't move, check the physical mic, the operating-system input, microphone permission and the Audio Input selection. If the meter moves but no clip appears, check the destination track and recording location; in Fairlight, also verify input patching and Record Arm.
Can I record voiceover in the free version of DaVinci Resolve?
Yes. The base Voiceover and Fairlight recording workflows are documented without a Studio-only restriction. Some AI cleanup tools differ by edition; Voice Isolation is explicitly Studio-only.
Why can I hear my voice with a delay while recording?
That delayed return is monitoring latency. Use direct monitoring on the audio interface when it's available, reduce the buffer only if the system stays stable, or turn off software Input Monitoring. Don't move the recorded clip until the waveform proves the recording itself is late.
Why is my voiceover only in one ear?
A mono microphone may have been recorded or interpreted as one side of a stereo clip. Check the source channels, Clip Attributes, track format and pan. Use a mono track for a normal single-microphone narration unless the source is genuinely stereo.
Where does DaVinci Resolve save voiceover recordings?
The Cut Voiceover palette has a Voiceover Recording File Location setting. Fairlight recordings use the Project media location under Project Settings > Master Settings > Working Folders, while the selected Media Pool bin controls where the new clips appear inside the project.
Should I use Voiceover or ADR in Fairlight?
Use Voiceover for narration, scratch tracks and simple timed pickups. Use Fairlight ADR when you need cue lists, pre-roll/post-roll, beeps, streamers, repeated performances and a controlled dialogue-replacement session.
