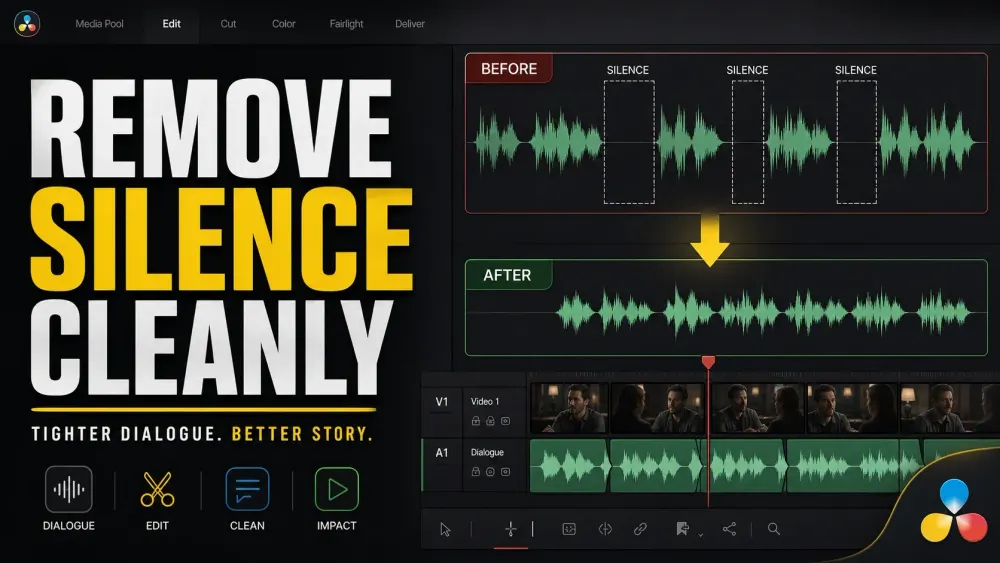
Ripple Delete Silence cuts detected pauses from an Edit or Cut timeline clip and closes the gaps. It's available in Resolve 21.1 Free and Studio without transcription. Duplicate your timeline before trying it: a level detector can mistake quiet consonants or breaths for silence, and every removed pause can create a picture cut.
If a search result says Resolve has no built-in way to remove dead air, check its date and version. That advice describes older releases or a different workflow: Blackmagic’s Resolve 20.2 New Features Guide introduced the native Ripple Delete Silence command, and the command remains documented in current Resolve 21.
Remove Silence and Ripple Delete Silence Do Different Jobs
| Command | Where | Timeline result |
|---|---|---|
| Ripple Delete Silence | Edit/Cut: Clip > Audio Operations | Cuts detected quiet sections and closes the gaps, shortening the sequence |
| Remove Silence (Studio only) | Fairlight: selected clip context menu | Creates separate audio clips with gaps while keeping the original timeline duration |
| Remove Silent Portions (Studio only) | Transcription window | Excludes silence markers for source assembly; Timeline Transcription mode can change an existing edit |
| Gate or expander | Fairlight dynamics | Reduces level during quiet passages but removes no timeline duration |
| Manual ripple edit | Edit/Cut timeline | Removes only the pauses the editor chooses |
Use Ripple Delete Silence to tighten a linked talking-head, interview, podcast-camera, or tutorial timeline where detected pauses should disappear from picture and sound. Use Fairlight Remove Silence in Studio when audio should be split around quiet regions without changing the program length.
In Studio, select a source clip in the Media Pool and choose AI Tools > Audio Transcription > Transcribe. In its Transcription window, use the Remove Silent Portions icon or the Options menu, select the wanted text and Insert or Append that range. This assembles selected speech; it does not automatically replace an existing edit. The full steps live in the Resolve 21 transcription workflow. Use a gate or expander only when the timing is already right and quiet passages should become lower, not shorter.
To change an existing edit through text, work on a duplicate and enter Timeline Transcription mode. That mode mirrors transcript edits to the timeline. It is separate from the source-clip Insert/Append workflow. The checked 21.1 manual documents Remove Silent Portions in Transcription, not a main Edit > Remove Silent Portions command or a separate Detect Silence step.
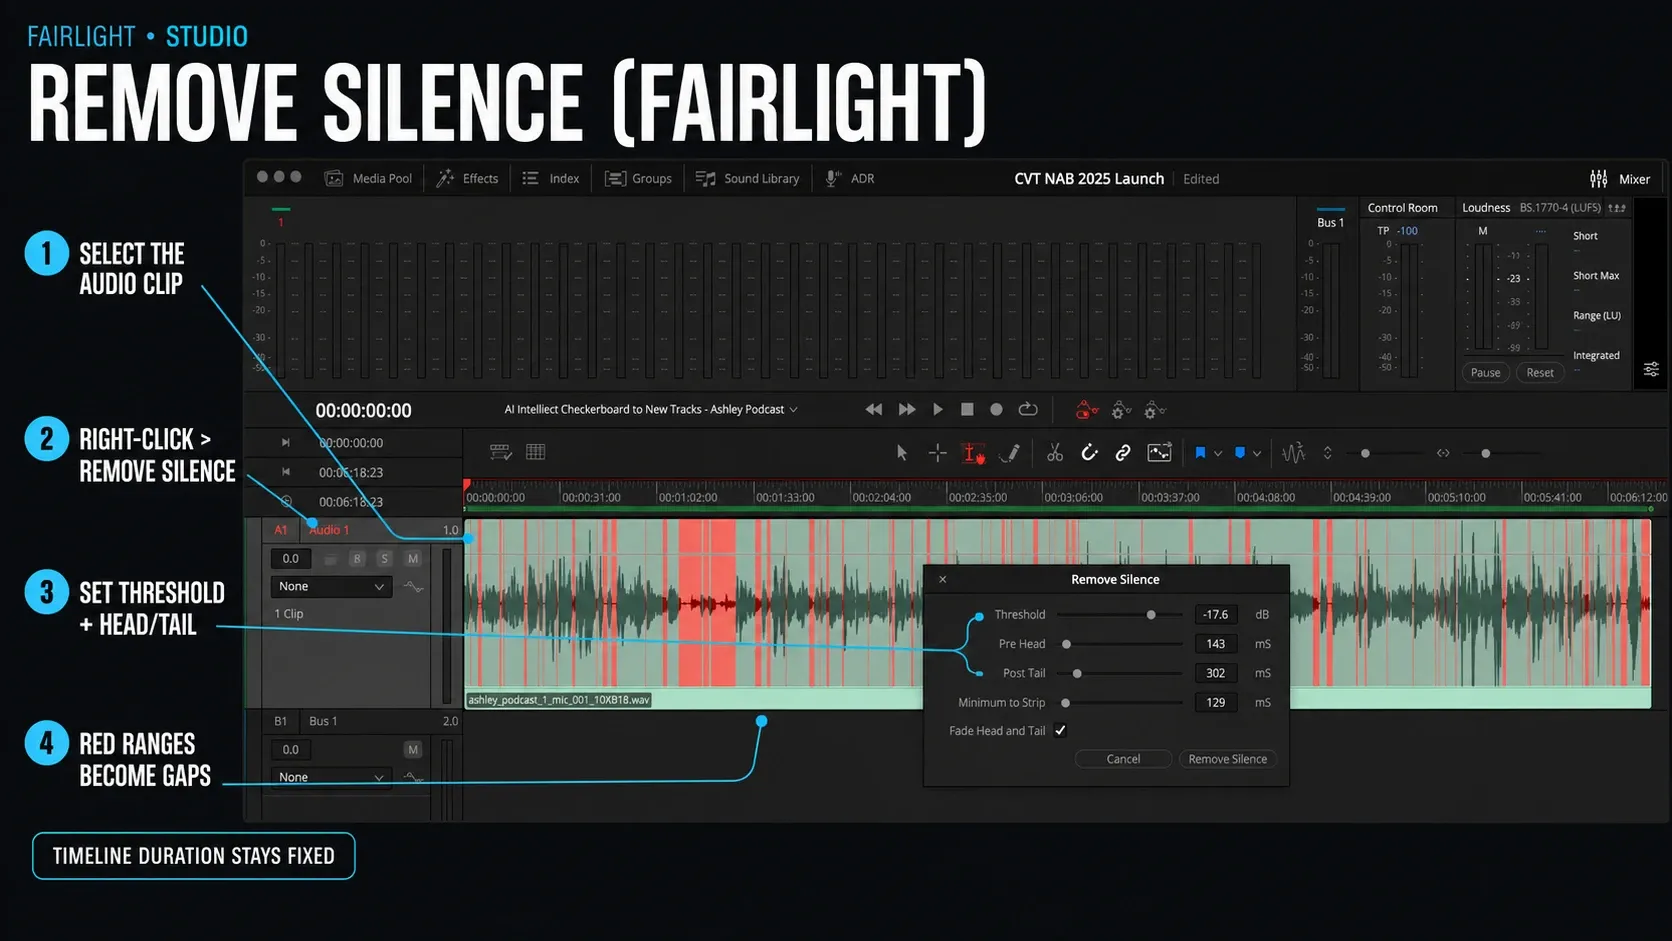
The September Resolve 21.1 Reference Manual (checked September 15, 2026) documents the Edit/Cut command, its five parameters, the red-striped preview, and current Sync Lock behavior. It also marks the separate Fairlight Remove Silence tool as Studio-only.
Prepare the Timeline Before Automatic Removal
- Save a project backup and duplicate the timeline. Give the copy a clear name such as
Interview_AutoSilence_Test. - Choose one representative section. Test 30–60 seconds containing normal speech, quiet speech, breaths, and real pauses before processing a one-hour recording.
- Confirm linked picture and production audio. If the audio belongs to the camera clip, keep Linked Selection on and select the linked clip.
- Inspect other tracks. Decide whether music, B-roll, graphics, subtitles, markers, and sound effects should ripple with the dialogue.
- Set sync locks deliberately. They operate independently from source/destination track selection: enabled tracks participate in ripple timing, while disabled tracks stay put and may lose relative sync.
For multicam or separately recorded sound, test the entire synchronized group on a duplicate. Don't run independent silence detection on each angle or microphone: different noise floors can produce different cuts. Keep the untouched multicam or nested timeline, and use manual linked edits if the detector cannot handle the selection safely.
Automatically Remove Silence in Resolve 21
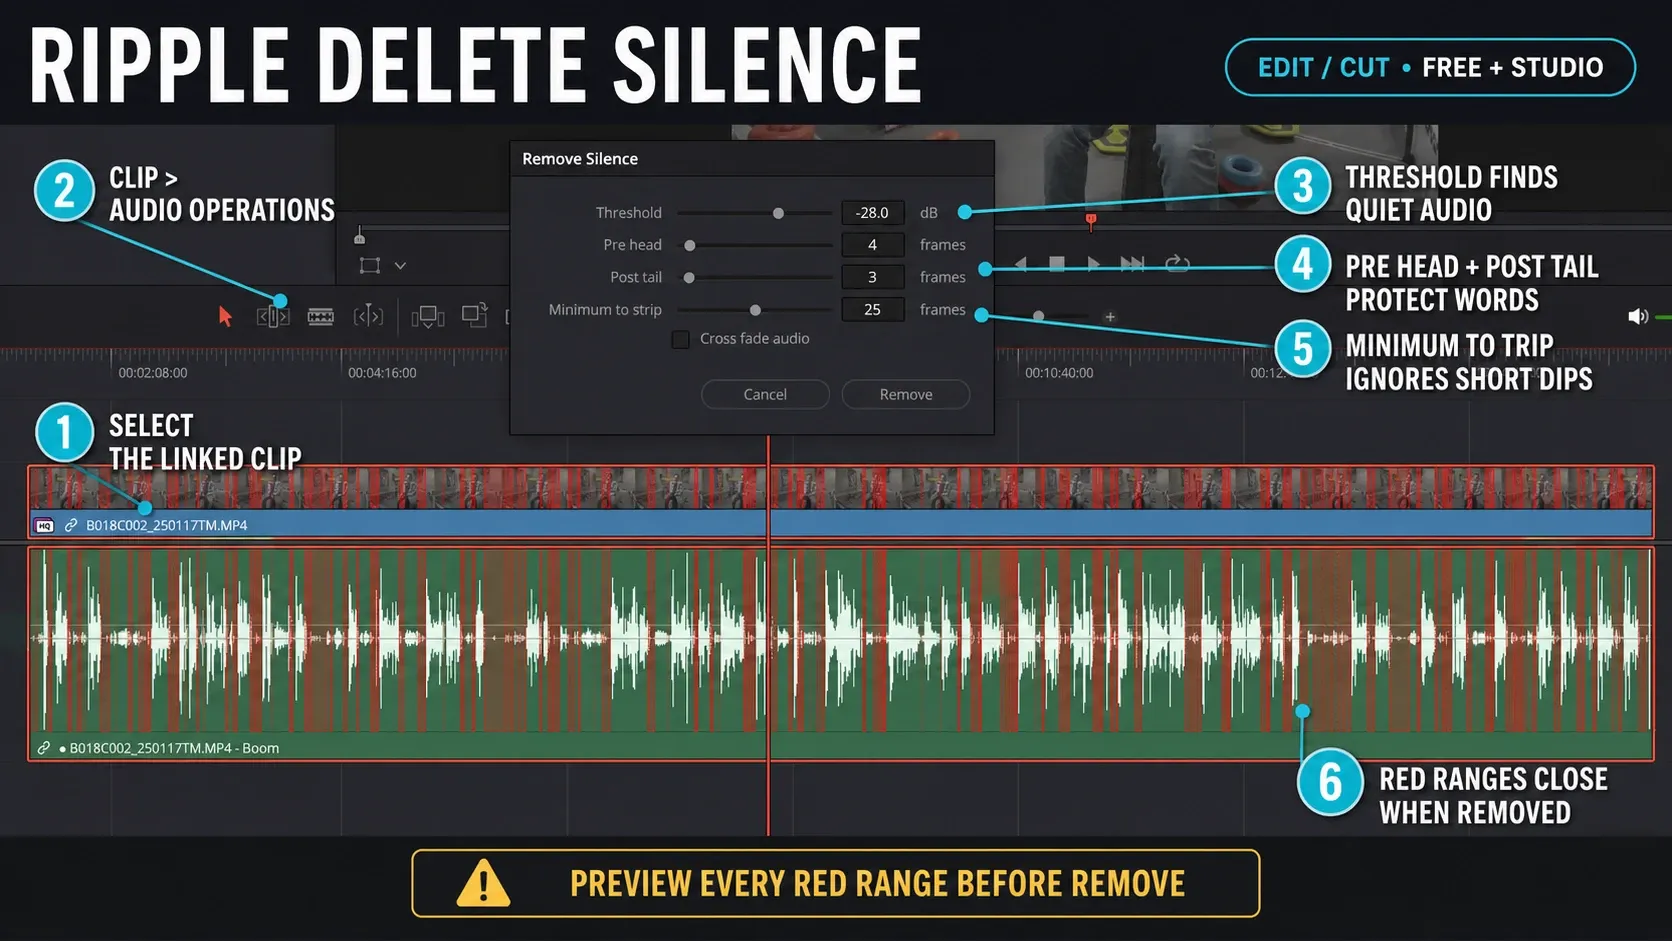
- Select the eligible timeline clip. On Edit or Cut, click the linked audio/video clip or the audio clip you want Resolve to analyze.
- Open the command. Choose Clip, then Audio Operations, then Ripple Delete Silence.
- Set Threshold. Start from the recording’s room-tone level, not a value copied from another microphone.
- Protect the word edges. Use Pre Head and Post Tail to retain time before and after detected audible regions.
- Set Minimum to Trip. Make Resolve ignore short low-level dips that are part of normal speech.
- Enable Cross fade audio. Let Resolve smooth adjacent audio edges when the retained handles are long enough.
- Inspect the red stripes. They show the sections Resolve intends to remove. Scrub quiet words, phrase endings, and breaths before committing.
- Click Remove. Resolve cuts the detected intervals and ripples the remaining sections together.
The numbers in the screenshot are an example, not a preset. A close-miked voice in a treated room, a laptop microphone, and a street interview have different noise floors and dynamic ranges. Adjust from the weakest real words in the selected clip.
What Each Ripple Delete Silence Setting Does
Threshold
Any signal below the threshold can be classified as silence. Raising the threshold removes more audio; lowering it preserves more. Set it too high and Resolve can remove soft syllables or breathy words. Set it too low and room tone prevents pauses from being detected.
Pre Head
Pre Head retains frames before each audible section. It protects the attack of an incoming word and keeps the edit from beginning exactly on a consonant.
Post Tail
Post Tail retains frames after each audible section. It protects word endings, breaths, and the decay of the room. The outgoing and incoming handles also give the crossfade somewhere to work.
Minimum to Trip
This is the minimum silent duration, measured in frames in the Edit/Cut command, that Resolve will strip. A higher value ignores short pauses; a lower value creates more cuts and can make speech sound chopped.
Cross fade audio
This adds a simple crossfade between remaining audio clips. It can prevent clicks and soften a room-tone change, but it can't restore a clipped consonant. If head and tail handles are too short, the transition still needs manual repair.
Dial In the Threshold Without Cutting Words
Find the quietest sentence you intend to keep, then compare it with a true pause containing only room tone. The threshold belongs between those levels. After each adjustment, inspect the red-striped preview: the stripes should cover pauses, not the front or tail of words.
If speech and noise overlap at similar levels, no threshold can separate them reliably. Lower the threshold to protect speech, remove only longer pauses, and finish difficult cuts manually.
Noise reduction, EQ, and compression are later mixing decisions; don't preprocess the dialogue so aggressively that the detector mistakes artifacts for silence. The Fairlight dialogue EQ guide explains the cleanup stage without using EQ as a silence detector.
Protect Music, B-Roll, Graphics, and Captions
Resolve 20.2 changed ripple behavior so sync locks can preserve relationships across tracks independently of ordinary track selection. That is helpful, but it means the timeline must be prepared intentionally.
- Music: let it ripple when it belongs to the dialogue timing; disable sync lock when the cue must stay anchored to absolute time.
- B-roll: decide whether it follows the spoken passage or should be re-edited after the dialogue changes.
- Titles and graphics: check both start and end after the ripple.
- Captions: regenerate, realign, or inspect every caption after timing changes.
- Bus and track automation: never assume it followed the editorial change. Compare automation breakpoints, fader moves, and music hits before and after the ripple.
- Markers: confirm whether critical delivery or music markers still identify the intended moment.
The safest first pass isolates a dialogue-driven duplicate. Once the timing is approved, rebuild or realign the supporting layers instead of assuming every overlay survived.
Make the Audio Joins Sound Natural
Cross fade audio handles simple joins, but automatic cuts can still reveal a changing noise floor. Listen with the picture hidden. If one edit jumps from air conditioner hum to near-digital silence, extend the audio edges, add consistent room tone under the cut, or adjust the crossfade by hand.
Don't use a gate to repair editorial rhythm. A gate or expander changes level, not duration. After the timing is stable, the Fairlight compressor guide can shape dynamics without changing where the words occur.
Fix the Picture Jump Cuts
Every removed internal pause in a single-camera talking head creates a picture cut. Sometimes that direct jump is the house style. When it is distracting, use one of these editorial fixes:
- cut to a genuine second angle;
- cover the edit with relevant B-roll;
- use a restrained punch-in or alternate crop;
- change the cut point with a J-cut or L-cut;
- restore part of the pause when the face or gesture can't be joined cleanly.
Smooth Cut can help only when subject and background position remain similar. In Resolve Studio 20 and later, the official Resolve 20 feature guide says Smooth Cut uses AI Speed Warp by default and provides an Inspector option to return to the earlier optical-flow method.
That AI Speed Warp option is Studio-only. Keep the transition short and inspect every frame; an honest jump cut is better than a warped face.
Use Fairlight Remove Silence Without Changing Duration
On the Fairlight page in Resolve Studio, select one clip or a collection of clips, right-click, and choose Remove Silence. This IntelliCut tool uses Threshold, Pre Head, Post Tail, Minimum to Strip in milliseconds, and Fade Head and Tail. It creates separated audio clips with gaps while the overall timeline timing remains fixed.
This is useful before mixing dialogue, ADR, or isolated microphones where you want empty regions but must not make picture shorter. It's associated with Fairlight’s IntelliCut feature set in Blackmagic’s Resolve 20 documentation, while the later Edit/Cut Ripple Delete Silence command is the straightforward current route for pacing a linked talking-head clip.
Blackmagic’s official Fairlight overview explains the wider track, bus, dynamics, and delivery workflow. For the practical clip-versus-track path, use the Fairlight audio hub.
Manual Ripple Edit: The Reliable Fallback
Automatic detection is the first pass, not a requirement. For emotional interviews, noisy field recordings, overlapping speakers, or a few remaining mistakes, manual edits give better control:
- Listen to the pause in sentence context.
- Cut linked picture and sound after the outgoing word and natural breath.
- Cut before the next word without touching its initial consonant.
- Ripple-delete the chosen gap.
- Add short fades or room tone.
- Review captions, graphics, music, and visible motion.
The Resolve shortcuts guide covers blade, trim, and ripple-delete commands for this cleanup pass. When the goal is to mute or detach audio without shortening the program, use the separate mute and split audio workflow.
Resolve Free vs Studio
The Edit/Cut Ripple Delete Silence command introduced in Resolve 20.2 is available in current Resolve 21 Free and Studio and doesn't require transcription. Manual cuts, ripple edits, fades, sync locks, and ordinary Fairlight mixing also work in Free.
The separate Fairlight Remove Silence command and Audio Transcription/Text Based Editing are Studio-only in Resolve 21. Ripple Delete Silence itself is the Free-and-Studio Edit/Cut route. If it's missing or gray, confirm Resolve 20.2 or later, switch to the Edit or Cut page, select an eligible timeline clip rather than a bin item, and open Clip > Audio Operations.
Fix Silence-Removal Problems
Resolve cuts quiet words
Lower the threshold, increase Pre Head and Post Tail, and raise Minimum to Trip. Retest a short section containing the quietest real speech.
Nothing is detected
Raise the threshold gradually and inspect whether constant room noise sits above it. A noisy recording may need manual candidates rather than an aggressive threshold.
Video and audio go out of sync
Undo, restore Linked Selection for the production pair, and inspect sync locks on every relevant track. Do not repair drift by sliding one component until the cause is known.
Music, captions, or graphics move incorrectly
Return to the duplicate, set track sync locks deliberately, and run the command again. Then inspect every timed overlay. Automatic dialogue cuts can't decide the story role of other tracks.
The dialogue sounds breathless
Restore pauses that carry emphasis or comprehension. Increase Minimum to Trip and Post Tail on the next pass. Fast is a style; nonstop is usually fatigue.
One-frame gaps or clicks remain
Zoom into the edit, close any residual gap manually, and add or adjust the crossfade. Keep room tone continuous. If the source is silent for unrelated reasons, the Resolve no-audio checklist separates playback failures from intentional pauses.
The Review Pass Automation Cannot Do
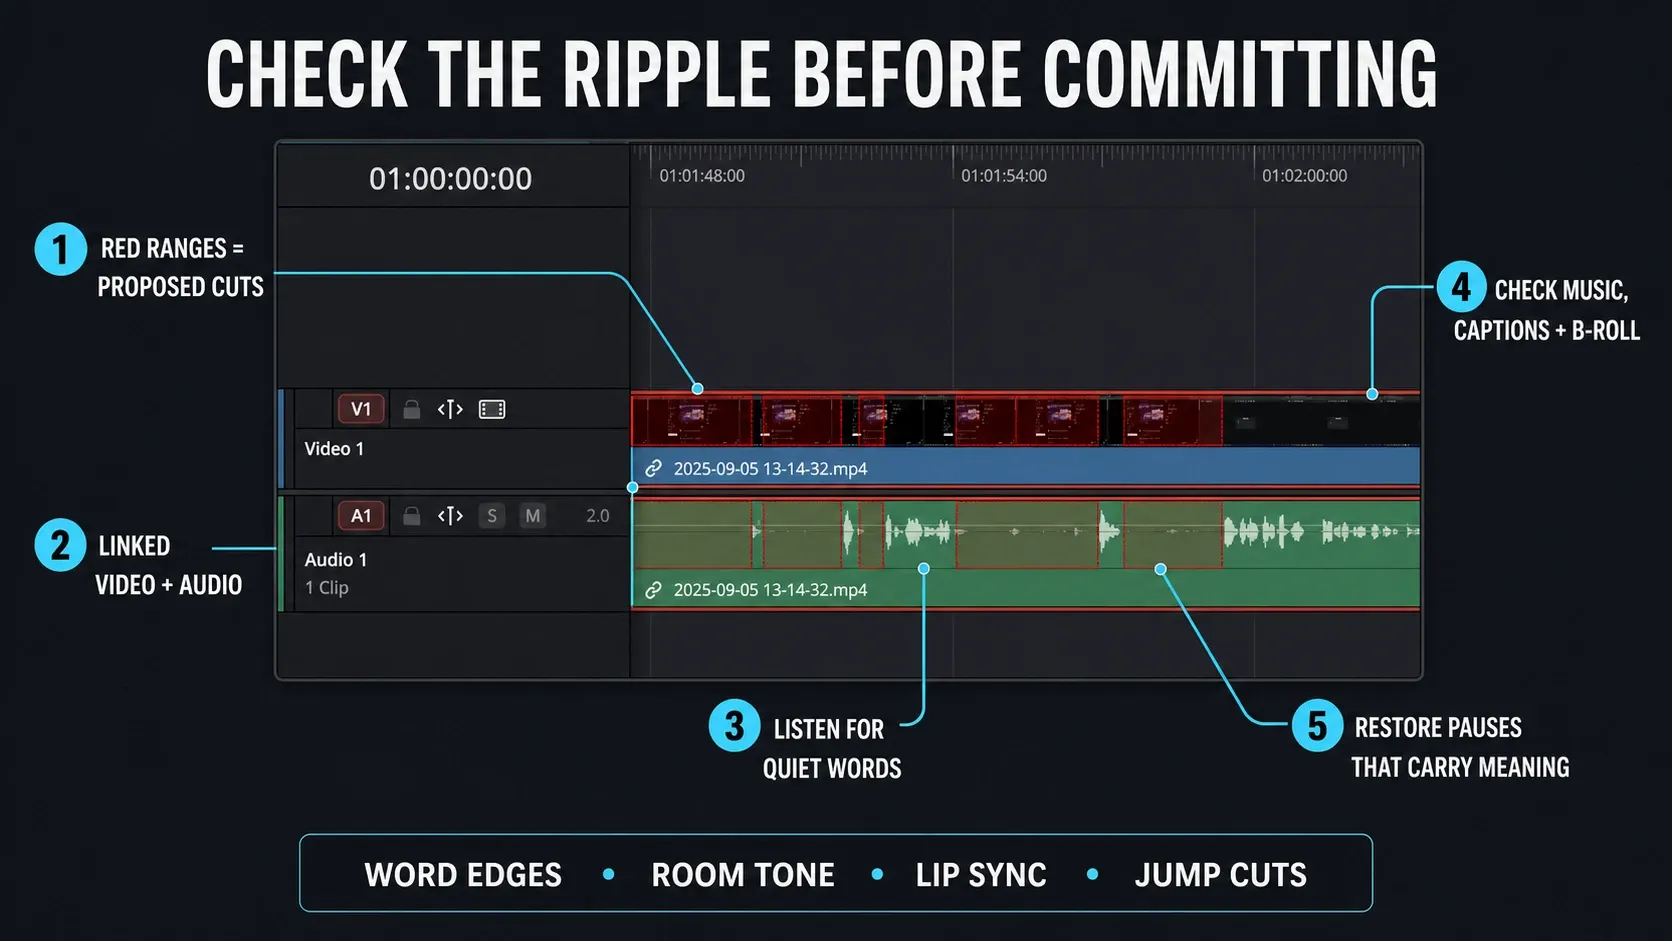
Watch once without looking at the waveform. Then listen with the picture hidden. Check sentence meaning, breath, room tone, clicks, lip sync, captions, graphics, music hits, gestures, and every visible jump created by the removals.
Keep pauses that give a listener time to understand a sentence or a speaker time to react. When timing is approved, measure the final mix with the Resolve audio levels and LUFS guide; pacing and loudness are separate deliverables.
For the next step, the Resolve workflow hub groups proxy, timeline, relinking, multicam, and finishing routes by task. If you are learning the application in sequence, the DaVinci Resolve tutorial roadmap moves from editing through dialogue repair, loudness, and export.
Remove Silence in Resolve FAQ
Where is Ripple Delete Silence in Resolve 21?
Select an eligible clip on the Edit or Cut timeline, then choose Clip, then Audio Operations, then Ripple Delete Silence.
What is the difference between Remove Silence and Ripple Delete Silence?
Fairlight Remove Silence creates gaps while keeping the timeline duration. Edit/Cut Ripple Delete Silence closes the detected gaps and shortens the sequence.
Does a noise gate remove silent sections from the timeline?
No. A gate reduces level during quiet passages but doesn't remove time. Use a ripple edit to shorten the program.
What threshold should I use?
Set it from the specific recording: above the room tone but below the quietest words you need to keep. There's no universal value for every microphone and room.
Why did video and audio go out of sync?
The linked pair or relevant tracks may not have shared the same edit. Undo, check Linked Selection and sync locks, then retry on a duplicate before moving clips by hand.
Can Resolve Free automatically remove pauses?
Yes. Current Resolve 21 Free includes Clip, then Audio Operations, then Ripple Delete Silence, along with manual ripple editing and fades.
