A mix can peak safely and still be much louder or quieter than the programs around it. It can also hit the right integrated LUFS while a short transient clips after encoding. Do not choose between peak and loudness meters. They answer different questions.
LUFS, dBFS, and True Peak in Plain English
| Reading | What it tells you | Common mistake |
|---|---|---|
| Sample peak (dBFS) | The highest encoded sample value | Assuming a safe sample peak guarantees safe encoded playback |
| True peak (dBTP) | An estimate of inter-sample peaks after reconstruction or conversion | Leaving no headroom for lossy encoding |
| Momentary loudness | Very short loudness window, roughly 400 ms under EBU mode | Trying to master an entire program from a jumping number |
| Resolve numeric Short / Short Max | The final Resolve 21 manual describes a 30-second window | Confusing this readout with the three-second history curve |
| Loudness History: Short Term | The past three seconds | Confusing one loud scene with the program average |
| Integrated loudness | Gated loudness across the measured program | Reading it before the whole relevant range has played |
| Loudness Range (LRA) | A statistical view of program loudness variation | Treating it as a mandatory target without a delivery spec |
Checked September 5, 2026, LUFS means Loudness Units relative to Full Scale. LKFS is the equivalent K-weighted term used by some standards; for the same BS.1770 measurement, the numerical values are treated equivalently.
Blackmagic's official Fairlight page confirms selectable standards, tolerance color coding, a main-bus loudness graph, and offline clip analysis. The final Resolve 21 Reference Manual documents the meter controls and readouts on pp. 4133–4137.
Which LUFS Target Should You Use?
Use a signed delivery specification when one exists. The examples below are orientation, not permission to ignore a network, distributor, or client document.
| Destination | Published reference | True peak |
|---|---|---|
| European broadcast (EBU R 128) | -23 LUFS program loudness | Generally no higher than -1 dBTP |
| US broadcast (ATSC A/85) | -24 LKFS for content without matching metadata; about ±2 dB measurement tolerance | Below -2 dBTP in the cited guidance |
| Apple Podcasts | About -16 dB LKFS, ±1 dB | No higher than -1 dBFS true peak |
| Netflix commissioned delivery | Specification-dependent dialogue-gated and/or full-program measurement | Use the current title-specific delivery specification |
| YouTube creator upload | No public fixed upload LUFS requirement in YouTube’s creator formatting guidance | Leave sensible encoding headroom and verify the upload |
The EBU’s loudness guidance specifies -23 LUFS and defines momentary, short-term, and integrated measurement. ATSC A/85 uses -24 LKFS when loudness metadata is absent or unspecified and recommends true peaks below -2 dBTP in that context. Apple Podcasts’ current requirements recommend about -16 LKFS ±1 with true peak no higher than -1 dBFS.
You'll often see “-14 LUFS for YouTube” repeated as if it were an upload contract. It can be a useful community mastering reference, but YouTube's current public video and audio formatting guidance does not state a universal creator-upload LUFS requirement.
Its separate audio-enhancements guidance says playback audio may be adjusted and that viewers can manage Stable volume or Voice boost. Don't crush a good mix merely to chase a screenshot from “Stats for nerds.”
Fix Levels in Signal-Flow Order
- Set repeatable monitoring. Pick a sensible speaker or headphone level and stop changing it every scene.
- Repair clip-level outliers. Use clip gain so unusually quiet or loud recordings enter the track chain in a workable range.
- Build dialogue first. Balance representative quiet, normal, and loud lines before music and effects.
- Shape tracks. Use EQ, compression, automation, and cleanup only where they solve an audible problem.
- Place music and effects around speech. Lower or automate competing material instead of forcing dialogue through it.
- Watch buses and Main. Several safe tracks can sum into an overloaded subgroup or output.
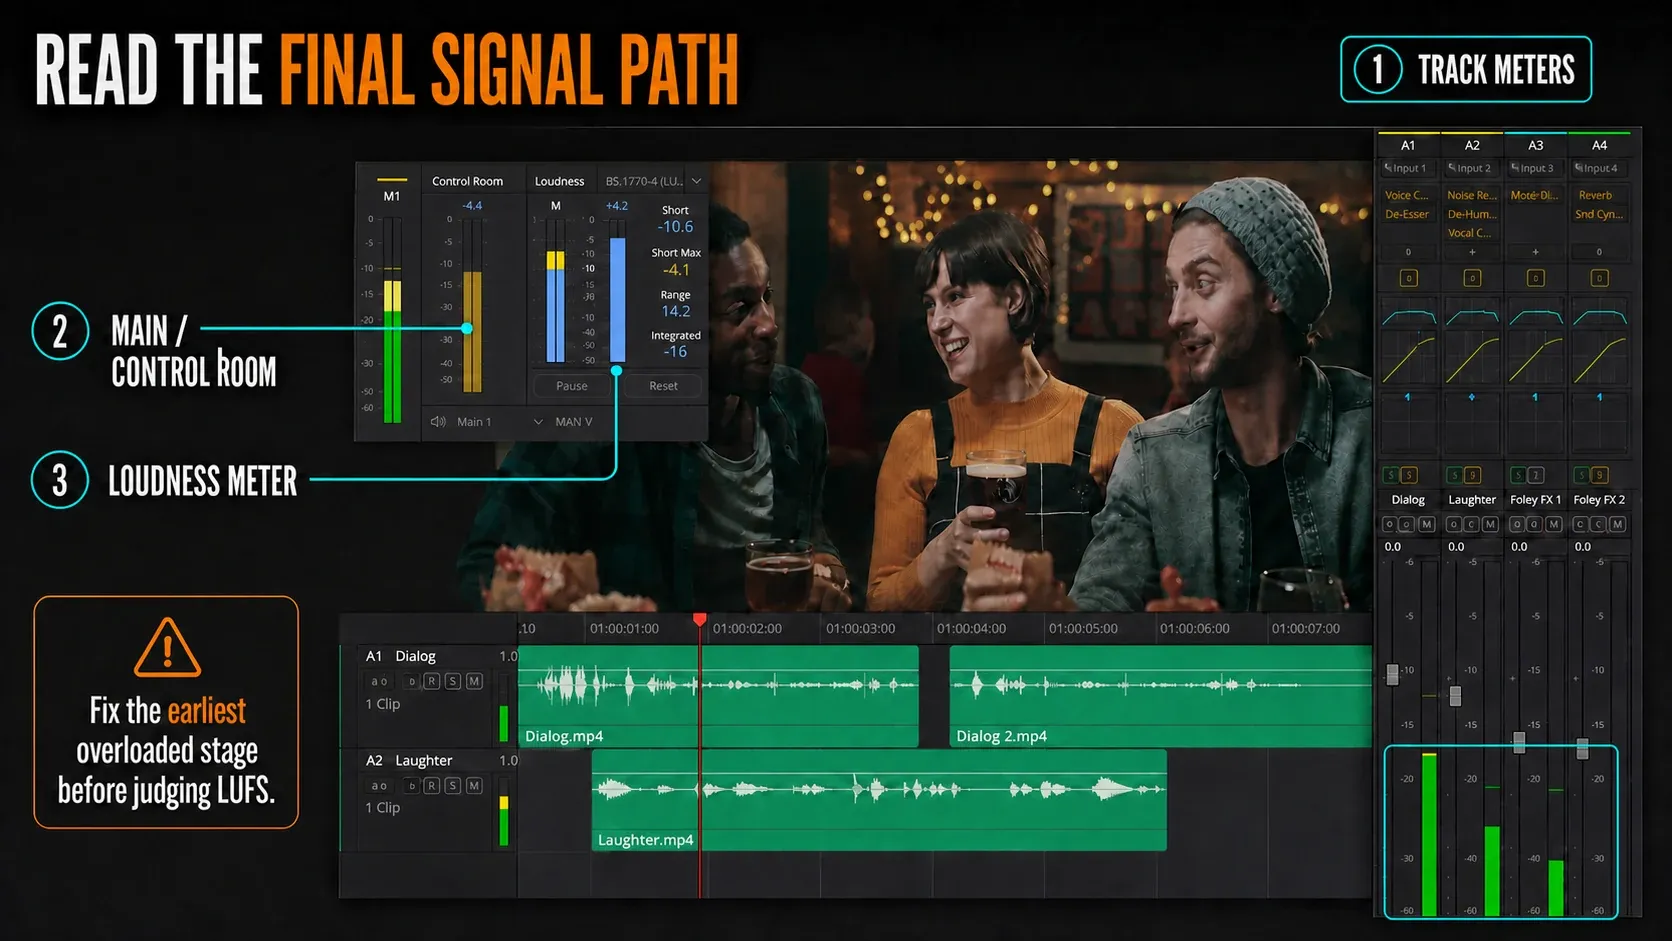
- Measure after all processing. The loudness meter must see the same final bus that the deliverable uses.
Clip gain is pre-track correction; a track fader balances that track in the scene; a bus fader balances a group; Main controls the program output. If your routing is unclear, fix that before metering with our Fairlight bus-routing guide.
Build a Dialogue Anchor Before Chasing LUFS
Choose several passages: a normal line, the quietest intentional line, an excited line, and a section under music. Set clip gain so the track processor receives consistent material without flattening performance. Then automate phrases that still wander.
Peak position alone doesn't define good dialogue. Mic distance, noise, spectral balance, accent, room reflections, music masking, and dynamic range all affect intelligibility.
Use the tools in order: clean obvious problems, shape tone with the approach in our Fairlight dialogue EQ guide, control excessive variation with the dialogue compressor workflow, then rebalance in context.
Resolve 21’s Voice Isolation and Dialogue Leveler can help specific recordings, but neither is a master-loudness control. Our Voice Isolation vs Dialogue Leveler comparison explains which problem each tool is designed to solve.
Set Up Fairlight Loudness Monitoring
- Go to the Fairlight page and open the Mixer and Control Room monitoring controls.
- Confirm that you're monitoring the same Main bus used for export.
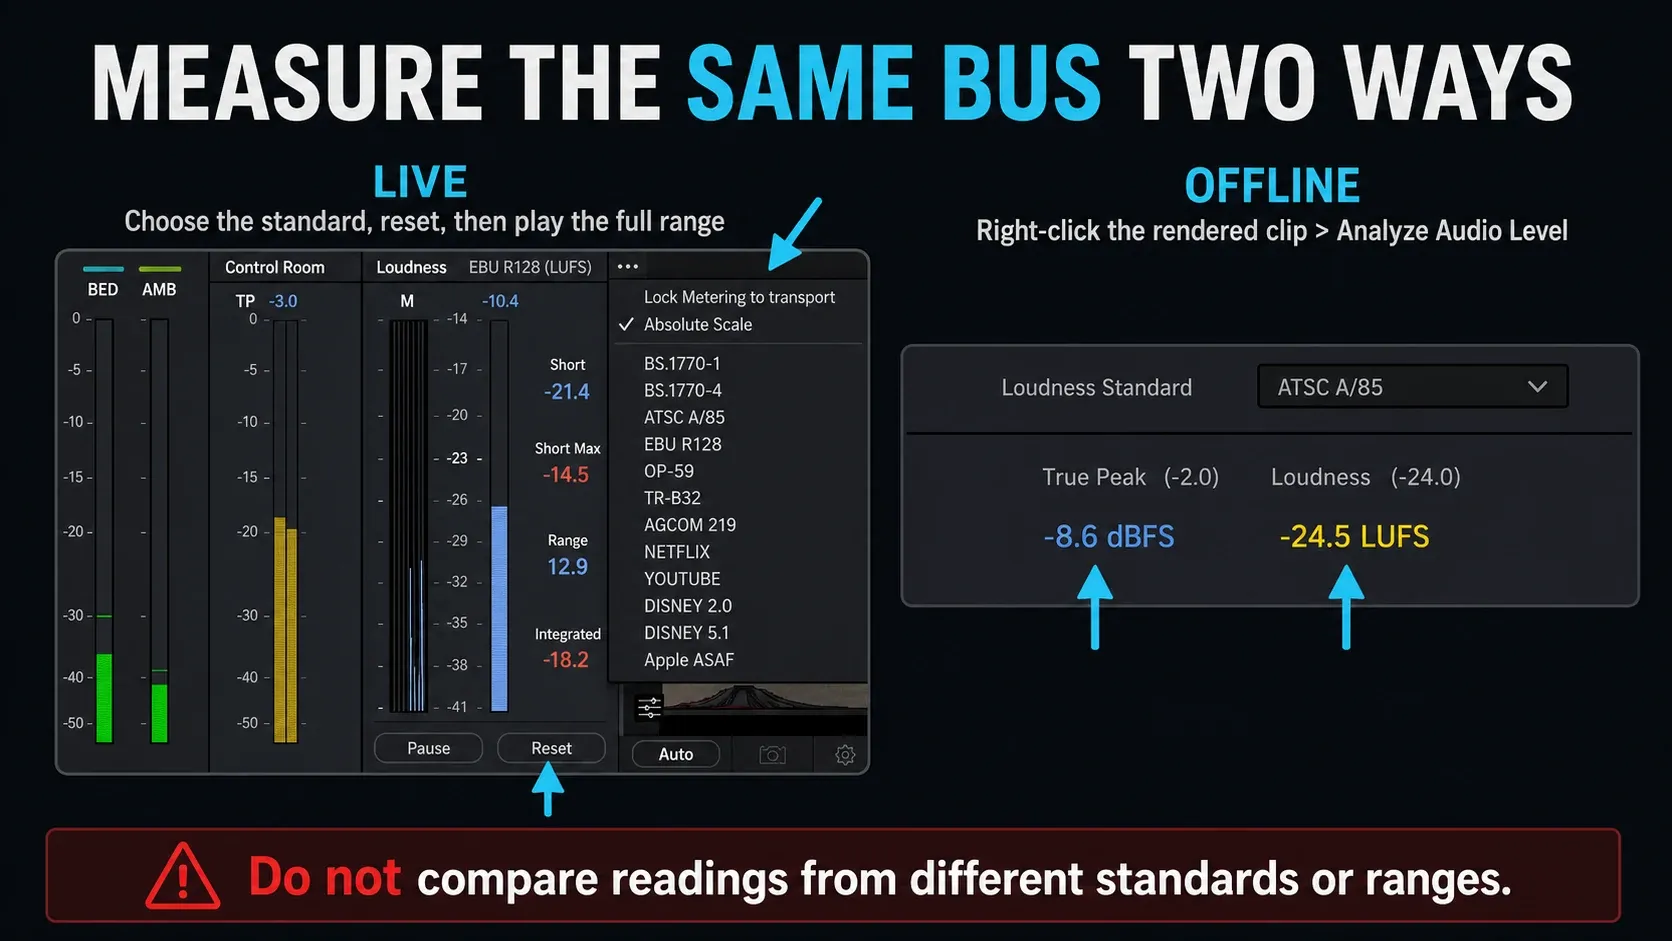
- Open the loudness meter options and choose the required standard: for example EBU R128, ATSC A/85, BS.1770, or another listed profile.
- Confirm the meter’s target and tolerance against the current delivery document.
- Enable true-peak measurement where the chosen meter or Loudness Meter effect exposes it.
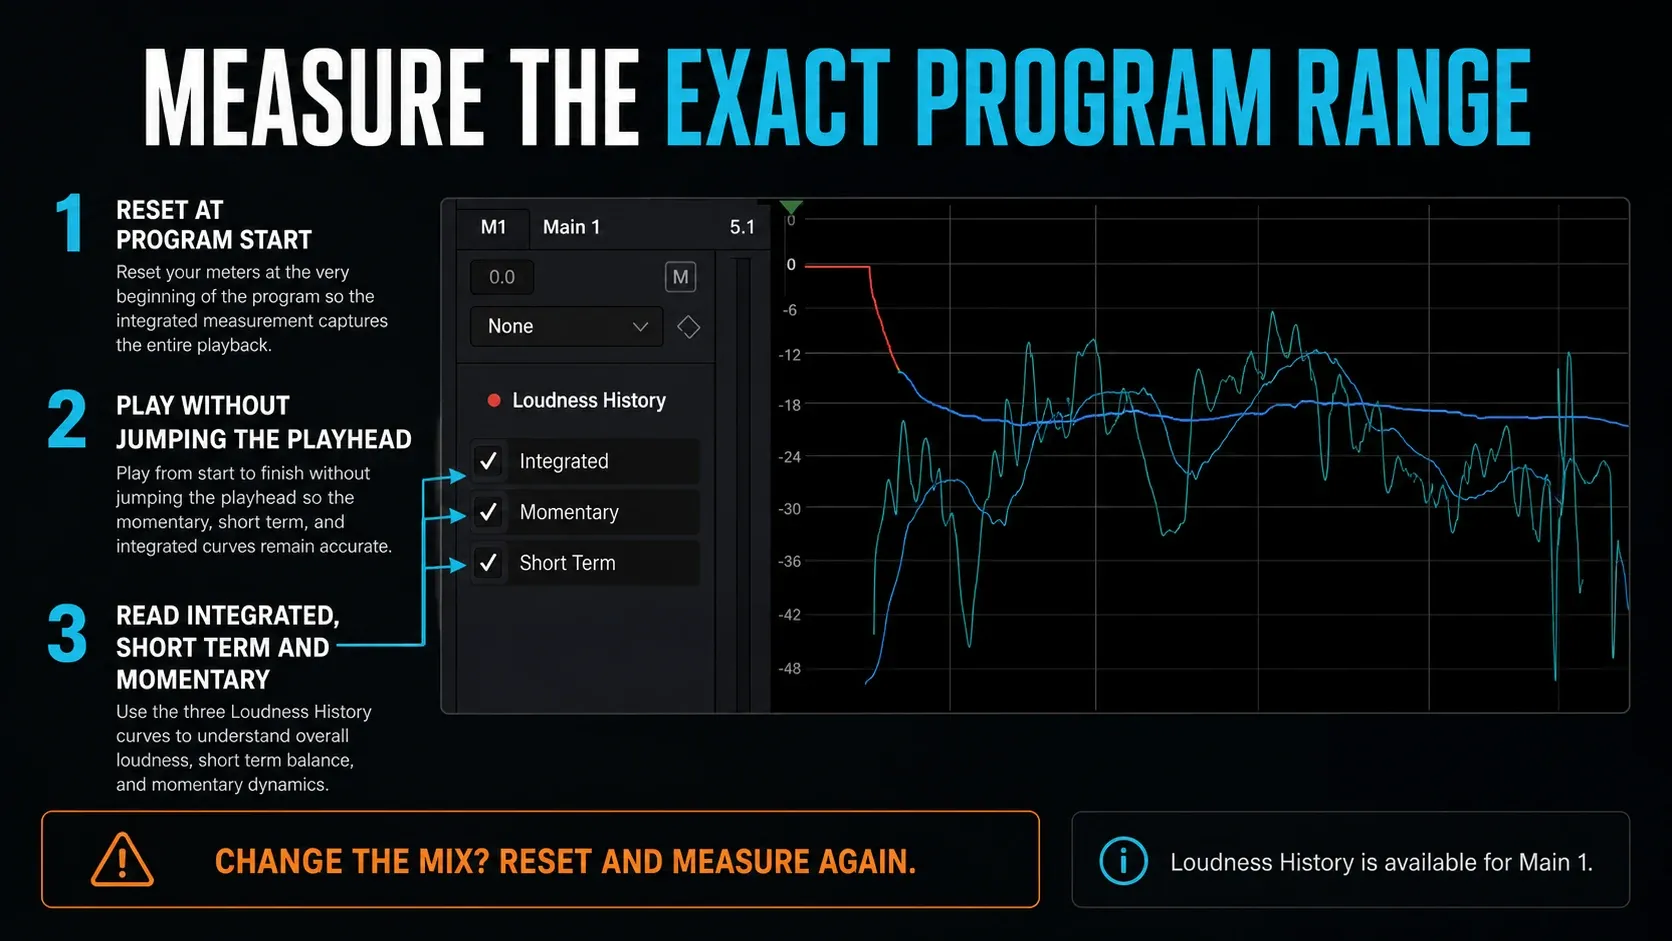
- Reset the integrated measurement immediately before the program start. If Lock Metering to Transport is enabled, moving the playhead resets the analysis; confirm that behavior before a compliance pass.
- Play the complete delivery range without jumping the playhead.
- Record the metrics required by the delivery spec: Integrated, the relevant Short/Short Max or Short Term history view, Loudness Range, and maximum True Peak.
Resolve’s colored loudness display is a compliance aid, not an automatic mix decision. Blue, yellow, and red depend on the selected standard and tolerance. A blue reading under EBU R128 is not necessarily wrong for a podcast, and a yellow reading under a custom -14 preset isn't broadcast approval.
Measure the Correct Range
Integrated loudness is only meaningful for the program that actually played after the last reset. Start at the first frame required by delivery and finish after the required tail. If the spec includes bars, tone, ident, or silence outside the measured program, follow its measurement boundaries precisely.
For a bounced or rendered audio clip, right-click it and use Analyze Audio Level for the offline check.
The three-second Short Term history curve helps you locate a shout, music sting, or weak scene. The numeric Short/Short Max readout is a different Resolve measurement, and Momentary loudness is more local still.
Neither can replace a complete integrated pass. If you change a bus limiter, music automation, dialogue gain, or the measured duration, reset and measure again.
Use a Limiter for Peaks, Not as a Loudness Bulldozer
A true-peak limiter on the final bus can catch remaining transients, but it should be the guardrail after a balanced mix. If it's shaving several decibels throughout every chorus or sentence, lower the contributing buses or revise compression upstream. Constant limiting changes punch, ambience, and speech texture.
Set the output ceiling from the delivery spec. Online work often leaves at least 1 dB of true-peak headroom because AAC or other lossy encoders can create inter-sample overs. Broadcast and platform contracts may require a different ceiling. Measure after the limiter. For the mechanics behind inter-sample overs, see true peak explained.
Should You Normalize Audio on Export?
Resolve’s Deliver page offers two different operations. Normalize to Standard scales toward the chosen standard until either the loudness or peak constraint governs. Optimize to Standard can optimize loudness while keeping peaks below the selected threshold.
Neither is a substitute for mixing: delivery processing can't decide that one interview is buried under music, repair a clipped bus, or preserve the intended drama of every scene.
- Measure and save the final mix first.
- Select the correct bus and channel format on Deliver.
- Choose Normalize to Standard or Optimize to Standard deliberately, and select the exact standard only when the delivery requires or benefits from it.
- Check what happens when the requested gain would violate the true-peak ceiling.
- Render a test file.
- Reimport that file, route it directly to a clean measurement bus, reset, and measure it again.
Our DaVinci Resolve audio export guide covers bus selection, mono/stereo layout, WAV versus AAC, and reimport verification in detail.
Resolve Free vs Studio
The core Fairlight mixer, bus routing, standard loudness monitoring, and audio rendering workflow are available in Resolve Free. Studio adds advanced features and immersive formats, but buying Studio doesn't choose the correct loudness specification or mix the program for you.
Exact standards, presets, effects, and labels can change by Resolve release. This article targets Resolve 21; verify the installed point release and the current client document before final QC.
Troubleshooting Audio Levels and LUFS
Integrated LUFS never settles
It will keep updating as new material plays. Reset at the true program start and play the complete range once. Do not loop a loud section and expect a program value.
Dialogue meets LUFS but is hard to understand
LUFS doesn't diagnose masking, noise, reverb, poor articulation, or spectral imbalance. Lower competing music, automate phrases, and repair the dialogue before changing the master target.
The Main bus clips although tracks look safe
Tracks sum at buses. Check subgroup gain, parallel sends, makeup gain, and Main processing. Fix the earliest overloaded stage instead of placing a limiter after accidental clipping.
The exported file measures differently
Confirm the Deliver page rendered the intended bus, channel count, timeline range, and Normalize/Optimize setting. A different bus or per-output normalization choice changes the measurement, and lossy encoding can alter true peak. Reimport and measure the rendered file through a clean path instead of trusting only the live timeline meter.
Music is loud enough but masks every word
Volume is only part of masking. Automate the music under speech and reduce competing midrange selectively. Do not keep boosting dialogue until the Main bus runs out of headroom.
Final Audio QC Checklist
- Listen through the complete program at a repeatable monitor level.
- Check dialogue on speakers, headphones, and a small mono-compatible device.
- Verify clip, track, subgroup, and Main stages do not clip.
- Reset and measure the exact delivery range.
- Record integrated loudness and maximum true peak.
- Compare those numbers with the current destination specification.
- Render the actual bus and channel layout.
- Reimport and remeasure the file after encoding.
- Check sync, start, tail, fades, channel order, and unexpected silence.
The meter proves compliance with a measurement. Your ears prove that dialogue is clear, music supports the scene, and dynamics still make sense. A finished mix needs both.
The Fairlight Audio in DaVinci Resolve hub places loudness measurement after routing, dialogue processing, and mix decisions, not before them.
DaVinci Resolve Audio Levels and LUFS FAQ
What is LUFS?
LUFS is a K-weighted loudness measurement relative to digital full scale. Integrated LUFS summarizes the measured program; short-term and momentary views show local changes.
Is LUFS the same as dBFS peak level?
No. Peak readings show signal headroom; LUFS estimates perceived loudness across time. A mix can pass one limit and fail the other.
What LUFS should I use for YouTube?
YouTube does not publish a universal -14 LUFS creator-upload requirement in its public formatting guidance. Use a sensible web master with true-peak headroom, avoid destructive loudness chasing, upload privately or unlisted, and verify playback.
What is the EBU R128 loudness target?
EBU R128 specifies -23 LUFS program loudness. Current delivery documents can also define tolerance, true peak, and Loudness Range requirements.
Should I normalize audio on export?
Only after the mix is balanced and you understand the selected standard. Render normalization can shift overall level, but it can't repair dialogue masking, bad routing, or excessive dynamics.
Why does LUFS change after export?
The rendered bus, channel layout, range, normalization, and codec may differ from the monitoring path. Reimport the actual file and measure it through a clean bus.
Can DaVinci Resolve Free measure LUFS?
Yes. The core Fairlight loudness-monitoring workflow is available in Resolve Free. Confirm the exact standards and controls in your installed Resolve 21 build.
