For one finished mix, open Deliver and start from the Audio Only preset or Custom Export. Confirm that Export Video is off and Export Audio is on, choose WAVE/Linear PCM, and select the actual stereo Main or Submix bus. 24-bit/48 kHz is common for video post, but the delivery specification wins.
For dialogue, music, and effects stems, route those groups to separate Fairlight buses first and render every bus over the same timeline range.
Decide What You Are Delivering: One Mix or Stems
Before touching the Deliver page, ask one question: should the recipient hear your finished mix, or should they be able to rebalance parts of it?
| Deliverable | Choose in Resolve | What it contains |
|---|---|---|
| Finished stereo mix | Main stereo bus | All tracks, automation, track processing, and bus processing routed into that bus |
| Dialogue, music, and effects stems | Separate D, M, and E buses | Processed groups that can be recombined downstream |
| Raw or lightly processed tracks | Individual timeline tracks | Each selected track, which may not include downstream bus processing |
| Bounced clip or track | Fairlight bounce command | A rendered asset created during editing, not necessarily the final delivery master |
Use the approved Main or Submix bus for approval files, podcasts, YouTube voiceovers, and final audio masters unless the handoff specification says otherwise. A timeline-track export isn't automatically a stem. If dialogue passes through a dialogue bus with EQ or compression, exporting the source track can produce a different result from the mix you approved.
Blackmagic’s Fairlight overview explains the routing model. The final Resolve 21 Reference Manual defines the Deliver Audio panel: Output Track can select a Main or Submix bus, the plus control adds more outputs to the same job, and All Timeline Tracks is a separate choice rather than a processed stereo mix.
How to Export One Audio File from DaVinci Resolve
- Set the render range. On the Deliver page, choose Entire Timeline unless you deliberately set In and Out points. Leave enough space for the last reverb or music tail.
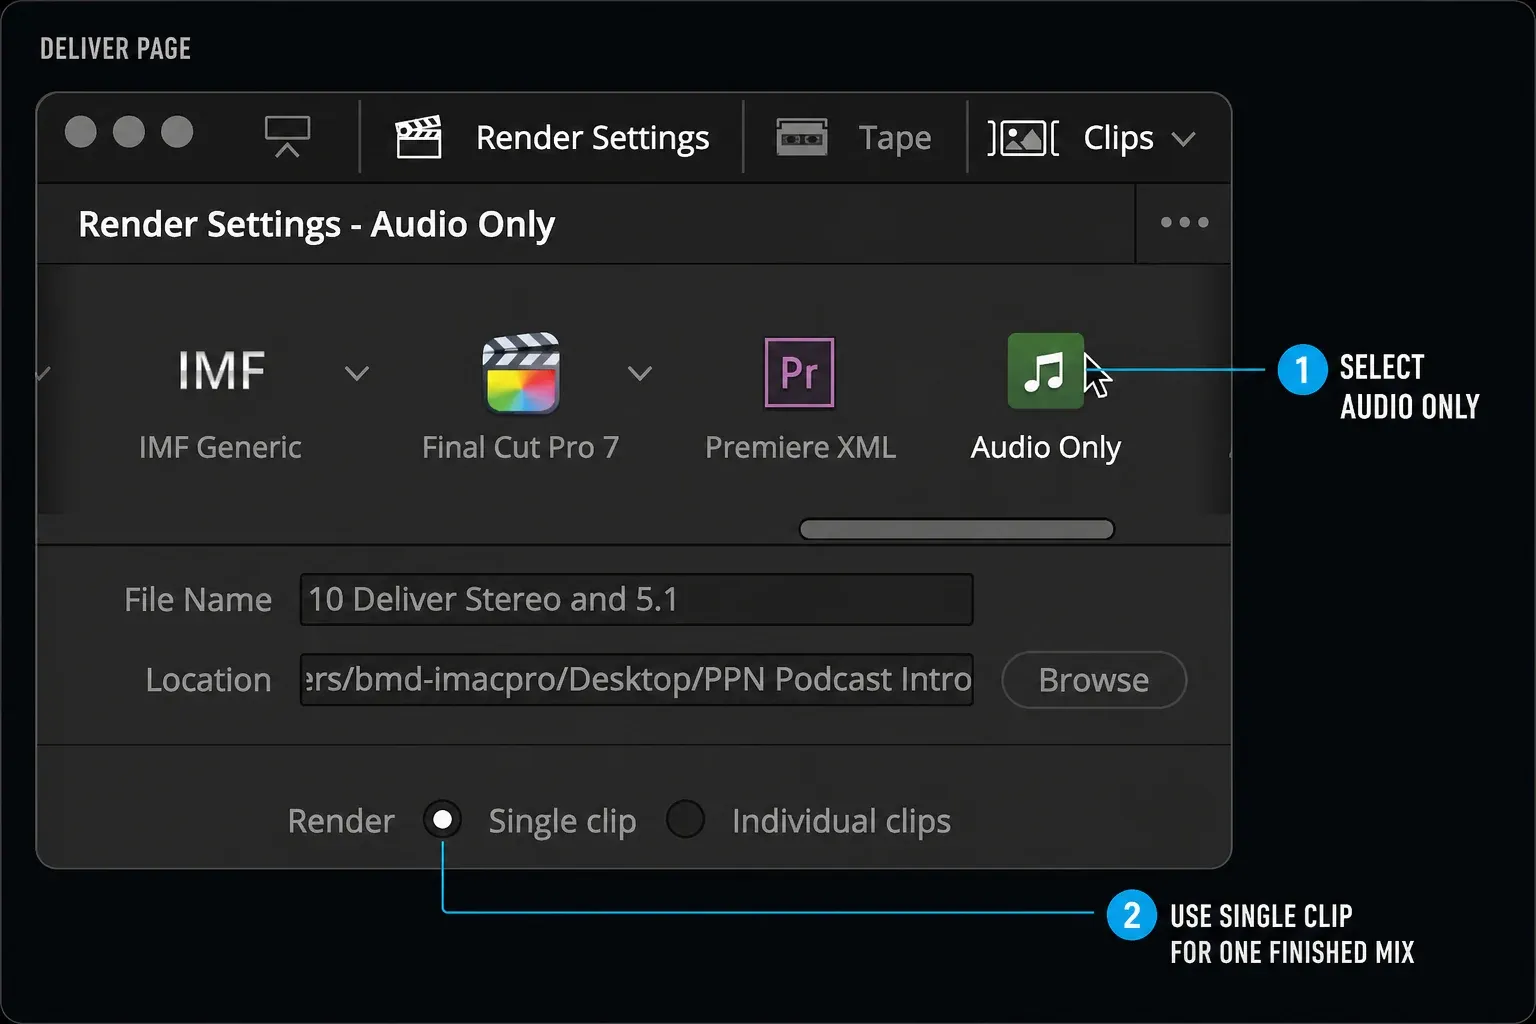
- Choose Audio Only or Custom Export. Audio Only is a quick starting preset; verify its format, bit depth, and Output Track. Custom Export exposes every setting for a manual setup. Give the file a useful name such as
project_mix_v03.wavand choose a normal delivery folder, not a cache directory. - Confirm that Export Video is disabled. Audio Only does this automatically. In Custom Export, open the Video section and clear Export Video. If the deliverable must include picture, use the video-export workflow instead.
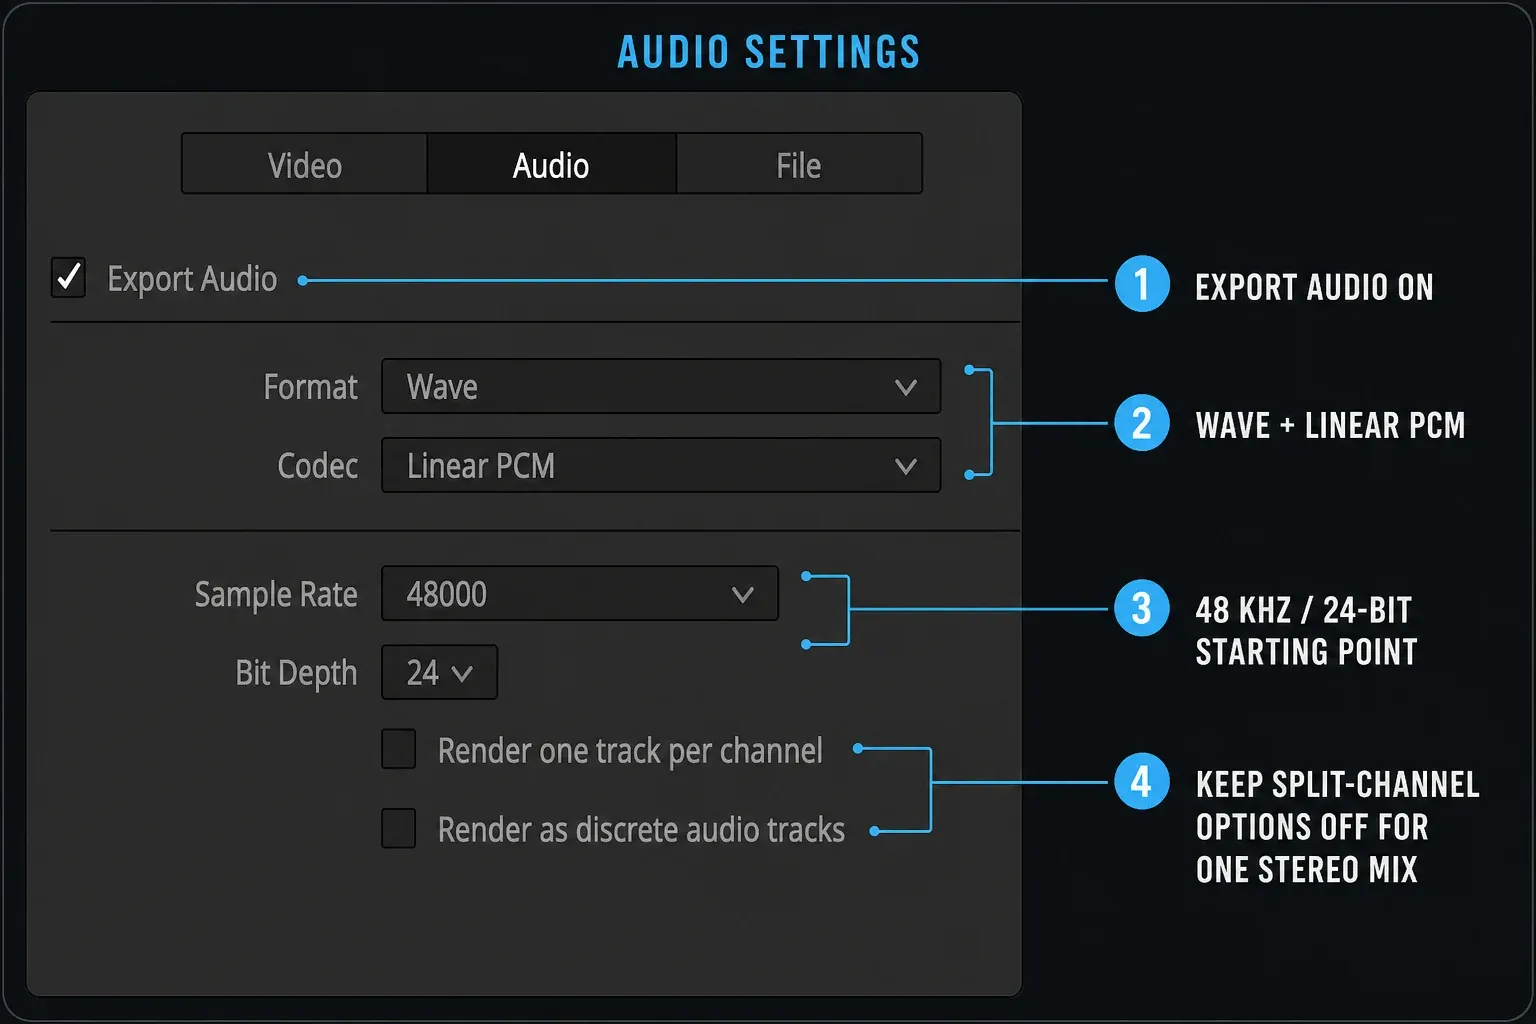
- Enable Export Audio. In the Audio section, turn on Export Audio.
- Choose WAV and Linear PCM. For a reliable master, select WAV, Linear PCM, 24-bit, and the project’s sample rate. In video post, that's normally 48 kHz. If a 16-bit file is required later, the 24-bit to 16-bit dither guide covers that single final step.
- Select the real output bus. In Output Track, choose the stereo Main or Submix bus that receives the approved mix. Use the project’s actual bus name; Resolve doesn't guarantee that every session calls it Bus 1.
- Keep channel-splitting options off for a normal stereo master. Render one track per channel and Render as discrete audio tracks have different channel/interleaving behavior. Enable either only when the delivery specification requires that structure.
- Add and render. Click Add to Render Queue, inspect the queued summary, then click Render All.
If Bus 1 isn't your actual mix bus, stop here and fix the routing. Open the Fairlight mixer, play the timeline, and watch the bus meters. The bus you select for delivery must receive every track you expect to hear. The Fairlight bus-routing guide shows the track-to-bus signal path without treating every track as an isolated output.
WAV, MP3, or AAC?
WAVE with Linear PCM is the safe default. That combination stores uncompressed PCM audio, survives another edit or encode without adding lossy-compression damage, and makes channel count, sample rate, and bit depth explicit. A common video-post starting point is 24-bit, 48 kHz WAVE/Linear PCM unless a broadcaster, editor, or client supplies a different specification.
MP3 and AAC are listening-copy formats. They're smaller and useful for review, but they should not replace an uncompressed master that will be edited, mixed, or encoded again.
Checked September 5, 2026, the final Resolve 21 manual confirms that AAC audio encoding is macOS-only. Don't promise AAC from Windows or Linux, and don't infer availability from a screenshot made on another platform. Verify the options on the delivery machine.
| Format | Use it for | Avoid it when |
|---|---|---|
| WAV / Linear PCM | Master, archive, editor handoff, stems | File size is the only concern |
| MP3 | Small speech or music review copy | The file will be processed or encoded again |
| AAC (macOS only in Resolve 21) | Compressed playback or a specified macOS handoff | The recipient asked for an uncompressed master |
How to Export Dialogue, Music, and Effects Stems
A stem is a deliberately routed group, not a synonym for every visible timeline track. A Dialogue bus can include the intended EQ, compression, automation, and level trim; a source-track export can omit downstream bus processing.
Verify the actual route and insert state, because a bus export contains what reaches that selected output path, not whatever the editor meant to include.
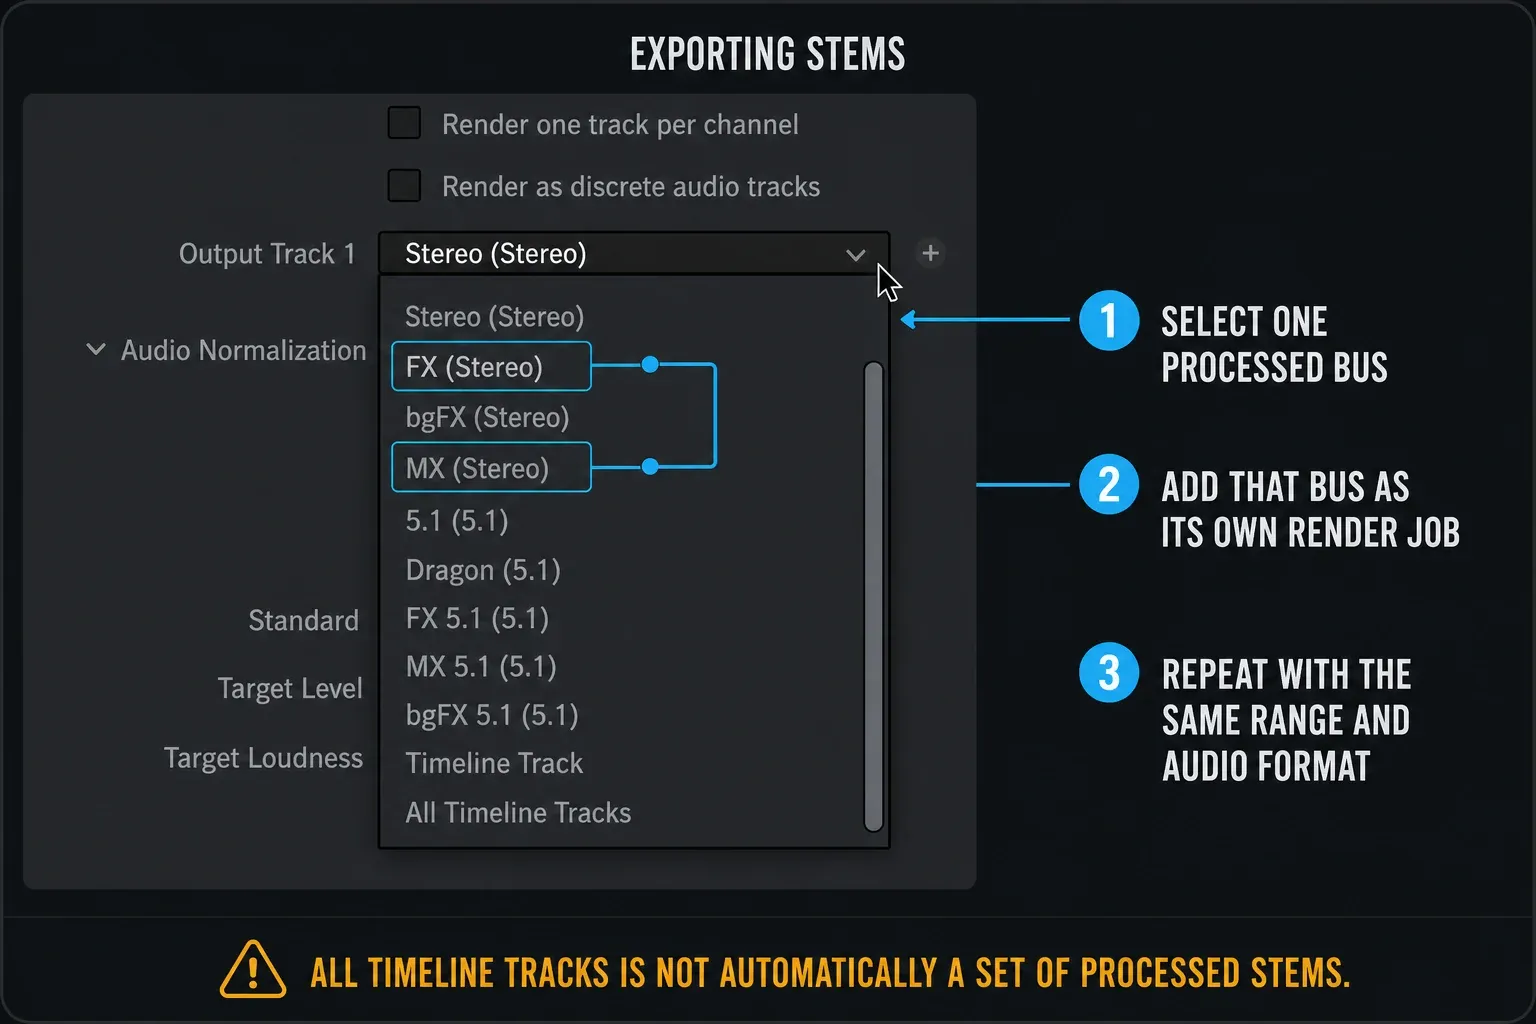
- Create or identify the processed stem buses. Route dialogue to DX, music to MX, and effects to FX, using the channel format required by the handoff.
- Verify the routes and processing. Watch each bus meter, check inserts and automation, and confirm the buses reach the approved monitoring path without double-counting.
- Set one common start and end range. Every stem must begin at the same time and end after the same final tail, including stems that are silent at the head or tail.
- Create one render job per standalone stem file. Select only the intended bus as Output Track, use a unique filename such as project_DX_v03.wav, and add the job to the queue. Repeat for MX and FX without changing range, sample rate, bit depth, or format.
- Render and verify. Reimport all stems at the same start time, sum them at unity gain, and compare the result with the approved mix.
For more complex sessions, set up the groups before the last day of the mix. Retrofitting buses at export time is how sends, sidechains, and bus plug-ins get missed. If dialogue dynamics are part of the approved sound, check the routing alongside the dialogue compressor workflow.
Bounce Is Not the Same as Deliver
Fairlight bounce commands create working media during the edit. The Resolve 21 Reference Manual says Bounce Mix to Track processes a selected bus mix to a new or existing timeline track and writes new media to the Project Settings > Capture and Playback > Save clips to location.
Deliver instead creates the controlled handoff job, range, filename, destination, and output assignment.
Use Bounce Mix to Track when you need a reusable timeline asset; use Deliver when you need the final master or handoff. A successful bounce doesn't validate the Deliver range, selected output, channel layout, normalization, or destination.
Check Loudness, Peaks, and the Render Range
Don't turn on normalization just because the export sounds quiet. First measure the mix, identify the required loudness target, and adjust the mix intentionally. A web video, podcast, broadcast master, and cinema deliverable may have different requirements. The Resolve loudness and LUFS guide explains what to measure before using any target-based normalization.
- Start: confirm that the first transient or word isn't before the chosen In point.
- End: listen past the last visible edit so reverb, room tone, and music decays aren't chopped.
- Peaks: fix clipping in the mix. Saving the same clipped signal as WAV doesn't repair it.
- Channels: confirm mono, stereo, or multichannel delivery against the specification.
- Version: put the revision in the filename instead of overwriting an approved file with an ambiguous name such as
final.wav.
Resolve Free vs Studio
The standard audio-only Deliver workflow, WAVE/Linear PCM export, Fairlight mixing, and ordinary bus routing are available in DaVinci Resolve Free. Specialized codecs and advanced workflows can vary by operating system, container, installed components, and edition.
Don't use edition labels as a substitute for the actual Audio panel. Codec availability also depends on the operating system and selected format: Resolve 21 documents AAC encoding as macOS-only. WAVE/Linear PCM is the portable choice for a dependable audio-only master when the recipient hasn't supplied another specification.
Fix Common Audio Export Problems
The exported file is silent
Confirm that Export Audio is enabled and that the selected bus meter moves during playback. Then check track mute, bus mute, automation, and routing. If the timeline itself is silent, start with the Resolve no-audio checklist before changing render settings.
The export contains only one track or misses music
You probably selected a timeline track or a bus that doesn't receive the whole mix. Follow the signal from each source track through any subgroup bus to the output chosen on Deliver. Don't assume Bus 1 is the master in a project with custom routing.
The WAV is mono instead of stereo
Inspect both the bus format and Output Track selection. A mono bus produces a mono output even when the timeline contains many audio clips. Change the routing or create the required stereo bus; renaming the file will not change its channel layout.
The render has separate tracks or channels instead of one stereo mix
Return to Audio and select the intended stereo Main or Submix bus. Disable Render one track per channel and Render as discrete audio tracks unless the delivery specification requests that structure. Those switches change how channels are stored in compatible rendered media; they don't substitute for a processed stereo bus or guarantee one standalone WAV file per stem.
The file ends too early
Check the In/Out range and move the Out point after the full audio tail. Entire Timeline is safer for a normal master, but still listen through the last seconds because a muted or trimmed tail can still sound abrupt.
The render is quieter or different from playback
Make sure Deliver is using the same bus path you monitored and that its meter moves through the full range. A bus render includes only audio actually routed through that output, with its active insert and automation state. Timeline-track output can differ, and normalization in the render job can change level after the mix.
A Two-Minute Verification After Every Export
Open the exported file in a player outside Resolve and listen to the beginning, a loud section, a quiet section, and the ending. Check duration and channel count. For a client master or stems, reimport the files into a clean timeline, line them up at the same start time, and compare them with the approved mix.
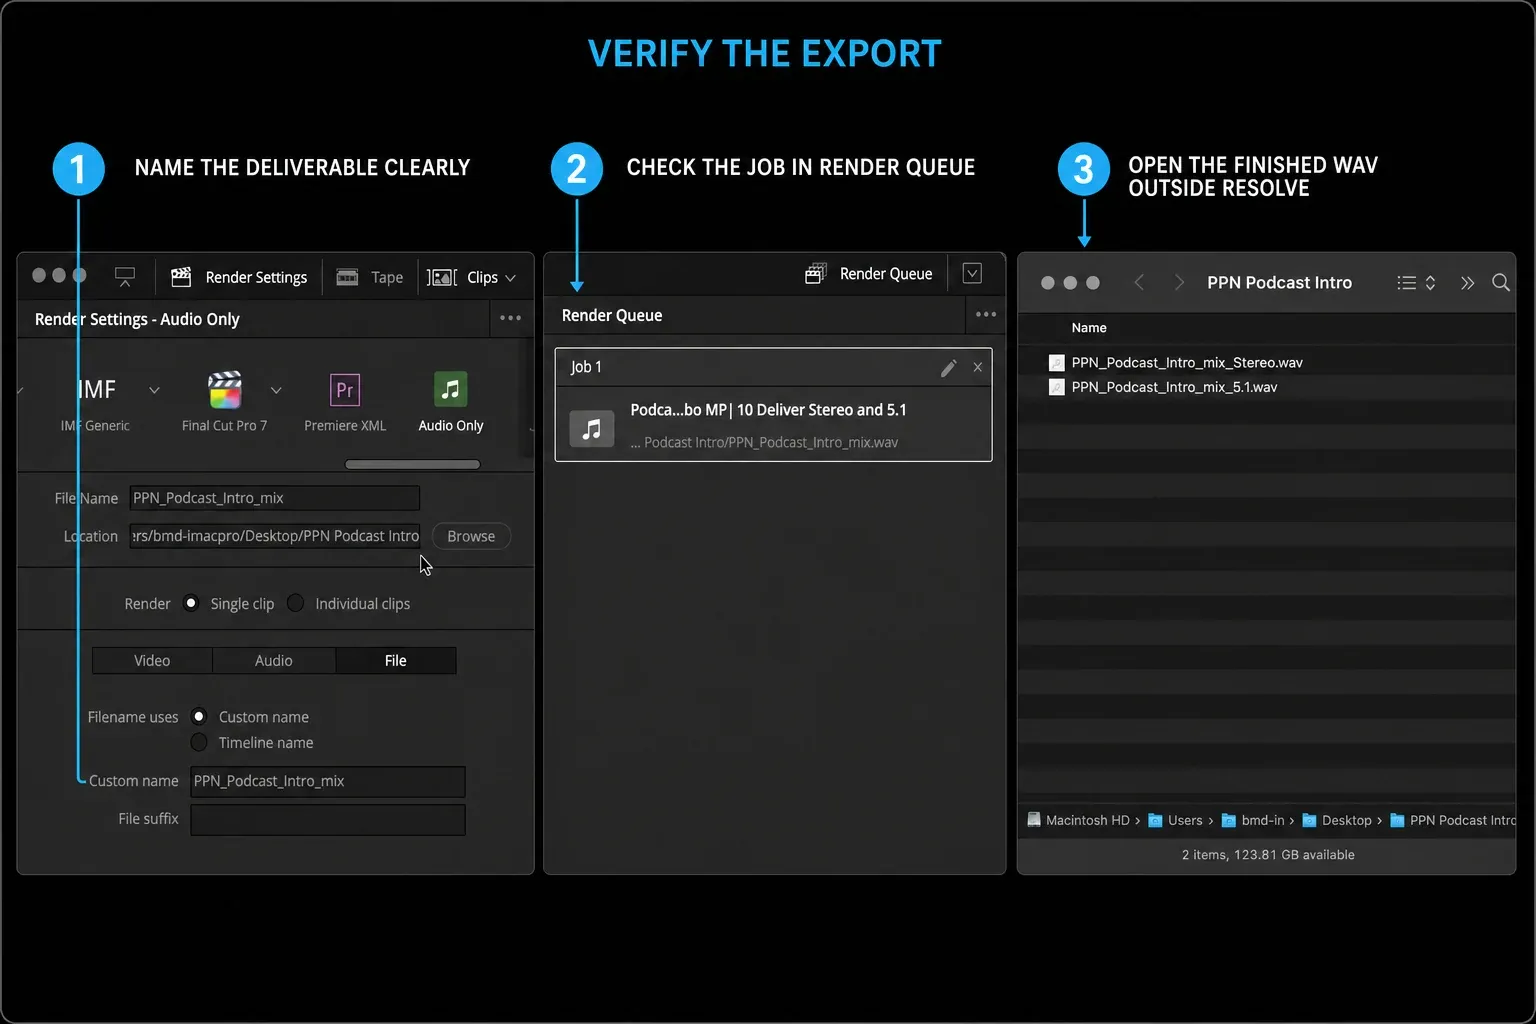
A green render-complete message proves only that Resolve wrote a file. It doesn't prove that you selected the correct bus, included the full range, preserved the channel layout, or delivered the version the recipient asked for.
Once that verification passes, keep the WAV master and create a smaller listening copy only if somebody needs it. For the rest of the picture-and-sound handoff, use the DaVinci Resolve export settings guide.
For the routing, dialogue, loudness, and bus work that comes before an audio master, continue through the Fairlight audio hub. This page stays focused on audio-only files, buses, tracks, stems, and verification.
DaVinci Resolve Audio Export FAQ
What are the best settings for audio-only export?
For a general video-post master, use WAV, Linear PCM, 24-bit, 48 kHz, and the main stereo bus. Follow a supplied delivery specification when it requires something different.
How do I export one finished stereo mix?
Turn off Export Video, turn on Export Audio, and choose the stereo bus that receives the complete approved mix. Keep individual-track and split-channel options disabled.
Can DaVinci Resolve export separate audio stems?
Yes. Route dialogue, music, and effects to separate processed buses, then create one named render job per bus with an identical start and end range, format, sample rate, and bit depth. Reimport and sum the files once to verify alignment and content.
Why is my exported audio silent?
The usual causes are Export Audio being off, the wrong output bus, a muted bus or track, automation, or source tracks that never reach the selected bus.
Should I use 44.1 or 48 kHz?
Match the project and delivery specification. Video post-production normally uses 48 kHz; some music-only workflows use 44.1 kHz.
Does audio-only export work in Resolve Free?
Yes. Resolve Free supports the standard audio-only workflow, WAV export, mixing, and ordinary bus routing. Specialized formats and advanced workflows can depend on Studio, the operating system, or additional components.
