Quick answer: fix large clip-gain differences before compression, then test the loud, normal, and quiet phrases. Blackmagic lays out 2.5:1–3:1 as commonly used dialogue ratios, but threshold must follow the actual input.
Tune attack for intact consonants, release for smooth recovery, and use the post-Dynamics Makeup Gain only to match bypass. If room noise breathes or the processed version merely sounds louder, back off.
What a Dialogue Compressor Does
A compressor reduces gain when the signal crosses a threshold. Ratio controls how strongly it reduces the portion above that threshold; Attack and Release control when reduction begins and recovers. The resulting smaller dynamic range can keep loud words from jumping out and make softer words easier to place in the mix.
It does not repair clipped audio, remove background noise, or know which whisper should remain quiet for the story. It also does not set LUFS by itself. Compression is one stage between editing and final measurement.
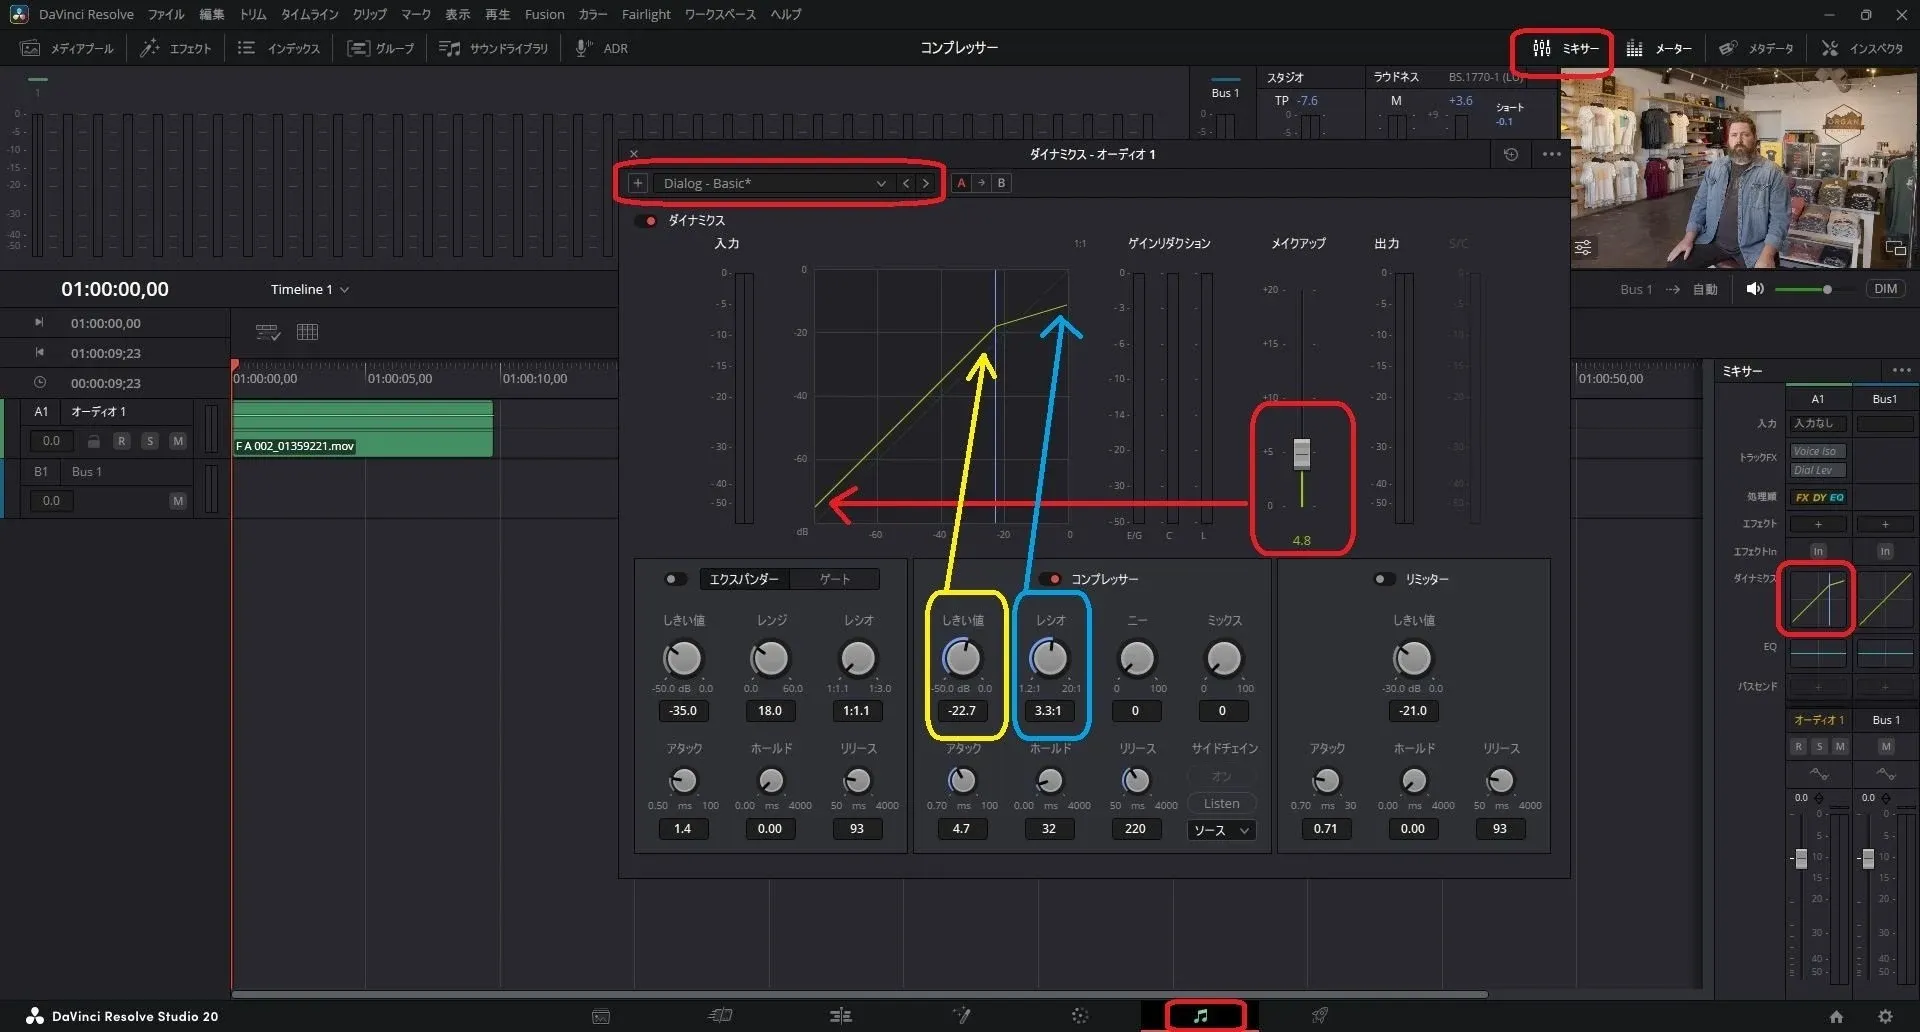
Checked September 16, 2026, the September 2026 DaVinci Resolve 21.1 Reference Manual notes that every Mixer channel has built-in Dynamics with separate Expander/Gate, Compressor, and Limiter modules.
Double-click the channel-strip Dynamics indicator to open the window; the graph maps input on the X axis, output on the Y axis, threshold as a blue line, and the active response as the green curve.
This guide uses the built-in Mixer Dynamics compressor on a track or bus. It is not a standalone Fairlight FX compressor inserted on a clip. An effect containing a compressor, such as a dialogue-processing plug-in, can have different controls. For one exceptional clip, adjust clip gain, use an appropriate clip effect, or put the clip on a separate track; do not look for this whole Dynamics window in the clip Inspector.
The Expander/Gate works below its threshold: expansion lowers softer material relative to louder material, while gating attenuates quiet sections more decisively. Neither separates noise from a word that opens the gate. The Compressor controls louder material; the Limiter provides stronger peak control. Keep the modules you do not need disabled.
Blackmagic’s Fairlight Audio Guide provides project media for learning the wider dialogue workflow. The training book currently listed by Blackmagic is for Resolve 20. For current controls and ranges, use the September 2026 Resolve 21.1 manual above; older tutorial screenshots are orientation aids, not control specifications.
Clip Gain, Track Compression, or Bus Compression?
| Stage | Use it for | Do not ask it to |
|---|---|---|
| Clip gain / clip-level envelopes | Large edit-to-edit jumps, one bad phrase, microphone changes | Automatically follow an entire performance |
| Track compressor | Remaining dynamics from one consistent speaker and microphone | Reconcile unrelated rooms and recording chains |
| Dialogue bus compressor | Very gentle cohesion after tracks are balanced | Repair one bad track without moving the others |
| Main limiter | Control final peaks, then verify true peak against the delivery specification | Create a good dialogue mix from an unbalanced session |
Move boom, lav, phone, ADR, and narrator recordings to sensible tracks before processing. If the signal path isn't obvious, follow our Fairlight bus-routing guide before touching Main.
Check the source channel mapping too. A single microphone recorded as mono does not need two duplicated channels to sound centered. Preserve genuine stereo recordings, and choose the track and output layout deliberately. There is no one dialogue peak or LUFS value that fits every mono recording, stereo mix, and delivery brief.
Clip gain changes the level reaching later track processing. Track fader automation is a different stage: use it to ride the mix, but do not assume it changes the input driving the track compressor. Recheck the threshold after a clip-gain change.
Fairlight Compressor Controls
- Threshold: the level where compression begins. Its useful value depends completely on the signal arriving at the track.
- Ratio: how much the level above threshold is reduced. At 2:1, a steady signal 2 dB above threshold becomes roughly 1 dB above it at the output, away from the soft-knee transition and before makeup gain.
- Attack: how quickly gain reduction engages. Too fast can dull consonants; too slow can let a shout or plosive through.
- Hold: how long reduction is held before release behavior takes over. It can keep the compressor from fluttering between closely spaced syllables.
- Release: how quickly gain returns. Too short pumps; too long keeps the next phrase unnecessarily suppressed.
- Knee: how gradually the compressor enters its ratio around threshold. A softer knee often makes ordinary dialogue control less obvious.
- Mix: blends compressed signal at 0 with the original uncompressed input at 100. The default is 0, meaning all compressed signal. Use it deliberately; don't mistake the scale direction for a conventional wet control.
- Makeup Gain: a post-Dynamics level control shared by the module, not a compressor threshold target. It raises voice and noise together; use it to level-match bypass, not to win the comparison.
- Gain Reduction meter: the amount the compressor is turning down at that moment. It helps diagnose behavior but doesn't judge sound quality.
Set a Fairlight Compressor for Dialogue
- Level extreme clips manually. Bring obviously mismatched lines near the track’s normal working level. Keep intentional whispers and shouts unless the brief says otherwise.
- Choose three test sections. Loop normal speech, the loudest useful phrase, and a quiet phrase with room tone.
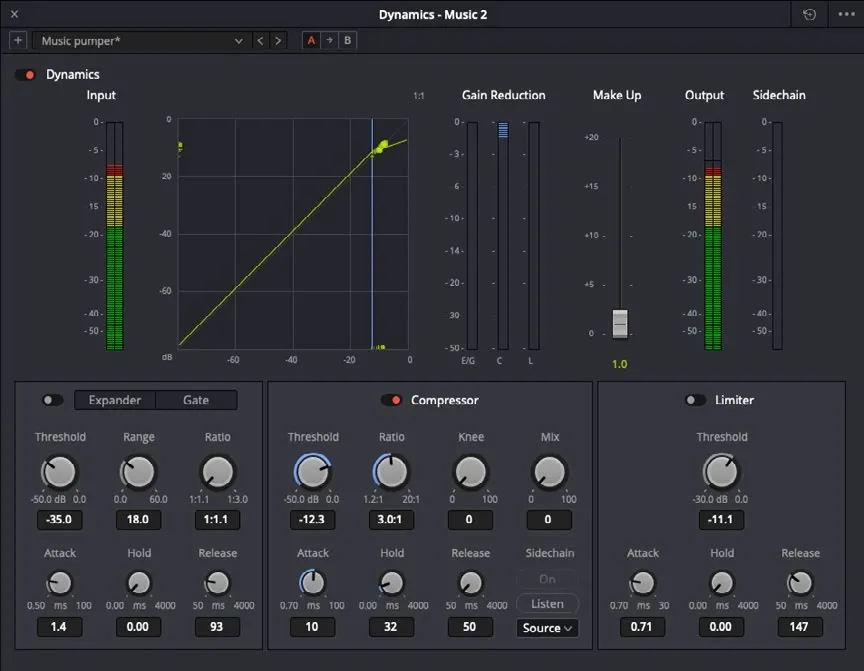
- Open Fairlight Dynamics. Enable Compressor and temporarily bypass Gate, Expander, and Limiter so you hear one process.
- Start with a gentle ratio. Blackmagic identifies 2.5:1–3:1 as commonly used for dialogue. Treat it as an audition range, not a preset; the recording and threshold still control how much compression occurs.
- Lower Threshold. Stop when louder words show a few decibels of reduction while ordinary speech moves less.
- Set Attack. Resolve 21 defaults to 1.4 ms and allows 0–100 ms. If consonants sound dulled, try a longer attack; if peaks still distract, try a shorter attack or repair that clip. The recording decides the value; this guide doesn't present an untested timing preset.
- Set Release. Resolve 21 defaults to 93 ms and allows 50–4000 ms. Follow the phrase rhythm: the response should recover smoothly rather than chatter or hold down the next line. This guide does not claim one universal speech-release range.
- Adjust Knee and Hold if needed. Use a softer transition and enough stability to avoid syllable-by-syllable movement.
- Match Makeup. Toggle bypass and match perceived loudness before deciding which version is better.
- Review the complete scene. Check every microphone change, edit, breath, pause, and downstream bus.
Attack, Release, and Threshold are source-dependent. The official ranges are wide, and threshold is especially non-portable because clip gain changes what reaches the detector.
The listed Attack and Release values are factory defaults, not recommended dialogue timings. You can keep a useful setting already in the project. If the attack dulls a word, lengthen it and compare; if peaks escape, consider a shorter attack or local clip repair. Stop when speech sounds natural, not when the knobs match a recipe.
For a fair comparison, disable the other Dynamics modules and toggle the overall Dynamics Enable button, or single-click its mini graph in the Mixer. Keep monitoring volume fixed and adjust Make Up Gain on the processed version until it is similarly loud. The Mixer Effects In switch does not bypass built-in Dynamics, EQ, or Track FX.
External sidechain is optional. For normal dialogue leveling, leave the Sidechain module off unless another track or bus should drive the detector. If it is on, confirm Source is intentional and use Listen only briefly to audition that detector feed, then turn Listen off. Music ducking belongs on the music track or bus, driven by dialogue, not on the dialogue just to make it louder.
How Much Gain Reduction?
For transparent ordinary dialogue, a few decibels on louder words is a useful place to begin. If gain reduction stays pinned through normal speech, ask whether the clip needs manual leveling or whether the threshold is too low. If only one peak triggers reduction, the compressor may be acting as a loose limiter rather than shaping the performance.
Don't chase a fixed meter number. Listen for a stable sentence, intact consonants, believable room tone, and natural differences between emotion and distance. Then compare in the full mix. A 6 dB reduction can be correct on one shout and obvious on another.
EQ, Isolation, Leveler, and Compression Order
Use clip gain first. Remove low rumble or a strong resonance before compression so the unwanted energy doesn't drive gain reduction; our dialogue EQ workflow explains that corrective stage. If Voice Isolation substantially changes the spectrum, use it conservatively before final EQ and dynamics.
Check the actual processing order before following that advice. Mixer Effects Order can rearrange the ordinary insert block (FX), Dynamics (DY), and channel EQ; the default is FX, Dynamics, EQ. If you want track EQ to remove rumble before the compressor, choose an order with EQ before DY. Changing the EQ curve alone does not move it upstream.
Built-in Track FX occupy fixed, dedicated processing points before the ordinary inserts and channel Dynamics/EQ. Voice Isolation and Dialogue Leveler do not move when you reorder FX, DY, and EQ. Path Trim is post-Track FX, so it is not the same correction point as changing the original clip gain.
Dialogue Leveler already rides speech. If you add heavy compression after automatic leveling, listen for raised breaths or pumping instead of assuming a second stage improves the result. The Voice Isolation vs Dialogue Leveler comparison helps decide whether you need separation, automatic leveling, conventional compression, or manual gain.
When Automation Beats More Compression
If a speaker leans away for one sentence, raise that clip or phrase. If one laugh is too loud, lower it. If music masks only three lines, automate the music.
When music should move automatically under recurring speech, use the separate Fairlight audio-ducking workflow instead of over-compressing the dialogue. Lowering Threshold until the dialogue compressor solves every exception usually flattens the normal material and lifts the noise floor.
Automation also preserves story dynamics. A whisper can remain a whisper while still being intelligible; a shout can feel larger without clipping. The compressor then handles smaller performance variation instead of doing editorial triage.
Dialogue Bus Compression and Limiting
Once separate dialogue tracks already match, a dialogue-bus compressor can add gentle cohesion. Use it only if the combined tracks need shared control. Audition a low ratio and modest reduction; choose timing from the scene rather than a mandatory bus preset. Bypass it on the whole scene, not one line, to confirm it improves continuity.
A limiter on Main is a peak guardrail after the mix. It isn't a replacement for clip gain, track compression, or correct loudness. Resolve 21 describes it as a very-high-ratio ceiling controlled by Threshold, Attack, Hold, and Release; too much limiting can remove internal dynamics. Measure after every bus processor with our LUFS and true-peak guide.
The built-in Dynamics Limiter threshold is not a certificate of true-peak compliance. Gain reduction reports how much attenuation a processor applies; its output meter reports signal level, not integrated LUFS. Select the intended output bus for loudness metering, reset the measurement, and play the full delivery range. Check integrated loudness and maximum true peak against the job specification, then verify the rendered file as well.

Free vs Studio
The built-in Fairlight channel compressor is available in both DaVinci Resolve Free and Studio. Voice Isolation and some other AI repair tools require Studio, but ordinary clip gain, EQ, dynamics, routing, automation, and loudness monitoring don't.
Troubleshooting Dialogue Compression
Dialogue pumps between words
Try a longer Release or less gain reduction, then audition Hold if the response still flutters. Change one control at a time and check whether a Gate or downstream Limiter causes the movement.
Consonants sound dull
Slow Attack or reduce compression. Listen at matched output level; the bypassed signal shouldn't lose simply because it's quieter.
Room noise becomes louder
Reduce Makeup and compressor workload. Compression narrows the difference between voice and noise; it can't separate them. Repair or automate the source first; the Resolve background-noise guide separates steady noise, hum, Voice Isolation, and manual cleanup before you push the compressor harder.
For one loud breath or plosive, reduce that short region or repair the clip rather than compressing every word harder. A low-frequency pop may need local EQ or a dedicated repair tool. Compression cannot reconstruct a clipped recording. If S sounds become sharp, use targeted de-essing or phrase gain and check consonants afterward; there is no gender-based frequency setting to copy.
Quiet lines remain too quiet
Raise those clips or phrases before compression. Driving Threshold lower until every whisper triggers reduction will usually flatten normal lines.
The bus clips after Makeup
Lower Makeup, inspect the dialogue bus and Main, and check downstream EQ boosts. Makeup should match bypass, not exceed it.
The export sounds different
Confirm the Deliver page renders the intended bus and channel layout, then reimport and listen. Our audio export checklist covers the verification.
Final Compressor Check
- Large edit-to-edit jumps are fixed before the compressor.
- Normal, loud, and quiet passages have all been tested.
- Gain reduction moves smoothly rather than staying pinned.
- Consonants retain their leading edge.
- Breaths and room noise don't surge.
- Makeup is level-matched to bypass.
- The track, dialogue bus, and Main retain headroom.
- The rendered file has been reimported and checked.
If you stop hearing the compressor and simply understand every line more easily, the settings are doing their job.
To place compression inside the complete signal path, use the DaVinci Resolve Fairlight audio hub alongside the contextual routing, EQ, Voice Isolation versus Dialogue Leveler, loudness, and export guides.
Fairlight Dialogue Compressor FAQ
What ratio should I use for dialogue?
Blackmagic walks through 2.5:1 to 3:1 as commonly used for dialogue processing. Treat that as an audition range, not a preset: incoming level, threshold, performance, and intended dynamics still decide the result.
How much gain reduction is enough?
A few decibels on louder words can be a starting point, but no meter reading guarantees transparent sound. If normal speech remains heavily reduced, fix clip gain or use less compression.
What attack time works for speech?
Resolve 21 defaults to 1.4 ms and allows 0–100 ms. If consonants sound dulled, try a longer attack; if peaks escape, compare a shorter attack or clip repair. The factory default is not a speech preset.
Why does compression raise background noise?
Gain reduction narrows the difference between voice and room sound, then the post-Dynamics Makeup Gain raises the complete result. Reduce compressor workload, match bypass level, and repair or automate the source first.
Should I use Dialogue Leveler and a compressor together?
Only if each solves a remaining audible problem. Dialogue Leveler already rides level, so keep both stages gentle and watch for breaths, noise, and pumping.
Should dialogue compression go on clips or tracks?
Correct exceptional clips with gain or automation. Use track compression for a consistent speaker and microphone, and bus compression only for subtle shared control.
Is the Fairlight compressor available in Resolve Free?
Yes. The built-in channel Dynamics compressor is part of the standard Fairlight toolset in Free and Studio.
