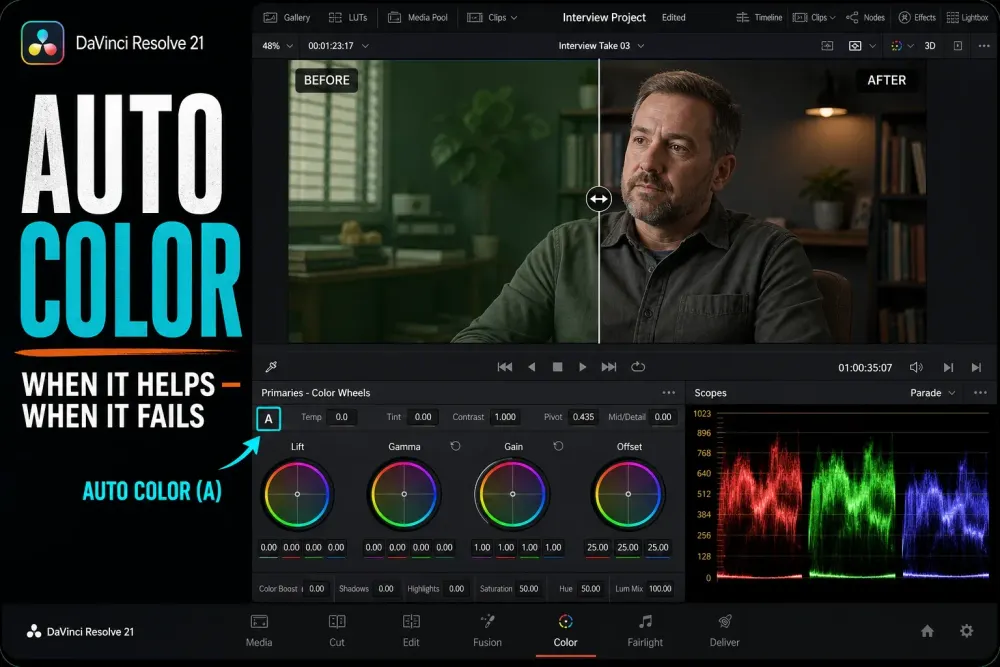
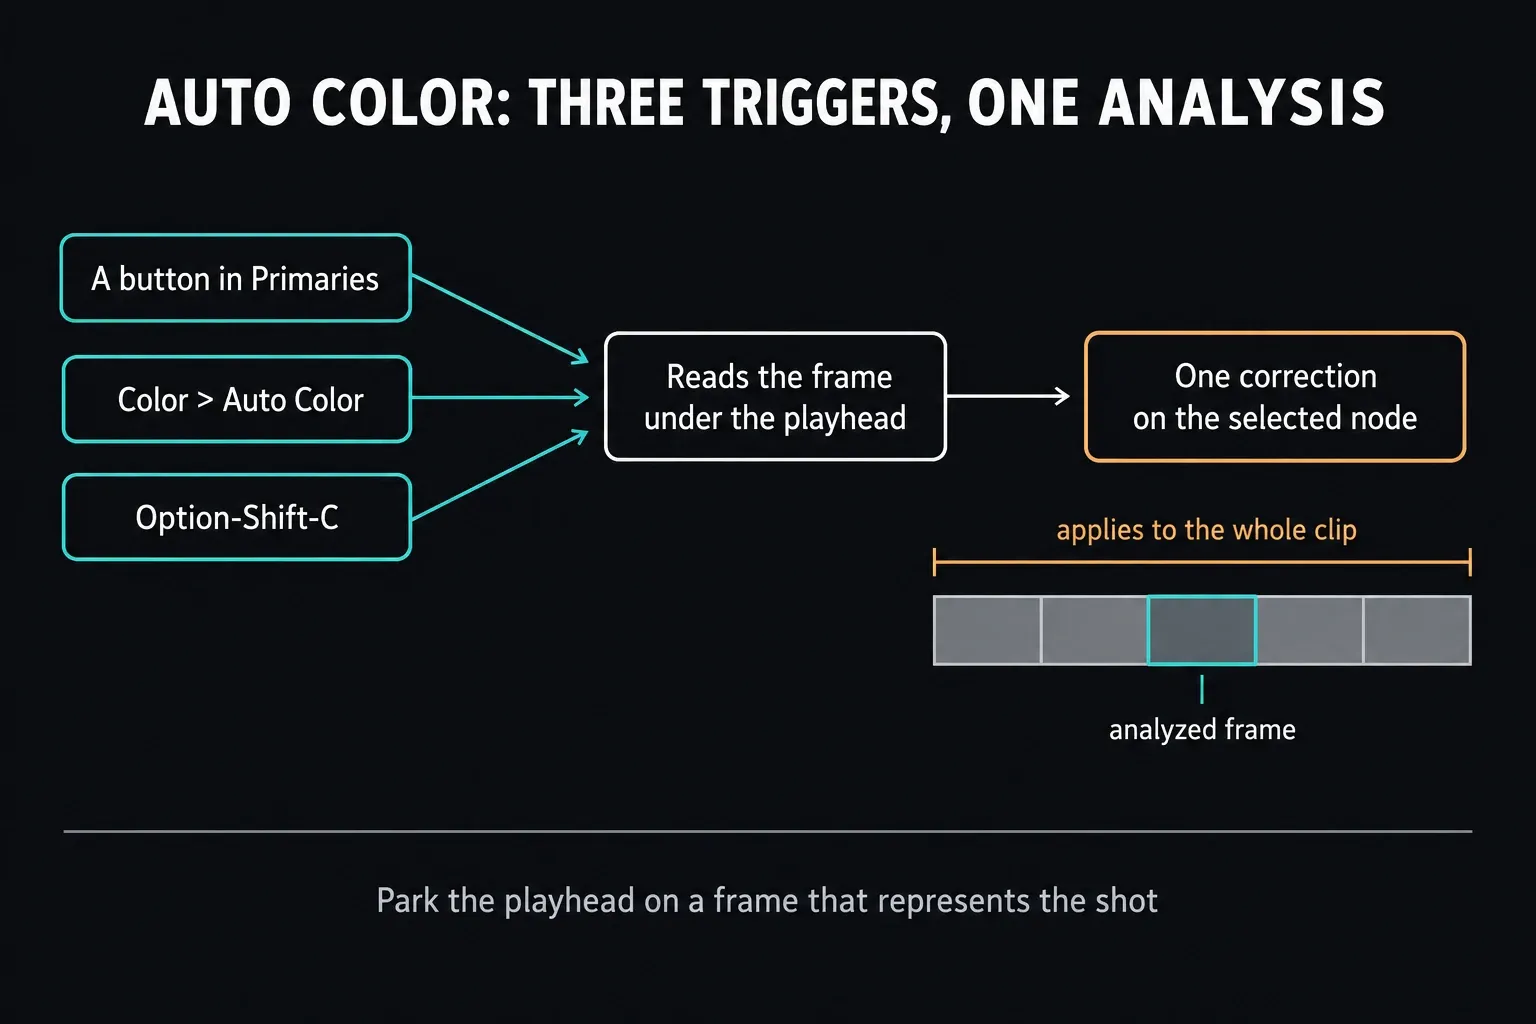
Quick answer: Auto Color analyzes the current frame under the playhead and applies one self-contained balance and contrast correction to the selected clip and node. In Resolve 21.1 you can click the A button in Primaries, choose Color > Auto Color, or press Option-Shift-C on the default macOS keymap.
Treat what you get as a proposal, not a verdict. Compare the node on and off, read the scopes, and reset it the moment the shot stops fitting the scene.
I rechecked this guide on October 1, 2026 against the DaVinci Resolve 21.1 Reference Manual. That's a documentation check, not a claim that I graded every kind of footage with it. The manual covers the current-frame analysis, the DaVinci Neural Engine method, the Rec.709 gamma 2.4 design target, how Resolve Color Management fits in, the default shortcut and the Legacy Auto Color preference that's still there. Those version-specific details matter more than a one-click demo recorded on an older release.
Auto Color has no idea which warmth belongs to a sunset, which darkness belongs to a low-key scene, or which practical lamp is meant to glow orange. Blackmagic pitches it as a neutral starting point and openly calls the result hit-or-miss. If the correction hurts the shot, reset it and grade by hand instead of talking yourself into the automatic result.
Where to Find the DaVinci Resolve Auto Color Button
Open the Color page and the Primaries palette. The A button sits in the lower-left corner of the palette, next to the other automatic controls. Blackmagic's Color-page overview says the same thing in plain terms: use the auto color button at the left of the color wheels to balance color and contrast.
The Resolve 21.1 manual lists three ways to trigger it: click A in Primaries, choose Color > Auto Color, or press Option-Shift-C on the default macOS keymap. If you grade on a DaVinci control panel, the T-bar panel has its own AUTO COLOR button too. A custom keyboard preset can override the shortcut, so when the menu command works but the keys don't, search for Auto Color in Keyboard Customization.
You'll also see Auto Balance used as a loose name for automatic balancing, so check which page a tutorial is on before you follow it. Resolve 21.1 documents a separate Auto Balance in the Photo page's Looks toolbar and in the Photo Inspector adjustments, and the Cut page puts Auto Color in the Color section of the Cut Viewer Tools. I'm sticking to the Color page here because that's where you can select, compare and reset the correction node directly.
How Resolve Auto Color Actually Balances a Shot
Auto Color reads the frame under the playhead and applies an automatic correction. Don't expect an editable recipe of Lift, Gamma and Gain moves to show up on the wheels. Compare the image with the correction node enabled and disabled, then do any manual refinement on a separate node.
Since Resolve 16 the command has run on an algorithm based on the DaVinci Neural Engine. Blackmagic says it was developed for Rec.709 at gamma 2.4, which is why it works well when Resolve Color Management normalizes the media before the analysis.
Legacy Auto Color still lives under Preferences > User > Color. With Use Legacy Auto Color switched on, Resolve neutralizes the RGB balance in the darkest and brightest parts of the image, then pushes Master Lift and Master Gain toward 0 and 100 percent. Leave it off unless you really want that older behavior, because it changes what the same A button does.
Is Resolve Auto Color Free or Locked to Studio
Auto Color works in Resolve Free as well as Studio. A Neural Engine label doesn't automatically put a tool behind the paywall: Blackmagic's current Studio and iPad features list for Resolve 21.1 marks Auto Color and Shot Matching as available on the desktop version, while Magic Mask is marked Studio. Magic Mask isolates a subject for selective work; it isn't an automatic whole-shot balance. If you're weighing the upgrade anyway, the Free vs Studio comparison covers that decision.
Why Resolve Auto Color Gives You a Worse Image
A bad result almost always comes from one of three places. The playhead sits on a frame that doesn't represent the shot, the image reaches the algorithm in the wrong color-management state, or the scene has an intentional cast or contrast shape that automatic neutralization reads as a mistake.
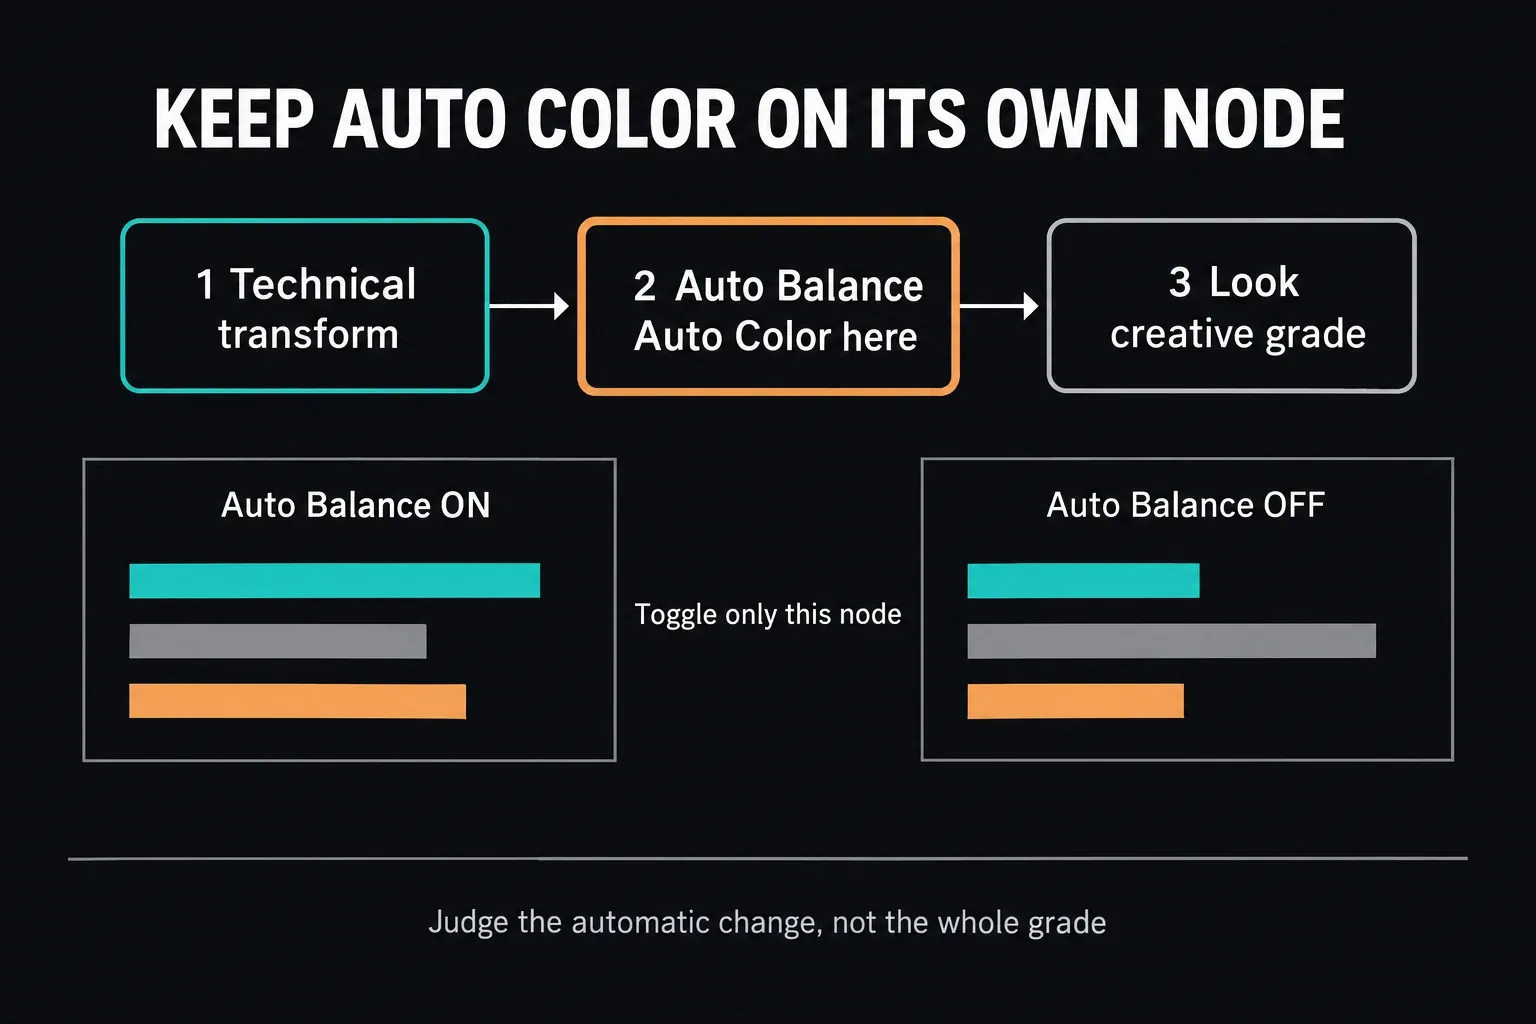
First, select the clip you mean and an ordinary serial node. Apply Auto Color once, on a dedicated node, so the proposal can be disabled, reset or deleted without touching the rest of the grade. Because the adjustment is opaque, toggling that node tells you far more than staring at wheel values that never moved or clicking A again and again.
Second, park the playhead on a frame that represents the clip. A flash, a whip pan, a blown-out window, a lighting change or an odd close-up can produce a correction that makes no sense for the rest of the take. Auto Color analyzes one frame, but the correction it creates stays on for the whole clip unless you deliberately limit or animate it.
Third, test the command inside your real pipeline. Auto Color was built around normalized Rec.709 gamma 2.4 images. Untouched log footage, a wrong input transform or a LUT in the wrong place can distort what the algorithm receives. Check the pipeline before you stack another conversion on top; the Resolve color-management guide untangles RCM, CST nodes and LUT order.
Watch the faces, not only the neutral objects. A face under tungsten light can rightly look warm, and mixed lighting can put different casts on either side of the same face. An overall automatic balance cannot decide which light should stay colored. Reject the proposal if it makes skin look wrong or creates a mismatch at the cut, but don't force every face onto a fixed vectorscope line either. Play through the whole shot and its neighbors before you keep the correction.
A Safer Resolve Auto Color Workflow, Step by Step
Compare before and after under the same viewing conditions. Waveform catches crushed or lifted endpoints, RGB Parade shows a new channel imbalance, and Vectorscope flags an implausible shift in hue or saturation. The Resolve scopes guide explains how to read each one; here the only question is whether Auto Color helped this particular shot.
To compare just this step, select the dedicated node and choose Color > Nodes > Enable/Disable Selected Nodes, as described in the manual's node-editing chapter. The documented macOS shortcut is Command-D, but confirm your own mapping in Keyboard Customization. View > Bypass Color and Fusion is a different kind of comparison: it can switch off grading and Fusion effects depending on which options are checked, so it doesn't isolate Auto Color.
- Choose the frame. Scrub past flashes, transitions and odd moments and stop on a frame that represents the shot.
- Isolate the proposal. Add a dedicated serial node, name it Auto Balance, and keep it ahead of your creative look nodes.
- Store a comparison. Grab a still or set up a clean before/after view before you touch the node.
- Apply once. Click A, choose Color > Auto Color, or press the default macOS shortcut Option-Shift-C.
- Disable the node. Switch the selected Auto Balance node on and off, and don't mistake changes from later look nodes for the automatic one.
- Read the signal. Check Waveform, RGB Parade and Vectorscope for new clipping, a new imbalance or an implausible neutralization.
- Keep, refine or reset. If the proposal helps, carry on grading downstream. If it hurts, reset or delete that node.
- Change the reference. Reach for White Balance, Shot Match or Color Match when the problem calls for a white patch, a reference clip or a chart.
Where to Apply Resolve Auto Color in Your Node Tree
Auto Color applies its hidden adjustment at the correction stage you selected. Upstream RAW decoding, normalization and earlier nodes shape the signal it sees, and downstream nodes can still change the final image. Put it on an early ordinary serial node, not deep inside a branch that a qualifier or power window already restricts.
In a simple SDR pipeline that converts camera log to Rec.709 Gamma 2.4 before grading, a technical transform, then Auto Color, then a look keeps the order easy to read. Treat that as an example, not a universal CST recipe. In RCM, verify the assigned input space and the project's working and output spaces, and don't add a second log-to-Rec.709 conversion just because the Viewer already looks normalized. Leave the existing output transform active while you compare. Follow the node-order guide for more complex trees.
Auto Color vs Auto White Balance vs Shot Match vs Color Match
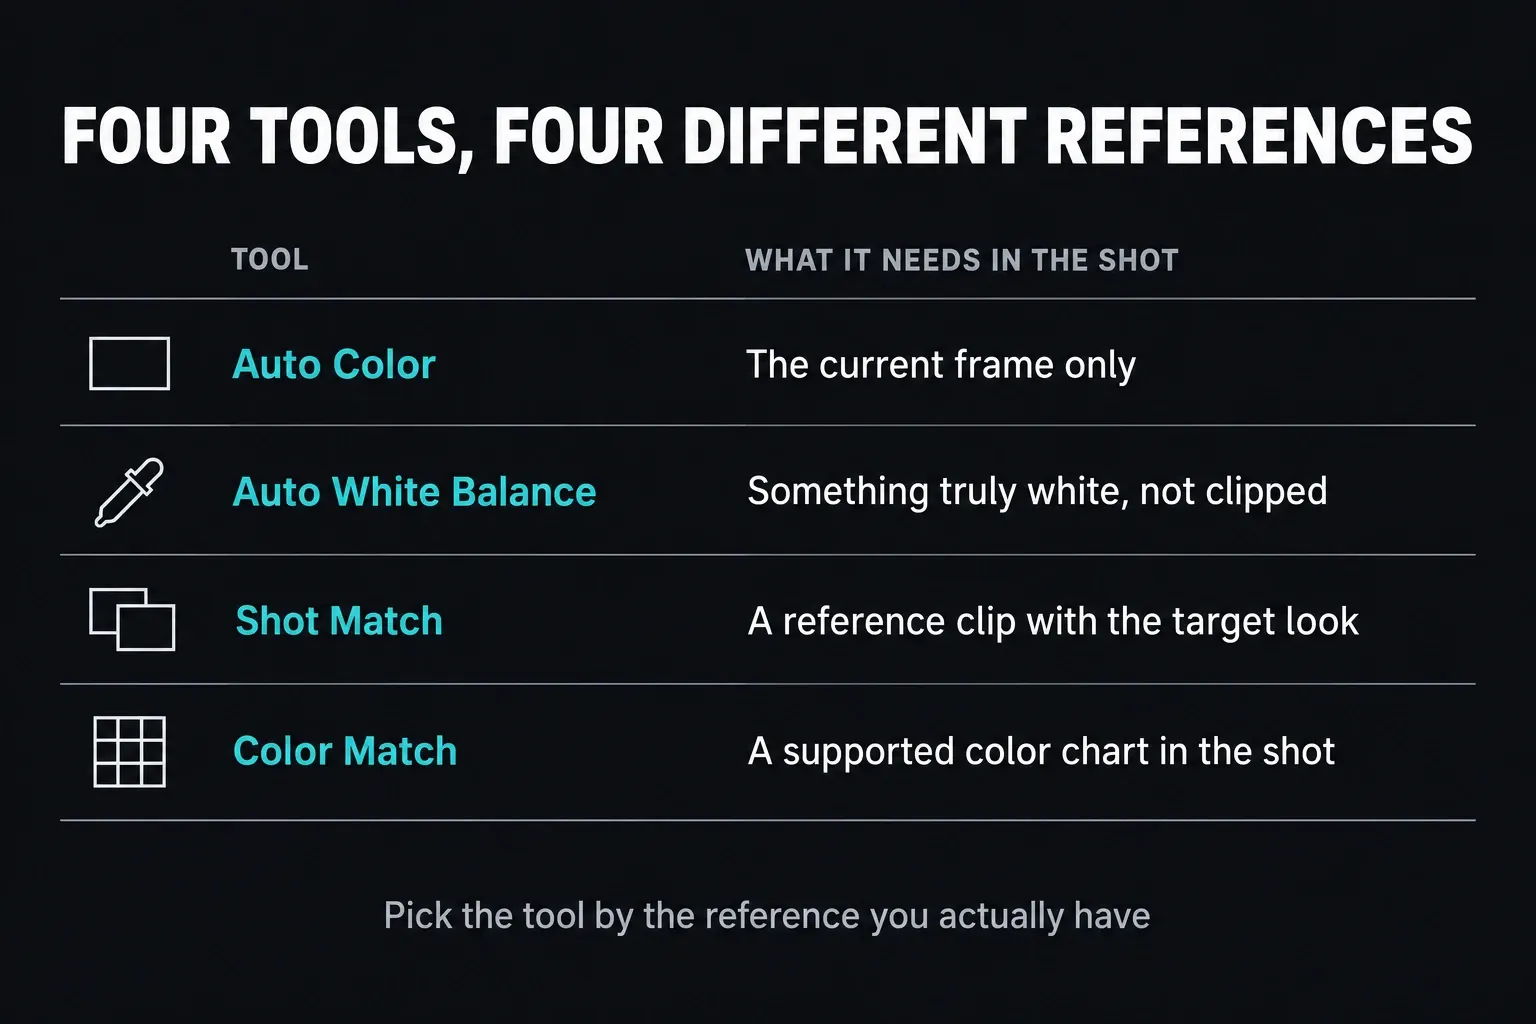
These four tools aren't stronger and weaker versions of the same command. Each one works from a different reference, and the useful decision is picking the reference your shot actually has.
Auto Color reads the whole current frame. Auto White Balance uses the Primaries eyedropper and expects you to sample something that's supposed to be white, isn't off-white and isn't clipped.
Shot Match pulls the selected target clips toward a separate reference clip through Shot Match to This Clip. Color Match works from a photographed chip chart that you line up in the Color Match palette. None of those references guarantees a finished grade, so every result still needs a look on the monitor and the scopes.
| Tool | Reference | Use it when | Trigger |
|---|---|---|---|
| Auto Color | Current frame at the playhead | You need a fast neutral proposal for one shot | A in Primaries; Color > Auto Color; Option-Shift-C on the default macOS keymap |
| Auto White Balance | An unclipped patch that should be white | A trustworthy white reference is visible | White Balance eyedropper in Primaries |
| Shot Match | A separate reference clip | Target clips should move toward an already balanced shot | Right-click the reference and choose Shot Match to This Clip |
| Color Match | A supported color chart photographed on set | The chart was captured under the relevant lighting | Align the chart in Color Match and click Match |
Use Auto Color when the current frame is the only reference you have. Use Auto White Balance only when the frame contains an unclipped object that should genuinely be white, not an off-white wall or a clipped reflection. Use Shot Match when another clip already has the look you want. Use Color Match when production shot a supported chart under the lighting you need to normalize.
Applying Resolve Auto Color Across Multiple Clips
Copying a correction isn't the same as running a fresh analysis. Applying a Gallery still to another clip copies the stored grade, while Auto Color analyzes the current playhead frame on the selected clip. When several targets should resemble one balanced shot, select the targets, right-click the reference and choose Shot Match to This Clip.
Blackmagic says the updated Shot Match algorithm was designed to run after Auto Color has been used on both the target clips and the reference. That's an order of operations, not permission to accept the results in bulk. Normalize first, create a neutral proposal only where it helps, match toward the strongest reference, then review every target in sequence. The manual is blunt that Shot Match is meant to make clips look the same, not to make them look good.
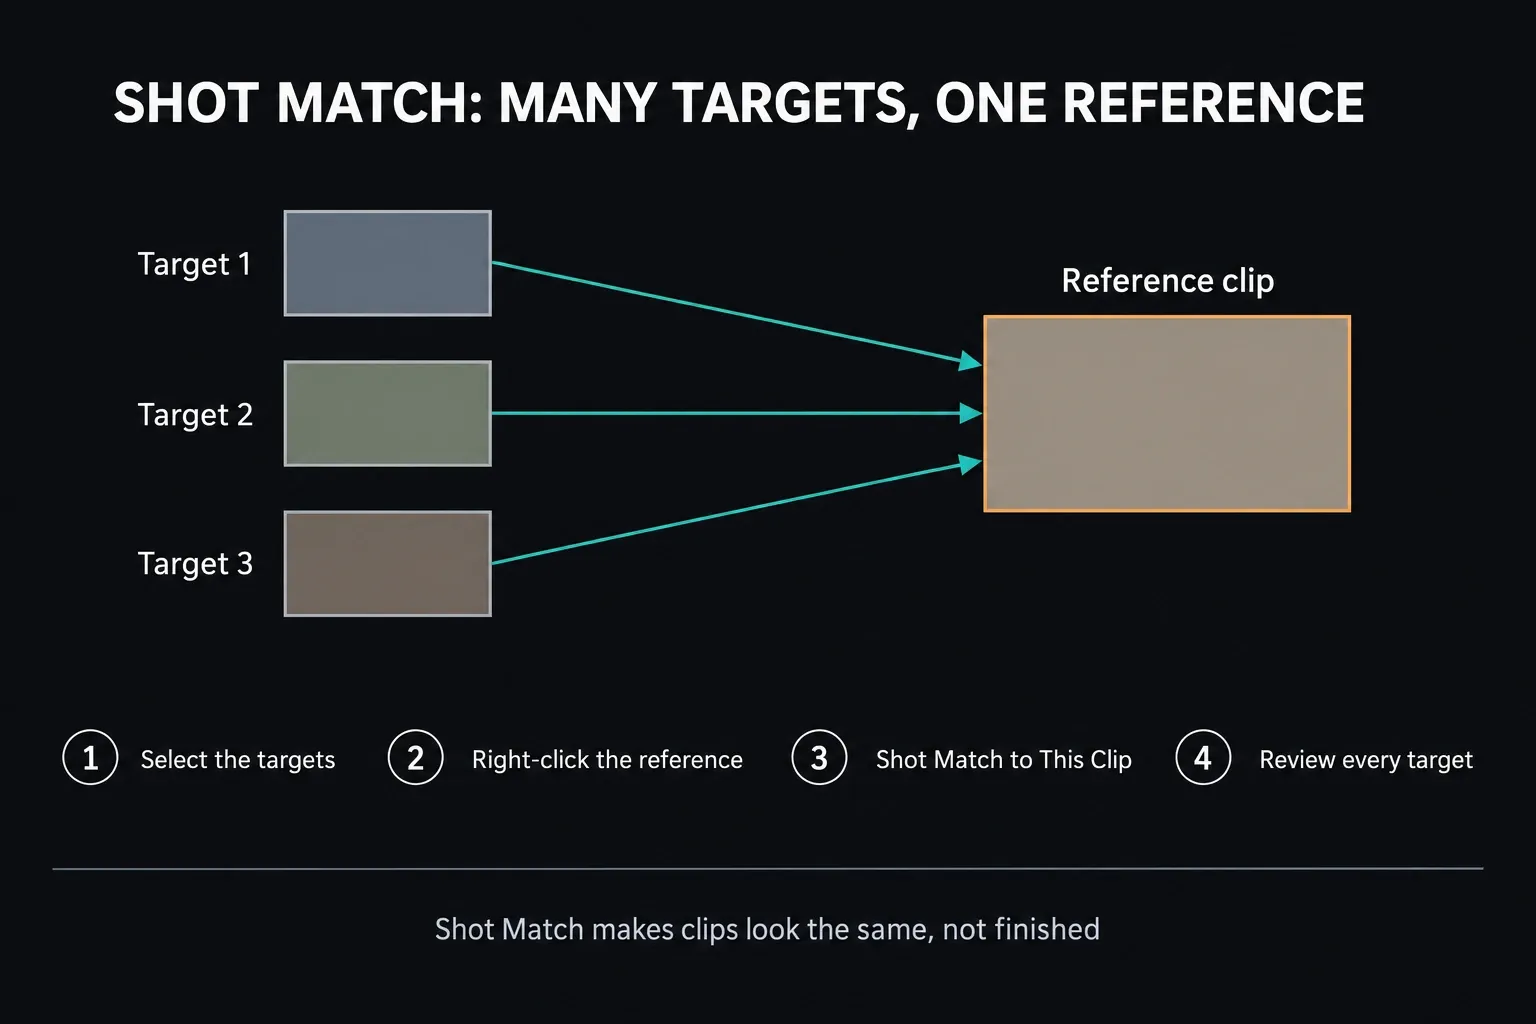
For choosing the reference, the match direction and a full sequence review, go to the shot-matching walkthrough. Keep the Auto Color decision on this page separate from copying a finished grade or balancing a whole scene.
Frequently Asked Questions About Auto Color
Is DaVinci Resolve Auto Color free or Studio only?
Yes, Auto Color is in Free as well as Studio. Blackmagic's current features list marks Auto Color as available rather than Studio-only, and the 21.1 manual documents it as a standard command. Don't assume you need a paid license just because the algorithm runs on the DaVinci Neural Engine.
Why does DaVinci Resolve Auto Color make my footage look worse?
Usually the playhead frame doesn't represent the shot, the signal reaches the algorithm before it's correctly normalized, or the scene has intentional warmth, coolness, darkness or brightness that the automatic neutral target misreads. Reset the dedicated node and correct the shot by hand when the proposal hurts the scene.
Can I apply DaVinci Resolve Auto Color to multiple clips at once?
Not as a documented one-click reanalysis of every selected clip. Applying a Gallery still copies one fixed grade. Use Shot Match when several selected targets should move toward a reference clip, then review each result.
What's the keyboard shortcut for DaVinci Resolve Auto Color?
Option-Shift-C is the documented default on macOS in Resolve 21.1, and Color > Auto Color does the same from the menu. If the keys do nothing, check Keyboard Customization, because a preset or a personal mapping can override the default.
Does DaVinci Resolve Auto Color work differently than the legacy version from older releases?
Yes. Resolve 21.1 still offers Use Legacy Auto Color under Preferences > User > Color. The default method uses the newer Neural Engine analysis; Legacy balances the darkest and brightest RGB regions and moves Master Lift and Gain toward 0 and 100 percent.
How do I undo DaVinci Resolve Auto Color?
On the Color page, with the same clip active, use Edit > Undo if Auto Color was your most recent color change. The Color page keeps a separate undo history for each clip, while Undo on the Edit page may undo an edit instead. To throw away the dedicated correction, right-click that node and choose Reset Node Grade. That clears every adjustment and keyframe on the node, so only use it when you really mean to clear it. Don't choose Reset All Grades and Nodes unless you want the entire grade gone.
Does DaVinci Resolve Auto Color affect one frame or the whole clip?
It analyzes the current frame under the playhead, but the correction it creates applies at the clip and node level. So it affects the whole clip until you limit or animate the correction, which is why picking a representative frame matters so much.
Why does the DaVinci Resolve Auto Color button do nothing when I click it?
Make sure the intended clip and an ordinary serial node are selected, put the playhead on a representative frame, and compare that node enabled versus disabled. The automatic adjustment is opaque, so wheel values that don't move don't prove nothing happened. If the image doesn't suit the command, reset the node.
Auto Color is only a starting correction. For the full manual order after this decision, follow the beginner color-grading workflow. The Color Grading hub ties that workflow to nodes, LUTs, scopes, color management and the rest of the correction path.
