
For a standard SDR upload from a Resolve installation that offers these codecs, start with MP4, H.264 High Profile, the timeline’s intended resolution and frame rate, AAC audio at 48 kHz, and matching BT.709 metadata. YouTube’s published bitrates are reference values, and none of them is a minimum. Use the YouTube preset for a quick setup or Custom Export when you need more control.
The built-in preset is the quicker route, and it now covers 720p, 1080p, 1440p and 2160p. Custom Export earns its extra clicks when you need to inspect Quality, keyframes, audio routing or color tags. Whichever you pick, YouTube will re-encode the upload. What you're aiming for is a clean source file with correct timing, color and audio, because no magic setting lets you dodge YouTube's compression.
If the Deliver page itself is new to you, start with the full Resolve export walkthrough. This guide sticks to the YouTube-specific decisions. For every other delivery target, the compact DaVinci Resolve Export Settings hub routes you by task without repeating this YouTube recipe.
DaVinci Resolve YouTube Export Settings: Quick Answer
| Control | Recommended starting point | Decision impact |
|---|---|---|
| Preset | YouTube 720p/1080p/1440p/2160p or Custom Export | Both are valid; Custom exposes more controls |
| Resolution | Match the intended timeline/output | Do not upscale only to chase a codec rumor |
| Frame rate | Keep the intended timeline frame rate | YouTube asks for the source frame rate |
| Format / codec | MP4 / H.264 | Matches YouTube's published upload baseline |
| Encoding profile | High | The profile named in YouTube's baseline |
| Quality | Automatic quality, where offered, or a deliberate bitrate | Resolve's Restrict to field is a maximum data rate |
| Key frames | Automatic | Avoid forcing the wrong GOP for a platform-specific encoder |
| Audio | AAC, normally stereo, 48 kHz | Matches YouTube's upload audio guidance |
| SDR color | BT.709 primaries, transfer and matrix | Avoids an avoidable metadata conversion |
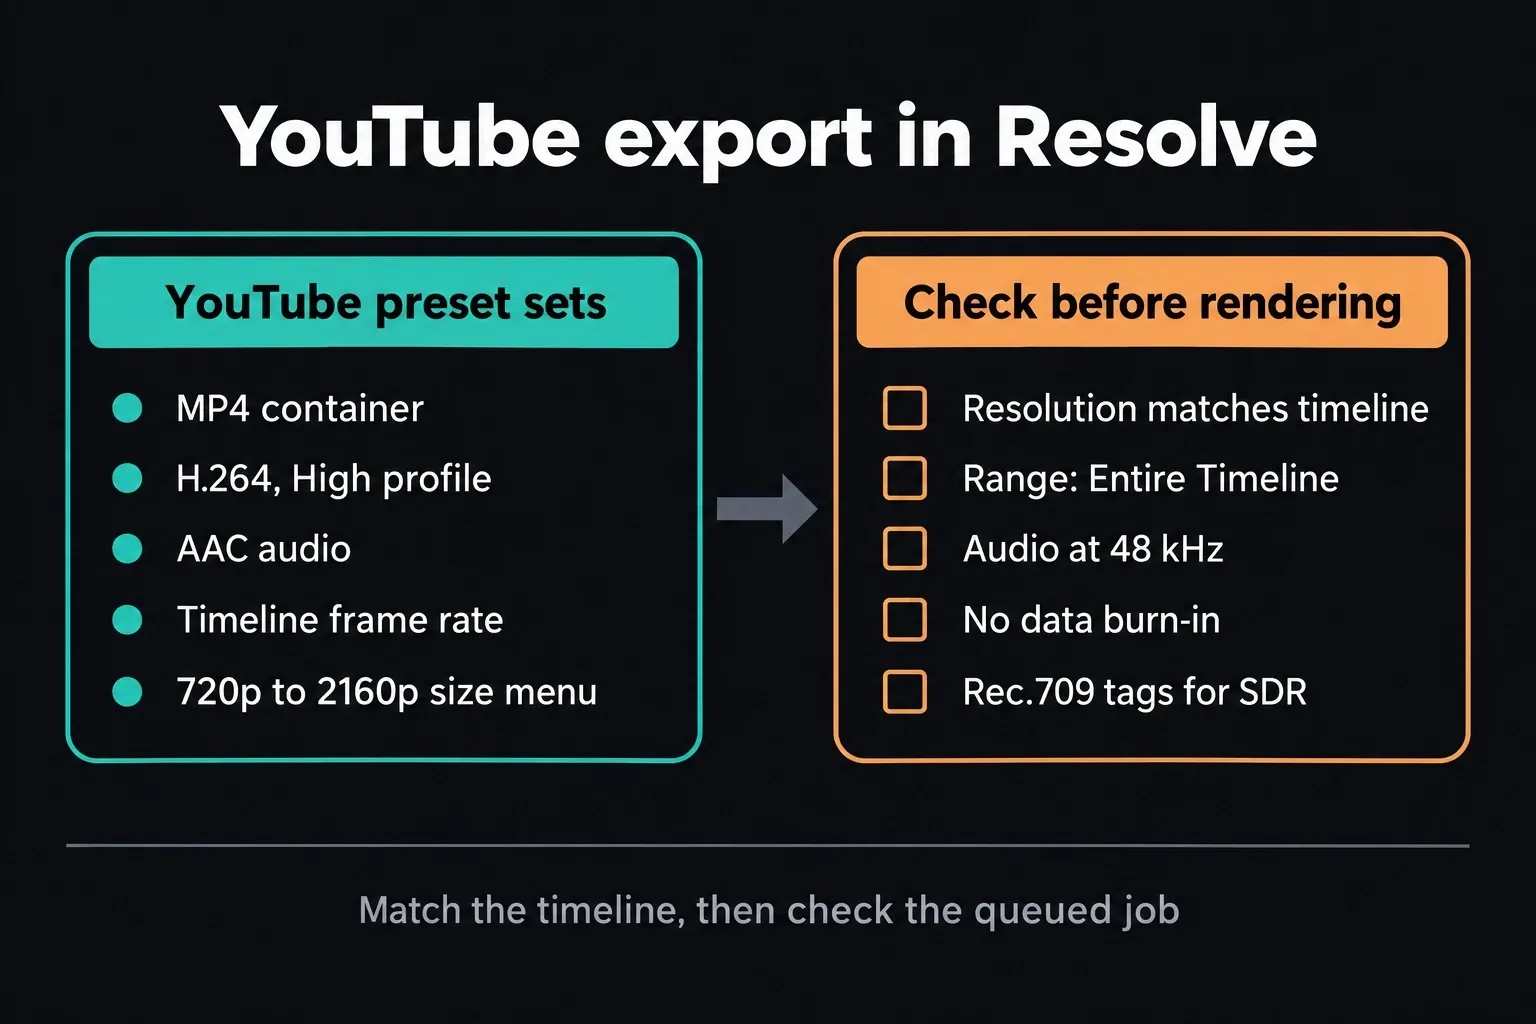
On the YouTube preset, pick the resolution version that matches the timeline and confirm the timeline frame rate. According to the Resolve 21 Reference Manual, the preset renders one clip at the timeline frame rate with MP4, H.264 High and AAC. It can also upload directly once you connect a YouTube account, with chapter markers taken from timeline markers and a thumbnail you select. The preset inherits Data Burn-In from the project as well, so make sure no unwanted burn-in preset is active before you render. All of these preset details still match the 21.1 manual.
On Custom Export, choose MP4 and H.264, then look at the controls your system actually offers. Encoder and rate-control choices vary with operating system, GPU, driver and edition. Use a quality-based Automatic setting if the encoder has one, or set a deliberate bitrate and check a short export. Every encoder has its own Quality menu, so expect the layout to change from one machine to the next. Resolve describes Restrict to as a maximum data rate. It caps the bitrate without promising a guaranteed average, and the field takes Kb/s, so convert from Mbps first.
For a finished edit, choose Single clip and confirm Entire Timeline in the render-range menu; save In/Out ranges for deliberate excerpts. Check the filename and destination, add the job to the Render Queue, then look over the queued job before you render. If Entire Timeline is unavailable, clear clip filtering first. The right codec won't rescue a job that only exports half the timeline.
Keep the timeline's intended frame rate, including fractional rates such as 23.976 or 29.97. With mixed-rate footage or slow motion, sort out the retiming in the edit and keep the export at the timeline rate, whatever one camera happened to shoot. Check pans and lip sync in the rendered sample, because a higher export frame rate can't recreate source frames that were never there.
YouTube Bitrate Recommendations for 1080p, 1440p and 4K
The current YouTube recommended upload encoding settings page, which I rechecked on October 2, 2026, gives the SDR references below. Standard frame rate means 24, 25 or 30 fps; high frame rate means 48, 50 or 60 fps. When Resolve asks for Kb/s, multiply the Mbps figure by 1,000.
| Resolution | 24/25/30 fps | 48/50/60 fps |
|---|---|---|
| 2160p (4K) | 35–45 Mbps | 53–68 Mbps |
| 1440p | 16 Mbps | 24 Mbps |
| 1080p | 8 Mbps | 12 Mbps |
| 720p | 5 Mbps | 7.5 Mbps |
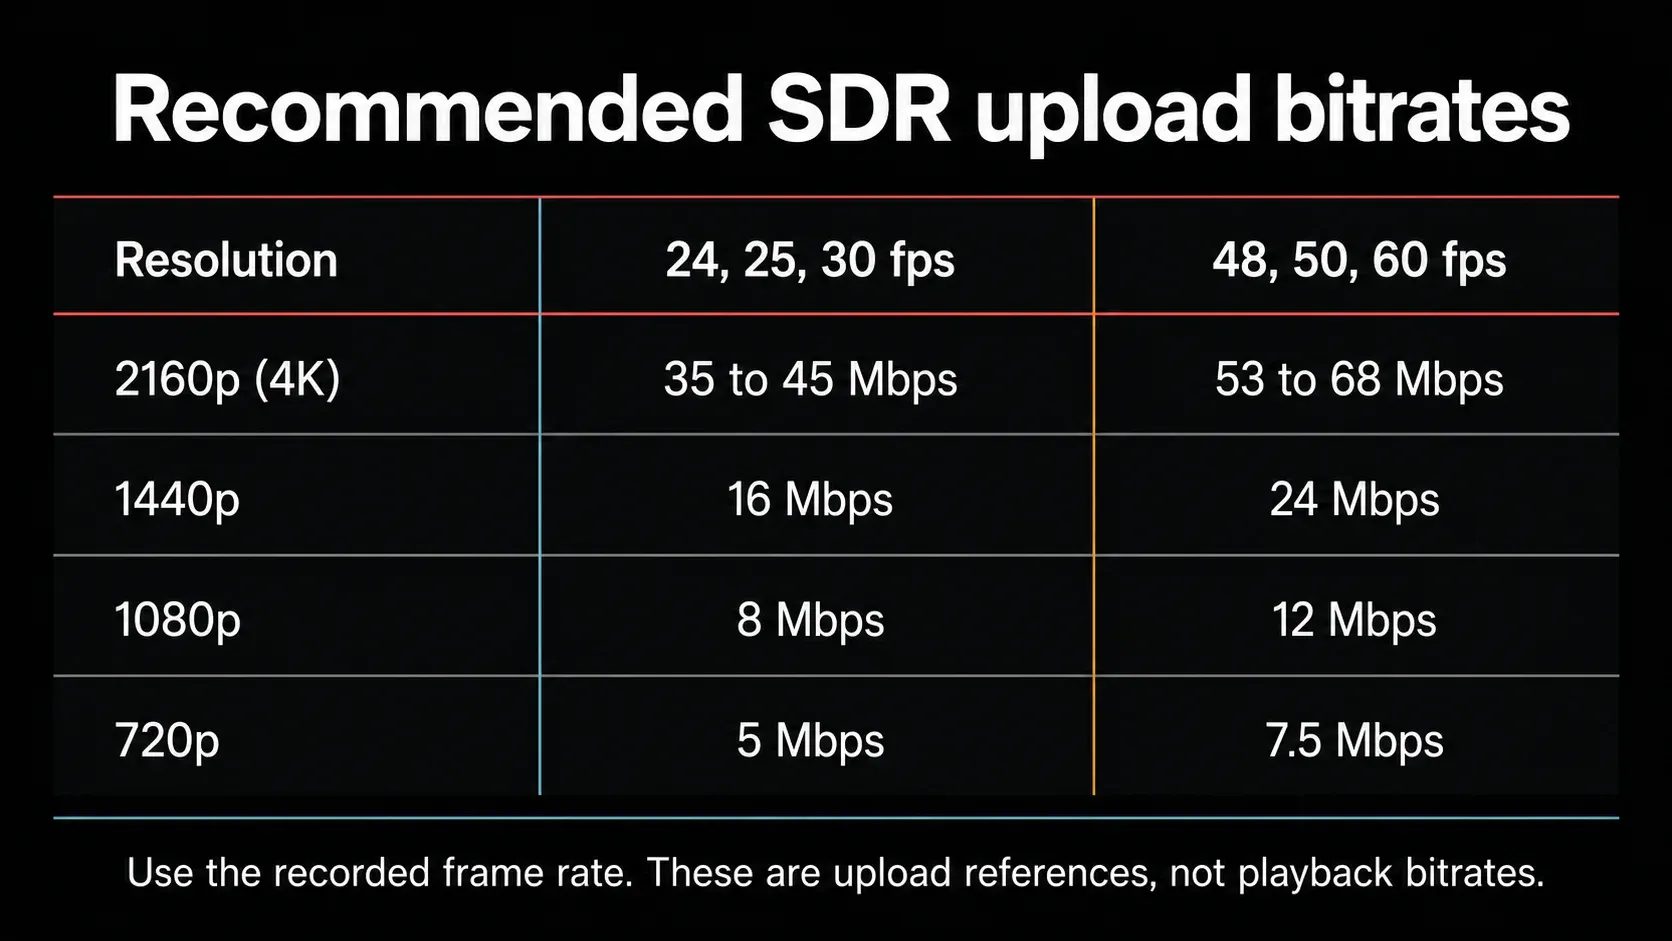
These numbers don't set a quality floor, and YouTube says outright that no bitrate limit is required. Treat them as a size-and-quality reference for an H.264 upload. A quality-based export may come out larger; a manually restricted one may be smaller and more predictable. Fast motion, grain, particles and gradients are much harder to compress than a locked-off talking head, so inspect a representative rendered section before you commit to a long queue.
YouTube's H.264 baseline also names progressive scan, two consecutive B-frames, CABAC, 4:2:0 chroma, variable bitrate and a closed GOP of half the frame rate. Resolve exposes different subsets of these controls depending on container and encoder. I'd leave Key Frames on Automatic unless the selected encoder exposes a reliable manual option and you understand how its value maps to the recommended GOP.
H.264 vs H.265 for a YouTube Upload
Choose H.264 when you want the closest match to YouTube's published baseline and the broadest handoff compatibility. H.265/HEVC can produce a smaller upload at the same visual quality, but how much smaller depends on the encoder and the source. YouTube accepts an HEVC file, and that alone doesn't mean it prefers HEVC for ordinary SDR uploads. No universal H.264-to-H.265 bitrate conversion can replace a test.
For HDR the choice changes, because YouTube requires 10- or 12-bit video and valid HDR metadata. Its HDR upload guidance recommends HEVC, VP9 Profile 2 or AV1. Your Resolve installation may not export every listed codec or profile. And changing an SDR file’s codec or tag alone won't turn it into an HDR master.
Free vs Studio: Check the Controls You Actually Have
Resolve Free’s overall delivery ceiling is Ultra HD 3840×2160 at up to 60 fps. Codec availability is a separate question. Studio extends the resolution and frame-rate ceiling and adds accelerated encoding options on supported systems, yet GPU, operating system and codec combinations still aren't interchangeable.
Before you buy Studio to fix a slow render, compare your actual Encoder and Audio menus with the Free edition limits and system requirements. Use software H.264 only where your installation offers it. In particular, don't assume a Linux setup has the same H.264/AAC route as a Mac or Windows machine. Check the platform-specific codec guide before you select an intermediate file or a separate encoding step.
Audio Export Settings for YouTube
In Render Settings > Audio, export the Main bus you actually monitored. Use AAC for a normal MP4 upload, a 48 kHz sample rate, and the correct channel layout. YouTube currently recommends 384 kbps for stereo and 512 kbps for 5.1. A clean mix matters more than a bigger codec number, especially while the wrong bus, a muted track or clipping is still in there.
For an ordinary stereo upload, export the stereo mix and leave individual timeline tracks out of it. If the AAC encoder doesn't offer exactly 384 kbps, use an available high-quality setting and check the file; YouTube doesn't reject an upload for missing that recommendation. For surround, check the stereo presentation too. YouTube's listed channel layout is stereo plus 5.1, and that's no reason to send a multichannel mix nobody monitored.
Loudness is a different control. The Resolve 21 manual gives -14 LUFS as the YouTube loudness target, and the YouTube preset exposes Normalize Audio. Treat that normalization as Resolve's delivery target. YouTube's upload form doesn't accept or reject a file by its loudness. The Resolve LUFS and audio-level guide covers integrated loudness, true peak and bus measurement without mixing them up with AAC bitrate.
Color Space: SDR BT.709 and the HDR Boundary
For SDR, YouTube recommends BT.709 for color primaries, transfer characteristics and matrix coefficients. If the project uses DaVinci Wide Gamut, ACES or CST nodes, verify that the output transform lands in SDR BT.709 and that the exported file carries matching tags. Color Space Tag and Gamma Tag describe the file, and changing those tags alone won't apply a missing output transform. Raising the bitrate won't fix a color-management problem either.
HDR needs its own master: compatible 10- or 12-bit encoding, Rec.2020 primaries with a non-constant-luminance matrix, and a PQ or HLG transfer function with matching metadata. YouTube publishes separate HDR bitrate references, 44–56 Mbps for 4K at 24/25/30 fps and 66–85 Mbps at 48/50/60 fps. The Resolve color-management guide explains RCM, CST order and double-transform failures before you reach Deliver.
YouTube Preset vs Custom Export
Use the YouTube preset when you want a fast, documented MP4/H.264 High export and optional direct upload. Use Custom Export when you need to control a delivery ceiling, inspect the audio bus, choose a different codec, verify color tags or save a reusable preset. Custom isn't automatically higher quality. It just puts more decisions in front of you.
If the selected MP4 encoder exposes Network Optimization, turn it on for a web-delivery file. YouTube asks for the MP4 moov atom at the front, commonly called Fast Start. Resolve's available controls vary by encoder, so when this packaging detail matters, verify the finished file itself. One checkbox won't behave the same way on every platform.
Before a final upload, check Use Proxy Media, Use optimized media and Use render cached images if the selected preset shows them. Each of those can pull proxy, optimized or cached files into the output. Leave them off when those files are lower quality than the intended master, and make sure the originals are online. Playback proxies and delivery choices are two separate decisions.
Exporting Vertical Video for YouTube Shorts
For a vertical Short, prepare and reframe a portrait timeline (1080×1920 is a practical starting size), then verify the exported dimensions. It's easy to slip into assuming a landscape preset will rotate them, and it won't. YouTube’s player adapts to the file’s aspect ratio, so don't bake black side bars into a widescreen frame. The aspect-ratio guide covers reframing subjects and captions.
For new uploads, YouTube currently classifies square or vertical videos up to three minutes long as Shorts. Its three-minute Shorts guidance also explains an important exception: a Short over one minute with an active Content ID claim is blocked globally. Check the upload’s classification and restrictions in Studio, because changing the bitrate won't remove a claim.
Why a YouTube Upload Looks Soft, Dark or Incomplete
First, wait for high-resolution processing. YouTube puts up a low-resolution version before 1080p and 4K processing finishes, and high-resolution processing can take hours. Judge the upload only once the quality option you exported for appears.
If it still looks wrong, isolate the failure. Soft blocks in motion point toward the source encode or an overly restrictive data rate. A global gamma or saturation shift points toward color primaries, transfer or matrix tags. Missing sound points toward the selected output bus or the Audio checkbox. If the local file looks different, reimport a short sample into the same managed project, compare it with the timeline, then check another player. That helps separate an export or transform error from player interpretation. If the local file checks out and the processed upload doesn't, investigate metadata, YouTube processing and playback before you touch the grade.
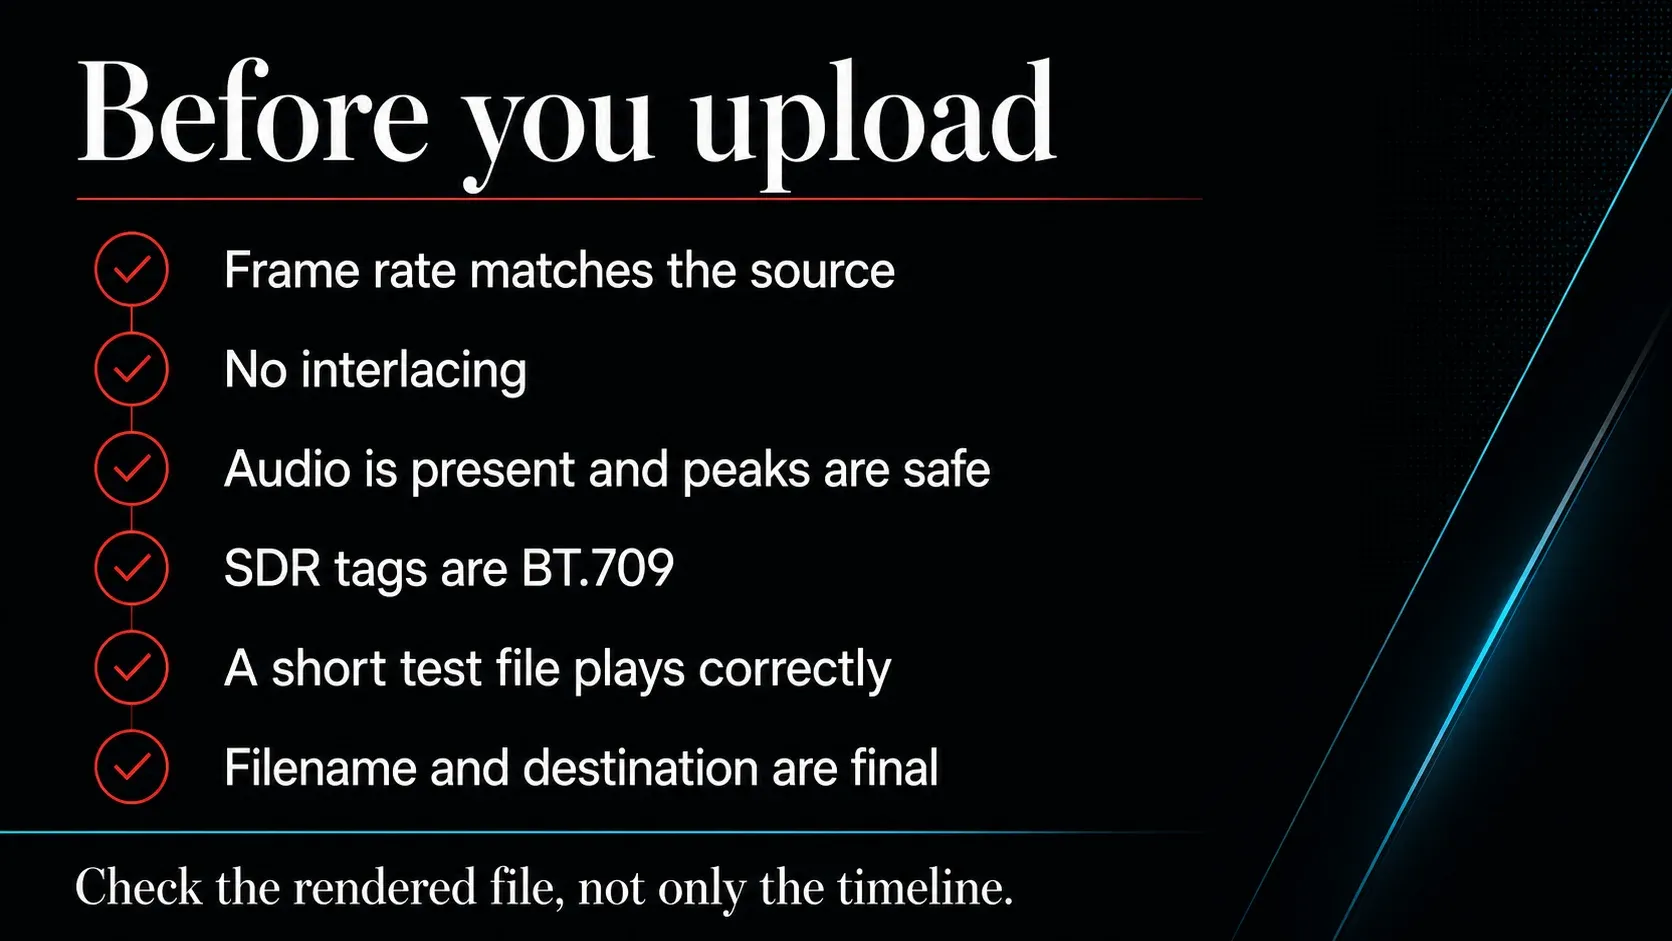
Render a short section that contains motion, gradients, dialogue and the darkest shot. Play that file outside Resolve, check the audio, then upload it as unlisted and wait for the intended resolution. It's quicker, and far more reliable, than changing five unrelated settings after a full-length export has gone wrong.
YouTube Export FAQ
What bitrate should I use for a 4K YouTube export in DaVinci Resolve?
YouTube recommends 35–45 Mbps for 4K at 24/25/30 fps and 53–68 Mbps at 48/50/60 fps for SDR H.264 uploads. Treat these as reference values; they aren't minimums. A quality-based Automatic mode is another option where your encoder offers one. Either way, check a representative export before you trust the label alone.
Should I use the YouTube preset or Custom Export in Resolve 21?
Both work. The YouTube preset gives you a documented MP4, H.264 High, timeline-frame-rate export and optional direct upload. Use Custom Export when you need explicit control over bitrate, audio routing, codec or color tags.
Should I export H.264 or H.265 for YouTube?
Use H.264 for the closest match to YouTube's published SDR upload baseline and broad compatibility. HEVC can reduce upload size, and it's useful for supported HDR workflows, but no universal bitrate conversion makes it automatically better.
What audio settings should I use for YouTube?
Use AAC in a normal MP4 file, a 48 kHz sample rate, and the bus and channel layout you actually mixed. YouTube recommends 384 kbps for stereo and 512 kbps for 5.1 uploads.
What color space should I export for SDR YouTube video?
Use BT.709 primaries, transfer characteristics and matrix coefficients for SDR. If the project is managed in DaVinci Wide Gamut, ACES or CST, verify the final output transform and the tags. Changing only the codec won't fix either of them.
Does upscaling 1080p to 4K guarantee better YouTube quality?
No. Upscaling can't recreate detail that was never captured, and these upload settings can't guarantee which playback codec or quality a viewer receives. If you want to compare a higher-resolution upload, make a short A/B test and wait for both versions to finish processing. Keep whichever version actually looks better with your footage.
Why is my YouTube upload blurry even though the local export is sharp?
Wait until 1080p or 4K processing finishes; YouTube publishes the low-resolution version first. If the final high-resolution stream is still soft, compare short tests for source quality, frame rate, bitrate restriction and color metadata, one variable at a time.
