Short answer: for a normal SDR Instagram Reel, edit in a 1080 × 1920 vertical timeline, reframe every shot, then export a Single Clip as MP4 with H.264 video and AAC stereo audio. Keep the timeline’s intended frame rate, use progressive scan, and keep the color pipeline consistent with Rec.709. When Resolve exposes a bitrate limit, 10,000–16,000 Kb/s is a practical starting range for 1080 × 1920 footage—not an Instagram requirement.
The export page cannot rescue a landscape edit that was never recomposed for a phone. I treat a Reel as a separate vertical delivery: duplicate the timeline, fix the framing, check titles against the phone interface, then make a clean source file for Instagram to encode.
Instagram Reels export settings: the practical preset
| Setting | Starting value | Why |
|---|---|---|
| Timeline / output | 1080 × 1920, 9:16 | A practical Full HD vertical canvas for a Reel. |
| Format | MP4 | Simple delivery container with broad compatibility. |
| Codec | H.264 | Reliable default when it is available in your Resolve installation. |
| Frame rate | Match the intended timeline cadence | Do not convert 24, 25, 30 or 60 fps footage just because another guide declares one universal number. |
| Scan | Progressive | Matches current platform delivery expectations. |
| Quality | Automatic quality, or 10,000–16,000 Kb/s as a starting limit | Enough room for a clean 1080 × 1920 source without pretending bitrate stops Instagram recompression. |
| Audio | AAC, stereo, 48 kHz; 192–320 Kb/s when available | Practical social-video delivery values, not rejection thresholds. |
| Color | Consistent SDR Rec.709 workflow | Prevents avoidable transform and tagging mistakes before the platform processes the file. |
Meta’s official Instagram Reels Publishing API sample lists MOV or MP4 containers, H.264 or HEVC video, AAC audio, progressive scan, and 23–60 fps, and recommends 9:16 to avoid cropping or blank space. Those specifications apply to media sent through the Publishing API. For a normal upload through the Instagram app, MP4 with H.264 video, AAC audio and a 1080 × 1920 frame is a practical, widely compatible Resolve profile—not a universal Meta requirement.
1. Make a separate 1080 × 1920 timeline
If the main edit is landscape, duplicate its timeline before changing anything. Open the duplicated timeline’s settings, enable custom settings, and set the resolution to 1080 × 1920. In builds that expose Use vertical resolution, it can swap compatible width and height values, but check the result instead of assuming the switch did the whole job.
Keep the original timeline untouched. A landscape master and a vertical Reel have different composition needs, and trying to serve both from one canvas makes every later revision harder.
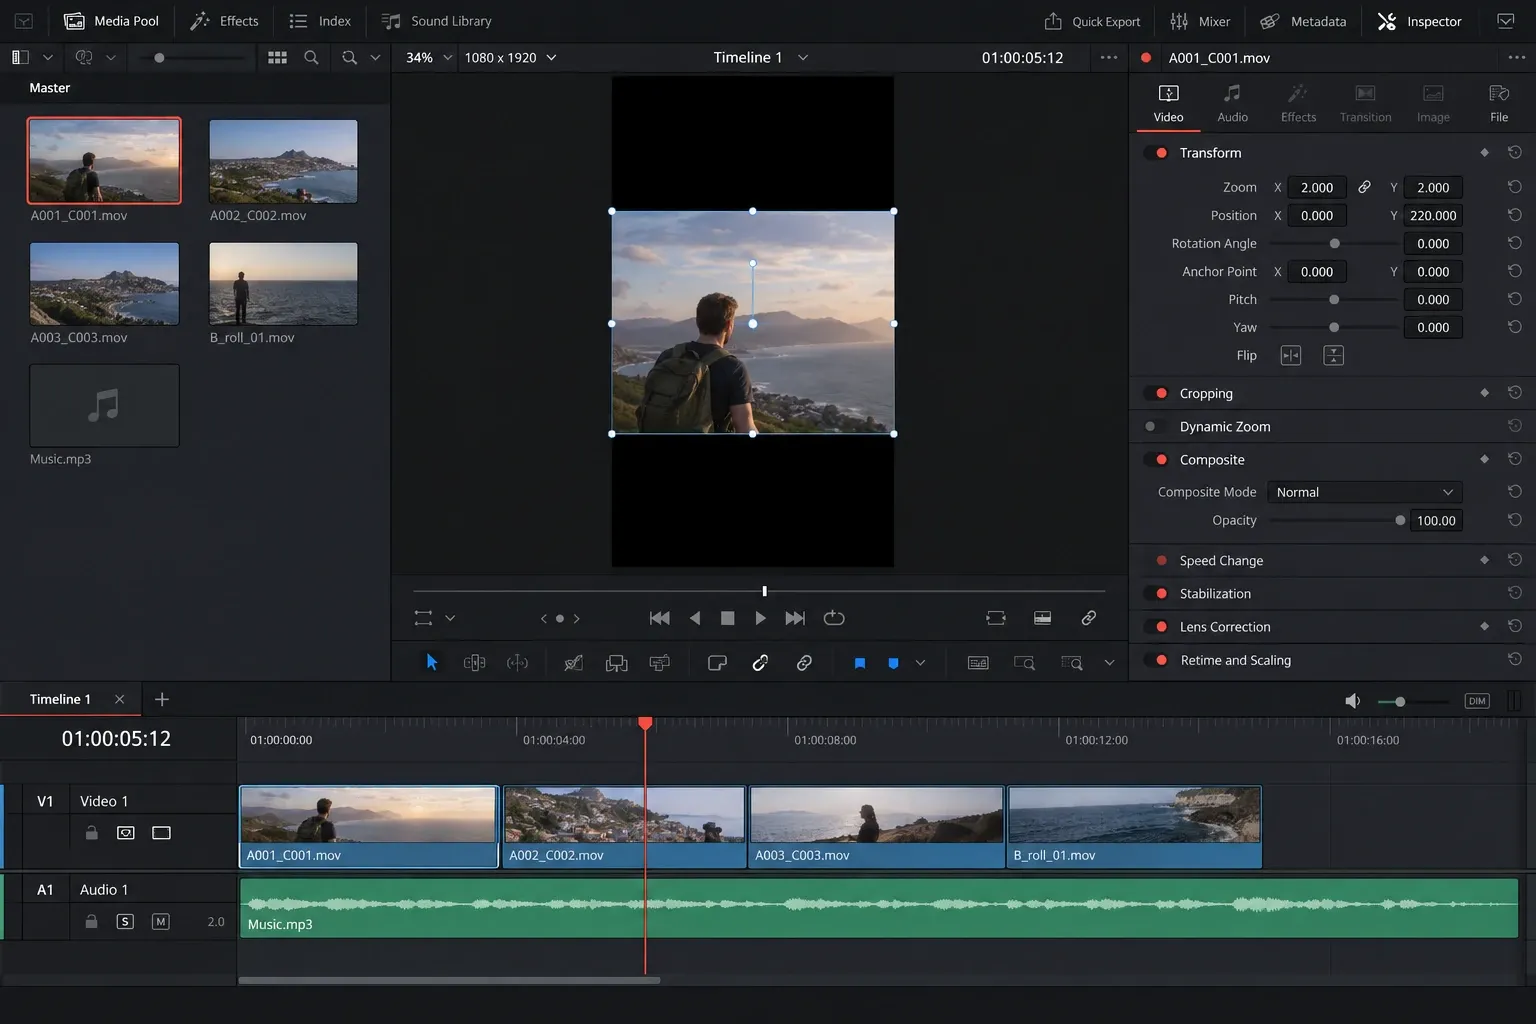
The aspect-ratio guide explains the difference between timeline size, output size and clip reframing. For Reels, that distinction is the foundation of the export rather than an optional cleanup step.
2. Reframe every shot for the portrait canvas
Changing the canvas does not compose the shot. Resolve may center-crop, scale or leave empty space depending on the project’s image-scaling settings, but it cannot decide which face, product or gesture matters.
Move through the duplicated timeline cut by cut. Use Inspector Zoom and Position to keep the intended subject inside the frame. Watch motion entering from the cropped sides. Check compound clips, Fusion compositions, adjustment clips, subtitles and lower thirds separately because their transforms can respond differently to the new canvas.
Do not stretch a landscape clip to fill 9:16. Preserve its proportions, crop deliberately, and accept that some shots need a new keyframed pan or a different source angle. A vertical version is a new edit, not a rotated export.
3. Configure Custom Export on the Deliver page
Open Deliver and choose Custom Export. Select Single Clip unless you have a documented reason to render each timeline clip separately. Set Format to MP4 and Codec to H.264 when those options are available on your system.
Set the resolution to match the 1080 × 1920 timeline. If the Deliver page already says Match Timeline Settings, keep it there. Confirm the frame rate matches the timeline and the scan is progressive. Encoder names and some advanced controls vary by operating system, Resolve edition and available hardware, so use the equivalent controls your installation actually provides.
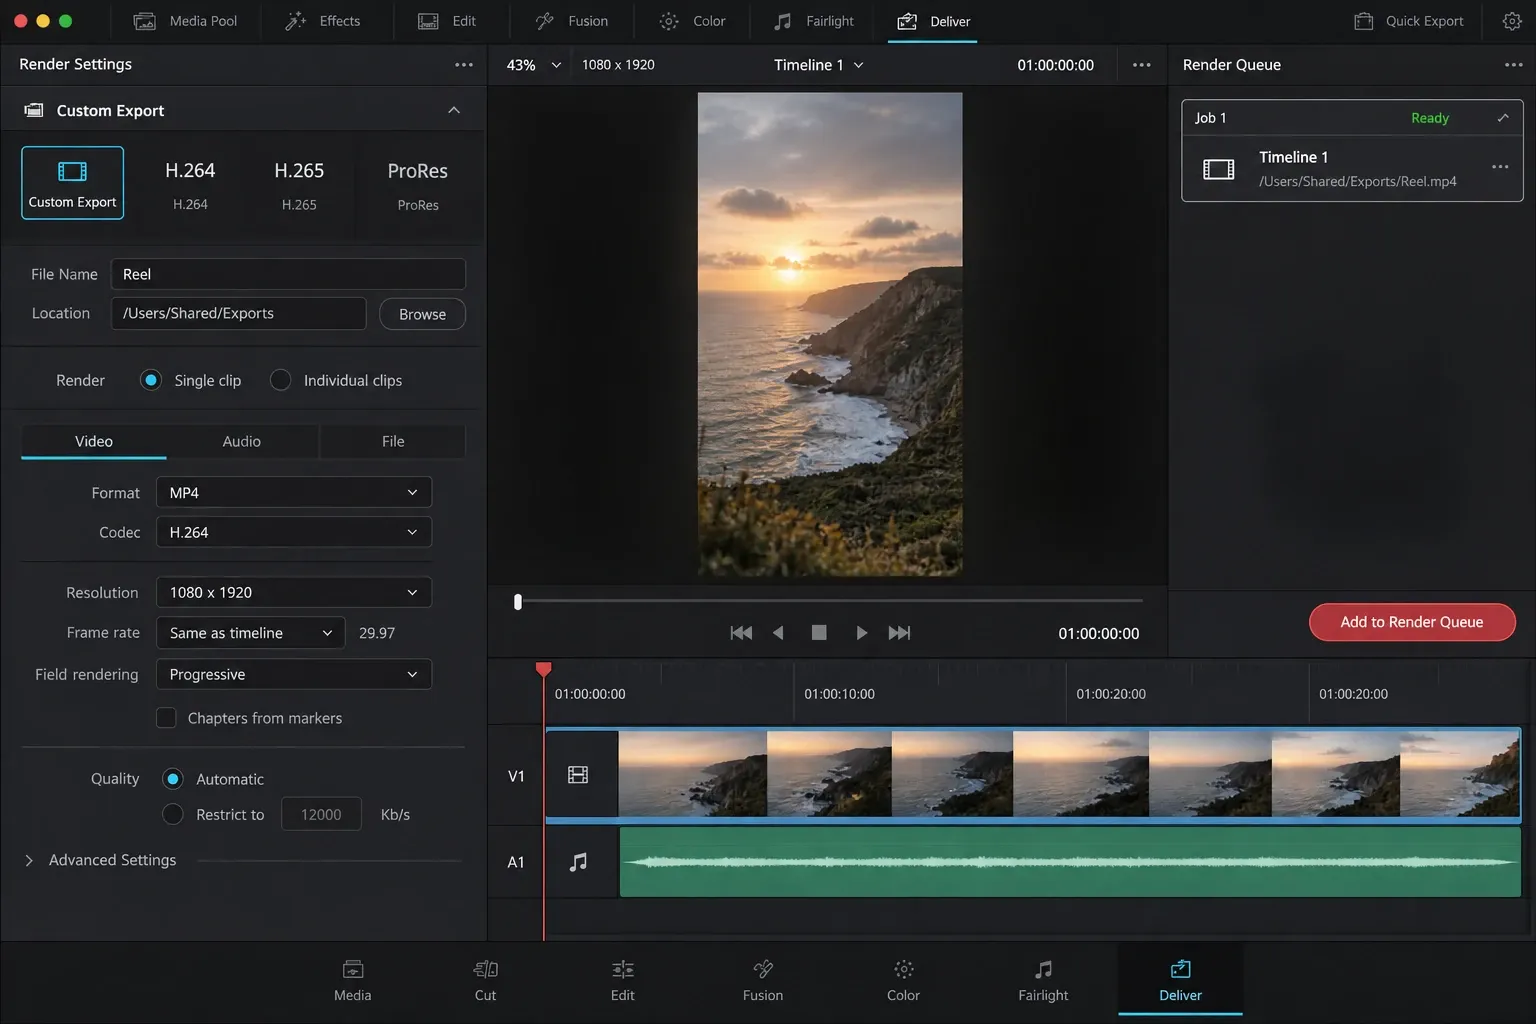
If the Render Queue, export range or audio controls are unfamiliar, use the full DaVinci Resolve export walkthrough. This guide stays focused on the decisions that change a Reel.
4. Treat bitrate as a starting point, not a platform law
Instagram will encode the upload again. There is no Resolve setting that forces the platform to preserve every source bit, and a giant file does not bypass that processing.
If the selected encoder offers an automatic or quality-based mode, a clean high-quality export is a reasonable starting point. If you prefer Restrict to, I would begin around 10,000–16,000 Kb/s for a 1080 × 1920 H.264 Reel and inspect a short local export. Fast movement, fine textures, confetti, water and added grain can need more room than a talking-head shot with a clean background.
That range is editorial guidance, not a Meta upload requirement. The right question is whether the local file preserves the detail you care about before Instagram touches it. If you also need a smaller review or transfer copy, use the Resolve file-size guide to reduce size without changing several variables at once.
5. Export AAC audio and check the actual output path
Open the Audio section in Render Settings and enable Export Audio. Choose AAC, stereo and 48 kHz when available. A bitrate between 192 and 320 Kb/s is a sensible working range for a normal Reel, but it is not a pass/fail line from Instagram.
Watch Resolve’s main output meter before rendering, then open the finished file outside Resolve. A timeline can sound fine during editing yet render the wrong bus or no audio if the output source is misconfigured. Check the beginning and end, dialogue level, music balance and whether stereo playback behaves as expected on a phone.
6. Keep the SDR color pipeline consistent
For a standard SDR Reel, keep the project, timeline, monitoring decisions and delivery tags aligned with a normal Rec.709 workflow. Do not treat an output metadata tag as a conversion. If the project was graded in another color space, use the intended color-management or output-transform path rather than changing tags at the final export.
Check the local file in a color-managed player and on a second device before blaming Instagram. If the local file already looks washed out, too dark or oversaturated, fix the pipeline before uploading.
7. Keep titles, faces and logos away from interface overlays
A 9:16 frame can still fail as a Reel when the caption line, profile controls or action buttons sit over important content. Exact overlay positions change with app revisions and viewing context, so I do not rely on one permanent pixel diagram.
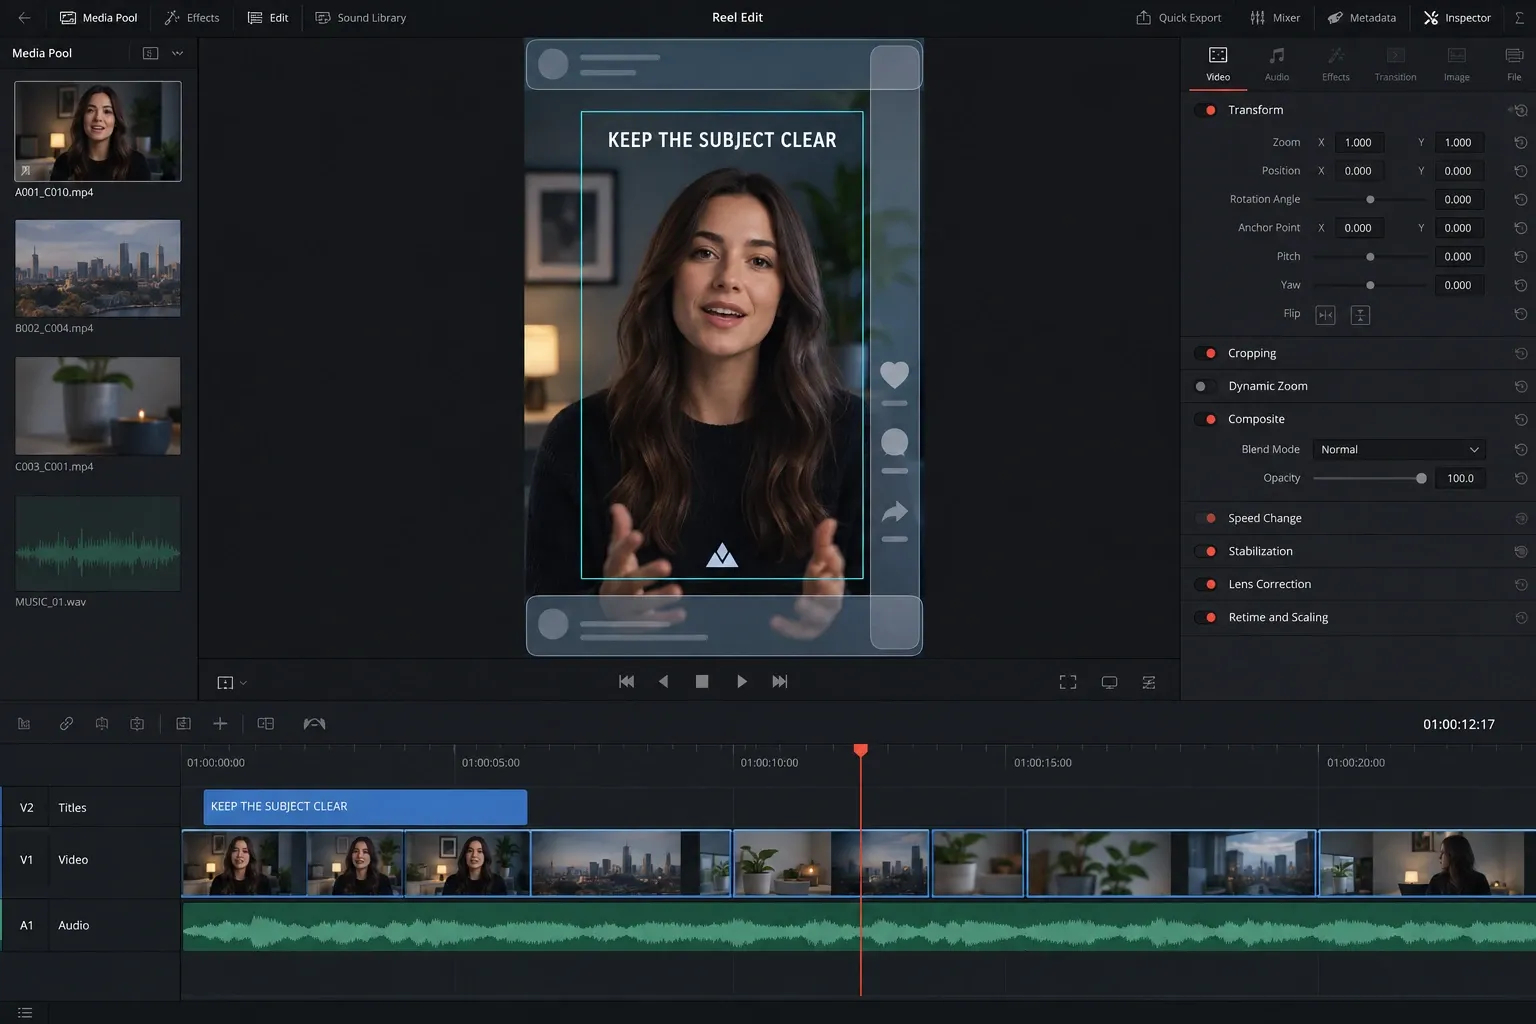
Keep essential text and logos away from the extreme top, bottom and right edges. Give subtitles enough room above the lower interface. If exact placement matters, make a private test upload and view it on the devices your audience actually uses. Resolve’s clean Viewer cannot predict every live overlay.
8. Check the local file before uploading
Render a short representative section first. Open it outside Resolve and confirm:
- the file is 1080 × 1920 and displays vertically without black side bars;
- faces and products are framed intentionally rather than blindly centered;
- text is readable at phone size and not pushed against an edge;
- motion, gradients and fine detail survive the local encode;
- audio is present, balanced and coming from the intended output;
- the picture has the expected SDR color and contrast.
In Instagram, enable Upload at highest quality. The setting’s exact menu path can move, so search the app’s Settings for “media quality” if the wording is not where an older walkthrough shows it. Upload on a stable connection and allow the platform time to finish processing before judging the result.
Why a Reel still looks soft or wrong after export
The local file is already soft
Check that the export is really 1080 × 1920, the source has enough detail for the crop, and scaling did not enlarge a small part of a landscape frame too far. Inspect the local file at its actual display size. Raising bitrate cannot restore detail that the crop or source never contained.
The local file is sharp but Instagram looks soft
Enable the highest-quality upload option, use a stable connection, wait for processing, and compare the same Reel after the app has generated its playback versions. Avoid changing codec, frame rate, bitrate and color settings together; change one variable and make another short upload.
The Reel has black bars or the image is stretched
Return to the vertical timeline. Black bars usually mean the clip or output did not fill the portrait canvas. Stretching means the original proportions were changed. Reframe with crop, scale and position while preserving the source aspect ratio.
Titles are hidden by buttons or captions
Move critical graphics inward and upward, then test the current Reels interface. Do not solve the problem with a single old safe-zone template and assume it will remain exact.
The colors change after upload
Verify the local export first. Confirm the project’s color-management and output-transform choices, then keep delivery tags consistent with the intended SDR file. Metadata alone cannot repair an incorrect transform.
My final Reels export check
I want the file to pass three checks before it leaves Resolve: the vertical edit looks intentional, the local H.264/AAC export is clean, and the important content survives a phone interface. If those three are right, Instagram receives a strong source. If one is wrong, a more aggressive bitrate will only make the wrong file larger.
For a different destination, use the DaVinci Resolve export settings hub rather than carrying this Reels recipe into YouTube, transparency, audio-only or client-master delivery.
Instagram Reels export FAQ
Should I export Instagram Reels at 30 fps?
Not automatically. Meta’s Publishing API accepts 23–60 fps, but that is API documentation rather than a rule for every app upload. For a normal export, keep the timeline’s intended cadence when possible. Converting 24, 25 or 60 fps material to 30 fps creates a new motion decision and can add duplicated or blended frames.
Is 1080 × 1920 the best Resolve resolution for a Reel?
It is the practical default for a Full HD 9:16 Reel. The key is to build or duplicate a vertical timeline and reframe the shots there, then make the output match that timeline.
What bitrate should I use for a 1080 × 1920 Reel?
For H.264, 10,000–16,000 Kb/s is a useful starting range when Resolve exposes a bitrate limit. Treat it as an editorial starting point, inspect a short local export, and give complex motion or texture more room when needed. It is not a Meta requirement.
Does Instagram support H.265 from DaVinci Resolve?
Meta’s Reels Publishing API documentation lists H.264 and HEVC for API-published media. That does not guarantee that every app-upload workflow or device will handle an H.265 file the same way. MP4 with H.264 remains the simpler practical default for a normal Resolve export when compatibility matters.
