Quick answer: if a phone or camera clip is simply sideways, correct the source through Clip Attributes > Video > Image Orientation and choose 90° Left, 90° Right, or 180°. If you want to tilt one timeline instance, use Inspector > Video > Transform > Rotation Angle. The first method fixes orientation at the source-clip level; the second is a creative timeline transform that can use any angle and keyframes. This rotation fix belongs with the practical tasks in the DaVinci Resolve tutorial hub. Before delivery, confirm the project timing in the frame rate guide.
That distinction prevents most rotation problems. A sideways recording usually needs one clean orientation correction. A Dutch angle, spinning title card, or deliberately tilted shot belongs in Transform. A vertical deliverable needs a vertical timeline, not a 90-degree turn applied to footage that is already upright.
Image Orientation or Rotation Angle?
| What you need | Use this | Why |
|---|---|---|
| Fix a clip recorded sideways | Clip Attributes > Image Orientation | Corrects the source interpretation in 90- or 180-degree steps. |
| Turn one timeline copy but leave other copies alone | Inspector > Rotation Angle | Applies to the selected timeline instance. |
| Create a small tilt or any non-right angle | Inspector > Rotation Angle | Accepts an arbitrary angle rather than fixed orientation choices. |
| Animate a spin | Rotation Angle keyframes | Stores different angle values at different frames. |
| Make a 9:16, square, or widescreen version | Timeline resolution and scaling | Defines the shape of the delivery canvas. |
| Remove exposed corners after rotation | Zoom, Position, then Crop if needed | Reframes the rotated image without confusing rotation with the canvas shape. |
I treat source correction and creative rotation as separate decisions even when both can make the Viewer look upright. The difference appears later when you reuse the clip. Clip Attributes can affect that Media Pool item wherever it is used. Inspector settings belong to the selected timeline instance and are easier to vary from shot to shot.
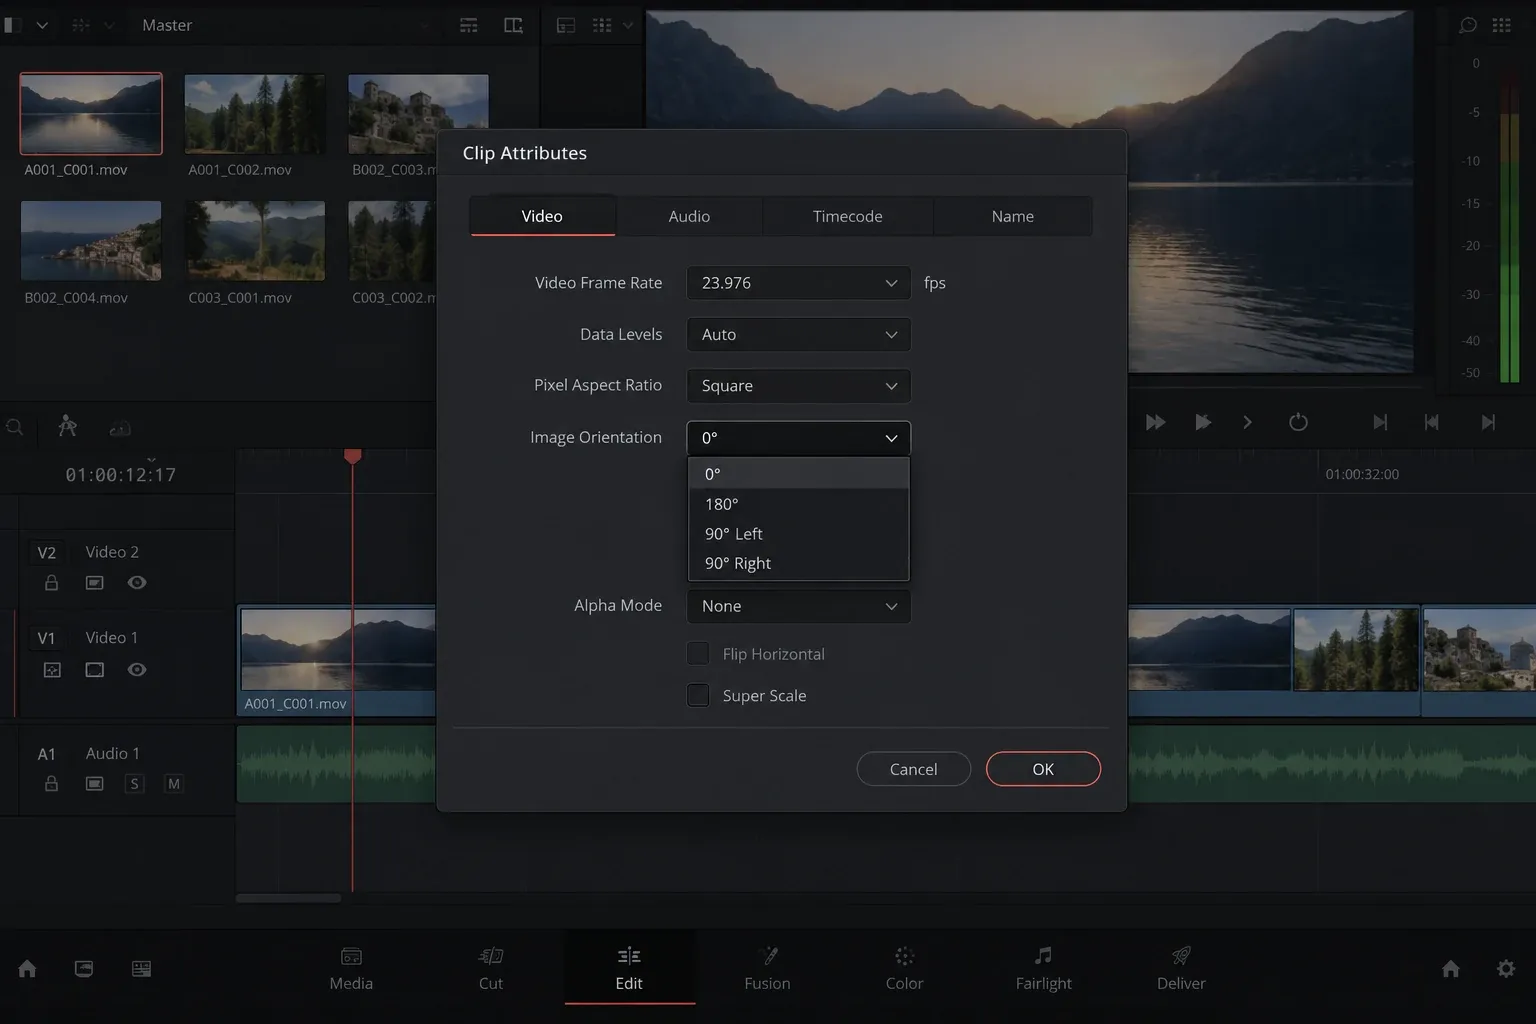
Fix a Sideways Clip with Image Orientation
- Find the source clip. In the Media Pool, select the clip that appears sideways or upside down.
- Open Clip Attributes. Right-click the clip and choose Clip Attributes.
- Open the Video tab. Find Image Orientation.
- Choose the correction. Use 90° Left, 90° Right, or 180° based on the direction the image needs to move.
- Apply the change. Return to the timeline and check every place where that source is used.
Choose the direction by the result, not by the way the camera was held. If the subject's head points toward the right edge, a 90-degree option that brings the head to the top is correct. If the first choice makes the clip upside down, use the opposite 90-degree direction.
This method is the clean fit for a file whose orientation is wrong before you begin editing. It keeps the timeline Transform section free for later framing and animation. It also makes thumbnails and source-viewing behavior easier to understand because the correction belongs with the source rather than with one accidental timeline copy.
Check other timelines before changing a heavily reused source. A source-level correction can change every instance that refers to the same Media Pool item. If one sequence intentionally uses the original sideways orientation, duplicate or isolate the media item according to your project structure, or use the Inspector only on the copy that needs to turn.
Rotate One Timeline Clip in the Inspector
Use the Inspector when the turn is part of the composition rather than a source correction.
- Put the clip on a timeline and select that timeline item.
- Open Inspector at the upper right.
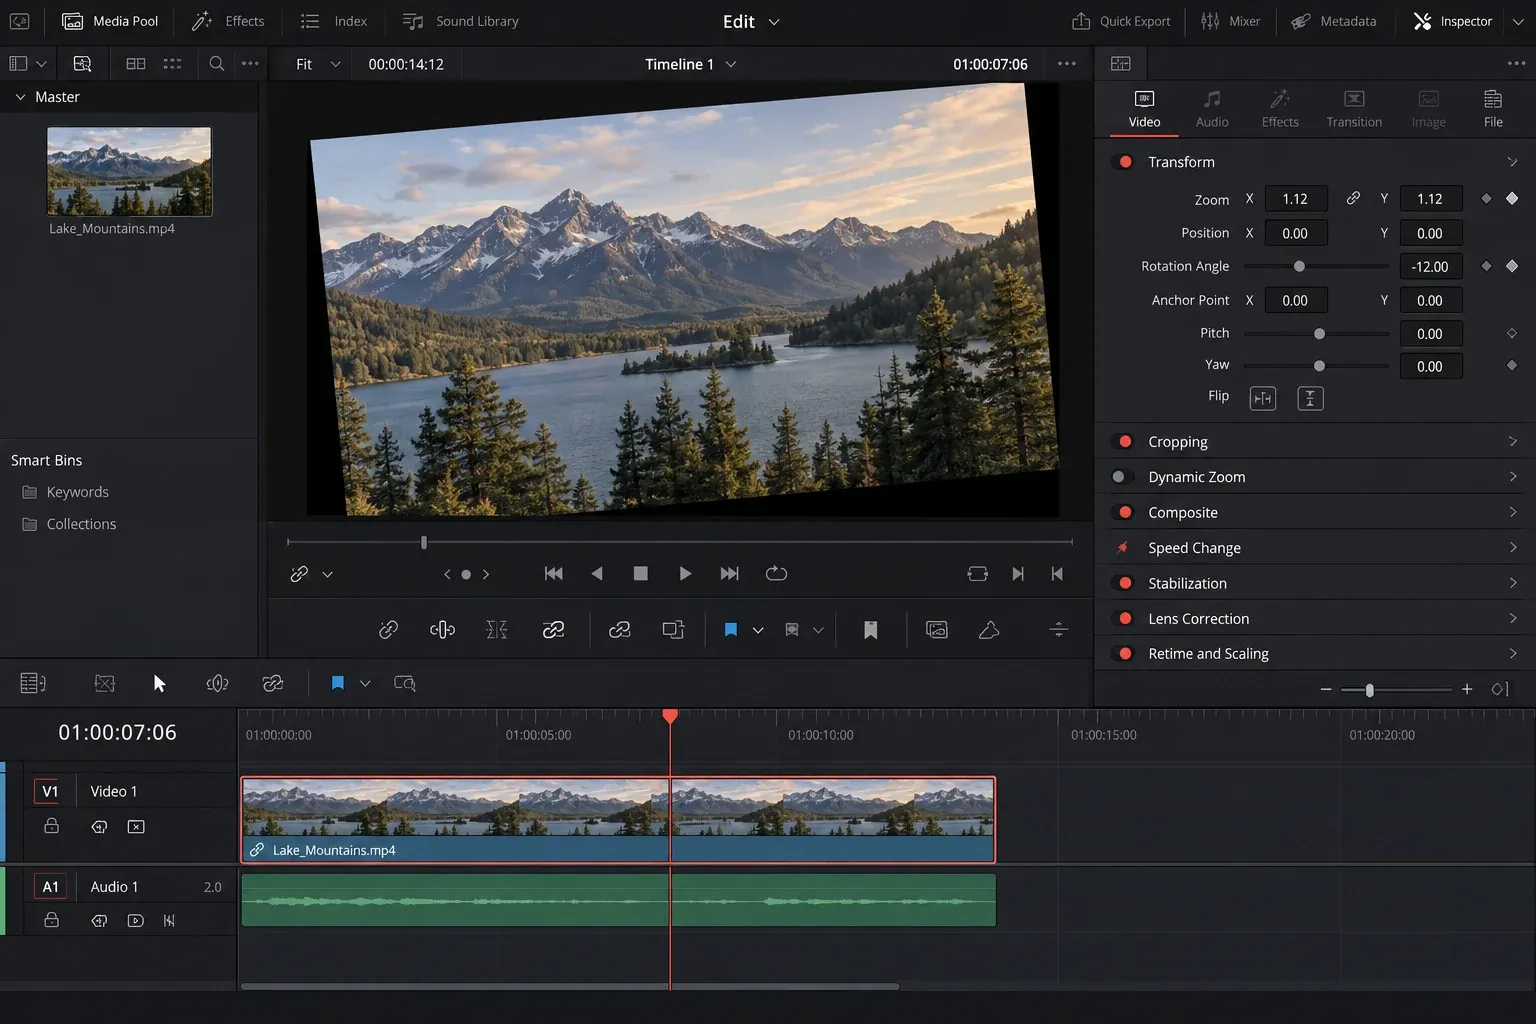
- Choose the Video tab and expand Transform.
- Enter a value in Rotation Angle, or drag the value while watching the Viewer.
- Use Zoom and Position X/Y to reframe the rotated image.
- Play through the complete clip and check all four edges.
For a right-angle turn, 90 or -90 points in opposite directions; 180 flips the frame upside down. For a small Dutch angle, begin with a restrained value and increase only when the composition needs it. The Viewer result matters more than the sign of the number.
The Inspector applies the rotation around the clip's anchor point. For ordinary footage, the default center is usually the useful starting point. Moving the anchor changes the pivot and can make Position feel unpredictable, so reset the anchor before troubleshooting a clip that swings around an unexpected point.
Blackmagic Design's official Edit page describes the Inspector and onscreen controls for position, size, and rotation. For a broader map of that panel and its reset behavior, use the DaVinci Resolve Inspector guide.
Fill the Frame After a 90-Degree Turn
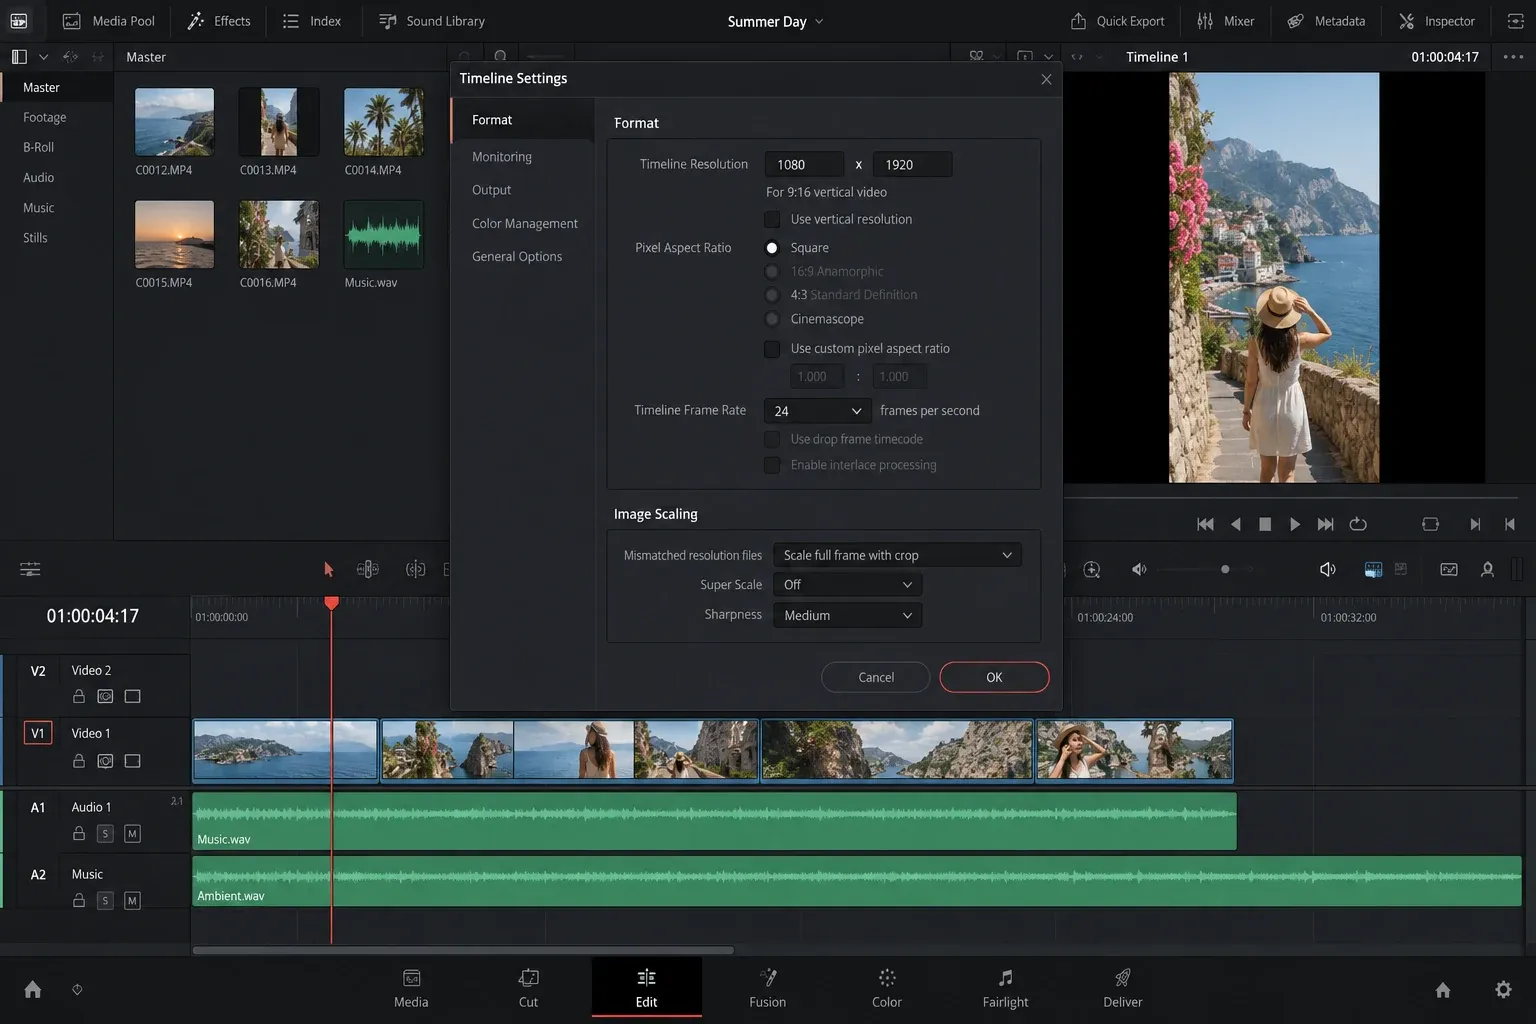
A landscape clip rotated 90 degrees becomes tall inside a landscape timeline. Resolve is doing what you asked: the image changed orientation, but the timeline canvas did not. The empty sides are a composition issue, not proof that rotation failed.
Choose the next step from the delivery:
- For a vertical deliverable: change or duplicate the timeline to a vertical resolution, then reframe the clip inside that canvas.
- For a landscape deliverable: keep the landscape timeline and decide whether to accept side space, enlarge and crop the tall image, or build a background treatment.
- For a deliberately tilted shot: increase Zoom only enough to hide exposed corners, then adjust Position to protect the subject.
- For a split layout: leave the extra canvas available and place another image, color, or graphic below the rotated clip.
Zoom always trades field of view for coverage. A 90-degree source placed in the wrong canvas may need a large enlargement, which throws away much of the image and can expose softness. Set the timeline shape first. Then choose the smallest Zoom that serves that composition.
Use Crop when you need to hide a specific edge or build a layout. Do not use crop as the first repair for a wrong timeline shape. Crop controls explain edge removal, Softness, and Retain Image Position once the rotation and canvas decisions are settled.
Vertical Video Usually Does Not Need Rotation
An upright portrait clip can look narrow on a 16:9 timeline while still being correctly oriented. Rotating it 90 degrees would make the subject sideways. The real task is to create a 9:16 timeline or another required portrait canvas and choose how source clips scale inside it.
- Duplicate the timeline if you need to preserve the landscape version.
- Open timeline settings and set the required vertical resolution.
- Review image-scaling behavior for clips whose shape differs from the timeline.
- Reframe each shot with Zoom and Position rather than applying a blanket rotation.
- Check graphics, subtitles, logos, and safe margins in the vertical canvas.
The exact pixel dimensions depend on the destination. The relationship is the stable part: timeline resolution defines the canvas, while clip transforms decide how each source sits inside it. The resolution and aspect-ratio guide covers that workflow in detail.
Animate Rotation with Keyframes
Rotation Angle has a keyframe diamond in the Inspector. Two angle values at two different frames create a turn between them.
- Select the clip and move the playhead to the first frame of the motion.
- Set the starting Rotation Angle.
- Click the diamond beside Rotation Angle to store the first keyframe.
- Move the playhead to the end of the motion.
- Enter the ending angle. Resolve stores the second value.
- Play the motion and adjust timing before adding more points.
A complete clockwise revolution can move from 0 to 360. The same visible endpoint can be reached with -360 in the opposite direction. For a short turn into place, begin off-angle and finish at 0 so the resting state is easy to read and reset.
Watch the corners during the move. A clip that fills the canvas at 0 degrees can expose empty triangles halfway through the rotation. Increase Zoom enough to cover the worst point, animate Zoom with the rotation, or design the empty area as part of the composition. One fixed Zoom is simpler; animated Zoom preserves more of the image before and after the turn.
Use the timeline keyframe or curve controls when the turn starts too abruptly or stops mechanically. The keyframes and Curve Editor guide covers point timing and easing. Keep the first attempt to two keyframes. Extra points make the motion harder to diagnose.
Rotate Several Clips Without Creating a Mess
If several files from the same camera were recorded with the same wrong orientation, correct each source through Clip Attributes before building the edit. That keeps later timeline work consistent. Select multiple appropriate clips only when you have confirmed they all need the same correction.
For timeline-level rotations, set one instance correctly, copy it, select the destinations, and use Paste Attributes. Transfer Transform only when the destination clips should receive the same Rotation Angle, Zoom, Position, Anchor Point, and related transform values.
Paste Attributes is efficient but literal. A portrait phone clip and a landscape camera clip can receive identical numbers and produce completely different framing. Inspect every destination after the paste. If only the orientation is shared, Clip Attributes is often cleaner than copying an entire Transform block.
Adjustment clips can rotate everything below them over their active duration, which is useful for a deliberate sequence effect. They are the wrong repair for one sideways source because they can also turn titles, overlays, and correctly oriented footage. Fix the lowest level that is actually wrong.
Fix Common Rotation Problems
Rotation Angle is missing
Select a video item on the timeline, open the Inspector, choose Video, and expand Transform. An audio-only clip, transition, title, generator, timeline, or effect can expose different controls. Make sure you selected the picture you intend to rotate rather than an item above or below it.
The clip turns around a strange point
Check Anchor Point in Transform. Reset it to the center before adjusting Position. A moved anchor is useful for a door-like swing or a graphic pivot, but it complicates an ordinary orientation correction.
Black corners appear during a tilt or spin
The rotated rectangle no longer covers the entire canvas. Increase Zoom, animate Zoom through the turn, place a background beneath the clip, or accept the corners as part of the design. Cropping more pixels does not create coverage; it removes additional image area.
The image looks soft after rotation
Rotation itself can require interpolation, and a large Zoom magnifies the source. Check the original resolution, timeline resolution, proxy or optimized-media state, and Viewer quality before judging the final output. If the softness comes from severe enlargement, the durable fix is a better composition or higher-resolution source, not sharpening a heavily scaled clip.
One copy is upright and another is sideways
Inspect where the correction was applied. Clip Attributes belongs to the Media Pool source and can influence every use. Inspector Rotation Angle belongs to one timeline instance. Reset the unintended Transform rotation or move the correction to the level that matches your intent.
The Viewer is upright but the exported file is sideways
First render a short section and open the actual file in more than one normal player. Then check the timeline item for Rotation Angle, the source for Image Orientation, and the Deliver page for expected resolution and scaling. Files from phones and cameras can carry orientation metadata, and different ingest or playback paths may interpret that metadata differently. A baked timeline transform is usually more predictable than relying on a player to honor metadata.
If only one player displays the file sideways while others show it correctly, the export may contain orientation information that the player handles differently. If every player shows the same wrong result, return to the project and correct the source or timeline transform. Do not stack a second 90-degree fix until you know which layer supplied the first one.
The clip is upright but the timeline is the wrong shape
Leave rotation alone. Change the timeline resolution and mismatch scaling, then reframe the clip. This is common when an upright phone recording is placed in a landscape edit or a landscape sequence is repurposed for a vertical platform.
Reset the Smallest Wrong Setting
Transform has a reset control, and individual parameters can be returned to their defaults. Use the smallest reset that solves the problem. Resetting the entire Inspector can remove Position, Zoom, Anchor Point, keyframes, Composite settings, cropping, stabilization, and other deliberate work.
When a clip has several unexplained transforms, diagnose it in this order:
- Check source Image Orientation in Clip Attributes.
- Check Rotation Angle and Anchor Point in Transform.
- Check Zoom and Position.
- Check Crop and Dynamic Zoom.
- Check effects or adjustment clips above the shot.
- Check timeline resolution, mismatch scaling, and Deliver resolution.
This order follows the image from source interpretation through clip-level work to timeline and output. It is faster than adding compensating changes until the Viewer happens to look right.
Rotation Check Before Export
- Confirm whether the job was source correction, creative rotation, or a new timeline shape.
- Check every reuse of a source changed through Clip Attributes.
- Play the whole clip and inspect all four edges.
- Check the midpoint of every animated turn for exposed corners.
- Review Zoom at the final delivery resolution.
- Verify logos, titles, subtitles, and adjustment clips above the footage.
- Render a short proof and open the file outside Resolve.
- Inspect both landscape and vertical timelines separately when you maintain multiple versions.
The reliable workflow is to fix orientation at the source when the file is wrong, use Rotation Angle when the composition needs a turn, and set the timeline shape for the delivery. Once those three jobs stay separate, black bars, strange pivots, and sideways exports become much easier to trace.
