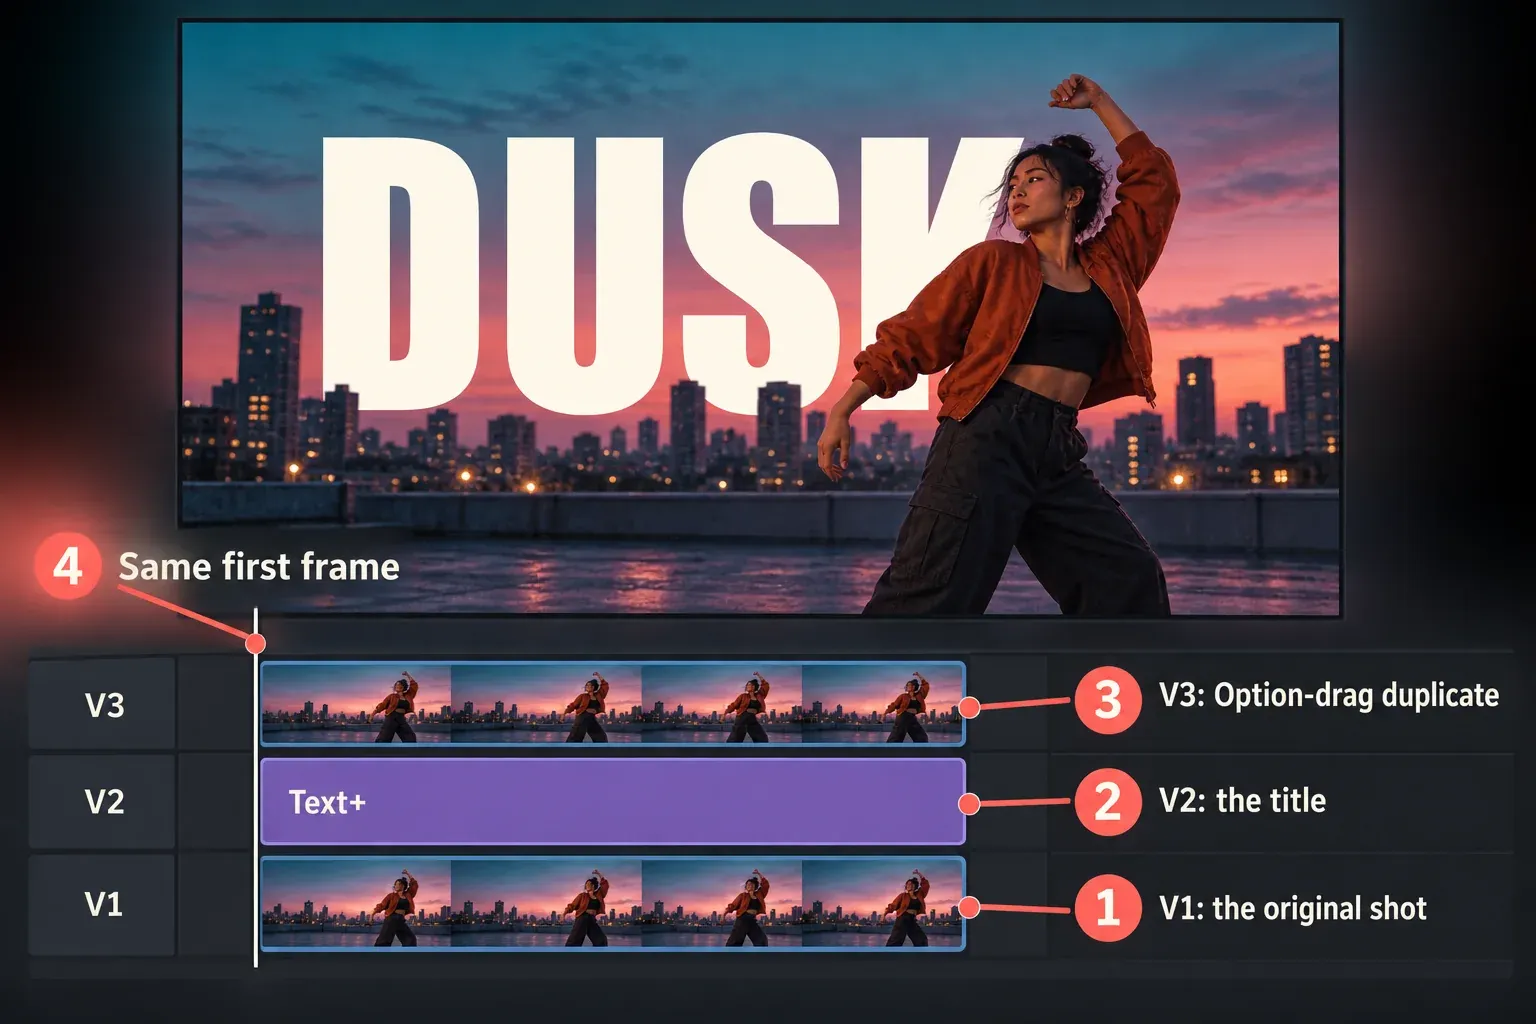
To put text behind a person in DaVinci Resolve, stack three layers on the Edit page: the original clip on V1, your title on V2 and a duplicate of the clip on V3. Then cut the person out of the V3 copy. In DaVinci Resolve Studio, click on them with Magic Mask on the Color page and connect that node's key output to an Alpha Output; in the free version, track a Curve window around the part of the person that crosses the letters. Everything else on V3 turns transparent, so the title shows through except where the person stands in front of it.
Magic Mask is the quick route when the person moves a lot. The free Curve window is enough when only a head and shoulders pass in front of the words, and a composite mode can do it with no mask at all when the lighting cooperates. Below are the layer stack, both Color page routes, the no-mask trick, the Fusion version for Text+ titles, how long tracking takes on common hardware, edge cleanup and fixes for the usual problems.
Pick a method for your shot
- Magic Mask on the Color page (Studio): the person walks, turns or gestures through the title. A few clicks and a track build the mask for the whole shot.
- Tracked Curve window (free): only part of the person overlaps the text, such as a head and shoulders in an interview. You mask just that part.
- Composite mode (free, no mask): the subject is darker than the text and the background is brighter, like a silhouette against a bright sky, or the mirror case. It takes seconds and fails on most other shots.
- Fusion with Text+ and two Merge nodes (free; Magic Mask node in Studio): the title is animated in Fusion, or you want the whole effect inside one clip.
Build the three-layer stack
- Trim the shot on V1 first. Set its final length before you duplicate it. Trimming afterward means trimming two clips in sync.
- Add the title on V2. Open Effects Library > Toolbox > Titles and drag Text or Text+ onto V2 above the shot. The manual's list of title generators describes Text+ as the Fusion-based title with more styling and animation options, while Text supports rich text. For one or two huge words I'd use Text+, because it has more styling and animation options. The guide to adding text in Resolve covers both titles in detail.
- Size and place the title. Big, heavy letters sell the effect, since the person has to cover a clear part of them. Place the title so the person crosses it with the head, shoulders or torso.
- Duplicate the shot onto V3. Select the V1 clip, hold Option (Alt on Windows) and drag it straight up to V3. The manual's section on duplicating clips says to keep holding Option until you release the mouse button, or you'll move the clip instead of copying it.
- Check the alignment. Park the playhead on the first frame of the V1 clip and confirm that the V3 copy starts on the same frame. One frame of offset shows up as a doubled outline the moment the person moves.
Right now V3 covers everything and the title is hidden. That's expected. To see the text while you adjust it, select the V3 clip and press D, which toggles a clip's enabled state, then press D again before you build the mask.
Studio: cut out the person with Magic Mask
Magic Mask is a DaVinci Resolve Studio feature. The Magic Mask chapter of the manual describes version 2 as a click-guided tool for people and objects, with a paint tool for quick fixes. If you're unsure which version you run, the free vs Studio comparison lists what else changes.
- Select the V3 clip on the Color page. Open the Color page and click the V3 clip in the thumbnail timeline. If you build the mask on V1 by mistake, nothing happens to the title, because V3 still covers it.
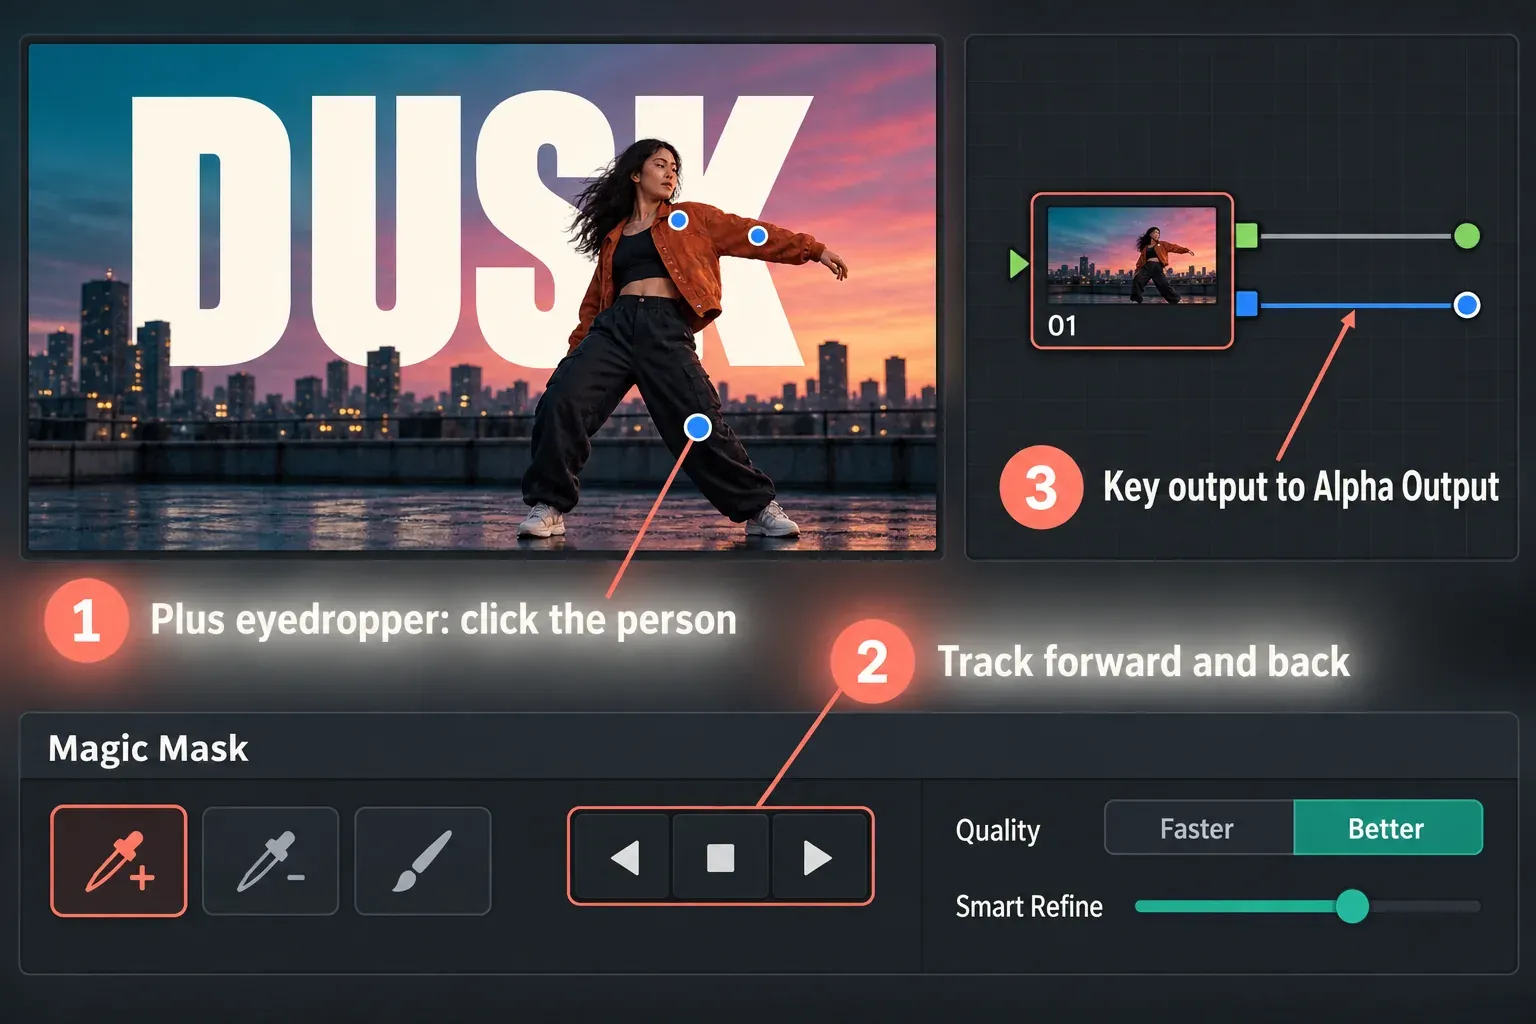
- Click on the person. Open the Magic Mask palette, choose the plus eyedropper from the click tools and click on the person in the Viewer. A positive click shows in blue. If the mask grabs something else, such as a second person or a chair, use the minus eyedropper to make a subtractive click there, shown in red. The manual's click workflow notes that clicks are live: drag one to a new spot and the mask updates without a new click.
- Track the clicks. Start on a frame where the person is fully visible, then press the track forward and track backward buttons in the palette. All clicks track together, and the mask is generated live for every frame, according to the tracking section.
- Add the Alpha Output. Right-click an empty gray area of the Node Editor and choose Add Alpha Output. An Alpha Output appears under the Node Tree output at the right.
- Connect the key output. Drag from the key output of the Magic Mask node to the Alpha Output. The manual's Alpha Output chapter explains that this output creates clip transparency for composites against clips on lower tracks. The person stays, the rest of V3 disappears, and your title shows behind them on both the Color and Edit pages.
- Check the matte. Press Shift-H for Highlight or Option-Shift-H for a black-and-white matte, as the Highlight controls describe. Scrub through the shot and watch the area where the person crosses the letters.
The paint tool in the palette works frame by frame and doesn't track. The manual keeps it for short hiccups. For anything longer than a few frames, add or move clicks instead. The full palette is covered in our Magic Mask guide.
Clean the edge where it crosses the letters
Only the part of the edge that crosses the title matters. Outside the letters, V3 and V1 show the same pixels, so a loose mask there is invisible. That makes the cleanup much smaller than it looks.
- Quality: set it to Better for the final track. The mask adjustment controls describe Faster as a lower quality mask suited to garbage matting and Better as the detailed mode. In Better, Smart Refine grows or shrinks the mask without adding softness.
- Matte Finesse: Shrink or Grow moves the edge in or out, Opening or Closing plugs holes and cleans up a ragged matte, and Clean White, Denoise and Black or White Clip tidy the matte. The Post Filter uses the original image to bring back fine detail in sharp edges or hair.
- Consistency: raises temporal smoothing against edge jitter in frizzy hair or translucent clothing. It starts at 0, costs more processing at higher values and can follow fast motion less closely. It also needs each click tracked over several frames, so track first, then raise it.
- Soft, see-through edges: the manual's Magic Mask notes say it doesn't specialize in soft translucent edges, which the HSL, Luma and 3D keyers handle. I'd move the title so flyaway hair or a veil sits above it, because no setting makes that edge as clean as a shoulder line.
Free version: track a Curve window
The free version has no Magic Mask, but you only need to mask the part of the person that overlaps the letters. A head and shoulders crossing a title in an interview is a simple shape with a handful of points, and the tracker moves it with the person.
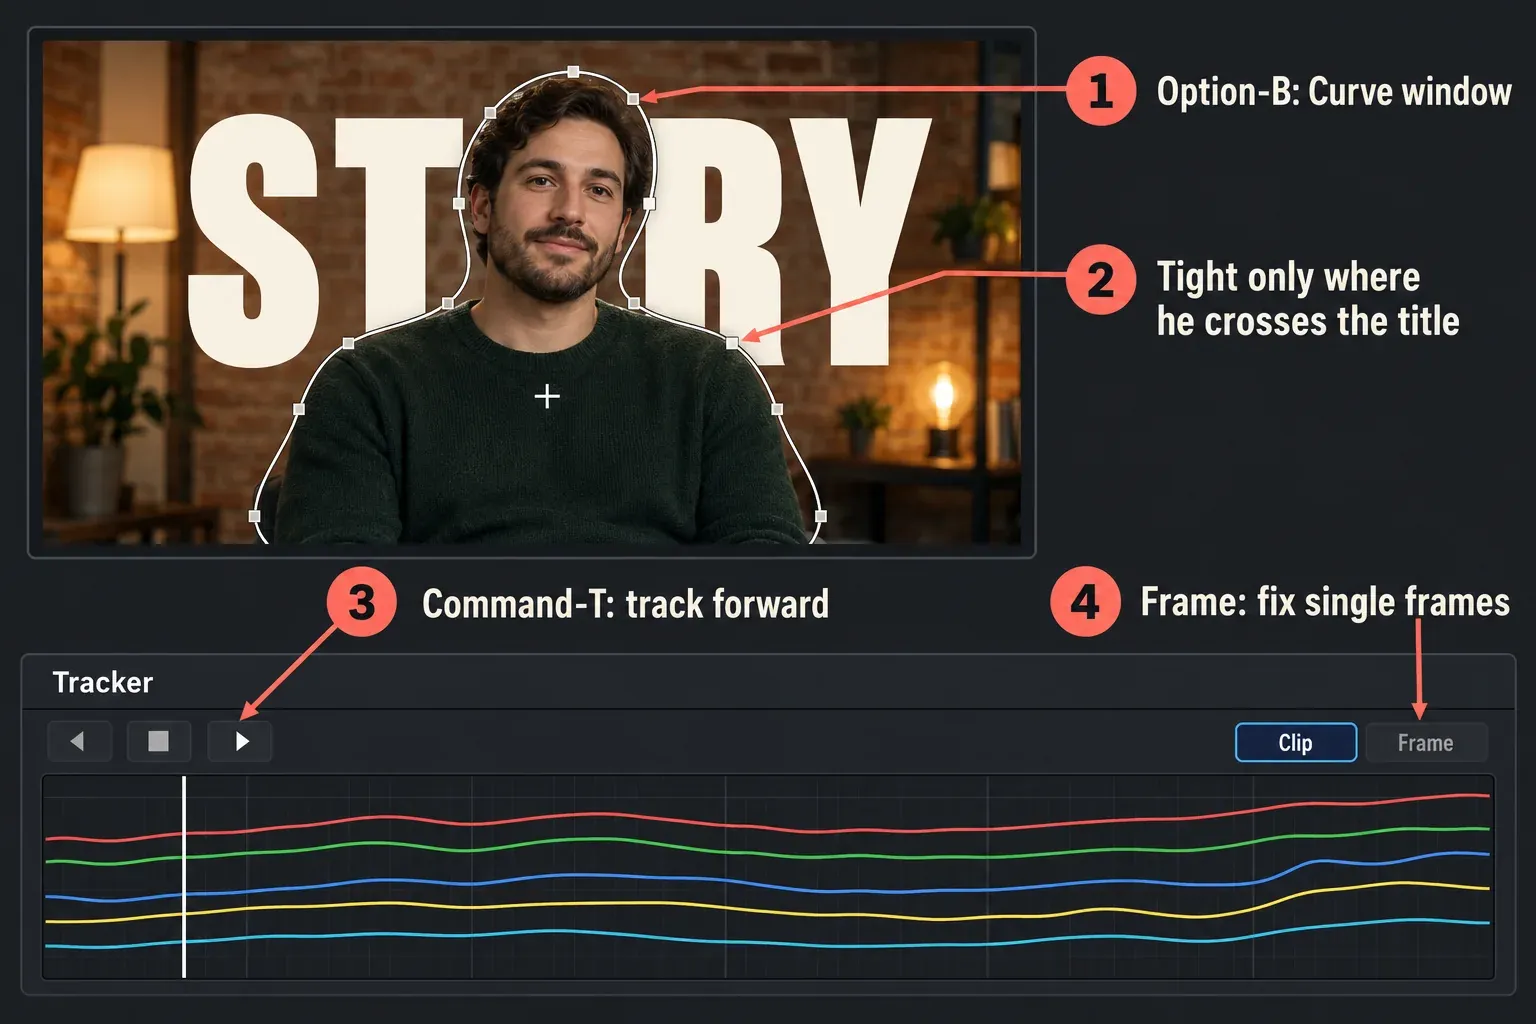
- Add a Curve window. On the Color page, select the V3 clip and press Option-B. The manual's node shortcuts list Option-B as adding a serial node with a Curve window.
- Draw around the overlap. Click points around the part of the person that crosses the title, drag while you click to make a Bezier curve, and click the first point to close the shape, as the Curve window steps explain. Keep the line tight against the person where it crosses letters and loose everywhere else.
- Connect the Alpha Output. Right-click an empty gray area of the Node Editor, choose Add Alpha Output and drag from that node's key output to it. Inside the window, V3 stays; outside, the title shows.
- Track the window. Open the Tracker palette and press Command-T to track forward, Option-T to track in reverse and Command-Option-T to stop. The tracker shortcuts also list Option-Right Arrow and Option-Left Arrow for one frame at a time.
- Fix the frames the tracker misses. The tracker moves the whole window with the subject; when an arm swings or the head turns, the outline itself needs adjusting. Switch the Tracker palette to Frame mode for manual frame-by-frame window adjustments on those frames.
- Soften the cut. Add a small amount of softness in the Window palette so the cut edge looks no sharper than the rest of the picture.
When the background behind the letters is a plain sky or wall, a key can do the outline for you. The manual's green screen example builds the same tree with a Qualifier key, inverted, feeding the Alpha Output, plus a tracked Power Window as a garbage matte. The 3D Keyer guide covers that kind of key. For a person who moves across most of the frame, the window route turns into rotoscoping, and that's the shot where Magic Mask in Studio saves the most time.
No mask: the composite mode trick
Some shots need no V3 copy at all. Select the title on V2, open the Inspector's Video tab and set Composite Mode to Darken or Lighten. Hovering over a mode in the list previews it in the Viewer, according to the composite mode preview note.
The trick comes straight from the math. The manual's composite mode list says Darken compares each color channel and keeps the darker value, and Lighten keeps the lighter one. That gives two working cases:
- Darken: the subject is darker than the text and the background is brighter. A dark silhouette against a bright sky with a mid-tone title hides the letters inside the silhouette and keeps them on the sky.
- Lighten: the mirror case. A brightly lit subject against a dark background, with a title darker than the subject and lighter than the background.
It fails whenever the subject has tones on both sides of the text, such as a white shirt under a dark jacket. The letters show through the shirt. Because the comparison runs per channel, a colored title can also pick up odd colors where its channels cross the picture. I'd reach for it on silhouettes and sunset shots and use a mask everywhere else.
Fusion: Text+ and two Merge nodes
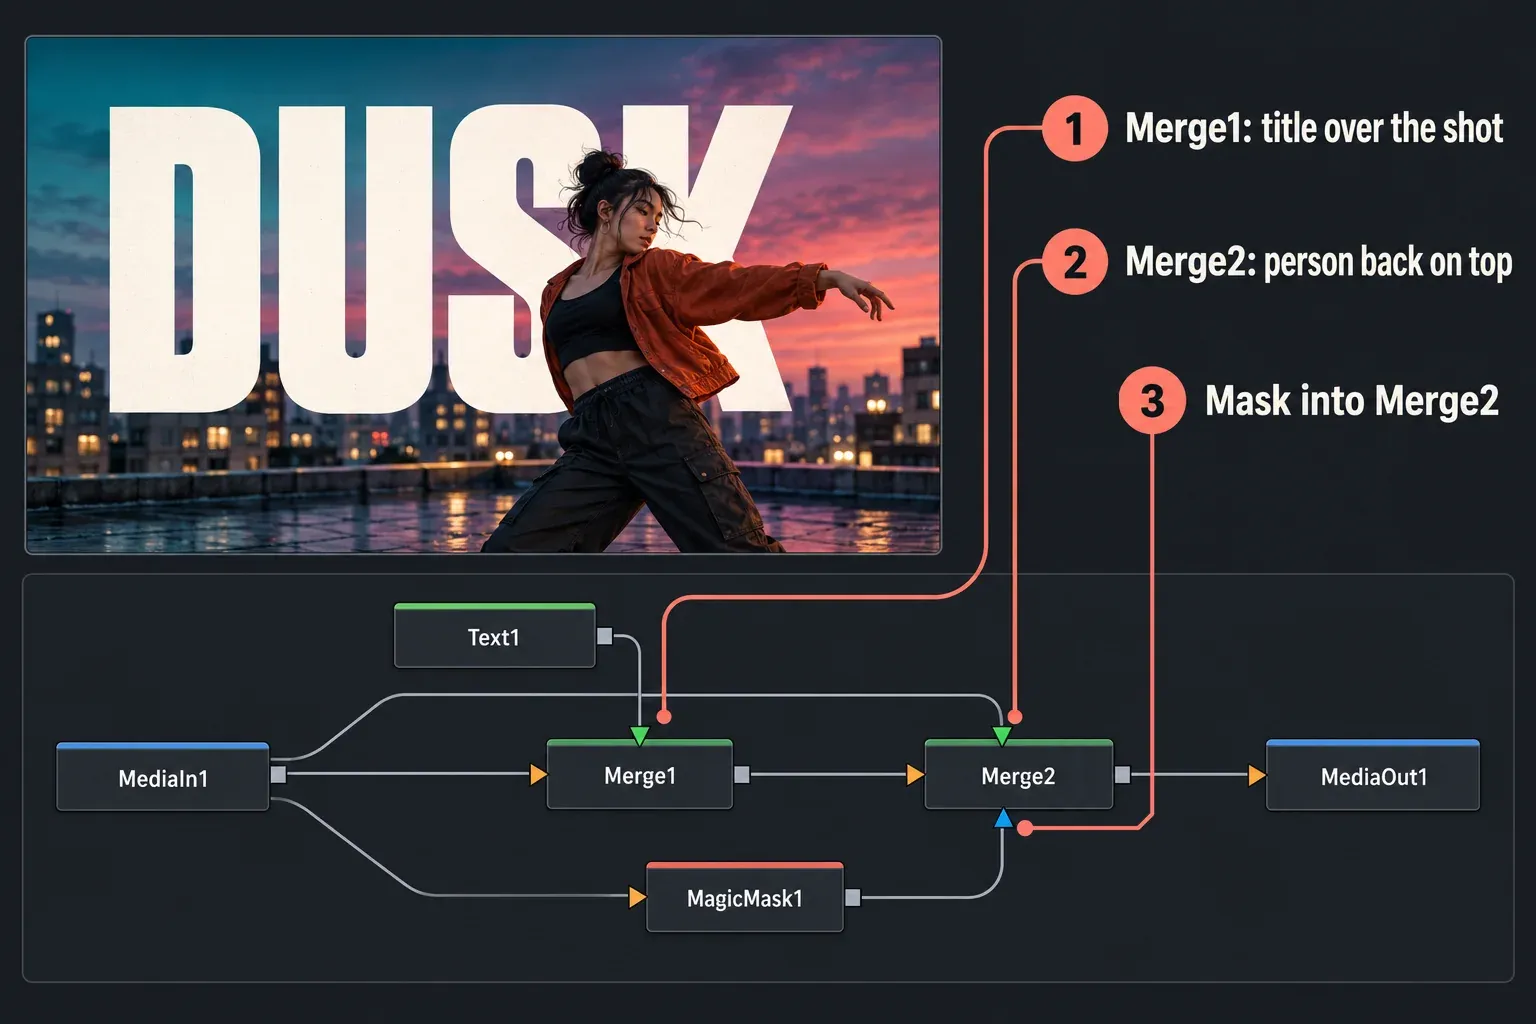
If the title is animated in Fusion, or you'd rather keep everything in one clip, build the same layers as a node tree. Select the shot on the Edit page and open the Fusion page, where MediaIn1 feeds MediaOut1.
- Add Text+. Press Shift-Spacebar to open the Select Tool dialog, type "text" and press Return. Type and style the title in the Inspector.
- Merge the title over the shot. Add a Merge node and connect MediaIn1 to its background input first, then Text1 to its foreground input. The Merge node page recommends connecting the background before the foreground.
- Merge the person on top. Add a second Merge. Connect Merge1 to its background and a second line from MediaIn1 to its foreground. Merge2 then goes to MediaOut1.
- Mask the foreground. Merge2's effect mask input limits where the foreground is merged: white shows the person, black lets the title through. In Studio, add a Magic Mask node, connect MediaIn1 to its orange input, click on the person in the Viewer (Option-click and drag for a subtractive point), track it in the node's Tracking tab and connect its output to Merge2's effect mask. The Fusion Magic Mask page confirms its output can feed any mask input. In the free version, draw a Polygon or B-Spline mask instead and animate it; the rotoscoping guide and the Fusion tracking guide cover both parts.
The Fusion tree replaces the V2 and V3 layers, so the Edit page timeline keeps a single clip. I'd use it when the title animation lives in Fusion anyway, because keyframes, mask and text then sit in one place.
How long Magic Mask tracking takes
Tracking is the step you repeat. Every new click has to be tracked through the shot, and the mask is generated live, so a change sends you back to the track buttons. To size that wait, I took the published Magic Mask tracking results from two platforms. The PugetBench public results database averages user uploads for Resolve 20.0 to 21.1 in both Faster and Better modes; its benchmark method page explains that the tests run through Resolve's scripting API, and the test clip's resolution isn't published. postPerspective timed Magic Mask tracking on three HP workstations with ARRI, RED and Sony footage. The last column converts each speed into the time for a 5-second shot at 24 fps (120 frames).
| Hardware | Source | Tracking speed | 5-second shot |
|---|---|---|---|
| RTX 5090 | PugetBench | Faster 32.2 fps (336 uploads), Better 29.5 fps (248) | 3.7 s Faster, 4.1 s Better |
| RTX 4090 | PugetBench | Faster 31.6 fps (54), Better 29.8 fps (24) | 3.8 s Faster, 4.0 s Better |
| RTX 5080 | PugetBench | Faster 30.3 fps (600), Better 27.1 fps (483) | 4.0 s Faster, 4.4 s Better |
| RTX 5070 Ti | PugetBench | Faster 29.0 fps (222), Better 25.9 fps (87) | 4.1 s Faster, 4.6 s Better |
| RTX 5070 | PugetBench | Faster 24.4 fps (181), Better 22.0 fps (130) | 4.9 s Faster, 5.5 s Better |
| RTX 5060 Ti | PugetBench | Faster 18.4 fps (93), Better 16.6 fps (60) | 6.5 s Faster, 7.2 s Better |
| Radeon RX 9070 XT | PugetBench | Faster 12.7 fps (41), Better 11.9 fps (23) | 9.5 s Faster, 10.1 s Better |
| Apple M4 Max, 40-core GPU | PugetBench | Faster 6.9 fps (20), Better 6.2 fps (3) | 17.4 s Faster, 19.3 s Better |
| Apple M4 Pro, 20-core GPU | PugetBench | Faster 3.8 fps (13), Better 3.6 fps (4) | 31.9 s Faster, 33.3 s Better |
| RTX PRO 6000 workstation (HP Z4 G6i) | postPerspective | 28 fps ARRI and Sony, 7 fps RED | 4.3 s; 17.1 s with RED |
| RTX PRO 5000 laptop (HP ZBook Fury G1i) | postPerspective | 20 fps ARRI, 15 fps RED, 21 fps Sony | 5.7 to 8.0 s |
| RTX PRO 2000 laptop (HP ZBook X G1i) | postPerspective | 8 fps ARRI, 7 fps RED, 10 fps Sony | 12.0 to 17.1 s |
Across 12 systems on two platforms, Faster-mode tracking runs from 3.8 fps on an M4 Pro to 32.2 fps on an RTX 5090. The median of the nine PugetBench averages is 24.4 fps, about 5 seconds for a 5-second shot. Better mode costs a median 9.7% of speed, with a range of 5.6 to 10.5%, on the seven cards with at least ten uploads in both modes. The footage counts too: the same RTX PRO 6000 workstation tracked ARRI and Sony clips at 28 fps and RED at 7.
My verdict: on a current NVIDIA desktop card, tracking is never the slow part of this effect, so I'd go straight to Better and retrack freely. On an M4 Pro or a laptop GPU, each pass over a 5-second shot takes 12 to 33 seconds, so place every click on one frame, track once and render the mask in place as soon as it looks right. PugetBench's seconds compare machines more than they predict your exact clip, since the test resolution isn't public. The GPU guide for DaVinci Resolve covers the cards in more depth.
Render the mask in place for smooth playback
The Magic Mask is generated live for every frame. Once the mask is right, you can turn it into rendered frames so Resolve no longer builds it on the fly: open the Magic Mask palette's three-dot options menu, choose Render in Place Magic Mask, and set a location for the cached frames. The manual's external matte steps say this creates an external matte node from those frames, which you can then use as the alpha source.
The Fusion route has its own option. On the Edit page, right-click the clip and choose Render in Place. The Render in Place section explains that it bakes all effects of the clip into a new media file next to the source, and Decompose to Original brings the editable clip back. Our Render in Place guide covers the codec choice, and the render cache guide covers the automatic alternative.
Fix common text-behind-person problems
- The title vanished when you added the duplicate. V3 is still opaque. Add the Alpha Output on the V3 clip's node tree and connect the mask node's key output to it.
- Nothing changes after masking. The mask was built on the V1 clip. Select V3 in the Color page's thumbnail timeline and rebuild it there.
- The person looks doubled when they move. The V3 copy is offset from V1. Line up the first frames again, or redo the Option-drag straight up.
- Letters show through the person. The mask has a hole. Add a positive click on that area, or use Matte Finesse Closing or Grow.
- The person looks pasted on. V1 and V3 carry different grades. Give V3 the same correction in a node before the mask node, as the manual's Alpha Output example does with node 1.
- The edge flickers on hair. Switch to Better, track every click, then raise Consistency a little at a time. If it still flickers, move the title away from the hair.
- Playback stutters. Render the mask in place, or turn to the slow playback fixes.
- The text isn't visible at all, even with V3 off. That's a title problem rather than a mask problem; the text not showing guide walks through the causes.
Text behind a person FAQ
Can you put text behind a person in the free version of DaVinci Resolve?
Yes. Use a tracked Curve window with an Alpha Output on the Color page, a Polygon or B-Spline mask in Fusion, or the Darken or Lighten composite mode when the lighting allows it. Magic Mask needs DaVinci Resolve Studio.
Why does my text disappear when I put the duplicate clip on V3?
The duplicate covers the whole frame until you give it transparency. Connect a mask's key output to an Alpha Output on the V3 clip, and the title shows everywhere except where the person stands.
Do I need Fusion to put text behind someone?
No. The three-layer stack with an Alpha Output on the Color page works on ordinary Edit page clips. Fusion is useful when the title is animated there or when you want a single clip.
Can the text move while it stays behind the person?
Yes. Keyframe the title on V2, or animate Text+ in Fusion. The mask on V3 follows the person, so any title animation underneath keeps working.
Does Magic Mask work for objects as well as people?
Yes. The manual describes Magic Mask version 2 as isolating one or more people or objects, guided by your clicks, so a car or a product can sit in front of a title the same way.