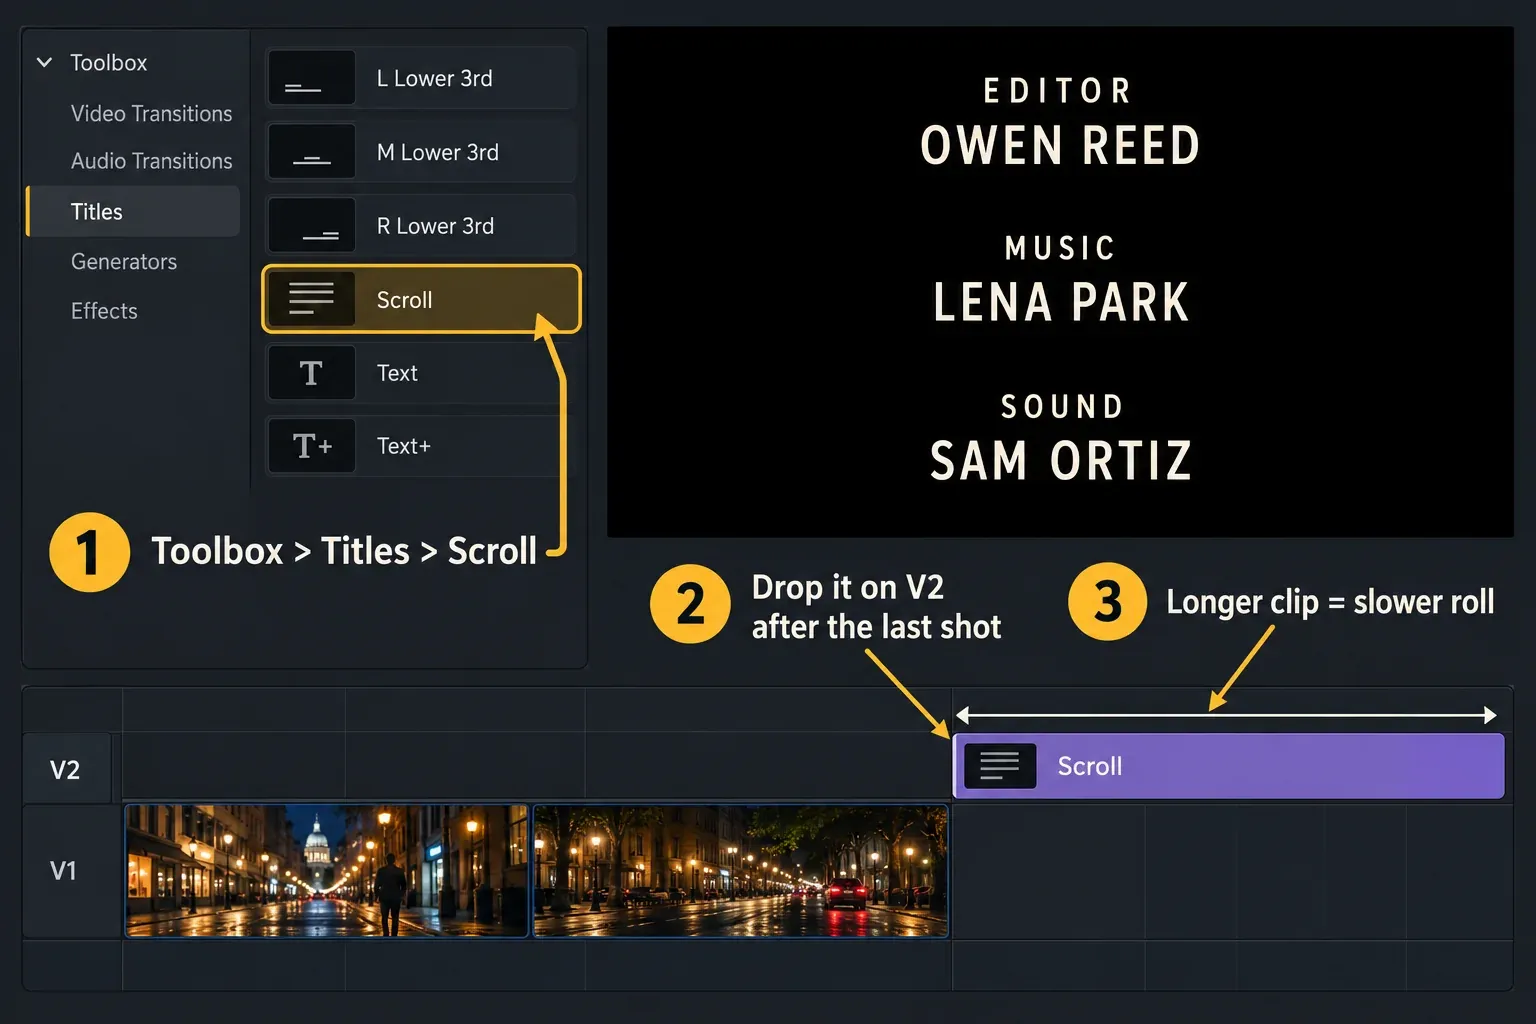
To make rolling credits in DaVinci Resolve, drag the Scroll title from Effects Library > Toolbox > Titles onto the timeline after your last shot (or onto V2 above it to roll over picture), type or paste the credits into the Inspector, and set the clip length: the longer the clip, the slower the roll. That works in the free version and is enough for a channel outro or a short film.
For credits that stay crisp on a big screen, the roll has to move a whole number of pixels every frame, about 3 at HD and 6 at UHD, and the Scroll title can't show you that number. That's why I build long or festival credits in Fusion, where a Transform node moves in exact pixel steps. Below are the Scroll steps, formatting that survives motion, the speed math, the Fusion setup, two-column layouts and the point where a dedicated credits tool saves you hours.
Which credits method to use
- Scroll title (free, Edit page): end credits for a YouTube video, a short film or an event recap. The clip length sets the speed.
- Text+ and a Transform in Fusion (free): an exact speed in pixels per frame, tab-stop columns and a predictable runtime. The right choice for a film master or when a Scroll title shimmers in the render.
- Keyframed Text title (free): credits that move top to bottom, stop in the middle of the screen or slide sideways.
- Cinecred or Endcrawl: hundreds of names kept in a spreadsheet, with the runtime fitted for you. You import the finished render into Resolve.
Make rolling credits with the Scroll title
- Decide what sits under the credits. For credits over black, leave the tracks below empty. For credits over picture, the title goes on a track above the shot, usually V2.
- Add the Scroll title. Open Effects Library > Toolbox > Titles and drag Scroll onto the timeline. A dropped title lands at 5 seconds by default, according to the Reference Manual's section on adding titles, which is far too short for more than a few lines.
- Enter the credits. Select the clip and open the Inspector. The text field is in the Title panel. Type the credits there, or paste them from a document with one line per role or name.
- Set the length. Choose Clip > Change Clip Duration (Command-D on a Mac) and type a duration in timecode or frames. Dragging the end of the clip works too, but a typed value lets you match the music exactly.
- Play it from the start and adjust. If the names fly past, make the clip longer. If the roll drags, make it shorter or tighten the line spacing.
The Scroll title always runs from the bottom of the screen to the top. The manual's list of title generators describes it that way and adds two details that shape the whole job: it supports rich text, and the duration of the clip in the timeline determines the speed. There's no speed field, so length is your only speed control.
Format credits that read while they move
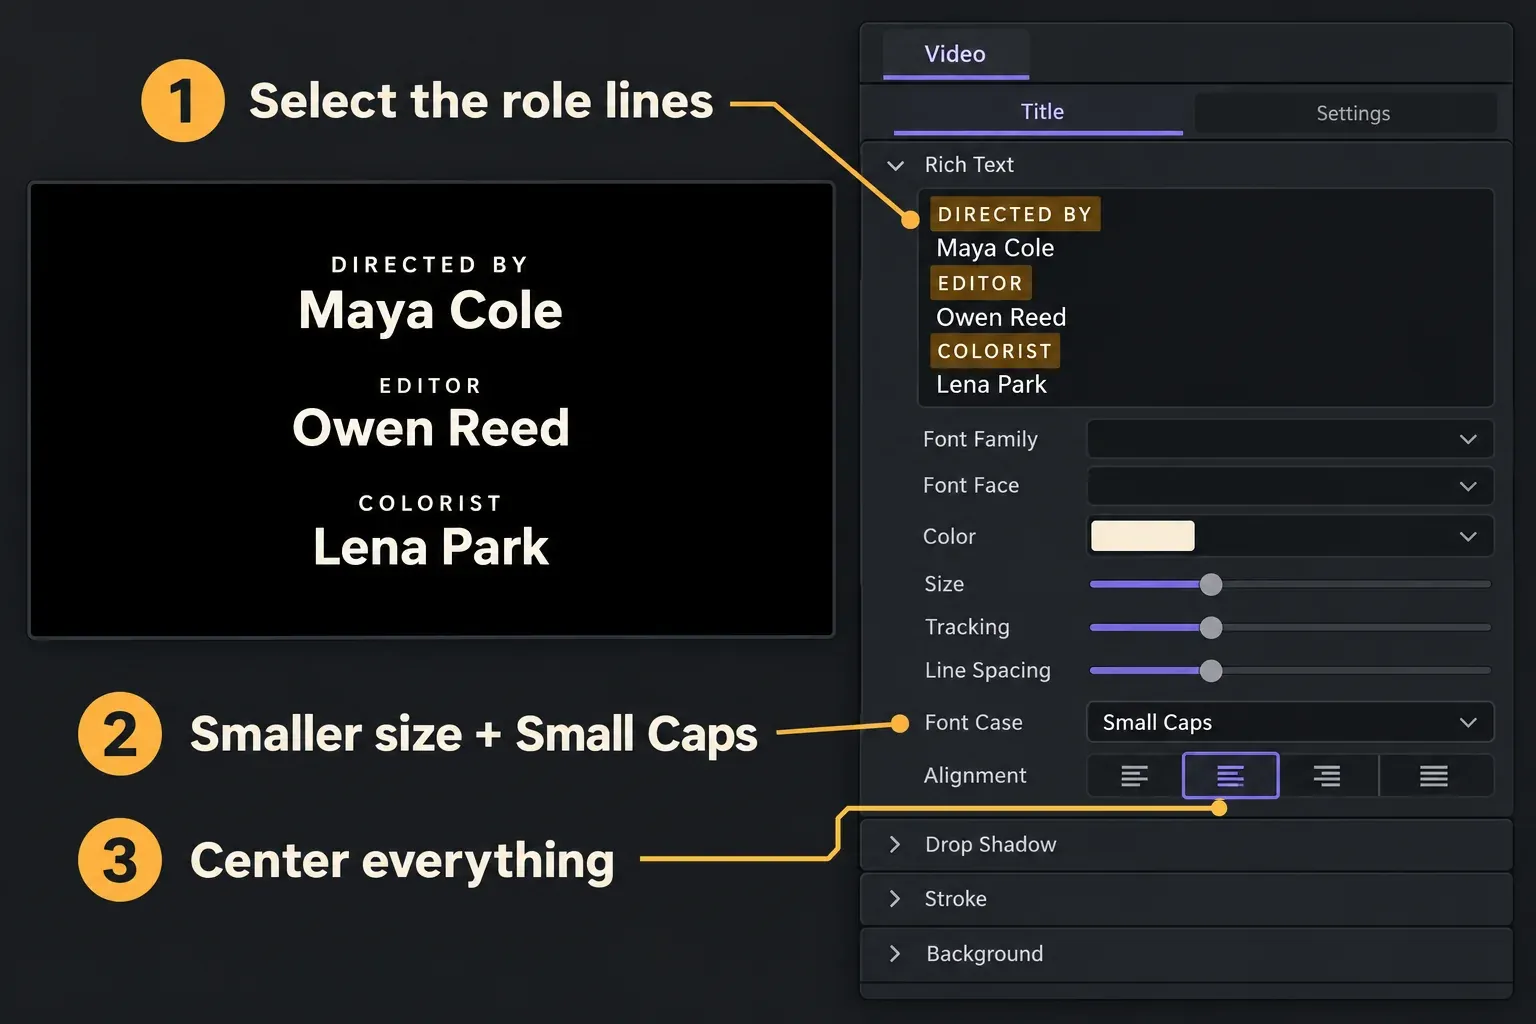
Every line of a Scroll title shares one text field, but rich text lets you style any selected part of it. The manual's shared title parameters list Font, Color, Size, Tracking, Line Spacing, Font Case and Alignment, and they apply to whatever you select. With nothing selected, a change hits the whole block.
- Make the hierarchy obvious. Set roles smaller, or in Small Caps or All Caps from Font Case, and names larger. Viewers read names first, so names get the weight.
- Center the block. Centered role-over-name stacks are the easiest layout to read in motion. For side-by-side columns, use one of the two-column methods below.
- Skip repeated spaces as columns. The ScrollX guide to Resolve credits warns against faking columns with spaces, because the spacing breaks when a name changes, a font is replaced or the text renders on another system.
- Pick a solid weight. Endcrawl's jitter checklist says to avoid thin and hairline strokes, which rules out the light weights of most fonts and many serif fonts.
- Stay inside Title Safe. Turn on the safe area overlay in the Viewer. The custom safe area defaults are 90% for Title Safe and 93% for Action Safe, and you can change them in the Editing panel of the User Preferences.
- Help credits over busy picture. The Title panel also holds Drop Shadow, Stroke and Background groups. A soft shadow or a dark Background keeps white text readable over a bright shot.
If a font you need isn't in the Font menu, follow the steps for adding fonts to Resolve and restart the app. The guide to adding text in Resolve covers the other title types if you only need a static end card.
How fast should credits scroll?
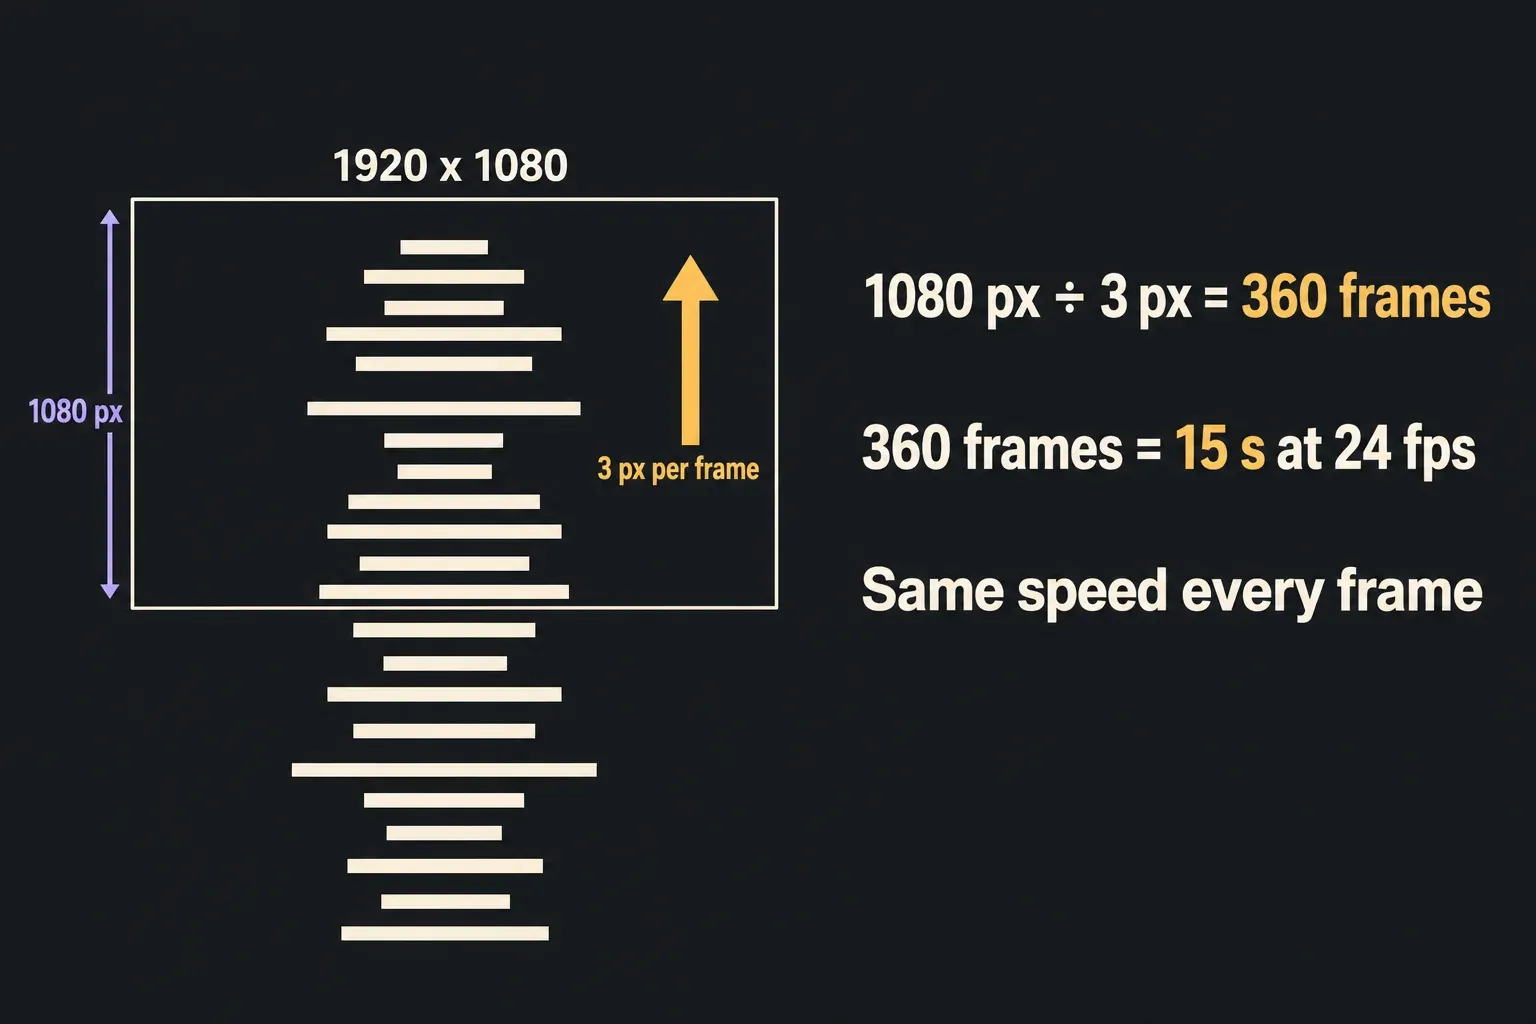
Credits look smooth when they move the same whole number of pixels on every frame. Joe Shapiro spells it out in a 2022 Blackmagic forum thread about end credits jitter: the roll has to move a constant number of pixels per frame, and only a small number of rates work. When the speed falls between pixels, the edges of the letters land on slightly different pixel rows from frame to frame, and that's the shimmer that shows up on a big screen.
These are the published speed recommendations with enough detail to compare:
| Source | HD or 2K | UHD or 4K |
|---|---|---|
| Endcrawl help center | 3 pixels per frame; stick to 3 or 4 if at all possible | 6 pixels per frame |
| Endcrawl blog, John Eremic | 3; 4 is already pushing it, 2 is very slow | 5 to 7 |
| Blackmagic forum, Igor Riđanović (2022) | 1, 2 or 3 at 23.976 fps | Not given |
| Blackmagic forum, Jean Claude (2018) | About 3 to 4 | About 4 to 7 |
| Lift Gamma Gain, Francis Hanneman (2017) | 3 as the standard; 2 for theatrical, 4 for HDTV | Not given |
Across these five sources on three platforms, the median for HD and 2K is 3 pixels per frame, with a range of 1 to 4. For UHD and 4K, three sources on two platforms put the median at 6, with a range of 4 to 7. My starting point is 3 for HD and 6 for UHD, because that's where the sources agree and both give the same reading time: one screen height passes in 360 frames.
When the roll has to end on a music cue, I change the layout and keep the speed. Fewer blank lines, one more column or a static card at the end all change the runtime without moving to a fractional speed that brings the shimmer back.
Work out how long the roll runs
A roll has to carry the whole credits block plus one screen height, so the first line can enter from below and the last line can leave at the top. The ScrollX guide defines scroll speed the same way, as total vertical travel divided by clip duration. That gives a simple formula:
- Frames = (credits block height + frame height) ÷ pixels per frame.
- At 3 pixels per frame, a 1080-pixel screen height takes 360 frames, which is 15 seconds at 24 fps.
- A block five screens tall (5,400 pixels) plus one screen of travel is 6,480 pixels. At 3 pixels per frame that's 2,160 frames, or 90 seconds at 24 fps.
- At UHD, the same layout is twice as many pixels and runs at 6 pixels per frame, so the runtime stays the same.
Why a Scroll title can shimmer
The Scroll title works out its speed from the clip length and never shows it, so you can't set or check whole-pixel movement. Some lengths render cleanly, others shimmer, and the only way to know is a test render. For a YouTube end screen, that's fine. For a film you'll project or deliver to a festival, I'd build the roll in Fusion, which is also where Igor Riđanović (2022) and Marc Wielage (2025) point on the Blackmagic forum for professional-looking credits.
Build exact-speed credits in Fusion
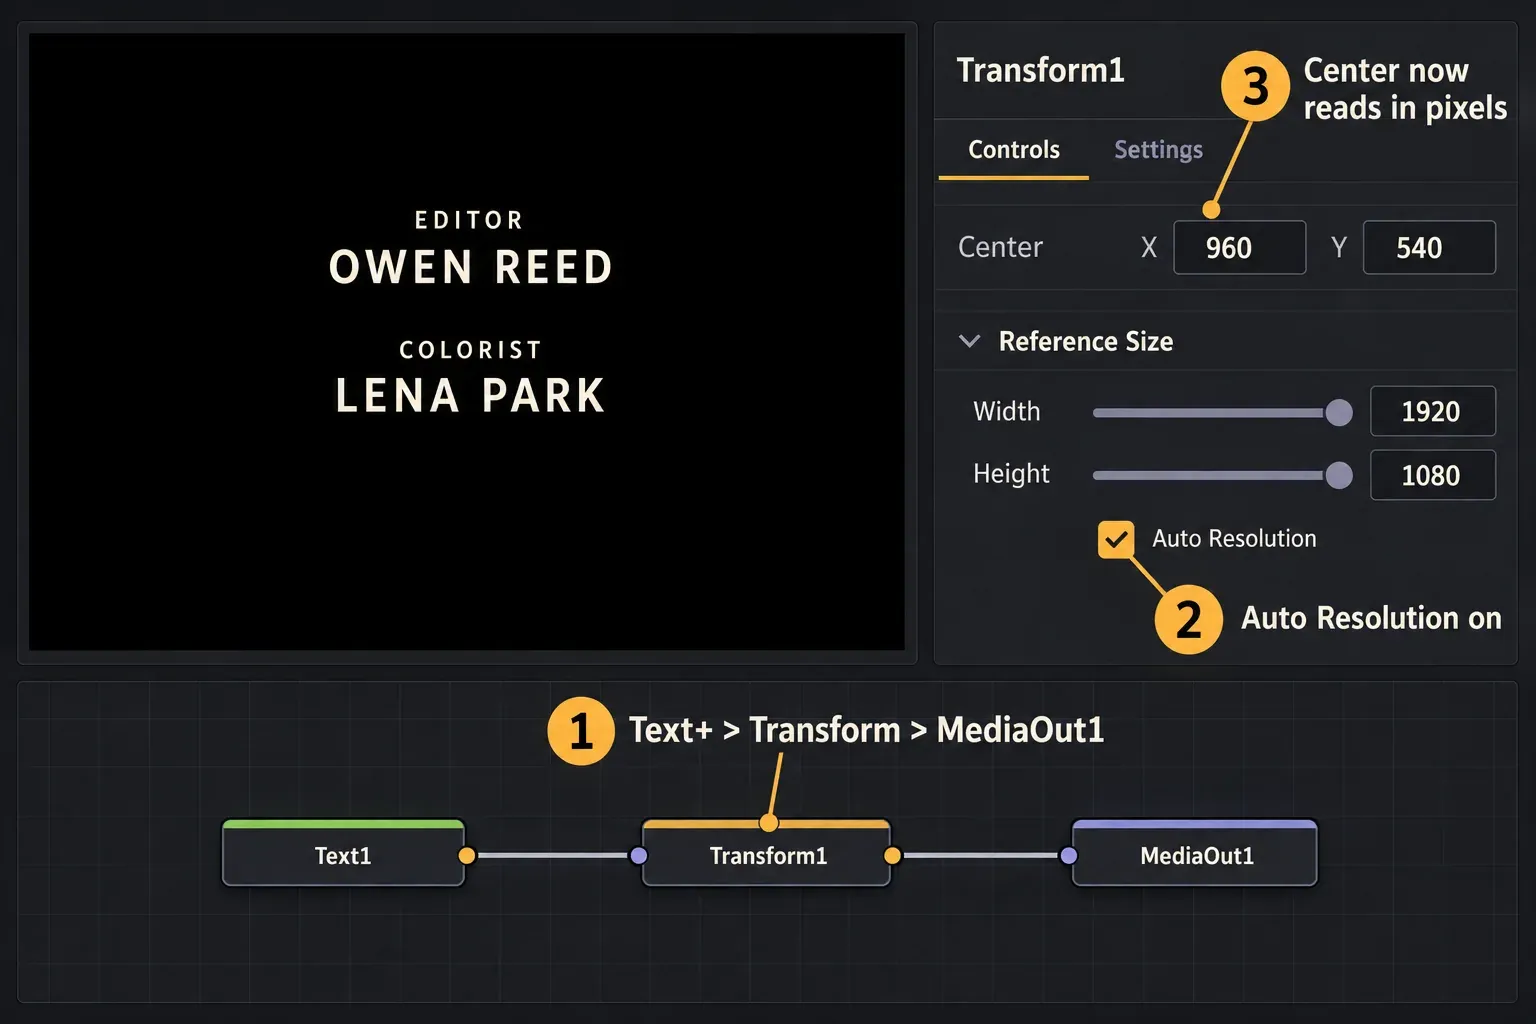
The Fusion route gives you a roll that moves exactly 3 or 6 pixels per frame, and it costs nothing extra. The setup is three nodes: Text+ for the credits, a Transform to move them, and MediaOut1 to send the result back to the timeline.
- Add a Fusion Composition. On the Edit page, drag Effects Library > Toolbox > Effects > Fusion Composition onto V2 above the end of the film, give it the frame count from the formula above, and open it on the Fusion page.
- Add the nodes. Add a Text+ node and a Transform node, then connect Text+ to the Transform and the Transform to MediaOut1.
- Type the credits into Text+. Use the Styled Text field and set Line Spacing for the gap between lines. Text+ on its own gives all the text one style; to make roles smaller than names, right-click in the Styled Text field and add the Character Level Styling modifier, then style the selected characters in the Modifiers tab.
- Switch the Transform to pixels. In the Transform node's Reference Size controls, turn on Auto Resolution, or set Reference Width and Height to your timeline size. The manual's Reference Size section explains that this doesn't change the image; it only shows Center in pixels instead of values between 0 and 1.
- Place the start. On the first frame, lower Center Y until the first line of credits sits just below the bottom of the frame, and set a keyframe.
- Place the end. On the last frame, set Center Y to the start value plus 3 times the number of frames between the two keyframes (6 times at UHD), and set a second keyframe.
- Make the motion linear. Open the Spline Editor, select both keyframes and press Shift-L. The default smooth keyframes ease in and out, so the speed changes at both ends.
- Check two neighboring frames. Step forward one frame at a time. Center Y should rise by exactly 3 on every frame.
On the same 2022 forum thread, Gordon Pearce describes this exact setup: set the Transform's Reference Size to the output resolution so it places the credits in integer pixel steps, then move it only by whole pixels, with a bit of care in the Spline Editor.
If you'd rather type one line than set keyframes, an expression does the same job. Type = in the Center field, press Return and enter:
Point(0.5, 0.5 + 3/1080*(time - 0))Expressions see Center as values between 0 and 1, even with Reference Size on, so 3/1080 is 3 pixels of a 1080-line frame; use 6/2160 at UHD. time returns the current frame number, according to the manual's SimpleExpression section. Replace the 0 with your comp's first frame if it doesn't start at 0, because Project Settings > Fusion > Default Start Frame can make compositions start at another number, such as 1000. With the expression, place the start position in the Text+ node's own Layout controls instead.
For more Text+ techniques, such as text appearing letter by letter, see the Text+ typewriter effect guide. The Fusion hub covers the basics of nodes and the Inspector.
Make two columns of credits
The classic crew layout puts the role on the left, aligned to a center gutter, and the name on the right. Resolve gives you two ways to build it.
Tab stops in Text+. Text+ has eight tab stops, and every tab character in the text snaps to them. On each line, type a tab, the role, another tab and the name. Then set Tab 1 slightly left of center with right alignment, and Tab 2 slightly right of center with left alignment. In the manual's Tab Spacing controls, Position runs from -0.5 to 0.5 with 0 at the center, and Alignment runs from -1 (left) to 1 (right). You can also paste tabbed text from a plain text editor.
Two Scroll titles side by side. On the Edit page, put a roles title and a names title on two tracks, with identical clip length, font size and line spacing, and move each one sideways with Position X in the Settings panel. In a 2025 forum thread on long scrolling credits, one user reports playing several Scroll titles together as overlays without timing problems by keeping the number of lines equal. So every role needs a matching line in the names title, even when it's an empty line.
I'd use the Text+ tabs for anything longer than a page of names, because one text block can't drift out of line with another, and a name change doesn't need a matching edit in a second title.
Static cards, a final hold and top-down credits
- Opening cards before the roll. Main titles, lead cast and company logos often work better as static cards that fade in and out, and only the long crew list rolls. Put Text titles before the Scroll clip.
- A final hold. End with a static card, such as a logo or a dedication, as a separate Text title after the roll. That also gives you a clean way to fill time to the end of the music.
- Top-to-bottom credits. The Scroll title only moves upward. For a downward roll, keyframe Position Y on a Text title, as Jean Claude suggests in the 2018 jerky scroll thread, or reverse the direction of the Transform keyframes in Fusion.
Keep the roll readable
- Lower the brightness of the text. Pure white on black strobes the most. Endcrawl's checklist suggests a darker text color or less gain in the grade, and its blog notes that in a dark theater even 60 to 70% gray still reads as white. On Lift Gamma Gain, Francis Hanneman suggests whites at about 80%, and Juan Salvo writes that white text on black moving faster than 3 pixels per frame at 2K calls for lower peak brightness.
- Use the width of the frame. More columns make the block shorter, so the same runtime can use a slower roll.
- Keep spacing even. Uneven gaps make a constant speed look uneven.
Motion blur is where the sources disagree. Endcrawl's blog says not to use it, because type on black behaves like a star field of small points of light, where blur doesn't help. In the 2022 Blackmagic thread, one user says a little motion blur on the Transform can sometimes smooth out problems, and Hanneman mentions a slight vertical blur as a strobing fix. I'd fix the speed and the contrast first and try blur last, because blur softens every letter, while a whole-pixel speed and dimmer whites keep the text sharp.
Judge the render, not the timeline
Timeline playback is a poor test for credits. In the 2018 jerky scroll thread, replies note that final renders are usually smoother than timeline playback, and the original poster confirms the worst stutter is only on the timeline, though the render still isn't perfectly smooth. Endcrawl adds that a 60 Hz computer display doesn't divide evenly into 23.98, 24 or 25 fps, so a desktop monitor can add judder that isn't in the file.
- Set In and Out points around the credits only.
- Render that range on the Deliver page at the final resolution and frame rate.
- Play the file on a display running at the project frame rate if you have one, or step through it frame by frame and watch one letter.
Export without breaking the speed
- Render at the delivery size. Scaling the file afterward breaks whole-pixel movement. Endcrawl's blog says 95% of the jitter reports it sees come from resizing, and gives the example of a 1152-line render scaled to HD, where 3 pixels per frame becomes 2.8125.
- Make one render per raster. If you deliver HD and UHD, render each one at its own size with its own speed, 3 and 6 pixels per frame.
- Don't change the frame rate after rendering. Retiming the credits file brings the fractional speed back.
- Use a high-quality master. Endcrawl recommends working uncompressed, because ProRes and H.264 are still compressed formats and can introduce small motion artifacts in scrolling credits. The export settings hub covers codecs and formats for the master.
When a dedicated credits tool saves time
For a feature with hundreds of names and changes right up to picture lock, a spreadsheet-based tool beats retyping text fields. Two come up in the forum threads above.
- Cinecred is free and open source under GPLv3. It reads credits from Excel, LibreOffice Calc, Numbers, CSV or Google Sheets, and the Cinecred website says it fits a desired runtime by adjusting vertical gaps instead of using shimmer-prone fractional speeds. It exports ProRes and image sequences that you import into Resolve.
- Endcrawl is a paid web service. Its pricing page lists a free Demo plan with unlimited checker renders, Short 2k at $99 and Feature Basic at $499.
I'd stay with the Scroll title for a short film or a channel outro, move to Fusion when the credits have to be clean on a big screen, and switch to Cinecred when the list lives in a spreadsheet that other people keep editing.
Fix common rolling credits problems
- The credits shimmer or jitter in the render: the speed isn't a whole number of pixels, or the file was scaled after rendering. Build the roll in Fusion at 3 or 6 pixels per frame and render at the delivery size.
- The roll is too fast: the Scroll clip is too short. Lengthen it with Change Clip Duration, or spread the names across more columns.
- The roll ends before the music: add a static end card or more space between sections. Slowing down to a fractional speed brings the shimmer back.
- The speed changes at the start and end of a Fusion roll: the keyframes are still smooth. Select them in the Spline Editor and press Shift-L.
- Roles and names won't take different styles: the clip is a Text+ title on the Edit page, where all text shares one style. Use the Scroll title, or Character Level Styling in Fusion.
- The credits don't appear over the picture: the title sits on a track below the shot. Move it to a higher track. For other causes, see the fixes for text that isn't showing.
- Edges of long names are cut off: turn on the Title Safe overlay and reduce the size or tracking until every line fits inside it.
Rolling credits FAQ
Is there a rolling credits template in DaVinci Resolve?
The built-in option is the Scroll title in Effects Library > Toolbox > Titles. It's free, supports rich text and rolls from the bottom of the screen to the top. Its length on the timeline sets the speed.
How do I make credits scroll slower in DaVinci Resolve?
Make the Scroll clip longer with Clip > Change Clip Duration or by dragging its end. In Fusion, lower the movement per frame, for example from 3 to 2 pixels at HD, and give the Fusion Composition more frames.
Can credits scroll from top to bottom?
Not with the Scroll title, which only moves upward. Keyframe Position Y on a Text title, or animate a Transform downward in Fusion.
Do rolling credits work in the free version of DaVinci Resolve?
Yes. The Scroll title, Text+, Fusion Compositions, the Transform node and expressions are all part of the free version.
How do I put credits on a black background?
Place the Scroll title after the last shot with nothing on the tracks below it. Empty tracks render as black.