Last week I was building a rough cut with 11 audio tracks — dialogue, ambient, music stems, a reference mix. I needed to kill the music track entirely to check the dialogue balance, then silence one specific cough halfway through an interview clip without cutting the video. Two different problems. Two different tools. Most tutorials only cover one of them.
This article covers both, plus how to split audio away from video so you can move or delete it independently. All of this works in DaVinci Resolve 20 and 21, including the free version, unless noted otherwise. The screenshots and menu names may vary slightly between minor updates, but the core tools — clip gain, track mute, keyframes, Link Clips, and Blade — remain the same.
Quick answer: To mute audio in DaVinci Resolve, drag the clip volume line down to -100dB, click the M button in the track header to mute a full track, or use 4 volume keyframes to silence only part of a clip. To split audio from video, turn off Link Clips or use Alt/Option-click for a temporary audio-only selection. To cut audio, use the Blade tool or Timeline > Split Clip.
How to Mute One Audio Clip in DaVinci Resolve
If you're new to the Edit page workflow, the DaVinci Resolve beginner's guide covers the interface before you start here.
Every audio clip on the Edit page has a thin white horizontal line running across it. Hover over it until your cursor changes to a double-triangle icon, then click and drag it all the way to the bottom of the clip. The clip volume drops to -100dB, which is effectively muted. You haven't deleted anything, you haven't cut the clip, and you can drag it back up at any time.
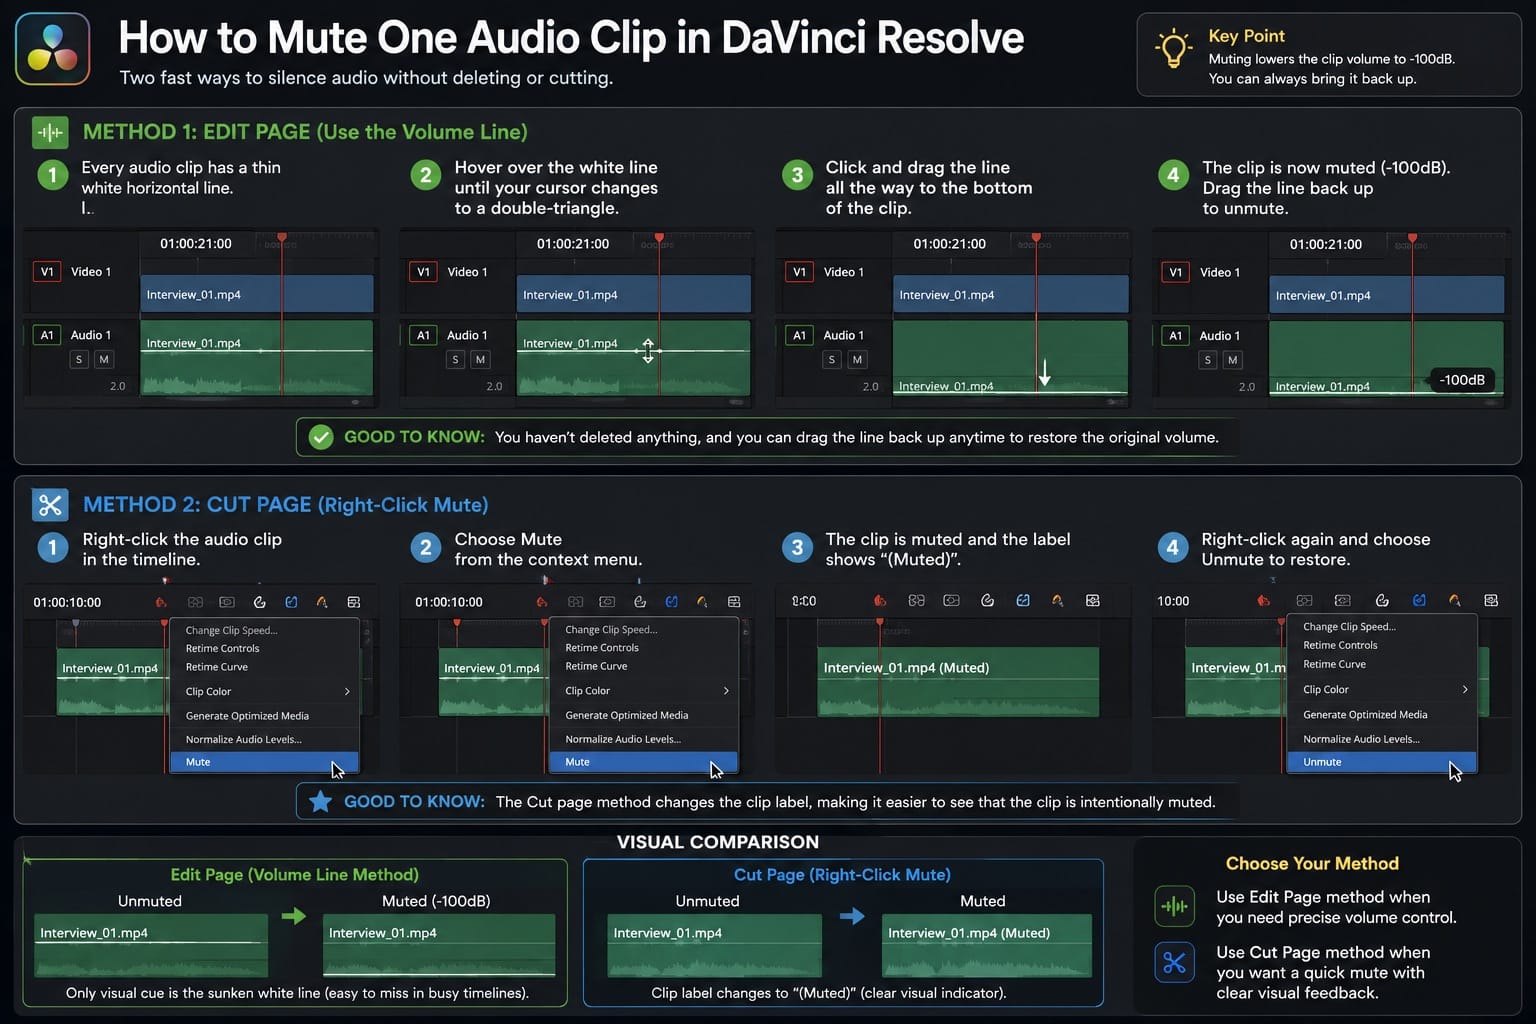
On the Cut page, skip the line method — it's awkward at that zoom level. Right-click the clip in the timeline and choose Mute from the context menu. That's the quickest path on the Cut page.
One thing most guides skip: if you want to mute a clip and leave an obvious visual indicator that it's intentionally silenced, the right-click method on the Cut page is clearer because the clip label changes. On the Edit page, the only visual cue is the sunken white line, which is easy to miss in a crowded timeline.
How to Mute an Entire Audio Track in DaVinci Resolve
Track-level muting lives in the track header — that column of controls to the left of the timeline. On the Edit page, look for the small M button in the track header row. Click it and the button turns red. The entire track is muted, every clip on it, without any destructive changes.
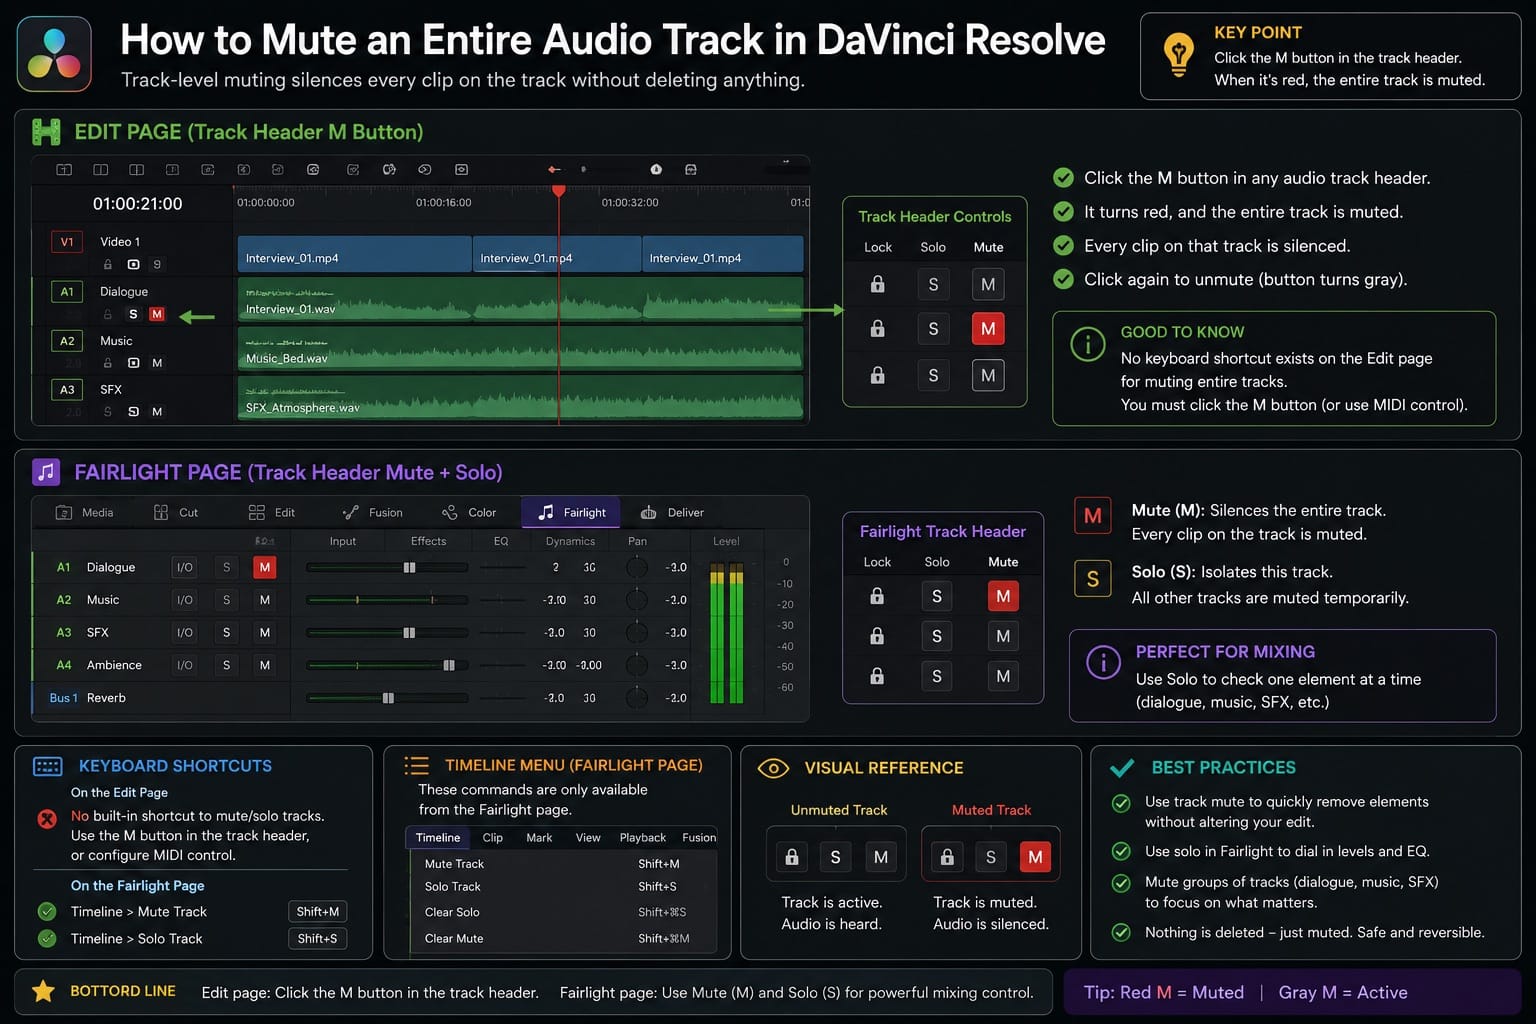
The Fairlight page has the same M button in its track headers and adds a solo button next to it. If you're doing any real audio mixing work, that solo function is worth knowing: it mutes every other track temporarily so you can listen to one track in isolation. I use it constantly when checking dialogue dynamics in Fairlight.
One thing the Blackmagic forum confirmed that most tutorials get wrong: on the Edit page, there is no built-in keyboard shortcut to mute an entire track. The Mute Track and Solo Track commands in the Timeline menu are only available from the Fairlight page. On the Edit page, you have to click the M button manually, or use MIDI control if you've set that up. Annoying, but worth knowing before you spend 23 minutes searching through the shortcut editor.
How to Mute Part of an Audio Clip in DaVinci Resolve
This is where people either do it the slow way or the right way. The slow way: split the clip with the Blade tool at the start and end of the unwanted section, select the middle piece, drag the volume line to zero. Works fine. Messy timeline.

The better method uses volume keyframes directly on the clip without any cuts. On the Edit page:
- Hold Alt (Windows) or Option (Mac) and click the white volume line on the audio clip to drop a keyframe.
- Add a second keyframe a few frames later — this becomes the start of your silent section.
- Move to where you want audio to return, add a third keyframe.
- Add a fourth keyframe a few frames after that.
- Drag the line between keyframes 2 and 3 all the way down to -100dB.
The 4-keyframe approach gives you clean transitions rather than a hard cut to silence. The two outer keyframes anchor the neighboring audio at its original level. The two inner keyframes define the silent stretch. If you only drop 2 keyframes and drag between them, you get a slope, not a silence — the audio fades rather than cuts.
You can do this on both the Edit page and the Fairlight page. In Fairlight, you get a more detailed waveform view, which helps when you need to find a specific cough or breath in a long take. For a full breakdown of what Fairlight adds beyond the Edit page, the free vs Studio comparison covers which audio features are Studio-only.
How to Split Audio from Video in DaVinci Resolve
By default, video and audio are linked — move one, both move. There are three ways to break that link, each suited to a different situation.
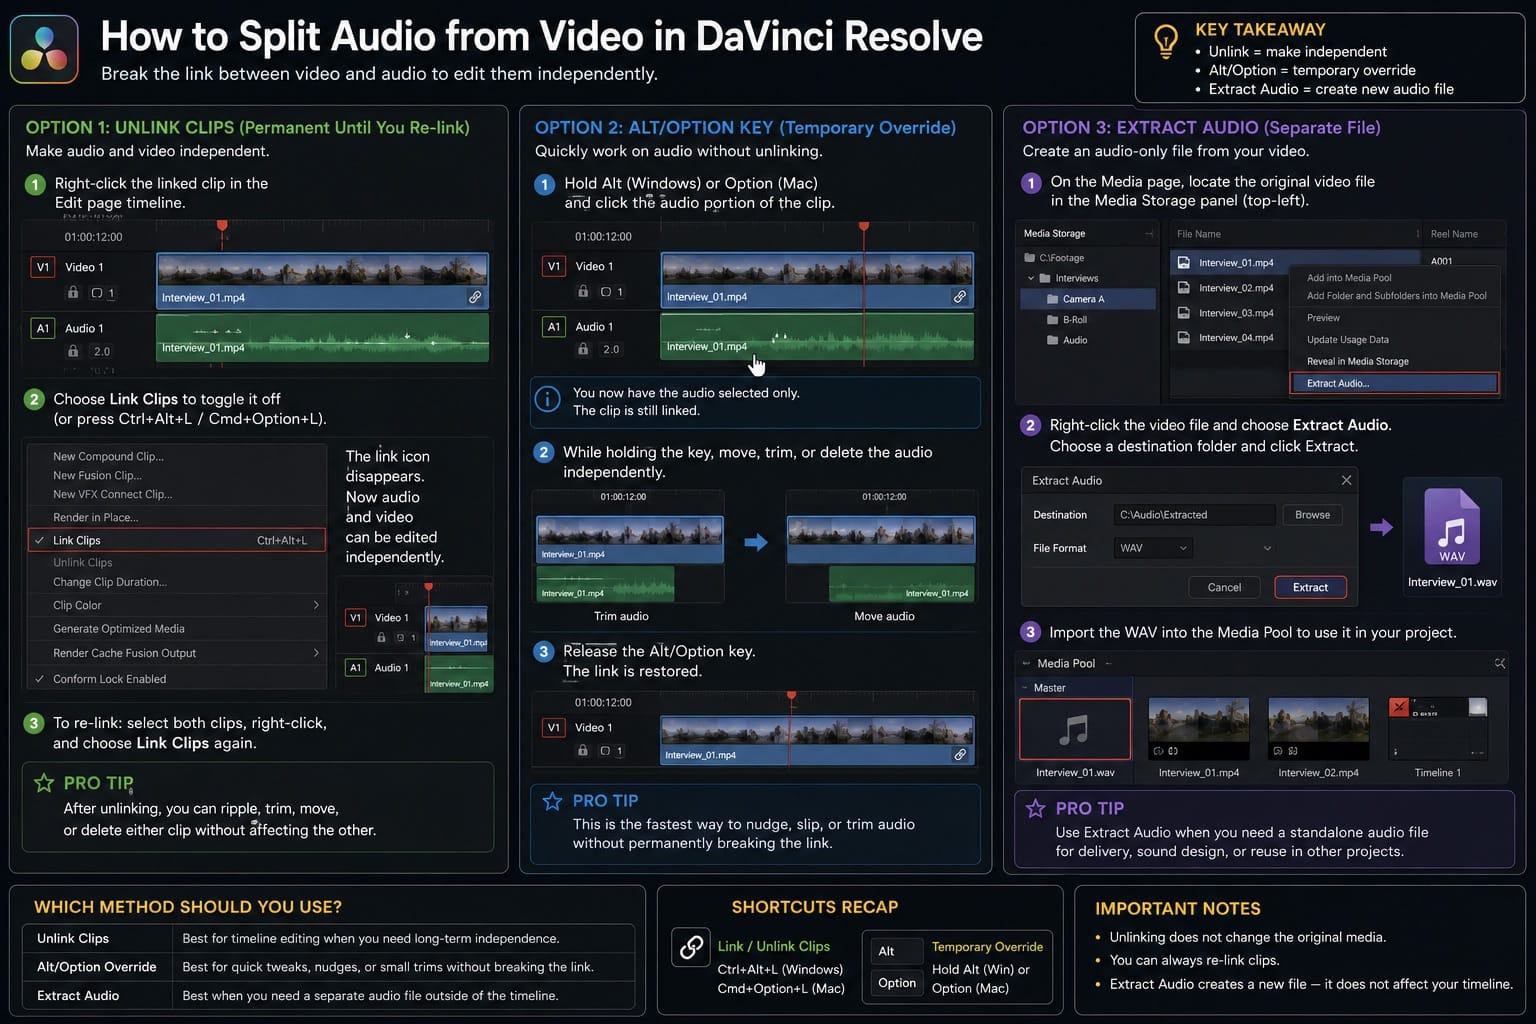
Option 1: Unlink Clips (Permanent Until You Re-link)
Right-click the clip in the Edit page timeline and choose Link Clips to toggle it off, or use the shortcut Ctrl+Alt+L (Windows) / Cmd+Option+L (Mac). The audio and video are now independent. You can trim, move, or delete either one without affecting the other. Re-link them the same way: select both, right-click, Link Clips.
Option 2: Alt/Option Key (Temporary Override)
Hold Alt (Windows) or Option (Mac) and click the audio portion of a linked clip. You've temporarily selected just the audio without unlinking the clip permanently. While holding the key, you can move, trim, or delete the audio independently. Let go, and the link is restored. This is the fastest method for a quick audio slip or nudge.
Option 3: Extract Audio (Separate File)
On the Media page, locate the original video file in the Media Storage panel (top-left). Right-click it and choose Extract Audio. A dialog appears where you can choose a destination folder. Click Extract and Resolve writes the audio as a standalone WAV file to that location. After that, import the WAV into the Media Pool if you want to use it in the project.
Most editors use the Unlink method for timeline work and never touch Extract Audio unless a client specifically wants an audio-only file. The temporary Alt/Option override is underused — once you build that muscle memory, you'll stop unlinking clips just to make a small trim.
How to Split or Cut Audio Clips in DaVinci Resolve
Cutting audio in the timeline works the same way as cutting video. For the cleanest split at a specific playhead position, use Timeline > Split Clip or the shortcut Ctrl+\ on Windows / Cmd+\ on Mac. This cuts selected clips at the playhead, or the tracks that are enabled through the track selectors.
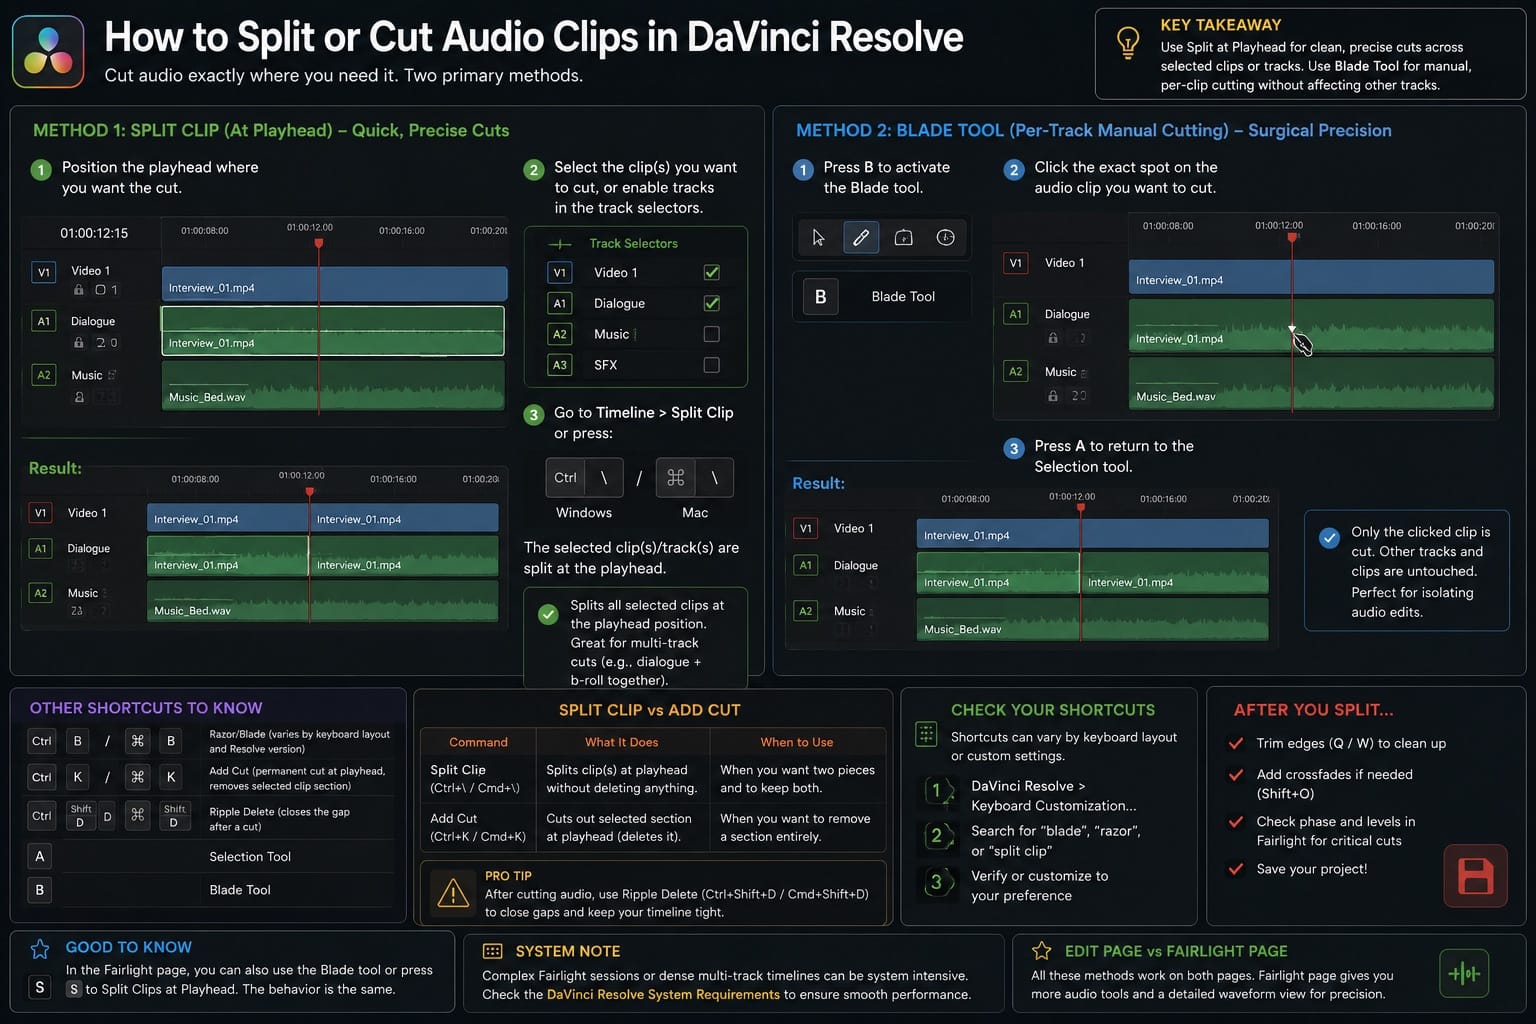
For manual, per-track cutting, press B to activate the Blade tool and click the exact clip you want to cut. This leaves everything else on other tracks untouched — the key distinction when you want to split an audio clip without touching the video above it. Press A to return to the Selection tool after you're done.
Some keyboard layouts and Resolve versions also map Ctrl+B / Cmd+B to Razor or Blade behavior, so check DaVinci Resolve > Keyboard Customization if your shortcut behaves differently from what you expect.
After any split, if you're running a complex Fairlight session or dense multi-track timeline, check the system requirements guide — audio-heavy projects with many tracks tend to expose hardware limits faster than video editing alone.
Frequently Asked Questions
How do I mute all audio in a DaVinci Resolve timeline?
The fastest method is to go to the Fairlight page and click the M button on each track header. There's no single "mute all" button. Alternatively, on the Deliver page, uncheck Export Audio in the audio settings before rendering — this exports a silent version without muting anything in your timeline.
Why can't I find the mute option when I right-click an audio clip on the Edit page?
The right-click Mute option is available on the Cut page, not the Edit page. On the Edit page, muting is done by dragging the volume line to -100dB or clicking the M button in the track header to mute the whole track.
Does muting affect the exported video?
Yes. If a track or clip is muted when you render, that audio won't appear in the export. Muting is not a monitoring-only toggle — it carries through to the Deliver page. Always check your track mute states before rendering.
Can I mute audio without splitting the clip?
Yes, using volume keyframes on the Edit or Fairlight page. Drop 4 keyframes around the section you want silent, then drag the middle section to -100dB. The clip stays intact and the video is unaffected.
What's the difference between unlinking and extracting audio in DaVinci Resolve?
Unlinking (Link Clips) keeps both the video and audio clips in the timeline but removes the sync lock between them. Extract Audio on the Media page creates a completely separate WAV file on disk. For most editing work, unlinking is all you need. Extract Audio is for when you need the audio as a standalone deliverable file.
How do I re-link audio and video after separating them?
Select both the audio and video clips in the timeline, right-click, and choose Link Clips. They'll move and trim together again. The shortcut is Ctrl+Alt+L on Windows or Cmd+Option+L on Mac.