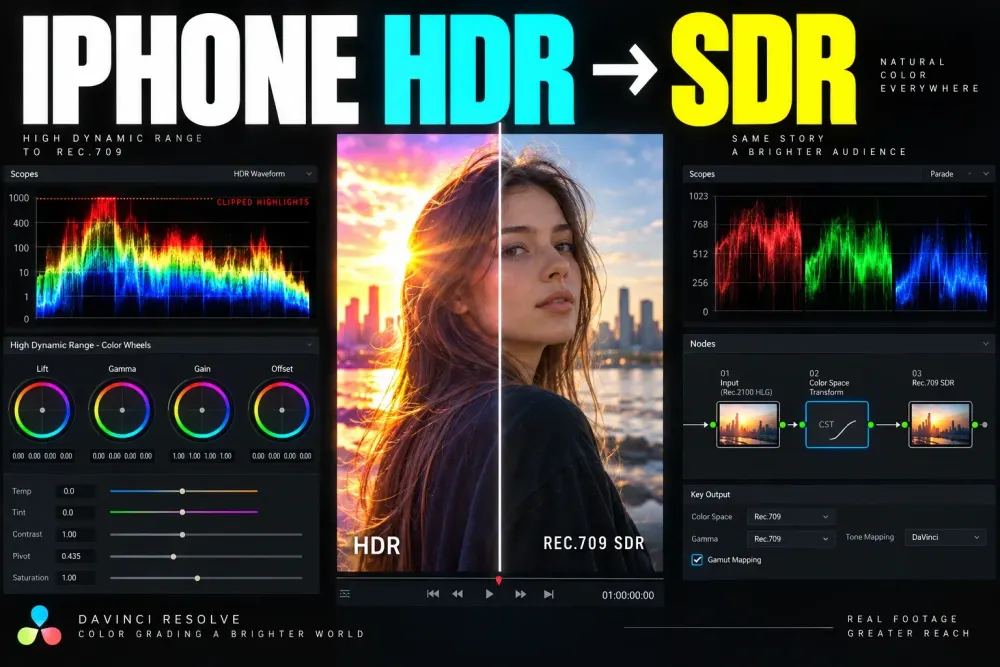
To convert iPhone HDR to SDR in DaVinci Resolve, first identify what the phone actually recorded. Standard iPhone HDR video, Dolby Vision metadata, Rec.2100 HLG, Apple Log, Apple Log 2 and ordinary Rec.709 are not interchangeable inputs. Assign the matching input transform, convert once to a defined SDR output, then grade and check the rendered file in the player or platform that matters.
If the clip looks washed out, the usual cause is not “bad iPhone color.” Resolve or the playback app is interpreting the source with the wrong transfer function, or the project has no controlled HDR-to-SDR mapping. If Apple Log looks flat, that can be normal before its input transform. If highlights clip or colors become electric after conversion, inspect the tone and gamut mapping before adding more contrast or saturation.
| Source you have | What Resolve needs | Common wrong move |
|---|---|---|
| iPhone HDR / Dolby Vision | The base color space and gamma reported by the clip, often an HLG-based HDR interpretation | Treating the clip as Rec.709 because the file is HEVC |
| Rec.2100 HLG | Rec.2020 primaries with the appropriate Rec.2100 HLG gamma choice | Applying an Apple Log transform |
| Apple Log or Apple Log 2 | The matching Apple Log input transform for that recording mode | Using an HLG CST or an arbitrary “iPhone LUT” |
| SDR Rec.709 | Rec.709 input handling without an HDR-to-SDR transform | Tone-mapping footage that is already SDR |
Identify the iPhone Recording Before You Grade
Start with how the clip was recorded. Apple documents that supported iPhones can record HDR video in Dolby Vision. On supported current Pro models, ProRes recording can also offer Log or Log 2, depending on the device and software version. Those labels describe different capture and encoding paths, so “shot on iPhone” is not enough information for a transform.
In Resolve, inspect the clip metadata and its assigned color space. Useful clues include codec, bit depth, color primaries, transfer characteristic, HDR metadata and the camera setting used during capture. An HEVC file can be HDR or SDR. A ProRes file can be Log or a different recording mode. The container and codec do not identify the color transform by themselves.
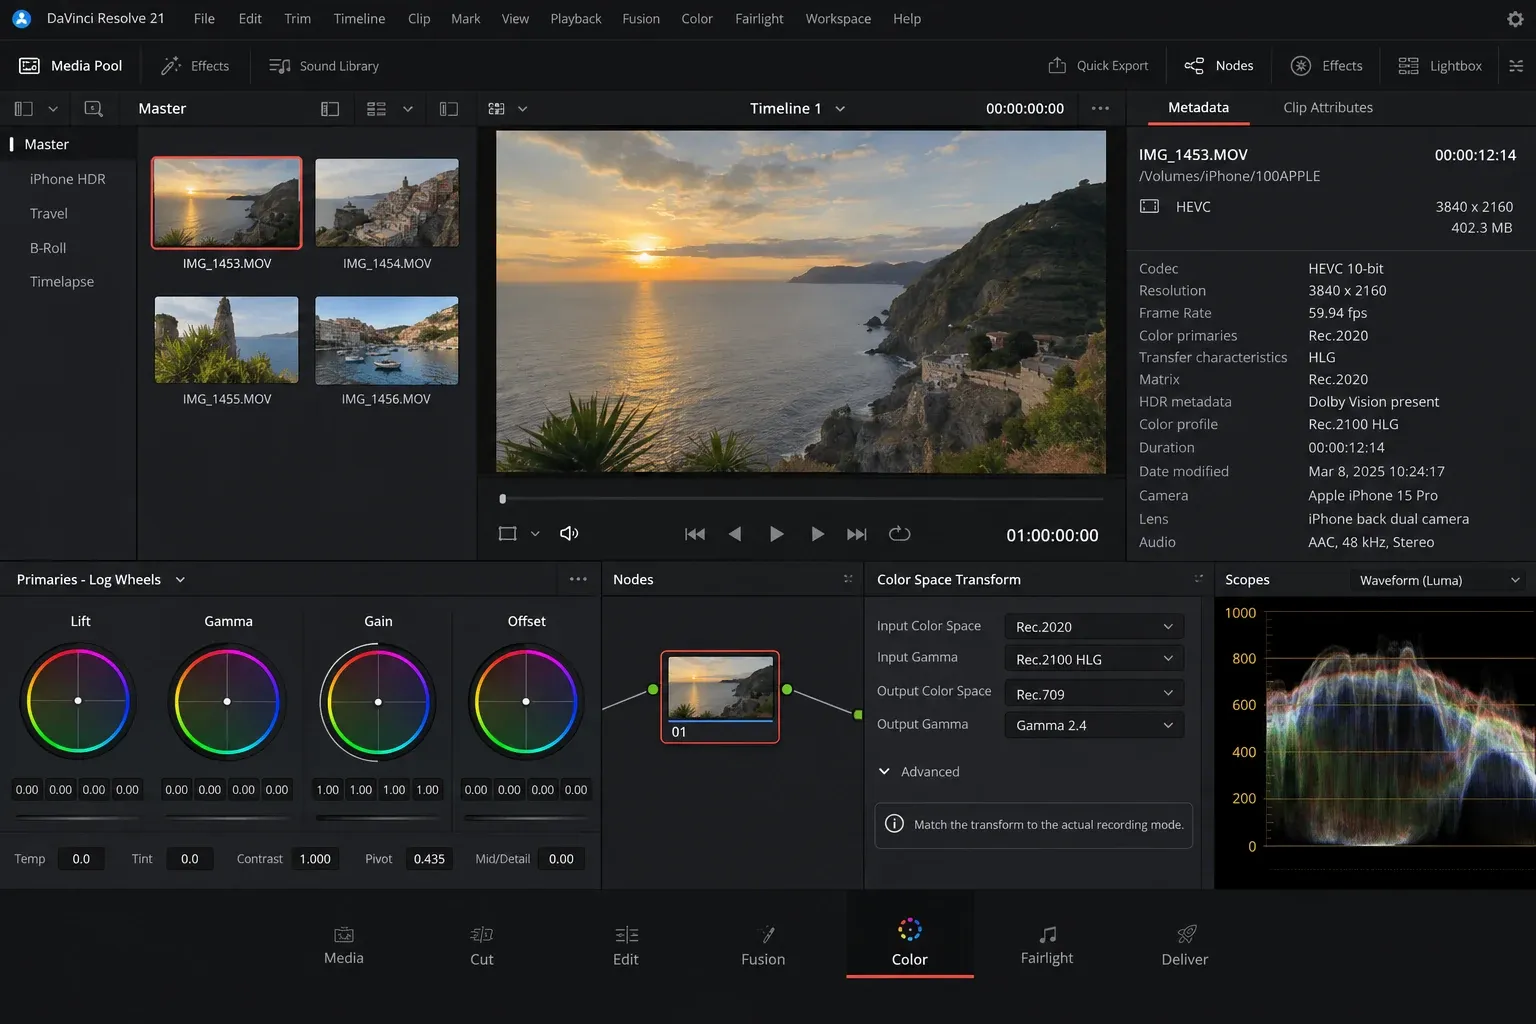
If the metadata and your recollection disagree, return to the original file and the iPhone recording settings. Transcoded social downloads, messaging apps and some handoff tools can strip or rewrite metadata. A file that has already been converted to SDR should not receive the same transform as the untouched HDR original.
Resolve also distinguishes Rec.2100 HLG from Rec.2100 HLG (Scene). That difference matters because the two choices describe different interpretations of HLG material. Use the one that matches the source and workflow rather than choosing whichever makes the viewer look brighter. When the correct interpretation is uncertain, preserve a copy of the original, document the available metadata and compare the transform against known scene content such as skin, neutral objects and highlight rolloff.
Choose One Color-Management Route
You can handle the conversion with Resolve Color Management or with a Color Space Transform node. Both can work. Problems begin when a project applies an automatic managed transform and the node tree adds a second CST or LUT for the same conversion.
I use Resolve Color Management when a timeline contains several cameras, multiple iPhone recording modes or a mixture of HDR and SDR clips. Each source can receive its own input assignment while the timeline uses a consistent working space and output. A CST is useful when the project is otherwise unmanaged, when the conversion belongs at a deliberate point in the node tree, or when you need to see the transform settings directly on the clip.
Our guide to Resolve Color Management and CST covers the wider decision. For this task, the rule is narrower: choose one owner for the input-to-output transform, make its settings explicit, and avoid stacking an input LUT, automatic color management and a CST without a defined reason.
Method 1: Convert iPhone HDR With Resolve Color Management
Open Project Settings > Color Management and use a color-managed project. For a flexible grading pipeline, DaVinci Wide Gamut / DaVinci Intermediate is a practical timeline working space. Blackmagic describes it as a wide working space intended to retain image information while projects target SDR or HDR outputs.
For an SDR job, set the timeline working luminance to an SDR target such as SDR 100 when that matches the project. Then define the output color space for the actual delivery. Rec.709 Gamma 2.4 is a common grading and video-delivery target in a controlled viewing environment, but it is not a magic setting for every web, broadcast or computer-display path. Use the destination specification and calibrated monitoring target.
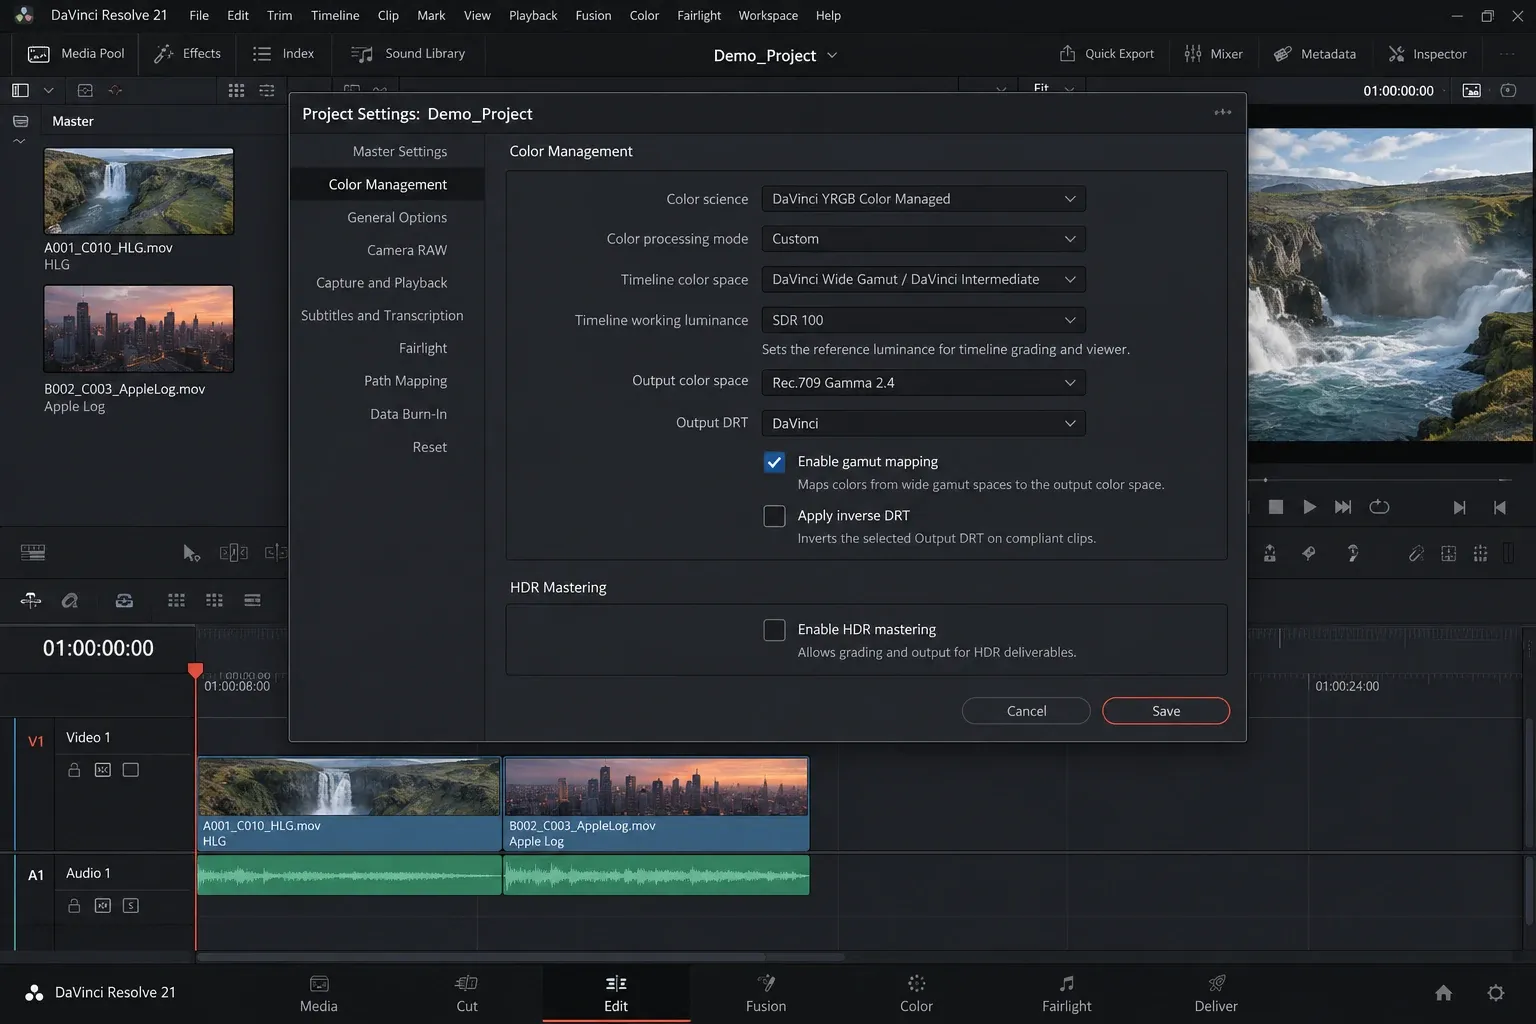
Assign the correct Input Color Space to every source clip:
- For an HLG source, assign the matching Rec.2100 HLG interpretation supported by the footage and project.
- For Apple Log, use the Apple Log input transform available in your Resolve build.
- For Apple Log 2, select a separate Apple Log 2 input only when that option appears in your installed Resolve version and the source was recorded in Log 2. Apple documents the recording mode; this article does not assume that every current Resolve build exposes the matching transform.
- For SDR Rec.709, assign the correct Rec.709 interpretation and do not force it through an HDR input transform.
In the Media Pool, select clips that share the same verified source, then use the input-color-space assignment rather than correcting each one by eye. Mixed folders deserve separate assignments. One mislabeled SDR clip inside an HLG batch can become too contrasty; one mislabeled HLG clip inside an SDR batch can remain pale or clip after later corrections.
Use an output DRT and gamut mapping that preserve a smooth transition from HDR highlights into the SDR range. Blackmagic’s DaVinci processing provides highlight and shadow rolloff and controlled handling of colors that exceed the destination gamut. Turning mapping off can be useful for diagnosis, but a simple mathematical conversion without tone or gamut handling can clip bright detail and push saturated colors outside Rec.709.
Grade in the managed working space after the input assignment is correct. Exposure, balance and creative contrast then operate on a predictable image. If you begin by crushing blacks and pulling gain down on a misinterpreted HLG clip, those corrections become technical compensation rather than an intentional grade.
Method 2: Use a Color Space Transform Node
For a CST workflow, keep the project’s color-management behavior clear and place one Color Space Transform at a deliberate point in the node tree. A basic HLG-to-SDR example uses:
- Input Color Space: Rec.2020
- Input Gamma: the appropriate Rec.2100 HLG choice
- Output Color Space: Rec.709
- Output Gamma: Gamma 2.4 when that is the chosen SDR target
- Tone Mapping Method: DaVinci
- Gamut Mapping Method: Saturation Mapping or another method selected for the material
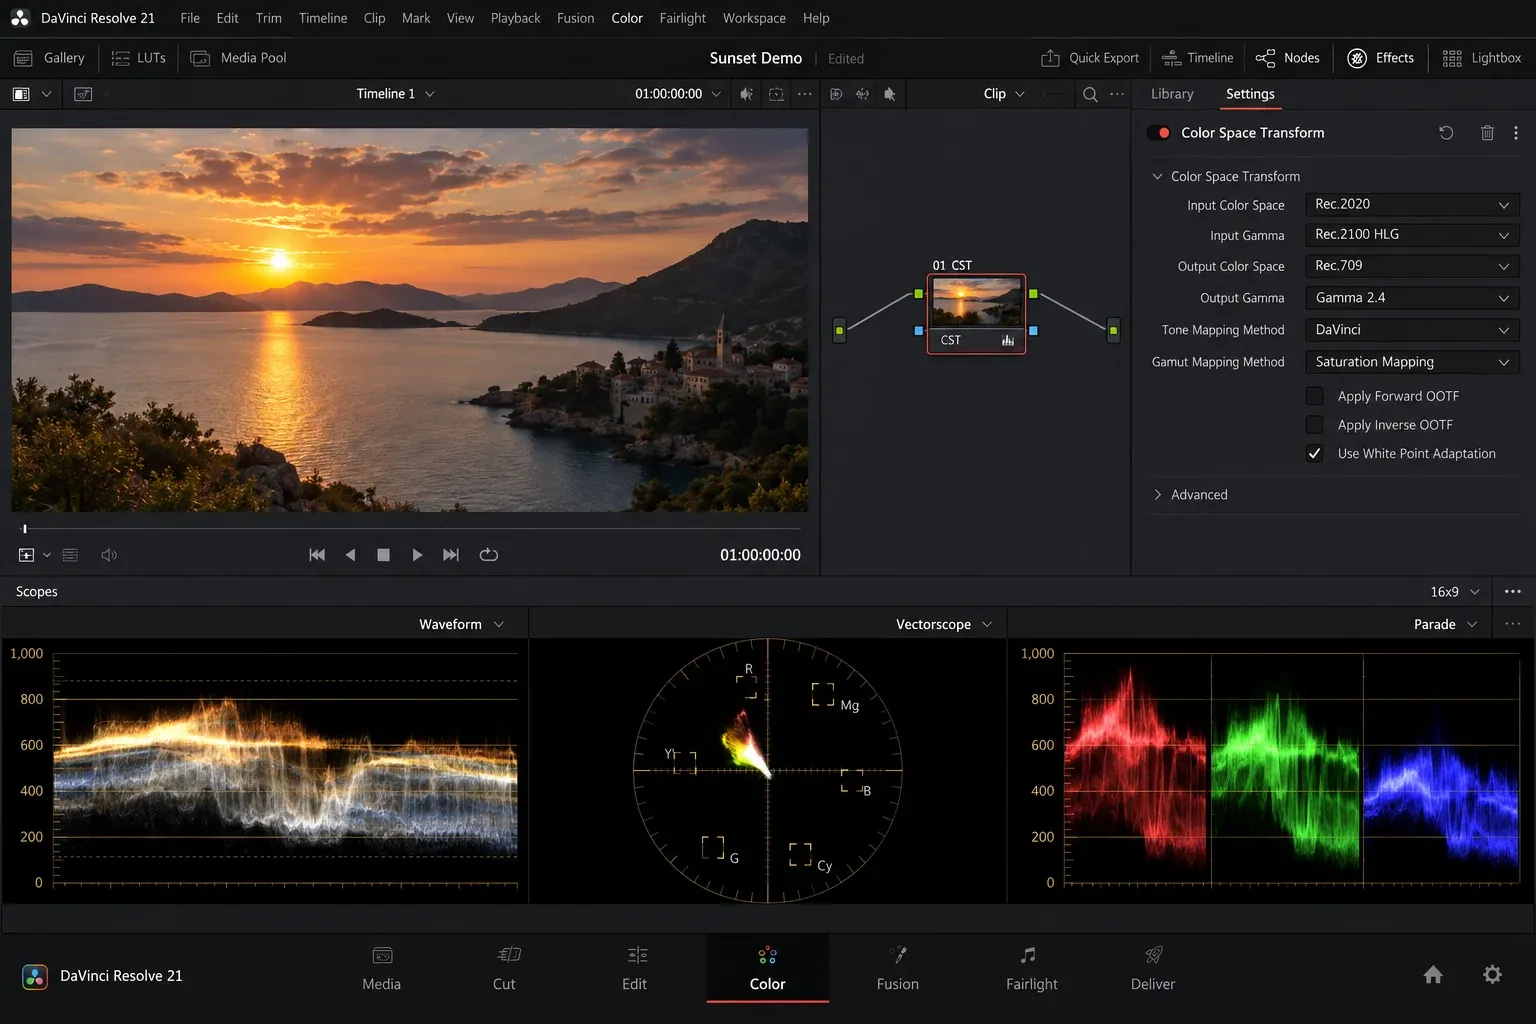
That example is only for the named HLG source. Do not copy its input values onto Apple Log or Apple Log 2. For Apple Log, choose the matching Apple transform available in your Resolve build. For Apple Log 2, use a distinct Log 2 input only if your installed version provides it. If it does not, do not substitute HLG or the older Apple Log transform by name alone; check the current Blackmagic release notes or support guidance and use a color workflow whose input transform you can verify. The output can remain Rec.709 when that is the intended delivery.
A useful node order is technical input transform first, then balancing and creative work, with any output transform placed according to the project design. In a simple CST-to-display tree, the transform may sit after scene-referred corrections so those corrections retain more source range. In other trees, a group or timeline-level output transform keeps clip nodes consistent. What matters is that you know where the scene-to-display conversion happens and do it once.
Watch the waveform while you tune tone mapping, but do not grade from scopes alone. HDR highlights compressed into SDR need a visual hierarchy: faces, practical lights, sky detail and specular reflections should not all collapse to the same value. Gamut mapping should control harsh color excursions without removing every vivid color from the scene.
Why iPhone HDR Looks Washed Out in Resolve
A washed-out image usually means HLG or another HDR transfer function is being viewed as if it were ordinary SDR. Midtones land in the wrong place and the contrast relationship changes. The correct response is to fix the input interpretation and output mapping, not to add an aggressive contrast curve as the first node.
If the project is color managed, verify the clip’s Input Color Space and the project output. If the project is unmanaged, verify the CST inputs. If both are active, temporarily bypass the CST and confirm whether the project is already doing the conversion. The companion guide to fixing a washed-out Resolve export covers data levels, tags and player differences after the image pipeline itself is correct.
Apple Log is supposed to appear low-contrast before transformation. If it remains flat after the correct input transform, inspect whether the node is enabled, whether the clip was actually recorded in Apple Log or Apple Log 2, and whether a project-level transform is being bypassed. Do not diagnose all flat iPhone footage as HLG.
Why Highlights Clip or Color Becomes Too Strong
Clipped highlights can come from missing tone mapping, a double transform or corrections made on the wrong side of the transform. Disable nodes one at a time. If bypassing the CST restores highlight detail, the source assignment or mapping settings are wrong. If the detail is absent in the source scopes before conversion, no output setting can restore information that was not recorded or survived a transcode.
Excessive saturation often appears when wide-gamut HDR colors are moved into Rec.709 without gamut compression. It can also come from a creative LUT designed for a different input. Use gamut mapping before pulling the global Saturation control down. A global reduction may make skin and ordinary objects dull while the few out-of-gamut colors still look unnatural.
After the technical transform is stable, use our shot-matching workflow to align exposure and color across several iPhone clips. Match shots after their inputs are normalized; otherwise, you may be comparing an HLG interpretation with a transformed Log clip.
QuickTime and macOS Can Still Look Different
A correct Resolve viewer and a correct rendered file can still appear different in QuickTime Player, a browser or another application. The player, display profile, output tags, macOS color management and the viewing environment all affect the displayed result. This is why changing a gamma tag sometimes changes the appearance but does not prove that the grade or transform was wrong.
Do not promise one universal “Rec.709-A fix.” Decide which delivery path has priority. Render a short representative section, inspect it in the required player or platform, and compare it on the intended display. Confirm that the export carries the color-space and gamma metadata expected by that path. Then make a controlled decision about output tags or target gamma while keeping the master workflow documented.
If the video is for several destinations, keep a managed master and create destination-specific deliverables when their requirements differ. A social platform, broadcast handoff and locally played macOS file do not necessarily share one ideal tagging and monitoring path.
Export and Verification Checklist
- Confirm the original recording mode: HDR/Dolby Vision, Rec.2100 HLG, Apple Log, Apple Log 2 or SDR Rec.709.
- Inspect clip metadata rather than inferring color from HEVC, ProRes, MOV or MP4.
- Choose Resolve Color Management or CST as the owner of the transform.
- Assign the matching input color space and gamma to each source type.
- Use DaVinci Wide Gamut / Intermediate or another documented working space when the project needs a scene-referred managed timeline.
- Define the SDR output from the delivery specification; use Rec.709 Gamma 2.4 only when it matches that target.
- Enable suitable tone mapping and gamut mapping for HDR or wide-gamut sources.
- Check that no input LUT, CST or managed transform duplicates the conversion.
- Balance and grade after the input is interpreted correctly. The broader DaVinci Resolve color-grading guide covers primary correction and scope use.
- Render a representative section and then the final file.
- Inspect highlights, skin, saturated colors, shadows and gradients on the required playback path.
- Record the input assignment, project working space, output target, mapping method and export tags so the result can be revised without guesswork.
Primary References
- Apple: adjust HDR camera settings on iPhone
- Apple: record ProRes video, including supported Log modes
- Blackmagic Design: DaVinci Resolve color page and color-management overview
- Blackmagic Design support: current Resolve documentation and downloads
The dependable conversion is source-aware. Identify the iPhone recording, apply one matching input-to-SDR transform, preserve highlights and wide-gamut color through deliberate mapping, then judge the exported file in its real delivery environment.
