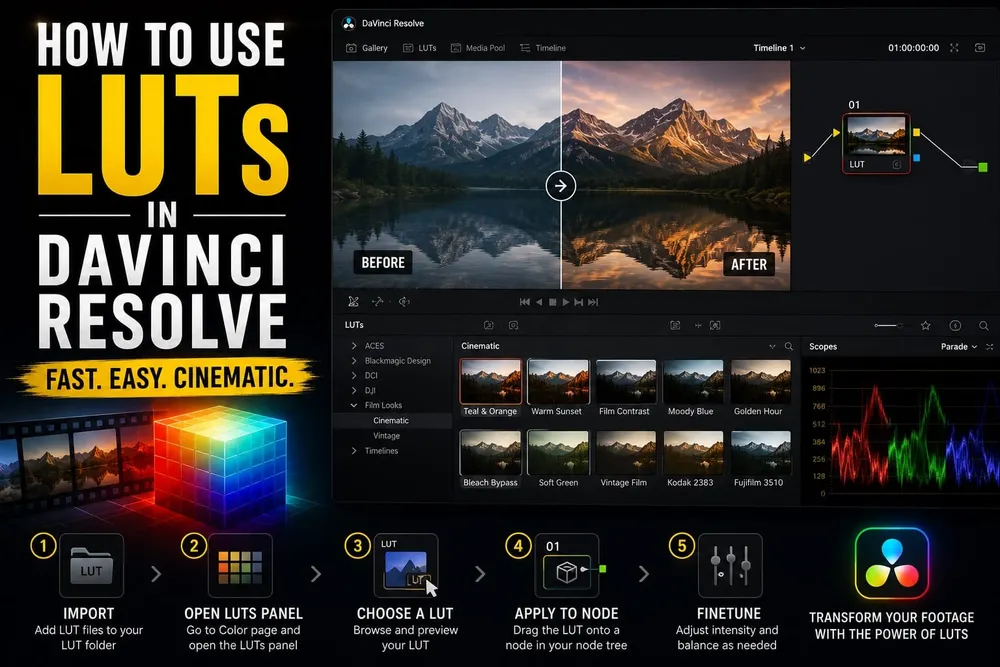
Quick answer: open Project Settings > Color Management > Lookup Tables, click Open LUT Folder, copy your extracted LUT file into that folder, then click Update Lists and Save. On the Color page, apply the LUT to its own dedicated node. Before you judge the picture or touch the strength, check the LUT's expected input and output.
If exposure and white balance still need work, keep the beginner color-grading workflow open alongside this guide. Here I start with installation and application, then node order and color management, and only then the look itself.
Where DaVinci Resolve Stores LUT Files on Mac and Windows
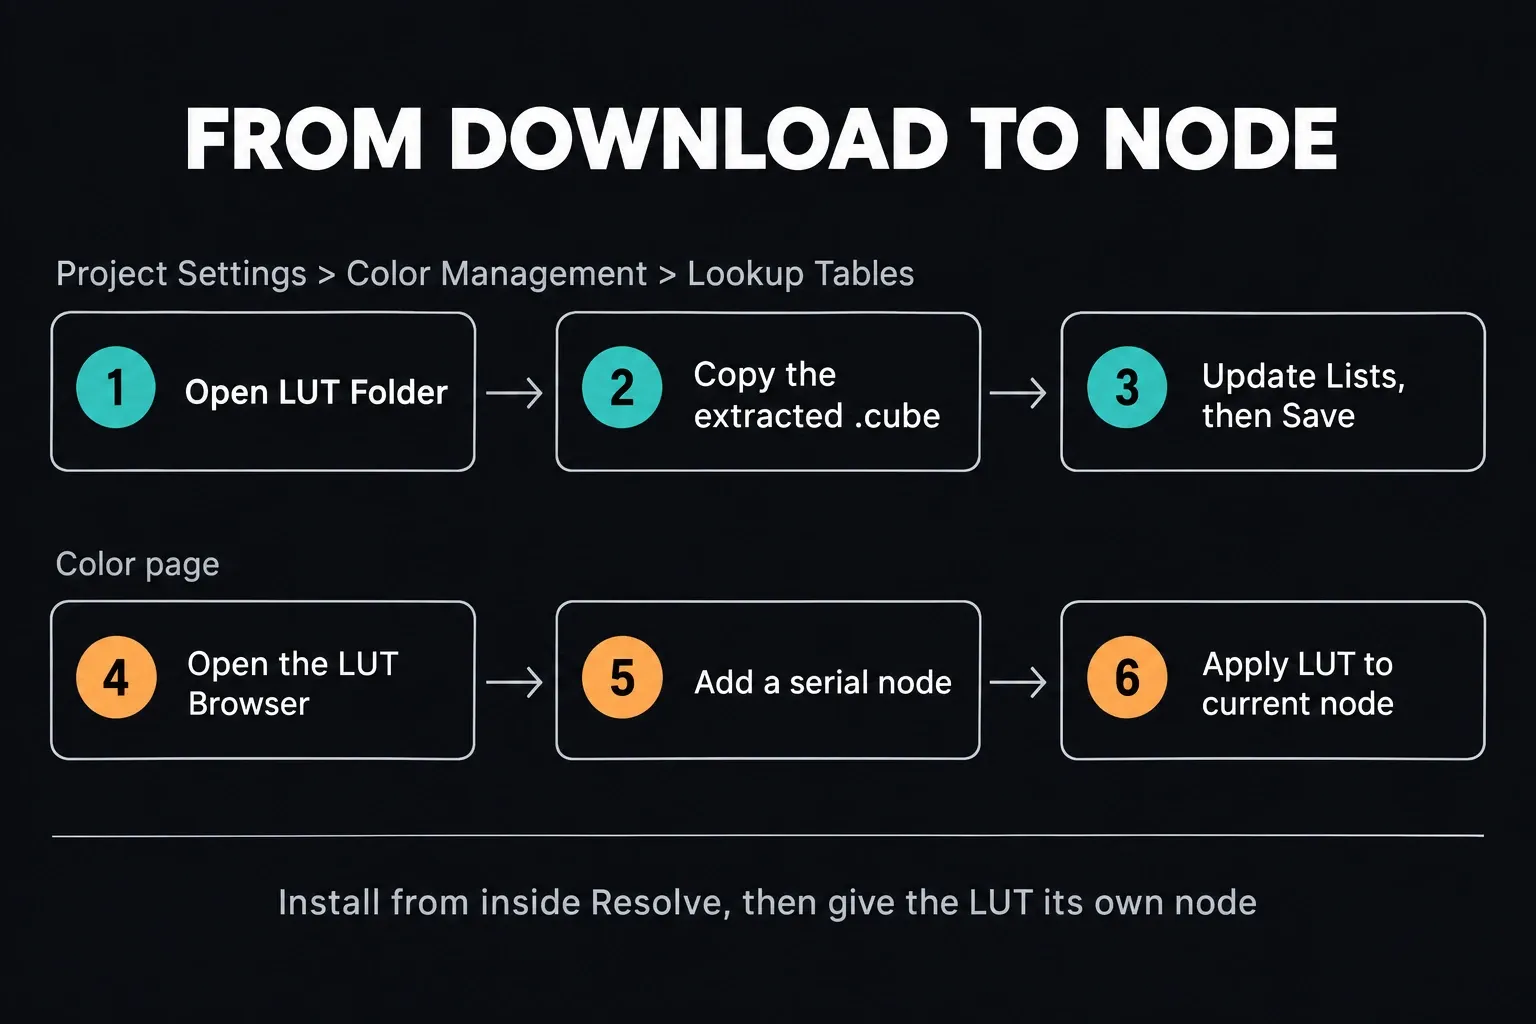
The safest way to install a LUT is from inside the application: open Project Settings > Color Management and click Open LUT Folder. That button opens the folder the current installation actually reads, which no screenshot from someone else's machine can promise. The Using LUTs chapter of the DaVinci Resolve 21 Reference Manual documents this path, the Update Lists control and the current LUT Browser behavior. I rechecked those steps against it on October 1, 2026; that's a documentation check, not a claim that I ran every LUT pack out there.
The standard macOS folder is /Library/Application Support/Blackmagic Design/DaVinci Resolve/LUT/. On Windows it's C:\ProgramData\Blackmagic Design\DaVinci Resolve\Support\LUT, and Windows ProgramData is normally hidden, which is one more reason to let the button do the navigating. Linux is messier: the current manual gives /opt/resolve/LUT in one chapter and /home/resolve/LUT in another, so use Open LUT Folder rather than guessing a Linux path.
The non-Studio Mac App Store build keeps its LUTs in a self-contained location of its own. So don't copy a path from another tutorial and assume it applies to your machine. Open the folder from Resolve, then add or remove files there. If several workstations share one library, a facility can add custom LUT paths, network volumes included, in DaVinci Resolve Preferences > System > General.
Where to Get LUTs for DaVinci Resolve
Start with what you already have. Resolve installs a set of factory preset LUTs, and the LUT Browser on the Color page lists them by category together with anything you add later. Hover-scrub a thumbnail to preview that LUT on the current clip, as the manual's LUT Browser section describes. Not every preset is a look: the VFX IO category, for example, holds conversions to and from linear.
For log footage, take the conversion LUT from the camera maker's own support downloads and match it to the exact gamma and gamut you recorded. Creative packs, free or paid, come from LUT sellers and marketplaces. The useful ones state the input they expect, usually Rec.709 or a named log profile, and spell out the license. If a pack doesn't say what it expects, you're guessing, and a mismatched input is behind much of the clipping and odd color covered further down.
How to Install a LUT in Resolve's Color Management Settings
If your download is a ZIP archive, extract it first, then copy the actual LUT files into the folder Resolve opened. Resolve 21 supports 1D and 3D .cube LUTs, externally created Shaper LUTs in .cube format, Panasonic VLUT and CLF. DCTL files sit in the same menus, but they're code-based transforms, not ordinary lookup tables. Keep the vendor's input/output notes with the files, because an accepted extension doesn't prove that a LUT suits your footage. If the DCTL effect or file is missing, the DCTL troubleshooting guide separates folder discovery from blank controls.
Go back to Color Management, click Update Lists, then Save to close Project Settings. There's a second route in the Color page LUT Browser: select the relevant category, right-click in the browser area and choose Refresh. They aren't the same button under two names. Update Lists refreshes the LUT menus; Refresh reloads the selected browser category from disk.
Named subfolders for camera transforms, show looks and calibration LUTs make a big library much easier to live with. Just don't rename a vendor pack blindly: a project can report a LUT as missing once its expected path or filename no longer matches. Resolve 21 also shows a Missing LUTs tab when a grade refers to files it can't find.
Applying a LUT to a Node in Resolve's Color Page
Open the Color page and select your clip. Click LUTs in the toolbar to open the LUT Browser. Select a node in the Node Editor and choose Color > Nodes > Add Serial, so the LUT gets a separate LUT node of its own. With that new node selected, right-click the LUT and choose Apply LUT to current node, or simply drag it onto the node. Drop another LUT on the same node and it replaces the previous one.
Resolve can also apply a LUT directly to one or more source clips from the Media Pool or the Color-page thumbnail timeline. That isn't inherently wrong, but the current manual warns that source-clip LUTs don't travel between timelines through ColorTrace. A node LUT lives inside the clip's grade, so it's usually easier to label, bypass, reorder and revise later.
Give a transform or a look a dedicated node whenever you expect to compare or blend it. The nodes explained guide covers the wider serial, parallel and layer logic; what matters here is that the node makes the LUT's place in the signal path visible at a glance.
Technical LUT vs Creative LUT
A technical LUT maps a known source state to another defined state, for example one camera gamut/gamma to a monitoring or delivery space. A creative LUT creates a look. Some LUTs combine both jobs, so labels such as “cinematic” or “log conversion” tell you very little. Read the documentation for the exact expected input and output.
If a creative LUT expects Rec.709 but you feed it camera log or DaVinci Wide Gamut, it can clip, wash out or distort color. If a camera-transform LUT expects S-Log3/S-Gamut3.Cine and gets a different Sony profile, the file may load perfectly while the image is still wrong. Installation success and color accuracy are two separate checks.
Where to Place the LUT Node in a Resolve Node Tree
Place a LUT where the signal matches its documented input. That single rule is more reliable than “technical first” or “creative last.” A technical LUT that converts native camera log has to see that native encoding. A creative LUT built for an already normalized image belongs after the normalization and after the corrections its designer expects.
Inside a node, Resolve applies the LUT as the last operation, after the other Color page adjustments made in that same node. So the node's own color and contrast controls can trim the signal before it enters the LUT. A separate upstream node is often clearer to read, but the image pipeline doesn't require one.
If the LUT clips highlights, lower exposure or contrast before it, either in an upstream node or with that node's own controls. A trim after the LUT only darkens a result that's already clipped; the manual notes that a 3D LUT clips values outside the range it was designed to handle. None of this damages your source file, because bypassing the LUT removes its processing. But no LUT adjustment can recreate detail already clipped in the recorded source.
There's no universal slot number for every LUT. The correct position depends on four facts: the current signal state, the expected input, the LUT's output and whatever output transform still comes after it. Label the node with the LUT's job, not merely “LUT.”
Node-Order Examples That Do Not Double-Transform the Image
Treat these as diagnostic patterns, then swap the generic labels for the actual color spaces from the LUT documentation:
- Camera-transform LUT: the exact camera log/gamut, then exposure and balance trims while the signal is still in the expected input, then the transform LUT, then display-referred finishing.
- Creative Rec.709 LUT: a deliberate normalization to Rec.709, then balance and shot matching, then the creative LUT, then a final trim and scope check.
- Scene-referred creative LUT: correct input tagging, then work in the LUT's documented scene-referred space, then the creative LUT, then one intentional output transform.
- Cineon film-print LUT: convert the working signal to the documented Cineon input, then the film-print LUT. Don't tack another output CST on afterward unless the LUT documentation and your delivery pipeline require it.
When the image breaks, read the chain from left to right and name the signal between every pair of nodes. Don't add another normalization step just because a tutorial shows one. For the full project color-management setup, the RCM vs CST guide walks through the choice.
Fixing LUTs That Won't Show Up
Refresh the list first. In Project Settings > Color Management, click Update Lists. In the LUT Browser, select the category, right-click in the browser area and choose Refresh. Restarting Resolve can also force a rescan, but it shouldn't be the first or the only thing you try.
Still missing? Check that you copied the extracted LUT, not its ZIP archive or a download shortcut, and confirm the location and format against the vendor's instructions. A damaged file, unsupported syntax or an unavailable custom path can stop discovery even when the extension looks familiar. And renaming some other file to .cube doesn't convert it into a LUT.
When a project opens with missing transforms, look for the Missing LUTs overlay at the bottom right and the Missing LUTs tab in the LUT Browser. Restore the original file or path when you can, instead of silently substituting a different look. On an App Store installation, always reopen the actual folder from Resolve, because its sandbox path differs from the standard macOS location.
Blending LUT Intensity with Resolve's Key Output Gain
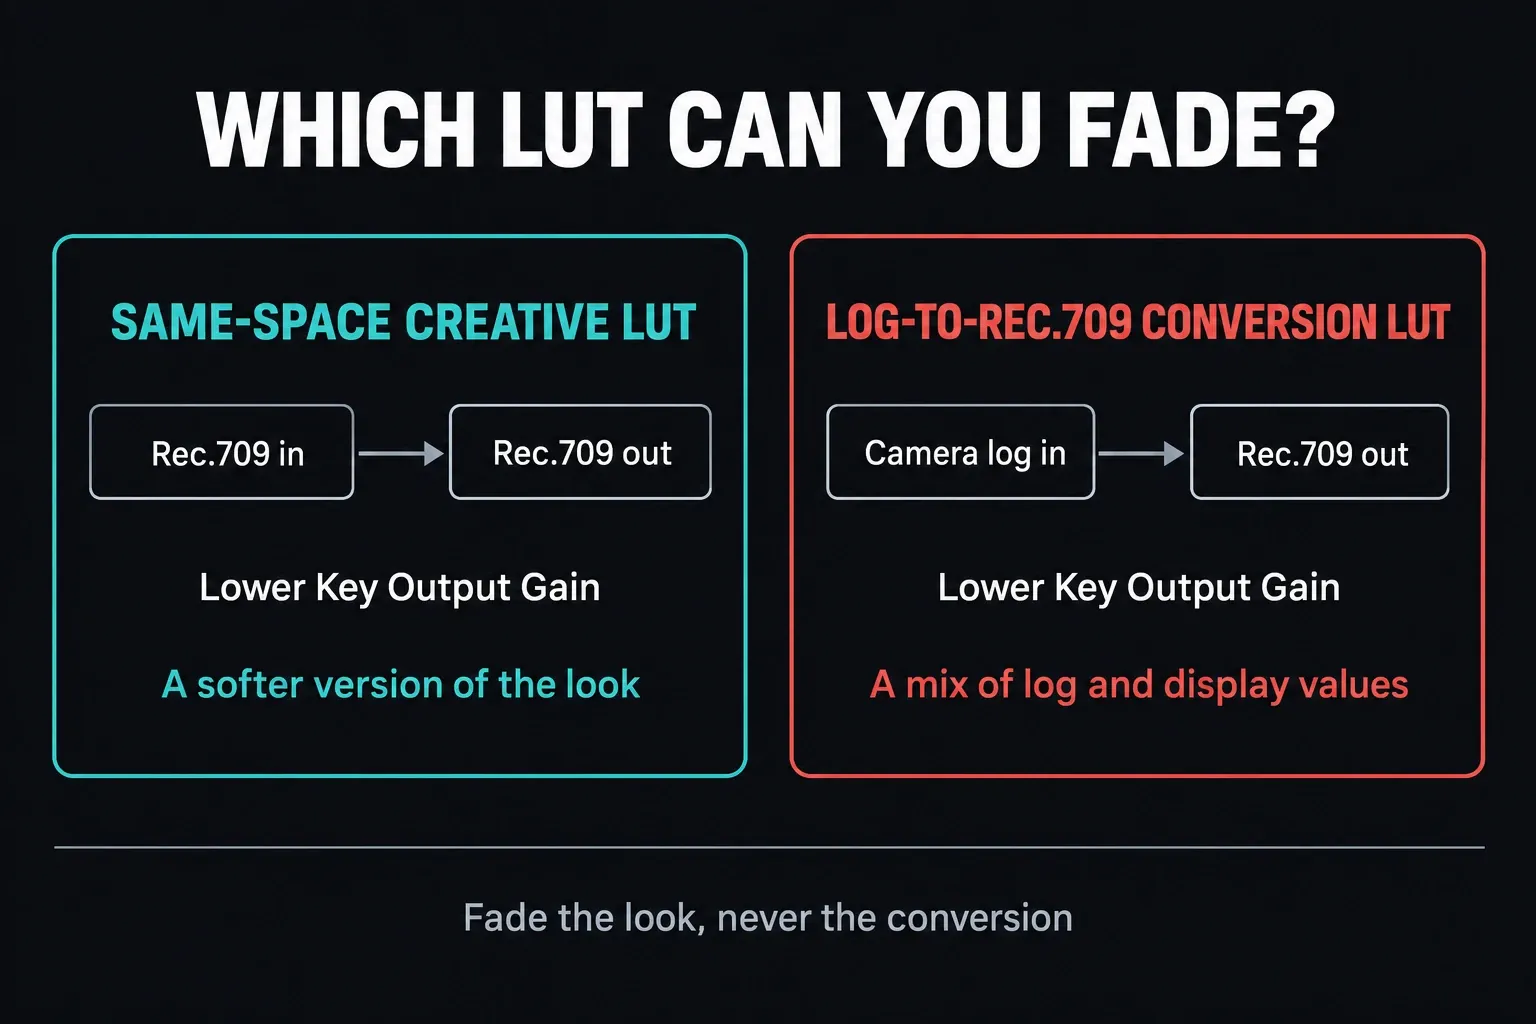
For a creative LUT that keeps the same input and output color space, select its node, open the Key palette and lower Key Output Gain. That blends the node's result back toward its input. It doesn't rewrite the LUT, and it won't fix a color-space mismatch.
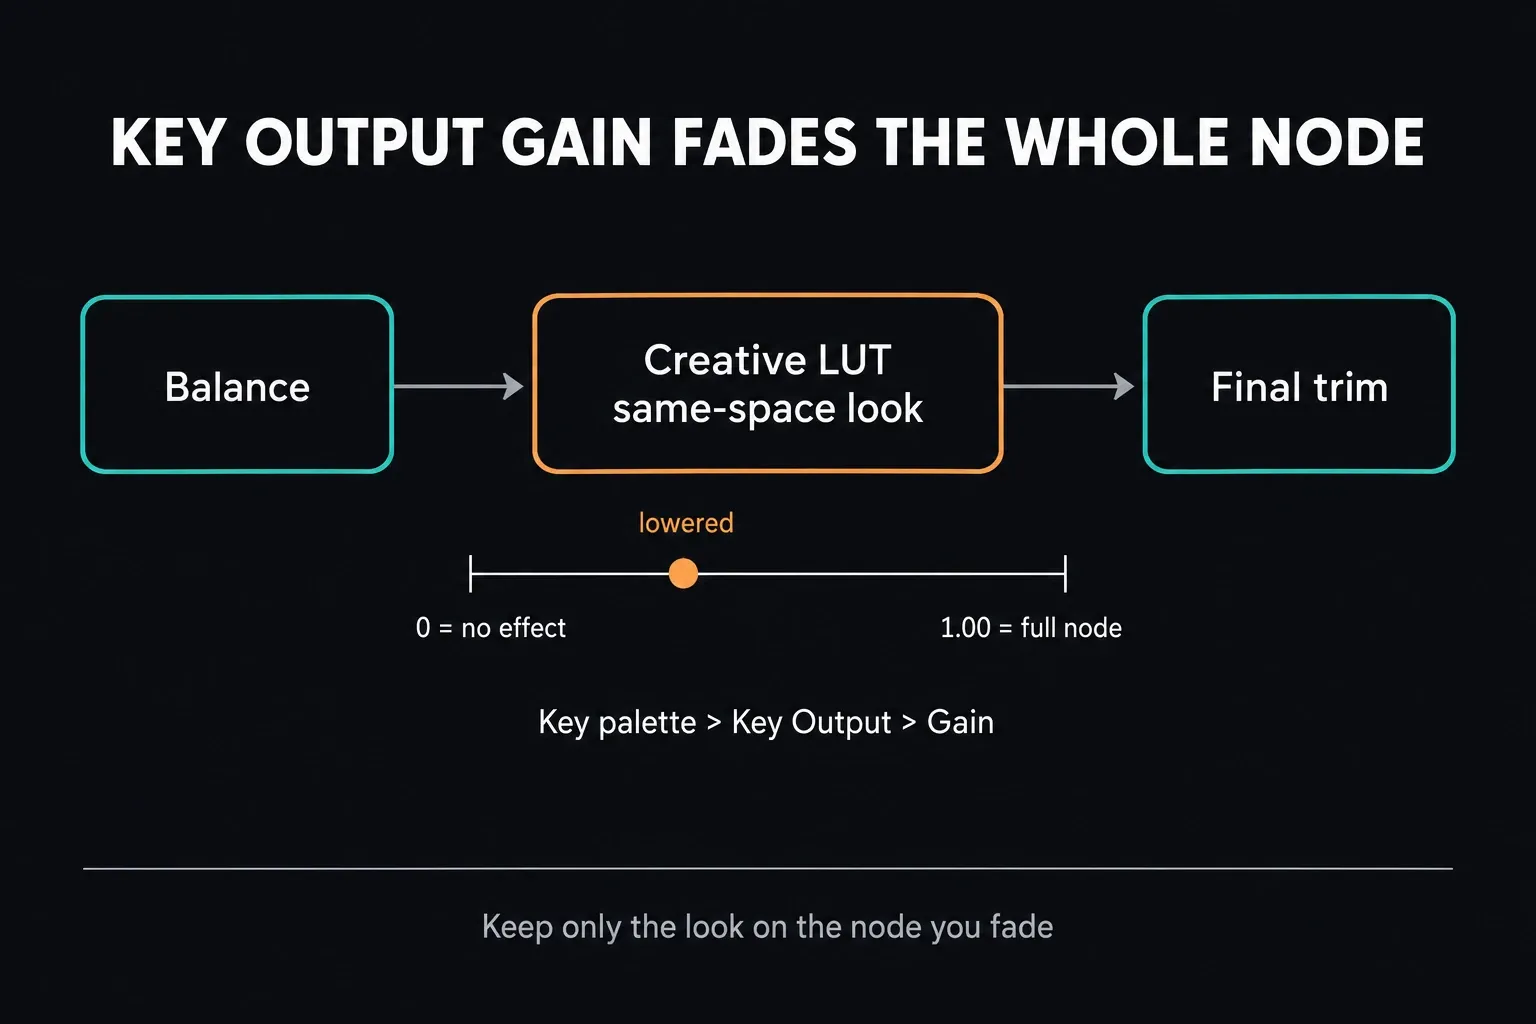
Keep a technical conversion at full strength. Lower the gain on a log-to-Rec.709 LUT and you get a mix of log and display-referred values, not a gentler but still correct conversion. If a LUT bakes a look into a technical transform, use a documented strength control or separate the look from the conversion before you blend anything.
Key Output Gain fades the whole node, including its exposure adjustments, windows and qualifiers. That's why the creative LUT belongs on a node of its own if you want predictable control. Start at the default 1.00 and compare the image and scopes as you lower it; at 0 the node has no effect at all. There's no universal percentage that suits every look or shot.
LUTs in Resolve Color Management and DaVinci Wide Gamut
A wide-gamut timeline isn't the problem by itself. The mismatch happens when a LUT designed for another signal receives DaVinci Wide Gamut/Intermediate values. Work out whether the LUT expects camera log, Cineon, Rec.709 or a scene-referred working space, and whether it returns a look in the same space or includes a display transform.
In Resolve Color Managed projects, input and output mapping may already happen outside the clip node tree. Stack a camera-to-Rec.709 LUT or a duplicate CST on top of that and you can apply the conversion twice. Inspect the clip's Input Color Space and the project Timeline/Output spaces before you add another transform.
A CST before the LUT is appropriate when it deliberately converts the current working signal into the LUT's required input. A CST after it is appropriate only when the LUT's documented output must go back to another working space. Don't build an automatic “CST sandwich” around every LUT: a film-print LUT that already outputs a display-referred result can make that second transform wrong.
Converting the LUT's output back to a wide-gamut space can't restore detail that the LUT or an earlier transform clipped. In an RCM project, I'd prefer a creative LUT that expects and returns the timeline's working space whenever you don't have a documented integration for another LUT.
When the signal path is unclear, bypass the LUT and every adjacent transform, then switch them back on one at a time while you read the waveform, RGB parade and vectorscope. The Resolve scopes guide helps you separate real clipping from a viewer or monitoring impression.
Reduce LUT Banding Without Guessing
Resolve has to interpolate values between the points stored in a 3D LUT. Project Settings > Color Management > 3D Lookup Table Interpolation offers Trilinear and Tetrahedral. The current manual describes Trilinear as the backward-compatible default and Tetrahedral as slightly more processor-intensive, with higher-quality LUT/DCTL processing and reduced color banding.
Use Tetrahedral when the project doesn't need to reproduce an older grade or match LUT processing in another application. It's one check among several: also look at the source bit depth, the codec, the scopes and the result with each LUT bypassed. Stacking LUTs can compound clipping or quantization, so better interpolation is no excuse to keep every transform in the chain.
Creating a Custom LUT
Right-click a clip thumbnail in the Color-page timeline and open Generate LUT. Resolve 21 offers 17 Point Cube, 33 Point Cube, 65 Point Cube and Panasonic VLUT. The manual doesn't recommend 17-point LUTs for grading, but they're useful for on-set monitoring, where display, calibration and signal-conversion devices may need a smaller cube. Higher point counts sample the grade more precisely, at the cost of a larger file not every device accepts.
Choose the destination in the file dialog, enter a name and click Save. Write the intended input and output spaces into your handoff notes. If you save outside Resolve's LUT directories, copy the exported file into a configured folder and refresh the list before using it.
The native LUT Browser, the node workflow and the Generate LUT path are all part of the current Resolve 21 color workflow. None of them depends on the Studio-only AI tools and extra Resolve FX listed on the official DaVinci Resolve page. If the broader edition decision matters to you, use the Free vs Studio comparison rather than buying Studio to solve an ordinary LUT-install problem.
A generated LUT isn't a portable copy of the whole grade. Resolve can translate Primaries, Custom Curves and compatible Color Space Transform, ACES Transform and Gamut Mapping operations. Any node with qualifiers, Power Windows, incompatible filters such as sharpening or blur, or incompatible ResolveFX/OpenFX is completely ignored, along with every other correction in that node. Keep exportable adjustments on separate nodes, then re-import the LUT and compare it with the intended grade on footage with the same input encoding.
Frequently Asked Questions About LUTs
Are LUTs free to use in DaVinci Resolve?
Yes. The normal install, the LUT Browser, node application, Key Output Gain and Generate LUT all work in the free version of Resolve, so you don't need Studio for an ordinary .cube LUT. A third-party LUT pack can still carry its own price and usage license; free software support doesn't make every pack free.
Where can I get LUTs for DaVinci Resolve?
Start with the factory presets already in the Color page LUT Browser. For log footage, download the conversion LUT from your camera maker for the exact profile you shot. For creative looks, use a free or paid pack that states its expected input, usually Rec.709, then install it through Open LUT Folder and Update Lists.
Can I use LUTs made for Premiere Pro in DaVinci Resolve?
Usually, as long as the file is a compatible .cube LUT and you know the color space and gamma it expects. The extension alone doesn't guarantee a match: Resolve has to feed the LUT the same signal it was designed to receive.
Should a LUT go on a single clip's node or the whole timeline?
Use a clip or a camera group when the transform belongs to one source type. Use a timeline-level LUT only when every shot should get the same transform at that stage. With mixed cameras, one global technical LUT can misinterpret part of the timeline.
What's the difference between a 1D and 3D LUT in DaVinci Resolve?
A 1D LUT maps each channel independently, which suits tone curves and per-channel transforms. A 3D LUT maps red, green and blue together, so it can change hue and saturation as well as tone. Resolve 21 supports both in .cube workflows.
Why does my LUT look wrong in DaVinci Resolve?
Check for a signal mismatch first: the wrong camera gamut or gamma, duplicate color management, or a LUT receiving DaVinci Wide Gamut when it expects another space. Verify its documented input and output, then check exposure and clipping before you change saturation or stack another LUT.
How do I reduce LUT strength in DaVinci Resolve?
For a same-space creative LUT, put it on its own node, open the Key palette and lower Key Output Gain. That fades the whole node. Don't use the same shortcut to weaken a technical log-to-display conversion, because it mixes differently encoded signals. Separate the creative look from the conversion first.
Should I use a LUT or a Color Space Transform in DaVinci Resolve?
Use Resolve Color Management or a Color Space Transform when you need an explicit, adjustable conversion between known color spaces. Use a technical LUT only for the exact input it was built for, and use a creative LUT when you want its specific look.
The Color Grading hub picks up from here, taking color management, scopes, node structure and matching in a deliberate order. A LUT should make a known pipeline faster. It should never be the part of the grade you can't explain.
