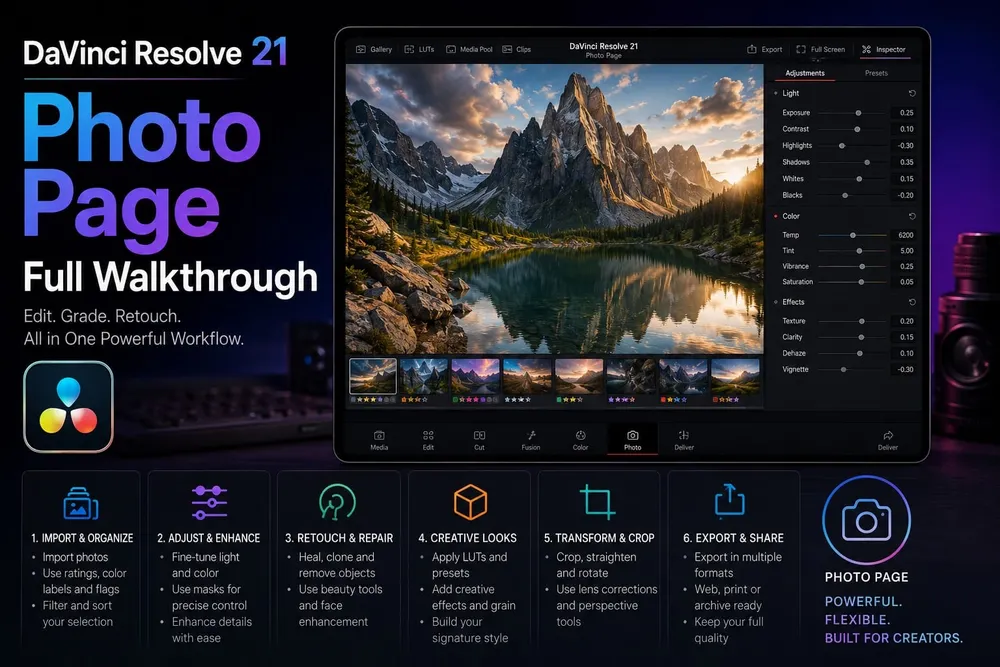
DaVinci Resolve 21's Photo page gives still images their own import, album, culling, adjustment and export workflow. The slider panel is perfectly usable, but the real reason to open this page is what sits behind it: a native-resolution Photo Album can go straight into the DaVinci Resolve color grading workflow or the Fusion page, where the nodes, scopes, masks and effects video colorists already know are waiting. I'll follow one shoot from import to delivery and point out the Free and Studio limits before they cost you an export.
What the Resolve 21 Photo Page Actually Adds
This walkthrough covers Resolve 21, including the Photo changes in 21.1. When I checked Blackmagic's support downloads on October 5, 2026, the current stable update was 21.1.1 build 10, released October 2; the Photo features below follow the 21.1 manual and release notes. Blackmagic's official Photo page describes albums, source-resolution processing and access to the Color and Fusion toolsets, so stills get their own route through those tools and no longer have to ride along as video-timeline media. If Resolve itself is new to you, learn the page layout with the beginner Resolve workflow first.
The page handles five jobs: importing stills, organizing them in bins and albums, culling with tags and ratings, making RAW or Photo adjustments, and exporting an album or a selection. Lightbox view puts several images side by side while a selected grade updates. The Metadata panel shows file and camera fields, and the Viewer can display EXIF details such as camera model, ISO, shutter speed, aperture and lens.
The Resolve 21 Reference Manual lists Canon CR3, Fujifilm RAF, Apple ProRAW, Nikon NEF, Sony ARW and Panasonic Lumix RW2 for Photo RAW controls. Read that as a list of formats. It doesn't promise every camera model or compression mode. JPEGs can still be adjusted, but their RAW tab stays greyed out because the sensor data was already processed in camera. Run a file from your own camera through the page before you commit a shoot to it.
The 21.1 release notes add camera controls for Fujifilm, Leica and Sony Alpha 7R VI, improve post-decode sharpening for RAW images, add DNG support for lens distortion, aberration and shading, and bring Sky Replacement to album photos. Camera control and RAW decoding are separate capabilities, though, and support for one tells you nothing about the other on a given body.
Photo Page Workflow: Import to Export
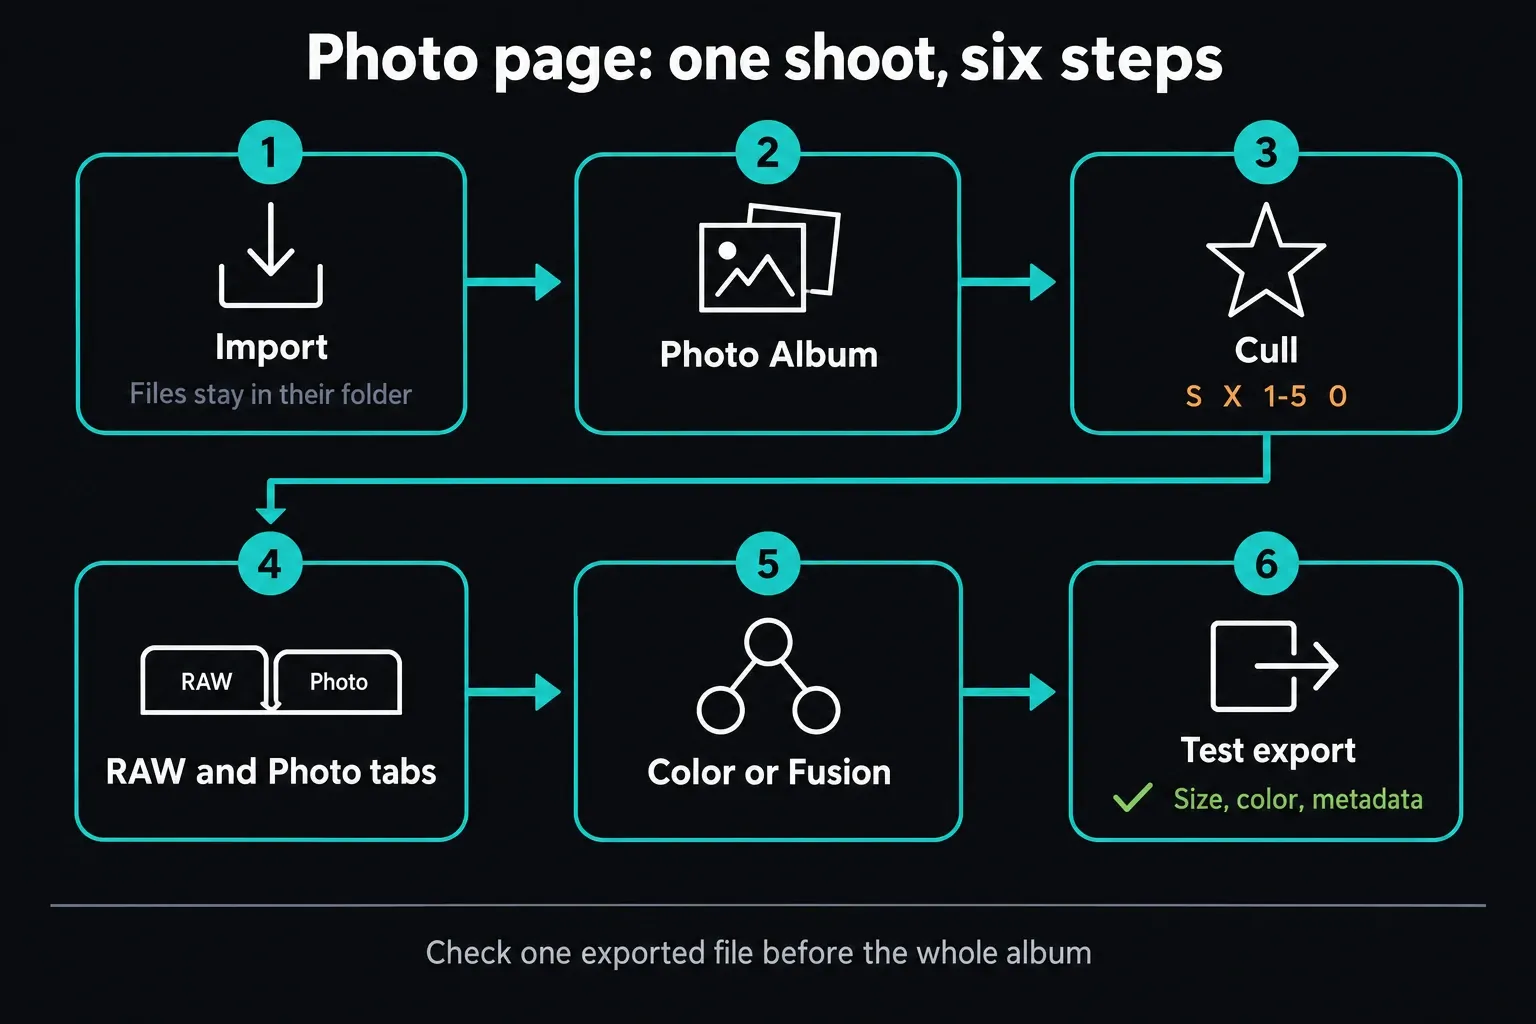
- Create a project for the shoot. Keep the original photos in a stable folder and back up both the source files and the Resolve project. The project holds your edits; the photos themselves stay where they are.
- Open the Photo page and bring the stills in with Import Media, Import Media Folder, Import From Photos on macOS, or File > Import > Lightroom Catalog.
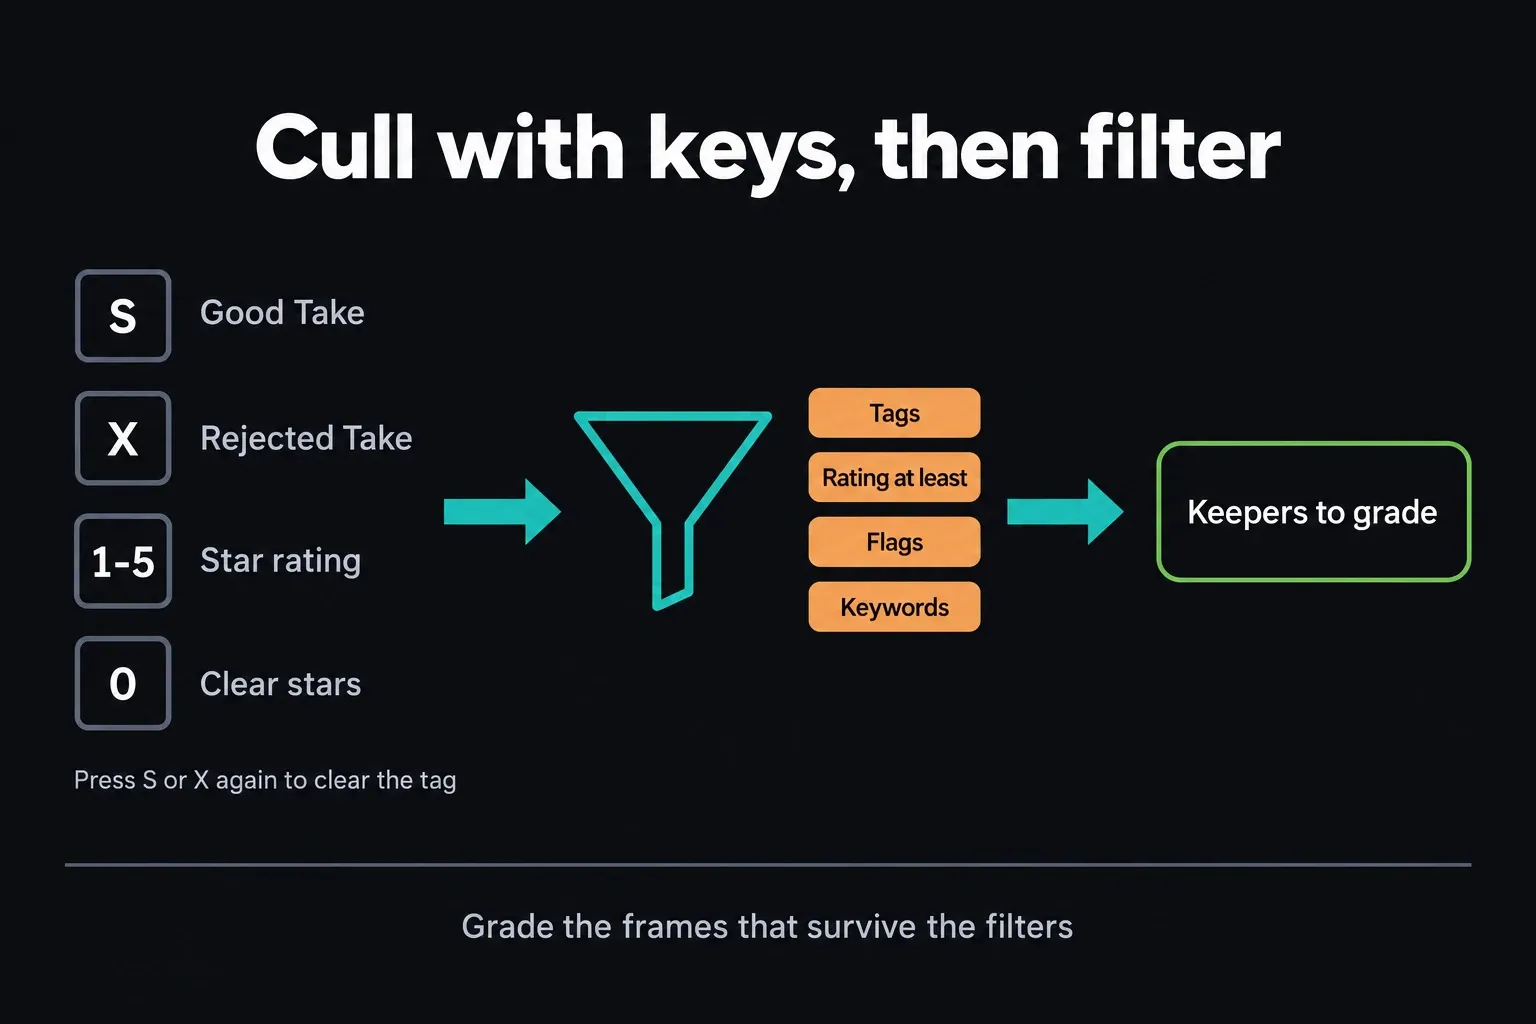
- Choose File > New Photo Album. Select photos in the Media Pool, right-click and choose Add Photo(s) to Album. Then cull: S marks a Good Take, X marks a Rejected Take, 1–5 adds stars and 0 clears the rating.
- Use the RAW tab for supported camera RAW controls and the Photo tab for general adjustments. Save a Version whenever you want an alternative look.
- Open the album in Color for a full node grade or in Fusion for compositing, then come back to Photo for review.
- Export a small selection first. Open it in the application that will receive it and check dimensions, color, compression, filename and metadata before you export the full album.
Importing Folders, Apple Photos and Lightroom Catalogs
Import Media takes selected files, and Import Media Folder brings in a whole folder. Import From Photos only exists on macOS, and the manual also lists Import Blackmagic Cloud Folder for shared cloud folders. In the Photo page the Media Pool shows still images only, while bins stay the broader organization layer for the project. Make as many albums as the project needs; adding a photo to an album doesn't duplicate the source file.
Lightroom migration comes with a clear warning. File > Import > Lightroom Catalog brings the photos into Resolve in their original state, and the manual says no Lightroom presets or edits come with them. You're moving media here, and the edits stay behind in Lightroom. Compare a representative image before you move a live catalog.
Culling and Organizing Photo Albums
If imported pictures seem to be missing, check the active bin, album and filters first. The Photo Media Pool hides video and audio clips, so it won't show every media type in the project. Leave files in their original folder, or use Relink Media if you moved them on purpose; its icon turns orange when Resolve can't find a previously imported image.
A Photo Album is a curated set of stills with no before or after, so you can't drag photos into a new order the way you would on a timeline. Filtering is how you reorder and narrow it. Switch between Single View and Lightbox, then filter by good or rejected tags, rating, flags, color, keywords, graded state or other available metadata. Right-click a filter icon for the detailed criteria; the rating filter can be set to equal to, at most or at least a chosen star count.
Culling gets fast once the shortcuts are in your fingers: S toggles Good Take, X toggles Rejected Take, 1 through 5 set a star rating and 0 clears it. Pressing S or X a second time clears the tag. In Lightbox, use those marks to cut the set down before you grade. Seeing the whole shoot at once is handy, but save your grading time for the keepers.
Grades, Albums and Versions
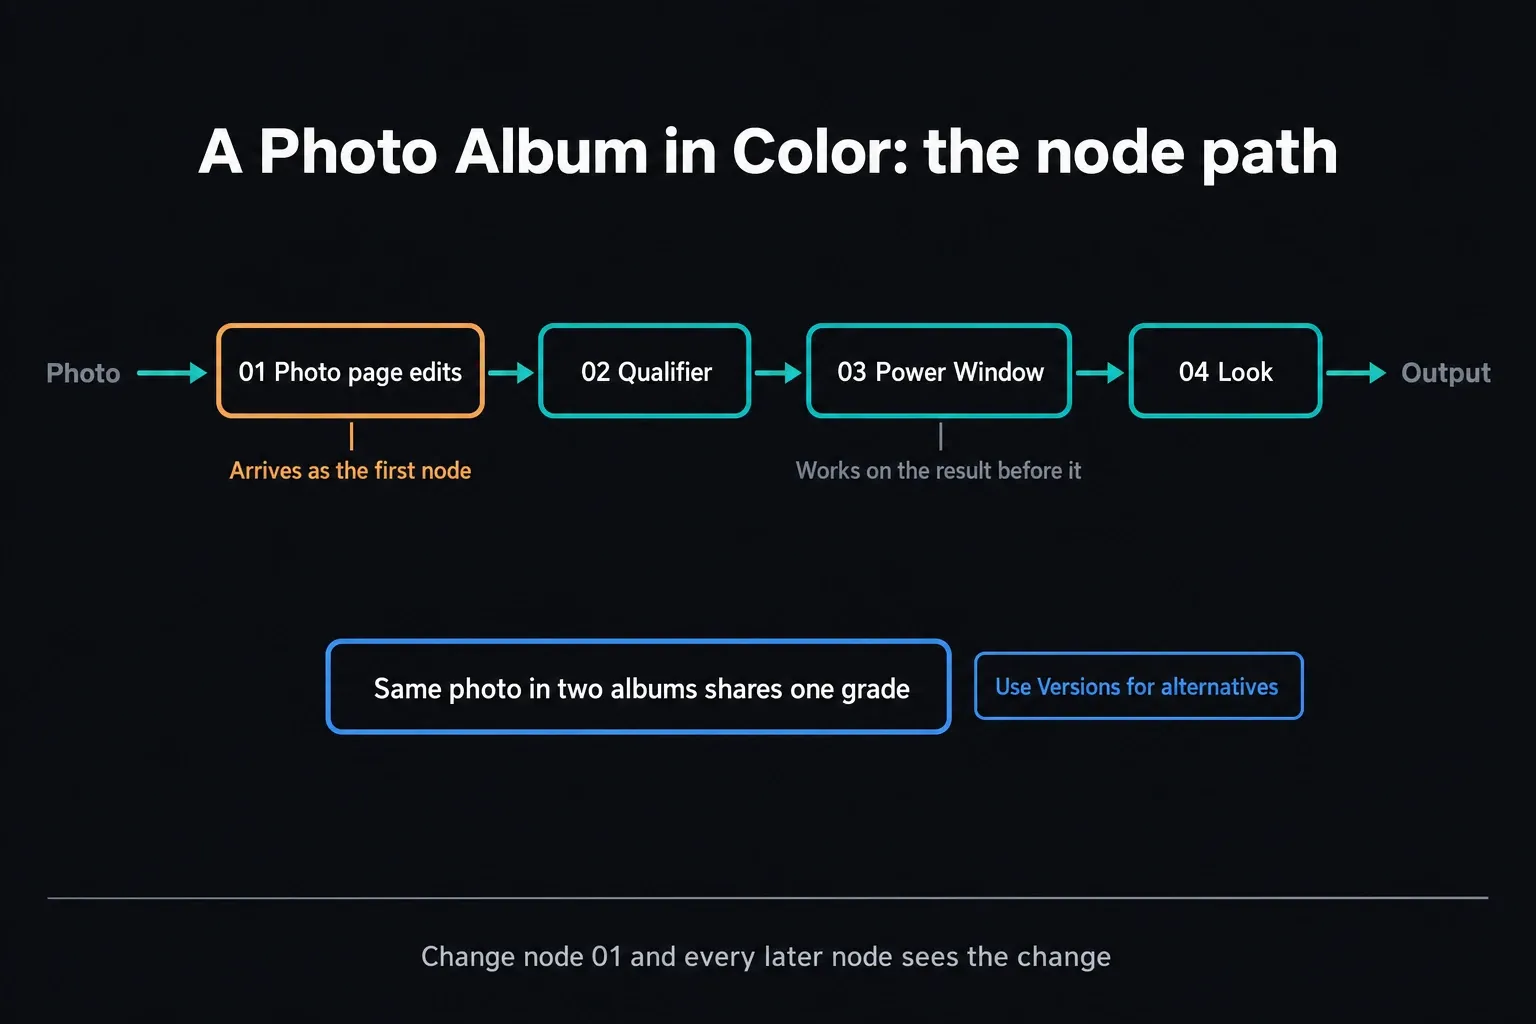
Grades and effects on stills are applied at the source level. Put one source photo in several albums of the same project and all of those albums share its grade. That's great for consistency, and useless when a social crop, a print look and a client alternative need to stay independent.
That's the job Versions do. Right-click the photo in its album, choose New Version and give the alternative a name before you try a different look, then switch back through the version dropdown under the Photo Viewer to compare. Quick Export and the Deliver page only export the version that's currently selected; Resolve ignores the others until you pick them.
RAW, Photo and Node-Based Grading
A supported RAW file switches on the RAW Inspector tab. You get decode and white-balance choices, with As Shot plus the Daylight, Cloudy, Shade, Tungsten, Fluorescent and Flash presets, along with temperature, tint, exposure and camera-dependent controls. The Photo tab handles general tonal and color work. Reset Camera Raw and Reset Photo are separate commands in the Inspector's three-dot menu, which helps when you need to find out where an adjustment came from.
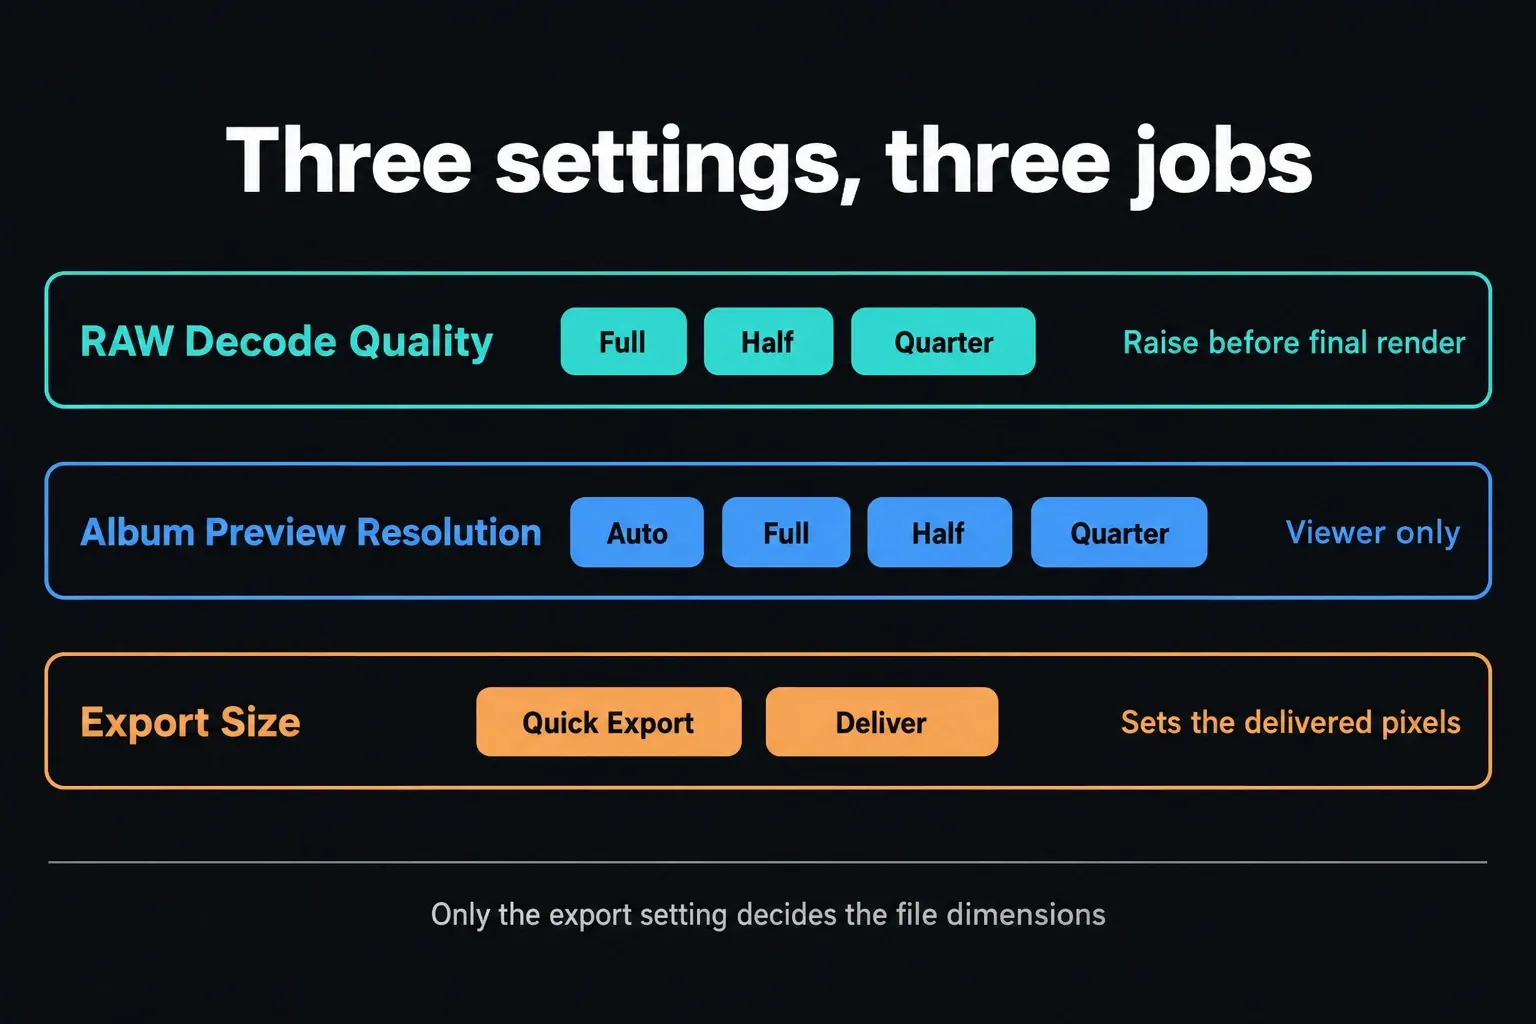
Keep RAW Decode Quality and Photo Album Preview Resolution apart in your head. Decode Quality debayers at Full, Half or Quarter resolution and trades quality for speed, so switch back to a higher setting before the final render. The album preview control only shrinks the working preview. In 21.1, each RAW parameter in the Inspector also gets its own reset icon, so you can undo one adjustment and keep the rest.
For deeper work, open the Photo Album on the Color page. Your Photo-page adjustments become the image's first node, and after that you have the normal node graph, qualifiers, Power Windows and scopes. Treat it as a grading pipeline. The Photo-page node and the Color-page nodes after it are separate stages in the image path, so each later node works on whatever the one before hands it.
To reuse adjustments, copy the reference photo, select the destination photos and choose Edit > Paste Attributes. Tick only the attributes you want; effects sit under Photo Attributes > Plugins. Middle-click copying works differently. It skips applied effects, and RAW settings only carry over between files of the same RAW format. Check one destination photo before you spread a look across the whole shoot.
For responsive viewing, Playback > Photo Album Preview Resolution offers Auto, Full, Half and Quarter. Auto, the default, scales anything over 4K down to a 4K working preview. None of these settings changes the export dimensions. Switch to Full when you need to judge fine detail, and judge final sharpness on the exported file itself.
Which Photo Features Require Studio
The core workflow runs without a Studio license: import, albums, culling, RAW and Photo adjustments, Color-page grading and standard export. Blackmagic documents Free output as Ultra HD or lower (3840×2160 in its edition comparison), even though Free can process larger source images. Picking Original in the size menu won't get you past that ceiling, so check the actual pixel dimensions, especially for portrait and print delivery. Higher-resolution output needs Studio.
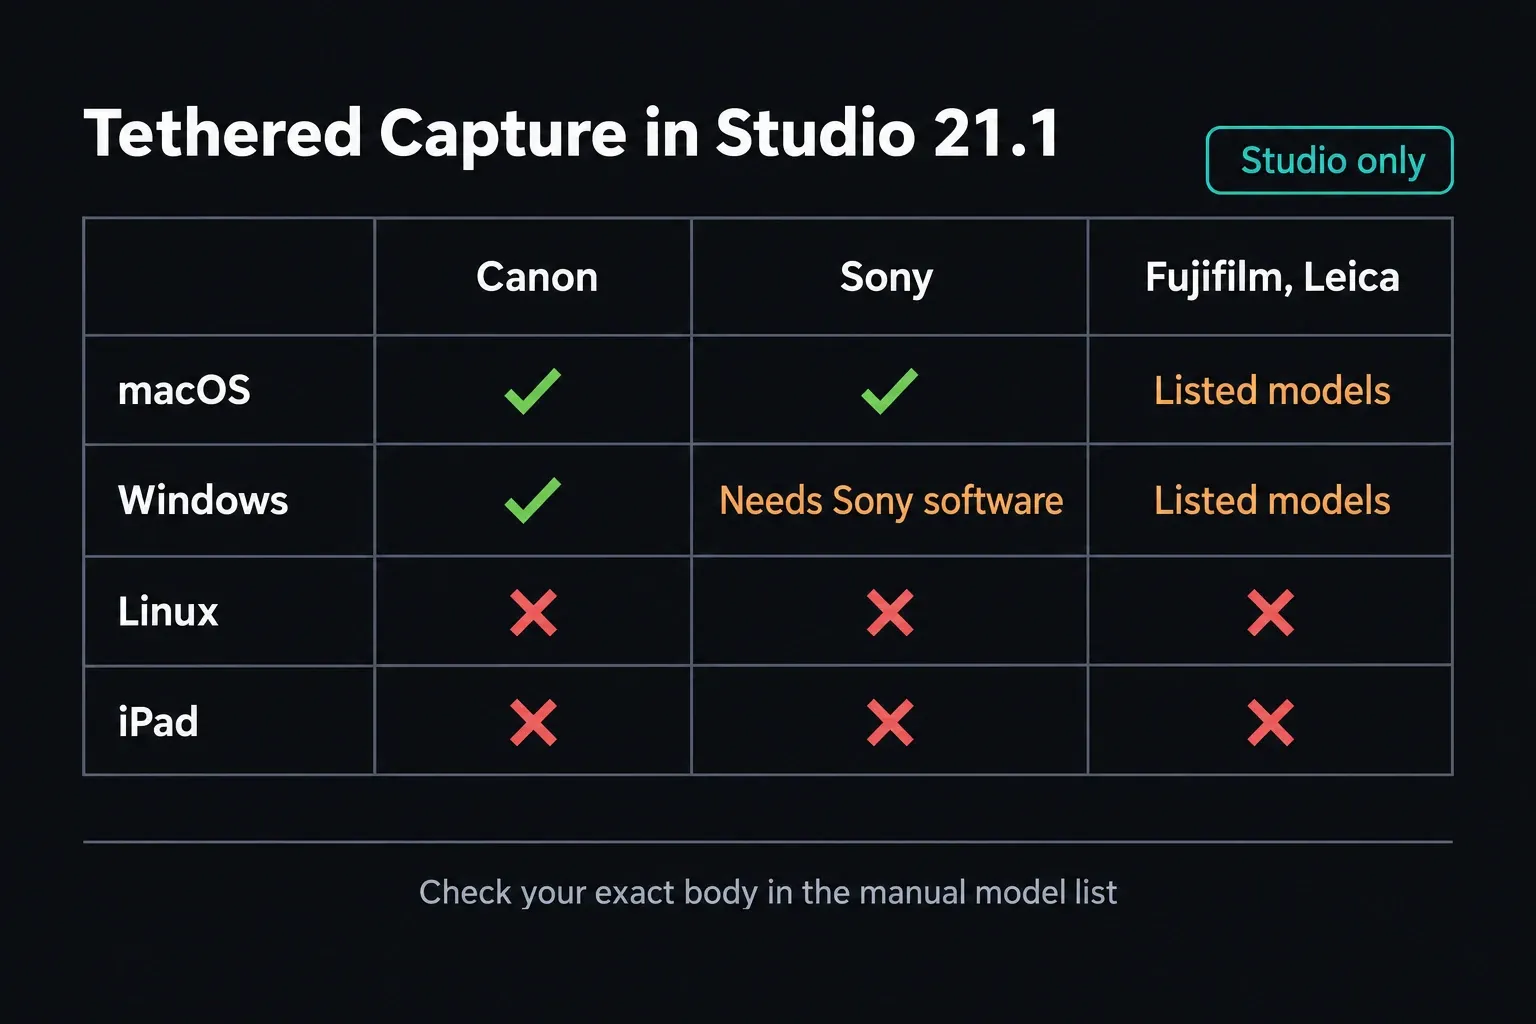
- Tethered Capture: Studio-only. Canon and Sony support is extended in 21.1 with Fujifilm, Leica and Sony Alpha 7R VI camera controls. The manual lists most modern Canon EOS and Sony bodies, named Fujifilm GFX and X-series models, and the Leica SL2 and SL3; check your model and platform anyway.
- IntelliSearch: Studio-only. Once the required model is installed and the media analyzed, it searches by people and objects.
- Magic Mask v2, Depth Map, CineFocus and Film Look Creator: marked Studio-only in the current Resolve 21 manual.
- Blemish Removal and UltraSharpen: Studio-only. Both help with retouching or selective sharpening, and both need a close look for artifacts.
- Other Resolve FX: licensing varies by effect. Look for the Studio label on each one; showing up in the library doesn't make an effect free.
For the full license boundary, output ceilings and the current US price, see the DaVinci Resolve Free vs. Studio comparison. The Resolve 21 AI tools guide covers setup and failure cases for the paid tools, and what’s new in DaVinci Resolve 21 explains the changes across the rest of the application.
Tethered Capture: Exact Support and Limits
Tethering isn't part of Resolve Free. In Studio, Capture sends each shot to the Media Pool or a chosen Photo Album and shows the controls the connected camera supports: aperture, shutter speed, ISO, exposure compensation, focus controls and Live Preview. Settings the camera doesn't support are greyed out. There's also a half-press button for locking autofocus and an overlay tool for matching a previous shot.
Switch on the camera's tethering mode as its manual describes, connect it by USB and open Capture in Resolve. Pick the save Location and the target bin or album, then take a test shot. If Resolve doesn't see the camera, close any other application that connects to it automatically and try restarting Resolve. Check both image transfer and the controls you need before the client arrives.
- macOS: Canon and Sony tethering are supported natively.
- Windows: the manual documents native Canon support and says Sony cameras need additional Sony software installed.
- Linux and iPad: Live Capture and tethering aren't supported.
- Fujifilm and Leica: 21.1 adds camera control. The manual names the supported Fujifilm bodies, from the GFX100 II and GFX100S to the X-H2S, X-T5 and X-M5, plus the Leica SL2 and SL3. It gives no separate operating-system notes for these brands, so verify your body and setup before a live session. RAW import support on its own proves nothing about tethering.
For a tether-first job, look up your exact camera in Capture One's camera support table, where RAW decoding, tethered capture, Live View and wireless support are listed as separate entries. Resolve makes sense when you need its Color and Fusion environment. Pick the application that supports the whole capture workflow for your body; the brand name alone won't tell you that.
Quick Export and Deliver Settings
Quick Export supports JPEG, PNG, HEIC and TIFF. Choose Entire Album or Selected Photos on purpose, then set the filename prefix, scale, quality or compression and bit depth where the format offers them. Scale sets the image dimensions. Resolution is only a pixels-per-inch value, and raising it won't add detail. Include Metadata is optional and can carry location data, so decide what belongs in the delivered file.
For more control, keep the Photo Album active and open Deliver. Choose the destination folder, format, size and Entire Album or Selected Photos. Size options are Original, Width and Height, Short Side, Long Side, Percentage (25% to 100%) and Megapixels, and Resolution can be set in ppi or ppcm. Quick Export calls the Apple-oriented format HEIC, while the Deliver list calls it HEIF. The controls you see depend on the format you pick.
To keep a link to the source file, use the + menu or type % in the file-naming controls and pick the source-name metadata field. Check the resulting name in a test export. Click Add to Render Queue, repeat with different settings if you need another size or format, then click Render All. Selecting photos in the album won't limit the export by itself; you still have to choose Selected Photos in the export settings.
Before exporting the whole album, open a test file in the application that will actually receive it. Compare crop, pixel dimensions, color, compression, filename and metadata. If the colors differ, check the RAW interpretation, color-management settings and output profile before you reach for a corrective grade. If detail looks soft, check RAW decode quality and export size. A smaller JPEG file on its own says little about image quality; compare the visible result at the same dimensions.
Where the Photo Page Fits Against Lightroom and Capture One
Resolve's clearest advantage is one color and compositing environment for hybrid productions. A Photo Album opens in Color or Fusion at native photo resolution, and the same project can hold the motion work. That matters when stills and video need one look, or when a node-based grade counts for more than catalog automation.
Lightroom imports leave the edits behind. Tethering still needs Studio and a supported camera and software combination, even with the brands added in 21.1. And Resolve keeps photos inside projects; there's no Lightroom-style lifetime catalog. Run one complete job, archive and delivery included, before you move an established library.
Photo Albums don't behave like ordinary video timelines. The manual says Cut, Edit and Fairlight can do little more than display the album as a timeline, because a Photo Album is non-temporal. To use a finished Photo-page image in a normal video edit, export it and import the rendered still as regular media. Color and Fusion are the pages that work with the album directly.
Large native-resolution photos, complex node trees and AI effects can push the GPU and memory hard even when the interface opens without trouble. 21.1 also adds hardware-accelerated HEIC decoding on Apple Silicon. Check the current Resolve 21 system requirements and practical hardware guidance before you move a large shoot.
DaVinci Resolve 21 Photo Page FAQ
Can DaVinci Resolve 21 edit RAW photos?
Yes. The manual documents Canon CR3, Fujifilm RAF, Apple ProRAW, Nikon NEF, Sony ARW and Panasonic Lumix RW2. Resolve 21.1 also improves RAW sharpening and adds DNG lens-correction support. Try a real file from your camera, because format support doesn't cover every model or compression mode.
Is the Resolve 21 Photo page free?
Yes. Albums, RAW and Photo adjustments, Color-page grading and standard export all work in Resolve Free. Blackmagic caps Free output at Ultra HD or lower, and choosing Original doesn't lift that cap, so check the exported pixel dimensions. Tethered Capture, IntelliSearch and the named Studio effects require Studio.
Does Resolve import Lightroom edits?
No. Resolve can import a Lightroom catalog through File > Import > Lightroom Catalog, but the Resolve 21 manual says the images arrive in their original state without Lightroom presets or edits.
Which cameras can tether to the Resolve Photo page?
Studio supports Canon and Sony tethering, and 21.1 adds Fujifilm, Leica and Sony Alpha 7R VI camera controls. The manual names the Fujifilm GFX and X-series models and the Leica SL2 and SL3. The manual documents native Canon and Sony support on macOS, while Sony cameras on Windows need additional Sony software. Linux and iPad don't support tethering. Verify your exact model and setup, especially for the newer brands.
Do Photo page grades change the same photo in every album?
Yes. Grades and effects on stills are applied at the source level and shared across every album in the project. Create named Versions when you need alternative looks; only the selected version exports.
Which still formats can the Photo page export?
Quick Export supports JPEG, PNG, HEIC and TIFF. The Deliver page lists HEIF, JPEG, PNG and TIFF and adds a render queue, naming and sizing controls. Turn on Include Metadata when the client needs it, then inspect a test file outside Resolve.
Can a Photo Album go directly into an Edit-page video timeline?
Only as a view. Photo Albums open directly in Color and Fusion, while Cut, Edit and Fairlight mostly just display the non-temporal album as a timeline. Export the finished photo and re-import it as a regular still for a video edit.
Does the Photo page replace Lightroom or Capture One?
For hybrid creators who want Resolve's nodes and one shared photo and video project, it can take over part of the workflow. It won't import Lightroom edits, and tethering needs Studio plus compatible camera software. Try culling, RAW interpretation, export and archive on a complete job before switching.
