
DaVinci Resolve's scopes answer different questions about the same frame. Waveform shows signal level and keeps horizontal position. Parade splits the components apart, so a channel imbalance is easier to spot. Vectorscope maps hue and saturation. Histogram counts pixels across the tonal range. CIE Chromaticity compares color values with a gamut boundary.
They measure the signal. They can't tell you whether a low-key shot, a warm practical light or a clipped sun is creatively wrong. That call is still yours.
A picture can look fine on an uncalibrated display and still hide clipped channels or a cast you never meant to add. I use scopes to investigate the signal and a calibrated reference display to judge how it looks. You need both.
I rechecked this guide on October 1, 2026 against the DaVinci Resolve 21.1 Reference Manual. On macOS, open the floating window with Workspace > Video Scopes > On/Off (Command-Shift-W). The same floating scopes are available from the Media, Color and Deliver pages, and a dual-screen layout can put them on another display.
Quick Map: Which DaVinci Resolve Scope to Use
Five scopes live in DaVinci Resolve's Color page, and you'll rarely need all five open at once.
- Waveform: exposure, contrast and clipping, with left-to-right image position intact. Choose Y, CbCr or RGB analysis.
- RGB Parade: component balance in separate lanes. Resolve also offers YRGB and YCbCr parade modes.
- Vectorscope: hue, saturation, color casts and a skin-hue guidepost.
- Histogram: pixel distribution from black to white without location in the frame.
- CIE Chromaticity: a rough gamut-boundary check, with 1931 xy or 1976 uv views.
Waveform, Parade and Vectorscope cover most correction work. Histogram earns its place when distribution matters more than location, and CIE comes in when the delivery gamut is part of the question. Opening every graph at once won't make your read more accurate. Usually it just makes the screen harder to read.
What a Resolve Video Scope Actually Measures
A scope analyzes the current image signal and plots levels or color components. It doesn't reproduce the picture. The Quality setting only affects drawing detail: pick High when you need to inspect a small excursion closely, or Auto to let Resolve balance it against your workstation.
The graphs don't measure your display's calibration, and they can't prove what another player will show. Confirm the signal path before you treat any reading as a delivery check.
For a focused working layout, I'd start with 2-Up or 4-Up from Workspace > Video Scopes, then choose a scope from the name menu in each pane. The floating window also supports 1-, 2-, 4- and 9-pane arrangements, and a multi-scope layout can show the same scope type twice with different settings. Open only the panels the current decision needs. To look closer on a Mac, hold Option and roll the scroll control to zoom into a graph, then drag with the middle mouse button to pan.
Waveform: Exposure and Clipping
In Y (luma) mode, the waveform maps signal level from left to right and keeps each feature's horizontal position in the frame. Height means level, not vertical position in the shot. It's a signal measurement. It doesn't directly measure scene brightness or the light coming off your monitor.
So a bright object in the bottom corner of your frame still shows up near the top of the waveform. It feels backwards until you remember the graph has no idea where things sit vertically. In RGB-based modes, the waveform shows channel information, not brightness alone; more on that below.
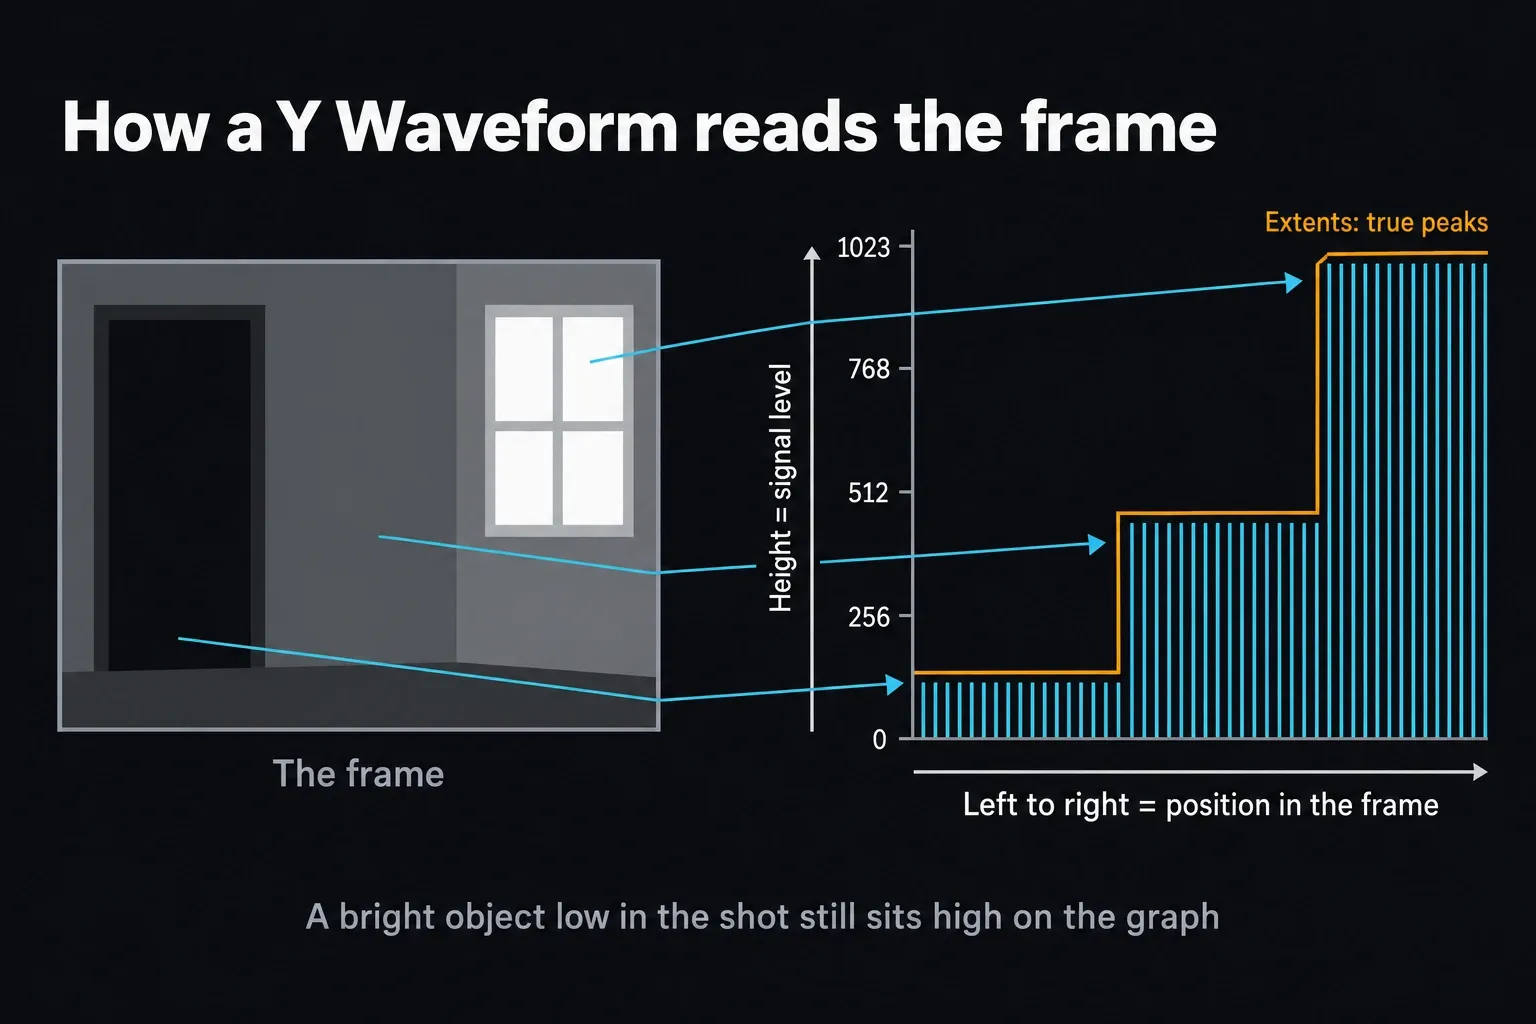
By default, Waveform and Parade use a 10-bit full-range display scale from 0 to 1023. The three-dot scopes menu also offers 12-bit, Percentage and millivolt labels. Those options relabel the measurement. They don't remap the clip or change the grade. Resolve 21.1 calls the 0–100 option Percentage, so don't read the label itself as a switch to legal range.
A trace touching the displayed ceiling is a reason to investigate. It isn't proof the camera clipped for good. Check the display range and any enabled transforms, compare the RGB channels, and lower exposure before the operation you suspect. If detail comes back, it was still there upstream. If the recording itself clipped, lowering it only makes the flat patch darker; no control can rebuild detail that was never captured.
A bright exterior doesn't have to touch 100 percent to be exposed correctly. There's no single right mark for every shot, because that depends on the subject, the lighting and your creative call. The waveform confirms an exposure decision you've already made. It won't hand you a target to hit regardless of what the shot actually needs.
Waveform vs Parade Modes: Y, RGB, YRGB and YCbCr
Open the Waveform pane's custom controls from its option button. Y shows true luma, CbCr isolates the color-difference components, and RGB overlays red, green and blue; in RGB mode, the R, G and B buttons toggle individually, so you can view any combination. Parade is the separated view, with RGB, YRGB or YCbCr components side by side. My default: Y Waveform for a fast exposure read, RGB Parade for channel comparisons, and YCbCr only when that component view helps the delivery check.
Reach for RGB Parade when you're comparing a neutral reference. For component chroma, select CbCr in Waveform or YCbCr in Parade. Waveform doesn't have Parade's combined YRGB or YCbCr modes. And a component reading alone isn't a complete broadcast compliance test.
RGB Parade: Finding Color Casts
Parade puts the component waveforms side by side. On a neutral patch, the matching red, green and blue features should reach similar levels; a channel that wanders away from the other two shows you the direction and tonal region of the imbalance. You're comparing matching image features here. The three traces don't need identical shapes overall.
Read the bottom, middle and top of the traces separately. A mismatch that lives only in the highlights calls for a different fix than one running through the whole signal. The graph tells you where the imbalance sits. It doesn't prescribe a fixed Gain, Gamma or Offset value.
A colored lamp or neon sign can legitimately push the parade off balance. Compare a surface you know is neutral under the light you want to render as neutral, like a grey card or a white shirt. Skin isn't a neutral RGB patch, so don't try to equalize its three channels.
Vectorscope: Hue, Saturation and Skin
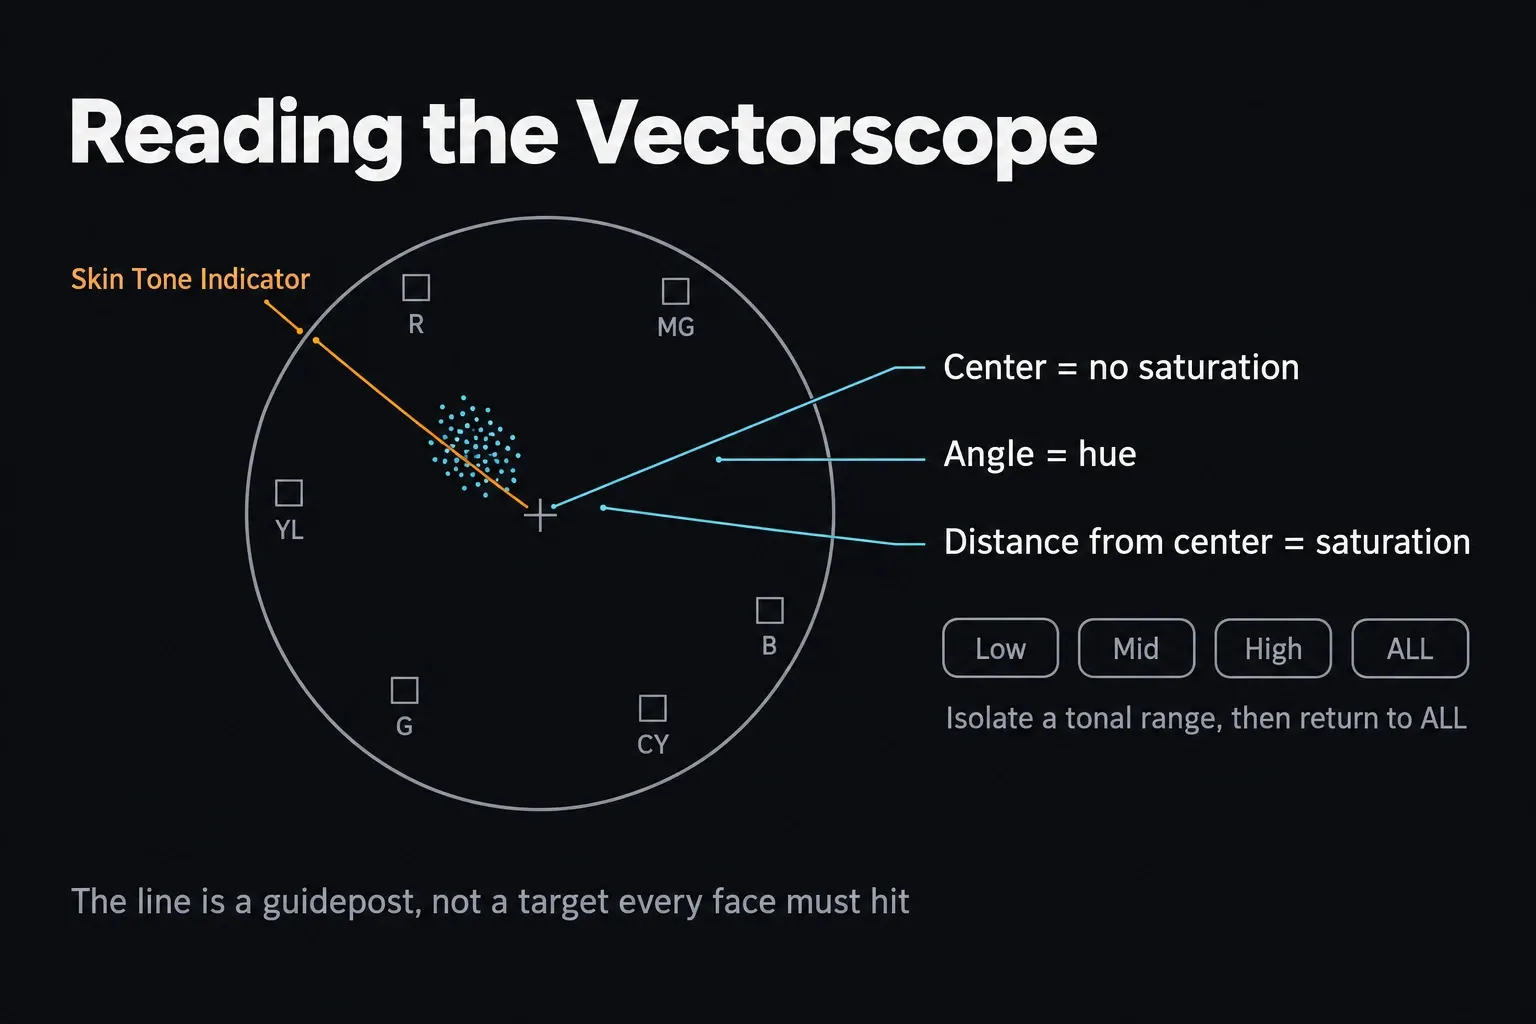
The vectorscope plots color on a circular graph. Distance from the center is saturation, and the angle around the circle is hue. A fully desaturated image, pure grayscale, collapses to a single point dead center. Push saturation on any color and its trace moves outward toward the edge, in the same rotational order you'd see on a standard color wheel.
Turn on Show Skin Tone Indicator in the Vectorscope controls to display the traditional in-phase angle. The Resolve 21.1 manual calls it a general guidepost for average skin-tone hue, and that's exactly how I'd treat it.
Complexion, undertone, lighting, makeup, white balance, camera color science and the look you're going for can all move the trace. Use the line to investigate a hue shift, but don't force every face onto it. Blackmagic's Color page describes the vectorscope as a way to spot unflattering green, yellow or magenta shifts, not as a universal skin coordinate.
If the trace is hard to read, the Vectorscope controls can isolate Low, Mid or High tonal ranges, show 2X Zoom, colorize the graph or display combined extents. The manual also suggests three Vectorscopes in a multi-scope layout, one each for Low, Mid and High, so shadows, midtones and highlights sit side by side. Isolate only long enough to diagnose the subject, then go back to the full image and judge the result on a calibrated display.
The 75% and 100% vectorscope targets are references for color signals. They aren't mandatory skin saturation levels or universal broadcast-safe limits. Vectorscope Scale Style in the three-dot menu changes how those references are drawn: Off, Standard, Simplified or Hue Vectors. The skin line gives you no luma target, so judge a face in its lighting context, not against a fixed saturation percentage or waveform height.
Histogram: Distribution Without Position
Histogram counts how many pixels fall at each tonal value, with black on the left and white on the right. Resolve offers RGB and YRGB views. Unlike Waveform, Histogram throws away horizontal image position, so a bright window on the left and a bright lamp on the right can produce similar peaks without telling you where either object is.
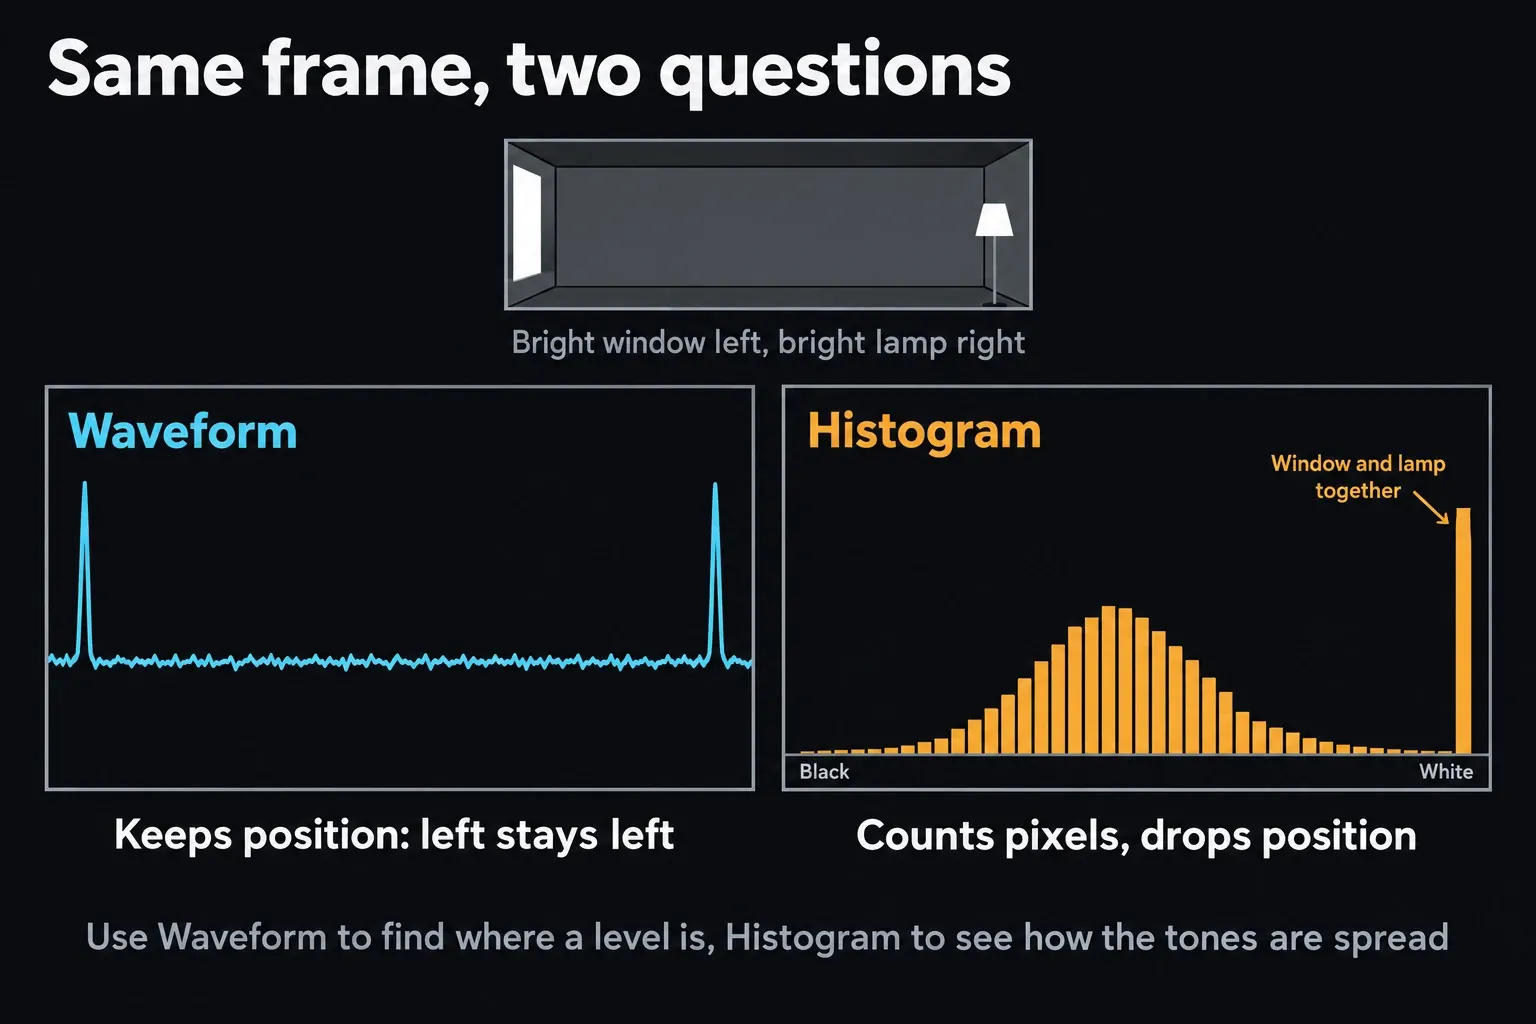
Use Histogram when the shape of the tonal distribution is the useful part, or when you want a second view of channel clipping. Use Waveform when you need to tie a high or low value back to a horizontal region of the image. For grading, that retained position usually makes Waveform the faster diagnostic tool, which is why I'd keep it open and treat Histogram as the second opinion.
CIE Chromaticity: Gamut Boundaries
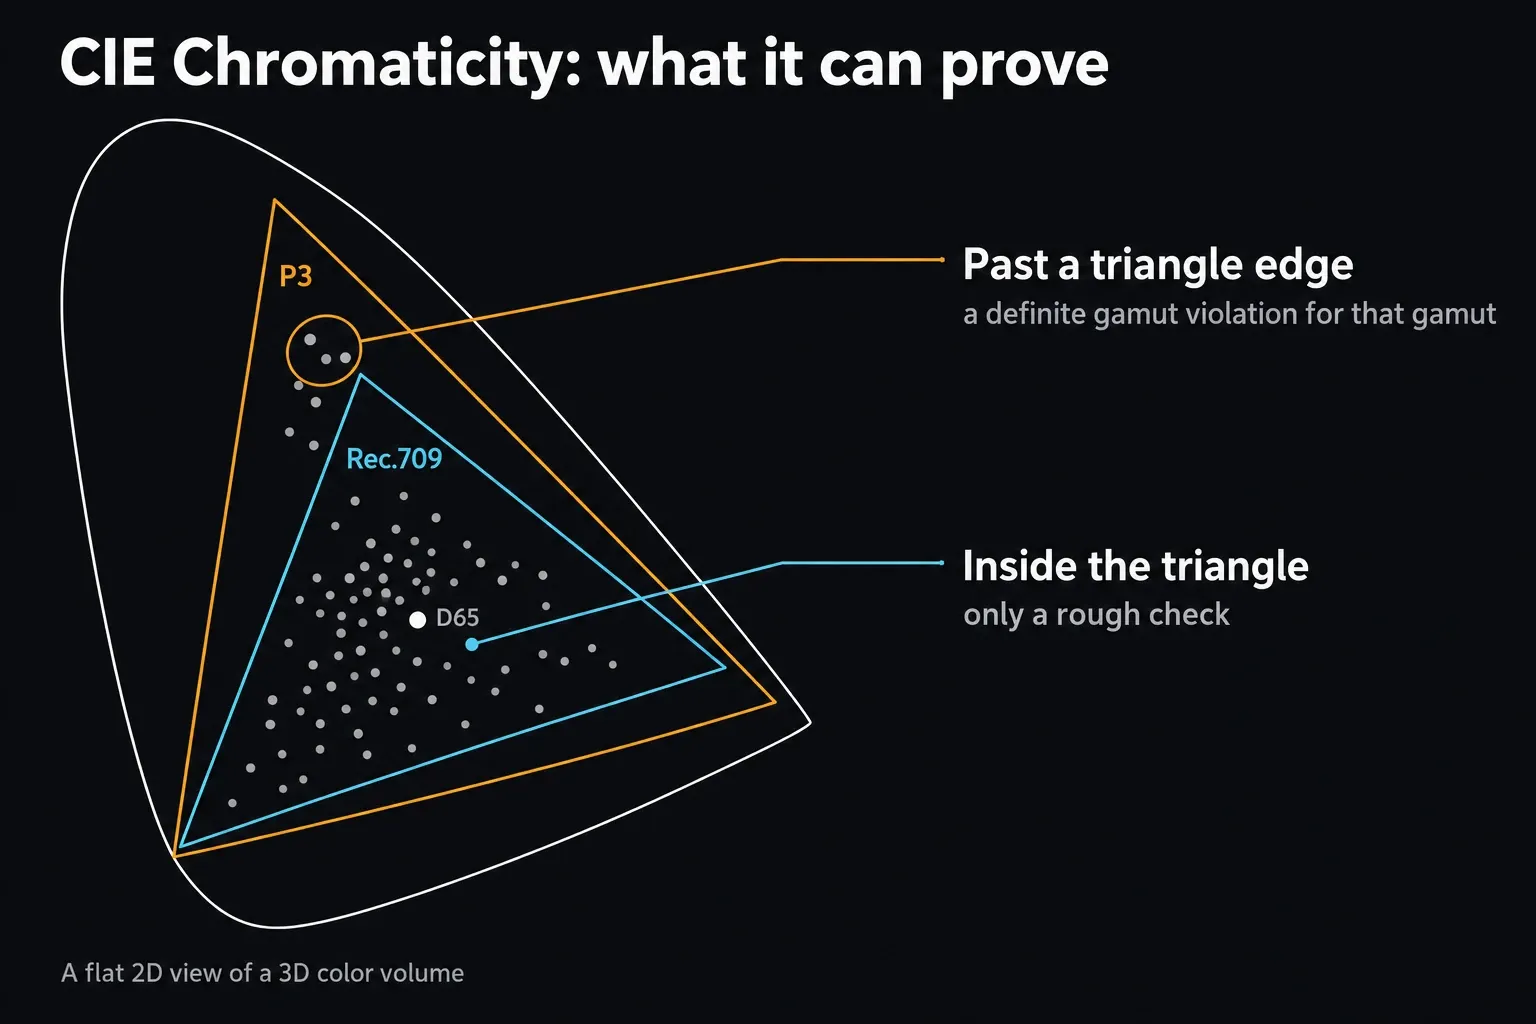
CIE Chromaticity draws the image analysis over a triangle for the selected working gamut and white point. Resolve 21.1 lets you switch between CIE 1931 xy and the more perceptually uniform CIE 1976 uv view, and you can add a second gamut triangle for comparison. When the trace crosses a gamut triangle, the manual treats that as a definite violation of that boundary.
The reverse doesn't hold. A trace inside the triangle is only a rough indication, because this two-dimensional view can't prove that every value in the three-dimensional color volume is safe across shadows, midtones and highlights. Treat CIE as a warning and comparison tool. It isn't a complete HDR or delivery validator.
Scope Scale vs Data Levels: Do Not Confuse Them
Keep three decisions apart: source-clip interpretation, scope display, and output-file mapping. The scope controls can't repair a wrong source range or a bad export tag.
In the scopes' three-dot menu, Waveform Scale Style picks 10-bit, 12-bit, Percentage, millivolt or Studio HDR labels. Video Level Scopes sits in that same submenu and changes the graph's Data/Video display mapping. Neither control changes the monitored or rendered image.
Clip interpretation and render mapping are two separate jobs. A source tagged or interpreted with the wrong range can enter the grade incorrectly, and a mismatched Deliver-page range or metadata choice can make the export play back washed out or crushed. Switching the scope ruler won't fix either problem.
For nominal 10-bit video-range coding, luma and RGB reference black and white are 64 and 940, and chroma runs 64 to 960 around neutral 512. Those are coding references, not universal exposure targets. They come from ITU-R BT.709, the recommendation that defines HDTV coding conventions.
Resolve's default scope ruler runs from 0 to 1023. Its Deliver-page documentation describes 10-bit Full output as 4 to 1019, and that isn't a universal definition for every codec. BT.2100, for example, distinguishes narrow-range permitted data from full-range coding. Follow the actual delivery format and receiver, not the scope labels. When a spec sheet names a range, compare the Resolve output-level documentation with BT.2100’s digital representation tables.
Don't choose Full just because the destination is the web. YouTube's current upload guidance says it converts full color range to limited range during processing. What keeps you safe is consistent interpretation, output mapping and metadata. The YouTube export settings guide walks through those Deliver-page choices, and the Color Grading hub keeps them in the wider color-management path.
| Scale option | What changes | Use it when |
|---|---|---|
| 10-bit (default) | Labels the WFM/Parade ruler from 0 to 1023 | You want a familiar scale for the internal signal |
| 12-bit | Relabels the same measurement on a 12-bit scale | Your specification or hardware workflow uses 12-bit values |
| Percentage | Labels the ruler from 0 to 100 | You read percentage faster than code values |
| Millivolt | Uses mV labels | You need that engineering reference |
| HDR ST.2084/HLG (Studio) | Shows Waveform, Parade and Histogram against nit values | The signal and project are set up for HDR measurement |
Low Pass Filter and Qualifier Focus
Low Pass Filter suppresses signal noise so dense Waveform and Parade traces are easier to read. It changes the graph, not the image, but it can make the visible highlight and shadow excursions look slightly shorter than they are. Turn on Extents whenever the filter is on: the outline keeps the true overshoots and undershoots, as Blackmagic documents.
Display Qualifier Focus ties a viewer sample to every open graph. Turn it on in the Video Scopes option menu, switch the Viewer to Qualifier mode, then move the eyedropper over the image. Resolve circles the sampled pixels in each visible scope. That beats guessing which cluster belongs to a face, a lamp or a clipped reflection.
Scopes and the Node Tree: What They Actually Measure
Scopes normally follow the signal shown in the Viewer after the enabled grade graph. Clicking a different node selects the correction you're editing. It doesn't solo that node or strip downstream processing out of the Viewer. The Resolve nodes guide explains graph order and bypass controls in context.
To inspect an intermediate stage, use a deliberate bypass or node-isolation method and confirm what the Viewer is showing before you read the graph. Highlight mode, a qualifier matte or a disabled downstream node can change the trace dramatically. The same caution applies when you evaluate a LUT in the node tree: confirm the input transform and node order before blaming the scope.
A Four-Step Resolve Scope Workflow
A useful pass moves from broad signal structure to delivery-specific checks:
- Waveform: find unintended clipping or crushed detail, while respecting the shot's lighting and creative contrast.
- RGB Parade: compare matching neutral features and locate channel imbalance by tonal region.
- Vectorscope: check hue direction and saturation; use the skin indicator as a guidepost when a face matters.
- CIE Chromaticity: compare against the delivery gamut when wide-gamut or HDR output makes that boundary relevant.
Then go back to the calibrated picture. The graphs answer measurable questions, and the image decides whether the correction serves the scene. For the full correction-first order around this pass, follow the beginner color-grading workflow.
Scopes: Free vs Studio
Blackmagic walks through the five standard scope types in Resolve's Color tools. The scope feature the Resolve 21.1 manual explicitly marks as Studio-only is HDR (ST.2084/HLG) measurement, which swaps the ordinary Waveform, Parade and Histogram scale for nit values. The standard SDR readings covered here don't need that HDR scale.
For HDR, select Waveform Scale Style > HDR (ST.2084/HLG) only when the project and signal interpretation match that measurement. The 21.1 manual warns that in a non-Resolve-Color-Managed workflow the scopes still read as HDR even when you've selected Rec.709 as the output space. Changing the ruler doesn't turn SDR into HDR, and it doesn't measure the physical nits of your display. Check the HDR scope warning and the RCM versus CST setup guide before you trust nit values.
The official Resolve Studio page describes its HDR scopes as measuring ST.2084 and HLG images. That scale alone doesn't validate an HDR master; the output transform, mastering setup, metadata and format still matter. The Free versus Studio comparison covers the rest of the paid feature split.
Common Resolve Scope Mistakes
- Forcing skin onto the indicator. Blackmagic calls it a guidepost. Lighting and complexion still matter.
- Making the entire Parade match. Compare matching neutral features, not unrelated red, green and blue content.
- Treating the scope ruler as media range. Scale style and Video Level Scopes change display labels and mapping, not the clip or the render.
- Smoothing without Extents. Low Pass Filter can understate visible excursions unless Extents is on.
- Reading an isolated or highlighted Viewer as the full grade. Check Highlight, bypass and downstream node state first.
- Treating CIE as a complete pass/fail test. Outside the triangle means something; inside alone isn't proof of a valid color volume.
Scopes FAQ
What is the best scope to use in DaVinci Resolve?
Start with Waveform for exposure and clipping, Parade for component balance, and Vectorscope for hue, saturation and a skin-hue reference. Histogram is a compact distribution view, and CIE is a gamut-boundary check. The best scope is simply the one that answers the measurement question you're asking right now.
Are DaVinci Resolve's scopes different in the free version?
The five standard scope types are documented in Resolve's Color tools. Resolve 21.1 explicitly marks the HDR ST.2084/HLG nit scale as Studio-only. For ordinary SDR Waveform, Parade, Vectorscope, Histogram and CIE work, the free version gives you the measurements described here. The free-version feature guide covers the differences outside the scopes.
Should I trust my monitor or my scopes in DaVinci Resolve?
Use scopes for objective signal questions like clipping, channel imbalance and gamut excursions. Use a calibrated display and your eyes for appearance, mood and intent. Scopes don't replace monitoring, and a nice-looking picture doesn't prove the levels are technically safe.
Why doesn't my skin tone line up with the vectorscope's skin tone indicator?
It may not need to. Resolve's line is a general hue guidepost, not a strict coordinate. Complexion, undertone, lighting, makeup, white balance, camera color science and the creative grade can all move the trace. Look into an obvious green, yellow or magenta shift, but don't force every face onto the line.
Should I grade to legal range or full range in DaVinci Resolve?
Match the delivery specification. Nominal 10-bit video-range reference values are commonly 64–940 for luma/RGB and 64–960 for chroma, but they're coding references, not creative exposure targets. Full range isn't automatically safer for the web either: YouTube says it converts full color range to limited during processing. Keep source interpretation, output mapping and metadata consistent.
What is CIE Chromaticity used for in DaVinci Resolve?
It compares the image analysis with one or two gamut triangles, in either CIE 1931 xy or CIE 1976 uv. A trace outside the selected triangle identifies a gamut violation. A trace inside is only a rough check, because a two-dimensional graph can't prove the entire three-dimensional color volume is safe.
Why does the histogram look different from the waveform in DaVinci Resolve?
Waveform keeps horizontal frame position, so a bright feature on the left shows up on the left side of the graph. Histogram counts pixels at each tonal value and drops location. Use Waveform to find where a level occurs, and Histogram to read the overall tonal distribution at a glance.
Why aren't my scopes showing up in DaVinci Resolve?
Choose Workspace > Video Scopes > On/Off on the Media, Color or Deliver page. If the window opens with no trace, make sure the Viewer has an active frame and the scope pane you want is selected. Check Highlight, bypass and any custom display range too. To undo customized scope controls, open the scopes option menu and choose Reset All.
What's the difference between IRE and 10-bit values on DaVinci Resolve's scopes?
Resolve 21.1 offers a Percentage scale and a default 10-bit scale. Percentage labels the ruler 0–100, and 10-bit labels it 0–1023. They're two labels for the same internal measurement, so switching between them doesn't change the grade, the media range or the render.
Can I zoom in on the DaVinci Resolve vectorscope?
Yes. Turn on Show 2X Zoom in the Vectorscope controls, and view either the full tonal range or just Low, Mid or High. On a Mac, you can also hold Option and roll the scroll control to zoom into any graph, then drag with the middle mouse button to pan. Zoom makes a small trace easier to inspect; it doesn't turn the skin indicator into a mandatory target.
Why do my DaVinci Resolve scopes look different after I export?
Color-page scopes measure the signal Resolve's Viewer path is presenting right now. An exported file can differ because of an output transform, data-level mapping, codec conversion, metadata tags or the playback application's color management. When you need to compare the encoded file with the timeline signal, re-import the export into a correctly configured project.
The habit worth building is simple: choose the graph by question, confirm the Viewer and scale state, make the correction, then judge the picture again. That turns scopes from background decoration into a fast diagnostic layer, and it keeps them from dictating the look.
