To add a shape in DaVinci Resolve, open Fusion and connect sRectangle → sRender → MediaOut. Use sEllipse for a circle or sPolygon for a custom outline. The important node is sRender: it turns the vector shape into an image that Resolve can display and composite.
For a graphic you want to move independently of the video, I recommend a Fusion Composition on the track above your footage. You can trim the overlay without changing the shot underneath. The steps below use the built-in Fusion tools in desktop Resolve Free or Studio, and you don’t need a shape plugin.
Choose a shape graphic or a mask
Fusion has two tools with confusingly similar names. sRectangle creates a vector graphic with its own color. Rectangle creates a mask that defines where another node is visible. Pick the tool by what you want to see:
- A colored box, circle, arrow, or animated callout: start with a Shape node and finish the shape chain with sRender.
- A colored panel in an existing Background-and-mask setup: connect a Rectangle mask to the Background node’s blue mask input.
- Footage cropped into a rounded frame: mask the footage itself. That is the separate rounded-corner video workflow.
Blackmagic’s sRender documentation describes the conversion from vector shapes to a bitmap image. That’s why a Shape node doesn’t connect to a regular image composite the way a Background node does.
Create a rectangle above your video
- On the Edit page, open the Effects Library and search for Fusion Composition. Drag it onto a video track above your footage, then trim it to the duration of the graphic.
- Park the playhead over that composition and open the Fusion page. A blank composition starts with a MediaOut node; it does not need a MediaIn node for the footage underneath it.
- Click empty space in the node editor so nothing is selected. Press Shift+Space, search for sRectangle, and add it. Add sRender as a separate node the same way.
- Connect the sRectangle output to sRender’s shape input, then connect sRender’s image output to MediaOut. Select MediaOut and press 2 to view the final result in the right viewer.
- Select sRectangle. In Controls, adjust Width, Height, X Offset, and Y Offset. Open Style to choose the color and set Alpha to 1 for an opaque shape.
Your chain should read sRectangle1 → sRender1 → MediaOut1. Return to Edit: the graphic should appear over the lower video track, with that footage visible outside the shape. If you see only the graphic in Fusion, that’s expected for this separate composition, since the shot sits on the timeline underneath it.
Blackmagic documents both the blank Fusion Composition setup and the rectangle’s geometry controls. Equal Width and Height values make a square. Unlike some image-position controls, the shape’s X and Y Offset values are centered at 0.0.
Change the fill, outline, color, and corners
Leave Solid enabled for a filled rectangle. To make a border around an object, disable Solid and increase Border Width until the line reads clearly against the footage. The center becomes transparent. Color and Alpha remain in the Style tab; reducing Alpha fades the graphic.
Corner Radius rounds the rectangle itself. Border Style controls how the outline joins at its corners: Bevel, Round, or Miter. Those are separate decisions. I’d set the overall corner shape first, then judge the border at the size viewers will see.
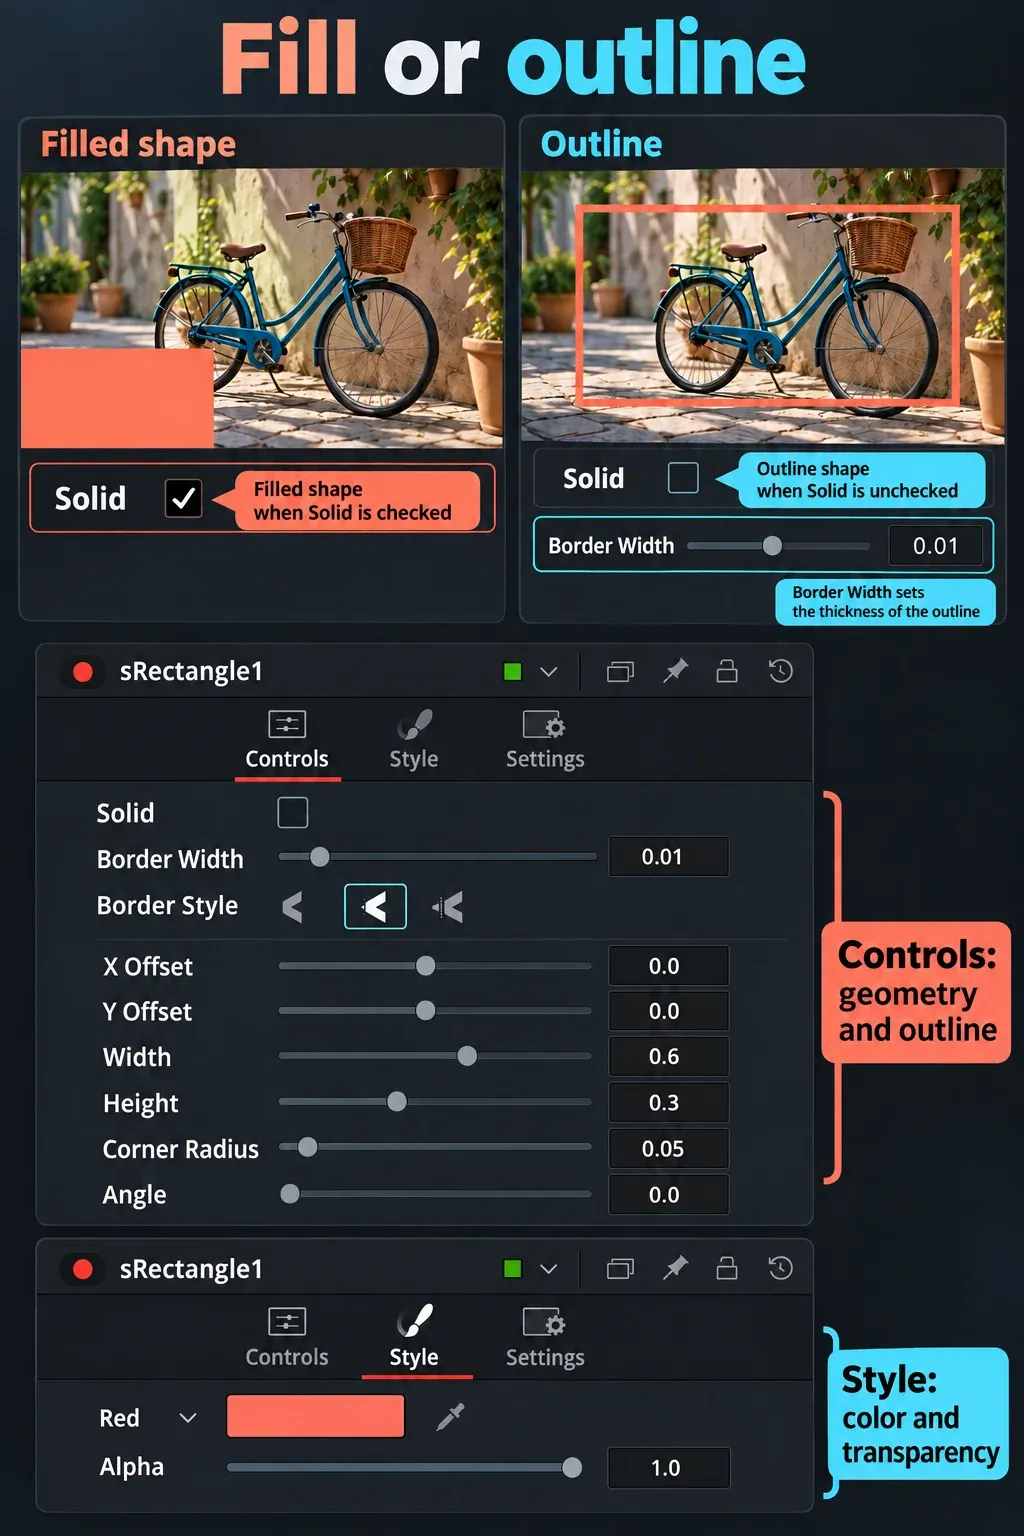
For a circular highlight, replace sRectangle with sEllipse and keep the sRender connection. Equal Width and Height values make a circle; different values make an ellipse. Its Solid and Border Width controls give you the same basic fill-versus-ring choice, as shown in Blackmagic’s sEllipse controls.
Draw a triangle, arrow, or custom shape
Add sPolygon when a rectangle or circle won’t do. Connect it to sRender, display sRender in a viewer, and select sPolygon so its drawing controls are active. The node starts without any points, so an empty viewer at this stage doesn’t mean it’s broken.
Click in the viewer to place the corners, then click the first point again to close the shape. Three points give you a triangle. For a simple arrow, place points around its shaft and arrowhead and close the perimeter instead of drawing a center line. Set its fill or outline and color in the node’s Controls and Style tabs.
After closing the polygon, you can move its points to refine the silhouette. Switch the polyline mode to Done when you want to avoid changing them by accident. These are the documented sPolygon drawing modes, and you don’t need an external vector application for a basic callout.
Composite a shape inside an existing video clip
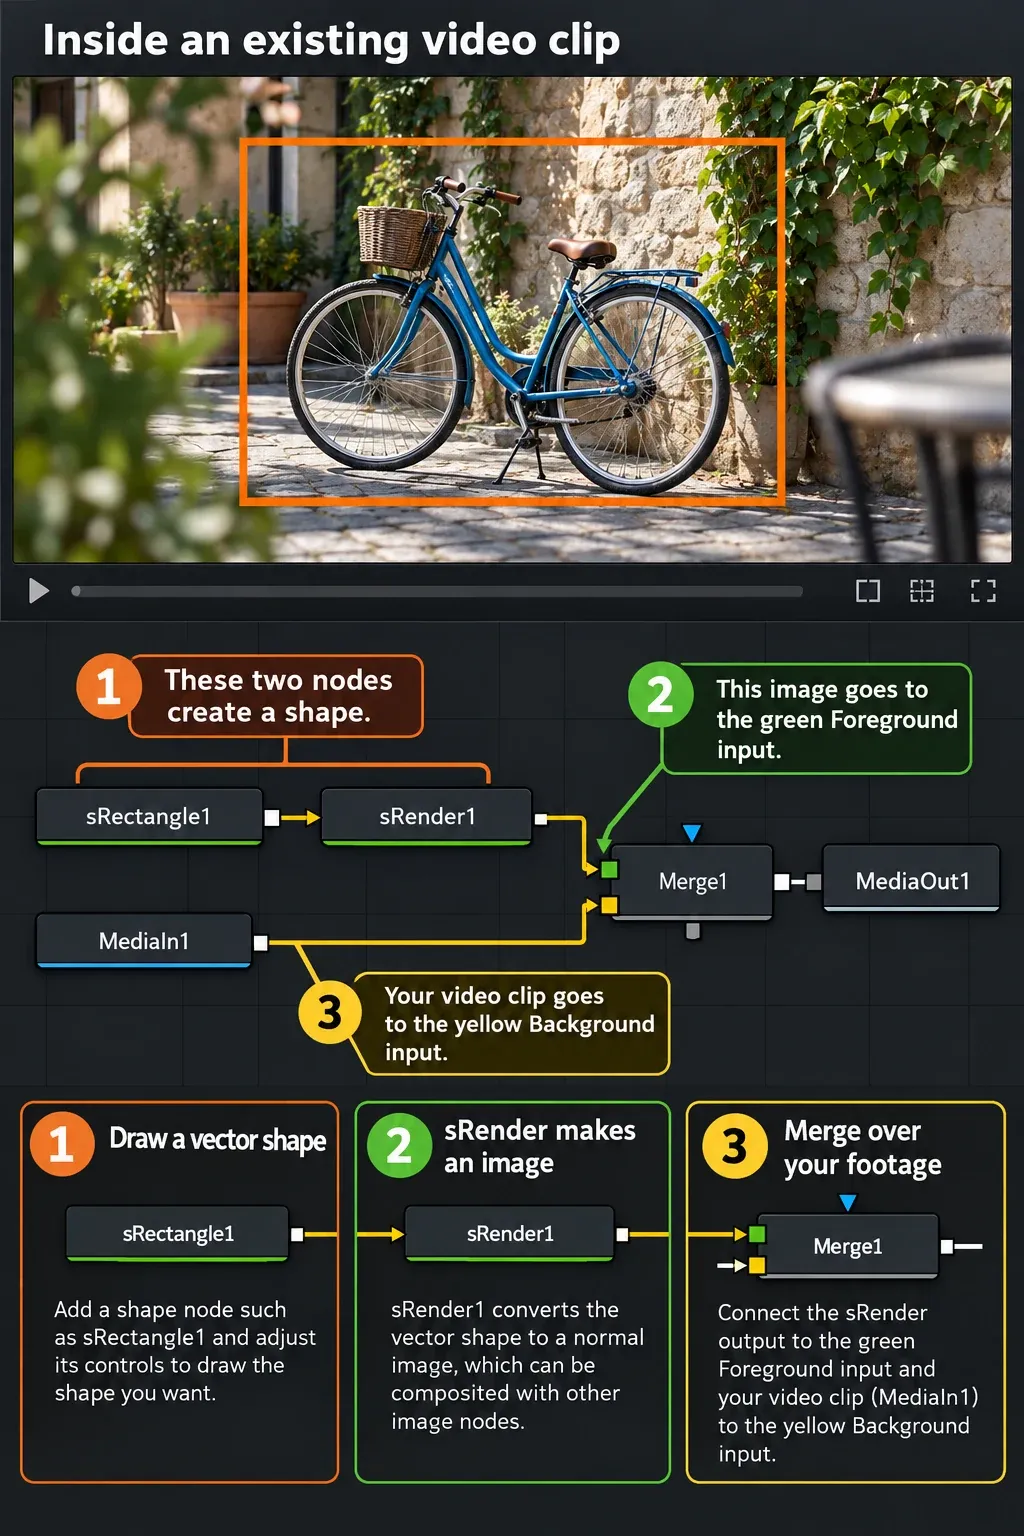
If you opened an ordinary video clip in Fusion, keep its MediaIn node. Add a Merge to combine the shot and the rendered shape:
- Connect MediaIn → Merge’s yellow Background input.
- Connect sRectangle → sRender → Merge’s green Foreground input.
- Connect Merge → MediaOut.
Use the green input for the graphic you want over the shot. The blue input is an effect mask, so it isn’t the destination for this rendered overlay. Blackmagic’s Fusion compositing guide explains the background, foreground, and mask roles.
For the mask-based alternative, add a Background, choose its color, and connect a Rectangle mask to its blue input. Route Background to MediaOut in a standalone overlay, or into Merge’s foreground when working over MediaIn. The Rectangle mask example uses this arrangement to cut a colored shape from a Background. It needs no sRender because Background already produces an image.
That route is useful when the rest of your composition already uses masks. For a new graphic you plan to reshape or animate, I’d keep the Shape-node route, because its geometry, styling, and shape transforms stay together. If connecting nodes is still unfamiliar, the Fusion beginner walkthrough covers the underlying node editor.
Animate the shape without changing its points
Put sTransform between the shape and sRender. For example: sPolygon1 → sTransform1 → sRender1 → MediaOut1. Blackmagic’s sTransform controls move, scale, and rotate the incoming shape. This keeps a slide or spin separate from the polygon’s point layout.
- Move the playhead to the frame where the motion should begin. Select sTransform and set the starting X Offset.
- Click the keyframe diamond beside X Offset. This records the starting position at that frame.
- Move the playhead later in the composition, then change X Offset to the final position. Once animation is enabled, changing that parameter at another frame adds a keyframe.
- Scrub between the two positions and play the move. Adjust the spacing between keyframes for timing; use the Spline editor if you want to refine acceleration and deceleration.
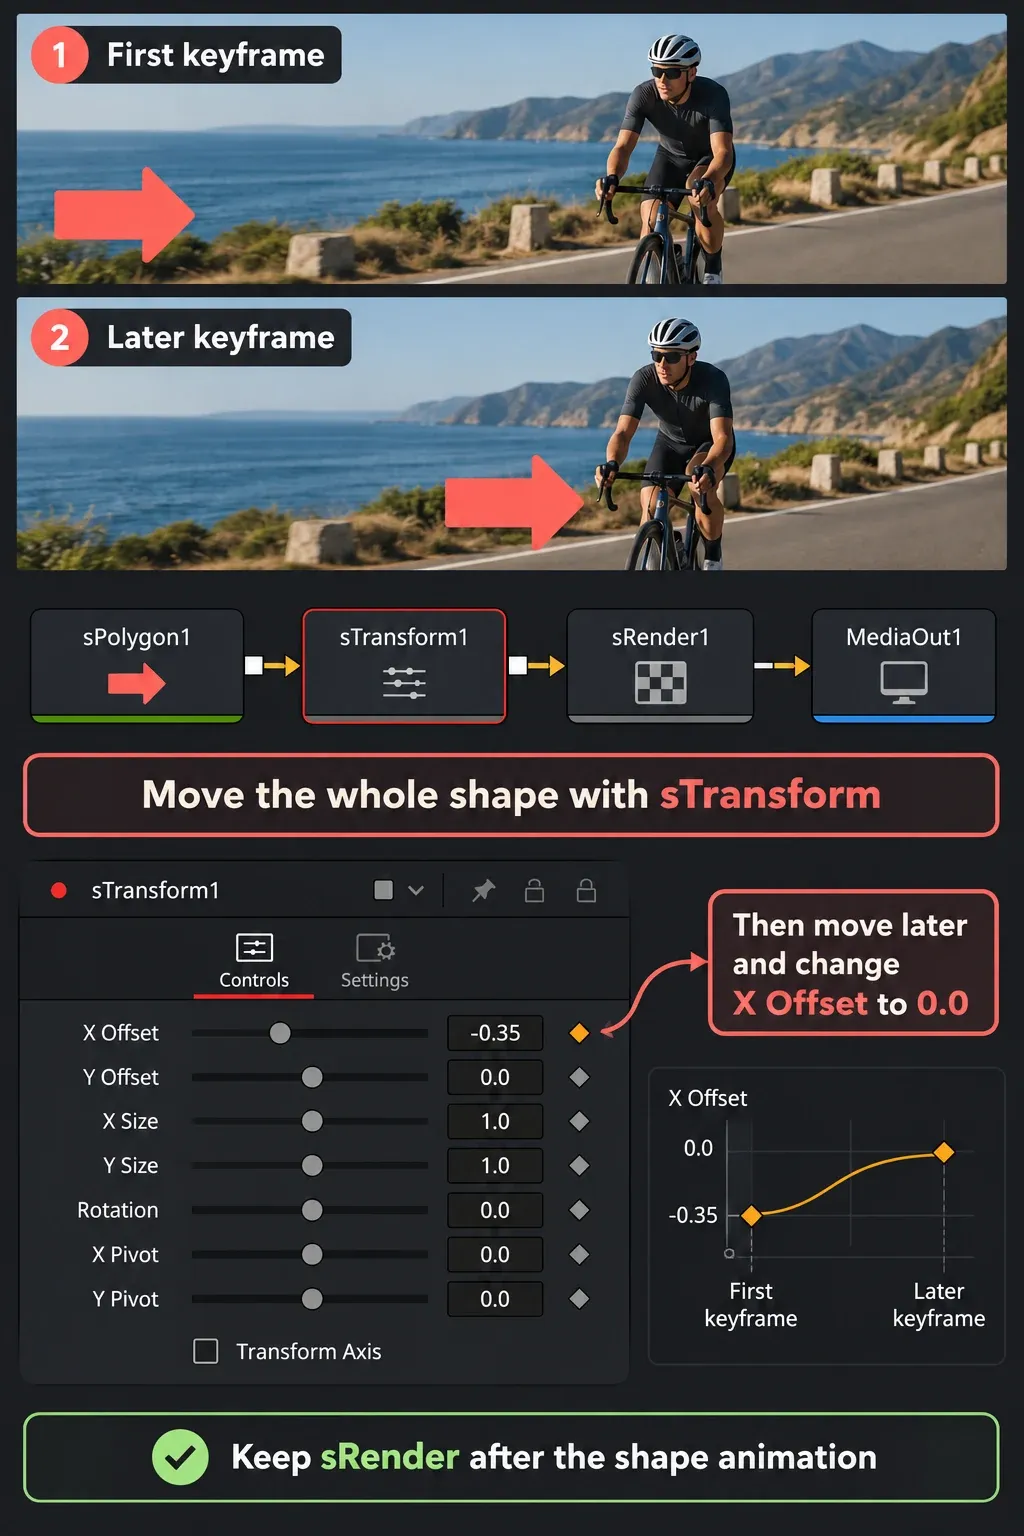
The same approach works for Rotation or X and Y Size. Keep the two size values matched when you want to preserve proportions. Blackmagic documents the Inspector’s keyframe behavior; the keyframes and curve editor guide explains the timing controls in more depth.
For a border that draws on, disable Solid on sRectangle or sEllipse, set a visible Border Width, and animate Length from 0 to 1. Length controls how much of the outline is visible; Position shifts where that outline starts. This is a different effect from moving the whole shape.
If the shape is missing or covers the video
- You can select the shape but see no rendered graphic: check that sRender sits after the Shape nodes and reaches MediaOut. View the output, not just the vector generator.
- A custom shape is blank: select sPolygon and check that you actually placed points. Close the perimeter for the filled polygon described above.
- The outline disappears: check Solid is disabled, Border Width is nonzero, Length is not at zero, and Style Alpha is not zero.
- The shot disappears inside a clip: inspect Merge. MediaIn belongs in Background and sRender in Foreground; sending sRender directly to MediaOut leaves the shot out of that composite.
- A solid color fills the frame: in the mask-based route, check the Rectangle-to-Background blue connection. An unmasked Background produces a full color image.
- The overlay is absent on Edit: check its track is enabled, above the footage, and under the current playhead. If its canvas dimensions are wrong, inspect sRender’s Image tab Width and Height against your composition.
Before moving on, review the graphic at both ends of the animation and over the brightest and darkest parts of the shot. A border that looks clear on one frame can disappear against another. Keep contrast, placement, and timing readable; a callout should help the viewer find the subject.