To add glow to a video in DaVinci Resolve, open the Edit page’s Effects library, search for Glow, and drag the Resolve FX effect onto your clip. In the Inspector’s Effects tab, adjust Shine Threshold to choose the bright areas that emit light, Spread to set the halo width, and Opacity to bring the effect back under control.
I’d start with a small light source against a darker background: a lamp, a reflection, or a bright sign. The goal is to give that light somewhere to spread while keeping faces, lettering, and shadow detail readable. A frame full of pale sky needs a more selective approach.
Choose the Glow tool that fits the job
Resolve FX Glow is the quickest route for bloom on footage. Use it on an Edit-page clip, or on a separate Color-page corrector when you want the effect inside your grade. Its source threshold and output views make it easier to see what’s feeding the halo.
Fusion’s native Glow node is useful when you need explicit connections: glowing text over sharp footage, a mask that selects the light source, or an effect confined to one graphic. It uses controls such as Glow Size, Glow, and Blend. Those differ from Resolve FX Glow’s Shine Threshold, Spread, and Opacity, and a setting from one tool doesn’t transfer directly to the other.
These Glow routes are available in desktop DaVinci Resolve Free and Studio. Don’t confuse them with the separate Halation effect: Blackmagic’s edition feature table lists Halation as Studio-only. The steps and control names here follow desktop Resolve 21.1, and older tutorials may show a different arrangement.
Add controlled bloom on the Edit page
- Select the clip and position the playhead over it. Choose a frame containing both the light source and an area you want to protect, such as a face.
- Open Effects and find Glow. Search in the Effects library’s Open FX section, then drag the built-in Glow effect onto the timeline clip.
- Open Inspector, then Effects. Expand Glow’s controls. This is where the effect is adjusted; the clip’s ordinary Video controls are a different panel.
- View Source Regions and adjust Shine Threshold. Select the bright parts that should generate the glow. If most of the picture qualifies, raise the threshold until the source is more selective.
- Switch to Glow Alone and set Spread. Judge the width of the light spill without the original picture distracting you. Keep H/V Ratio neutral for an even halo; change it only when you want a directional streak.
- Return to Final Result and reduce Opacity. Start with the default Screen composite. Adjust Gain if the glow itself needs to be brighter, then use Opacity for its final contribution.
- Toggle the effect off and on, then play the shot. Check the brightest moment and any face passing through the light. A good still frame is not enough if the halo washes across the subject a moment later.
Blackmagic documents both Edit-page effects in the Inspector’s Effects tab and the Glow output views and controls in the same manual’s Resolve FX Light chapter. Use Source Regions → Glow Alone → Final Result as a working order: select the source, shape the light, then judge the complete image.
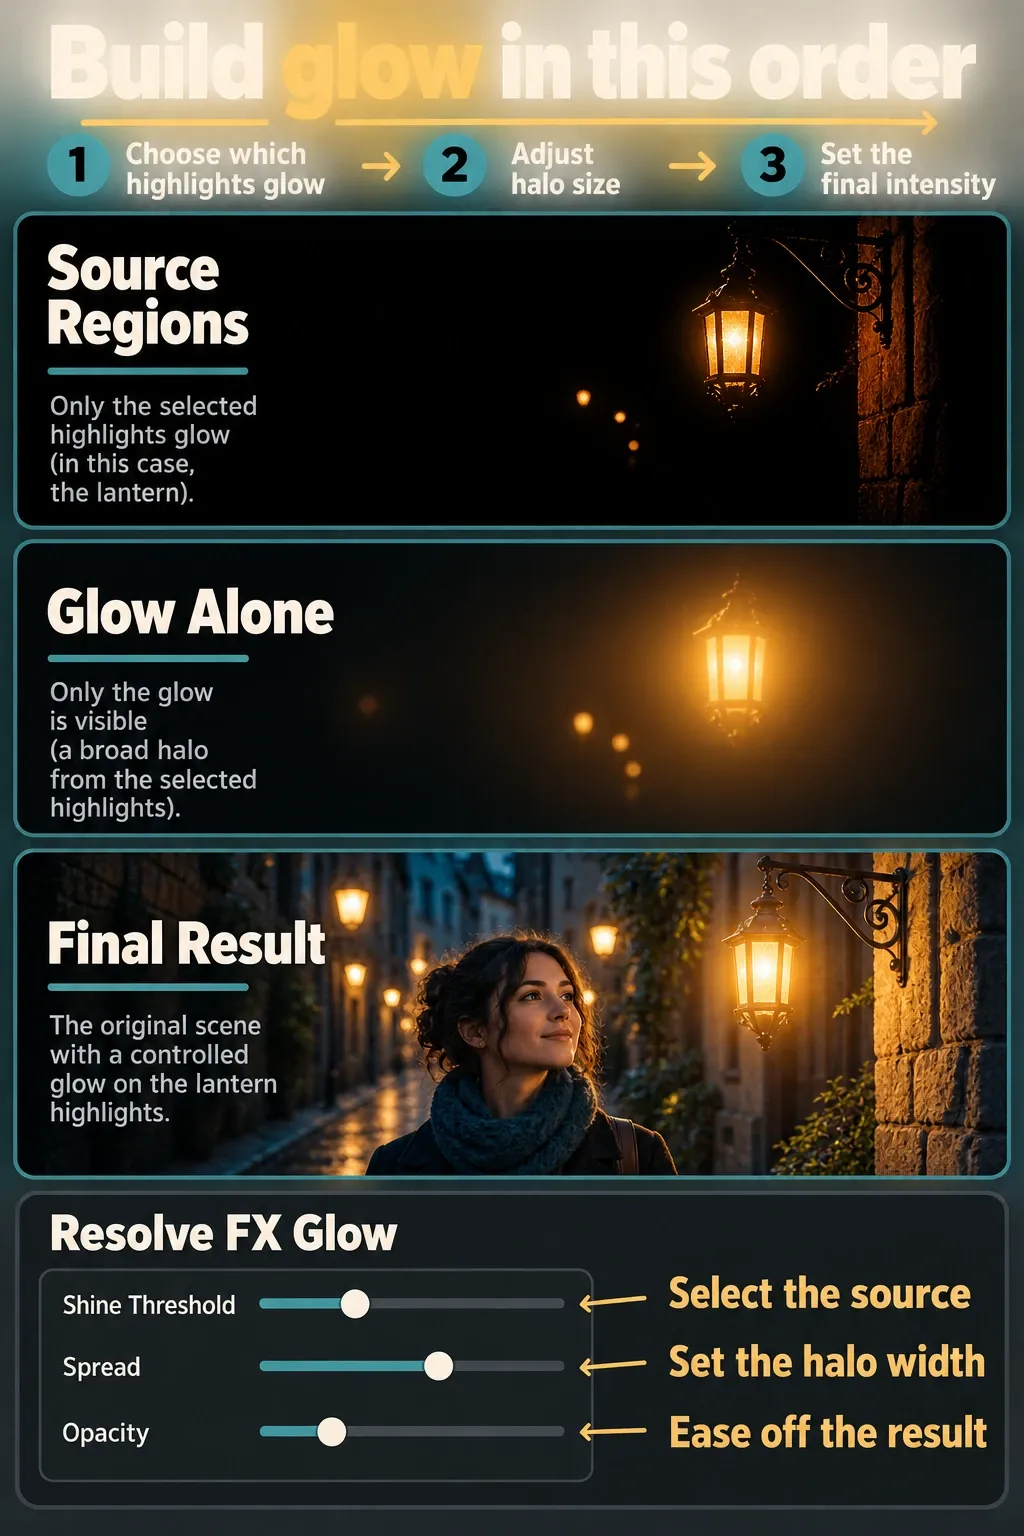
There’s no useful universal Shine Threshold preset. A dark street with a few lamps and a bright snow scene feed very different pixels into the same effect. Keep the source selection meaningful instead of copying numbers from unrelated footage.
Keep texture in bright areas
If the picture turns milky, check the source selection before making the halo smaller. A low threshold can let walls, skin, and clouds all emit glow. Raising the threshold reduces that spill at its source; reducing Opacity then controls how much of the remaining glow reaches the picture.
For a gentle look, I prefer Screen. Blackmagic describes Add as a hotter composite than Screen, so it’s an intentional choice for a stronger effect. Gain changes the glow’s brightness; Gamma changes its distribution and falloff. Raise all of them together and it gets harder to tell which adjustment caused the problem.
Bright Region Recovery can reclaim detail lost because of the glow. It can’t restore texture that was already absent from the source. Compare with the effect disabled: if the plain clip already has a featureless white sky, that’s an exposure or source-image problem to solve before adding more bloom. The waveform and other scopes help you watch the signal while making that comparison.
The published walkthroughs point to the same practical choice. Megan Tan’s Resolve 18 demonstration uses street lamps as glow sources and eases the brightness back before the clip becomes overexposed. Alli and Will’s four-clip walkthrough shows why an already bright overcast sky is much less forgiving than a dark sunset with a small bright sun. I’d choose the source deliberately, then keep enough contrast to read the subject.
Put Glow into a Color or Fusion node chain
On the Color page, add a serial corrector after the nodes whose output you want to feed into Glow. Select it, search for Glow in the Effects library, and drag the effect onto that corrector. Open the effect’s Settings to adjust it. Keeping this corrector separate makes the glow easy to bypass without disabling the earlier grade. The node-chain guide explains serial ordering if the connections are new to you.
In Fusion, a simple full-image chain is MediaIn1 → Glow1 → MediaOut1. Open the clip in Fusion, select MediaIn1, and add the native Glow tool through the tool search, typically Shift-Space. Check that the image output passes through Glow1 to MediaOut1, because a disconnected node won’t change the final picture.
Select Glow1 and start with Glow Size for width, Glow for intensity, and Blend for the affected/original mix. Fast Gaussian is its default filter. As Blend approaches zero, more of the original image returns. High Glow values can push the image toward white. Blackmagic describes these separately in the native Glow controls, so don’t look here for Resolve FX’s Shine Threshold.
For a softer atmospheric treatment, Fusion also has Soft Glow. It performs additional processing for a softer result and has the same image, Effect Mask, and Glow Mask input roles. Choose it for the character of the falloff, then check the subject’s contrast again.
Use the right mask input in Fusion
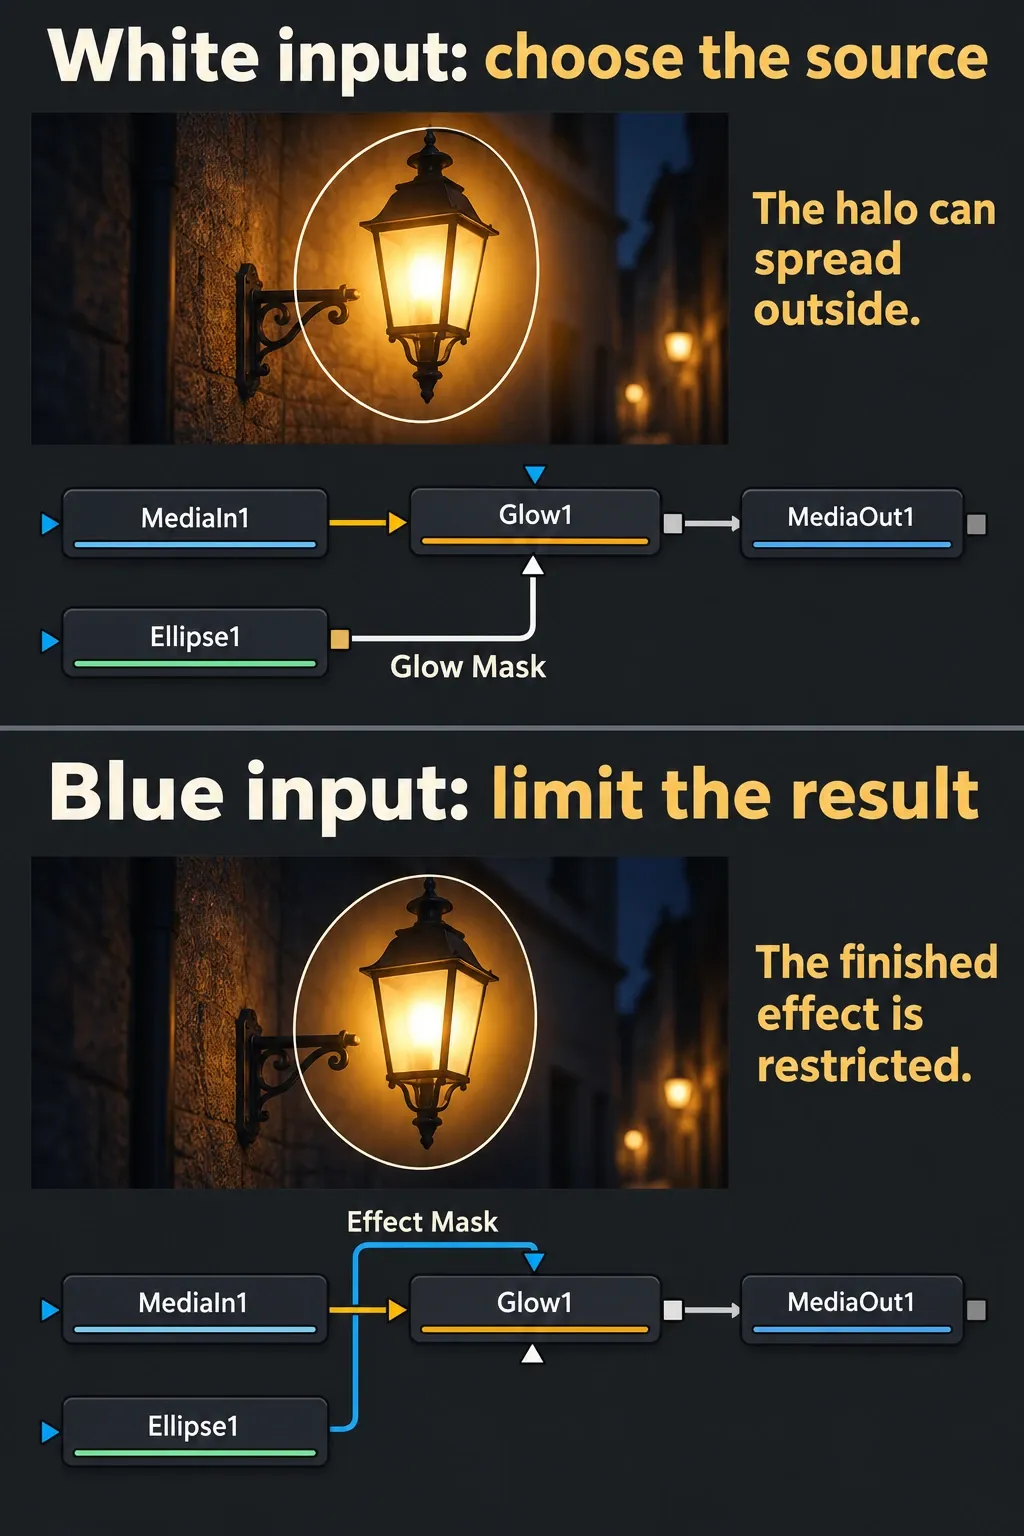
The native Glow node has two mask inputs with different jobs. This matters when you want a lamp to emit light outside a selected area.
- White Glow Mask input: pre-masks the source before generating the glow. Connect an Ellipse or Polygon mask here to choose what emits light; the halo can extend beyond the mask’s border.
- Blue Effect Mask input: restricts the processed effect afterward. Use this when the finished glow must stay inside the mask, rather than when the mask should only select its source.
Keep the footage connected to the orange image input. For a lamp, draw a mask around the emitting area, connect it to the white input, and leave room for the halo to spread. Move or track the mask if the light moves. Blackmagic’s Glow input definitions distinguish this pre-mask from the blue mask applied after processing.
An outer glow around an entire person is a different selection problem. You need a usable foreground matte first, since one ellipse drawn around the subject won’t follow their outline. Use a key or an appropriate subject-isolation workflow, then build the rim from that selection. Raising the brightness of every edge in the original shot also brightens unrelated background detail.
Make text glow while the footage stays sharp
Put the glow on the text branch before it joins the footage. This avoids blooming every bright object behind the title.
- Open a video clip in Fusion, click empty node-graph space to deselect the existing nodes, and add a Text+ node through the tool search. Enter your title and choose a light text color; the text guide covers the typography controls.
- Connect the text output to a native Glow node.
- Add a Merge node. Connect MediaIn1 to its yellow background input first, then connect Glow’s output to the green foreground input. Connect Merge’s output to MediaOut1.
- Adjust Glow Size and Glow, then ease back Blend until the letter cores remain readable. For a halo beneath the text, try the Glow node’s Merge Under Apply Mode, which uses the image’s alpha channel.
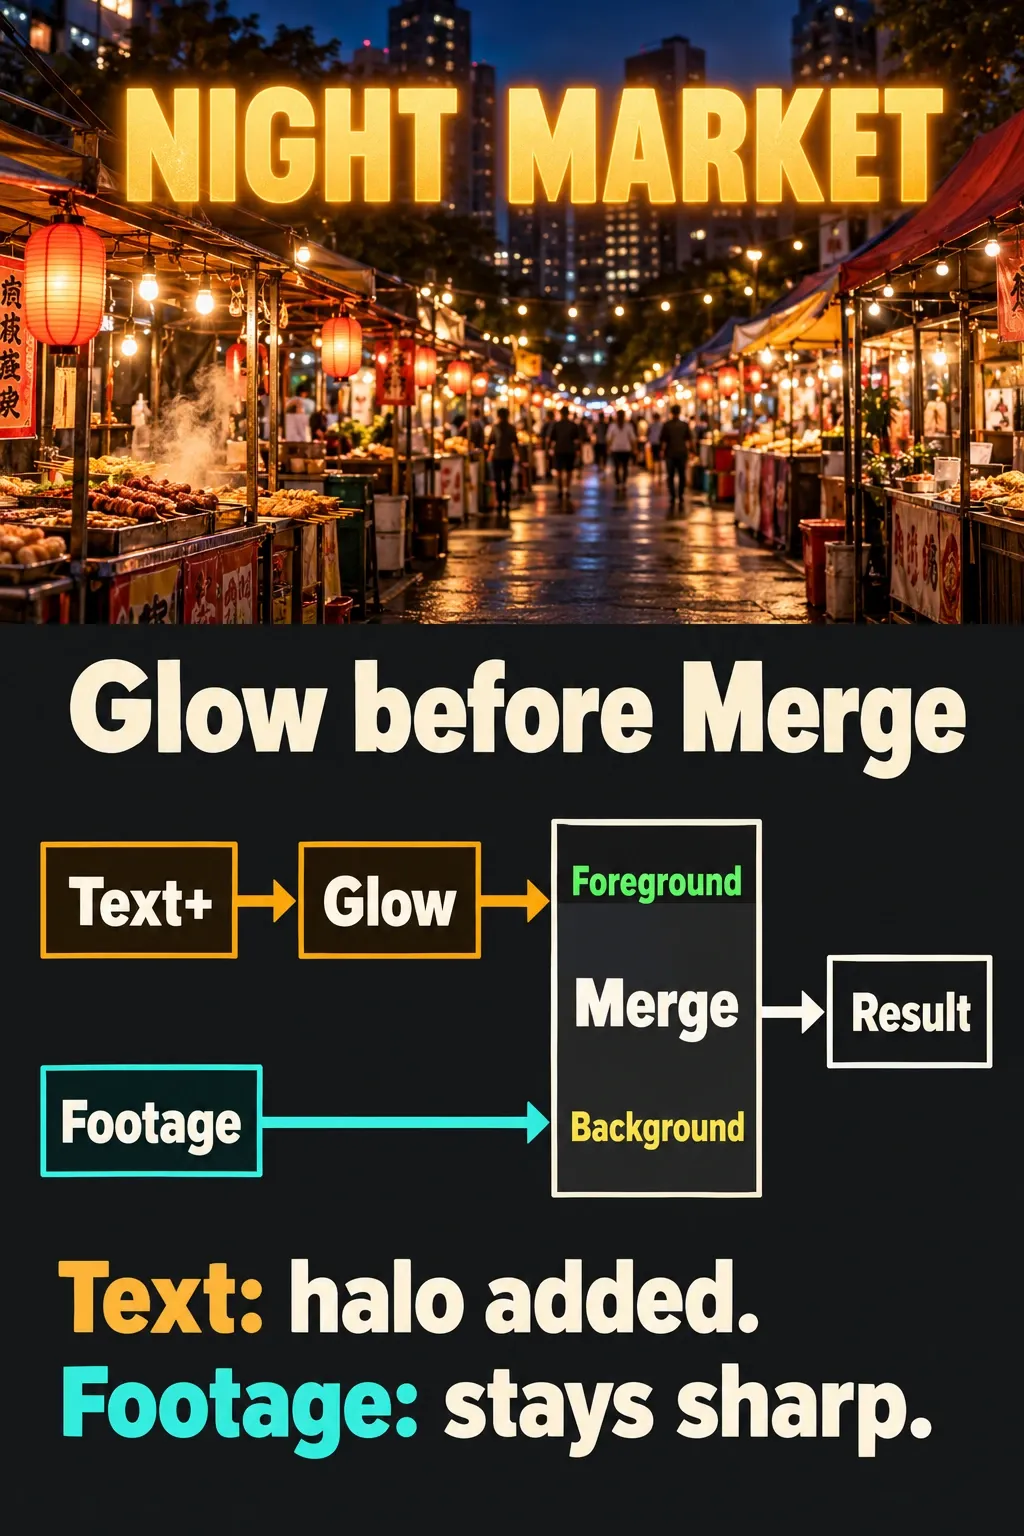
If you place Glow after Merge, it receives the combined text and footage. That can be useful for a unified finish, but it’s the wrong place when only the lettering should emit light. Keep animation of the text or its glow in that same branch so you don’t animate the whole footage composite by accident.
Fix an invisible, clipped, or excessive glow
- No visible change: on Edit, confirm that Glow is enabled on the selected clip and the playhead is over that clip. In Resolve FX, check that Shine Threshold has not excluded all useful sources. In Fusion, check the path to MediaOut1, the Glow amount, Blend, and any attached mask.
- A hard boundary at the mask: if the mask should select the emitter, check whether it is connected to the white Glow Mask input. The blue Effect Mask can restrict the finished halo.
- A clipped halo around small graphics: inspect Fusion’s Clipping Mode. Domain respects the incoming domain of definition and can clip a large filter. Frame uses the full image frame. Neither this setting nor a larger Glow Size creates room beyond the final output canvas; reposition the graphic or provide enough canvas space upstream.
- A washed-out face or sky: tighten source selection, reduce Opacity or Blend in the applicable tool, and compare with the effect bypassed. In Resolve FX, try Bright Region Recovery for detail lost to the effect.
- A request to activate Studio: check the exact effect you added. Halation and other Studio effects are separate entries; the built-in Glow and Fusion Glow workflows here do not require that substitution.
Before export, watch the entire shot at its intended viewing size. Look for halos crossing faces, letters losing their centers, and light hitting the image boundary. I’d keep a smaller glow that survives those checks over a dramatic still-frame look that falls apart in motion. For other node-based effects, continue with the Fusion workflow guides.